Kawasaki Ninja 300 / Ninja 300 ABS Motorcycle. Service Manual (2013) - page 15
 

  Index      Manuals     Kawasaki Ninja 300 / Ninja 300 ABS Motorcycle. Service Manual (2013)


Search            copyright infringement  


Content      ..     13      14      15      16     ..


Kawasaki Ninja 300 / Ninja 300 ABS Motorcycle. Service Manual (2013) - page 15


14-10 STEERING

Handlebar

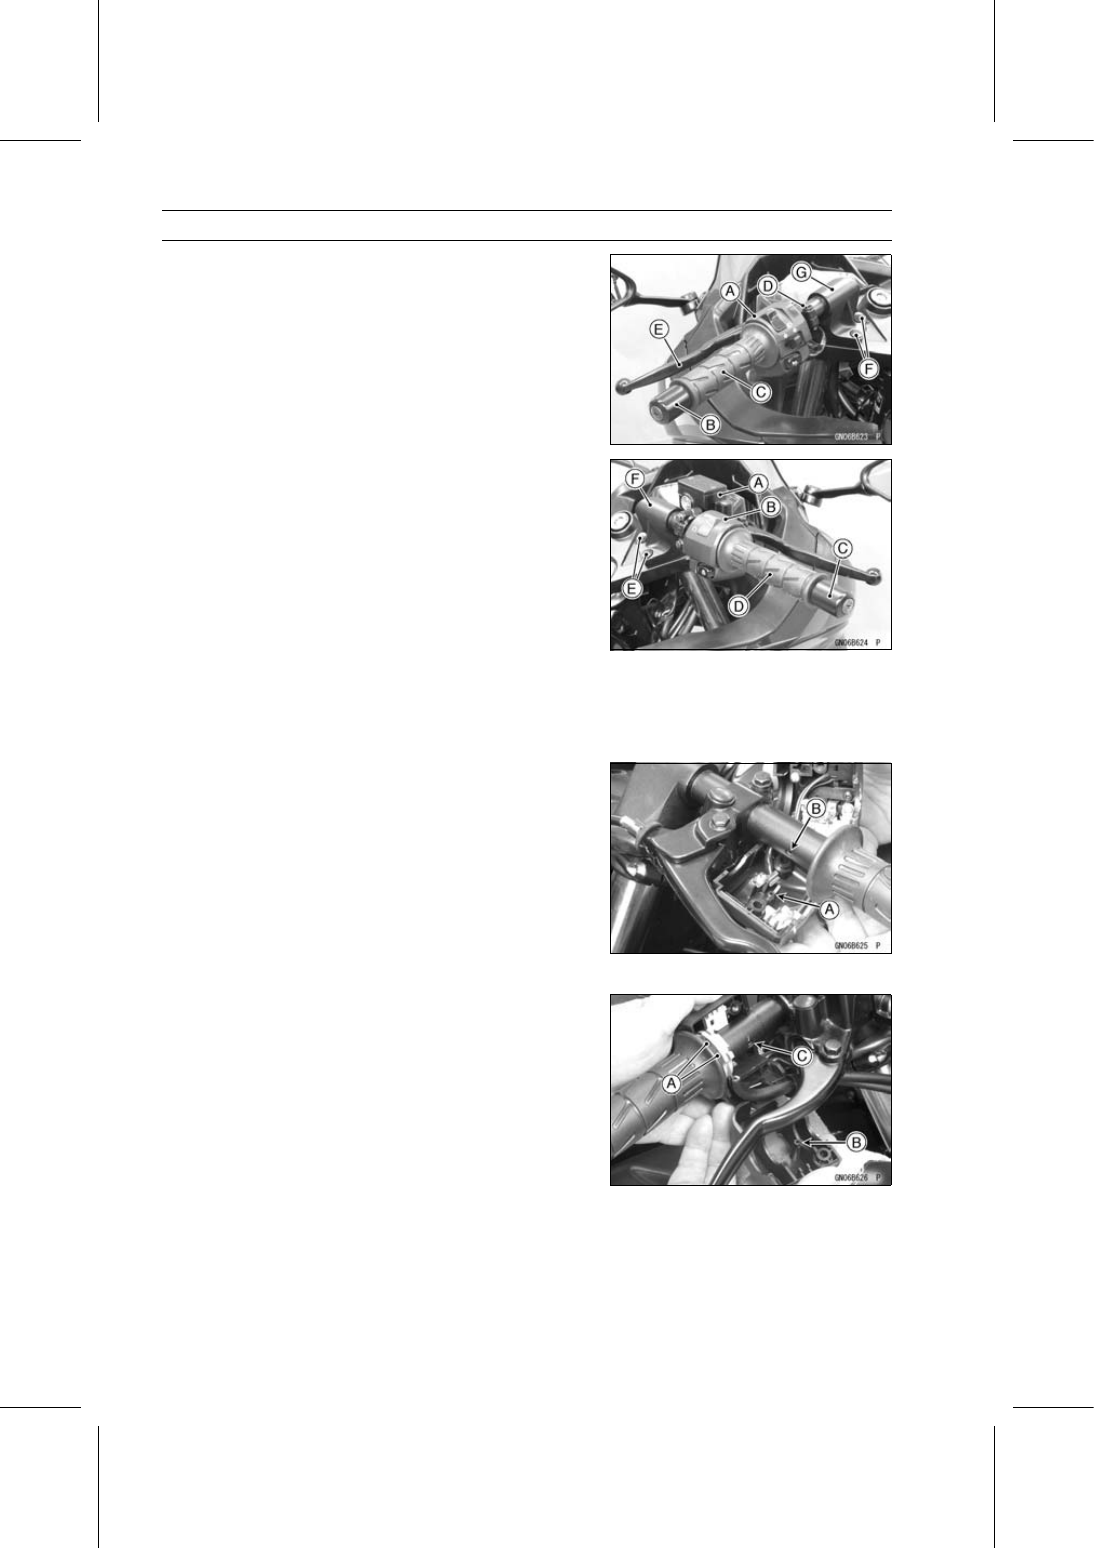
Handlebar Removal

Remove:

Left Switch Housing [A]
Handlebar Weight [B]
Left Handlebar Grip [C]
Clutch Lever Clamp Bolt [D]
Clutch Lever Assembly [E]
Caps [F] and Bolts
Left Handlebar [G]

Remove:

Front Master Cylinder [A] (see Front Master Cylinder Re-
moval in the Brakes chapter)
Right Switch Housing [B]
Handlebar Weight [C]
Throttle Grip [D]
Caps [E] and Bolts
Right Handlebar [F]

Handlebar Installation

Tighten:

Torque - Handlebar Mounting Bolts: 25 N·m (2.5 kgf·m, 18

ft·lb)

Install the clutch lever (see Clutch Lever Installation in the
Clutch chapter).

Apply adhesive cement to the inside of the left handlebar
grip, and install it.

Apply a non-permanent locking agent to the left handlebar
weight screw, and tighten it.

Install the left switch housing.

Fit the projection [A] into a hole [B] in the handlebar.

Tighten:

Torque - Switch Housing Screws: 3.5 N·m (0.36 kgf·m, 31

in·lb)

Install:

Throttle Grip
Throttle Cable Tips [A]
Right Switch Housing

Fit the projection [B] into a hole [C] in the handlebar.

Tighten:

Torque - Switch Housing Screws: 3.5 N·m (0.36 kgf·m, 31

in·lb)

Apply a non-permanent locking agent to the right handle-
bar weight screw, and tighten it.

Install the front brake master cylinder (see Front Master
Cylinder Installation in the Brakes chapter).

Push the caps into the handlebar mounting bolts.

FRAME 15-1

15

Frame

Table of Contents

Exploded View........................................................................................................................

15-2

Seats ......................................................................................................................................

15-8

Rear Seat Removal...........................................................................................................

15-8

Rear Seat Installation........................................................................................................

15-8

Front Seat Removal ..........................................................................................................

15-8

Front Seat Installation .......................................................................................................

15-8

Fairings...................................................................................................................................

15-9

Lower Fairing Removal .....................................................................................................

15-9

Lower Fairing Installation ..................................................................................................

15-9

Inner Fairing Removal.......................................................................................................

15-9

Inner Fairing Installation....................................................................................................

15-9

Tank Side Cover Removal ................................................................................................

15-9

Tank Side Cover Installation .............................................................................................

15-10

Middle Fairing Removal ....................................................................................................

15-10

Middle Fairing Installation .................................................................................................

15-10

Windshield Removal/Installation .......................................................................................

15-11

Upper Fairing Removal .....................................................................................................

15-11

Upper Fairing Installation ..................................................................................................

15-11

Instrument Cover Removal ...............................................................................................

15-12

Instrument Cover Installation ............................................................................................

15-12

Upper Fairing Bracket Removal........................................................................................

15-12

Upper Fairing Bracket Installation.....................................................................................

15-12

Side Cover..............................................................................................................................

15-13

Side Cover Removal .........................................................................................................

15-13

Side Cover Installation ......................................................................................................

15-13

Seat Covers............................................................................................................................

15-14

Seat Cover Removal.........................................................................................................

15-14

Seat Cover Installation......................................................................................................

15-14

Fenders ..................................................................................................................................

15-15

Front Fender Removal ......................................................................................................

15-15

Front Fender Installation ...................................................................................................

15-15

Flap and Rear Fender Removal........................................................................................

15-15

Flap and Rear Fender Installation.....................................................................................

15-16

Frame .....................................................................................................................................

15-17

Frame Inspection ..............................................................................................................

15-17

Sidestand................................................................................................................................

15-18

Sidestand Removal...........................................................................................................

15-18

Sidestand Installation........................................................................................................

15-18

15-2 FRAME

Exploded View

FRAME 15-3

Exploded View

Torque

No.

Fastener

N·m

kgf·m

ft·lb

Remarks

1

Front Footpeg Bracket Bolts

25

2.5

18

2

Rear Footpeg Bracket Bolts

25

2.5

18

3

Sidestand Switch Bolt

8.8

0.90

78 in·lb

L

4

Sidestand Nut

39

4.0

29

R

G: Apply grease.

L: Apply a non-permanent locking agent.

R: Replacement Parts

15-4 FRAME

Exploded View

FRAME 15-5

Exploded View

Torque

No.

Fastener

N·m

kgf·m

ft·lb

Remarks

1

Left Middle Fairing Bracket Bolts

9.8

1.0

87 in·lb

HL

2. US, CAL, CA, AU and CO Models
3. CAL Model

HL: Apply a non-permanent locking agent (High Strength).

15-6 FRAME

Exploded View

FRAME 15-7

Exploded View

1. US, CAL, CA, AU and CO Models

15-8 FRAME

Seats

Rear Seat Removal

Insert the ignition key [A] into the seat lock, turning the
key clockwise, pull up the front of seat [B], and remove
the rear seat by pushing it to the front.

Rear Seat Installation

Insert the rear seat tabs [A] to the slots [B] on the frame.

Insert the seat lock projection [C] into the latch hole [D].

Push down the front part of the seat until the lock clicks.

Front Seat Removal

Remove:

Side Covers (see Side Cover Removal)
Bolt [A] and collar (Both Sides)

Pull the front seat [B] backward.

Front Seat Installation

Insert the front seat tabs [A] into the slots [B] on the
bracket.

Install the collars and tighten the bolts.

Install the side covers (see Side Cover Installation).

FRAME 15-9

Fairings

Lower Fairing Removal

Remove:

Quick Rivets [A]
Bolts and Nylon Washers [B]
Bolt and Nylon Washer [C]
Lower Fairing [D]

Lower Fairing Installation

Installation is the reverse of removal.

Insert the tabs [A] on the lower fairing [B] into the slots [C]
on the side fairing.

Inner Fairing Removal

Remove:

Quick Rivets [A]
Bolts [B]
Inner Fairing [C]

Inner Fairing Installation

Installation is the reverse of removal.

Insert the tabs [A] on the inner fairing into the grooves
behind the middle fairing.

Tank Side Cover Removal

Remove:

Side Cover (see Side Cover Removal)
Bolt [A]
Screw [B]

Pull the rear of the tank side cover [C] outward then pull
the front of the tank side cover upward.

15-10 FRAME

Fairings

Tank Side Cover Installation

Installation is the reverse of removal.

Insert the projections [A] on the tank side cover [B] into
the grommets [C] on the middle fairing and fuel tank.

Middle Fairing Removal

Remove:

Lower Fairing (see Lower Fairing Removal)
Inner Fairing (see Inner Fairing Removal)
Tank Side Cover (Tank Side Cover Removal)

Remove the quick rivet [A].

Remove:

5 mm Bolt [A]
5 mm Bolt [B] and Washer
6 mm Bolt [C] and Washer
6 mm Bolt [D] and Collar

Pull the middle fairing [E] outward to clear the tabs [F]
from the slots.

Disconnect the front turn signal light lead connector and
remove the middle fairing.

Middle Fairing Installation

Connect the front turn signal connector.

Make sure that the reserve tank overflow hose is routed
properly.

Insert the tab [A] on the middle fairing into the slot [B] on
the upper fairing and instrument cover.

Insert the tab [A] on the middle fairing into the slot [B] on
the upper fairing.

FRAME 15-11

Fairings

Tighten the bolts in the following order.

6 mm Bolt [A] and Collar
6 mm Bolt [B] and Washer
5 mm Bolt [C] and Washer
5 mm Bolt [D]

Windshield Removal/Installation

Remove:

Bolts [A]
Rear View Mirrors [B]
Windshield [C]

Installation is the reverse of removal.

Upper Fairing Removal

Remove:

Middle Fairing (see Middle Fairing Removal)
Windshield (see Windshield Removal/Installation)
Bolts [A] (Both Sides)
Band [B] (Both Sides)

Move the upper fairing [C] forward to remove it from the
grommet [D].

Disconnect the headlight lead connector [A] and city light
lead connector [B] from the headlight (both sides).

Remove the upper fairing [C] from the upper fairing
bracket.

Remove the headlight from the upper fairing (see Head-
light Removal/Installation in the Electrical System chap-
ter).

Upper Fairing Installation

Assembly is the reverse of removal.

Install the removed parts (see appropriate chapters).

Run the cable, leads and harness correctly (see Cable,
Wire, and Hose Routing section in the Appendix chapter).

15-12 FRAME

Fairings

Instrument Cover Removal

Remove the upper fairing (see Upper Fairing Removal).

Slide the connector cover [A] and disconnect the meter
connector [B] from the meter unit.

Remove the instrument cover [C] forward.

Remove the meter unit (see Meter Unit Removal/Installa-
tion in the Electrical System chapter).

Instrument Cover Installation

Installation is the reverse of removal.

Insert the projection [A] on the instrument cover into the
grommet [B] on the bracket.

Install the removed parts (see appropriate chapters).

Upper Fairing Bracket Removal

Remove:

Upper Fairing (see Upper Fairing Removal)
Fuel Tank (see Fuel Tank Removal in the Fuel System
(DFI) chapter)
Coolant Reserve Tank [A] (see Coolant Reserve Tank
Removal in the Cooling System chapter)
Bolt [B]
Bracket Mounting Bolt [C]

Remove the bolts [A] and regulator/rectifier [B].

Clear the main harness [C] from the clamps.

Remove the bracket mounting bolts [D] and upper fairing
bracket [E].

Upper Fairing Bracket Installation

Installation is the reverse of removal.

Install the removed parts (see appropriate chapters).

Run the cables and leads correctly (see Cable, Wire, and
Hose Routing section in the Appendix chapter).

FRAME 15-13

Side Cover

Side Cover Removal

Remove the bolt and collar [A].

Pull the side cover [B] outward straight to detach the pro-
jections [C] from the grommets.

NOTE

Be careful not to tilt the side cover when pulling it out to
prevent the projections from the breaking.

Side Cover Installation

Insert the projections [A] into the grommets [B] and push
the side cover [C].

Install the collar and bolts.

Make sure that the grommets are not come off when in-
serting the projections.

15-14 FRAME

Seat Covers

Seat Cover Removal

Remove:

Side Covers (see Side Cover Removal)
Seats (see Rear/Front Seat Removal)
Bolts [A]
Bolts [B]

Remove the quick rivets [A].

Pull the seat covers [B] outward.

Remove the center cover [C].

Seat Cover Installation

Installation is the reverse of removal.

Insert the projections [A] on the center cover [B] into the
grommet.

Insert the projections [A] on the seat covers [B] into the
grommets on the frame.

Make sure that the grommets are not comes off when
inserting the projections.

FRAME 15-15

Fenders

Front Fender Removal

Remove:

Bolts [A] with Collars (Both Sides)
Front Fender [B]

For US, CAL, CA, AU and CO models, remove the reflec-
tor before removing the bolts.

Front Fender Installation

Installation is the reverse of removal.

Flap and Rear Fender Removal

Remove:

Seat Covers [A] and Center Cover [B] (see Seat Cover
Removal)
Battery [C] (see Battery Removal in the Electrical Sys-
tem chapter)
Seat Bracket [D]

Disconnect each connector [A].

Remove the screw [B] and move the holder [C] aside.

Pull out the ECU [D] from the rear fender.

Free each lead from the clamp [E].

Remove the lead cover [A].

Remove the bolts [B] and flap assembly from the rear
fender.

Remove:

Tail/Brake Light Socket [C] (see Tail/Brake Light Bulb Re-
placement in the Electrical System chapter)
Seat Lock Screws [D]

15-16 FRAME

Fenders

Remove:

Rear Footpeg Bracket Bolts [A] (Both Sides)
Screw and Air Cleaner Housing Cap [B]
Rear Fender Mounting Bolts [C]
Clamp [D] (Right Side only)

Remove:

Screw [A]
Cover [B]
Clamp [C]
Rear Fender Mounting Bolts [D]

Remove the rear fender [E] rearward.

Flap and Rear Fender Installation

Fit the rear fender assembly to the frame.

Run the cable, leads and harness correctly (see Cable,
Wire, and Hose Routing section in the Appendix chapter).

Install the bolts [A] temporarily to hold the rear fender.

Install the rubber damper [A] to the frame.

Install the rear fender side mounting bolts temporarily.

Tighten the middle bolt [A] (both side) first while pushing
up the rear fender.

Tighten the front mounting bolts [B] (both sides) and rear
mounting bolts.

Install the removed parts (see appropriate chapters).

Torque - Rear Footpeg Bracket Bolts [C]: 25 N·m (2.5 kgf·m,

18 ft·lb)

FRAME 15-17

Frame

Frame Inspection

Visually inspect the frame for cracks, dents, bending, or
warp.
If there is any damage to the frame, replace it.

WARNING

A repaired frame may fail in use, possibly causing
an accident resulting in injury or death. If the frame
is bent, dented, cracked, or warped, replace it.

15-18 FRAME

Sidestand

Sidestand Removal

Raise the rear wheel off the ground with the stand.

Remove the lower fairing (see Lower Fairing Removal).

Remove:

Sidestand Switch Bolt [A]
Sidestand Switch [B]
Spring [C]
Sidestand Nut and Bolt [D]
Sidestand [E]

Sidestand Installation

Apply grease to the sliding area [A] of the sidestand [B].

Replace the sidestand nut [C] with a new one.

Tighten the sidestand nut.

Torque - Sidestand Nut: 39 N·m (4.0 kgf·m, 29 ft·lb)

Hook the spring [D] in the direction as shown.

Install the sidestand switch.

Apply a non-permanent locking agent to the threads of
the switch bolt, and tighten it.

Torque - Sidestand Switch Bolt: 8.8 N·m (0.90 kgf·m, 78

in·lb)

Run the lead and hoses according to Cable, Wire, and
Hose Routing section in the Appendix chapter.

Install the lower fairing (see Lower Fairing Installation).

ELECTRICAL SYSTEM 16-1

16

Electrical System

Table of Contents

Exploded View........................................................................................................................

16-4

Specifications .........................................................................................................................

16-10

Special Tools and Sealant ......................................................................................................

16-11

Parts Location.........................................................................................................................

16-12

Wiring Diagram (EX300A without GPS Unit)..........................................................................

16-14

Wiring Diagram (EX300A with GPS Unit)...............................................................................

16-16

Wiring Diagram (EX300B without GPS Unit)..........................................................................

16-18

Wiring Diagram (EX300B with GPS Unit)...............................................................................

16-20

Precautions.............................................................................................................................

16-22

Electrical Wiring......................................................................................................................

16-23

Main Harness Inspection ..................................................................................................

16-23

Battery ....................................................................................................................................

16-24

Battery Removal ...............................................................................................................

16-24

Battery Installation ............................................................................................................

16-24

Battery Activation ..............................................................................................................

16-25

Precautions .......................................................................................................................

16-27

Interchange .......................................................................................................................

16-28

Charging Condition Inspection..........................................................................................

16-28

Refreshing Charge............................................................................................................

16-28

Charging System ....................................................................................................................

16-30

Alternator Cover Removal.................................................................................................

16-30

Alternator Cover Installation..............................................................................................

16-30

Stator Coil Removal ..........................................................................................................

16-31

Stator Coil Installation .......................................................................................................

16-31

Alternator Rotor Removal .................................................................................................

16-32

Alternator Rotor Installation ..............................................................................................

16-32

Charging Voltage Inspection .............................................................................................

16-34

Alternator Inspection .........................................................................................................

16-34

Regulator/Rectifier Inspection...........................................................................................

16-36

Ignition System .......................................................................................................................

16-38

Crankshaft Sensor Removal .............................................................................................

16-38

Crankshaft Sensor Installation ..........................................................................................

16-38

Crankshaft Sensor Inspection...........................................................................................

16-38

Crankshaft Sensor Peak Voltage Inspection.....................................................................

16-39

Stick Coil Removal............................................................................................................

16-39

Stick Coil Installation.........................................................................................................

16-40

Stick Coil Inspection..........................................................................................................

16-40

Stick Coil Primary Peak Voltage Inspection ......................................................................

16-40

Spark Plug Removal .........................................................................................................

16-41

Spark Plug Installation ......................................................................................................

16-41

Spark Plug Condition Inspection.......................................................................................

16-41

Interlock Operation Inspection ..........................................................................................

16-42

IC Igniter Inspection ..........................................................................................................

16-43

Electric Starter System ...........................................................................................................

16-46

Starter Motor Removal......................................................................................................

16-46

Starter Motor Installation...................................................................................................

16-46

Starter Motor Disassembly................................................................................................

16-47

Starter Motor Assembly ....................................................................................................

16-48

Brush Inspection ...............................................................................................................

16-49

Commutator Cleaning and Inspection...............................................................................

16-49

16-2 ELECTRICAL SYSTEM

Armature Inspection..........................................................................................................

16-50

Brush Lead Inspection ......................................................................................................

16-50

End Cover Inspection........................................................................................................

16-50

Starter Relay Inspection....................................................................................................

16-50

Lighting System ......................................................................................................................

16-53

Headlight Beam Horizontal Adjustment ............................................................................

16-53

Headlight Beam Vertical Adjustment.................................................................................

16-53

Headlight Bulb Replacement ............................................................................................

16-53

Headlight Removal/Installation .........................................................................................

16-54

City Light Bulb Replacement.............................................................................................

16-54

Tail/Brake Light Bulb Replacement ...................................................................................

16-55

Tail/Brake Light Removal ..................................................................................................

16-55

Tail/Brake Light Installation ...............................................................................................

16-55

License Plate Light Bulb Replacement .............................................................................

16-56

Turn Signal Light Bulb Replacement ................................................................................

16-57

Turn Signal Relay Inspection ............................................................................................

16-58

Air Switching Valve .................................................................................................................

16-61

Air Switching Valve Operation Test ...................................................................................

16-61

Air Switching Valve Unit Test ............................................................................................

16-61

Radiator Fan System..............................................................................................................

16-63

Fan Motor Inspection ........................................................................................................

16-63

Meter, Gauge, Indicator Unit...................................................................................................

16-65

Meter Unit Removal/Installation ........................................................................................

16-65

Meter Unit Inspection ........................................................................................................

16-65

Switches and Sensors ............................................................................................................

16-74

Brake Light Timing Inspection...........................................................................................

16-74

Brake Light Timing Adjustment .........................................................................................

16-74

Switch Inspection ..............................................................................................................

16-74

Water Temperature Sensor Inspection .............................................................................

16-75

Speed Sensor Removal ....................................................................................................

16-75

Speed Sensor Installation .................................................................................................

16-76

Speed Sensor Inspection..................................................................................................

16-76

Oxygen Sensor Removal (Equipped Model).....................................................................

16-76

Oxygen Sensor Installation (Equipped Model)..................................................................

16-77

Oxygen Sensor Inspection (Equipped Model) ..................................................................

16-77

Fuel Level Sensor Inspection............................................................................................

16-77

Relay Box ...............................................................................................................................

16-78

Relay Box Removal ..........................................................................................................

16-78

Relay Box Installation .......................................................................................................

16-78

Relay Circuit Inspection ....................................................................................................

16-78

Diode Circuit Inspection ....................................................................................................

16-79

Fuse........................................................................................................................................

16-81

30 A Main Fuse Removal..................................................................................................

16-81

Fuse Box Fuse Removal...................................................................................................

16-81

Fuse Installation................................................................................................................

16-81

Fuse Inspection.................................................................................................................

16-82

ELECTRICAL SYSTEM 16-3

This page intentionally left blank.

16-4 ELECTRICAL SYSTEM

Exploded View

ELECTRICAL SYSTEM 16-5

Exploded View

Torque

No.

Fastener

N·m

kgf·m

ft·lb

Remarks

1

Front Brake Light Switch Screw

1.2

0.12

11 in·lb

2

Switch Housing Screws

3.5

0.36

31 in·lb

16-6 ELECTRICAL SYSTEM

Exploded View

ELECTRICAL SYSTEM 16-7

Exploded View

Torque

No.

Fastener

N·m

kgf·m

ft·lb

Remarks

1

Spark Plugs

13

1.3

115 in·lb

2

Crankshaft Sensor Screws

5.2

0.53

46 in·lb

3

Alternator Rotor Bolt

107.8

10.99

79.51

S

4

Stator Coil Bolts

12

1.2

106 in·lb

5

Regulator/rectifier Mounting Bolts

9.8

1.0

87 in·lb

6

Alternator Cover Plug

Hand

-Tighten

7

Alternator Cover Bolts

9.8

1.0

87 in·lb

8

Alternator Rotor Bolt Cap

Hand

-Tighten

9

Starter Motor Clutch Bolts

34.3

3.50

25.3

L

10 Starter Motor Cable Terminal Nut

9.8

1.0

87 in·lb

11 Starter Motor Mounting Bolts

9.8

1.0

87 in·lb

12 Starter Motor Terminal Locknut

11

1.1

97 in·lb

13 Starter Motor Brush Holder Screw

3.8

0.39

34 in·lb

14 Starter Motor Through Bolts

5.0

0.51

44 in·lb

15 Speed Sensor Bracket Bolts

9.8

1.0

87 in·lb

16 Speed Sensor Bolt

7.8

0.80

69 in·lb

L

G: Apply grease.

L: Apply a non-permanent locking agent.

M: Apply molybdenum disulfide grease.

R: Replacement Parts

S: Follow the specified tightening sequence.

SS: Apply silicone sealant.

16-8 ELECTRICAL SYSTEM

Exploded View

ELECTRICAL SYSTEM 16-9

Exploded View

Torque

No.

Fastener

N·m

kgf·m

ft·lb

Remarks

1

Fuel Pump Bolts

9.8

1.0

87 in·lb

L

2

Water Temperature Sensor

12

1.2

106 in·lb

3

Intake Air Temperature Sensor Screw

1.2

0.12

11 in·lb

4

Oil Pressure Switch Terminal Bolt

1.5

0.15

13 in·lb

G

5

Oil Pressure Switch

15

1.5

11

SS

6

Oxygen Sensor

44.1

4.50

32.5

Si

7

Neutral Switch

15

1.5

11

8

Sidestand Switch Bolt

8.8

0.90

78 in·lb

L

G: Apply grease.

L: Apply a non-permanent locking agent.

R: Replacement Parts

Si: Apply silicone grease (ex. PBC grease).

SS: Apply silicone sealant.

16-10 ELECTRICAL SYSTEM

Specifications

Item

Standard

Battery

Type

Sealed Battery

Model Name

FTX9-BS

Capacity

12 V 8 Ah

Voltage

12.6 V or more

Gross Weight

3.0 kg (6.6 lb)

Electrolyte Volume

0.41 L (25 cu in.)

Charging System

Type

Three-phase AC

Alternator Output Voltage

35 V or more at 4 000 r/min (rpm)

Stator Coil Resistance

0.05

0.6

at 20°C (68°F)

Charging Voltage

14.0

14.6 V

(Regulator/Rectifier Output Voltage)

Ignition System

Crankshaft Sensor Resistance

180

280

Crankshaft Sensor Peak Voltage

4.5 V or more

Stick Coil:

Primary Winding Resistance

1.1

1.5

Secondary Winding Resistance

6.4

9.6 k

Primary Peak Voltage

90 V or more

Spark Plug:

Type

NGK CR8E

Gap

0.7

0.8 mm (0.028

0.031 in.)

Electric Starter System

Starter Motor:

Brush Length

12 mm (0.47 in.) (Service Limit: 6.5 mm (0.26 in.))

Air Switching Valve

Resistance

20

24

at 20°C (68°F)

Switches and Sensors

Rear Brake Light Switch Timing

ON after about 10 mm (0.39 in.) of pedal travel

Engine Oil Pressure Switch Connections

When engine is stopped: ON
When engine is running: OFF

Water Temperature Sensor Resistance

In the text

Fuel Level Sensor Resistance:

Full Position

9

11

Empty Position

213

219

ELECTRICAL SYSTEM 16-11

Special Tools and Sealant

Flywheel Holder:
57001-1313

Hand Tester:
57001-1394

Flywheel Puller Assembly, M38 × 1.5/M35 × 1.5:
57001-1405

Peak Voltage Adapter:
57001-1415

Lead Wire - Peak Voltage Adapter:
57001-1449

Liquid Gasket, TB1211F:
92104-0004

16-12 ELECTRICAL SYSTEM

Parts Location

ELECTRICAL SYSTEM 16-13

Parts Location

1. Meter Unit
2. Ignition Switch
3. Starter Lockout Switch
4. Air Switching Valve
5. Stick Coils
6. Spark Plugs
7. Neutral Switch
8. Starter Relay
9. Relay Box

10. Fuse Box

11. Turn Signal Relay

12. Regulator/Rectifier
13. Crankshaft Sensor
14. Oxygen Sensor (Equipped Model)
15. Alternator
16. Starter Motor
17. Speed Sensor
18. Sidestand Switch
19. Battery 12 V 8 Ah
20. ECU
21. Water Temperature Sensor
22. Front Brake Light Switch
23. Rear Brake Light Switch
24. Engine Ground
25. Oil Pressure Switch
26. Fan Motor


Content      ..     13      14      15      16     ..