Dodge Dakota (ND). Manual - part 1207


  Index      Dodge     Dodge Dakota (ND) 2005 - service repair manual 2005 year


Search            


Content   ..  1205  1206  1207  1208   ..


Dodge Dakota (ND). Manual - part 1207


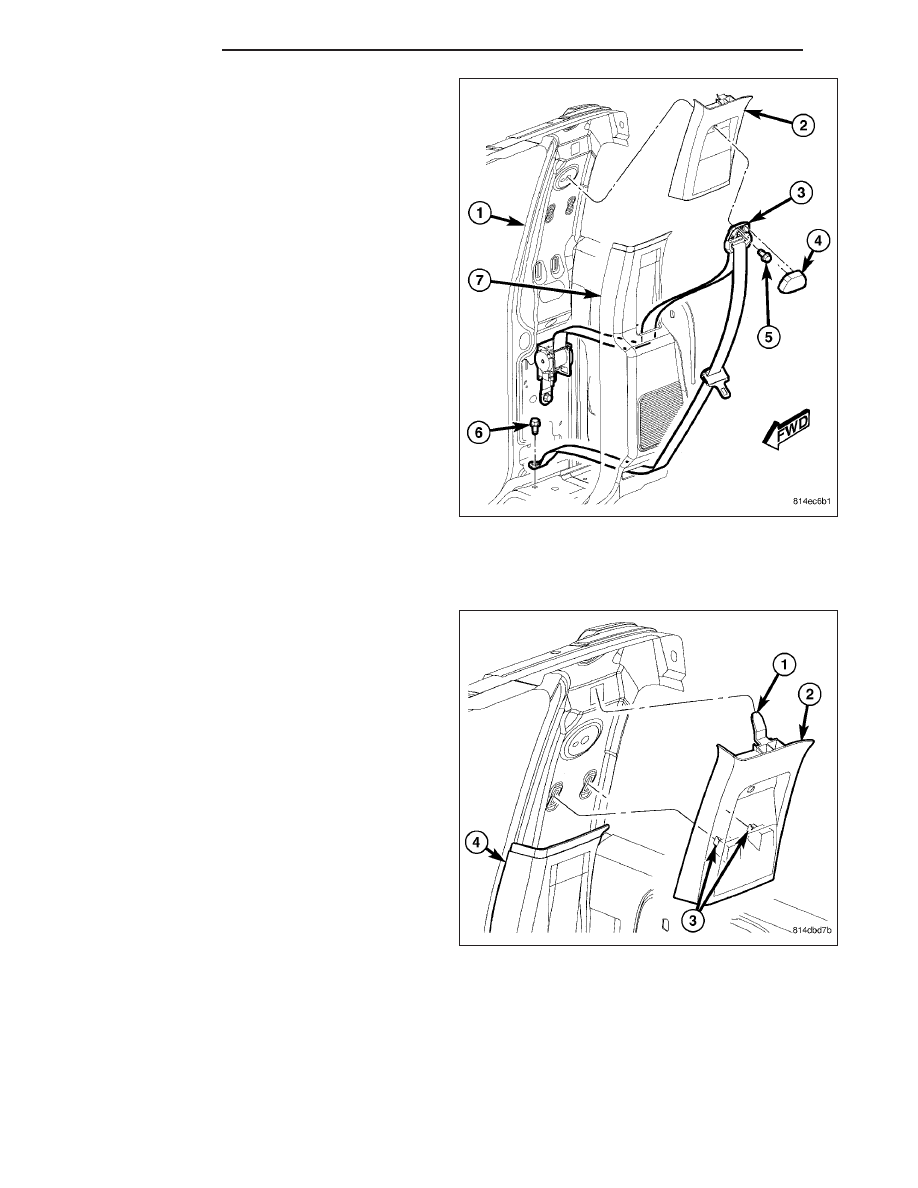
3. Remove the upper C-pillar trim panel, refer to

(Refer to 23 - BODY/INTERIOR/PANEL-C PILLAR
UPPER TRIM - REMOVAL).

4. Using a trim stick C-4755 or equivalent, disengage

the retaining tabs that secure the lower C-pillar trim
panel (7) to the C-pillar (1).

5. Remove the screw (6) that secures the lower

anchor to the floor panel near the base of the C-pil-
lar.

6. Remove the seat belt (3) from the lower C-pillar

trim panel through the slots provided and remove
the trim panel.

INSTALLATION

Club Cab, Without Rear Jumper Seats

1. Position the lower C-pillar trim panel (4) to the

C-pillar and engage the retaining tabs that secure
the trim panel to the C-pillar.

2.

CAUTION: Keep the inner bottom end of the upper
C-pillar trim panel away from the cab back trim
panel when installing the upper C-pillar trim panel
to prevent scratching the back trim panel.Install
the upper C-pillar trim panel, (Refer to 23 - BODY/
INTERIOR/PANEL-C

PILLAR

UPPER

TRIM

-

INSTALLATION).

23 - 240

INTERIOR

ND

3. Install the rear door sill scuff plate, (Refer to 23 -

BODY/INTERIOR/PLATE-DOOR

SCUFF

-

INSTALLATION).

4. Install the outer front seat belt retractor cover,

(Refer to 23 - BODY/INTERIOR/COVER-OUTER
FRONT

SEAT

BELT

RETRACTOR

-

INSTALLATION).

ND

INTERIOR

23 - 241

Club Cab, With Rear Jumper Seats

1. Position the lower C-pillar trim panel (7) in the vehi-

cle.

2. Route the seat belt, lower anchor, latch plate and

turning loop (3) through the slots provided in the
lower C-pillar trim panel. Verify that the seat belt
webbing between the retractor and the lower
anchor is not twisted.

3. Position the seat belt lower anchor to the mounting

hole in the floor panel near the base of the C-pillar
and Install the screw (6) that secures the lower
anchor to the floor panel. Tighten the screw to 39
N·m (29 ft. lbs.).

4. Position the lower C-pillar trim panel to the C-pillar

(1) and engage the retaining tabs that secure the
trim panel to the C-pillar.

5.

CAUTION: Keep the inner bottom end of the upper
C-pillar trim panel away from the cab back trim
panel when installing the upper C-pillar trim panel
to prevent scratching the back trim panel.Install
the upper C-pillar trim panel, (Refer to 23 - BODY/
INTERIOR/PANEL-C

PILLAR

UPPER

TRIM

-

INSTALLATION).

6. Install the rear door sill scuff plate, (Refer to 23 -

BODY/INTERIOR/PLATE-DOOR

SCUFF

-

INSTALLATION).

23 - 242

INTERIOR

ND

7. Install the outer front seat belt retractor cover,

(Refer to 23 - BODY/INTERIOR/COVER-OUTER
FRONT

SEAT

BELT

RETRACTOR

-

INSTALLATION).

Quad Cab

1. Position the lower C-pillar trim panel (7) in the vehi-

cle.

2. Route the seat belt, lower anchor, latch plate and

turning loop (3) through the slots provided in the
lower C-pillar trim panel. Verify that the seat belt
webbing between the retractor and the lower
anchor is not twisted.

3. Position the seat belt lower anchor to the mounting

hole in the floor panel near the base of the C-pillar
and Install the screw (6) that secures the lower
anchor to the floor panel. Tighten the screw to 39
N·m (29 ft. lbs.).

4. Position the lower C-pillar trim panel to the C-pillar

(1) and engage the retaining tabs that secure the
trim panel to the C-pillar.

5. Install the upper C-pillar trim panel, (Refer to 23 -

BODY/INTERIOR/PANEL-C PILLAR UPPER TRIM
- INSTALLATION).

6. Install the rear seat, (Refer to 23 - BODY/SEATS/SEAT-SECOND ROW - INSTALLATION).

ND

INTERIOR

23 - 243


Content   ..  1205  1206  1207  1208   ..