Dodge Dakota (ND). Manual - part 54


  Index      Dodge     Dodge Dakota (ND) 2005 - service repair manual 2005 year


Search            


Content   ..  52  53  54  55   ..


Dodge Dakota (ND). Manual - part 54


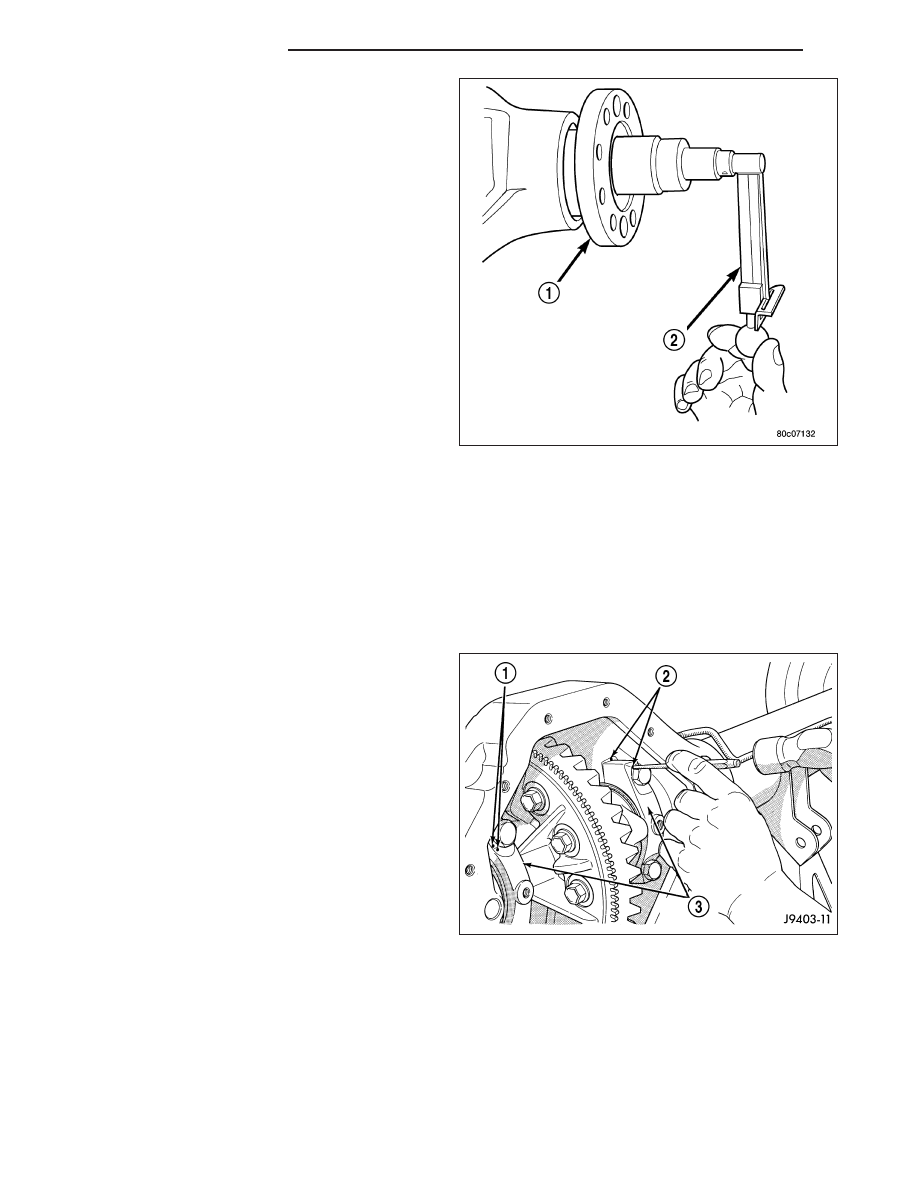
9. Rotate pinion with an inch pound torque wrench

(2). Rotating torque should be equal to the reading
recorded during removal plus an additional 0.56
N·m (5 in. lbs.).

CAUTION: Never loosen pinion nut to decrease
pinion bearing rotating torque and never exceed
specified preload torque. If rotating torque is
exceeded, a new collapsible spacer must be
installed. Failure to follow these instructions will
result in damage to the collapsible spacer

10. If rotating torque is low, use Holder 6719 to hold

the companion flange and tighten pinion nut in 6.8
N·m (5 ft. lbs.) increments until proper rotating
torque is achieved.

NOTE: The bearing rotating torque should be con-
stant during a complete revolution of the pinion. If
the rotating torque varies, this indicates a binding
condition.

NOTE: The seal replacement is unacceptable if the final pinion nut torque is less than 285 N·m (210 ft. lbs.).

11. Install propeller shaft.

DIFFERENTIAL

REMOVAL

1. Remove filler plug from the differential cover.

2. Remove differential cover and drain the lubricant.

3. Remove axle shafts.

4. Remove RWAL/ABS sensor from housing.

NOTE: Side play resulting from bearing races
being loose on case hubs requires replacement of
the differential case.

5. Mark differential housing and bearing caps (3) for

installation reference.

3 - 132

REAR AXLE - 9 1/4

ND

6. Remove bearing threaded adjuster lock from each

bearing cap.

7. Loosen differential bearing cap bolts.

8. Loosen differential bearing adjusters through the

axle tubes (1) with Wrench C-4164 (3).

9. Hold differential case while removing bearing caps

and adjusters.

10. Remove differential case.

NOTE: Tag bearing cups and threaded adjusters to
indicate their location.

11. Clean housing cavity with flushing oil, light engine

oil or a lint free cloth.

DISASSEMBLY

1. Rotate one pinion gear (2) with thrust washer (3) to

the differential window (1) and remove gear and
thrust washer.

2. Rotate remaining pinion gear (3) with thrust washer

(2) to the differential window (1) and remove gear
and washer.

ND

REAR AXLE - 9 1/4

3 - 133

3. Remove differential side gears (1) (2) and thrust

washers.

ASSEMBLY

NOTE: If same gears and thrust washers are being
used, install them into their original locations.

1. Lubricate all differential components with axle lubri-

cant.

2. Install

differential

side

gears

(2)

and

thrust

washers.

3. Install first pinion gear (3) with thrust washer into

differential window (1) and side gears (2). Rotate
pinion gear into the case.

4. Install remaining pinion gear and thrust washer.

Rotate gears to align hole in the pinion gears with
hole in the differential case.

5. Slide pinion shaft into the case and through the

pinion gears to align the gears.

3 - 134

REAR AXLE - 9 1/4

ND

INSTALLATION

1. Apply a coating of hypoid gear lubricant to the dif-

ferential bearings, bearing cups, and threaded
adjusters. A dab of grease can be used to keep the
adjusters in position.

2. Install differential assembly into the housing.

3. Install differential bearing caps (4) in their original

locations.

4. Install bearing cap bolts and tighten the upper bolts

to 14 N·m (10 ft. lbs.). Tighten the lower bolts fin-
ger-tight until the bolt head is seated.

5. Perform the differential bearing preload and adjust-

ment procedure.

NOTE: Be sure that all bearing cap bolts are tight-
ened to their final torque of 136 N·m (100 ft.lbs.)
before proceeding.

6. Install axle shafts.

7. Apply a bead of orange Mopar Axle RTV Sealant

(1) or equivalent to the housing cover (2).

CAUTION: If cover is not installed within 3 to 5
minutes, the cover must be cleaned and new RTV
applied or adhesion quality will be compromised.

8. Install the cover and any identification tag and

tighten cover bolts to 41 N·m (30 ft. lbs.).

9. Fill differential with lubricant to bottom of the fill

plug hole. Refer to the Lubricant Specifications for
the correct quantity and type.

NOTE: Trac-lok™ differential equipped vehicles
should be road tested by making 10 to 12 slow fig-
ure-eight turns. This maneuver will pump the lubri-
cant through the clutch discs to eliminate a
possible chatter noise complaint.

ND

REAR AXLE - 9 1/4

3 - 135


Content   ..  52  53  54  55   ..