DAF LF45, LF55 Series. Manual - part 120


  Index      DAF     DAF LF45, LF55 Series - service repair manual


Search            


Content   ..  118  119  120  121   ..


DAF LF45, LF55 Series. Manual - part 120


1

LF45/55 series

Removal and installation

EXTERNAL CAB COMPONENTS

4-15

Applying sealant
1.

For hot processing, the adhesive should be

heated in an oven, special tool
(DAF no. 1329416) for 60 minutes at 80

_C.

2.

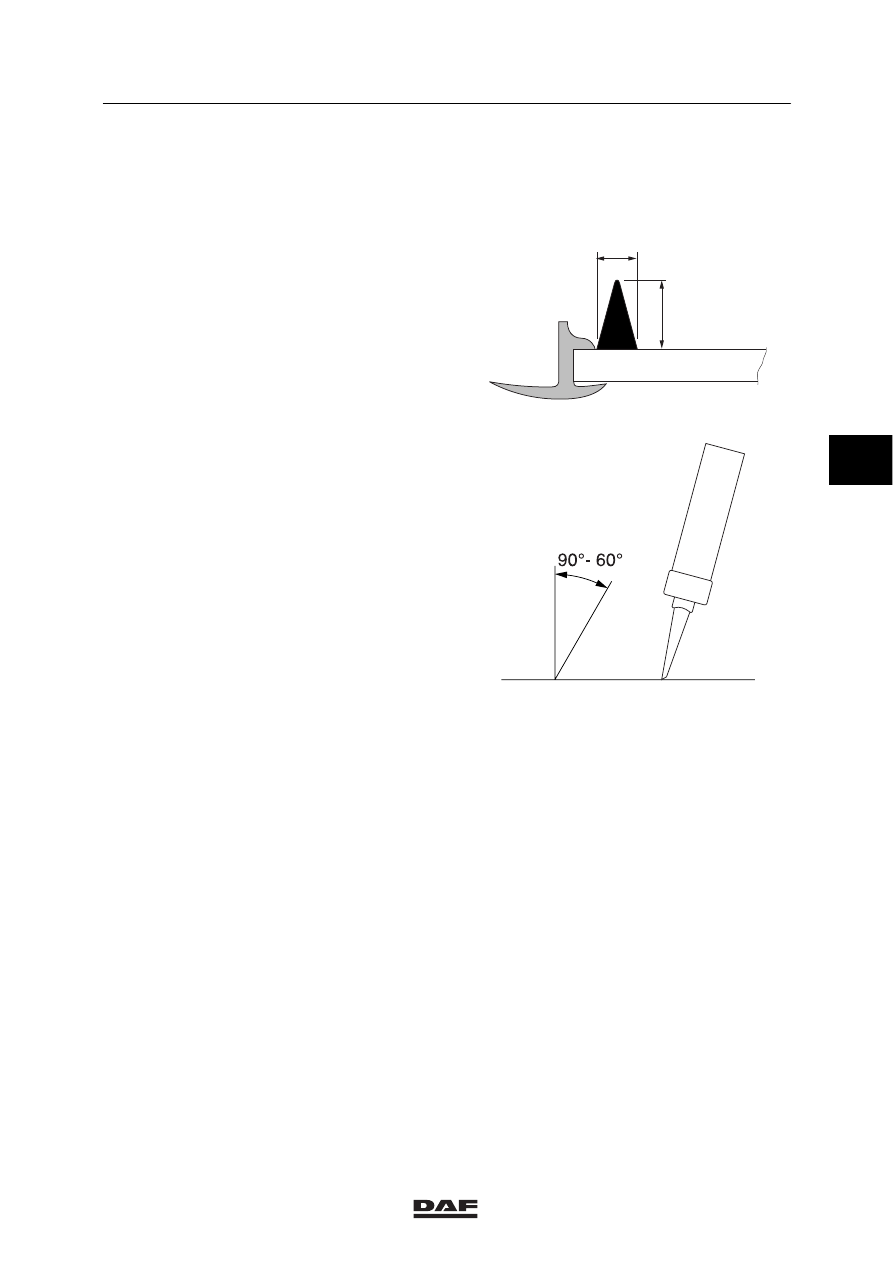
Apply the sealant to the rubber as indicated
in the diagram. There is no rubber on the
underside of the windscreen. Here, the seal
beads must be 11 mm from the edge of the
glass.

K1 01 215

15

8

3.

Take note of the processing time when
applying the sealant. See “Technical data”.

4.

Place the sealant gun with the opening
90

_/60_ onto the windscreen and move it

evenly to build up a good layer.

5.

Avoid air bubbles in the layer of sealant.

K1 00 722

Note:
If a pneumatic glue gun is used for sealing
(special tool DAF no 1240444) then before
beginning adjust the pressure in the gun by
spraying several test strips.

Fitting the glass
1.

For safety, open the windows to avoid
undesirable pressure build-up on the
windscreen.

2.

The glass should be taken from the
workbench by two persons and it should be
placed in the frame in one go. Use the tape
strips to determine the correct position.

3.

Make sure that the rubber windscreen trim
on the bottom seats properly into the frame.

4

ǹ 0210

1

EXTERNAL CAB COMPONENTS

Removal and installation

LF45/55 series

4-16

4.

Use a sealant remover to remove the
excess sealant immediately from the
painted parts, see ”Technical data”.

5.

Depending on the type of sealant used
(hardening time), fit straps. See “Technical
data”. Protect the paint by fitting linen tape
in the places where the straps will touch the
paint.

6.

If applicable, pull two strips round the
outside of the windscreen and the cab pillar.
Put strips of wood or Tempex underneath to
avoid damage.

7.

Let the sealant harden. See “Technical
data”.

8.

Remove from the cab body all the tape
used for protection and marking.

9.

Clean the entire windscreen and the parts
of the cab body which have been fouled
during installation of the windscreen using a
glass cleaner.

10. Fit the A-pillar trimming panels in the cab.

11. Fit the cover panel to the window frame.

12. Fit the windscreen wipers and adjust them.

13. Fit the grille.

14. If the vehicle is fitted with an airbag, apply a

new airbag sticker to the windscreen.

K1 01 426

4

ǹ 0210

1

LF45/55 series

Removal and installation

EXTERNAL CAB COMPONENTS

4-17

4.13 REMOVAL AND INSTALLATION, REAR WINDOW GLASS

Removing the rear window glass
1.

Remove the cover panel attachment bolts.
Remove the cover panels.

2.

Attach a suction pad (DAF no. 0484800).

3.

Put the wire (special tool,
DAF no. 1329415) at approximately the
middle of the upper and lower side of the
glass using pliers or a special pass-through
tool (special tool, DAF no. 1240458)
through the sealant.

Note:
Remove the wire pass-through tool before
fitting the wire ends to the handles of the
cutting wire set.

K1 01 131

4.

The length of the cutting wire should be
1.5 x the height of the window.

5.

Secure the handles that are part of the set,
special tool (DAF no. 0499817) to the
cutting wire.

6.

Use tape strips to protect the glass from
falling out accidentally (after the sealant has
been cut through).

7.

Start cutting in the middle.
Make sure the wire is kept moving and
tightly stretched all the time. If the wire gets
twisted, it will inevitably break.

8.

Keep the cutting wire as close as possible
to the edge of the glass.

9.

Make sure the wire ends are crossed before
the bottom corners are reached.

10. Take the glass out of the frame using a

suction pad, special tool
(DAF no. 0484800).

K1 01 059

4

ǹ 0210

1

EXTERNAL CAB COMPONENTS

Removal and installation

LF45/55 series

4-18

11. Remove any remaining sealant in the

window frame with a scraper, special tool
(DAF no. 1329417). Make sure the
remaining layer of sealant has a thickness
of at most 1 to 1.5 mm and that it is flat and
smooth.

12. Remove frayed pieces and granules of old

sealant and clean the frame thoroughly with
a cleaner.

Fitting the rear window glass
1.

If necessary, smooth off spare sealant.

2.

Apply the adhesive (1) as shown.

3.

Fit the spraying nozzle to the cartridge and
apply the sealant to the window, spraying as
evenly as possible.

K1 01 178

9 mm

6 mm

1

4.

Place the sealant gun with the opening
90

_/60_ onto the windscreen and move it

evenly to build up a good layer.

5.

Avoid air bubbles in the layer of sealant.

Note:
If a pneumatic glue gun is used for sealing
(special tool DAF no 1240444) then before
beginning adjust the pressure in the gun by
spraying several test strips.

6.

Pay attention to the processing time, see
”Technical data”.

7.

Fit the rear window glass and press it into
the frame. Secure the glass in several
places with strips of tape around 20 cm
long. Open the door windows to prevent
pressure in the cab.

K1 00 722

4

ǹ 0210


Content   ..  118  119  120  121   ..