Chrysler Sebring, Stratus sedan, Sebring Convertible. Manual - part 611


  Index      Chrysler     Chrysler Sebring, Stratus sedan, Sebring Convertible - service repair manual 2001-2007 year


Search            


Content   ..  609  610  611  612   ..


Chrysler Sebring, Stratus sedan, Sebring Convertible. Manual - part 611


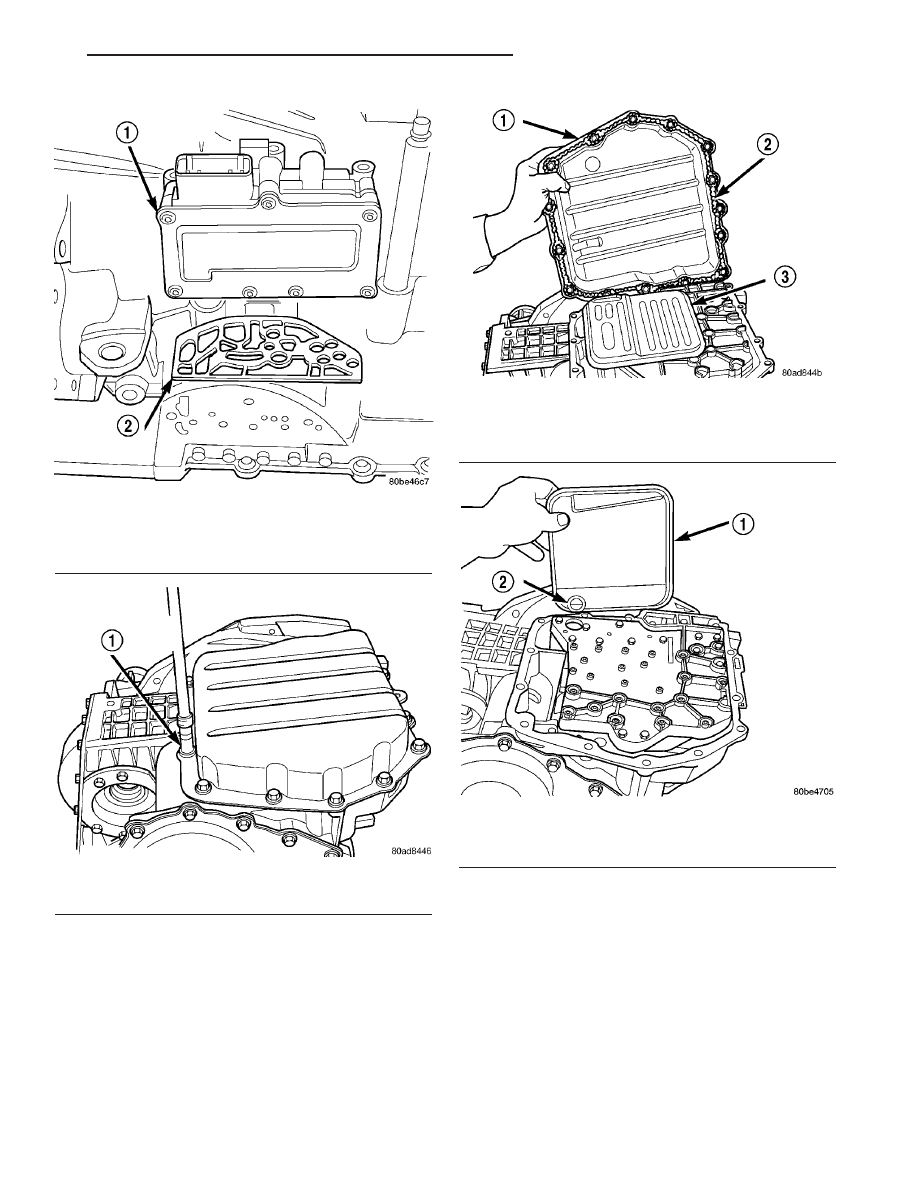
Fig. 9 Solenoid/Pressure Switch Assembly and

Gasket

1 - SOLENOID/PRESSURE SWITCH ASSEMBLY
2 - GASKET

Fig. 10 Remove Oil Pan Bolts

1 - OIL PAN BOLTS (USE RTV UNDER BOLT HEADS)

Fig. 11 Remove Oil Pan

1 - OIL PAN
2 - 1/8 INCH BEAD OF MOPAR

T

ATF RTV (MS-GF41)

3 - OIL FILTER

Fig. 12 Remove Oil Filter

1 - OIL FILTER
2 - O-RING

JR

41TE AUTOMATIC TRANSAXLE

21 - 205

41TE AUTOMATIC TRANSAXLE (Continued)

(8) Remove valve body-to-case bolts (Fig. 13).

CAUTION: Do not handle the valve body assembly
from the manual valve. Damage can result.

(9) Using a screwdriver, push park rod rollers

away from guide bracket (Fig. 14) and remove valve
body assembly (Fig. 15).

NOTE: Depending on engine application, some
accumulators will have two springs and others will
have one spring. The springs are color-coded
according to application and year. When disassem-
bling, mark accumulator spring location to ease
assembly.

(10) Remove underdrive and overdrive accumula-

tors (Fig. 16).

Fig. 13 Remove Valve Body Attaching Bolts

1 - VALVE BODY ATTACHING BOLTS (18)
2 - VALVE BODY

Fig. 14 Push Park Rod Rollers from Guide Bracket

1 - PARK SPRAG ROLLERS
2 - SCREWDRIVER
3 - PARK SPRAG GUIDE BRACKET

Fig. 15 Remove Valve Body

1 - VALVE BODY

Fig. 16 Underdrive and Overdrive Accumulators

1 - OVERDRIVE PISTON AND SPRING
2 - UNDERDRIVE PISTON AND SPRING

21 - 206

41TE AUTOMATIC TRANSAXLE

JR

41TE AUTOMATIC TRANSAXLE (Continued)

(11) Remove low/reverse accumulator snap ring

(Fig. 17).

(12) Remove low/reverse accumulator plug (Fig.

18).

(13) Remove low/reverse accumulator piston using

suitable pliers (Fig. 19) (Fig. 20).

Fig. 17 Remove Low/Reverse Accumulator Snap

Ring

1 - SNAP RING
2 - PLUG

Fig. 18 Remove Low/Reverse Accumulator Plug

(Cover)

1 - ADJUSTABLE PLIERS
2 - PLUG

Fig. 19 Low/Reverse Accumulator Piston

1 - ACCUMULATOR PISTON

Fig. 20 Low/Reverse Accumulator

1 - PISTON
2 - RETURN SPRINGS

JR

41TE AUTOMATIC TRANSAXLE

21 - 207

41TE AUTOMATIC TRANSAXLE (Continued)

(14) Measure input shaft end play. Place transaxle

so input shaft is vertical. Set up end play set and
dial indicator as shown in (Fig. 21). Input shaft end
play should be within 0.13-0.64 mm (0.005-0.025
in.) 
If outside of this range, a #4 thrust plate change
is required. Record indicator reading for reference
upon reassembly.

(15) Remove oil pump-to-case bolts (Fig. 22).

CAUTION: Be sure input speed sensor is removed
before removing oil pump.

(16) Install pullers Tool C-3752 as shown in (Fig.

23).

(17) Remove oil pump assembly (Fig. 24) (Fig. 25).

Fig. 21 Measure Input Shaft End Play Using End

Play Set 8266

1 - TOOL 8266–8
2 - TOOL 8266–2
3 - TOOL C-3339

Fig. 22 Remove Pump Attaching Bolts

1 - PUMP ATTACHING BOLTS
2 - PUMP HOUSING

Fig. 23 Install Tool C-3752

1 - PULLERS TOOL C-3752
2 - PUMP

Fig. 24 Remove Oil Pump

1 - “PUSH IN” ON INPUT SHAFT WHILE REMOVING PUMP

21 - 208

41TE AUTOMATIC TRANSAXLE

JR

41TE AUTOMATIC TRANSAXLE (Continued)


Content   ..  609  610  611  612   ..