Chrysler Sebring, Stratus sedan, Sebring Convertible. Manual - part 291


  Index      Chrysler     Chrysler Sebring, Stratus sedan, Sebring Convertible - service repair manual 2001-2007 year


Search            


Content   ..  289  290  291  292   ..


Chrysler Sebring, Stratus sedan, Sebring Convertible. Manual - part 291


(6) Remove wheel cylinder mounting bolts (Fig.

66).

(7) Carefully remove wheel cylinder and seal from

between brake shoes and support plate.

INSTALLATION

(1) Install seal on mounting surface of wheel cylin-

der.

(2) Install wheel cylinder between brake shoes on

support plate (Fig. 66). Install and tighten mounting
bolts to 13 N·m (115 in. lbs.) torque.

(3) Adjust brake shoes to drum diameter using

brake shoe gauge. (Refer to 5 - BRAKES/HYDRAU-
LIC/MECHANICAL/BRAKE

PADS/SHOES

-

ADJUSTMENTS)

(4) Install brake drum. (Refer to 5 - BRAKES/HY-

DRAULIC/MECHANICAL/DRUM - INSTALLATION)

(5) Thread flex hose tube nut into wheel cylinder

port (Fig. 64). Tighten tube nut to 17 N·m (145 in.
lbs.) torque.

(6) Install tire and wheel assembly. Tighten wheel

mounting nuts to 135 N·m (100 ft. lbs.) torque.

(7) Slowly rotate wheel and verify that brake drum

lightly drags on shoes.

(8) Lower vehicle.
(9) Remove brake pedal depressor (holding) tool.

(10) Bleed affected wheel cylinder/circuit as neces-

sary. (Refer to 5 - BRAKES - STANDARD PROCE-
DURE)

(11) Road test vehicle stopping in both forward

and reverse directions. Automatic-adjuster will con-
tinue to adjust brakes as necessary during road test.

PARKING BRAKE

ADJUSTMENTS

ADJUSTMENT - PARKING BRAKE

This vehicle uses a bent nail type park brake cable

tension equalizer (Fig. 67). The bent nail tension
equalizer it to be used only one time to set the park
brake cable tension. If the park brake cables require
adjustment during the life of the vehicle, a NEW ten-
sion equalizer MUST be installed before doing the
park cable adjustment procedure.

(1) Remove the center floor console. (Refer to 23 -

BODY/INTERIOR/FLOOR CONSOLE - REMOVAL)

(2) Lower park brake lever handle.

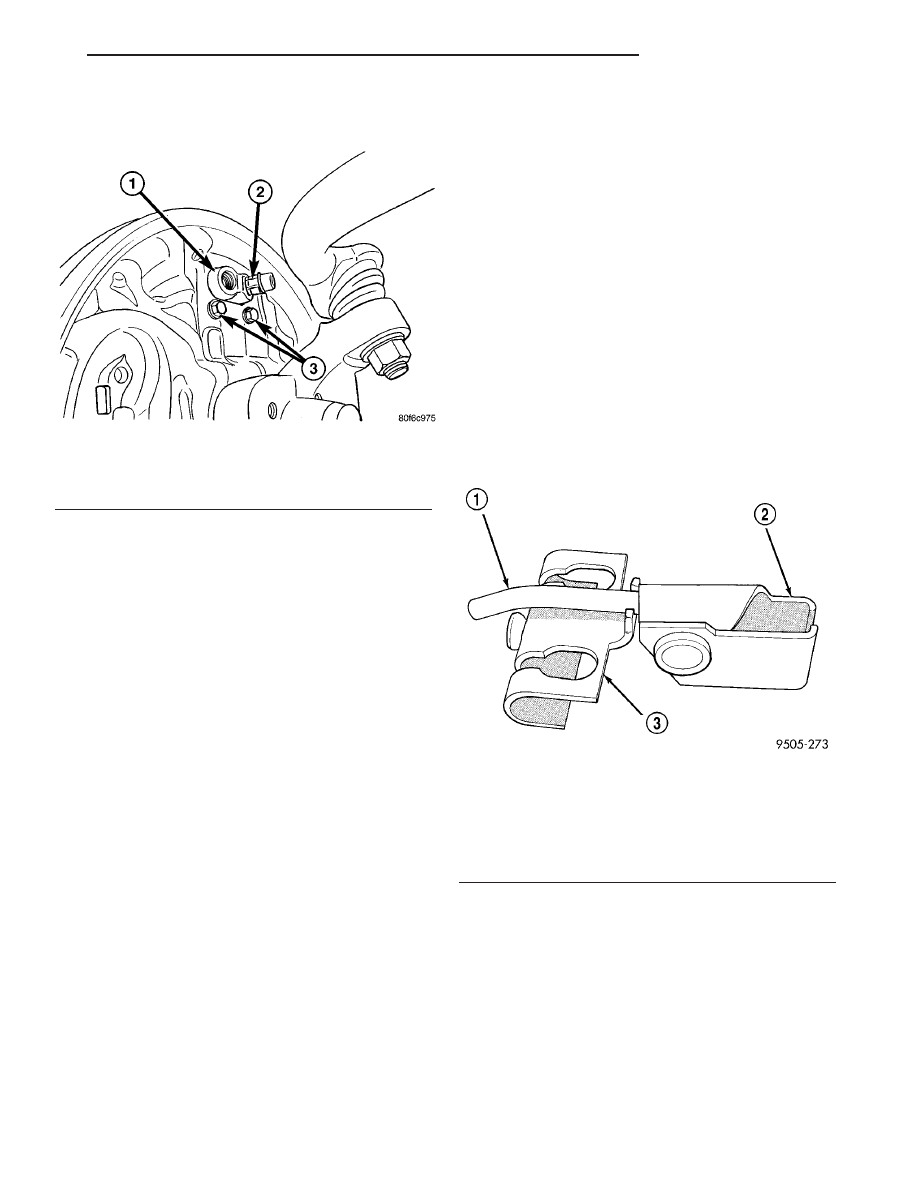
Fig. 66 Wheel Cylinder Mounting

1 - WHEEL CYLINDER
2 - BLEEDER SCREW
3 - MOUNTING BOLTS

Fig. 67 Bent Nail Park Brake Cable Tension

Equalizer

1 - BENT NAIL
2 - PARK BRAKE LEVER OUTPUT CABLE ATTACHMENT TO
TENSION EQUALIZER
3 - REAR PARK BRAKE CABLE ATTACHMENT TO TENSION
EQUALIZER

JR

BRAKES - BASE

5 - 39

WHEEL CYLINDER (Continued)

(3) Loosen adjusting nut (Fig. 68) on park brake

cable output cable. This will take tension off output
cable, allowing it to be easily removed from tension
equalizer.

CAUTION: Discard output cable retaining clip after
removing it from park brake cable tension equalizer.
Retainer is not to be re-used, a new retainer is to be
installed when attaching output cable to tension
equalizer.

(4) Using a screwdriver (Fig. 69), unlatch the park

brake output cable retainer. Then remove cable
retainer from park brake cable tension equalizer.

(5) Remove the park brake cable tension equalizer

from the park brake lever output cable and the rear
park brake cables (Fig. 70).

CAUTION: A new cable tension equalizer must be
installed when adjusting park brake cable tension.

(6) Install a NEW park brake cable tension equal-

izer on the park brake lever output cable and rear
park brake cables (Fig. 70).

CAUTION: A new park brake lever output cable
retainer must be used when installing output cable
on cable tension equalizer. Cable retainer usage is
required to ensure output cable can not separate
from tension equalizer.

Fig. 68 Park Brake Lever Output Cable Adjustment

Nut

1 - ADJUSTING NUT
2 - PARK BRAKE LEVER
3 - PARK BRAKE LEVER OUTPUT CABLE

Fig. 69 Output Cable To Equalizer Retaining Clip

1 - SCREWDRIVER
2 - PARK BRAKE LEVER OUTPUT CABLE
3 - CABLE RETAINER
4 - REAR PARK BRAKE CABLES
5 - PARK BRAKE CABLE TENSION EQUALIZER

Fig. 70 Park Brake Cable Tension Equalizer

1 - PARK BRAKE CABLE TENSION EQUALIZER
2 - PARK BRAKE MECHANISM
3 - PARK BRAKE LEVER OUTPUT CABLE
4 - PARK BRAKE LEVER
5 - REAR PARK BRAKE CABLES

5 - 40

BRAKES - BASE

JR

PARKING BRAKE (Continued)

(7) Install a new park brake lever output cable to

tension equalizer retaining clip (Fig. 71) on tension
equalizer. The cable retainer (Fig. 71) must be closed
and securely latched.

(8) Adjust cable tension for the parking brake sys-

tem using the following steps.

• Position park brake lever so it is in the fully

released position.

• Tighten the adjusting nut on the parking brake

lever output cable until 26 millimeters of thread is
out past top edge of adjustment nut (Fig. 72).

• Actuate the parking brake lever to its fully

applied position (15 clicks) 1 time and then reposition
the lever to its fully released position.

NOTE: Actuating the parking brake lever to its fully
applied position one time after tightening the
adjustment nut will yield (stretch) the bent nail por-
tion of the tension equalizer approximately 1/4 inch.
This process will correctly set the parking brake
cable tension.

(9) Check the rear wheels of the vehicle; they

should rotate freely without dragging.

(10) After the park brake cable tension has been

properly adjusted, check for free play in park brake
lever. Park brake hand lever should feel firm at all
clicks, with a maximum of 15 clicks of lever travel
possible.

(11) Install the center floor console. (Refer to 23 -

BODY/INTERIOR/FLOOR CONSOLE - INSTALLA-
TION)

CABLES - PARKING BRAKE

REMOVAL

For servicing either the left or right rear parking

brake cable, follow the procedure as listed below.

(1) Remove center floor console. (Refer to 23 -

BODY/INTERIOR/FLOOR CONSOLE - REMOVAL)

(2) Lower park brake lever handle.
(3) Loosen adjusting nut (Fig. 73) on park brake

cable output cable. This will take tension off park
brake cables, allowing rear park brake cables to be
easily removed from tension equalizer.

Fig. 71 Cable Retainer Installed On Tension

Equalizer

1 - REAR PARK BRAKE CABLES
2 - CABLE RETAINING CLIP
3 - PARKING BRAKE MECHANISM OUTPUT CABLE
4 - PARK BRAKE MECHANISM
5 - PARK BRAKE CABLE TENSION EQUALIZER

Fig. 72 Parking Brake Adjustment

1 - BENT NAIL
2 - ADJUSTING NUT
3 - PARKING BRAKE LEVER
4 - PARKING BRAKE CABLE TENSION EQUALIZER

Fig. 73 Park Brake Lever Output Cable Adjustment

Nut

1 - ADJUSTING NUT
2 - PARK BRAKE LEVER
3 - PARK BRAKE LEVER OUTPUT CABLE

JR

BRAKES - BASE

5 - 41

PARKING BRAKE (Continued)

(4) Remove parking brake cable requiring service

from the parking brake cable tension equalizer (Fig.
74).

(5) Remove rear seat cushion from vehicle. (Refer

to 23 - BODY/SEATS/SEAT CUSHION - REMOVAL)

(6) Remove scuff plates from right and left rear

door sills. Scuff plates are attached to door sills using
clips on bottom of scuff plates. Remove by carefully
prying scuff plate retaining clips out of door sills.

(7) Fold rear carpeting forward to expose park

brake cables.

(8) Install 12 point 1/2 inch or 13 mm box wrench

over parking brake cable retainer as indicated (Fig.
75). This will compress tabs on parking brake cable
retainer allowing cable to be removed from console
bracket. From under carpet, grasp park brake cable
housing and pull cable straight out of console
bracket.

(9) Raise vehicle. (Refer to LUBRICATION &

MAINTENANCE/HOISTING - STANDARD PROCE-
DURE)

(10) Remove rear wheel and tire assembly.
(11) On vehicles with rear disc brakes, remove cal-

iper, rotor, hub and bearing, and parking brake
shoes. (Refer to 5 - BRAKES/PARKING BRAKE/
SHOES - REMOVAL)

(12) On vehicles with rear drum brakes, remove

hub and bearing dust cap and retaining nut, then
slide hub and bearing off spindle.

(13) Remove parking brake cable from parking

brake actuating lever (Fig. 76).

Fig. 74 Rear Park Brake Cables At Tension

1 - REAR PARK BRAKE CABLES
2 - PARK BRAKE CABLE TENSION EQUALIZER

Fig. 75 Compressing Park Brake Cable Retaining

Tabs

1 - BOX END WRENCH
2 - VEHICLE CARPETING
3 - CONSOLE BRACKET
4 - REAR PARK BRAKE CABLE

Fig. 76 Cable Removal From Lever

5 - 42

BRAKES - BASE

JR

CABLES - PARKING BRAKE (Continued)


Content   ..  289  290  291  292   ..