Chrysler Le Baron, Dodge Dynasty, Plymouth Acclaim. Manual - part 591


  Index      Chrysler     Chrysler Le Baron, Dodge Dynasty, Plymouth Acclaim - service repair manual 1993 year


Search            


Content   ..  589  590  591  592   ..


Chrysler Le Baron, Dodge Dynasty, Plymouth Acclaim. Manual - part 591


(2) Loosen the right engine mount insulator yoke

screw and 2 turns on yoke nut, then loosen the front
engine mount bracket to front crossmember screws and
nuts.

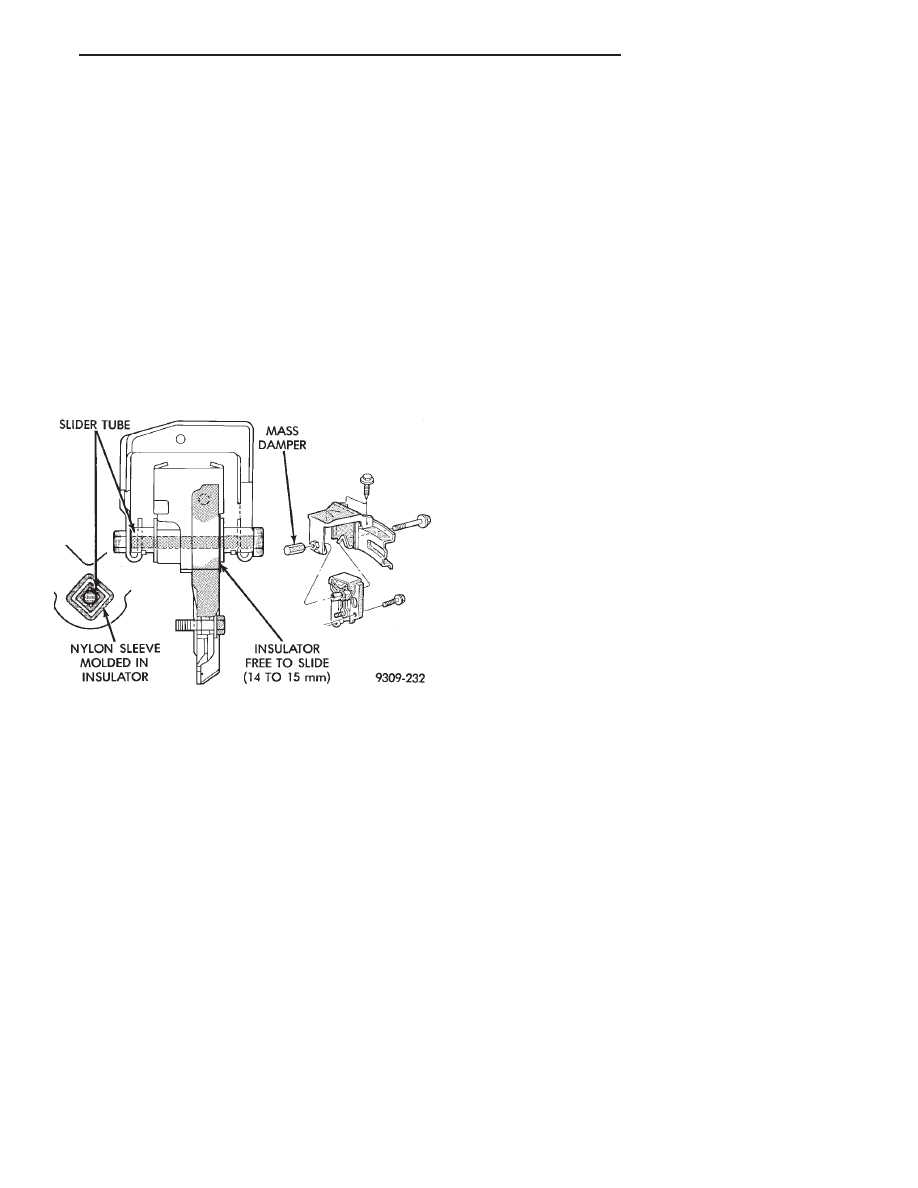
Left engine mount insulator is sleeved over

shaft and long support bolt to provide lateral
movement adjustment with engine weight re-
moved or not.

(3) Pry the engine right or left as required to achieve

the proper drive shaft assembly length. See Drive
Shaft in Suspension Group 2 for driveshaft identifica-
tion and related assembly length measuring.

(4) Tighten right engine mount insulator yoke nut to

102 N

Im (75 ft. lbs.). Then tighten front engine mount

screws and nuts to 54 N

Im (40 ft. lbs.) and center left

engine mount insulator.

(5) Recheck drive shaft length.

ENGINE ASSEMBLY

REMOVAL

(1) Disconnect battery.
(2) Mark hood position at hinges and remove hood.
(3) Drain cooling system. Refer to Cooling System,

Group 7 for procedure.

(4) Disconnect all electrical connections.
(5) Remove coolant hoses from radiator and engine.
(6) Remove radiator and fan assembly.
(7) See Fuel System, Group 14, to release fuel pres-

sure. Disconnect fuel lines and accelerator cable.

(8) Remove air cleaner assembly.
(9) Hoist vehicle and drain engine oil.
(10) Remove air conditioning compressor mounting

bolts and set compressor aside.

(11) Disconnect exhaust pipe at manifold.
(12) Remove transmission inspection cover and

mark flex plate to torque converter position. For disas-
sembly procedure for the all wheel drive vehicle refer to
Group 21 Transaxle.

(13) Remove screws holding torque converter to

flex plate and attach C-clamp on bottom of converter
housing to prevent torque converter from counting
out.

(14) Remove power steering pump mounting bolts

and set pump aside.

(15) Remove

two

lower

transmission

to

block

screws.

(16) Remove starter.
(17) Lower vehicles and disconnect vacuum lines

and ground strap.

(18) Install transmission holding fixture.
(19) Attach engine lifting hoist and support en-

gine.

(20) Remove upper transmission case to block

bolts.

(21) See Engine Mounting in (Fig. 3) and separate

mount/insulators as follows:

(a) Mark RIGHT insulator on right rails sup-

ports. Remove insulator to rails screws.

(b) Remove FRONT engine mount through bolt

and nut.

(c) Remove LEFT insulator through bolt from in-

side wheelhouse or insulator bracket to transmis-
sion screws.
(22) Remove engine.

INSTALLATION

(1) Attach hoist and lower engine into engine com-

partment.

(2) Align engine mounts and install but do not

tighten until all mounting bolts have been installed.
Tighten bolts to torque specified in (Fig. 3).

(3) Install transmission case to cylinder block,

tighten bolts to 102 N

Im (75 ft. lbs.) torque.

(4) Remove engine hoist and transmission holding

fixture.

(5) Remove C-clamp from torque converter hous-

ing. Align flex plate to torque converter and install
mounting screws. Tighten to 75 N

Im (55 ft. lb-

s.)torque. Refer to Group 21 transaxle for the all
wheel drive installation procedure.

(6) Install transmission inspection cover.
(7) Connect exhaust system at manifold.
(8) Install starter.
(9) Install power steering pump and air condition-

ing compressor. For belt installation see Accessory
Belt Drive in Cooling System Group 7.

(10) Lower vehicle and connect all vacuum lines.
(11) Connect all electrical connections including

ground strap.

(12) Connect fuel lines and accelerator cable.
(13) Install radiator and fan assembly. Reconnect

fan motor electrical lead. Reinstall radiator hoses.
Fill cooling system. See Cooling System Group 7 for
filling procedure.

(14) Fill engine crankcase with proper oil to cor-

rect level.

Fig. 4 Left Insulator Movement

Ä

3.3/3.8L ENGINE

9 - 101

(15) Install hood.
(16) Connect battery.
(17) Start engine and run until operating temper-

ature is reached.

(18) Adjust transmission or linkage if necessary.

ROCKER ARMS AND SHAFT ASSEMBLY

REMOVAL

(1) Remove upper intake manifold assembly. Refer

to Intake and Exhaust Manifolds, Group 11.

(2) Disconnect spark plug wires by pulling on the

boot straight out in line with plug.

(3) Disconnect closed ventilation system and evap-

oration control system from cylinder head cover.

(4) Remove cylinder head cover and gasket.
(5) Remove four rocker shaft bolts and retainers.
(6) Remove rocker arms and shaft assembly.
(7) If rocker arm assemblies are disassembled for

cleaning or replacement. Assemble rocker arms in
their original position.Refer to (Fig. 5) for rocker arm
for positioning on the shaft.

INSTALLATION

(1) Install rocker arm and shaft assemblies with

the stamped steel retainers in the four positions,
tighten to 28 N

Im (250 in. lbs.) (Fig. 5).

WARNING:

THE

ROCKER

ARM

SHAFT

SHOULD

BE

TORQUED

DOWN

SLOWLY,

STARTING WITH THE CENTERMOST BOLTS.
ALLOW 20 MINUTES TAPPET BLEED DOWN
TIME

AFTER

INSTALLATION

OF

THE

ROCKER SHAFTS BEFORE ENGINE OPERA-
TION.

(2) Clean cylinder head cover gasket surface. In-

spect cover for distortion and straighten if necessary.

(3) Clean head rail if necessary. Install a new gas-

ket and tighten cylinder head cover fasteners to 12
N

Im (105 in. lbs.).

(4) Install closed crankcase ventilation system and

evaporation control system.

(5) Install spark plug wires.
(6) Install upper intake manifold assembly. Refer to

Exhaust Systems and Intake Manifolds Group 11.

CYLINDER HEADS

The alloy aluminum cylinder heads shown in (Fig. 6)

are held in place by 9 bolts. The spark plugs are located
in peak of the wedge between the valves.

REMOVAL

(1) Drain cooling system refer to Cooling System

Group 7 for procedure and disconnect negative battery
cable.

Remove intake manifold, and throttle body. Refer to

Group 11 Exhaust System and Intake Manifold.

(2) Disconnect coil wires, sending unit wire, heater

hoses and by-pass hose.

(3) Remove closed ventilation system, evaporation

control system and cylinder head covers.

(4) Remove exhaust manifolds.
(5) Remove rocker arm and shaft assemblies. Re-

move push rods and identify to insure installation
in original locations.

(6) Remove the 9 head bolts from each cylinder head

and remove cylinder heads (Fig. 7).

Fig. 5 Rocker Arm Location Left Blank

Fig. 6 Cylinder Head Assembly

Fig. 7 Cylinder Head Bolts Location

9 - 102

3.3/3.8L ENGINE

Ä

INSPECTION

(1) Before cleaning, check for leaks, damage and

cracks.

(2) Clean cylinder head and oil passages.
(3) Check cylinder head for flatness (Fig. 8).
(4) Inspect all surfaces with a straightedge if there is

any reason to suspect leakage. If out of flatness exceeds
.019mm (.00075 inch). times the span length in inches
in any direction, either replace head or lightly machine
the head surface. As an example, if a 12 inch span is
1mm (.004 inch) out of flat, allowable is 12 x .019mm
(.00075 inch) equals .22mm (.009 in.) This amount of
out of flat is acceptable.

*Maximum of 0.2 mm (.008 inch) for grinding is

permitted.

CAUTION: This is a combined total dimension of
stock removal from cylinder head and block top
surface.

INSTALLATION

(1) Clean all surfaces of cylinder block and cylinder

heads.

(2) Install new gaskets on cylinder block (Fig. 9).
The Cylinder head bolts are torqued using the

torque yield method, they should be examined
BEFORE reuse. If the threads are necked down,
the bolts should be replaced 
(Fig. 10).

Necking can be checked by holding a scale or straight

edge against the threads. If all the threads do not
contact the scale the bolt should be replaced.

(3) Tighten the cylinder head bolts 1 thru 8 in the

sequence shown in (Fig. 11). Using the 4 step torque
turn method, tighten according to the following values:
• First-All to 61 NIm (45 ft. lbs.)

• Second-All to 88 NIm (65 ft. lbs.)

• Third-All (again) to 88 NIm (65 ft. lbs.)

• Fourth + 1/4 Turn Do not use a torque wrench
for this step

(4) Bolt torque after 1/4 turn should be over 122

N

Im(90 ft. lbs.). If not, replace the bolt.

(5) Tighten head bolt number 9 (Fig. 11) to 33 N

Im

(25 ft. lbs.) after head bolts 1 thru 8 have been tighten
to specifications.

(6) Inspect push rods and replace worn or bent rods.
(7) Install push rods, rocker arm and shaft assem-

blies with the stamped steel retainers in the four
positions, tighten to 28 N

Im (250 in. lbs.) (Fig. 12).

Fig. 8 Check Cylinder Head

Fig. 9 Head Gasket Installation

Fig. 10 Checking Bolts for Stretching (Necking)

Fig. 11 Cylinder Head Tightening Sequence

Ä

3.3/3.8L ENGINE

9 - 103

(8) Place new cylinder head cover gaskets in position

and install cylinder head covers. Tighten to 12 N

Im

(105 in. lbs.).

INTAKE MANIFOLD SEALING

The intake manifold gasket is a one-piece stamped

steel gasket with a sealer applied from the manufac-
turer. This gasket has end seals incorporated with it.

WARNING: INTAKE MANIFOLD GASKET IS

MADE OF VERY THIN METAL AND MAY CAUSE
PERSONAL INJURY, HANDLE WITH CARE.

(1) Clean all surfaces of cylinder block and cylinder

heads.

(2) Place a drop ( about 1/4 in. diameter) of Mopar

Silicone Rubber Adhesive Sealant or equivalent, onto
each of the four manifold to cylinder head gasket
corners (Fig. 13).

(3) Carefully install the intake manifold gasket (Fig.

14). Torque end seal retainer screws to 12 N

Im (105 in.

lbs.).

(4) Install intake manifold and (8) bolts and torque

to 1 N

Im (10 in. lbs.). Then tighten bolts to 22 NIm

(200 in. lbs.) in sequence shown in (Fig. 15). Then
tighten again to 22 N

Im (200 in. lbs.). After intake

manifold is in place, inspect to make sure seals

are in place. Refer to Group 11 Exhaust System and
Intake Manifold to complete Intake Manifold Assem-
bly.

(5) Install exhaust manifolds and tighten bolts to

27 N

Im (20 ft. lb.) and nuts to 20 NIm (15 ft. lbs.).

(6) Adjust spark plugs to specification in Electrical

Section, Group 8, and install the plugs.

VALVE SERVICE

VALVES AND VALVE SPRINGS

The valves are arranged in line in the cylinder

heads and inclined 18 degrees. The rocker shaft sup-
port are cast integral with the heads.

REMOVAL

(1) With cylinder head removed, compress valve

springs

using

Valve

Spring

Compressor

Tool

C-3422-B with adapter 6412 as shown in (Fig. 16).

(2) Remove valve retaining locks, valve spring re-

tainers, valve stem seals and valve springs.

Fig. 14 Intake Manifold Gasket Retainers

Fig. 15 Intake Manifold Removal and Installation

Fig. 12 Rocker Arm Shaft Retainers

Fig. 13 Intake Manifold Gasket Sealing

9 - 104

3.3/3.8L ENGINE

Ä


Content   ..  589  590  591  592   ..