Chrysler Le Baron, Dodge Dynasty, Plymouth Acclaim. Manual - part 229


  Index      Chrysler     Chrysler Le Baron, Dodge Dynasty, Plymouth Acclaim - service repair manual 1993 year


Search            


Content   ..  227  228  229  230   ..


Chrysler Le Baron, Dodge Dynasty, Plymouth Acclaim. Manual - part 229


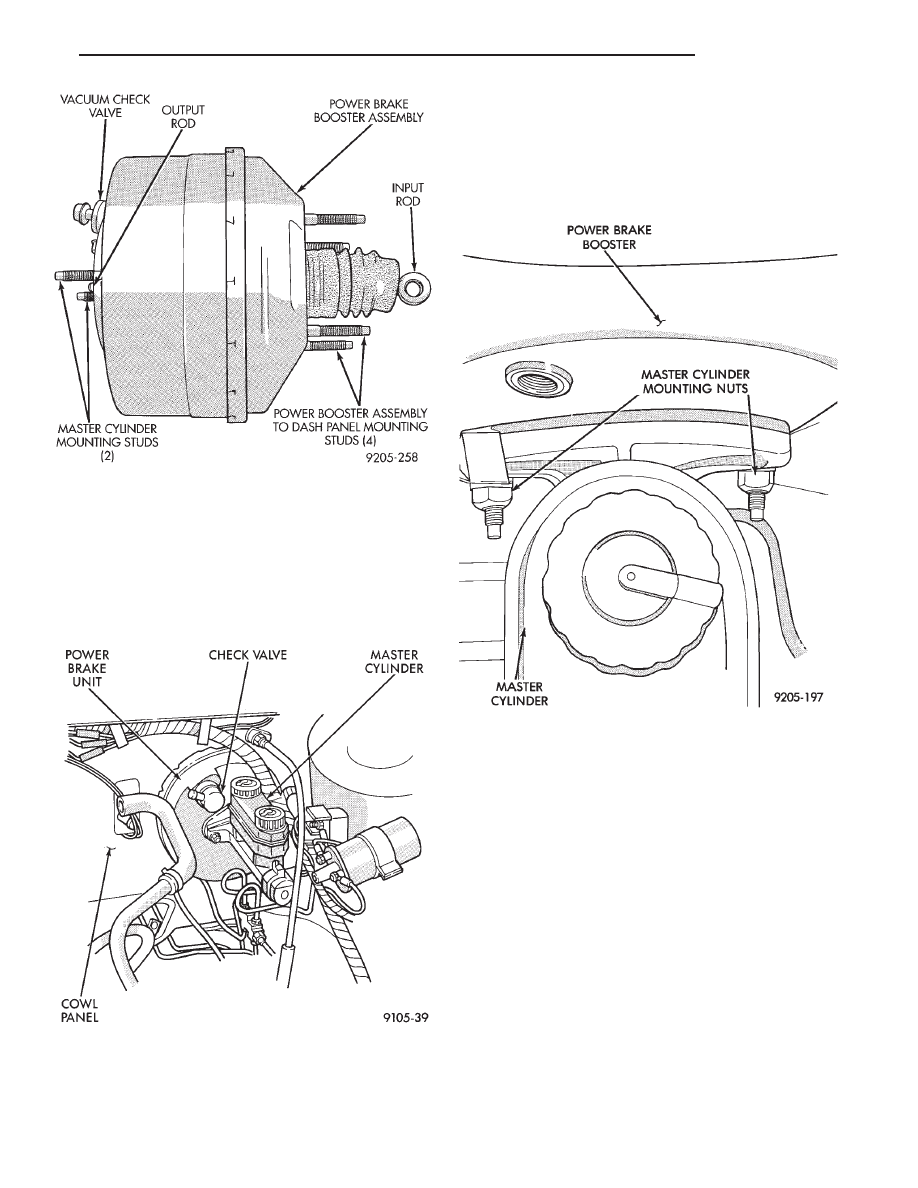
The power brake booster assembly mounts on the

engine side of the dash panel. It is externally con-
nected to the brake system by an input push rod to
the brake pedal. A vacuum line connects the power
booster to the intake manifold. The master cylinder
is bolted to the front of the power brake booster as-
sembly (Fig. 3).

SERVICE PROCEDURES

POWER BRAKE BOOSTER ASSEMBLY

REMOVE

(1) Remove the 2 nuts (Fig. 4) attaching master

cylinder assembly to power brake unit.

(2) Carefully slide master cylinder off mounting

studs with brake lines attached, and allow the assem-
bly to rest against fender shield.

(3) Disconnect vacuum hose from power brake

booster check valve (Fig. 1). DO NOT REMOVE
CHECK

VALVE

FROM

POWER

BRAKE

BOOSTER.

(4) From under instrument panel, position a small

screwdriver between the center tang on the power
brake booster input rod to brake pedal pin retaining
clip.

(5) Rotate screwdriver enough to allow retainer clip

center tang to pass over end of brake pedal pin and pull
retainer clip off pin. Discard retainer clip it is not
to be reused, replace only with a new retainer
clip.

(6) Remove the four nuts that attach the power

brake booster to the vehicle dash panel. Nuts are
accessible from under the dash panel in the area of the
steering column and pedal bracket (Fig. 5).

Fig. 2 Power Brake Booster Assembly

Fig. 3 Power Brake Mounting

Fig. 4 Master Cylinder Mounting

Ä

BRAKES

5 - 69

(7) Unfasten brackets on steel heater water line at

dash panel and left frame rail. On Manual Transmis-
sion vehicles, 
unfasten clutch cable bracket at shock
tower and move aside.

(8) Slide the power brake unit up and to the left

(mounting holes are slotted) on the dash panel, then
tilt inboard and up to remove.

CAUTION: Do not attempt to disassemble power
brake unit as this booster is serviced ONLY as a
complete assembly.

INSTALL

(1) Position power brake booster onto dash panel.
(2) Install and tighten the 4 power brake booster to

dash panel mounting nuts (Fig. 5) to 29 N

Im (250 in.

lbs.) torque.

(3) Install steel heater water line and clutch cable

bracket, if so equipped.

(4) Carefully position master cylinder on power

brake unit.

(5) Install and tighten the 2 master cylinder to

power booster mounting nuts (Fig. 4) to 29 N

Im (250

in. lbs.) torque.

(6) Connect vacuum hose onto the check valve, lo-

cated on the power brake unit.

(7) Using lubriplate, or equivalent, coat the bearing

surface of pedal pin (Fig. 5).

(8) Connect power brake booster input rod to brake

pedal pin and install a NEW retainer clip. Use only a
new retainer clip DO NOT USE the old clip.

(9) Check stop light operation.

WHEEL BEARINGS

FRONT WHEEL BEARINGS

Front wheel drive vehicles are equipped with per-

manently sealed front wheel bearings. There is no
periodic lubrication or maintenance recommended for
these units. However if during servicing of the brake
system, service to the front wheel bearing is required
refer to Group 2, Suspension in this service manual.

REAR WHEEL BEARINGS

NORMAL SERVICE

The lubricant in the rear wheel bearings should be

inspected whenever the hubs are removed to inspect
or service the brake system. Or at least every 30,000
miles (48,000 km). The bearings should be cleaned
and repacked with a High Temperature Multipurpose
E.P. Grease whenever the disc brake rotors are re-
surfaced.

INSPECTION

Check lubricant to see that it is adequate in quan-

tity and quality. If the grease is low in quantity, con-
tains dirt, appears dry or has been contaminated
with water, it will appear milky. The bearings then

must be cleaned and repacked. Do not add grease to
a wheel bearing that already has grease packed
in it. Relubricate completely. Mixing of different
types of greases in wheel bearings should be
avoided since it may result in excessive thinning
and leakage of the grease.

REMOVAL AND INSTALLATION

For the servicing, removal and installation of the

rear wheel bearings follow the procedure listed below.

(1) Remove the rear tire and wheel assembly.
(2) On rear disc brake equipped vehicles remove the

caliper and rotor. Support the caliper out of the way.
Do not allow the caliper to hang by the hydraulic
hose. 
See disc brake section in this group for caliper
removal procedure.

(3) Remove grease cap, cotter pin, nut lock, nut,

thrust washer and outer wheel bearing.

(4) Carefully slide hub or drum from spindle. Do not

drag inner bearing or grease seal over stub axle
(thread, bearing, and oil seal may be damaged.) Using
an appropriate tool remove the grease seal and inner
bearing from the drum or hub. Discard grease

Fig. 5 Power Brake Booster Mounting

5 - 70

BRAKES

Ä

seal, a new seal should be used when reinstalling the
inner bearing. (See Fig. 1)

(5) Thoroughly clean all old grease from the outer

and inner bearings, bearing cups and hub cavity (See
Fig. 1). To clean bearings, soak them in an ap-
propriate cleaning solvent. Strike the flat sur-
face

of

the

bearing

inner

race

against

a

hardwood block several times. Immerse the
bearings in solvent between the blows to jar
grease loose and wash old particles of hardened
grease from bearings. Repeat this operation un-
til bearings are clean. Bearings can be dried
using compressed air but do not spin the bear-
ings. After cleaning, oil the bearings with engine
oil. Insert the bearing into its appropriate cup,
apply pressure to the bearing while rotating it to
test them for pitting and roughness. Replace all
worn or defective bearings. If bearing shows

signs of pitting or roughness they should be
replaced. Bearings must be replaced as a set,
both the cup and the bearing need to be replaced
at the same time. If bearings are suitable for
further use, remove engine oil from bearings
using appropriate solvent and dry bearings. Re-
pack the bearings using a Multi-Purpose NLGI.
Grade 2 EP Grease such as Mopar or equivalent,
and place them in a clean covered container
until ready for installation. If a bearing packer is
not available, hand pack grease into all cavities
between bearing cage and rollers.

(6) If bearings and cups are to be replaced, remove

cups from the drum or hub using a brass drift or
suitable remover.

(7) Replace bearing cups with appropriate installing

tool.

(8) Install inner bearing in grease coated hub and

bearing cup, and install new grease seals using the
appropriate seal installer.

(9) Coat hub cavity and cup with grease.
(10) Before installing hub or drum assembly, inspect

stub axle and seal surface for burrs or roughness, and
smooth out all rough surfaces.

(11) Coat the stub axle with Multi-Purpose NLGI,

Grade 2 EP grease such as Mopar or equivalent.

(12) Carefully slide the hub of drum assembly onto

the stub axle. Do not drag seal or inner bearing
over the threaded area of the stub axle.

(13) Install outer bearing, thrust washer and nut.
(14) Tighten the wheel bearing adjusting nut to 27 to

34 N

Im (240 to 300 in. lbs.) while rotating hub or drum

assembly. This seats the bearings.

(15) Back off adjusting nut 1/4 turn (90°) then

tighten adjusting nut only finger tight.

(16) Position the nut lock over the bearing adjusting

nut with one pair of slots in line with the cotter pin hole
in the stub axle, and install cotter pin.

(17) Install the grease caps and the wheel and tire

assemblies. Tighten wheel stud nuts to 115 N

Im (85 ft.

lbs.) on all models. reinstall wheel covers if so
equipped.

Fig. 1 Rear Wheel Bearings

Ä

BRAKES

5 - 71

ANTI-LOCK BRAKE SYSTEM—BENDIX ANTI-LOCK 10 AC/Y BODY

INDEX

page

page

ABS Brake System Diagnostic Features

. . . . . . . 92

ABS Braking System Diagnosis

. . . . . . . . . . . . . . 87

ABS Controller Anti-Lock Brake (CAB) Service

Precautions

. . . . . . . . . . . . . . . . . . . . . . . . . . . 88

ABS Equipped Vehicle Performance

. . . . . . . . . . 75

ABS Hydraulic Circuits and Valve Operation

. . . . 85

ABS System Diagnostic Connector

. . . . . . . . . . . 82

ABS System General Service Precautions

. . . . . . 88

ABS System Self-Diagnostics

. . . . . . . . . . . . . . . 75

ABS Warning Systems Operation

. . . . . . . . . . . . 75

Anti-Lock Brake System Components

. . . . . . . . . 76

Anti-Lock Brake System Definitions

. . . . . . . . . . . 72

Anti-Lock Operation and Performance

. . . . . . . . . 73

Anti-Lock System Relays and Warning Lamps

. . . 82

Controller Anti-Lock Brake (CAB)

. . . . . . . . . . . . . 80

Electronic Components

. . . . . . . . . . . . . . . . . . . 103

General Information

. . . . . . . . . . . . . . . . . . . . . . . 72

General Service Precautions

. . . . . . . . . . . . . . . . 93

Major ABS Components

. . . . . . . . . . . . . . . . . . . 73

Mechanical Diagnostics and Service Procedures

89

Normal Braking System Function

. . . . . . . . . . . . . 72

On Car Hydraulic ABS Component Service

. . . . . 93

GENERAL INFORMATION

The purpose of the Anti-Lock Brake System (ABS)

is to prevent wheel lock-up under heavy braking con-
ditions on virtually any type of road surface. Anti-
Lock Braking is desirable because a vehicle which is
stopped without locking the wheels will retain direc-
tional stability and some steering capability. This al-
lows the driver to retain greater control of the
vehicle during heavy braking.

ANTI-LOCK BRAKE SYSTEM DEFINITIONS

In this section of the manual several abbreviations

are used for the components that are in the Anti-
Lock Braking System They are listed below for your
reference.
• CAB—Controller Anti-Lock Brake

• ABS—Anti-Lock Brake System

• PSI—Pounds per Square Inch (pressure)

• WSS—Wheel Speed Sensor

NORMAL BRAKING SYSTEM FUNCTION

Under normal braking conditions, the ABS System

functions much the same as a standard brake system
with a diagonally split master cylinder. The primary
difference is that power assist is provided by hydrau-
lic power assist instead of the conventional vacuum
assist.

If a wheel locking tendency is noticed during a

brake application, the system will enter Anti-Lock
mode. During Anti-Lock braking, hydraulic pressure
in the four wheel circuits is modulated to prevent
any wheel from locking. Each wheel of the vehicle
has a set of electrical solenoid valves and hydraulic
line to provide hydraulic modulation. For vehicle sta-
bility, though both rear wheel valves receive the
same electrical signal. The system can build, hold or
reduce pressure at each wheel of the vehicle. This is
determined by the signals generated by the wheel

Four-Wheel Anti-Lock Brake System

5 - 72

ANTI-LOCK 10 BRAKE SYSTEM

Ä


Content   ..  227  228  229  230   ..