Volvo V90 Recharge Plug-in Hybrid (2021 year). Manual in english - page 29
 

  Index      Manuals     Volvo V90 Recharge Plug-in Hybrid (2021 year). Manual in english


Search            copyright infringement  


Content      ..     27      28      29      30     ..


Volvo V90 Recharge Plug-in Hybrid (2021 year). Manual in english - page 29


||

STARTING AND DRIVING

* Option/accessory.

494

Related information

Extendable and retractable towbar

*

(p. 495)

Driving with a trailer (p. 497)

Towbar-mounted bicycle rack

*

 (p. 501)

Specifications for towbar

*

 (p. 494)

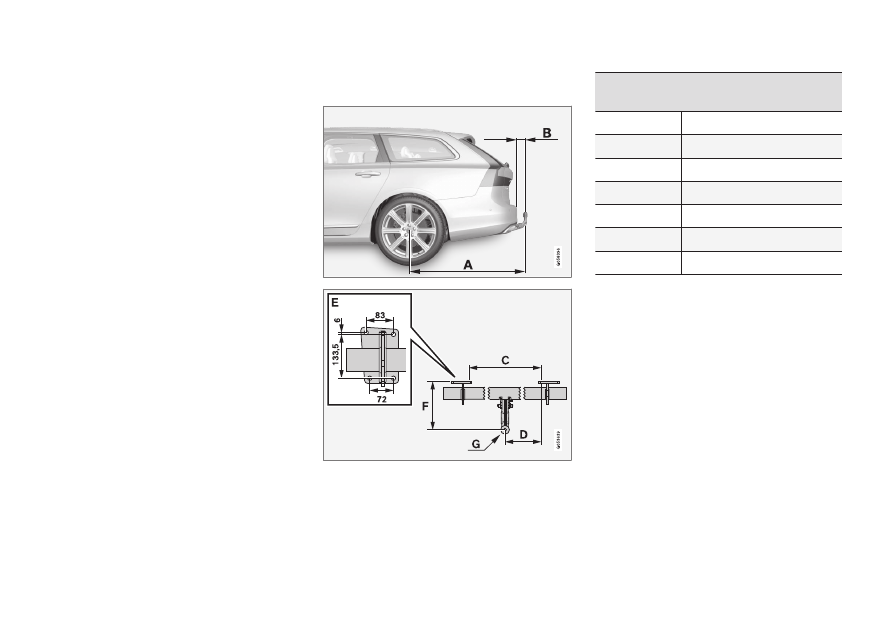
Specifications for towbar

*

Dimensions and mounting points for towbar.

Dimensions, mounting points in mm
(inches)

A

1229 (48.4)

B

111.8 (4.4)

C

875 (34.4)

D

437.5 (17.2)

E

See the image above

F

310.5 (12.2)

G

Ball centre

Related information

Towbar

*

 (p. 493)

Towing capacity and towball load
(p. 676)

-------------------------------------------------------------------------------------------------------------------------------------------------------------

STARTING AND DRIVING

}}

* Option/accessory.

495

Extendable and retractable

towbar

*

The retractable tow hook is easy to retract or
extend as required. In the retracted position,
the towbar is completely concealed.

WARNING

Follow the instructions for retracting and

extending the towbar carefully.

WARNING

Do not press the extend/retract button if a

trailer or accessory is attached to the tow

bar.

Extending the towbar

WARNING

Avoid standing close to the bumper in the

centre behind the car when extending the

towing hitch.

1.

Open the tailgate. A button for extending/
retracting the towbar is located on the
right-hand side at the rear of the cargo
area. An indicator lamp in the button must
illuminate with a constant orange glow for
the extension function to be active.

2. Press and release the button – extension

might not start if the button is pressed for
too long.

> The towbar extends out and down in an

unlocked position - the indicator lamp
flashes orange. The tow hook is ready
to continue moving to the locked posi-
tion.

-------------------------------------------------------------------------------------------------------------------------------------------------------------

||

STARTING AND DRIVING

496

3.

Move the towbar to its end position,
where it is secured and locked in place -
the indicator lamp illuminates with a con-
stant orange glow.
> The towbar is ready for use.

IMPORTANT

When the tow bar is activated by pressing
a key and has been placed in the unlocked
position:

Wait at least 2 seconds before the tow bar
is moved to the locked position. If the tow
bar does not remain in the locked position,
wait another few seconds and try again.

Do not kick the tow bar.

WARNING

Take care to secure the trailer's safety

cable in the intended bracket.

NOTE

Power save mode activates after a while
and the indicator lamp goes out. The sys-
tem is reactivated by closing and opening
the tailgate. This applies when retracting or
extending the towbar.

If the car detects a connected trailer elec-
trically, the indicator lamp stops illuminat-
ing with a constant glow.

Retracting the towbar

IMPORTANT

Make sure that there is no plug or adapter
in the electrical socket when retracting the
towbar.

1. Open the tailgate. Press and release the

button on the right-hand side at the rear of
the cargo area - retraction might not start
if the button is pressed for too long.
> The towbar automatically lowers in an

unlocked position - the indicator lamp
in the button flashes orange.

2.

Lock the towbar by moving it back to its
retracted position, where it is locked.
> The indicator lamp will now illuminate

with a constant glow if the towbar is
correctly retracted.

-------------------------------------------------------------------------------------------------------------------------------------------------------------

STARTING AND DRIVING

}}

* Option/accessory.

497

IMPORTANT

When the tow bar is activated by pressing
a key and has been placed in the unlocked
position:

Wait at least 2 seconds before the tow bar
is moved to the locked position. If the tow
bar does not remain in the locked position,
wait another few seconds and try again.

Do not kick the tow bar.

Related information

Driving with a trailer (p. 497)

Towbar

*

 (p. 493)

Driving with a trailer

When driving with a trailer, there are a num-
ber of points that are important to think about
regarding the towbar, the trailer and how the
load is positioned in the trailer.

Payload depends on the car's kerb weight. The
total of the weight of the passengers and all
accessories, e.g. towbar, reduces the car's
payload by a corresponding weight.

The car is supplied with the necessary equip-
ment for towing a trailer.

The car's towbar must be of an approved
type.

Distribute the load on the trailer so that
the weight on the towbar complies with
the specified maximum towball load. Tow-
ball load is calculated as part of the car's
payload.

Increase the tyre pressure to the recom-
mended pressure for a full load.

The engine is loaded more heavily than
usual when driving with a trailer.

Do not tow a heavy trailer when the car is
brand new. Wait until it has been driven at
least 1000 km (620 miles).

The brakes are loaded much more than
usual on long and steep downhill slopes.
Downshift to a lower gear when shifting
manually and adjust your speed.

Follow the regulations in force for the per-
mitted speeds and weights.

Maintain a low speed when driving with a
trailer up long, steep ascents.

The maximum indicated trailer weight only
applies to heights up to 1000 metres
above sea level (3280 ft). At higher eleva-
tions, the engine output and the vehicle's
climbing ability are reduced due to the
reduced air density, and the maximum
trailer load must therefore be reduced. The
weight of the car and trailer must be
decreased by 10% for each additional
1000 m (3280 ft) or part thereof.

Avoid driving with a trailer on inclines of
more than 12%.

NOTE

Extreme weather conditions, driving with a
trailer or driving at high altitudes, in combi-
nation with poorer fuel quality than recom-
mended, are factors that considerably
increase the car's fuel consumption.

Trailer connector

An adapter is required if the car's towbar has a
13 pin connector and the trailer has a 7 pin
connector. Use an adapter approved by Volvo.
Make sure the cable does not drag on the
ground.

-------------------------------------------------------------------------------------------------------------------------------------------------------------

||

STARTING AND DRIVING

* Option/accessory.

498

IMPORTANT

When the engine is switched off, the con-
stant battery voltage to the trailer connec-
tor can be switched off automatically so as
not to drain the starter battery.

Trailer weights

WARNING

Follow the stated recommendations for

trailer weights. Otherwise, the car and

trailer may be difficult to control in the

event of sudden movement and braking.

NOTE

The stated maximum permitted trailer
weights are those permitted by Volvo.
National vehicle regulations can further
limit trailer weights and speeds. Towbars
can be certified for higher towing weights
than the car can actually tow.

Level control

*

The car's system for level control endeavours
to maintain a constant height regardless of
load (up to the maximum permissible weight).
When the car is stationary the rear of the car
lowers slightly, which is normal.

When driving in hilly terrain and hot
climates

Under certain circumstances, there may be a
risk of overheating when towing a trailer. If the
engine and drive system overheats, a warning
symbol comes on in the driver display and a
message is displayed.

The automatic gearbox adapts the gears
depending on load and engine speed.

Steep inclines

Do not lock the automatic gearbox in a higher
gear than the engine "can cope with" - it is not
always a good idea to drive at a high gear with
low engine speed.

Parking on a hill

1. Depress the brake pedal fully.

2. Activate the parking brake.

3. Select gear position 

P

.

4. Release the brake pedal.

Block the wheels with chocks when parking a
car with hitched trailer on a hill.

Starting on a hill

1. Depress the brake pedal fully.

2. Select gear position 

D

.

3. Releasing the parking brake.

4. Release the brake pedal and start driving

off.

Related information

Trailer stability assist

*

 (p. 499)

Checking trailer lamps (p. 500)

Towing capacity and towball load
(p. 676)

Overheating in the engine and drive sys-
tem (p. 490)

Adverse driving conditions for engine oil
(p. 680)

Extendable and retractable towbar

*

(p. 495)

-------------------------------------------------------------------------------------------------------------------------------------------------------------

STARTING AND DRIVING

* Option/accessory.

499

Trailer stability assist

*

The function of trailer stability assist (TSA

12

),

which is included in the stability system
ESC

13

, is to stabilise cars towing trailers in

situations where they begin snaking. The
function is available with towbar installation,
contact a Volvo dealer for more information.

Reasons for snaking

The snaking phenomenon can occur with any
car/trailer combination. Snaking normally
occurs at high speeds. However, there is a risk
of it occurring at lower speeds if the trailer is
overloaded or the load is improperly distrib-
uted, e.g. too far back.

In order for snaking to occur, there must be a
triggering factor, e.g.:

Car with trailer subjected to a sudden and
powerful side wind.

Car with trailer drives on an uneven road
surface or in a pothole.

Sweeping steering wheel movements.

If snaking has started, it could be difficult or
even impossible to suppress. This makes the
car/trailer combination difficult to control and
there is a risk that you could, for example, end
up in the wrong lane or leave the carriageway.

Trailer stability assist function

The trailer stability assist function continually
monitors the car's movements, particularly lat-
eral movements. If snaking is detected, the
front wheels are individually braked. This
serves to stabilise the car/trailer combination.
This is often enough to help the driver regain
control of the car.

If snaking is not eliminated the first time that
trailer stability assist intervenes, the car/trailer
combination is braked with all wheels and
engine power is reduced. Once snaking has
been gradually suppressed and the car/trailer
combination is stable once again, the system
stops regulating and the driver once again has
full control of the car.

NOTE

The stability function is deactivated if the
driver chooses to activate 

ESC Sport

Mode

 via the menu system in the centre

display.

Trailer stability assist may fail to intervene if
the driver uses severe steering wheel move-
ments to try to rectify the snaking because in
such a situation the system cannot determine
whether it is the trailer or the driver causing
the snaking.

When Trailer Stability Assist
(TSA) is operating, the ESC
symbol flashes in the driver
display.

NOTE

Retrofitting a towbar requires an update of
the car's software, contact a Volvo dealer.

Related information

Driving with a trailer (p. 497)

Electronic stability control (p. 291)

12

Trailer Stability Assist

13

Electronic Stability Control

-------------------------------------------------------------------------------------------------------------------------------------------------------------

STARTING AND DRIVING

* Option/accessory.

500

Checking trailer lamps

When connecting a trailer - check that all the
trailer lamps work before departure.

Direction indicators and brake lights
on the trailer

If one or more of the trailer's direction indica-
tors or brake light bulbs is broken, the driver
display shows a symbol and a message. Other
lights on the trailer must be checked manually
by the driver before setting off.

Symbol Message

Trailer turn indicator


Right

turn indicator malfunction

Trailer turn indicator


Left

turn indicator malfunction

Trailer brake light


Malfunc-

tion

If any lamp for the trailer's direction indicators
is broken, the driver display symbol for direc-
tion indicators will also flash more quickly than
normal.

Rear fog lamp on trailer

When connecting the trailer, the rear fog lamp
may not light up on the car. In such cases, the
rear fog lamp function switches to the trailer.
Upon activation of the rear fog lamp, check

therefore that the trailer is equipped with a
rear fog lamp to travel safely.

Checking trailer lamps

*

Automatic checking

After a trailer is connected electrically, it is
possible to check that the trailer lamps are
working via an automatic lamp activation. The
function helps the driver check that the trailer
lamps are working before starting off.

The car must be switched off to perform the
check.

1. When a trailer is connected to the towbar,

the 

Automatic Trailer Lamp Check

 mes-

sage is shown in the driver display.

2. Confirm the message by pressing the

right-hand steering wheel keypad's 

O

 but-

ton.
> The lamp check starts.

3. Exit the car to check lamp functionality.

> All trailer lamps start to flash - then the

lamps are switched on one at a time.

4. Visually check that all lamps available on

the trailer are operational.

5. After a moment, all lamps on the trailer

flash again.
> The check is complete.

Switching off automatic checking

The automatic checking function can be
switched off in the centre display.

1. Press 

Settings

 in the top view.

2. Press 

My Car

Lights and Lighting

.

3. Deselect 

Automatic Trailer Lamp

Check

.

Manual checking

If the automatic checking is switched off then
it is possible to start the check manually.

1. Press 

Settings

 in the top view.

2. Press 

My Car

Lights and Lighting

.

3. Select 

Manual Trailer Lamp Check

.

> The lamp check starts. Exit the car to

check lamp functionality.

Related information

Driving with a trailer (p. 497)

-------------------------------------------------------------------------------------------------------------------------------------------------------------

STARTING AND DRIVING

* Option/accessory.

501

Towbar-mounted bicycle rack

*

When using a bicycle rack, the bicycle racks
that Volvo has developed are recommended.

This is in order to avoid damage to the car and
in order to achieve the maximum possible
safety during a journey. Volvo's bicycle racks
are available for purchase at authorised Volvo
dealers.

Carefully follow the instructions enclosed with
the bicycle rack.

Bicycle rack including load must weigh a
maximum of 75 kg (165 pounds).

The bicycle rack may be designed for a
maximum of three bicycles.

WARNING

Incorrect use of the bicycle rack may cause

damage to the towbar and car.
The bicycle rack can loosen from the tow-

bar if it

is incorrectly fitted on the towball

is overloaded, see the bicycle rack's
instructions for maximum load weight

is used for carrying something other
than bicycles.

The car's driving characteristics are affected
when a bicycle rack is fitted on the towbar.
For example due to:

increased weight

reduced acceleration capacity

reduced ground clearance

changed braking capacity.

Recommendations for loading
bicycles on the bicycle rack

The larger the distance between the load's
centre of gravity and the towball, the greater
the load on the towbar.

Load according to the following recommenda-
tions:

Fit the heaviest bicycle furthest in, closest
to the car.

Keep the load symmetrical and as close to
the centre of the car as possible e.g. by
loading the bicycles facing alternately if
several bicycles are loaded.

Remove loose objects from the bicycle for
transportation, e.g. bicycle basket, battery,
child seat. Partly to reduce the load on the
towbar and bicycle rack, and partly to
reduce the wind resistance, which affects
fuel consumption.

Do not use protective covers on the bicy-
cles. This may affect manoeuvrability,
impair visibility and increase fuel con-

sumption. It may also lead to an increased
load on the towbar.

Related information

Towbar

*

 (p. 493)

-------------------------------------------------------------------------------------------------------------------------------------------------------------

STARTING AND DRIVING

502

Towing

During towing, the car is towed by another
vehicle by means of a towline.

Towing the car is not permitted as this will
damage the electric motor. Instead, the car
must be transported raised with all the wheels
on a recovery vehicle's platform, neither of the
wheel pairs may have road contact.

When towing another car

Towing a car requires a lot of energy - use the

Constant AWD

 drive mode. This then

charges the hybrid battery, in combination
with improving the car's driving characteristics
and roadholding.

Find out the statutory maximum speed limit
for towing before the towing begins.

Jump starting

Tow-starting the motor is not permitted as
this will damage the electric motor. Use a
donor battery if the starter battery is dis-
charged and the engine does not start.

IMPORTANT

The electric drive motor and the catalytic
converter may be damaged during
attempts to tow-start the car.

Related information

Fitting and removing the towing eye
(p. 502)

Hazard warning flashers (p. 159)

Recovery (p. 503)

Using jump starting with another battery
(p. 492)

Selecting ignition mode (p. 453)

Gearbox (p. 464)

Fitting and removing the towing

eye

Use the towing eye if the car shall tow
another vehicle. The towing eye is screwed
into a threaded socket behind a cover on the
right-hand side of the rear bumper.

NOTE

If the car is equipped with a towbar, there
is no rear mounting for a towing eye.

Fitting the towing eye

Take out the towing eye from the foam
block under the floor in the cargo area

14

.

14

The shape and location of the foam block may vary depending on car model.

-------------------------------------------------------------------------------------------------------------------------------------------------------------

STARTING AND DRIVING

}}

* Option/accessory.

503

Remove the cover – press on the marking
with a finger while you fold out the oppo-
site side/corner.
> The cover pivots around its centre line

and can then be removed.

3. Screw in the towing eye until it reaches its

end stop.

Screw the eye in firmly. For example,
thread through the wheel bolt wrench

*

 and

use it as a lever.

IMPORTANT

It is important that the towing eye is firmly
screwed into place - right in until it stops.

Removing the towing eye

Unscrew and remove the towing eye after
use and return it to its foam block.

Finish by refitting the cover onto the
bumper.

Related information

Towing (p. 502)

Recovery (p. 503)

Tool kit (p. 581)

Recovery

For recovery, the car is taken away with the
help of another vehicle.

Call a recovery service for recovery assistance.

The towing eye can be used to pull the car up
onto a recovery vehicle with a flatbed plat-
form.

IMPORTANT

Note that the car must always be transpor-
ted raised up with all the wheels on the
recovery vehicle's platform.

Applies to cars with level control

*

: If the car

is equipped with air suspension, this must be
disabled before the car is raised. Deactivating
the function via the centre display.

1. Press 

Settings

 in the top view.

2. Press 

My Car

Parking Brake and

Suspension

.

3. Select 

Disable Leveling Control

.

The car's position and ground clearance deter-
mine whether it is possible to pull it up onto a
flatbed platform. If the slope of the recovery
vehicle's ramp is too steep, or if the ground
clearance under the car is inadequate, then
the car may be damaged if you try to pull it up.
The car should then be lifted using the recov-
ery vehicle's lifting device.

-------------------------------------------------------------------------------------------------------------------------------------------------------------

||

STARTING AND DRIVING

* Option/accessory.

504

WARNING

No one/nothing is allowed to remain

behind the recovery vehicle while the car

pulled up onto the flatbed platform.

Related information

Fitting and removing the towing eye
(p. 502)

HomeLink

®

*

15

HomeLink

®

16

 is a programmable remote con-

trol, integrated in the car's electrical system,
which can remotely control up to three differ-
ent devices (e.g. garage door opener, alarm
system, outdoor and indoor lighting) and
thereby replace the remote controls for them.

General

The figure is schematic - the version may vary.

Button 1

Button 2

Button 3

Indicator lamp

HomeLink

®

 is supplied built-in to the interior

rearview mirror. The HomeLink

®

 panel con-

sists of three programmable buttons and one
indicator lamp in the mirror glass.

For more information about HomeLink

®

, visit

homelink.com or call 00 8000 466 354 65
(or the toll number +49 6838 907 277)

17

.

Save the original remote controls for future
programming (e.g. when changing to another
car or for use in another vehicle).

IMPORTANT

The programming for the buttons should
be deleted when the car is sold.

Related information

Using HomeLink

®

*

 (p. 507)

Programming HomeLink

®

*

 (p. 505)

Type approval for HomeLink

®

*

 (p. 507)

15

Applies to certain markets.

16

HomeLink and the HomeLink house symbol are registered trademarks of Gentex Corporation.

17

Note that the toll-free number may not be available depending on operator.

-------------------------------------------------------------------------------------------------------------------------------------------------------------

STARTING AND DRIVING

}}

* Option/accessory.

505

Programming HomeLink

®

*

18

Follow these instructions to program
HomeLink

®

, reset all programming or repro-

gram individual buttons.

NOTE

In certain vehicles the ignition must be
switched on or in "accessory position"
before HomeLink

®

 can be programmed or

used. If possible, fit new batteries in the
remote control that shall be replaced by
HomeLink

®

 for faster programming and

improved transmission of the radio signal.
The HomeLink

®

 buttons should be reset

before programming.

WARNING

While programming HomeLink

®

, the

garage door or gate being programmed

may activate. For this reason, make sure

that nobody is in the vicinity of the door or

gate while programming is in progress. The

car should be outside the garage while a

garage door opener is being programmed.

1. Aim the remote control towards the

HomeLink

®

 button to be programmed and

hold it approx. 2-8 cm (approx. 1-3 inches)
from the button. Do not obstruct the indi-
cator lamp on HomeLink

®

.

Note:

 The ability of some remote controls

to program HomeLink

®

 is improved at a

distance of approx. 15-20 cm (approx.
6-12 inches). Bear this in mind if problems
occur with the programming.

2. Press and hold depressed both the button

on the remote control and the button to be
reprogrammed on HomeLink

®

.

3. Do not release the buttons until the indica-

tor lamp has switched from flashing
slowly (approx. once per second) to either
flashing quickly (approx. 10 times per sec-
ond) or illuminating with a constant glow.
>

If the indicator lamp illuminates with
a constant glow:

 Indication that the

programming has finished. Press the
programmed button twice to activate.

If the indicator lamp flashes quickly:

The device to be programmed to
HomeLink

®

 may have a security func-

tion that requires extra steps. Test by
pressing the programmed button twice
to see whether the programming is
working. Otherwise, continue with the
following steps.

18

Applies to certain markets.

-------------------------------------------------------------------------------------------------------------------------------------------------------------

||

STARTING AND DRIVING

* Option/accessory.

506

4. Locate programming button

19

 on the

receiver for the garage door or similar. It is
normally located close to the antenna's
bracket on the receiver.

5. Depress and release the receiver's pro-

gramming button once. The programming
must be completed within 30 seconds of
the button being depressed.

6. Press and release the button on

HomeLink

®

 that you want to program.

Repeat the sequence of pressing/holding/
releasing a second time and, depending
on the receiver model, even a third time.
> Programming is now be complete and

the garage door, gate or similar should
now be activated when the pro-
grammed button is depressed.

In the event of programming problems, con-
tact HomeLink

®

 at homelink.com, or call

00 8000 466 354 65 (or the toll number
+49 6838 907 277)

20

.

Reprogramming individual buttons

To reprogram an individual HomeLink

®

 button,

proceed as follows:

1. Press the desired button and hold it

depressed for approx. 20 seconds.

2. Once the indicator lamp on HomeLink

®

starts to flash slowly, programming can
continue as normal.

Note:

 If the button to be reprogrammed is

not programmed with a new unit, it will
resume the previously saved program-
ming.

Resetting the HomeLink

®

 buttons

It is only possible to reset all of the HomeLink

®

buttons at the same time, not each button
individually. Individual buttons can only be
reprogrammed.

Press and hold depressed the outer but-
tons (1 and 3) on HomeLink

®

 for approx.

10 seconds.
> When the indicator lamp changes over

from a constant glow to starting to
flash, the buttons are reset and ready to
be reprogrammed.

Related information

Using HomeLink

®

*

 (p. 507)

HomeLink

®

*

 (p. 504)

Type approval for HomeLink

®

*

 (p. 507)

19

Button designation and colour varies between manufacturers.

20

Note that the toll-free number may not be available depending on operator.

-------------------------------------------------------------------------------------------------------------------------------------------------------------

STARTING AND DRIVING

* Option/accessory.

507

Using HomeLink

®

*

21

When HomeLink

®

 is fully programmed it can

be used in place of the separate original
remote controls.

Depress the programmed button. The garage
door, gate, alarm system or similar is activated
(may take a few seconds). If the button is
depressed for more than 20 seconds then the
reprogramming is started. The indicator lamp
illuminates or flashes when the button has
been depressed. Naturally the original remote
controls can still be used in parallel with
HomeLink

®

 if required.

NOTE

When the ignition has been switched off,
HomeLink

®

 works for at least 7 minutes.

NOTE

HomeLink

®

 cannot be used if the car is

locked and the alarm is armed

*

 from the

outside.

WARNING

If HomeLink

®

 is used to control a

garage door or gate, ensure that
nobody is near the door or gate while it
is in motion.

Do not use HomeLink

®

 for any garage

door that does not have safety stop
and safety reverse.

Related information

HomeLink

®

*

 (p. 504)

Programming HomeLink

®

*

 (p. 505)

Type approval for HomeLink

®

*

 (p. 507)

Type approval for HomeLink

®

*

22

Type approval for EU

Gentex Corporation hereby declares that
HomeLink

®

 Model UAHL5 complies with the

Radio equipment directive 2014/53/EU.

Wavelength within which the radio equipment
functions:

433.05MHz-434.79MHz <10mW E.R.P.

868.00MHz-868.60MHz <25mW E.R.P.

868.70MHz-868.20MHz <25mW E.R.P.

869.40MHz-869.65MHz <25mW E.R.P.

869.70MHz-870.00MHz <25mW E.R.P.

Certificate holder address: Gentex Corpora-
tion, 600 North Centennial Street, Zeeland MI
49464, USA

For more information, search support informa-
tion on type approval at volvocars.com

Related information

HomeLink

®

*

 (p. 504)

21

Applies to certain markets.

22

Applies to certain markets.

-------------------------------------------------------------------------------------------------------------------------------------------------------------

STARTING AND DRIVING

* Option/accessory.

508

Compass

*

The upper right-hand corner of the rearview
mirror has an integrated display that shows
the compass direction

23

 in which the front of

the car is pointing.

Rearview mirror with compass.

Eight different compass directions are shown
by their English abbreviations: 

N

 (north), 

NE

(north east), 

E

 (east), 

SE

 (south east), 

S

(south), 

SW

 (south west), 

W

 (west) and 

NW

(north west).

Related information

Activating and deactivating the compass

*

(p. 508)

Calibrating the compass

*

 (p. 508)

Activating and deactivating the

compass

*

The upper right-hand corner of the rearview
mirror has an integrated display that shows
the compass direction

24

 in which the front of

the car is pointing.

The compass is activated automatically when
the car is started.

To deactivate/activate the compass manually:

Depress the button on the underside of
the rearview mirror using e.g. a paper clip.
> If the compass is deactivated when the

car is switched off, it will not be acti-
vated the next time the car is started. In
this case, the compass needs to be
activated manually.

Related information

Compass

*

 (p. 508)

Calibrating the compass

*

 (p. 508)

Calibrating the compass

*

The earth is divided into 15 magnetic zones.
The compass

25

 should be calibrated if the car

is moved between several magnetic zones.

1. Stop the car in a large open area free from

steel structures and high-voltage power
lines.

2. Start the car and switch off all electrical

equipment (air conditioning, wipers, etc.)
and ensure that all doors are closed.

NOTE

Calibration may fail or not start at all if
electrical equipment is not switched off.

3. Hold the button on the underside of the

rearview mirror depressed for
approx. 3 seconds (use a paper clip, for
example). The number for the current
magnetic zone is shown.

23

A rearview mirror with a compass is available as an option on certain markets and models only.

24

A rearview mirror with a compass is available as an option on certain markets and models only.

25

A rearview mirror with a compass is available as an option on certain markets and models only.

-------------------------------------------------------------------------------------------------------------------------------------------------------------

STARTING AND DRIVING

* Option/accessory.

509

Magnetic zones.

4. Press the button repeatedly until the

required magnetic zone (

1–15

) is shown.

See the map of magnetic zones for the
compass.

5. Wait until the display returns to showing

the character 

C

, or hold the button on the

underside of the rearview mirror
depressed for approx. 6 seconds until the
character 

C

 is shown.

6. Drive slowly in a circle at a speed of no

more than 10 km/h (6 mph) until a com-
pass direction is shown in the display,
indicating that calibration is complete.
Then drive a further 2 circles to fine-tune
calibration.

7.

Cars with heated windscreen

*

:

 If the

character 

C

 is shown in the display when

the heated windscreen is activated, per-
form the calibration in accordance with
point 6 above with the heated windscreen
activated.

8. Repeat the above procedure as necessary.

Related information

Compass

*

 (p. 508)

Activating and deactivating the compass

*

(p. 508)

-------------------------------------------------------------------------------------------------------------------------------------------------------------


Content      ..     27      28      29      30     ..