Volvo S90 Twin Engine (2020 year). Manual in english - page 9
 

  Index      Manuals     Volvo S90 Twin Engine (2020 year). Manual in english


Search            copyright infringement  


Content      ..     7      8      9      10     ..


Volvo S90 Twin Engine (2020 year). Manual in english - page 9


LIGHTING

153

WARNING

This system help to save energy - it cannot

determine in all situations when daylight is

too weak or sufficiently strong, e.g. in mist

and rain.
The driver is always responsible for ensur-

ing that the car is driven with the correct

beam pattern for the traffic situation and in

accordance with applicable traffic regula-

tions.

Related information

Lighting control (p. 150)

Ignition positions (p. 436)

Dipped beam (p. 153)

Dipped beam

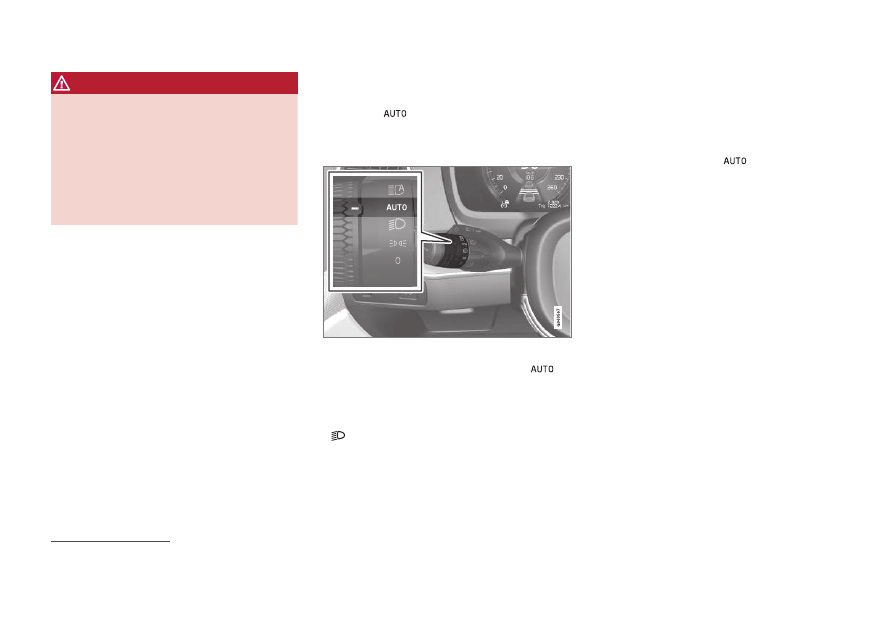
When driving with the stalk switch's rotating
ring in the 

 position, dipped beam is

activated automatically in weak daylight or
darkness or when the car's electrical system
is in ignition position 

II

.

Stalk switch rotating ring in 

AUTO

 position.

With the stalk switch's rotating ring in 
position, dipped beam is also activated auto-
matically if the rear fog lamp is activated.

With the stalk switch's rotating ring in the

 position, dipped beam is always acti-

vated when the car's electrical system is in
ignition position 

II

.

Tunnel detection

The car detects when it is driven into a tunnel
and switches from daytime running lights to
dipped beam.

Note that the rotating ring in the left-hand
stalk switch must be in 

 mode for tunnel

detection to work.

Related information

Lighting control (p. 150)

Ignition positions (p. 436)

Daytime running lights (p. 152)

1

Daytime Running Lights

-------------------------------------------------------------------------------------------------------------------------------------------------------------

LIGHTING

154

Using main beam

Main beam is operated with the left-hand
stalk switch. Main beam is the car's stron-
gest lighting and should be used when driv-
ing in the dark for better visibility, as long as
it does not dazzle other road users.

Steering wheel stalk switch with rotating ring.

Main beam flash

Move the stalk switch backwards slightly
to main beam flash position. Main beam
comes on until the stalk switch is
released.

Main beam

Main beam can be activated when the
steering wheel stalk switch's rotating ring
is in position 

2

 or 

. Activate

main beam by moving the stalk switch for-
wards.
Deactivate by moving the stalk switch
backwards.

When main beam has been activated the

 symbol illuminates in the driver display.

Related information

Lighting control (p. 150)

Active main beam (p. 154)

Active main beam

Active main beam is a function which uses a
camera sensor at the top edge of the wind-
screen to detect the headlamp beams from
oncoming traffic or the rear lights of vehicles
in front, and then switches from main beam
to dipped beam.

The symbol 

 represents active main beam.

The function can start while driving in the dark
when the car's speed is approx. 20 km/h
(approx. 12 mph) or higher. The function can
also take streetlights into account. When the
camera sensor no longer detects any oncom-
ing car or car in front, main beam is switched
on again after about a second.

2

When dipped beam is activated.

-------------------------------------------------------------------------------------------------------------------------------------------------------------

LIGHTING

}}

* Option/accessory.

155

Activate active main beam

Active main beam is activated and deactivated
by turning the left-hand stalk switch to posi-
tion 

. The rotating ring then returns to

position 

. When active main beam is

activated, the symbol 

 illuminates with a

white glow in the driver display. When main
beam is activated, the symbol shines blue.

If active main beam is deactivated while main
beam is on, the lighting is immediately reset to
dipped beam.

Adaptive functionality

For cars with LED

3

 headlamps

*

, active main

beam has adaptive functionality

4

. In this case,

unlike what happens during conventional dim-
ming, the light beam continues to illuminate
with main beam on both sides of oncoming
traffic or vehicles ahead – only the part of the
light beam that points directly to the vehicle is
dimmed.

Adaptive functionality: Dipped beam directly towards

oncoming vehicle, but continued main beam on both

sides of the vehicle.

The main beam is partly dimmed, i.e. if the
light beam shines with slightly more than
dipped beam, the symbol 

 in the driver

display shines blue.

Limitations for active main beam

The camera sensor on which the function is
based has limitations.

If this symbol is shown in the driver
display, together with the message

Active High Beam


Temporarily

unavailable

, then switching

between main and dipped beam must be per-
formed manually. The 

 symbol extin-

guishes when these message are shown.

The same applies if this symbol is
shown together with the message

Windscreen sensor


Sensor

blocked, see Owner's manual

.

Active main beam may be temporarily unavail-
able e.g. in situations with dense fog or heavy
rain. When active main beam becomes availa-
ble again, or the windscreen sensors are no
longer blocked, the message goes out and the

 symbol illuminates.

WARNING

Active main beam is an aid for using the

optimum beam pattern when conditions

are favourable.
The driver always bears responsibility for

manually switching between main and

dipped beam when traffic situations or

weather conditions so require.

3

LED (Light Emitting Diode)

4

Depending on the car's equipment level.

-------------------------------------------------------------------------------------------------------------------------------------------------------------

||

LIGHTING

156

Related information

Lighting control (p. 150)

Using main beam (p. 154)

Limitations for camera and radar unit
(p. 337)

Using direction indicators

The car's direction indicators are operated
with the left-hand stalk switch. The direction
indicator lamps flash three times or continu-
ously, depending on how far up or down the
stalk switch is moved.

Direction indicators.

Short flash sequence

Move the stalk switch up or down to the
first position and release. The direction
indicator lamps flash three times. If the
function is deactivated via the centre dis-
play, the lamps will flash once.

NOTE

This automatic flashing sequence can
be stopped by moving the stalk switch
immediately in the opposite direction.

If the symbol for direction indicators in
the driver display flashes more quickly
than normal - see the message in the
driver display.

Continuous flash sequence

Move the stalk switch up or down to its
end position.

The stalk switch remains in its position and is
moved back manually, or automatically by the
steering wheel movement.

Related information

Hazard warning flashers (p. 159)

Adjusting light functions via the centre
display (p. 151)

-------------------------------------------------------------------------------------------------------------------------------------------------------------

LIGHTING

}}

* Option/accessory.

157

Active bending lights

*

Active bending lights are designed to provide
additional illumination in bends and junctions.
Cars with LED

5

 headlamps

*

 can have active

bending lights, depending on the car's equip-
ment level.

Headlamp pattern with function deactivated (left)

and activated (right) respectively.

Active bending lights follow steering wheel
movements to provide additional illumination
in bends and junctions and can thereby pro-
vide the driver with improved visibility.

The function is activated automatically when
the car is started. In the event of a fault in the
function, the 

 symbol illuminates in the

driver display at the same time as the driver
display shows an explanatory text.

The function is only active in weak daylight or
darkness and only when the car is moving and
dipped beam is switched on.

Deactivating/activating the function

The function is activated when the car is sup-
plied from the factory and can be deactivated/
activated via the centre display's function
view.

Press the 

Active Bending

Lights

 button.

Related information

Adjusting light functions via the centre
display (p. 151)

Rear fog lamp

The rear fog lamp is considerably stronger
than the normal rear lights and should only be
used in reduced visibility due to fog, snow,
smoke or dust so that other road users have
an early warning of a vehicle ahead.

Button for rear fog lamp.

The rear fog lamp is a lamp at the rear of the
car, on the driver's side.

The rear fog lamp can only be switched on
when ignition position 

II

 is active and the

rotating ring on the stalk switch is in position

 or 

.

Press the button to switch the lights on/off.
The 

 symbol in the driver display illumi-

nates when the rear fog lamp is switched on.

5

LED (Light Emitting Diode)

-------------------------------------------------------------------------------------------------------------------------------------------------------------

||

LIGHTING

158

The rear fog lamp switches off automatically
when the car is switched off or when the
rotating ring on the stalk switch is set to the

 or 

 position.

NOTE

Regulations on the use of rear fog lamps
vary from country to country.

Related information

Lighting control (p. 150)

Ignition positions (p. 436)

Brake lights

The brake light automatically comes on dur-
ing braking.

The brake light is illuminated when the brake
pedal is depressed and when the car is braked
automatically by one of the driver support sys-
tems.

Related information

Emergency brake lights (p. 158)

Brake functions (p. 439)

Driving support systems (p. 280)

Emergency brake lights

Emergency brake lights are activated to alert
vehicles behind about heavy braking.

The function means that the brake light
flashes instead of - as in normal braking -
shining with a constant glow.

The emergency brake lights are activated dur-
ing heavy braking or if the ABS system is acti-
vated at high speeds.

After the driver brakes to a low speed and
then releases the brake, the brake light returns
to normal glow.

The car's hazard warning flashers are acti-
vated at the same time. These flash until the
driver accelerates the car to a higher speed
again or switches off the car's hazard warning
flashers.

Related information

Brake lights (p. 158)

Foot brake (p. 440)

Hazard warning flashers (p. 159)

-------------------------------------------------------------------------------------------------------------------------------------------------------------

LIGHTING

* Option/accessory.

159

Hazard warning flashers

Hazard warning flashers warn other road
users by means of all of the car's direction
indicators being activated simultaneously.
The function can be used to give a warning in
the event of traffic hazards.

Button for hazard warning flashers.

Press the button to activate the hazard warn-
ing flashers.

The hazard warning flashers are automatically
activated when the car brakes so powerfully
that the emergency brake lights are activated
and the speed is low. The hazard warning
flashers start to flash after the emergency
brake lights have stopped flashing and are
then deactivated automatically when the car
drives away again or are deactivated if the but-
ton is depressed.

NOTE

Regulations for the use of hazard warning
flashers may vary between countries.

Related information

Emergency brake lights (p. 158)

Using direction indicators (p. 156)

Using home safe lighting

Some of the exterior lighting can be kept
switched on to work as home safe lighting
after the car has been locked.

To activate the function:

1. Switch off the car.

2. Move the left-hand stalk switch forward

toward the instrument panel and release.

3. Get out of the car and lock the door.

> A symbol in the driver display is illumi-

nated to indicate that the function is
activated and outer lighting is switched
on: Position lamps, headlamp beams,
number plate lighting and lighting in
outer handles

*

.

The length of time that home safe lighting
remains on can be set via the centre display.

Related information

Adjusting light functions via the centre
display (p. 151)

Approach light duration (p. 160)

-------------------------------------------------------------------------------------------------------------------------------------------------------------

LIGHTING

* Option/accessory.

160

Approach light duration

Approach lighting is switched on when the
car is unlocked and is used to switch on the
car's lighting at a distance.

The function is activated when the remote
control key is used for unlocking. In daylight,
position lamps, interior roof lamps, floor lights
and cargo area lighting are activated. In weak
daylight or darkness, number plate lighting
and lighting in the outer handles are also acti-
vated

*

 with their light source aimed towards

the ground.

The lighting stays on for approx. 2 minutes if
no doors are opened. If a door is opened
within the activation time, the time for the
interior lighting and lighting in the outer han-
dles

*

 will be extended.

The function can be activated and deactivated
via the centre display.

Related information

Adjusting light functions via the centre
display (p. 151)

Using home safe lighting (p. 159)

Remote control key (p. 237)

Interior lighting

The passenger compartment is equipped
with several types of lighting, e.g. general
interior lighting, adjustable decor illumination
and lock lighting.

All lighting in the passenger compartment can
be switched on and off manually at least
5 minutes from when:

the car has been switched off and its elec-
trical system is in ignition position 

0

the car has been unlocked, but it has not
yet been started.

Front roof lighting

Controls in roof console for the front reading lamps

and passenger compartment lighting.

Reading lamp, left-hand side

Passenger compartment lighting

Auto function for passenger compartment
lighting
Reading lamp, right-hand side

Reading lighting

The reading lamps on the right and left-hand
sides can be turned on and off by briefly press-
ing the buttons in the roof console. Brightness
is adjusted by holding the button pressed in.

Passenger compartment lighting

The floor lighting and interior roof lighting are
switched on or off with a short press on the
button in the roof console.

-------------------------------------------------------------------------------------------------------------------------------------------------------------

LIGHTING

}}

* Option/accessory.

161

Auto function for passenger compartment
lighting

The automatic function is activated by a short
press on the 

AUTO

 button in the roof console.

With the automatic system activated, the light
indicator in the button illuminates and the pas-
senger compartment lighting is switched on
and off according to the following.

The passenger compartment lighting comes
on when:

The car is unlocked

The car is switched off

A side door is opened.

The passenger compartment lighting goes off
when:

The car is locked

The car is started

A side door is closed

A side door has remained open for approx.
2 minutes.

Rear roof lighting

The rear area of the car has reading lighting,
which is also used as passenger compartment
lighting.

Reading lamps above the rear seat.

The reading lamps are switched on or off by
briefly pressing the button on the lamp.
Brightness is adjusted by holding the button
pressed in.

Glovebox lighting

Glovebox lighting is switched on and off
respectively when the lid is opened or closed.

Sun visor mirror lighting

*

The lighting for the mirror in the sun visor is
switched on and off respectively when the
cover is opened or closed.

Ground lighting

*

The ground lighting is switched on or off when
the corresponding door is opened or closed.

Door sill lighting

The door sill lighting is switched on or off
when a door is opened or closed.

Lighting in cargo area

The lighting in the cargo area is switched on or
off when the boot lid is opened or closed.

Decor lighting

The ambient light is switched on when you
open the doors and is switched off when the
car is locked. The intensity of the decor light-
ing can be adapted in the centre display and
also precisely adjusted using the thumbwheel
in the instrument panel.

Ambience lights

*

The car is equipped with LEDs that make it
possible to change the colour of the light.
These lights are switched on when the car is
running. The ambience light can be adapted in
the centre display and also precisely adjusted
using the thumbwheel in the instrument panel.

Lighting in storage compartments in
doors

The lighting in the storage compartments in
the doors is switched on when you open the
doors and is switched off when the car is
locked. The brightness can be precisely
adjusted using the thumbwheel in the instru-
ment panel.

Lighting in the tunnel console's front
cup holder

The lighting in the front cup holders is
switched on when the car is unlocked and is
switched off when the car is locked. The

-------------------------------------------------------------------------------------------------------------------------------------------------------------

||

LIGHTING

* Option/accessory.

162

brightness can be precisely adjusted using the
thumbwheel in the instrument panel.

Related information

Adjusting interior lighting (p. 162)

Lighting control (p. 150)

Ignition positions (p. 436)

Passenger compartment interior (p. 582)

Adjusting interior lighting

The lamps inside the car come on differently
depending on the ignition position used. The
interior lighting can be adjusted with a
thumbwheel in the instrument panel, and cer-
tain light functions can also be adjusted via
the centre display.

The thumbwheel on the
instrument panel, to the left
of the steering wheel, is used
to adjust the brightness of
the display light, control light,
ambient light and ambience
light

*

Adjusting ambient decor illumination

1. Press 

Settings

 in the top view in the cen-

tre display.

2. Press 

My Car

Lights and Lighting

Interior Lighting

.

3. Choose between the following settings:

Under 

Ambient Light Intensity

, select

from 

Off

Low

 and 

High

.

Under 

Ambient Light Level

, select

from 

Reduced

 and 

Full

.

Adjusting ambience light

*

The car is equipped with a number of LEDs
that make it possible to change the colour of
the light. These lights are switched on when
the car is running.

Changing the brightness of the lights

1. Press 

Settings

 in the top view in the cen-

tre display.

2. Press 

My Car

Lights and Lighting

Interior Lighting

Interior Mood

Lighting

.

3. Under 

Interior Mood Light Intensity

,

select from 

Off

Low

 and 

High

.

Changing the colour of the light

1. Press 

Settings

 in the top view in the cen-

tre display.

2. Press 

My Car

Lights and Lighting

Interior Lighting

Interior Mood

Lighting

.

3. Choose between 

By Temperature

 and

By Colour

 in order to change the colour of

the light.

With the 

By Temperature

 option, the

light changes according to the set passen-
ger compartment temperature.

With the 

By Colour

 option, the 

Theme

Colours

 subcategory can be used to

adjust further.

-------------------------------------------------------------------------------------------------------------------------------------------------------------

-------------------------------------------------------------------------------------------------------------------------------------------------------------

WINDOWS, GLASS AND MIRRORS

* Option/accessory.

166

Windows, glass and mirrors

The car contains several different windows,
glass panes and mirrors. Some of the win-
dows in the car are laminated.

The windscreen has laminated glass, and lami-
nated glass is available as an option for certain
other glass areas. Laminated glass is rein-
forced, which provides better protection
against break-ins and improved sound insula-
tion in the passenger compartment.

The symbol is shown on the windows where the
glass is laminated

1

Related information

Pinch protection for windows and sun
blinds (p. 166)

Sunroof

*

 (p. 174)

Power windows (p. 168)

Rearview and door mirrors (p. 171)

Using the sun blind

*

 (p. 170)

Head-up display

*

 (p. 140)

Using windscreen wipers (p. 177)

Using windscreen and headlamp washers
(p. 179)

Activating and deactivating the heated
windscreen

*

 (p. 216)

Activating and deactivating the heated
rear window and door mirrors (p. 217)

Pinch protection for windows and

sun blinds

All power windows and sun blinds

*

 have

pinch protection which is deployed if they are
blocked by any object while opening or clos-
ing.

In the event of blocking, the movement stops
and then reverses automatically to approx.
50 mm (approx. 2 inches) from the blocked
position (or to full ventilation position).

It is possible to force pinch protection when
closing has been cancelled, e.g. when ice is
formed, by continuing to press the control in
one and the same direction.

If any fault arises with the pinch protection, a
reset sequence can be tested.

WARNING

If the starter battery is disconnected, the

automatic opening and closing function

must be reset to work properly. A reset

must take place for pinch protection to

work.

Related information

Reset sequence for pinch protection
(p. 167)

Operating power windows (p. 168)

1

Does not apply to the windscreen, which is always laminated and thus does not have this symbol.

-------------------------------------------------------------------------------------------------------------------------------------------------------------

WINDOWS, GLASS AND MIRRORS

* Option/accessory.

167

Using the sun blind

*

 (p. 170)

Operating the sunroof

*

 (p. 175)

Reset sequence for pinch

protection

If a problem occurs with the electrical func-
tions for the electric windows, a reset
sequence can be tested.

Electrically-operated sun blinds

*

 have a reset

sequence that can be tested if necessary.

WARNING

If the starter battery is disconnected, the

automatic opening and closing function

must be reset to work properly. A reset

must take place for pinch protection to

work.

If a problem persists, or if it concerns the sun-
roof, contact a workshop

2

.

Reset the power window

1. Start with the window in closed position.

2. Then operate the controls in the manual

position 3 times upwards to closed posi-
tion.
> The system is initialised automatically.

Reset sun blind

*

1. Start with the sun blind retracted.

2. Press the control against retracting mode

for approx. 15 seconds.
> The system is initialised automatically.

Related information

Pinch protection for windows and sun
blinds (p. 166)

Operating power windows (p. 168)

Using the sun blind

*

 (p. 170)

2

An authorised Volvo workshop is recommended.

-------------------------------------------------------------------------------------------------------------------------------------------------------------

WINDOWS, GLASS AND MIRRORS

* Option/accessory.

168

Power windows

Each door has a control panel for the electri-
cally-driven power windows. The driver's
door has controls for operating all windows
and also to activate the child safety locks.

Driver's door control panel.

Electric child safety locks

*

 that deactivate

the controls in the rear doors to prevent
doors or windows from being opened
from the inside.
Controls for rear windows.

Controls for front windows.

WARNING

Children, other passengers or objects may

be trapped by the moving parts.

Always operate the windows with cau-
tion.

Do not allow children to play with the
controls.

Never leave children alone in the car.

Remember to always switch off the
power supply to the power windows
by setting the car's electrical system in
ignition position 

0

, and then take the

remote control key with you when leav-
ing the car.

Never put an object or part of the body
through the windows, even if the car's
electrical system is fully disconnected.

Related information

Operating power windows (p. 168)

Pinch protection for windows and sun
blinds (p. 166)

Reset sequence for pinch protection
(p. 167)

Operating power windows

Using the driver's door control panel, all
power windows can be operated - using the
control panels in the other doors operates the
power window in the individual door.

The power windows are equipped with pinch
protection. If any fault arises with the pinch
protection, a reset sequence can be tested.

WARNING

Children, other passengers or objects may

be trapped by the moving parts.

Always operate the windows with cau-
tion.

Do not allow children to play with the
controls.

Never leave children alone in the car.

Remember to always switch off the
power supply to the power windows
by setting the car's electrical system in
ignition position 

0

, and then take the

remote control key with you when leav-
ing the car.

Never put an object or part of the body
through the windows, even if the car's
electrical system is fully disconnected.

-------------------------------------------------------------------------------------------------------------------------------------------------------------

WINDOWS, GLASS AND MIRRORS

* Option/accessory.

169

Operating the power windows.

Operating without auto. Move one of the
controls gently up or down. The power
windows move up or down as long as the
control is held in position.
Operating with auto. Move one of the con-
trols up or down to the end position and
release it. The window runs automatically
to its end position.

In order for the power windows to be used,
the ignition position must be 

I

 or 

II

. The power

windows can be operated for a few minutes
after the car has been switched off and after
the ignition has been switched off - although
not after a door has been opened. It is only
possible to operate one control at a time.

It can also be operated using a remote control
key or keyless opening

*

 with the door handle.

WARNING

Check that children or other passengers

are not at risk of crushing when all the win-

dows are closed with a remote control key

or keyless opening

*

 with a door handle.

NOTE

One way to reduce the pulsating wind
noise when the rear windows are open is
to also open the front windows slightly.

NOTE

The windows cannot be opened at speeds
above approx. 180 km/h (approx.
112 mph), but they can be closed.

The driver always bears responsibility for
following traffic regulations in force.

NOTE

It may not be possible to operate windows
at low temperatures.

Related information

Power windows (p. 168)

Pinch protection for windows and sun
blinds (p. 166)

Reset sequence for pinch protection
(p. 167)

Keyless locking and unlocking

*

 (p. 261)

Locking and unlocking with the remote
control key (p. 239)

-------------------------------------------------------------------------------------------------------------------------------------------------------------

WINDOWS, GLASS AND MIRRORS

* Option/accessory.

170

Using the sun blind

*

The sun blinds are built into each of the rear
doors, and there is a sun blind built into the
rear parcel shelf.

Rear door – manually operated

The figure is schematic - the version may vary.

Hook with associated catch

Pull up the sun blind and attach it to the
hook in the upper door frame.

The window can still be opened and closed
with the sun blind up.

Rear window parcel shelf

There is an electrically operated sun blind built
on the rear window shelf.

In order that the sun blind can be operated,
the car's electrical system must be in ignition
position 

II

.

NOTE

It may not be possible to operate the sun
blind in low temperatures.

Operating via the centre display

Give a short tap on the 

Rear

Sun Curtain

 button in the

function view in the centre
display - the sun blind is
operated automatically to its
end position, up or down.

Related information

Pinch protection for windows and sun
blinds (p. 166)

Reset sequence for pinch protection
(p. 167)

Power windows (p. 168)

-------------------------------------------------------------------------------------------------------------------------------------------------------------


Content      ..     7      8      9      10     ..