Volkswagen Jetta GLI (2014 year). Instruction - part 22
 

  Index      Volkswagen     Volkswagen Jetta GLI - instruction 2014 year in english


Search            copyright infringement  


Content   ..  20  21  22  23   ..


Volkswagen Jetta GLI (2014 year). Instruction - part 22


  WARNING 

Disregarding the safety-related checklist may lead to accidents and serious personal injuries. 

  Always review and follow the checklist. Follow accepted safety practices and use common 

sense. 


  NOTICE 

Always insert and remove lamps carefully to help prevent damage to the vehicle paint or to 
other parts of the vehicle.
 

Replacing halogen headlight bulbs 


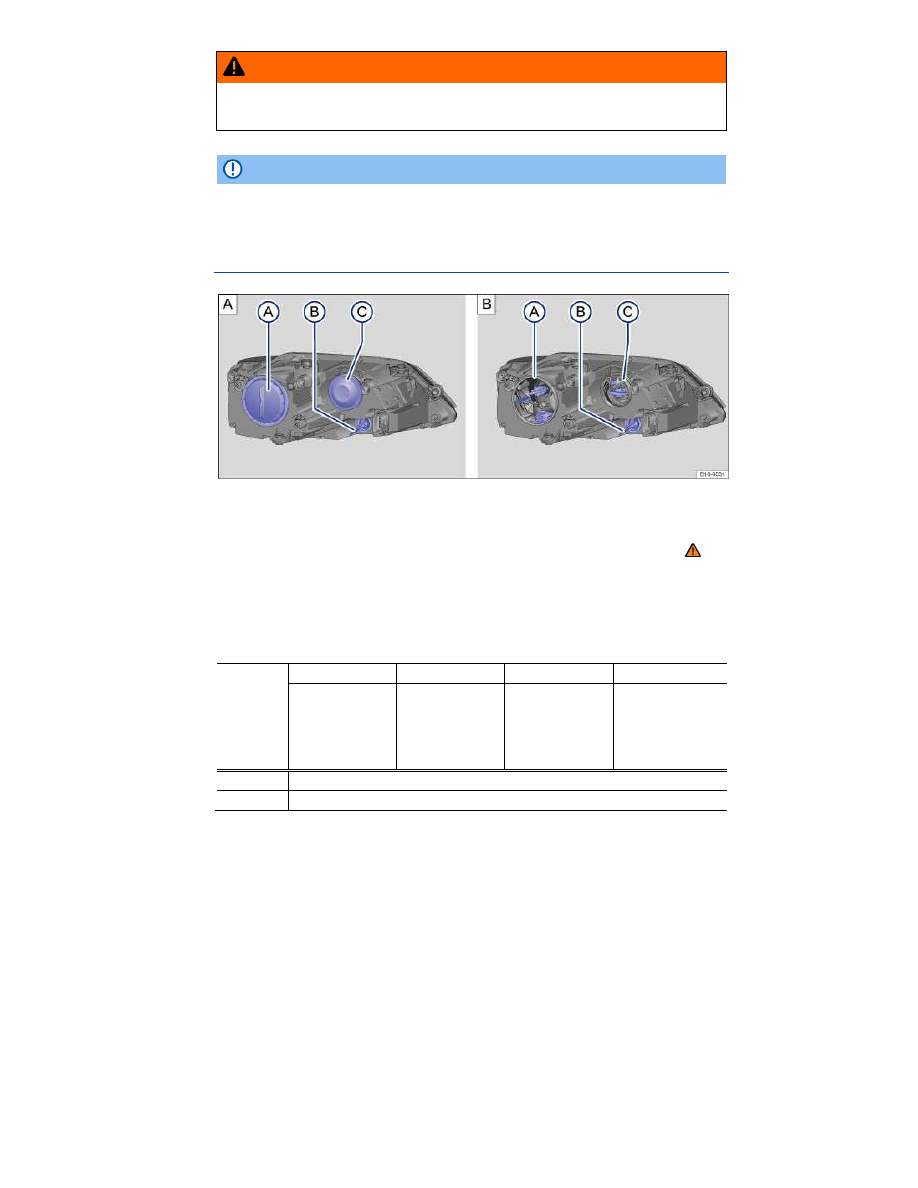
Fig. 176 In the engine compartment: Covers in the left headlight assembly. A Low beam headlight, daytime 
low beam headlight or daytime running light, side marker light; B Turn signal indicator; C High beam, parking 
light, daytime running light. 

Please first read and note the introductory information and heed the WARNINGS 


It is not necessary to dismantle the headlight assembly to replace a light bulb. 

The following instructions only apply to vehicles with halogen headlight bulbs. Contact your authorized 
Volkswagen dealer or an authorized Volkswagen Service Facility for assistance with HID headlight 
replacement. 


Please carry out each step only in the order specified:

fig. 176


(A)


(B)

(C)

(C)


Low beam, 

daytime low beam 

headlight or 

daytime running 

light, side marker 

light 

Front turn signal 

indicator 

High beam

Parking light (small 

bulb holder) 

1.


Please review and follow the checklist  

2.


Open the engine hood   


Please carry out each step only in the order specified:

fig. 176


(A)


(B)

(C)

(C)


Low beam, 

daytime low beam 

headlight or 

daytime running 

light, side marker 

light 

Front turn signal 

indicator 

High beam

Parking light (small 

bulb holder) 

3.


Pull off the rubber cover on the back of the headlight. 
Depending on the model, a plastic cover with securing clip might be used. Press the 
securing clip upward and remove the cover. 

4.


Turn the bulb holder as far as it goes to the left and pull out 
with the light bulb facing rearward. 

Pull out the bulb 
holder with the light 
bulb facing 
rearward. 

5.


Pull the light bulb straight out of the bulb socket. 
If necessary, press the lock on the bulb holder. 

6.


Replace the burned out light bulb with a new bulb of the same type. 

7.


Insert the bulb holder into the headlight assembly and turn as 
far as it goes to the right. 

Insert the bulb 
holder into the 
headlight and slide it 
in completely. 

8.


Attach the rubber or plastic cover. 
If applicable slide the securing clip rearward. 


  The illustrations show the left headlight assembly from the rear. The right headlight assembly is 

the mirror image of the left headlight assembly. 

  Different models may have different lights, and the location and design of covers, bulb holders, 

and bulbs may be in a different location than shown in the illustrations. 

  You cannot replace the LEDs in LED daytime running lights. Contact your authorized 

Volkswagen dealer or an authorized Volkswagen Service Facility for assistance. 


Replacing light bulbs in the Xenon headlight 


Fig. 177 In the engine compartment: Cover 1 on the left headlight for the cornering light bulb holder 2 and the 
turn signal bulb holder 3. 

 Please first read and note the introductory information and heed the WARNINGS 


Contact your authorized Volkswagen dealer or an authorized Volkswagen Service Facility for 
assistance with HID headlight replacement. 

The headlight does not need to be removed in order to replace the light bulbs. 
 

Please carry out each step only in the order specified:

fig. 177


Cornering light 

(2)

or turn signal 

(3)

1.


Please review and follow the checklist  

2.


Open the engine hood   

3.


Remove the rubber cover 

(1)

 A on the side of the headlight. 

4.


Turn the bulb holder counterclockwise until it stops and remove it toward the rear with 
the bulb. 

5.


Replace burned out bulbs with new bulbs that are identical to the ones being replaced. 

6.


Reinsert the bulb holder in the headlight and turn it clockwise until it stops. 

7.


Install the rubber cover 

(1)

 A


  The illustrations show the left headlight assembly from the rear. The right headlight assembly is 

the mirror image of the left headlight assembly. 

  Different models may have different lights, and the location and design of covers, bulb holders, 

and bulbs may be in a different location than shown in the illustrations. 

  You cannot replace the LEDs in LED daytime running lights. Contact your authorized 

Volkswagen dealer or an authorized Volkswagen Service Facility for assistance. 


Replacing light bulbs in the front bumper 


Fig. 178 In the wheel house liner: Removing the cover. 


Fig. 179 Replacing a light bulb in the fog light. 

 Please first read and note the introductory information and heed the WARNINGS 


Please carry out each step only in the order specified:

1.


Please review and follow the checklist  

2.


Start the engine. To change the left bulb, turn the steering wheel completely to the 

right; to change the right bulb, turn the steering wheel completely to the left. 

3.


Switch off the ignition and lights. Pull out the ignition key. 

2.


With the flat blade of the screwdriver from the vehicle tool kit , remove the cover in the 

wheel house lining from below 

⇒ 

fig. 178

 (arrow). 

3.


Release the connector 

⇒ 

fig. 179


(2)

 and pull it off. 

4.


Turn the bulb holder 

(1)

 as far as it goes to the left and then pull it out with the light 

bulb to the rear. 

5.


Replace the burned out light bulb with a new bulb of the same type. 

6.


Insert the bulb holder into the headlight and turn as far as it goes to the right. 


Please carry out each step only in the order specified:

7.


Attach the connector 

(2)

 to the bulb holder 

(1)

. The connector must latch audibly. 

8.


Replace the cover 

⇒ 

fig. 178

 in the wheel house liner. 


  Different models may have different lights, and the location and design of covers, bulb holders, 

and bulbs may be in a different location than shown in the illustrations. 

Replacing taillight bulbs in the luggage compartment lid (LED taillights) 


Fig. 180 In the luggage compartment lid: A: removing the cover on the LED taillight, B: Removing the LED 
taillight. 


Fig. 181 LED taillight: A: Removing the bulb holder, B: Removing the bulb. 

 Please first read and note the introductory information and heed the WARNINGS 


Please carry out each step only in the order specified:

1.


Please review and follow the checklist  

2.


Open the luggage compartment lid  


Please carry out each step only in the order specified:

3.


Using the screwdriver from the vehicle tool kit, carefully pry the cover off with the flat blade 

of the screwdriver inserted in the opening  A 

(1)

4.


Loosen the fasteners 

⇒ 

fig. 180

 B 

(2)

 and carefully remove the taillight with the connected 

wire from the luggage compartment lid. 

5.


Pull the red retainer 

⇒ 

fig. 181

 A 

(1)

 in the direction of the arrow to release the lock on the 

connector A 

(2)

6.


Press the lock on the connector A 

(3)

 and disconnect the connector A 

(2)

7.


Turn the bulb holder A 

(4)

 in the direction of the arrow until it stops and remove it with the 

bulb. 

8.


Pull the burned out bulb out of the bulb holder in the direction of the arrow and replace it 

with a new bulb of the same type B

9.


Insert the bulb holder A 

(4)

 in the taillight and turn it in the direction of the arrow until it 

stops. 

10.


Connect the connector A 

(2)

 and press the red retainer A 

(1)

 in the opposite direction of 

the arrow. 

11.


Hold the taillight in the installation position with one hand and tighten the bolts with the 

other hand 

⇒ 

fig. 180

 B 

(2)

12.


Check the taillight assembly for proper installation and secure fit. 

13.


Insert the cover. The cover must securely lock into place. 

14.


Close the luggage compartment lid  


LEDs in the taillights 

LEDs cannot be replaced. Contact your authorized Volkswagen dealer or authorized Volkswagen 
Service Facility for assistance. 

  Different models may have different lights, and the location and design of covers, bulb holders, 

and bulbs may be in a different location than shown in the illustrations. 


Replacing the taillight bulbs in the vehicle body (LED taillights) 


Fig. 182 In the side of luggage compartment: A: Open cover of the rear side panel. B: Removing the LED 
taillight assembly. 


Fig. 183 LED taillight. A: Removing the bulb holder, B: Removing the bulb. 

Please first read and note the introductory information and heed the WARNINGS 


Please carry out each step only in the order specified. 

Removing the taillight 
 

1.


Please review and follow the checklist  

2.


Open the luggage compartment lid  

3.


Open the cover on the rear side trim panel 

⇒ 

fig. 182

 A

4.


Remove the taillight bolt B 

(1)

 and carefully remove the taillight from the body with the 

electrical wire connected. 

5.


Pull the red retainer 

⇒ 

fig. 183

 A 

(1)

 in the direction of the arrow to release the lock on the 

connector A 

(2)

6.


Press the lock on the connector A 

(3)

 and disconnect the connector A 

(2)


Replacing a bulb 
 

7.


Turn the bulb holder A 

(4)

 in the direction of the arrow until it stops and remove it with the 

bulb. 

8.


Pull the burned out bulb out of the bulb holder in the direction of the arrow and replace it 

with a new bulb of the same type 

⇒ 

fig. 181

 B

9.


Insert the bulb holder A 

(4)

 in the taillight and turn it in the direction of the arrow until it 

stops. 


Installing the taillight 
 

10.


Connect the connector A 

(2)

 and press the red retainer A 

(1)

 in the opposite direction of the 

arrow. 

11.


Hold the taillight in the installation position with one hand and tighten the bolt with the other 

hand 

⇒ 

fig. 182

 B 

(1)

12.


Check the taillight assembly for proper installation and secure fit. 

13.


Install the cover on the rear side trim panel. 

14.


Close the luggage compartment lid  


LEDs in the taillights in the body 

LEDs cannot be replaced. Contact your authorized Volkswagen dealer or authorized Volkswagen 
Service Facility for assistance. 

  Different models may have different lights, and the location and design of covers, bulb holders, 

and bulbs may be in a different location than shown in the illustrations. 

Replacing license plate light bulbs 

 Please first read and note the introductory information and heed the WARNINGS 


You cannot replace the LEDs in LED license plate lights. Contact your authorized Volkswagen dealer 
or an Authorized Volkswagen Service Facility for assistance. 


Jump-starting 

 Introduction 

In this section you’ll find information about: 

Using jumper cables


If your engine does not start because the vehicle battery is dead, your vehicle's battery can be 
connected to the battery of another vehicle to start your engine (jump-starting). Check the battery acid 
level indicator on the vehicle battery before jump-starting, Vehicle battery

You must use jumper cables that meet recognized industrial standards (check information provided by 
the jumper cable manufacturer). For vehicles with gasoline engines, the cross-section of the jumper 
cable wire must be at least 0.038 in.

2

 (25 mm

2

), or about 3 ga. (AWG). 

More information: 

  Starting assistance systems  
  Working in the engine compartment  
  Vehicle battery  

  WARNING 

Working on the batteries or the electrical system in your vehicle can cause serious acid 
burns, fires, or electrical shock. 

  Always keep children away from battery acid and vehicle batteries in general. 
  Sulfuric battery acid is very corrosive and can cause blindness and damage to 

unprotected skin. Never let battery acid or lead particles contact your eyes, skin, and 
clothing. 

  Never lean over a vehicle battery. Always wear protective gloves and eye protection. To 

reduce your risk of injury, never tilt the batteries; acid could spill out through the vents and 
burn you. 

  A highly explosive mixture of gases is given off when the battery is being charged. 
  Always avoid fires, sparks, open flame, and smoking. Never create sparks or electrostatic 

charges when handling cables and electrical equipment. Never short-circuit the battery 
terminals. High-energy sparks can cause serious personal injury. 

  If you get battery acid in your eyes or on your skin, immediately rinse with cold water for 

several minutes and get medical attention immediately. If you swallow any battery acid, get 
medical attention immediately. 


  WARNING 

Improper use of jumper cables when jump-starting a vehicle with a dead battery can cause 
the battery to explode, leading to serious personal injury. To help reduce the risk of battery 
explosion: 

  All work on the batteries or the electrical system in your vehicle can cause serious acid 

burns, fires, or electrical shocks. Always read and heed the following WARNINGS and safety 

precautions before working on the batteries or the electrical system 

⇒ page 329, Vehicle 

battery

  Always make sure that the battery providing starting assistance (the booster battery) has 

the same voltage as the dead battery (12 V) and about the same amperage capacity (see 
battery label). 

  Never jump-start a vehicle with a thawed or frozen vehicle battery. The battery can 

explode. A dead battery can freeze at temperatures around +32 °F (0 °C). 

  A battery that is frozen or was frozen, but has since thawed, must be replaced. 
  When the vehicle battery is jump-started, it gives off hydrogen gas, which is highly 

explosive! Always keep fire, sparks, open flame, and smoking materials far away from vehicle 
batteries. Never use a mobile telephone while connecting or disconnecting jumper cables. 

  Jump-start batteries only in well-ventilated areas. Batteries give off highly explosive 

hydrogen gas during jump-starting. 

  Always route the jumper cables so that they cannot get caught in any moving parts in the 

engine compartment. 

  Never short out the battery terminals by connecting the positive (+) and negative (-) 

terminals with each other. 

  Never connect the negative cable from the other vehicle directly to the negative terminal 

of the dead battery, as this may cause the hydrogen gas given off by the dead battery to 
explode. 

  Never attach the negative cable from the vehicle providing starting assistance to any part 

of the fuel system or to the brake hoses or brake lines. 

  Never allow the non-insulated parts of the battery clamps to touch. 
  Never allow the jumper cable attached to the positive battery terminal to contact metal 

parts of the vehicle. 

  Always follow the instructions of the jumper cable manufacturer. 


  NOTICE 

To help prevent extensive damage to the vehicle electrical system, read and heed the 
following:
 

  Connecting jumper cables improperly can cause a short circuit and do expensive damage 

to the vehicle's electrical system. 

  Do not let the vehicles touch each other while the jumper cables are connected. If they do, 

electrical current may flow between the vehicles when the positive (+) terminals are connected, 
causing electrical system damage.


Using jumper cables 


Fig. 184 Diagram for attaching the jumper cables: Dead battery 1 and booster battery 2. 

ä

 Please first read and note the introductory information and heed the WARNINGS 


The dead battery must be properly connected to the vehicle's electrical system. 

Make certain that the vehicles are not touching each other. Otherwise, electric current could flow as 
soon as the positive terminals (+) are connected. Use longer jumper cables if necessary. 

The clamps on the jumper cables must have good contact to bare metal on the battery terminals. 

If the engine does not start, stop the process after 10 seconds and repeat after about 1 minute. 

The procedure for attaching and for removing the jumper cables is described below. Perform each of 
the following steps only in the order described, which follow the letters shown in the illustration 
⇒ 

fig. 184

 A – B – C – D

Attaching jumper cables 

1.  Switch off the ignition in both vehicles, Starting and stopping the engine

2.  Open the battery cover in the engine compartment if the battery has a cover 

⇒ page 329, Vehicle 

battery

3.  Attach one end of the red jumper cable to the positive terminal 

(+)

 of the dead battery: 

(1)


⇒ 

4.  Attach the other end of the red jumper cable to the positive terminal 

(+)

 of the good battery 

(booster battery): 

(2)

5.  Attach one end of the black jumper cable to the negative terminal 

(-)

 of the booster battery: 

(2)

 . 

6.  Attach the other end of the black jumper cable 

(3)

 to a bare metal part of the vehicle with the 

dead battery. This part should be connected directly to the engine block. You may also attach the 

cable to the engine block itself or to the towing eye installed on the front of the vehicle 

⇒ page 415, 

Towing. Attach the clamp to a point that is as far away as possible from the dead battery 

(1)


⇒ 

7.  Route the jumper cables so that they cannot get caught in any moving parts in the engine 

compartment of either vehicle. 


Starting the engine 

  Start the engine of the vehicle with the good battery that is providing help and let it run at idle 

speed. 

  Turn on the ignition of the vehicle with the dead battery. If the engine starts, wait 2 to 3 minutes 

until it “runs smoothly” before removing the jumper cables as described below 

⇒ 

. If the engine 

does not start within about 10 seconds, turn off the ignition and wait at least 1 minute; then try again. 


Before removing the jumper cables 

  Switch off the headlights (if they are on). 
  In the vehicle with the dead battery, switch on the heater fan and the rear window defroster. This 

helps to minimize voltage spikes when the cables are disconnected. 

Removing jumper cables 

With the engine running, remove the jumper cables in reverse order to the way they were connected. 

1.  Disconnect the black (-) cable from the vehicle with the dead battery. 

2.  Disconnect the black (-) cable from the other vehicle (vehicle with the good battery). 

3.  Disconnect the red (+) cable from the other vehicle (vehicle with the good battery). 

4.  Disconnect the red (+) cable from the vehicle with the dead battery. 

5.  Close the battery cover. 

6.  If necessary, unscrew the towing eye on the front of the vehicle, Installing the front towing eye


  WARNING 

Improper use of jumper cables when jump-starting a vehicle with a dead battery can cause 
the battery to explode, leading to serious personal injury. To help reduce the risk of battery 
explosion: 

  All work on the batteries or the electrical system in your vehicle can cause serious acid 

burns, fires, or electrical shocks. Always read and heed the following WARNINGS and safety 
precautions before working on the batteries or the electrical system, Vehicle battery

  Always wear proper eye protection. Never lean over the vehicle battery. 
  Attach the jumper cables in the correct order: first the positive cable, then the negative 

cable. 

  Never connect the negative cable from the vehicle providing starting assistance to parts 

of the fuel system or to the brake hoses or brake lines. 

  Never allow the non-insulated parts of the battery clamps to touch. 
  Never allow the jumper cable attached to the positive battery terminal to contact metal 

parts of the vehicle. 

  Check the battery acid level indicator window on the vehicle battery. Use a flashlight, 

never a match, cigarette lighter, or other open flame. If you cannot see the color of the 
window clearly, or if it is light yellow or colorless, do not jump-start the vehicle. Get expert 
assistance. 

  Avoid electrostatic discharge in the vicinity of the vehicle battery. Sparks may cause the 

hydrogen gas escaping from the vehicle battery to ignite. 

  Never jump-start a vehicle with a battery that is damaged or frozen or that was frozen and 

has thawed. The battery can explode. Replace the battery instead. 

  Always follow the instructions of the jumper cable manufacturer. 
  Always make sure that the battery providing starting assistance has the same voltage as 

the dead battery (12 V) and about the same capacity (see battery label). 

  Batteries give off explosive hydrogen gas. Always keep fire, sparks, open flame and 

smoking materials away from batteries. 

  Never connect the negative cable from the other vehicle directly to the negative terminal 

of the dead battery. The hydrogen gas from the battery is explosive. 

  Never short out the battery terminals by connecting the positive (+) and negative (-) 

terminals with each other. 


Towing 

 Introduction 

In this section you’ll find information about: 

Towing on a commercial tow truck


Tips on towing


Installing the front towing eye


Installing the rear towing eye


Driving tips while towing


Observe legal requirements when towing. 

For technical reasons: 

  A vehicle with a dead battery must never be towed. Jump-start the vehicle instead. 
  It is not possible to tow-start or push-start your vehicle. Jump-start the vehicle instead. 

Vehicles with Keyless Access may only be towed with the ignition on. 

Towing the vehicle when the engine is turned off and the ignition is turned on drains the vehicle 
battery. Depending on the charge level of the vehicle battery, it is possible that even after just a few 
minutes, electrical devices such as the emergency flashers may not have the power necessary to 

function. The steering wheel might lock in vehicles with Keyless Access 

⇒ 

More information: 

  Exterior views  
  Shifting  
  Engine control and emission control system  
  Jump-starting  

  WARNING 

Never tow a vehicle without any electrical power. 

  Never remove the remote control vehicle key from the ignition switch or turn off the 

ignition with the starter button while the vehicle is moving. The electronic steering column 
lock could suddenly engage, and you would not be able to steer or control the vehicle. You 
can lose control of the vehicle, crash, and seriously injure yourself and others. 

  If the vehicle loses power while it is being towed, stop towing the vehicle immediately and 

contact your authorized Volkswagen dealer or authorized Volkswagen Service Facility for 
assistance. 


  WARNING 

Towing a vehicle changes the way it handles and brakes. To help reduce the risk of an 
accident and serious personal injury, note the following: 

  The driver of the vehicle that is being towed: 


–  Since the brake booster also does not work when the engine is stopped, you will need 
to press harder on the brake pedal to slow down or stop. Always be alert so as not to rear-
end the towing vehicle. 


–  Will have to use considerably more force to turn the steering wheel because the power 
steering is not working. 

  The driver of the vehicle that is doing the towing: 


–  Must accelerate gradually and gently and avoid jerking movements. 


–  Must not brake hard or steer sharply. 


–  Must brake earlier and more gently than in normal driving. 


  NOTICE 

  Be careful not to damage the paint when installing and removing the towing eye and the 

cover for the threaded hole behind the bumper. 

  Unburned fuel can get into the catalytic converter during towing and damage it. 

Towing on a commercial tow truck 

ä

 Please first read and note the introductory information and heed the WARNINGS 


To help avoid damaging the vehicle, have it towed only by a professional towing company. Read and 
heed the following information: 

General information 

Never let the vehicle be towed at speeds above 30 mph (50 km/h). 

Never let the vehicle be towed for more than 30 miles (50 km). 

Towing manual transmission vehicles 

  Release the parking brake. 
  Shift the transmission into Neutral (N)

  If possible, have the vehicle towed with the front wheels off the ground. 

  If necessary, the vehicle can also be towed with the rear wheels off the ground 

⇒ 

Towing automatic transmission vehicles 

  Release the parking brake. 
  Shift the transmission into Neutral (N)

  Tow the vehicle only with its front wheels off the ground 

⇒ 

When not to tow your vehicle 

If there is little or no oil in the transmission because of damage to your vehicle, it must be moved with 
the drive wheels off the ground. The vehicle can only be towed if its ignition is switched on and its 
electrical system is operating. In the following situations, the vehicle cannot be towed at all and must 
be transported on a flatbed truck or trailer: 


  If the front and rear wheels cannot turn. 
  If the vehicle battery is dead (because the electronic steering column lock engages and cannot be 

released). 

  If you have to tow an automatic transmission vehicle more than 30 miles (50 km). 

  WARNING 

It is not safe for children or other persons to ride in a vehicle that is being towed. 

  Never let children or anyone else remain in the vehicle while it is being towed. 


  NOTICE 

The drive axle rotates while the vehicle is being towed with its rear wheels off the ground. This 
can damage the automatic transmission.
 

  Never tow automatic transmission vehicle with the rear wheels off the ground. 
  Tow manual transmission vehicles with the rear wheels off the ground only if it is certain 

that no transmission fluid can leak out. 

Tips on towing 

 Please first read and note the introductory information and heed the WARNINGS 


Towing eye; tow rope or tow bar 

A towing eye is included in your vehicle's tool kit. This can be inserted in a threaded hole in the front 
bumper and used when your vehicle is being towed by another vehicle. On most vehicles, there is 
another threaded hole in the rear bumper, so you can use the towing eye to tow other vehicles as well. 
Towing a vehicle with a tow bar is safer and easier on both vehicles than using a tow rope. A tow rope 
should be used only if a tow bar is not available. 

The tow rope should be flexible enough to help protect both vehicles from damage. Use a synthetic 
fiber rope or similar rope. 

Attach the tow rope or tow bar only to the towing eye included in the vehicle tool kit for this purpose, or 
to a trailer hitch. 

Towing manual transmission vehicles 

Check whether your vehicle can be towed at all; see below, When not to tow your vehicle 

If yes, not the following for the towed vehicle: 

  Shift the gearshift lever to Neutral, Shifting
  Do not tow faster than 30 mph (50 km/h). 
  Do not tow more than 30 miles (50 km). 

Towing automatic transmission vehicles 

Check whether your vehicle can be towed at all; see below, When not to tow your vehicle 

If yes, not the following for the towed vehicle: 

  Put the transmission in Neutral (N)

  Do not tow faster than 30 mph (50 km/h). 
  Do not tow more than 30 miles (50 km). 


  When a commercial tow truck is being used, the vehicle must only be towed with the front wheels 

lifted off the ground. 

When not to tow your vehicle 

In the following situations, the vehicle cannot be towed and must be transported on a flatbed truck or 
trailer: 

  If transmission fluid has leaked out of the transmission. 
  If there is little or no oil in the transmission because of damage to your vehicle, it must be moved 

with the drive wheels off the ground. 

  If the front and rear wheels cannot turn. 
  When the vehicle battery is dead, because the steering may remain disabled and it may not be 

possible to release the electronic steering column lock. 

  If you have to tow an automatic transmission vehicle more than 30 miles (50 km). 

Towing other vehicles 

  Obey all legal requirements 
  Read and heed all towing information in the owner's manual for the other vehicle. 

  A vehicle can be towed only if the electronic steering column lock is released. In case of a power 

loss or malfunctions of the electrical system, the engine may have to be jump-started in order to 
release the electronic steering column lock. 

Installing the front towing eye 


Fig. 185 In the right front bumper: Removing the cover. 


Content   ..  20  21  22  23   ..