Volkswagen EOS (2015 year). Instruction - part 24
 

  Index      Volkswagen     Volkswagen EOS - instruction 2015 year in english


Search            copyright infringement  


Content   ..  22  23  24  25   ..


Volkswagen EOS (2015 year). Instruction - part 24


  WARNING 

Improper use of your vehicle jack can cause the vehicle to fall off the jack leading to serious 
personal injury. To help reduce the risk of serious personal injury: 

  Use only jacks approved by Volkswagen for the vehicle. Other jacks might slip, even those 

approved for other Volkswagen models, but not for your vehicle. 

  Always set up the jack on firm and level ground. The vehicle may slip off the jack if the 

jack is resting on soft or sloping ground. If necessary, place a sturdy board under the jack. 

  On a hard, slippery surface (such as a tiled floor), use an anti-skid rubber mat or 

something similar to help prevent the jack from slipping. 

  Position the jack only at the described vehicle lift points. Before you raise your vehicle, 

always make sure the jack claw properly grips the vertical rib under the sill so that the jack 

does not slip off when you are raising the vehicle 

⇒ 

fig. 186

  Never have any part of your body (such as your arm or leg) under the vehicle when it is 

supported by the jack. Never let other persons have any part of their body under the vehicle, 
either! 

  If you must work under a vehicle raised on a floor jack, always make sure that the vehicle 

is safely supported on safety stands intended for that purpose that are strong enough to 
support the weight of the vehicle. 

  Never lift the vehicle when it is tilted or inclined to one side or the engine is running. 
  Never lift the vehicle when more than 1 tire is flat or damaged. 
  Do not start the engine while the vehicle is supported by a jack. Engine vibrations may 

cause the vehicle to slip off the jack. 


  WARNING 

Disregarding the safety-related checklist may lead to accidents and serious personal injuries. 

  Always review and follow the checklist. Follow accepted safety practices and use common 

sense. 

Changing a wheel 


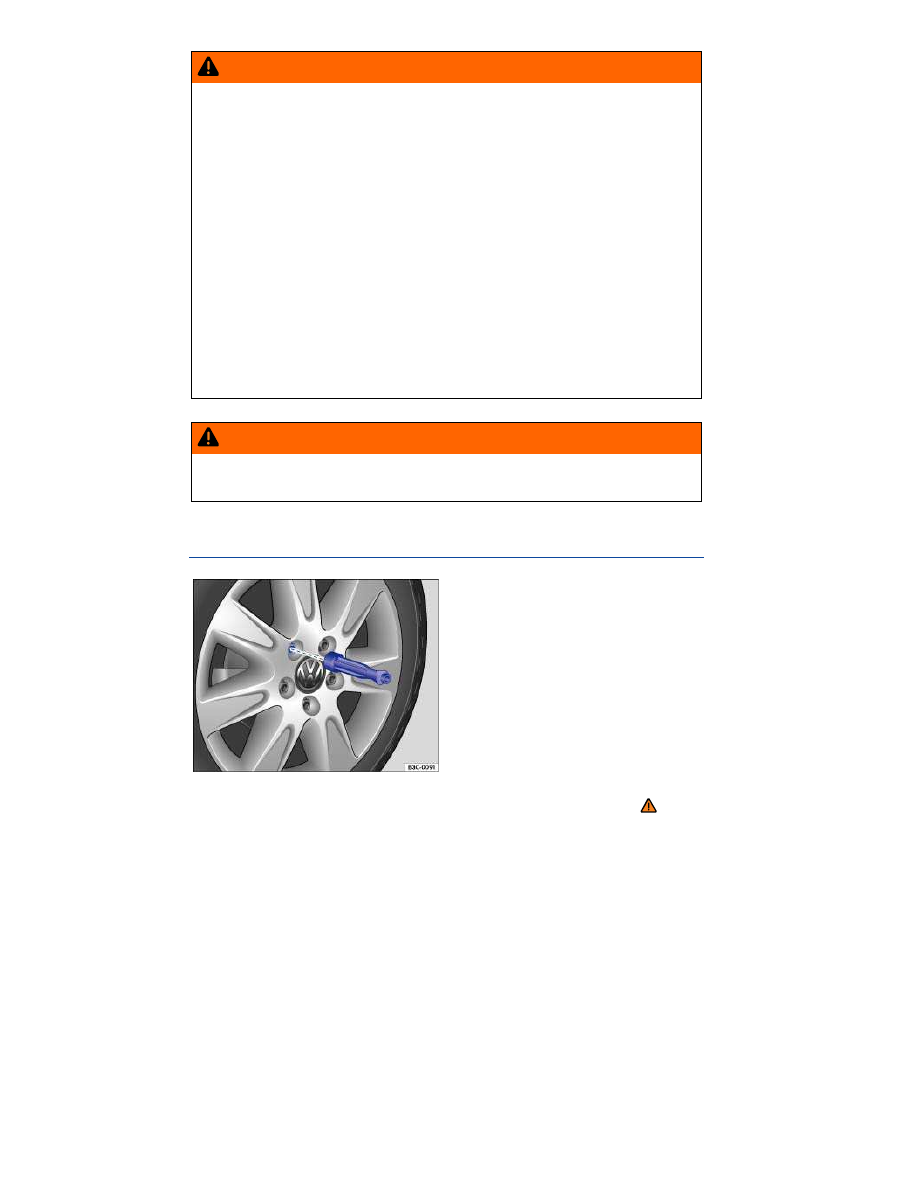
Fig. 187 Changing a wheel: remove previously loosened wheel bolts using the screwdriver handle. 

 Please first read and note the introductory information and heed the WARNINGS 


Removing the wheel 

  Review the checklist 

⇒  Preparations for changing a wheel

  Loosen the wheel bolts 

⇒  Wheel bolts

  Lift the vehicle 

⇒  Lifting the vehicle with the vehicle jack

  Completely unscrew and remove the previously loosened wheel bolts using the hexagonal socket 

in the screwdriver handle 

⇒ 

fig. 187

. Place the wheel bolts on a clean surface. 

  Remove the wheel. 

Mounting a spare or compact spare wheel 

If the tire is a unidirectional tire, be sure to install it in the proper rolling direction 

⇒ page 165, 

Unidirectional tires

  Place the spare wheel or compact spare wheel on the axle. 
  Screw in the wheel bolts clockwise and tighten them slightly using the hexagonal socket in the 

screwdriver handle. 

  Lower the vehicle with the jack. 

  Use the lug wrench to firmly tighten all wheel bolts (turn clockwise) 

⇒ 

. Do not tighten them in 

sequence! Tighten any wheel bolt to begin, then tighten the wheel bolt diagonally opposite the first 
bolt, and so forth. 

  Install the wheel bolt caps, center wheel hubcap, or wheel cover, if any 

⇒  Wheel trim

  WARNING 

Wheel bolts that are tightened or installed improperly can come loose, causing loss of 
vehicle control, a crash, and serious personal injury. 

  Always keep wheel bolts and threads in the wheel hub clean and free of oil and grease. 

The wheel bolts must turn easily and must be tightened with the right torque. 

  Use the hexagonal socket in the screwdriver handle only to turn the wheel bolts when they 

are loose, never to loosen them or tighten them firmly. 


  WARNING 

Improper use of a compact spare wheel can cause loss of vehicle control, a crash or other 
accident, and serious personal injury. 

  Never use a compact spare wheel if it is damaged or worn down to the wear indicators. 
  Never drive faster than 50 mph (80 km/h) with a compact spare wheel. Avoid full-throttle 

acceleration, heavy braking, and fast cornering! 

  Never drive more than 125 miles (200 km) with a compact spare wheel that is installed on 

the front axle (drive axle). 

  Replace the compact spare with a normal wheel and tire as soon as possible. Compact 

spare tires are designed for brief use only. 

After changing a wheel 

 Please first read and note the introductory information and heed the WARNINGS 


  Clean the tools in the vehicle tool kit if necessary and stow them in the foam insert in the luggage 

compartment 

⇒  Vehicle tool kit


  Securely store the compact spare wheel or the wheel you took off the vehicle in the luggage 

compartment. 

  Have the wheel bolt tightening torque immediately checked with a torque wrench 

⇒  Wheel bolt 

tightening torque

  Have the damaged wheel replaced as soon as possible. 

  If factory-installed wheels and/or tires are replaced, make sure that the tires are equipped with 

sensors that are compatible with the factory-installed Tire Pressure Monitoring System and with the 

wheels 

⇒  Tire Pressure Monitoring System (TPMS) and ⇒  New and replacement tires. The Tire 

Pressure Monitoring System must be recalibrated after each tire change 

⇒  Tire Pressure Monitoring 

System (TPMS) and recalibration with the SET button


Fuses 

 Introduction 

In this section you’ll find information about: 

Fuses in the vehicle


Replacing blown fuses


Due to ongoing development of the vehicle, configuration-dependent allocation of fuses and the 
combined fuse protection of multiple loads with one fuse, an up-to-date overview of the fuse location 
per load is not possible at the time of printing. Detailed information regarding fuse box layout is 
available from authorized Volkswagen dealers and authorized Volkswagen Service Facilities. 

In general, one fuse can protect several loads. One load can also be protected by several fuses. 

Find out why the fuse blew and correct the problem before replacing a blown fuse. If a newly replaced 
fuse blows again after a short time, the electrical system should be checked by an authorized 
Volkswagen dealer or an authorized Volkswagen Service Facility. 

More information: 

  Working in the engine compartment 

⇒ Working in the engine compartment 

  WARNING 

High voltage systems in the engine compartment can cause electrical shocks, severe burns, 
and even death! 

  Never touch ignition cables. Never touch other components of the high voltage electronic 

ignition system. 

  Avoid short circuits in the electrical system. 


  WARNING 

Using the wrong fuse, using a blown fuse that has been repaired, and using metal objects in 
place of fuses to complete the electrical connection in the circuit can cause fires and serious 
personal injury. 

  Never replace a fuse with one that has a higher amp rating. Replace a blown fuse only with 

a fuse of the same amperage (same color and same imprint) and same overall size. 

  Never repair fuses. 
  Never replace fuses with a metal strip, a paper clip, or a similar object. 


  NOTICE 

  To help prevent damage to the electrical system, switch off all lights and accessories, 

switch off the ignition, and remove the key from the ignition switch before replacing a fuse. 

  If a fuse is replaced with a fuse with higher amperage, this can also cause damage at 

different locations in the electrical system. 

  Open fuse boxes must be protected from dirt and moisture. Dirt and moisture in fuse boxes 

can cause damage to the electrical system. 


Fuses in the vehicle 


Fig. 188 On the driver side in the instrument panel: Fuse box cover with plastic tweezers 1 on the inside of 
the cover. 


Fig. 189 In the engine compartment: Fuse box cover. 

 Please first read and note the introductory information and heed the WARNINGS 


Replace a blown fuse only with a fuse of the same amperage (same color and same imprint) and 
same overall size. 

Fuse color coding 
 

Color  

Current strength in amps  

Purple  

3  

Light brown  

5  

Brown  

7.5  

Red  

10  

Blue  

15  


Color  

Current strength in amps  

Yellow  

20  

White or clear  

25  

Green  

30  

Orange  

40  


Opening the fuse box in the instrument panel 

  Insert a flat object, such as a screwdriver from the vehicle tool kit, into the opening 

⇒ 

fig. 188


(magnified view) and carefully lift off the cover. 

  On the inside of the cover there are plastic tweezers 

(1)

 for removing and inserting fuses. 

  To install, guide the cover from the bottom into the instrument panel and push until you can hear it 

latch into place. 

Opening the fuse box in the engine compartment 

  Open the engine hood   

⇒  Working in the engine compartment

  Move the release buttons in the direction of the arrows 

⇒ 

fig. 189

 to unlock the fuse box cover. 

  Remove the cover upward. 
  To install, place the cover on the fuse box. Slide release buttons against the direction of the 

arrows until they latch with an audible “click”. 

  NOTICE 

  To help prevent vehicle damage, be careful when removing fuse box covers and be sure to 

reinstall them properly. 

  Open fuse boxes must be protected from dirt and moisture. Dirt and moisture in fuse boxes 

can cause damage to the electrical system. 

  The vehicle contains other fuses in addition to those mentioned in this section. Have these fuses 

replaced by an authorized Volkswagen dealer or an authorized Volkswagen Service Facility. 


Replacing blown fuses 


Fig. 190 Illustration of a blown fuse. 


Fig. 191 Removing or inserting a fuse using the plastic tweezers 1. 

 Please first read and note the introductory information and heed the WARNINGS 


Preparations 

  Switch off the headlights, the ignition, and all electrical consumers. 

  Open the appropriate fuse box 

⇒  Fuses in the vehicle

Identifying blown fuses 

A blown fuse can be recognized by the burned metal strip 

⇒ 

fig. 190

Shine a flashlight on the fuse. This makes it easier to tell if the fuse has blown. 

Replacing the fuse 

  If needed, remove the plastic tweezers 

⇒ 

fig. 188


(1)

 from the fuse box cover. 

  For small fuses, slide the tweezers 

⇒ 

fig. 191


(1)

 onto the fuse from the top A

  For larger fuses, slide the tweezers 

(1)

 onto the fuse from the side B

  Pull out the blown fuse. 
  If the fuse is blown, replace the fuse with a new fuse of the same amperage (same color and same 

imprint) and same overall size 

⇒  . 


  If necessary, replace the plastic tweezers in the fuse box cover. 
  Replace the cover. 

  NOTICE 

If a fuse is replaced with a fuse with higher amperage, then damage can occur at various 
places in the electrical system.


Replacing light bulbs 

 Introduction 

In this section you’ll find information about: 

Indicator light


Replacing taillight bulbs in the luggage compartment lid


Replacing taillight bulbs in the vehicle body


Replacing license plate light bulbs


Changing a light bulb requires a certain amount of skill. Therefore, Volkswagen recommends having 
the light bulb changed by an authorized Volkswagen dealer or an authorized Volkswagen Service 
Facility. Special training and knowledge are generally required when other vehicle parts must be 
disassembled to replace a bulb, or when HID – High Intensity Discharge (Xenon) headlights must be 
replaced. 

You should always keep a box in the vehicle with all the replacement bulbs required for traffic safety. 
Replacement bulbs are available from your authorized Volkswagen dealer or authorized Volkswagen 
Service Facility. The laws of some countries explicitly require you to have replacement bulbs in the 
vehicle. 

Driving with outside lights that do not work may be against the law. 

To obtain the Volkswagen service information necessary to change light bulbs yourself, see 

⇒  

Volkswagen service information

Additional light bulb specifications 

Some factory-installed light bulbs in the headlights or the rear lights may have different specifications 
than conventional light bulbs. Specifications are on the glass bulb or on the metal base. 

  WARNING 

Crashes and other accidents can happen when you cannot see the road ahead and when you 
cannot be seen by other motorists. 


  WARNING 

Improper replacement of burned out headlights and other light bulbs can cause serious 
personal injury. 

  Stop! Always read and heed the WARNINGS before doing any work in the engine 

compartment 

⇒  Working in the engine compartment. The engine compartment of any motor 

vehicle is a potentially dangerous area, and work in this area can lead to serious personal 
injury. 

  HID – High Intensity Discharge (Xenon) headlights get power from a high voltage source 

that can cause severe personal injury and even death if handled improperly. 

  H7 bulbs and HID – High Intensity Discharge (Xenon) headlights are under high pressure 

and can explode if handled improperly. 

  Always let a burned out light bulb cool down before replacing it. 
  Never replace a light bulb unless you are familiar with all of the necessary procedures. In 

particular, never remove a headlight unless you know exactly how to carry out the job and 
have the correct tools and light bulbs. 

  If you are uncertain about what to do, have the work performed by an authorized 

Volkswagen dealer, an authorized Volkswagen Service Facility, or another qualified 
workshop. Serious personal injury may result from improperly performed work. 

  We strongly recommend that you always have HID – High Intensity Discharge (Xenon) 

headlights and H7 bulbs replaced by a qualified technician. 

  Do not touch the glass of light bulbs with your bare hands. Fingerprints left on the bulb 

evaporate due to the heat when the bulb is switched on and cause the reflector to “cloud.” 

  There are sharp edges on and around the headlight housing in the engine compartment 

and the rear light housing. Wear hand protection if you replace bulbs. 


  NOTICE 

After replacing a headlight bulb or other light bulb, always make sure that the rubber covers or 
plastic caps have been properly and securely reinstalled to help prevent water from getting 
into the electrical connections and the headlight housing and damaging the electrical system.
 

  LEDs cannot be replaced. Contact your authorized Volkswagen dealer or authorized Volkswagen 

Service Facility for assistance. 

Indicator light 

 Please first read and note the introductory information and heed the WARNINGS 


Lights 

up  

Possible cause  

Proper response  


Light bulb of the exterior vehicle lighting 

not working.

7


See an authorized Volkswagen dealer, an 

authorized Volkswagen Service Facility, or 

other qualified workshop to replace the light 

bulb that isn't working.  


7

  Displayed in color on an instrument cluster with color display. 


When the ignition is switched on, several warning and indicator lights come on briefly for a function 
check. They go out after a few seconds. 

  WARNING 

Failure to heed warning lights and instrument cluster text messages can cause the vehicle to 
break down in traffic and result in a collision and serious personal injury. 

  Never ignore warning lights or text WARNINGS. 
  Always stop the vehicle as soon as it is safe to do so. 


  NOTICE 

Failure to heed warning lights or text WARNINGS can result in vehicle damage. 

  Failure of a single LED within a taillight is not indicated. However, the   indicator light will light 

up if all LEDs fail. 

Replacing taillight bulbs in the luggage compartment lid 

 Please first read and note the introductory information and heed the WARNINGS 


LEDs in the taillights in the luggage compartment lid 

Changing LEDs is not possible without dismantling vehicle components. Contact an authorized 
Volkswagen dealer or an authorized Volkswagen Service Facility for assistance. 

Replacing taillight bulbs in the vehicle body 

 Please first read and note the introductory information and heed the WARNINGS 


LEDs in the taillights in the vehicle body 

Changing LEDs is not possible without dismantling vehicle components. Contact an authorized 
Volkswagen dealer or an authorized Volkswagen Service Facility for assistance. 

Replacing license plate light bulbs 

 Please first read and note the introductory information and heed the WARNINGS 


LEDs in the license plate lights 

Your vehicle is equipped with LED license plate lights. Individual LED lights cannot be replaced. It is 
not possible to replace the LED unit without dismantling vehicle components. Please see an 
authorized Volkswagen dealer or an authorized Volkswagen Service Facility for assistance. 


Jump-starting 

 Introduction 

In this section you’ll find information about: 

Using jumper cables


If your engine does not start because the vehicle battery is dead, your vehicle's battery can be 
connected to the battery of another vehicle to start your engine (jump-starting). Check the battery acid 

level indicator on the vehicle battery before jump-starting 

⇒  Vehicle battery

You must use jumper cables that meet recognized industrial standards (check information provided by 
the jumper cable manufacturer). For vehicles with gasoline engines, the cross-section of the jumper 
cable wire must be at least 0.038 in

2

 (25 mm

2

), or about 3 ga. (AWG). 

More information: 

  Starting assistance systems  
  Working in the engine compartment  
  Vehicle battery  

  WARNING 

Working on the batteries or the electrical system in your vehicle can cause serious acid 
burns, fires, or electrical shock. 

  Always keep children away from battery acid and vehicle batteries in general. 
  Sulfuric battery acid is very corrosive and can cause blindness and damage to 

unprotected skin. Never let battery acid or lead particles contact your eyes, skin, and 
clothing. 

  Never lean over a vehicle battery. Always wear protective gloves and eye protection. To 

reduce your risk of injury, never tilt the batteries; acid could spill out through the vents and 
burn you. 

  A highly explosive mixture of gases is given off when the battery is being charged. 
  Always avoid fires, sparks, open flame, and smoking. Never create sparks or electrostatic 

charges when handling cables and electrical equipment. Never short-circuit the battery 
terminals. High-energy sparks can cause serious personal injury. 

  If you get battery acid in your eyes or on your skin, immediately rinse with cold water for 

several minutes and get medical attention immediately. If you swallow any battery acid, get 
medical attention immediately. 


  WARNING 

Improper use of jumper cables when jump-starting a vehicle with a dead battery can cause 
the battery to explode, leading to serious personal injury. To help reduce the risk of battery 
explosion: 

  All work on the batteries or the electrical system in your vehicle can cause serious acid 

burns, fires, or electrical shocks. Always read and heed the following WARNINGS and safety 

precautions before working on the batteries or the electrical system 

⇒ page 298, Vehicle 

battery

  Always make sure that the battery providing starting assistance (the booster battery) has 

the same voltage as the dead battery (12 V) and about the same amperage capacity (see 
battery label). 

  Never jump-start a vehicle with a thawed or frozen vehicle battery. The battery can 

explode. A dead battery can freeze at temperatures around +32 °F (0 °C). 

  A battery that is frozen or was frozen, but has since thawed, must be replaced. 
  When the vehicle battery is jump-started, it gives off hydrogen gas, which is highly 

explosive! Always keep fire, sparks, open flame, and smoking materials far away from vehicle 
batteries. Never use a mobile telephone while connecting or disconnecting jumper cables. 

  Jump-start batteries only in well-ventilated areas. Batteries give off highly explosive 

hydrogen gas during jump-starting. 

  Always route the jumper cables so that they cannot get caught in any moving parts in the 

engine compartment. 

  Never short out the battery terminals by connecting the positive (+) and negative (-) 

terminals with each other. 

  Never connect the negative cable from the other vehicle directly to the negative terminal 

of the dead battery, as this may cause the hydrogen gas given off by the dead battery to 
explode. 

  Never attach the negative cable from the vehicle providing starting assistance to any part 

of the fuel system or to the brake hoses or brake lines. 

  Never allow the non-insulated parts of the battery clamps to touch. 
  Never allow the jumper cable attached to the positive battery terminal to contact metal 

parts of the vehicle. 

  Always follow the instructions of the jumper cable manufacturer. 


  NOTICE 

To help prevent extensive damage to the vehicle electrical system, read and heed the 
following:
 

  Connecting jumper cables improperly can cause a short circuit and do expensive damage 

to the vehicle's electrical system. 

  Do not let the vehicles touch each other while the jumper cables are connected. If they do, 

electrical current may flow between the vehicles when the positive (+) terminals are connected, 
causing electrical system damage.


Using jumper cables 


Fig. 192 Diagram for attaching the jumper cables: Dead battery 1 and booster battery 2. 

 Please first read and note the introductory information and heed the WARNINGS 


The dead battery must be properly connected to the vehicle's electrical system. 

Make certain that the vehicles are not touching each other. Otherwise, electric current could flow as 
soon as the positive terminals (+) are connected. Use longer jumper cables if necessary. 

The clamps on the jumper cables must have good contact to bare metal on the battery terminals. 

If the engine does not start, stop the process after 10 seconds and repeat after about 1 minute. 

The procedure for attaching and for removing the jumper cables is described below. Perform each of 
the following steps only in the order described, which follow the letters shown in the illustration 
⇒ 

fig. 192

 A – B – C – D

Attaching jumper cables 

1.  Switch off the ignition in both vehicles 

⇒  Starting and stopping the engine

2.  Open the battery cover in the engine compartment if the battery has a cover 

⇒  Vehicle battery

3.  Attach one end of the red jumper cable to the positive terminal 

(+)

 of the dead battery: 

(1)


⇒ 

4.  Attach the other end of the red jumper cable to the positive terminal 

(+)

 of the good battery 

(booster battery): 

(2)

5.  Attach one end of the black jumper cable to the negative terminal 

(-)

 of the booster battery: 

(2)


⇒ 

fig. 192

6.  Attach the other end of the black jumper cable 

(3)

 to a bare metal part of the vehicle with the 

dead battery. This part should be connected directly to the engine block. You may also attach the 

cable to the engine block itself or to the towing eye installed on the front of the vehicle 

⇒  Towing

Attach the clamp to a point that is as far away as possible from the dead battery 

(1)


⇒ 

7.  Route the jumper cables so that they cannot get caught in any moving parts in the engine 

compartment of either vehicle. 


Starting the engine 

  Start the engine of the vehicle with the good battery that is providing help and let it run at idle 

speed. 


  Turn on the ignition of the vehicle with the dead battery. If the engine starts, wait 2 to 3 minutes 

until it “runs smoothly” before removing the jumper cables as described below 

⇒ 

. If the engine 

does not start within about 10 seconds, turn off the ignition and wait at least 1 minute; then try again. 

Before removing the jumper cables 

  Switch off the headlights (if they are on). 
  In the vehicle with the dead battery, switch on the heater fan and the rear window defroster. This 

helps to minimize voltage spikes when the cables are disconnected. 

Removing jumper cables 

With the engine running, remove the jumper cables in reverse order to the way they were connected. 

1.  Disconnect the black (-) cable from the vehicle with the dead battery. 

2.  Disconnect the black (-) cable from the other vehicle (vehicle with the good battery). 

3.  Disconnect the red (+) cable from the other vehicle (vehicle with the good battery). 

4.  Disconnect the red (+) cable from the vehicle with the dead battery. 

5.  Close the battery cover. 

6.  If necessary, unscrew the towing eye on the front of the vehicle 

⇒  Installing the front towing eye


  WARNING 

Improper use of jumper cables when jump-starting a vehicle with a dead battery can cause 
the battery to explode, leading to serious personal injury. To help reduce the risk of battery 
explosion: 

  All work on the batteries or the electrical system in your vehicle can cause serious acid 

burns, fires, or electrical shocks. Always read and heed the following WARNINGS and safety 

precautions before working on the batteries or the electrical system 

⇒ page 298, Vehicle 

battery

  Always wear proper eye protection. Never lean over the vehicle battery. 
  Attach the jumper cables in the correct order: first the positive cable, then the negative 

cable. 

  Never connect the negative cable from the vehicle providing starting assistance to parts 

of the fuel system or to the brake hoses or brake lines. 

  Never allow the non-insulated parts of the battery clamps to touch. 
  Never allow the jumper cable attached to the positive battery terminal to contact metal 

parts of the vehicle. 

  Check the battery acid level indicator window on the vehicle battery. Use a flashlight, 

never a match, cigarette lighter, or other open flame. If you cannot see the color of the 
window clearly, or if it is light yellow or colorless, do not jump-start the vehicle. Get expert 
assistance. 

  Avoid electrostatic discharge in the vicinity of the vehicle battery. Sparks may cause the 

hydrogen gas escaping from the vehicle battery to ignite. 

  Never jump-start a vehicle with a battery that is damaged or frozen or that was frozen and 

has thawed. The battery can explode. Replace the battery instead. 

  Always follow the instructions of the jumper cable manufacturer. 
  Always make sure that the battery providing starting assistance has the same voltage as 

the dead battery (12 V) and about the same capacity (see battery label). 

  Batteries give off explosive hydrogen gas. Always keep fire, sparks, open flame and 

smoking materials away from batteries. 

  Never connect the negative cable from the other vehicle directly to the negative terminal 

of the dead battery. The hydrogen gas from the battery is explosive. 

  Never short out the battery terminals by connecting the positive (+) and negative (-) 

terminals with each other. 


Content   ..  22  23  24  25   ..