Volkswagen EOS (2015 year). Instruction - part 9


  Index      Volkswagen     Volkswagen EOS - instruction 2015 year in english


Search            copyright infringement  


Content   ..  7  8  9  10   ..


Volkswagen EOS (2015 year). Instruction - part 9


Wiper performance in different situations:  

During intermittent wiping:  

Speed-dependent interval control: The higher the vehicle 
speed, the faster the wipers move.  


Heated washer nozzles 

The heating thaws frozen washer nozzles, but not the fluid supply hoses. When the ignition is switched 
on, the heat applied to the washer nozzles is automatically regulated depending on the outside air 
temperature. 

Headlight washer system 

The headlight washer system cleans the headlight glass. 

If the ignition and the headlights (high or low beams) are switched on, the headlights are cleaned the 
first time and every fifth time the front windshield washers are activated. This happens only when the 
low or high beams are on when the windshield wiper lever is pulled towards the steering wheel. 
However, the headlights must still be washed by hand periodically (for instance, during refueling) in 
order to get rid of hard-to-remove dirt (like insect splatter). 

To help make sure that the headlight cleaning system works during winter weather, always keep the 
headlight washer nozzles free of snow and remove any ice with a deicer spray before driving. Use a 
deicer spray to remove any ice. 

  If there is something on the windshield, the wiper will try to wipe it away. If it continues to block 

the wiper, the wiper will stop moving. Remove the obstacle and switch the wiper on again. 

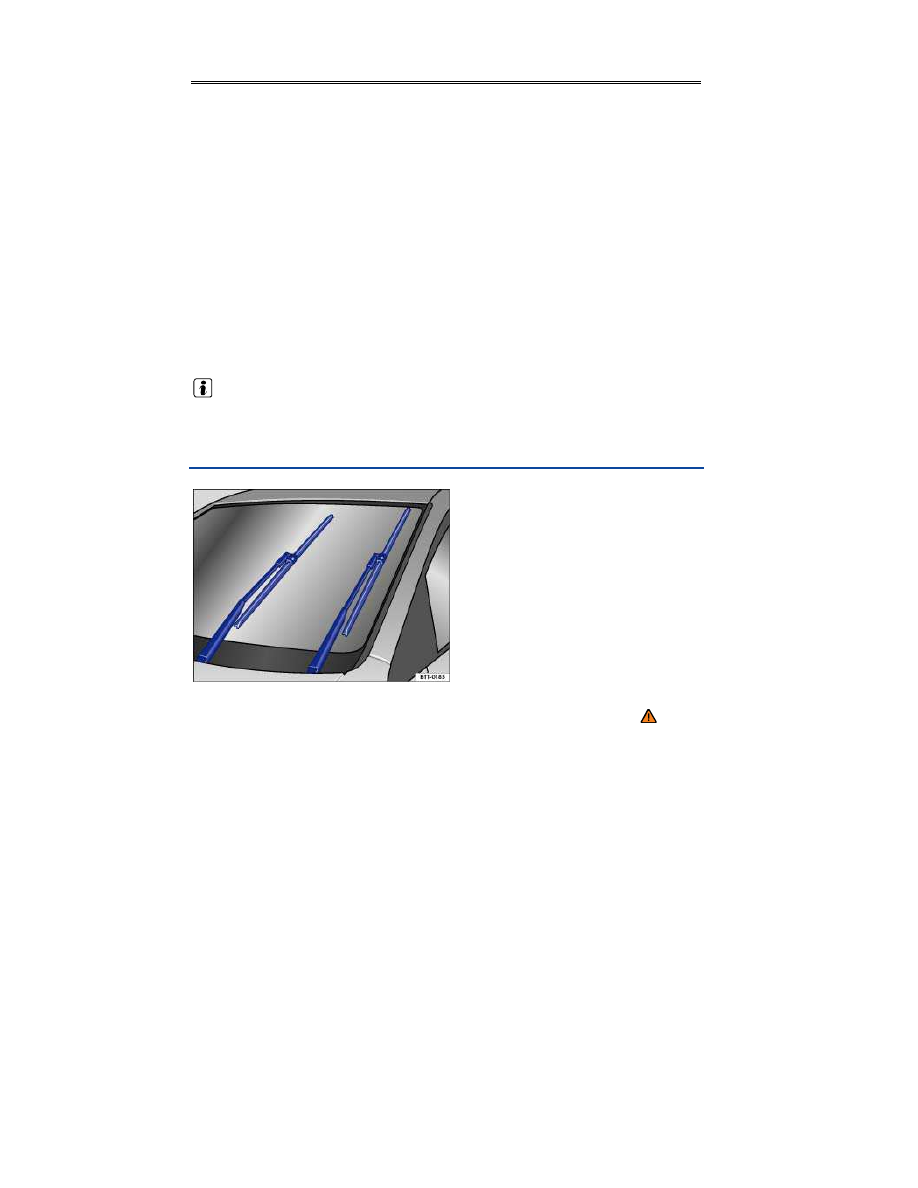
Windshield wiper service position 


Fig. 89 Windshield wiper in service position. 

 Please first read and note the introductory information and heed the WARNINGS 


In the service position, the wiper arms can be lifted away from the windshield 

⇒ 

fig. 89

. The wipers are 

moved to the service position as follows: 

  The engine hood must be closed, Working in the engine compartment
  Switch the ignition off, turn it on briefly, and then off again. 

  Press the windshield wiper lever down briefly 

⇒ 

fig. 88


(E)

 when the ignition is off. 


  Wipers move into service position. 

Carefully fold the wiper arms back onto the windshield before driving! Switch the ignition on and press 

the windshield wiper lever down briefly 

⇒ 

fig. 88


(E)

. The wiper arms move back to their original 

position. 

Lifting the wiper blades and tilting them away from the windshield 

  Put the wiper arms in service position 

⇒  . 

  Do not handle the wiper blades, handle the wiper arms only at the attachment above the wiper 

blades. 

  NOTICE 

  To help prevent damage to the engine hood and the windshield wiper arms, lift the wiper 

arms away from the windshield only when they are in the service position. 

  Always carefully fold the windshield wiper arms down against the windshield before driving 

the vehicle. 

Rain sensor 


Fig. 90 Windshield wiper lever: Adjusting rain sensor 1. 


Fig. 91 Inside the front windshield above the inside mirror: Sensitive rain sensor surface. 

 Please first read and note the introductory information and heed the WARNINGS 


When switched on, the rain sensor automatically shortens or lengthens the time between wiping 

intervals depending on how hard it is raining 

⇒ 

. The rain sensor's sensitivity can be adjusted 

manually. Manual wiping (vehicles without rain sensors), see, Windshield wiper lever


Push the lever into the desired position 

⇒ 

fig. 90

(A)


Rain sensor off (windshield wiper lever home position). 

(B)


Rain sensor active – automatic wiping as needed. 

(1)


Adjusting the sensitivity of the rain sensor: 
–  Move switch to the right – high sensitivity. 
–  Move switch to the left – low sensitivity. 

After switching the ignition off and back on again, the rain sensor stays on and works again with the 
wiper lever in position 

(B)

Possible reasons for changes in the way the rain sensor works 

The rain sensor may misread what is happening in the detection zone of its sensitive rain-sensor 

surface 

⇒ 

fig. 91

 (arrow) and not work for a number of reasons, which include: 

  Worn out wiper blades: Worn out wiper blades may leave a film of water or wiping streaks; this can 

cause the wipers to run longer, to wipe more often, or to wipe continuously at high speed. 

  Insects: Insects hitting the sensor may trigger the wipers. 
  Salt streaks: Salt streaks on the windshield from winter driving can cause wiping more often or 

continuously on glass that is almost dry. 

  Dirt: Caked-on dust, wax, any other buildup on the windshield (lotus effect), or car-wash detergent 

residue can lower the rain sensor's sensitivity and cause it to react too slowly or not at all. 

  Crack or chip in the windshield: If a stone hits and chips the windshield while the rain sensor is on, 

this will trigger a wiper cycle. After that, the rain sensor will recognize the change and recalibrate itself 
to respond to the sensitive surface's reduced detection zone. Depending on the size of the chip, the 
sensor's reaction pattern may or may not change. 

  WARNING 

The rain sensor cannot always recognize rain and activate the wipers. 

  Switch the wipers on manually when water on the windshield reduces visibility. 

  Clean the rain sensor's sensitive surface 

⇒ 

fig. 91

 (arrow) regularly and check the wiper blades 

for wear or damage. 

  To remove wax and coats of polish safely, we recommend using an alcohol-based windshield 

cleaner. 


Checking and refilling windshield washer fluid 


Fig. 92 In the engine compartment: Cap of the windshield washer fluid reservoir. 

 Please first read and note the introductory information and heed the WARNINGS 


Check the windshield washer fluid level regularly and refill as necessary. 

There is a filter screen in the filler neck of the windshield washer fluid reservoir. The screen helps to 
keep large particles and debris from getting into and clogging the windshield washer nozzles when 
adding windshield washer fluid. Take the screen out only to clean it. If the screen is damaged or 
missing, have it replaced immediately, otherwise the system may become clogged and not work 
properly. 

  Open the engine hood   

⇒ Working in the engine compartment

  The windshield washer fluid reservoir can be identified by the   symbol on its cap 

⇒ 

fig. 92

  Check if there is still enough windshield washer fluid in the reservoir. 
  Refill with clear water (not distilled water) and an appropriate windshield washer fluid that is 

recommended by Volkswagen 

⇒  . Follow the directions on the container. 

  In cold weather, always use a special windshield washer antifreeze solution that will help keep the 

water from freezing 

⇒ 

Recommended cleaners 

  For the warmer months, Windscreen Clear SummerG 052 184 A1 or equivalent. Mixing ratio 

1:100 (1 part concentrate to 100 parts water) in the windshield washer reservoir. 

  All-season Windscreen ClearG 052 164 A2 or equivalent. Mixing ratio in winter to 0 °F (-18 °C) 

about 1:2 (1 part concentrate to 2 parts water), otherwise, mixing ratio 1:4 in the windshield washer 
reservoir. 

Filling capacity 

The windshield washer fluid reservoir holds 3.1–4.2 quarts (about 3–4 liters); in vehicles with a 
headlight cleaning system 3.1–6.3 quarts (about 3–6 liters). 

  WARNING 

Never mix antifreeze or similar additives into the windshield washer reservoir. This could 
produce an oily film on the windshield, which would considerably reduce visibility. 

  Use clear water (not distilled) with a cleaning solution recommended by Volkswagen. 

  If necessary, blend with a suitable windshield washer fluid antifreeze agent. 


  NOTICE 

  Never mix cleaning solutions recommended by Volkswagen with other cleaning agents. If 

you do, this could cause sediments or other by-products that can clog the windshield washer 
nozzles.
 

  When refilling, do not confuse one type of operating liquid with another! Otherwise serious 

malfunctions and engine damage can occur! 


Mirrors 

 Introduction 

In this section you’ll find information about: 

Inside mirror


Outside mirrors


Outside mirrors


For your driving safety, it is important that you properly adjust the outside mirrors and the inside mirror 

before you start driving 

⇒ 

The outside mirrors and the inside mirror help you see and adapt your driving to traffic behind you. 
Remember that the inside and outside rearview mirrors will not show everything behind you. There 
can be blind spots. Blind spots can be significantly larger if the mirrors are not properly adjusted. 

More information: 

  Exterior views  
  Volkswagen Information System  
  Adjusting the seating position  
  Shifting  
  Braking and parking  

  WARNING 

Adjusting mirrors when the vehicle is moving can cause driver distraction, accidents, and 
serious personal injury. 

  Always adjust the rearview mirrors when the vehicle is not moving. 
  Always be aware of what is happening around the vehicle when changing lanes, passing, 

turning, or parking. Another vehicle, pedestrian, or object could be in your blind spot. 

  Always make sure mirrors are properly adjusted and the view to the rear is not reduced by 

moisture, ice, snow, or other things. 


  WARNING 

Self-dimming mirrors contain an electrolyte fluid which can leak if the mirror glass is broken. 
Electrolyte fluid can irritate the skin, eyes, and respiratory system. 

  Repeated or prolonged exposure to electrolyte fluid can irritate the respiratory system, 

especially among people with asthma or other respiratory conditions. Get fresh air 
immediately by leaving the vehicle or, if that is not possible, open windows and doors all the 
way. 

  If electrolyte fluid gets into the eyes, flush them thoroughly with large amounts of clean 

water for at least 15 minutes; medical attention is recommended. 

  If electrolyte fluid contacts skin, flush affected area with clean water for at least 

15 minutes and then wash affected area with soap and water; medical attention is 
recommended. Thoroughly wash affected clothing and shoes before reuse. 

  If swallowed, and the person is conscious, rinse mouth with water for at least 15 minutes. 

Get medical attention immediately. Do not induce vomiting unless instructed to do so by a 
medical professional. 


  NOTICE 

Broken glass in the self-dimming mirrors can cause electrolyte fluid leakage. Liquid electrolyte 
leaked from a broken mirror glass will damage any plastic surfaces it comes in contact with. 
Clean up spilled electrolyte fluid immediately with clear water and a sponge.
 

Inside mirror 


Fig. 93 Manually adjustable inside mirror. 


Fig. 94 Self-dimming inside mirror (if applicable): Version A and Version B. 

 Please first read and note the introductory information and heed the WARNINGS 


Adjust the inside mirror to make sure that there is good visibility through the rear window. 

For example, visibility through the rear window could be impaired if there is a sunshade on the rear 
window or clothing on the luggage compartment cover, or if the rear window is covered with ice, snow, 
or dirt. 

Manually adjustable inside mirror 

  Home position: Lever on the bottom edge of the mirror points forward. 

  To adjust to non-glare visibility, move the lever so that it points backward 

⇒ 

fig. 93

Self-dimming inside mirror (if applicable) 

Key to 

fig. 94

(1)


Indicator light 

(2)


Switch 

(3)


Sensor for recognizing entry of light 


The self-dimming feature can be switched on and off with the switch on the inside mirror 

(2)

 A or   

(2)


B. When self-dimming is activated, the indicator light 

(1)

 is on. 

If the ignition is switched on, the sensor 

(3)

 automatically darkens the inside mirror depending on the 

amount of light shining into the vehicle from the rear. 

The self-dimming feature is deactivated when you shift the transmission into reverse or switch on the 
interior lights or the reading light. 

Do not attach external navigation devices to the windshield or in the vicinity of the self-dimming inside 

mirror 

⇒ 

  WARNING 

The illuminated display on an external navigation device can cause the self-dimming inside 
mirror to malfunction, which can result in crashes and serious injuries. 

  Malfunctions in the self-dimming function can result in the inside mirror being unable to 

evaluate the exact distance of vehicles in the rear or other objects. 

  If the light striking the sensor is filtered or blocked (such as by a sunshade), the self-dimming 

inside mirror will not work properly or may not work at all. 

  When the CSC roof is down, the self-dimming inside mirror may darken under certain lighting 

conditions even though this is unnecessary. Turn off the self-dimming feature if necessary. 

Outside mirrors 


Fig. 95 In the driver door: Adjusting knob for the outside mirrors. 

 Please first read and note the introductory information and heed the WARNINGS 


Turn the knob in the driver door 

⇒ 

fig. 95

 to adjust the outside mirrors. 


Turn the rotary knob to the desired position:  


Fold the outside mirror in toward the vehicle body 

⇒ 

.  


Turn the rotary knob to the desired position:  


Switch on outside mirror heating. Heats only at outside air 
temperatures below +68 °F (+20 °C).  


Adjust the left outside mirror by pressing the knob to left/right 
and up/down.  


Adjust the right outside mirror by pressing the knob to left/right 
and up/down.  


Neutral position. Outside mirror folded out, no heating or 
adjustment possible.  


Synchronous mirror adjustment 

  In the Settings - Convenience menu, select Mirror adjust - Both mirrors for 

synchronous outside mirror adjustment 

⇒  Volkswagen Information System

  Turn the adjusting knob to the L position. 
  Adjust the left outside mirror. The right (passenger) outside mirror will automatically adjust at the 

same time. 

  If needed, correct the position of the right mirror by turning the adjusting knob to the R position. 

Self-dimming outside mirror on the driver side 

Some models are equipped with an self-dimming outside mirror, which is controlled together with the 

self-dimming inside mirror 

⇒ 

fig. 94

Memory for front passenger side mirror (when backing up) 

  Choose the remote control vehicle key that will be used with the settings about to be made. 
  Unlock the vehicle with that remote control vehicle key. 
  Set the parking brake. 
  Switch on the ignition. 
  Activate the function Mirror down in the Settings - Convenience menu. 
  Turn the adjusting knob for the side mirrors to the R position. 
  Shift the transmission into Reverse (R)

  Adjust the passenger outside mirror for a clear view of the curb, for example. 
  The adjusted mirror position is automatically stored and assigned to the vehicle key used to unlock 

the vehicle. The preselected position will be recalled when the key assigned to that mirror adjustment 
position is used again. 

Recalling passenger side mirror settings 

  Turn the adjusting knob for the side mirrors to the R position. 

  Shift the transmission into reverse gear with the ignition switched on. 
  The mirror moves back to the regular position when the vehicle moves forward faster than about 

10 mph (15 km/h) or the adjusting knob is turned to the O or L position. 


  WARNING 

Improper use of the folding outside mirrors can cause personal injury. 

  Always make sure that nobody is in the way when folding the mirrors in or out. 
  Make sure that you do not get your finger caught between the mirror and the mirror base 

when moving the mirrors. 


  WARNING 

Incorrectly estimating distances with the right outside mirror can cause collisions and 
serious injury. 

  The right outside mirror has a convex (curved) surface. This widens your field of vision. 

But vehicles or other objects seen in a convex mirror will look smaller and farther away than 
they really are. 

  If you use the right outside mirror to judge distances from vehicles behind you when 

changing lanes, you could estimate incorrectly and cause a crash and serious injuries. 

  Whenever possible, use the inside mirror to more accurately judge distance and size of 

vehicles or other objects seen in the convex mirror. 

  Always make sure you have a clear view to the rear of the vehicle. 


  NOTICE 

Always fold in the outside mirrors when taking the vehicle through an automatic car wash. 

  Never fold power mirrors in manually because doing so could damage the electrical drive. 

  To reduce fuel consumption, use outside mirror heating only when needed. 

  When first switched on, outside mirror heating works with maximum heat for about 2 minutes. 

  If power mirror adjustment does not work, the outside mirrors can be adjusted by hand by 

pressing on the edges of the mirror surface. 


Driving tips 

 Introduction 

In this section you’ll find information about: 

Stowing luggage


Luggage compartment cover


Driving with an open luggage compartment lid


Driving a loaded vehicle


Weights and axle weights


Always stow heavy objects in the luggage compartment. Always secure the objects with suitable 
straps. Never overload the vehicle. Remember that the vehicle load, as well as how it is distributed, 

can affect vehicle handling and braking 

⇒ 

More information: 

  Luggage compartment lid  
  Folding the passenger seat backrest forward  
  Lights  
  Luggage compartment  
  Trailer towing  
  Tires and wheels  

  WARNING 

Unsecured or incorrectly stowed items can fly through the vehicle, causing serious personal 
injury during hard braking or sharp steering or in an accident. Loose items can also be struck 
and thrown through the passenger compartment by the front airbags if they inflate. To help 
reduce the risk of serious personal injury: 

  Always stow all objects securely in the vehicle. 
  Always keep storage compartments closed while driving. 
  Do not stow hard, heavy, or sharp objects in open bins in the vehicle or on top of the 

instrument panel. 

  Remove hard, heavy, and sharp objects from clothing and bags in the vehicle interior and 

stow securely. Always put heavy items in the luggage compartment. 

  Always secure objects in the passenger compartment properly with suitable straps so that 

they cannot move into the deployment area of a side or front airbag during braking, in a 
sudden maneuver, or in a collision. 

  Always make sure that there is nothing on the front passenger seat when the backrest is 

folded forward. When the backrest is folded forward, even light objects could be pushed into 
the seat cushion and cause the weight-sensing mat in the seat to register enough weight to 
turn the airbag on 

  Always make sure that the PASSENGER AIR BAG 

   light is on and stays on whenever 

the backrest of the front passenger seat is folded forward. PASSENGER AIR BAG 

   light

  Passengers must never ride in an incorrect seating position because objects are being 

transported in the vehicle. 

  Never let anybody sit in a seat that is blocked by objects being carried in the vehicle. 


  WARNING 

Heavy loads will influence the way your vehicle handles and increase stopping distances. 
Heavy loads that are not properly stowed or secured can cause loss of control and serious 
injury. 

  Secure the load properly to keep it from shifting. 

  Always remember when transporting heavy objects that a change in the center of gravity 

also changes the way your vehicle handles: 
 

–  Always distribute the load as evenly as possible. 


–  Secure heavy objects properly as far forward in the luggage compartment as possible. 


–  Always tie down heavy items securely with suitable straps in the luggage 
compartment. 

  Never exceed the Gross Axle Weight Rating or the Gross Vehicle Weight Rating on the 

safety compliance sticker on the left door jamb. Exceeding permissible weight can cause the 
vehicle to skid and handle differently. 

  Always adapt your speed and driving to the heavier load and the weight distribution in the 

vehicle. Take road, weather, traffic, and visibility conditions into account as well. 

  Always accelerate gently and avoid sudden braking and driving maneuvers. 
  Always brake earlier than you would if you were not driving a loaded vehicle. 


  NOTICE 

  When the CSC roof opens (goes down), it folds completely into the luggage compartment. 

The open CSC roof fills all the space above and on both sides of the cover that is installed 
inside the luggage compartment. When the CSC roof opens and retracts, it must be able to 
lower itself completely into the luggage compartment without any interference.
 

  When you put the roof down, items 

–  to the left or right of the luggage compartment cover, 
–  on top of the luggage compartment cover, or 
–  above the level of the luggage compartment cover at the rear of the vehicle will prevent the roof 
from folding up completely in the luggage compartment and will damage the CSC roof. Damage to 
the CSC roof caused by items in those areas of the luggage compartment where the CSC 
roof segments are stored when retracted will not be covered by any Volkswagen Limited 
Warranty.
 

  The heating wires in the rear window can be severely damaged by hard or sharp things in 

the area below the rear window. 


Stowing luggage 


Fig. 97 Luggage compartment cover in the luggage compartment. 

 Please first read and note the introductory information and heed the WARNINGS 


Always stow all luggage securely in the vehicle 

  Stow luggage only in the space that remains underneath the luggage compartment cover when 

the cover is locked into its latches in its "down" position (blue shaded area) 

⇒ 

fig. 97

. Otherwise, both 

the CSC roof and the luggage may be damaged. When you open the CSC roof (put it down), the roof 
is stored in the luggage compartment above and on both sides of the luggage compartment cover. 
Nothing may be in the way when the roof lowers into the luggage compartment. 

  Distribute the load in the vehicle and in the trailer as evenly as possible. 
  Put heavy objects as far forward as possible in the luggage compartment. 
  Secure luggage in the luggage compartment with suitable straps, Luggage compartment
  Have the headlight range adjusted, if necessary, Lights
  Check the pressure in all 4 tires when the tires are still cold. Never reduce air pressure in warm 

tires to match cold tire inflation pressure. Heed the information on the tire pressure label, Tires and 
wheels

  Pay especially close attention to your vehicle's Tire Pressure Monitoring System when driving with 

a heavy load  

  NOTICE 

The defroster heating wires in the rear window can be damaged by objects that rub against 
them.
 

  Please review the information on loading a trailer , Trailer towing

  In order to open or close the CSC roof, the luggage compartment cover must be down and 

locked in place in its latches 

⇒ 

fig. 98

 (inset). 


Luggage compartment cover 


Fig. 98 Lifting up the inside luggage compartment cover. 


Fig. 99 Removing the inside luggage compartment cover. 

 Please first read and note the introductory information and heed the WARNINGS 


When the CSC roof is closed, you can raise the luggage compartment cover or remove it entirely. 
This makes more space available in the luggage compartment for cargo. In order to open the CSC 
roof, the luggage compartment cover must be down and locked in place in its latches (magnified view). 

When the CSC roof is open (down), it is stowed completely in the luggage compartment. The luggage 
compartment cover divides the space needed by the CSC roof when open from the space that still 
remains available for luggage in order to help prevent you from using space that the roof needs. There 
is accordingly much less space available for cargo in the luggage compartment when the CSC roof is 
lowered and stored. It is not possible to raise the luggage compartment cover when the CSC roof is 
open. 

Raising the luggage compartment cover 

  Pull the luggage compartment cover up by the handle 

⇒ 

fig. 98


(A)

. A little extra force may be 

needed to disengage the cover from the latches (magnified view). 

  Lift the cover up. 
  Latch the cover by slipping hooks 

(B)

 over tabs 

(C)


Lowering the luggage compartment cover 

  Using handle 

(A)

, pull back slightly on the luggage compartment cover to release the hooks from 

the tabs. 

  Lower the cover and push it completely into its latches 

⇒ 

fig. 98

 (magnified view), so that these 

engage. 

Removing the luggage compartment cover 

  Lift the cover up. 

  Pull the latch 

⇒ 

fig. 99

 (magnified view) in the direction of the arrow to release the hinge. 

  Raise the left side of the luggage compartment cover until the left locking pin lifts out of the 

attachment. 

  Pull the luggage compartment cover slightly to the left to pull the right locking pin out of its 

attachment. 

  Remove the luggage compartment cover. It is now impossible to open and close the CSC roof. 

Installing the luggage compartment cover 

To install the luggage compartment cover, perform the steps for removal in reverse order. 

  In order to open or close the CSC roof, the luggage compartment cover must be down and 

locked in place in its latches 

⇒ 

fig. 98

 (inset). 

Driving with an open luggage compartment lid 

 Please first read and note the introductory information and heed the WARNINGS 


Driving with an open luggage compartment lid, especially when the CSC roof is closed, can lead to 
serious personal injury. If you have to drive with an open luggage compartment lid, make sure that all 
objects and the lid itself are properly secured and take appropriate measures to keep toxic exhaust 
fumes from entering the vehicle. 

  WARNING 

Driving with an unlatched or open luggage compartment lid can lead to serious personal 
injury. 

  Never transport objects larger than those that fit completely in the luggage compartment, 

because the luggage compartment lid cannot be fully closed properly. 

  After closing the lid, always pull up on it to make sure that it is properly closed and cannot 

open suddenly when the vehicle is moving. 

  Always stow all objects securely in the luggage compartment. Loose objects can fall out 

of the luggage compartment and injure others on the road behind you. 

  Drive carefully; anticipate what other drivers will do. 
  Avoid abrupt or sudden acceleration, steering, or braking, because the unlatched luggage 

compartment lid can move suddenly. 

  Always mark objects sticking out from the luggage compartment clearly for others to see. 

Obey all applicable legal requirements. 

  Never use the luggage compartment lid to “clamp” or “hold” objects that stick out of the 

luggage compartment. 

  Always remove any luggage rack or other rack mounted on the luggage compartment lid 

(along with any luggage on the rack) before driving with an open luggage compartment lid. 


  WARNING 

Driving with an open luggage compartment lid can cause poisonous carbon monoxide in the 
engine exhaust to get into the passenger compartment. 

  Carbon monoxide causes drowsiness, inattentiveness, poisoning, and loss of 

consciousness. It can lead to accidents and severe personal injuries. 

  Always keep the luggage compartment lid closed while driving to help keep poisonous 

exhaust fumes from being drawn into the vehicle. 

  Never transport objects that are too large to fit completely into the luggage area, because 

then the luggage compartment lid cannot be fully closed. 

  If you absolutely must drive with the CSC roof closed and an open luggage compartment 

lid, do the following to reduce the risk of carbon monoxide poisoning: 
 

–  Close all windows, the CSC roof, and the sunroof. 


–  Switch off the climate control system's air recirculation feature. 


–  Open all air vents in the instrument panel. 


–  Set the fresh air fan to the highest speed. 


  NOTICE 

The open luggage compartment lid changes the vehicle height. 

Driving a loaded vehicle 

 Please first read and note the introductory information and heed the WARNINGS 


For good handling when driving a loaded vehicle, please observe the following: 

  Securely stow all luggage 

⇒  Stowing luggage

  Drive especially carefully and accelerate gently. 
  Avoid sudden braking and driving maneuvers. 
  Brake earlier than you would if you were not driving a loaded vehicle. 

  If applicable, observe information about driving with a trailer 

⇒ page 151, Trailer towing


Content   ..  7  8  9  10   ..