Volkswagen 01M Transmission. Manual - part 43


  Index      Volkswagen     Volkswagen 01M Transmission - service manual 2001 year


Search            copyright infringement  


Content   ..  41  42  43  44   ..


Volkswagen 01M Transmission. Manual - part 43


31

Copyright © 2010 ATSG

AUTOMATIC TRANSMISSION SERVICE GROUP

Technical Service Information

* 20SGL J00037

142

7

AT

1

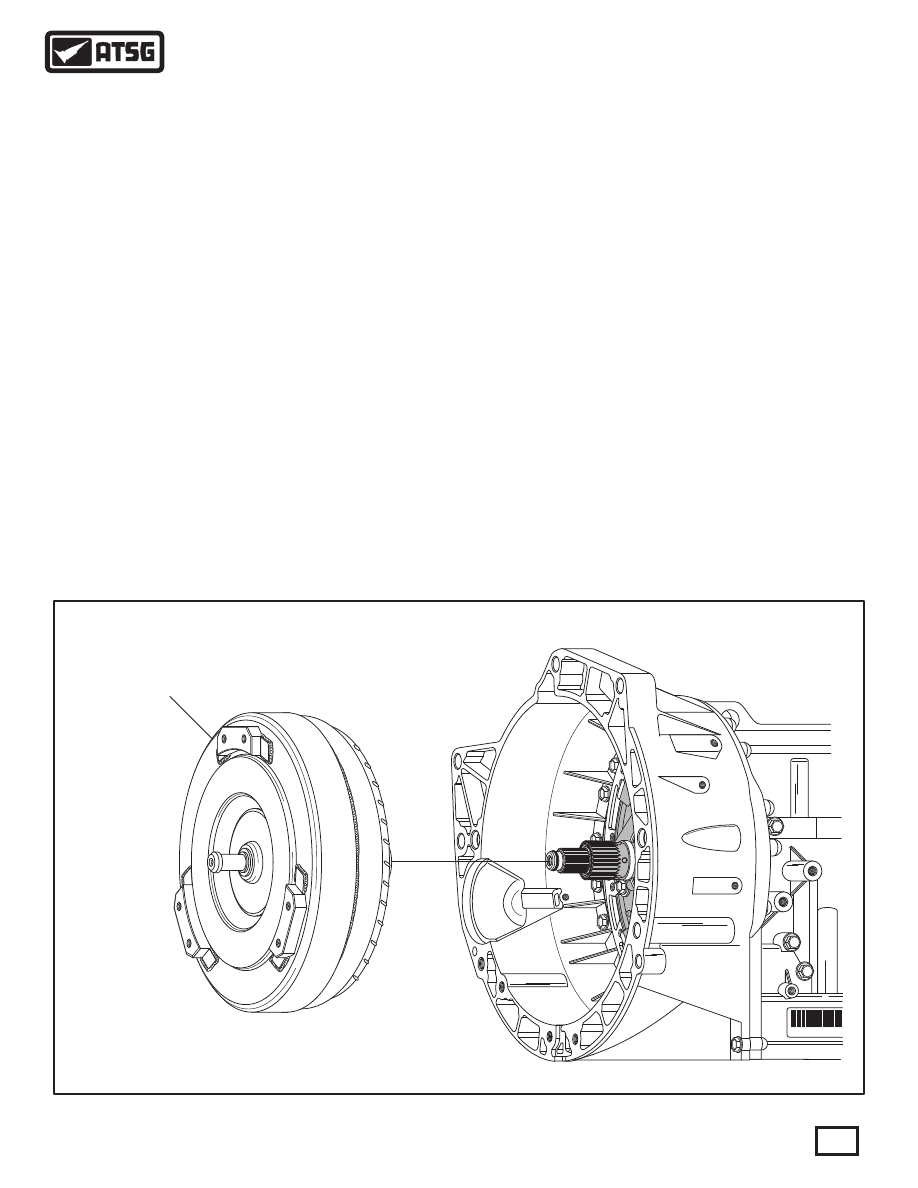
    1  TORQUE CONVERTER ASSEMBLY.

TRANSMISSION DISASSEMBLY

SAFETY PRECAUTIONS

   Service information provided in this manual by 
ATSG is intended for use by professional, qualified 
technicians.   Attempting repairs or service without 
the appropriate training, tools and equipment could 
cause injury to you or others.
   The service procedures we recommend and 
describe in this manual are effective methods of 
performing service and repair on this unit.   Some of 
the procedures require the use of special tools that 
are designed for specific purposes.
   This manual contains CAUTIONS that you must 
observe carefully in order to reduce the risk of injury 
to yourself or others.   This manual also contains 
NOTES that must be carefully followed in order to 
avoid improper service that may damage the vehicle, 
tools and/or equipment.

     1. The transmission should be steam cleaned  
             on the outside, to remove any dirt and grease 
       before disassembly begins.
     2. This transmission can be disassembled very 
             easily on a work bench without the benefit of 
       holding fixture for rotation.
     3. Remove torque converter from transmission, as
       shown in Figure 38.
       Caution:   Use care when removing the torque
       converter, to avoid personal injury and/or
             damage to converter, as it is heavy.
     4. Record the torque converter code letters, to
             determine 2 port or 3 port design, for future
       reference.

Continued on Page 32

     Note: The illustrations provided in the Assembly
     and Disassembly section, are of a VW "09D" 
     model with the 3 port converter, but procedures
     are the same on all "09D" models.

WARNING: At time of this printing, there are not 
any new "hard parts" available from the 
manufacturer for this unit. Only source will be used 
aftermarket suppliers.

Figure 38

WWW.ALL-TRANS.BY

{

4 Behind Face Of Bell Housing Here

22 Total

TRANSMISSION DISASSEMBLY (CONT'D)

     5. Remove the 22 converter housing retaining bolts,
             which is the outer row, as shown in Figure 39, 
       using a 12 MM socket.
       Note: Four of the converter housing bolts 
             are behind the face of housing, as shown in
       Figure 39.
     6. Remove torque converter housing, as shown in
             Figure 40, by tapping with a mallet as necessary.
     7. Remove and discard the turbine shaft "O" ring,
       as shown in Figure 40.
       Note: Turbine shaft "O" ring is used on the
       3 port converter models only.

Continued on Page 33

Figure 39

Figure 40

20SGL

 J00037

142

7

AT

     2  CONVERTER HOUSING.
       3  CONVERTER HOUSING BO LTS, 30 MM (1.181")  (22 REQ).
 225  TURBINE SHAFT "O" RING   (3 PORT MODELS ONLY).

2

3

225

32

Copyright © 2010 ATSG

Copyright © 2010 ATSG

AUTOMATIC TRANSMISSION SERVICE GROUP

Technical Service Information

CONVERTER HOUSING BOLT LOCATIONS

WWW.ALL-TRANS.BY

Pump

Pressure

Pump

Pressure

Pump

Suction

Pump

Suction

33

Copyright © 2010 ATSG

Copyright © 2010 ATSG

AUTOMATIC TRANSMISSION SERVICE GROUP

Technical Service Information

A-3

2

2

2

2

AISIN

AISIN

AISIN

AISIN

8 8

6 0

8 8

6 0

8 8

6 0

8 8

6 0

1

1

1

1

9A

N3K0

1755

9AN3

K0

1762

8BA

3K

0163

1

9A

N3K0

1748

9A

N3K

017

42

4AM

3K03O

18

142

7

AT

JP

  57344-0

1

09D 321 361

>F

e/Zn

<

24

15

84

54

0

TR

A0

10

    5  TRANSMISSION MULTIFUNCTION (RANGE) SWITCH   (F125).
    6  SWITCH RETAINING BOLTS, 16.9 MM (0.665"), 2 REQUIRED.
   7  MOISTURE/DEBRIS SHIELD.
    8  MOISTURE/DEBRIS SHIELD ACORN RETAINING NUT.

5

6

7

8

Figure 41

Figure 42

TRANSMISSION DISASSEMBLY (CONT'D)

     8. Some models of the "09D" family route line 
             pressure through the converter housing and will
             have two "O" ring seals on the back side of the
             converter housing, as shown in Figure 41.
     9. Remove the acorn nut and debris shield from
       the transmission range (multifunction) switch, as
       shown in Figure 42.
 10. Remove the two range switch retaining bolts, as
             shown in Figure 42, and slide TRS off of manual
       shaft.
       Note: If the range (multifunction) switch is 
             removed or replaced, a position to the manual
             selector shaft must be set using a special tool
       available from Volkswagen.

Continued on Page 34

WWW.ALL-TRANS.BY

    9  DRIVESHAFT YOKE RETAINING NUT.
 10  DRIVESHAFT YOKE.
 11  MOUNTING PL ATE RETAINING BOLTS  (8 REQUIRED).
 12  MOUNTING PL ATE.
 13  REAR TRANSMISSION YOKE SEAL.   

 13  REAR TRANSMISSION SEAL.   

9

10

11

12

13

13

2WD MODELS ONLY

4WD MODELS ONLY

Figure 43

Figure 44

TRANSMISSION DISASSEMBLY (CONT'D)

Continued on Page 35

 11. If you are working on a 4WD model, you can 
             remove the rear seal now or you can wait until
             you have the output shaft out as it is easier to 
       remove at that point  (See Figure 43).
 12. However, if you are working on a 2WD model,
             you must remove the driveshaft yoke nut and the
             driveshaft yoke, as shown in Figure 44, before
       you can remove the output shaft.
 13. Remove the eight mounting plate retaining bolts
             and the mounting plate, as shown in Figure 44.
 14. Again, you can remove the rear seal now or wait
             until you have the output shaft out.

34

Copyright © 2010 ATSG

Copyright © 2010 ATSG

AUTOMATIC TRANSMISSION SERVICE GROUP

Technical Service Information

WWW.ALL-TRANS.BY


Content   ..  41  42  43  44   ..