Toyota Land Cruiser Prado (2023 year). Manual in english - page 39
 

  Index      Manuals     Toyota Land Cruiser Prado (2023 year). Manual in english


Search            copyright infringement  


Content      ..     37      38      39      40     ..


Toyota Land Cruiser Prado (2023 year). Manual in english - page 39


626

7-3. Do-it-yourself maintenance

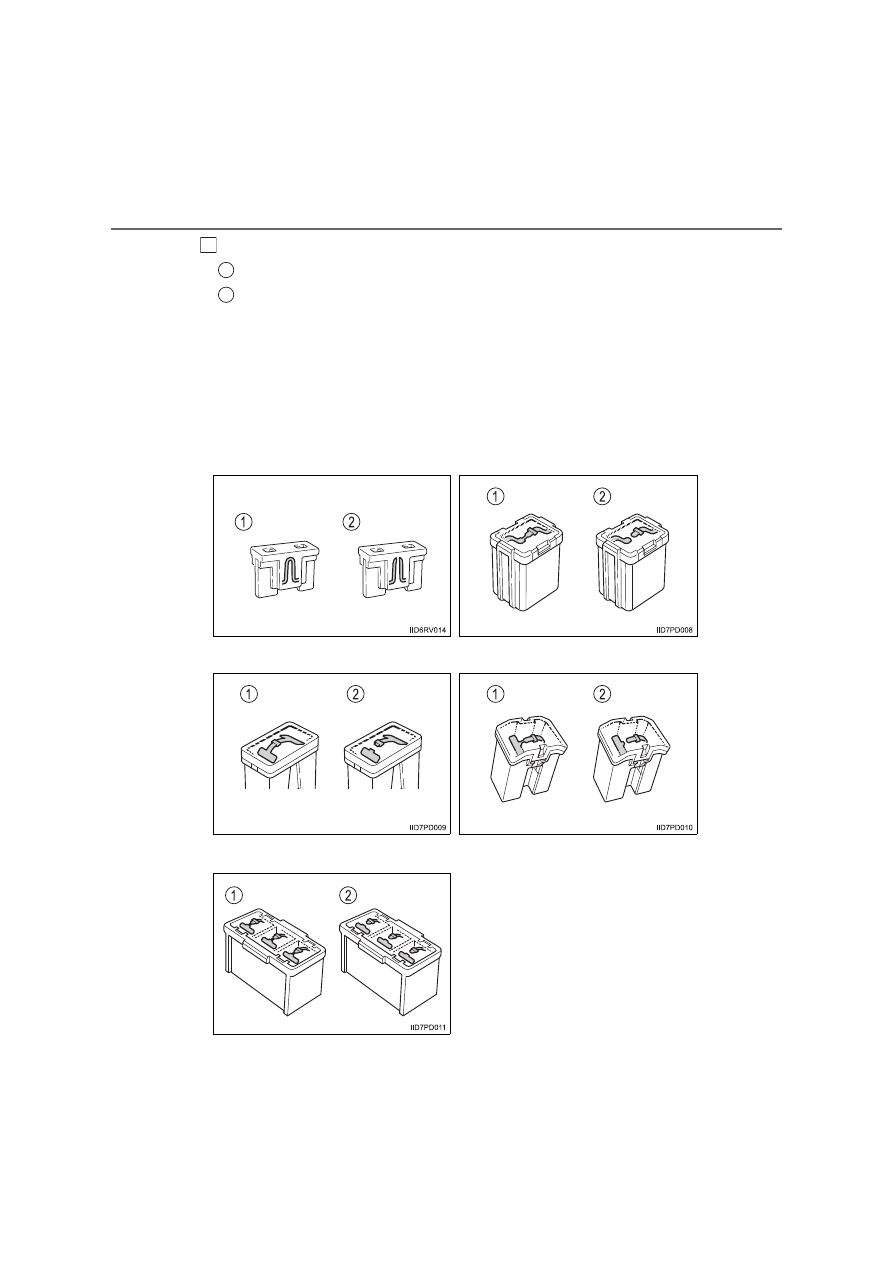
Check if the fuse is blown.

Normal fuse
Blown fuse

Type A
Replace the blown fuse with one of an appropriate amperage rat-
ing. The amperage rating can be found on the fuse box lid.
Type B, C, D and E
Contact any authorized Toyota retailer or Toyota authorized
repairer, or any reliable repairer.

4

1
2

Type A

Type B

Type C

Type D

Type E

627

7-3. Do-it-yourself maintenance

7

M

a

in

te

nan
ce and

 ca

re

After a fuse is replaced

If the lights do not turn on even after the fuse has been replaced, a bulb may
need replacement. (

P. 628)

If the replaced fuse blows again, have the vehicle inspected by any autho-
rized Toyota retailer or Toyota authorized repairer, or any reliable repairer.

If there is an overload in a circuit

The fuses are designed to blow, protecting the wiring harness from damage.

When replacing light bulbs

Toyota recommends that you use genuine Toyota products designed for this
vehicle. Because certain bulbs are connected to circuits designed to prevent
overload, non-genuine parts or parts not designed for this vehicle may be
unusable.

WARNING

To prevent system breakdowns and vehicle fire

Observe the following precautions.
Failure to do so may cause damage to the vehicle, and possibly a fire or
injury.

Never use a fuse of a higher amperage rating than indicated, or use any
other object in place of a fuse.

Always use a genuine Toyota fuse or equivalent.
Never replace a fuse with a wire, even as a temporary fix.

Do not modify the fuses or fuse boxes.

NOTICE

Before replacing fuses

Have the cause of electrical overload determined and repaired by any
authorized Toyota retailer or Toyota authorized repairer, or any reliable
repairer as soon as possible.

628

7-3. Do-it-yourself maintenance

Light bulbs

Check the wattage of the light bulb being replaced. (

P. 764)

P. 578

You may replace the following bulbs yourself. The difficulty level
of replacement varies depending on the bulb. If necessary bulb
replacement seems difficult to perform, contact any authorized
Toyota retailer or Toyota authorized repairer, or any reliable
repairer.
For more information about replacing other light bulbs, contact
any authorized Toyota retailer or Toyota authorized repairer, or
any reliable repairer.

Preparing for light bulb replacement

Removing the engine compartment covers

629

7-3. Do-it-yourself maintenance

7

M

a

in

te

nan
ce and

 ca

re

Front

Bulb locations

Headlight low beam 
(halogen headlights)
Headlight high beam 
(halogen headlights)

Front turn signal light

1

2

3

630

7-3. Do-it-yourself maintenance

Rear

Vehicles with under floor mounted spare tire

Vehicles with back door mounted spare tire

Running board lights 
(if equipped)
Rear turn signal light

Back-up light
Rear fog light
License plate lights

1

2

3
4
5

Running board lights 
(if equipped)
Rear turn signal light

Back-up light
Rear fog light
License plate lights

1

2

3
4
5

631

7-3. Do-it-yourself maintenance

7

M

a

in

te

nan
ce and

 ca

re

Headlight low beams (halogen headlights)

Unplug the connector while
depressing the lock release.

Turn the light bulb counter-
clockwise.

Replace the light bulb.

Align the 3 tabs on the light bulb
with the mounting, and insert.

Turn and secure the light
bulb.

Replacing light bulbs

1

2

3

4

632

7-3. Do-it-yourself maintenance

Set the connector.

Shake the light bulb gently to
check that it is not loose, turn
the headlights on once and visu-
ally confirm that no light is leak-
ing through the mounting.

Headlight high beams (halogen headlights)

Unplug the connector while
depressing the lock release.

Turn the light bulb counter-
clockwise.

Replace the light bulb.

Align the 3 tabs on the light bulb
with the mounting, and insert.

5

1

2

3

633

7-3. Do-it-yourself maintenance

7

M

a

in

te

nan
ce and

 ca

re

Turn and secure the light
bulb.

Set the connector.

Shake the light bulb gently to
check that it is not loose, turn
the headlights on once and visu-
ally confirm that no light is leak-
ing through the mounting.

Front turn signal lights

Remove the fender liner
bolts.

To allow enough working space,
turn the steering wheel to the
opposite side of the bulb to be
replaced.

Open the fender liner.

4

5

1

2

634

7-3. Do-it-yourself maintenance

Turn the bulb base counterclockwise.

Remove the light bulb.

When installing, reverse the steps listed.

3

Vehicles with halogen head-
lights

Vehicles with LED headlights

4

5

635

7-3. Do-it-yourself maintenance

7

M

a

in

te

nan
ce and

 ca

re

Rear turn signal lights and back-up lights

Open the back door.

Left-hand side

Remove the bolts and lamp
assembly.

Right-hand side

Remove the bolts.

Close the back door half
way and remove the lamp
assembly.

1

1

2

636

7-3. Do-it-yourself maintenance

Unplug the connector while
pushing the lock release.

Turn the bulb bases counter-
clockwise.

Rear turn signal light
Back-up light

Remove the light bulb.

Rear turn signal light
Back-up light

When installing, reverse the steps listed.

2

3

1
2

4

1
2

5

637

7-3. Do-it-yourself maintenance

7

M

a

in

te

nan
ce and

 ca

re

Rear fog lights

Remove the under cover
bolts and pull down the under
cover.

Turn the bulb base counter-
clockwise.

Remove the light bulb.

When installing, reverse the steps listed.

1

2

3

4

638

7-3. Do-it-yourself maintenance

License plate lights

Vehicles with under floor mounted spare tire and without spare
tire

Remove the screws.

Remove the lens and the
license plate light unit.

Remove the light bulb.

When installing, reverse the steps listed.

1

2

3

639

7-3. Do-it-yourself maintenance

7

M

a

in

te

nan
ce and

 ca

re

Vehicles with back door mounted spare tire

Remove the screws.

Remove the lens and the
license plate light unit.

Remove the light bulb.

When installing, reverse the steps listed.

1

2

3

640

7-3. Do-it-yourself maintenance

Running board lights (if equipped)

Turn the bulb bases counter-
clockwise.

Remove the light bulb.

When installing, reverse the steps listed.

Lights other than the above

If any of the lights listed below has burnt out, have it replaced by
any authorized Toyota retailer or Toyota authorized repairer, or any
reliable repairer.

Headlight low beams (LED headlights)

Headlight high beams (LED headlights)

Front position lights/daytime running lights

Front fog lights (if equipped)

Side turn signal lights

High mounted stoplight

Stop/tail lights

Outer foot lights (if equipped)

1

2

3

641

7-3. Do-it-yourself maintenance

7

M

a

in

te

nan
ce and

 ca

re

Installing the lenses of the license plate lights

Make sure to install the packing in its original position. Failure to do so may
allow water to get inside.

LED lights

The headlight low beams (LED headlights), headlight high beams (LED head-
lights), front position lights/daytime running lights, front fog lights (if
equipped), side turn signal lights, high mounted stoplight, stop/tail lights con-
sist of a number of LEDs. If any of the LEDs burn out, take your vehicle to any
authorized Toyota retailer or Toyota authorized repairer, or any reliable
repairer to have the light replaced.

Condensation build-up on the inside of the lens

Temporary condensation build-up on the inside of the headlight lens does not
indicate a malfunction. Contact any authorized Toyota retailer or Toyota
authorized repairer, or any reliable repairer for more information in the follow-
ing situations: 

Large drops of water are built up on the inside of the lens.

Water has built up inside the headlight.

When replacing light bulbs

P. 627

WARNING

Replacing light bulbs

Turn off the headlights. Do not attempt to replace the bulb immediately
after turning off the headlights.
The bulbs become very hot and may cause burns.

Do not touch the glass portion of the light bulb with bare hands. When it is
unavoidable to hold the glass portion, use and hold with a clean dry cloth
to avoid getting moisture and oils on the bulb.
Also, if the bulb is scratched or dropped, it may blow out or crack.

Fully install light bulbs and any parts used to secure them. Failure to do so
may result in heat damage, fire, or water entering the headlight unit. This
may damage the headlights or cause condensation to build up on the lens.

Do not attempt to repair or disassemble light bulbs, connectors, electric
circuits or component parts.
Doing so may result in death or serious injury due to electric shock.

To prevent damage or fire

Make sure bulbs are fully seated and locked.

Check the wattage of the bulb before installing to prevent heat damage.


Content      ..     37      38      39      40     ..