Toyota Land Cruiser Prado (2023 year). Manual in english - page 37
 

  Index      Manuals     Toyota Land Cruiser Prado (2023 year). Manual in english


Search            copyright infringement  


Content      ..     35      36      37      38     ..


Toyota Land Cruiser Prado (2023 year). Manual in english - page 37


594

7-3. Do-it-yourself maintenance

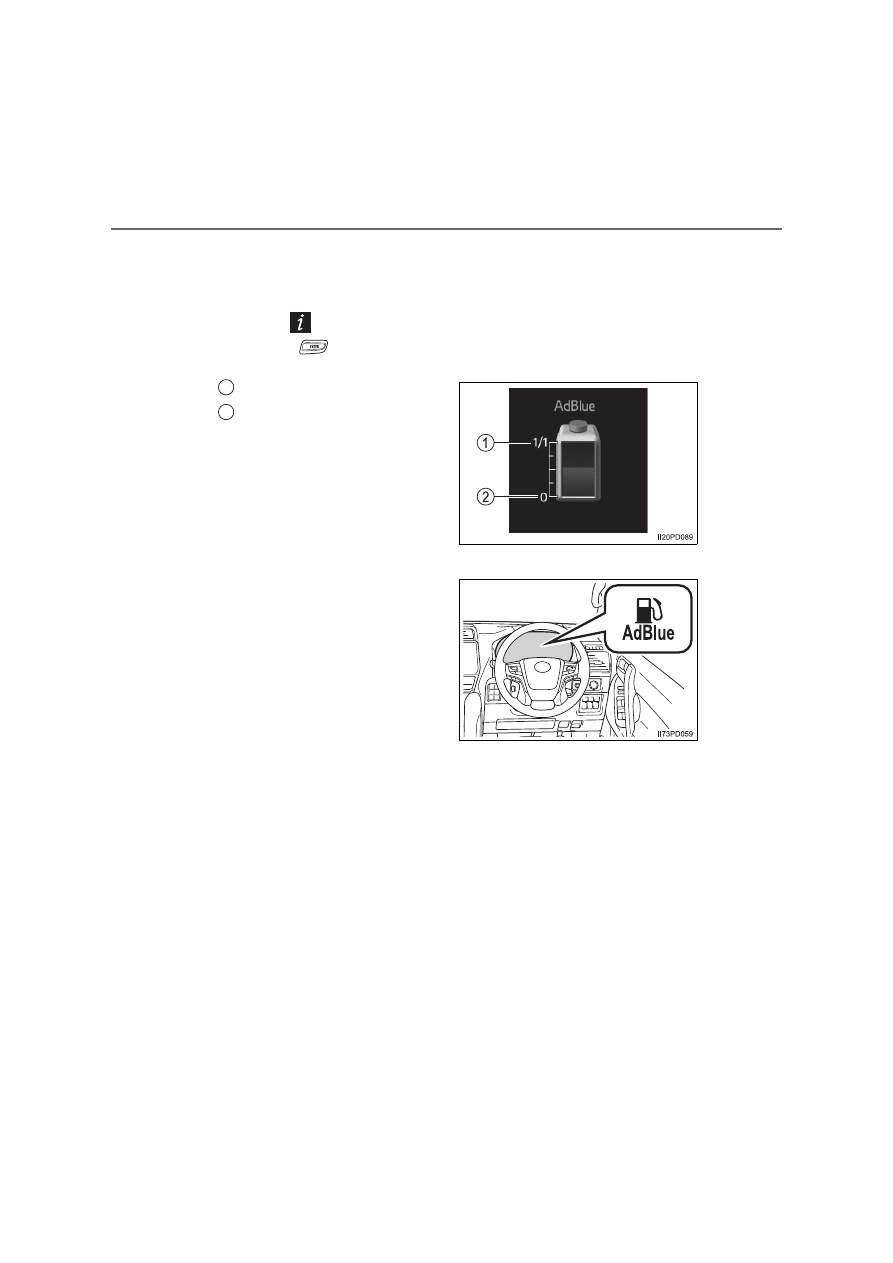
AdBlue™ gauge

The quantity of AdBlue™ remaining in the tank can be checked on
the multi-information display.

Select 

 (drive information) using the meter control switches, and

operate 

 up and down to display the quantity of AdBlue™ remain-

ing in the tank. (

P. 140) 

Full
Empty

AdBlue™ warning light and warning message

When AdBlue™ is low, the low
AdBlue™ level warning light
turns on and a warning mes-
sage appears on the multi-infor-
mation display. (

P. 595) 

When the possible driving range
based on the remaining amount of
AdBlue™ reaches approximately
2400 km (1491 miles), the low
AdBlue™ level warning light turns
on and a warning message is dis-
played.
When refilling AdBlue™ by yourself in an emergency, be sure to follow the
correct refill procedures. (

P. 596)

1
2

595

7-3. Do-it-yourself maintenance

7

M

a

in

te

nan
ce and

 ca

re

Warning message

If the following warning message is displayed on the multi-information dis-
play, follow the appropriate troubleshooting procedure.

*

1

: Use the driving range shown on the multi-information display as a refer-

ence. The possible driving range that is displayed may differ from the
actual driving range depending on the refill method, driving conditions
and driving environment. (

P. 593)

*

2

: The master warning light turns on and the buzzer sounds in accordance

with the warning message.

Warning message

Details/Actions

“Fill up AdBlue in 

2400 km 

See owner’s manual”

*

1

AdBlue™ needs to be refilled

Have AdBlue™ refilled to the full at any
authorized Toyota retailer or Toyota
authorized repairer, or any reliable
repairer.

“AdBlue level low 

No start in 

800 km! 

Fill up AdBlue 

See owner’s manual”

*

1, 2

AdBlue™ needs to be refilled
If the displayed driving distance is
exceeded, the engine cannot be restarted.

Have AdBlue™ refilled to the full at any
authorized Toyota retailer or Toyota
authorized repairer, or any reliable
repairer.

“AdBlue empty 

Unable to 

restart engine 
Fill up AdBlue 

See owner’s manual”

*

2

AdBlue™ needs to be refilled

If the engine is stopped, it cannot be
restarted.
Without stopping the engine, contact any
authorized Toyota retailer or Toyota
authorized repairer, or any reliable
repairer immediately and have AdBlue™
refilled to the full.

NOTICE

When AdBlue™ is low

When AdBlue™ is depleted, the engine cannot be restarted. 
Be sure to have AdBlue™ refilled to the full at any authorized Toyota retailer
or Toyota authorized repairer, or any reliable repairer before it is completely
depleted.

596

7-3. Do-it-yourself maintenance

When the engine cannot be restarted due to the depletion of
AdBlue™, adding approximately 6.5 L (6.9 qt., 5.7 Imp.qt.) or more of
AdBlue™ will allow the engine to be started again. Perform the follow-
ing procedures to refill AdBlue™. (The AdBlue™ tank has a capacity
of 12.1 L [12.7 qt., 10.6 Imp.qt.].)

Refilling with the refilling equipment
Park the vehicle on a level surface, turn the engine switch off, and
then open the hood. (

P. 574)

Open the AdBlue™ tank cap.

Insert the nozzle and refill
AdBlue™.

Close the AdBlue™ tank cap.

Turn the cap until you hear a click.

Refilling AdBlue™ by yourself in an emergency (if equipped)

1

2

3

4

597

7-3. Do-it-yourself maintenance

7

M

a

in

te

nan
ce and

 ca

re

Check that the engine starts.

Confirm that the low AdBlue™ level warning light has turned off and warn-
ing message has disappeared.
Have AdBlue™ refilled to the full at your Toyota dealer.

Refilling with the bottle
Park the vehicle on a level surface, turn the engine switch off, and
then open the hood. (

P. 574)

Open the AdBlue™ tank cap.

Insert a bottle of AdBlue™ and
fully tighten it.

Push down on the bottle.

AdBlue™ will begin to refill. Refill
AdBlue™ slowly so that it does not
spill. Do not remove the bottle until
it is empty.

5

1

2

3

4

598

7-3. Do-it-yourself maintenance

Check that no AdBlue™
remains in the bottle, and then
remove it.

Repeat steps 

 to 

 until

approximately 6.5 L (6.9 qt., 5.7
Imp.qt.) or more of AdBlue™ have
been refilled.

Close the AdBlue™ tank cap.

Turn the cap until you hear a click.

Check that the engine starts.

Confirm that the low AdBlue™ level warning light has turned off and warn-
ing message has disappeared.

The way of refilling may differ from those shown in the illustration.
Have AdBlue™ refilled to the full at your Toyota dealer.

Refilling AdBlue™

Use AdBlue™ (compliant with ISO 22241-1).
AdBlue™ is a trademark of the German Association of the Automotive
Industry (VDA).

Before driving for a long period of time in an area where AdBlue™ cannot
be refilled, consult any authorized Toyota retailer or Toyota authorized
repairer, or any reliable repairer.

When refilling AdBlue™

After refilling AdBlue™, the engine may take a few seconds longer than nor-
mal to start.

5

3

5

6

7

599

7-3. Do-it-yourself maintenance

7

M

a

in

te

nan
ce and

 ca

re

NOTICE

When refilling AdBlue™

Observe the following precautions. 
Failure to do so may result in damage to the vehicle parts, paint, etc.

Do not use urea solution other than AdBlue™.

If AdBlue™ comes into contact with any painted surfaces on the vehicle,
immediately wash the affected areas with water.

If AdBlue™ is spilled inside the engine compartment, immediately wipe it
with a wet cloth.

When refilling AdBlue™ with the refilling equipment

Observe the following precautions to prevent AdBlue™ overflowing from the
AdBlue™ tank:

Securely insert the nozzle into the AdBlue™ filler neck.

Stop filling the tank after the nozzle automatically clicks off.

Do not top off the AdBlue™ tank.

When storing AdBlue™

Observe the following precautions. 
Failure to do so may result in damage to vehicle parts, paint, etc., and
changes in the chemical compounds of AdBlue™ may cause unpleasant
odors.

Do not leave AdBlue™ inside the vehicle. 

Tightly seal AdBlue™ containers and store them in a cool, dry location
with good ventilation and no exposure to direct sunlight.

600

7-3. Do-it-yourself maintenance

Tires

Check if the treadwear indicators are showing on the tires. Also check
the tires for uneven wear, such as excessive wear on one side of the
tread.
Check the spare tire condition and pressure if not rotated.

New tread
Worn tread
Treadwear indicator

The location of treadwear indicators is shown by the “TWI” or “

” marks,

etc., molded on the sidewall of each tire.
Replace the tire if the treadwear indicators are showing on a tire.

Replace or rotate the tires in accordance with maintenance
schedules and treadwear.

Checking tires

1
2
3

601

7-3. Do-it-yourself maintenance

7

M

a

in

te

nan
ce and

 ca

re

Rotate the tires in the order shown.

To equalize tire wear and help extend tire life, Toyota recommends that you
rotate your tires approximately every 5000 km (3000 miles).
Vehicles with the tire pressure warning system: Do not fail to initialize the
tire pressure warning system after tire rotation.

Tire rotation

Vehicles with a standard spare
tire

Vehicles with an emergency
tire puncture repair kit

Front

Front

602

7-3. Do-it-yourself maintenance

Your vehicle is equipped with a tire pressure warning system that uses
tire pressure warning valves and transmitters to detect low tire infla-
tion pressure before serious problems arise. 

If the tire pressure drops below a predetermined level, the driver is
warned by a warning light. (

P. 662)

Vehicles with the multi-informa-
tion display type B: The tire
pressure detected by the tire
pressure warning system can
be displayed on the multi-infor-
mation display.

Installing tire pressure warning valves and transmitters

When replacing tires or wheels, tire pressure warning valves and
transmitters must also be installed.
When new tire pressure warning valves and transmitters are
installed, new ID codes must be registered in the tire pressure
warning computer and the tire pressure warning system must be
initialized. (

P. 604)

Initializing the tire pressure warning system

The tire pressure warning system must be initialized in the fol-
lowing circumstances:

When changing the tire size.

When rotating the tires.

When the tire inflation pressure is changed such as when chang-
ing load weight.

After registering the ID codes. (

P. 604)

When the tire pressure warning system is initialized, the current tire
inflation pressure is set as the benchmark pressure.

Tire pressure warning system (if equipped)

603

7-3. Do-it-yourself maintenance

7

M

a

in

te

nan
ce and

 ca

re

How to initialize the tire pressure warning system

Park the vehicle in a safe place and turn the engine switch to the
“LOCK” position (vehicles without a smart entry & start system)
or off (vehicles with a smart entry & start system).

Initialization cannot be performed while the vehicle is moving.

Adjust the tire inflation pressure to the specified cold tire inflation
pressure level. (

P. 761)

Make sure to adjust the tire pressure to the specified cold tire inflation
pressure level. The tire pressure warning system will operate based on
this pressure level.

Turn the engine switch to the “ON” position (vehicles without a
smart entry & start system) or IGNITION ON mode (vehicles with
a smart entry & start system). 

Press and hold the tire pres-
sure warning reset switch
until the tire pressure warn-
ing light blinks 3 times.

Vehicles with the multi-informa-
tion display type B: “- -” will be
displayed for inflation pressure
of each tire on the multi-informa-
tion display while the tire pres-
sure warning system determines
the position of each tire. When
position of each tire is deter-
mined, the inflation pressure of
each tire will be displayed on the
multi-information display.

Drive the vehicle at approximately 40 km/h (25 mph) or more for
approximately 10 to 30 minutes.

Vehicles with the multi-information display type B: When initialization is
complete, the inflation pressure of each tire will be displayed on the
multi-information display.
Depending on the vehicle and driving conditions, initialization may take
up to approximately 1 hour to complete.

1

2

3

4

5

604

7-3. Do-it-yourself maintenance

Registering ID codes

The tire pressure warning valve and transmitter is equipped with a
unique ID code. When replacing a tire pressure warning valve and
transmitter, it is necessary to register the ID code. When registering
the ID codes, perform the following procedure:

How to register the ID codes

Turn the engine switch to the “ON” position (vehicles without a
smart entry & start system) or IGNITION ON mode (vehicles with
a smart entry & start system).

Press the tire pressure warn-
ing reset switch briefly 3
times in succession.

The tire pressure warning light
blinks slowly 3 times.
The change wheel set mode is
activated and registration is
started.
Vehicles with the multi-informa-
tion display type B: “--” is dis-
played for inflation pressure of
each tire on the multi-informa-
tion display.
Then, the tire pressure warning
light blinks rapidly for approxi-
mately 1 minute and stays on.

Drive the vehicle at approximately 40 km/h (25mph) or more for
approximately 10 to 30 minutes.

Vehicles with the multi-information display type B: When registration is
completed, the tire pressure warning light will go off and the inflation
pressure of each tire will be displayed on the multi-information display.
The time elapsed before registration is completed differs according to
the driving condition and environment.

1

2

3

605

7-3. Do-it-yourself maintenance

7

M

a

in

te

nan
ce and

 ca

re

When to replace your vehicle’s tires

Tires should be replaced if:

The treadwear indicators are showing on a tire.

You have tire damage such as cuts, splits, cracks deep enough to expose
the fabric, and bulges indicating internal damage

A tire goes flat repeatedly or cannot be properly repaired due to the size or
location of a cut or other damage

If you are not sure, consult with any authorized Toyota retailer or Toyota
authorized repairer, or any reliable repairer.

Replacing tires and wheels (vehicles with the tire pressure warning sys-
tem)

If the ID code of the tire pressure warning valve and transmitter is not regis-
tered, the tire pressure warning system will not work properly. After driving for
about 10 minutes, the tire pressure warning light blinks for 1 minute and stays
on to indicate a system malfunction.

Tire life

Any tire over 6 years old must be checked by a qualified technician even if it
has seldom or never been used or damage is not obvious.

Routine tire inflation pressure checks (vehicles with the tire pressure
warning system)

The tire pressure warning system does not replace routine tire inflation pres-
sure checks. Make sure to check tire inflation pressure as part of your routine
of daily vehicle checks.

If the tread on snow tires wears down below 4 mm (0.16 in.)

The effectiveness of the tires as snow tires is lost.

606

7-3. Do-it-yourself maintenance

Situations in which the tire pressure warning system may not operate
properly (vehicles with the tire pressure warning system)

In the following cases, the tire pressure warning system may not operate
properly.
• If non-genuine Toyota wheels are used. 
• A tire has been replaced with a tire that is not an OE (Original Equipment)

tire.

• A tire has been replaced with a tire that is not of the specified size.
• Tire chains etc. are equipped.
• An auxiliary-supported run-flat tire is equipped.
• If a window tint that affects the radio wave signals is installed.
• If there is a lot of snow or ice on the vehicle, particularly around the

wheels or wheel housings.

• If the tire inflation pressure is extremely higher than the specified level.
• If the spare tire is in a location subject to poor radio wave signal recep-

tion.

*

• If a large metallic object which can interfere with signal reception is put

near the spare tire.

*

• If tires not equipped with the tire pressure warning valves and transmit-

ters are used.

• If the ID code on the tire pressure warning valves and transmitters is not

registered in the tire pressure warning computer.

*

: Vehicles with the spare tire only

Performance may be affected in the following situations.
• Near a TV tower, electric power plant, gas station, radio station, large dis-

play, airport or other facility that generates strong radio waves or electri-
cal noise

• When carrying a portable radio, cellular phone, cordless phone or other

wireless communication device

When the vehicle is parked, the time taken for the warning to start or go off
could be extended.

When tire inflation pressure declines rapidly for example when a tire has
burst, the warning may not function.

Warning performance of the tire pressure warning system (vehicles with
the tire pressure warning system)

The warning of the tire pressure warning system will change in accordance
with the conditions under which it was initialized. For this reason, the system
may give a warning even if the tire pressure does not reach a low enough
level, or if the pressure is higher than the pressure that was adjusted to when
the system was initialized.

607

7-3. Do-it-yourself maintenance

7

M

a

in

te

nan
ce and

 ca

re

The initialization operation (vehicles with the tire pressure warning sys-
tem)

Make sure to carry out initialization after adjusting the tire inflation pressure.
Also, make sure the tires are cold before carrying out initialization or tire
inflation pressure adjustment.

If you have accidentally turned the engine switch to the “LOCK” position
(vehicles without a smart entry & start system) or off (vehicles with a smart
entry & start system) during initialization, it is not necessary to press the
reset switch again as initialization will restart automatically when the engine
switch has been turned to the “ON” position (vehicles without a smart entry
& start system) or IGNITION ON mode (vehicles with a smart entry & start
system) for the next time.

If you accidentally press the reset switch when initialization is not necessary,
adjust the tire inflation pressure to the specified level when the tires are
cold, and conduct initialization again.

Vehicles with the multi-information display type B: While the position of each
tire is being determined and the inflation pressures are not being displayed
on the multi-information display, if the inflation pressure of a tire drops, the
tire pressure warning light will come on.

When initialization of the tire pressure warning system has failed (vehi-
cles with the tire pressure warning system)

Do not move the vehicle backward during initialization. Initialization is
started again from the beginning and it may take longer than usual.

Initialization may take longer to complete if the vehicle is driven on an
unpaved road.
When performing initialization, drive on a paved road if possible. Depending
on the driving environment and condition of the tires, initialization will be
completed in approximately 10 to 30 minutes.
• If initialization is not complete after driving approximately 30 minutes,

continue driving for a while.

• If initialization is not complete after driving approximately 1 hour, park the

vehicle in a safe place for approximately 20 minutes. Then drive straight
(with occasional left and right turns) at approximately 40 km/h (25 mph)
or more

*

 for approximately 10 to 30 minutes.

If initialization is still not complete, have the vehicle inspected by any autho-
rized Toyota retailer or Toyota authorized repairer, or any reliable repairer.

*

: Except when making a left/right turn

In the following situations, the tire inflation pressure will not be recorded and
the system will not operate properly. Perform initialization again.
• When operating the tire pressure warning reset switch, the tire pressure

warning light does not blink 3 times.

• After performing initialization, the tire pressure warning light blinks for 1

minute then stays on after driving for about 20 minutes.

608

7-3. Do-it-yourself maintenance

When registering ID codes (vehicles with the tire pressure warning sys-
tem)

Initialize the tire pressure warning system after ID code registration. Initial-
ization is disabled if the system was initialized before registration.

After ID code registration, the tires are hot by driving. Initialize the tire pres-
sure warning system after the tires become cold.

Canceling the change wheel set mode (vehicles with the tire pressure
warning system)

If turning the engine switch to the “LOCK” position (vehicles without a smart
entry & start system) or off (vehicles with a smart entry & start system) when
in the change wheel set mode before driving, the change wheel set mode is
canceled.

After driving when in the change wheel set mode, the change wheel set
mode cannot be canceled. To cancel the mode, perform the procedure for
ID code registration again and turn the engine switch to the “LOCK” position
(vehicles without a smart entry & start system) or off (vehicles with a smart
entry & start system) before driving.

If the change wheel set mode is canceled, the ID codes that have already
been registered are communicated. When communication is finished, the
tire pressure warning light will turn off.

609

7-3. Do-it-yourself maintenance

7

M

a

in

te

nan
ce and

 ca

re

When ID code registration has failed (vehicles with the tire pressure
warning system)

Registration may take long time or the ID codes may not be registered in the
following situations.
• When the vehicle is moved backward during registration.

Registration is started again from the beginning and it may take longer
than usual.

• When another vehicle is running the side of the vehicle such as in heavy

traffic.
It may take longer to detect the vehicle’s tire pressure warning valves and
transmitters.

• If tire pressure warning valves and transmitters are in the vehicle.

The ID codes may not be registered.

When performing registration, drive on a paved road if possible. Depending
on the driving environment and condition of the tires, registration will be
completed in approximately 10 to 30 minutes.
• If registration is not complete after driving approximately 30 minutes, con-

tinue driving for a while.

• If registration is not complete after driving approximately 1 hour, park the

vehicle in a safe place for approximately 20 minutes. Then drive straight
(with occasional left and right turns) at approximately 40 km/h (25 mph)
or more

*

 for approximately 10 to 30 minutes.

If registration is still not complete, have the vehicle inspected by any autho-
rized Toyota retailer or Toyota authorized repairer, or any reliable repairer.

*

: Except when making a left/right turn

When the tire pressure warning light does not blink slowly 3 times, the ID
code will not be registered and the system will not operate properly. Perform
registration again.


Content      ..     35      36      37      38     ..