Toyota Land Cruiser Prado (2023 year). Manual in english - page 18
 

  Index      Manuals     Toyota Land Cruiser Prado (2023 year). Manual in english


Search            copyright infringement  


Content      ..     16      17      18      19     ..


Toyota Land Cruiser Prado (2023 year). Manual in english - page 18


288

4-2. Driving procedures

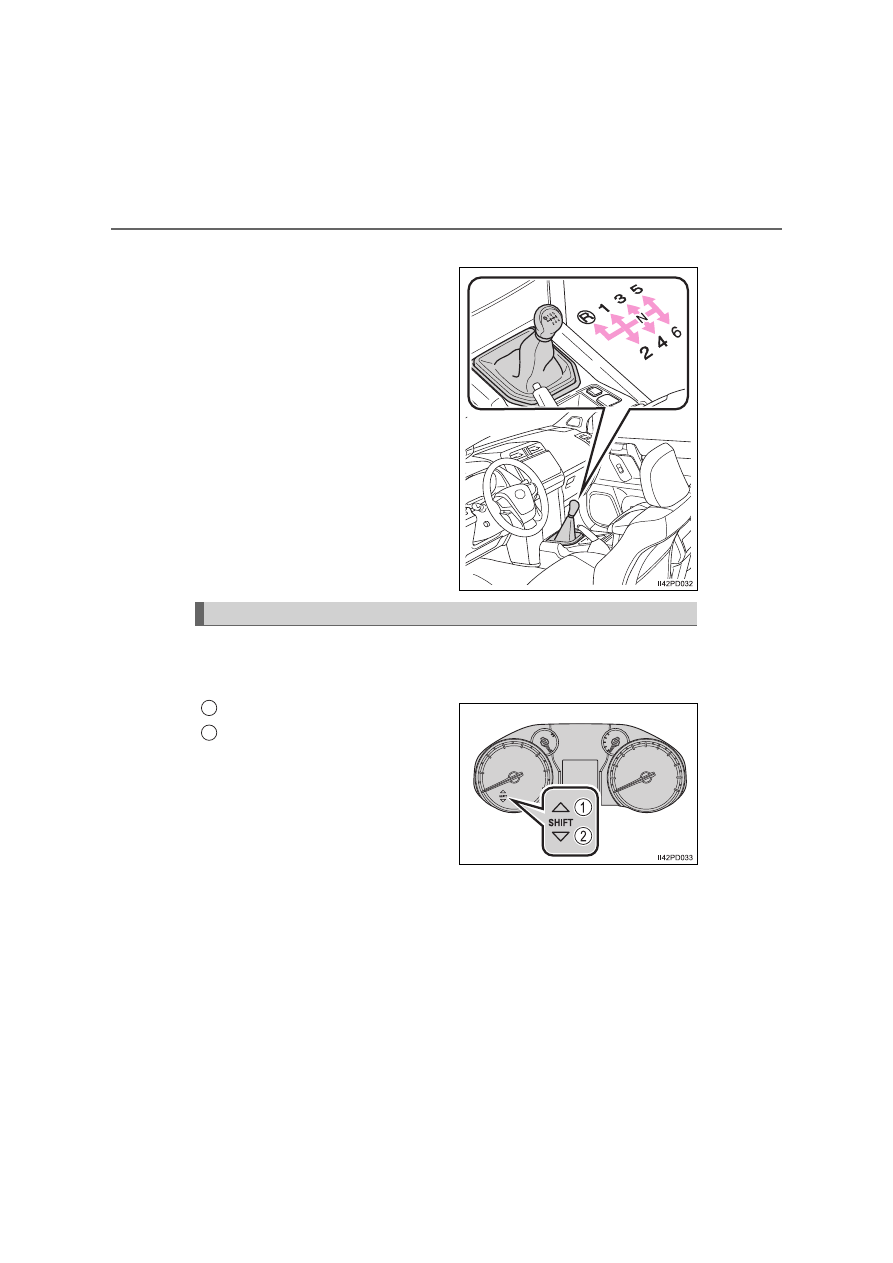
6-speed transmission

Fully depress the clutch pedal
before operating the shift lever,
and then release it slowly.

The Gear Shift Indicator display is a guide to help the driver achieve
improved fuel economy and reduced exhaust emissions within limits
of engine performance.

Upshifting
Downshifting

Gear Shift Indicator (if equipped)

1
2

289

4-2. Driving procedures

4

D

riv

in

g

Gear Shift Indicator display

The Gear Shift Indicator will not be displayed when the four-wheel drive con-
trol switch is in L4.

The Gear Shift Indicator may not be displayed when your foot is placed on
the clutch pedal.

Maximum downshifting speeds

Observe the downshifting speeds in the following table to prevent over-rev-
ving the engine.

5-speed transmission

6-speed transmission

Reverse warning buzzer (vehicles with a 6-speed transmission)

A buzzer will sound to alert the driver if the shift lever is shifted to the R posi-
tion.

Shift position

Maximum speed (km/h [mph])

Transfer position

H4

Transfer position

L4

1

44 (27)

17 (11)

2

82 (51)

32 (20)

3

117 (73)

46 (29)

4

168 (104)

66 (41)

Shift position

Maximum speed (km/h [mph])

Transfer position

H4

Transfer position

L4

1

39 (24)

15 (9)

2

75 (47)

29 (18)

3

111 (69)

43 (27)

4

138 (86)

54 (34)

5

165 (103)

64 (40)

290

4-2. Driving procedures

WARNING

Gear Shift Indicator display (if equipped)

For safety, the driver should not look only at the display. Refer to the display
when it is safe to do so while considering actual traffic and road conditions.
Failure to do so may lead to an accident.

NOTICE

To prevent damage to the transmission

Shift the lever to R only when the vehicle is stationary.

Do not shift the shift lever to R without
depressing the clutch pedal.

291

4

4-2. Driving procedures

D

riv

in

g

Turn signal lever

The turn signal lever can be used to show the following intentions of
the driver:

Right turn
Lane change to the right (push
and hold the lever partway)

The right hand signals will flash
until you release the lever.

Lane change to the left (push
and hold the lever partway)

The left hand signals will flash until
you release the lever.

Left turn

Turn signals can be operated when

Vehicles without a smart entry & start system

The engine switch is in the “ON” position.

Vehicles with a smart entry & start system

The engine switch is in IGNITION ON mode.

If the indicator flashes faster than usual

Check that a light bulb in the front or rear turn signal lights has not burned
out.

Operating instructions

1
2

3

4

292

4-2. Driving procedures

Parking brake

To set the parking brake, fully
pull the parking brake lever
while depressing the brake
pedal.
To release the parking brake,
slightly raise the lever and
lower it completely while press-
ing the button.

Parking the vehicle

P. 239

Usage in winter time

P. 436

1

2

NOTICE

Before driving

Fully release the parking brake.
Driving the vehicle with the parking brake set will lead to brake components
overheating, which may affect braking performance and increase brake
wear.

293

4

4-2. Driving procedures

D

riv

in

g

DPF (Diesel Particulate Filter) system

: If equipped

When the deposit collected by the filter reaches a predetermined
amount, it is automatically regenerated.

WARNING

During regeneration

Observe the following precautions. 
Failure to do so may result in serious injury such as burns caused by the hot
exhaust pipe and exhaust gases, or may cause a fire.

Do not carry out regeneration when the vehicle is in an enclosed area,
such as a garage.

Do not touch the exhaust pipe and exhaust gases during regeneration.

Do not stop the vehicle where flamma-
ble materials, such as dry grass, are
near the exhaust pipe.

Make sure that there are no people
near the exhaust pipe.

294

4-2. Driving procedures

Regeneration

During normal driving, the filter is automatically regenerated
every several hundred kilometers*. During regeneration, the DPF
system warning light turns on (vehicles with the multi-information
display type A) or the DPF system warning message “DPF
regeneration in process” is displayed on the multi-information
display (vehicles with the multi-information display type B).

When the amount of accumulated deposit reaches a certain
level, regeneration can be performed. (

P. 295

)

*

: Differs in accordance with weather, driving conditions, etc.

System characteristics

The DPF system has the following characteristics:

Idle speed increases during regeneration

The smell of the exhaust gas differs from that of a conventional
diesel vehicle

White smoke may be emitted from the exhaust pipe during
regeneration. However, this does not indicate a malfunction.

NOTICE

To prevent the DPF system from failing

Do not drive for long periods of time while the DPF system warning light is
flashing (vehicles with the multi-information display type A) or the DPF
system warning message “DPF full Visit your dealer” appears on the multi-
information display (vehicles with the multi-information display type B) and
a buzzer sounds (malfunction indicator lamp comes on)

Do not use fuel other than the specified type

Do not use engine oil other than the recommended type

Do not modify the exhaust pipe

295

4-2. Driving procedures

4

D

riv

in

g

Vehicles with the multi-information display type A

The amount of accumulated deposit in the DPF system can be con-
firmed on the odometer/trip meter display.

The DPF deposition status appears when pressed the “ODO/TRIP” button.
(

P. 136)

The amount of accumulated deposit in the DPF system is displayed by 11
stages.

Vehicles with the multi-information display type B

The amount of accumulated deposit in the DPF system can be con-
firmed on the multi-information display.

Select 

 (drive information) using the meter control switches, and oper-

ate 

 up and down to display the DPF deposition status. (

P. 140) 

Use the displayed DPF deposition as a reference.

Low
High

If the DPF system warning light flashes (vehicles with the multi-
information display type A) or the DPF system warning message
“DPF full See owner’s manual” appears on the multi-information
display (vehicles with the multi-information display type B), follow
the procedure below to regenerate.

DPF deposition status

1
2

DPF system failure warning

296

4-2. Driving procedures

When regenerating the filter during driving the vehicle

To regenerate the filter, the following driving methods are recom-
mended.

*

1

• By driving continuously (for example, at around 60 km/h [37 mph]

for 20 to 30 minutes).

• By avoiding short trips, or by driving continuously (leaving the

engine running for long periods of time).

Check the engine is warmed up before driving the vehicle to regenerate
the filter. If the engine is cold, warm up the engine by driving the vehicle
downshifting to increase the engine speed.

*

2

Vehicles with the multi-information display type A: The warning light will
turn off when regeneration is complete. However, depending on the
driving condition such as heavy traffic, the amount of accumulated
deposit increases and the warning light may not turn off. If the warning
light flashes again after driving, press the DPF system switch to manu-
ally regenerate the filter.
Vehicles with the multi-information display type B: The warning mes-
sage will disappear on the multi-information display when regeneration
is complete. However, depending on the driving condition such as
heavy traffic, the amount of accumulated deposit increases and the
warning message may not disappear on the multi-information display. If
the warning message does not disappear on the multi-information dis-
play after driving, press the DPF system switch to manually regenerate
the filter.
Regeneration during driving cannot be performed when the vehicle is
higher than 4000 m (13124 ft.) above sea level.

*

1

: When driving, pay sufficient attention to weather, road conditions, ter-

rain and traffic conditions, and drive according to traffic laws.

*

2

: Depending on the situation, it may be necessary to downshift until the

engine speed is increased to 3000 rpm. If the engine coolant tem-
perature or exhaust gas temperature is low, it may take a long time to
regenerate, or regeneration may be impossible.

When regenerating the filter by pressing the DPF system switch
Stop the vehicle in a safe place.
Shift the shift lever to P (automatic transmission) or N (manual
transmission), and firmly set the parking brake.

Do not stop the engine. 
Also, make sure that there are no flammable materials near the exhaust
pipe. (

P. 293)

Check the engine is warmed up. If the engine is cold, warm up the
engine by depressing the accelerator pedal.

*

1

1

2

297

4-2. Driving procedures

4

D

riv

in

g

Press the DPF system switch.

Vehicles with the multi-information display type A

The DPF system warning
light will illuminate, and the
idling engine speed will
increase.

Vehicles with the multi-information display type B

The DPF system warning
message shown in the illus-
tration appears on the multi-
information display, and the
idling engine speed will
increase.

Regeneration will take around 15 - 40 minutes to complete.

*

2

When the DPF system warning light turns off (vehicles with the
multi-information display type A) or the DPF system warning mes-
sage disappears on the multi-information display (vehicles with the
multi-information display type B), the idling engine speed will have
finished returning to normal.
The DPF system switch may not operate when the vehicle is higher
than 4000 m (13123 ft.) above sea level.

*

1

: Depending on the situation, it may be necessary to depress the acceler-

ator pedal until the engine speed is increased to 3000 rpm. If the engine
coolant temperature or exhaust gas temperature is low, it may take a
long time to regenerate, or regeneration may be impossible.

*

2

: Time required for regeneration differs in accordance with the outside

temperature. Also, if the engine speed is still approximately 2000 rpm
10 minutes after pressing the DPF system switch, the exhaust gas tem-
perature may be low. In this case, depress the accelerator pedal to run
the engine at approximately 3000 rpm for a while.
When depressing the accelerator pedal, regeneration will be stopped. In
this case, restart regeneration.

3

298

4-2. Driving procedures

Vehicles with the multi-information display type B: If the “DPF full
Manual regeneration required See owner’s manual” appears on the
multi-information display, press the DPF system switch to regener-
ate the filter. (

P. 295)

If the DPF system warning light flashes (vehicles with the multi-
information display type A) or the DPF system warning message
“DPF full Visit your dealer” appears on the multi-information display
(vehicles with the multi-information display type B) and a buzzer
sounds (malfunction indicator lamp comes on), have the vehicle
inspected by any authorized Toyota retailer or Toyota authorized
repairer, or any reliable repairer immediately.

Regeneration with the DPF system switch

After pressing the DPF system switch, depressing the accelerator pedal or
clutch pedal (manual transmission) will stop regeneration. If regeneration
has been stopped, restart regeneration as soon as possible.

After regeneration is finished, race the engine several time to clean the
exhaust system.

DPF system warning

Under the following driving conditions, the DPF system warning light may
flash (vehicles with the multi-information display type A) or the DPF system
warning message may be displayed on the multi-information display (vehicles
with the multi-information display type B) earlier than normal.

*

When only driving at low speeds (for example 20 km/h [12 mph] or below).

If the engine is turned on and off frequently (if the engine is not left running
for more than 10 minutes at a time).

*

: Differs in accordance with weather, driving conditions, etc.

NOTICE

If the malfunction indicator lamp comes on (warning buzzer)

The malfunction indicator lamp comes on if you continue driving while the
DPF system warning light is flashing (vehicles with the multi-information dis-
play type A) or the DPF system warning message appears on the multi-
information display (vehicles with the multi-information display type B). In
this event, damage may be caused to the vehicle or an accident may occur.
Have the vehicle inspected by any authorized Toyota retailer or Toyota
authorized repairer, or any reliable repairer immediately.

299

4

4-3. Operating the lights and wipers

D

riv

in

g

Headlight switch

Operating the 

 switch turns on the lights as follows:

Type A

Vehicles without a smart
entry & start system:
The headlights, front
position lights, daytime
running lights (

P. 311)

and so on turn on and
off automatically (when
the engine switch is in
the “ON” position.)
Vehicles with a smart
entry & start system:
The headlights, front
position lights, daytime
running lights (

P. 311)

and so on turn on and
off automatically (when
the engine switch is in
IGNITION ON mode.)
The front position, tail, license plate and instrument panel
lights turn on.
The headlights and all lights listed above turn on.

The headlights can be operated manually or automatically.

Operating instructions

1

2

3

300

4-3. Operating the lights and wipers

Type B

Vehicles without day-
time running light sys-
tem: Off.
Vehicles with daytime
running light system:
The daytime running
lights turn on (

P. 311).

The front position, tail,
license plate and instru-
ment panel lights turn
on.
The headlights and all
lights listed above turn
on.

Vehicles without a smart entry & start system: The head-
lights, front position lights, daytime running lights (

P. 311)

and so on turn on and off automatically (when the engine
switch is in the “ON” position.)
Vehicles with a smart entry & start system: The headlights,
front position lights, daytime running lights (

P. 311) and so

on turn on and off automatically (when the engine switch is
in IGNITION ON mode.)

1

2

3

4

301

4-3. Operating the lights and wipers

4

D

riv

in

g

With the headlights on, push
the lever away from you to turn
on the high beams. 

Pull the lever toward you to the
center position to turn the high
beams off.

Pull the lever toward you and
release it to flash the high
beams once. 

You can flash the high beams with the headlights on or off.

This system allows the headlights and front position lights to be turned
on for 30 seconds when the engine switch is off.

Pull the lever toward you and
release it with the light switch is in

 or 

 after turning the

engine switch off.

Pull the lever toward you and
release it again to turn off the
lights.

The level of the headlights can be adjusted according to the number
of passengers and the loading condition of the vehicle.

Raises the level of the head-
lights
Lowers the level of the head-
lights

Turning on the high beam headlights

1

2

Extended Headlight Lighting system (if equipped)

Manual headlight leveling dial (if equipped)

1

2

302

4-3. Operating the lights and wipers

Guide to dial settings

9-seat models

Occupancy and luggage load conditions

Driver only, or Driver and one passenger in the front seat
Driver, one passenger in the front seat, and all passengers in the
rear seats farthest to the rear
All passengers
All passengers and full luggage loading in the luggage room
Driver and full luggage loading in the luggage room

*

: The model code is indicated on the manufacturer’s label. (

P. 740)

1
2

3
4
5

Model code

*

Type

GRJ150L-GKTEK

With sub fuel tank

0

1

3

3

4

Without sub fuel tank

0

1

3

3.5

4.5

TRJ150L-GKMEK

TX grade

0

1

3

4

4

TX-L grade

0

1

3

3.5

4

TRJ150L-GKTEK

TX grade

0

1

3

4

4

TX-L grade

0

1

3

3.5

3.5

1

2

3

4

5

303

4-3. Operating the lights and wipers

4

D

riv

in

g

7-seat models

Occupancy and luggage load conditions

Driver only, or Driver and one passenger in the front seat
Driver, one passenger in the front seat, and all passengers in the
rear seats farthest to the rear
All passengers
All passengers and full luggage loading in the luggage room
Driver and full luggage loading in the luggage room

1
2

3
4
5

Model code

*

Type

GDJ150L-GKFEYW

-

0

1

2

3.5

4

GDJ150L-GKTEYW

Tire size: 245/70R17

0

1

2

3.5

4

Tire size: 265/65R17

0

1

2

3

4

Tire size: 265/55R19

0

1

2

3

4

GDJ150R-GKFEYW

-

0

1

2

3.5

4

GDJ150R-GKTEYW

Tire size: 265/65R17

0

1

2

3

4

Tire size: 245/70R17

0

1

2

3.5

4

GDJ150L-GKTEYX

-

0

1

2

3.5

4.5

GDJ150L-GKTEY

-

0

1

2

3.5

4.5

With KDSS

0

0

0

0.5

1

With sub fuel tank

0

1

2

3

4

1

2

3

4

5


Content      ..     16      17      18      19     ..