Toyota Land Cruiser Prado (2023 year). Manual in english - page 4
 

  Index      Manuals     Toyota Land Cruiser Prado (2023 year). Manual in english


Search            copyright infringement  


Content      ..     2      3      4      5     ..


Toyota Land Cruiser Prado (2023 year). Manual in english - page 4


63

1-2. Child safety

1

Fo
r s

a

fe

ty a
n

d se
cu

rity

When installing a child restraint system to a front passenger
seat

For the safety of a child, install a child restraint system to a rear
seat. When installing a child restraint system to the front passenger
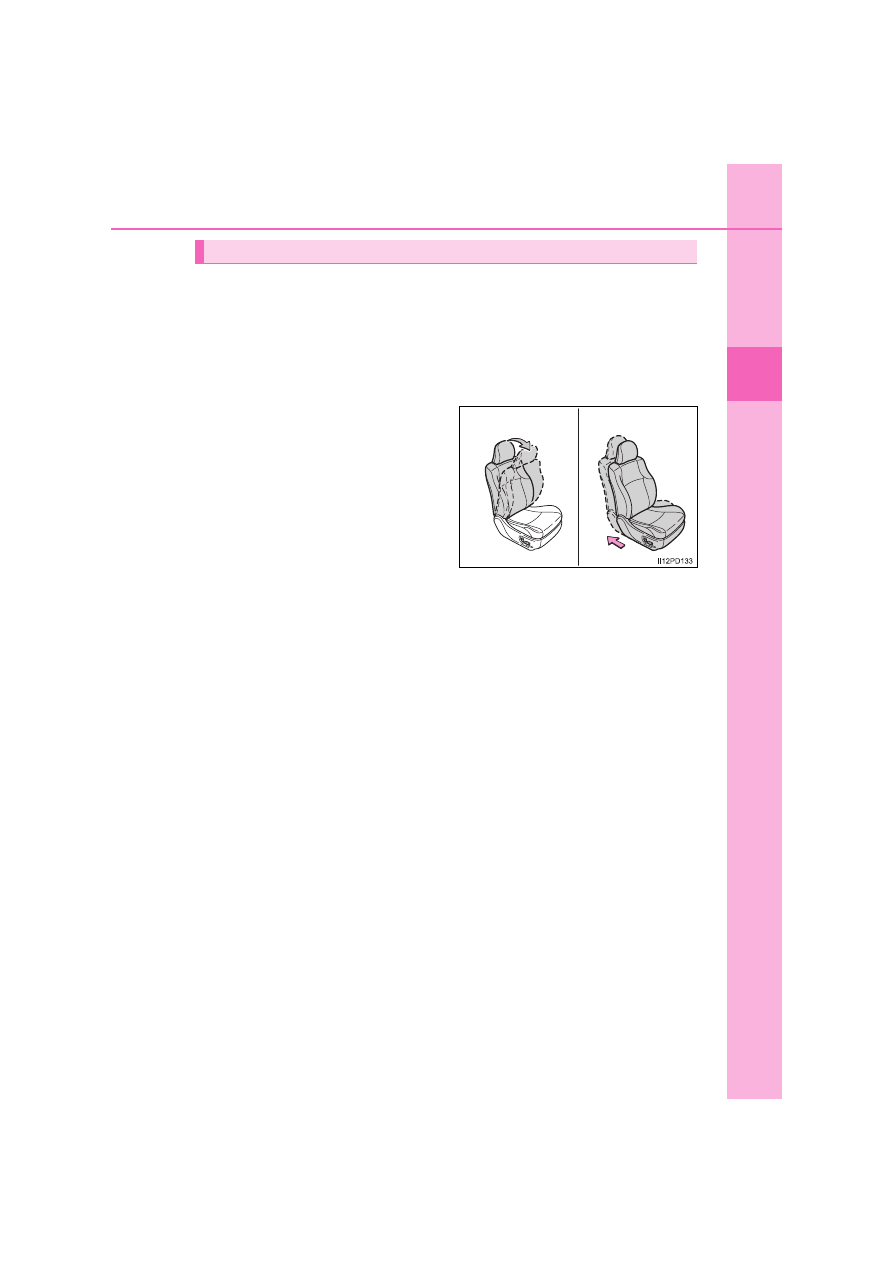
seat is unavoidable, adjust the seat as follows and install the child
restraint system.

Adjust the seatback angle to
the most upright position.

When installing a forward-fac-
ing child seat, if there is a gap
between the child seat and the
seatback, adjust the seatback
angle until good contact is
achieved.

Move the seat fully rearward.

If the head restraint interferes with the child restraint system
installation and the head restraint can be removed, remove the
head restraint. Otherwise, put the head restraint in the upper
most position.

When using a child restraint system

64

1-2. Child safety

WARNING

When using a child restraint system

Observe the following precautions.
Failure to do so may result in death or serious injury.

Vehicles without airbag manual on-off
switch: Never install a rear-facing child
restraint system on the front passenger
seat. 
The force of the rapid inflation of the
front passenger airbag can cause death
or serious injury to children in the event
of an accident.

Vehicles with airbag manual on-off
switch: Never use a rear-facing child
restraint system on the front passenger
seat when the airbag manual on-off
switch is on. (

P. 58)

The force of the rapid inflation of the
front passenger airbag can cause death
or serious injury to children in the event
of an accident.

On some models: There is a label(s) on
the passenger side sun visor, indicating
it is forbidden to attach a rear-facing
child restraint system to the front
passenger seat.
Details of the label(s) are shown in the
illustration below.

65

1-2. Child safety

1

Fo
r s

a

fe

ty a
n

d se
cu

rity

WARNING

When using a child restraint system

When a junior seat is installed, always ensure that the shoulder belt is
positioned across the center of the child’s shoulder. The belt should be
kept away from the child’s neck, but not so that it could fall off the child’s
shoulder.

Use a child restraint system suitable to the age and size of the child and
install it to the rear seat.

Only put a forward-facing child restraint
system on the front seat when unavoid-
able. When installing a forward-facing
child restraint on the front passenger
seat, move the seat as far back as pos-
sible. Failing to do so may result in
death or serious injury if the airbags
deploy (inflate).

Do not allow the child to lean his/her
head or any part of his/her body against
the door or the area of the seat, front or
rear pillars, or roof side rails from which
the SRS side airbags or SRS curtain
shield airbags deploy even if the child is
seated in the child restraint system. It is
dangerous if the SRS side airbags and
curtain shield airbags inflate, and the
impact could cause death or serious
injury to the child.

If the driver’s seat interferes with the
child restraint system and prevents it
from being attached correctly, attach
the child restraint system to the right-
hand rear seat (left-hand drive vehicles)
or the left-hand rear seat (right-hand
drive vehicles).

Adjust the front passenger seat so that
it does not interfere with the child
restraint system.

66

1-2. Child safety

Child restraint system compatibility for each seating position

Compatibility of each seating position with child restraint systems
(

P. 68, 73, 80, 86, 92) displays the type of child restraint systems

that can be used and possible seating positions for installation
using symbols. Also, the recommended child restraint system that
is suitable for your child can be selected.
Otherwise, check [Recommended child restraint systems informa-
tion] for recommended child restraint systems. 
(

P. 79, 85, 91, 97)

Check the selected child restraint system together with the follow-
ing [Before confirming the compatibility of each seating position
with child restraint systems].

Before confirming the compatibility of each seating position
with child restraint systems

Checking the child restraint system standards.
Use a child restraint system that conforms to UN(ECE) R44

*

1

.

The following approval mark is displayed on child restraint sys-
tems which are conformed. 
Check for an approval mark attached to the child restraint sys-
tem.
Example of the displayed
regulation number
UN(ECE) R44 approval
mark

*

2

The weight range of the child
who is applicable for an
UN(ECE) R44 approval mark
is indicated.

*

1

: UN(ECE) R44 is an U.N. regulation for child restraint systems.

*

2

: The displayed mark may differ depending on the product.

Child restraint system compatibility for each seating position

1

67

1-2. Child safety

1

Fo
r s

a

fe

ty a
n

d se
cu

rity

Checking the category of the child restraint system.
Check the approval mark of the child restraint system for which
of the following categories the child restraint system is suitable.
Also, if there are any uncertainties, check the user’s guide
included with the child restraint system or contact the retailer of
the child restraint system.

• “universal”
• “semi-universal”
• “restricted”
• “vehicle specific”

2

68

1-2. Child safety

3-door models (2-seat models) and 5-door models (2-seat models)

Compatibility of each seating position with child restraint sys-
tems

Left-hand drive vehicles:

Right-hand drive vehicles:

*

1, 2, 3


Deactivation of front passenger airbag.

Activation of front passenger airbag.
Never use a rearward-facing child restraint system on the front
passenger seat when the airbag manual on-off switch is on.

Suitable for “universal” category child restraint system fixed with
the seat belt.

Suitable for forward-facing “universal” category child restraint sys-
tem fixed with the seat belt.

69

1-2. Child safety

1

Fo
r s

a

fe

ty a
n

d se
cu

rity

*

1

: Move the front seat fully rearward. If the passenger seat height can be

adjusted, move it to the upper most position.

*

2

: Adjust the seatback angle to the

most upright position.
When installing a forward-facing
child seat, if there is a gap between
the child seat and the seatback,
adjust the seatback angle until
good contact is achieved.

*

3

: If the head restraint interferes with your child restraint system, and the

head restraint can be removed, remove the head restraint.
Otherwise, put the head restraint in the upper most position.

70

1-2. Child safety

When securing some types of child restraint systems in rear seat, it
may not be possible to properly use the seat belts in positions next
to the child restraint without interfering with it or affecting seat belt
effectiveness. Be sure your seat belt fits snugly across your shoul-
der and low on your hips. If it does not, or if it interferes with the
child restraint, move to a different position.
Failure to do so may result in death or serious injury.

When installing a child restraint in the rear seats, adjust the front
seat so that it does not interfere with the child or child restraint
system.

When installing a child seat with support base, if the child seat
interferes with the seatback when latching it into the support
base, adjust the seatback rearward until there is no interference.

If the seat belt shoulder
anchor is ahead of the child
seat belt guide, move the
seat cushion forward.

When installing a junior seat, if the child in your child restraint
system is in a very upright position, adjust the seatback angle to
the most comfortable position. And if the seat belt shoulder
anchor is ahead of the child seat belt guide, move the seat cush-
ion forward.

71

1-2. Child safety

1

Fo
r s

a

fe

ty a
n

d se
cu

rity

Detail information for child restraint systems installation

*

: All universal categories (group 0, 0+, I, II and III).

Seating position

Seat position number

Airbag manual on-off switch

ON

OFF

Seating position suitable for univer-
sal belted (Yes/No)

*

Yes

Forward-facing 

only

Yes

i-Size seating position (Yes/No)

No

No

Seating position suitable for lateral
fixture (L1/L2/No)

No

No

Suitable rearward facing fixture (R1/
R2X/R2/R3/No)

No

No

Suitable forward facing fixture (F2X/
F2/F3/No)

No

No

Suitable junior seat fixture (B2/B3/
No)

No

No

72

1-2. Child safety

ISOFIX child restraint systems are divided into different “fixture”.
The child restraint system can be used in the seating positions for
“fixture” mentioned in the table above. For kind of “fixture” relation,
confirm the following table.
If your child restraint system has no kind of “fixture” (or if you can-
not find information in the table below), please refer to the child
restraint system “vehicle list” for compatibility information or ask the
retailer of your child seat.

Mass 

groups

Child weight

Size 

class

Fixture

Description

0

up to 10 kg 

(22 lb.)

E

R1

Rearward-facing infant seat

F

L1

Left lateral-facing infant seat 

(Carrycot)

G

L2

Right lateral-facing infant seat 

(Carrycot)

0+

up to 13 kg 

(28 lb.)

C

R3

Full-size, rearward-facing child 

restraint system

D

R2

Reduced-size, rearward-facing 

child restraint system

R2X

Reduced-size, rearward-facing 

child restraint system

E

R1

Rearward-facing infant seat

I

9 to 18 kg 

(20 to 39 lb.)

A

F3

Full-height, forward-facing child 

restraint system

B

F2

Reduced-height, forward-facing 

child restraint system

B1

F2X

Reduced-height, forward-facing 

child restraint system

C

R3

Full-size, rearward-facing child 

restraint system

D

R2

Reduced-size, rearward-facing 

child restraint system

II

15 to 25 kg 

(34 to 55 lb.)

B2, B3

Junior seat

III

22 to 36 kg 

(48 to 79 lb.)

73

1-2. Child safety

1

Fo
r s

a

fe

ty a
n

d se
cu

rity

3-door models (5-seat models)

Compatibility of each seating position with child restraint sys-
tems

Left-hand drive vehicles:

Right-hand drive vehicles:

*

1, 2, 3


*

2, 3


*

2, 3


*

2, 3


*

5

*

4

Deactivation of front passenger airbag.

Activation of front passenger airbag.
Never use a rearward-facing child restraint system on the front
passenger seat when the airbag manual on-off switch is on.

74

1-2. Child safety

*

1

: Move the front seat fully rearward. If the passenger seat height can be

adjusted, move it to the upper most position.

*

2

: Adjust the seatback angle to the

most upright position.
When installing a forward-facing
child seat, if there is a gap between
the child seat and the seatback,
adjust the seatback angle until
good contact is achieved.

*

3

: If the head restraint interferes with your child restraint system, and the

head restraint can be removed, remove the head restraint.
Otherwise, put the head restraint in the upper most position.

*

4

: Top tether anchorage for center seat only.

*

5

: Cabriofix only.

Suitable for “universal” category child restraint system fixed with
the seat belt.

Suitable for forward-facing “universal” category child restraint sys-
tem fixed with the seat belt.

Suitable for child restraint systems given on recommended child
restraint systems information (

P. 79).

Suitable for ISOFIX child restraint system.

Includes a top tether anchorage point.

75

1-2. Child safety

1

Fo
r s

a

fe

ty a
n

d se
cu

rity

When securing some types of child restraint systems in rear seat, it
may not be possible to properly use the seat belts in positions next
to the child restraint without interfering with it or affecting seat belt
effectiveness. Be sure your seat belt fits snugly across your shoul-
der and low on your hips. If it does not, or if it interferes with the
child restraint, move to a different position.
Failure to do so may result in death or serious injury.

When installing a child restraint in the rear seats, adjust the front
seat so that it does not interfere with the child or child restraint
system.

When installing a child seat with support base, if the child seat
interferes with the seatback when latching it into the support
base, adjust the seatback rearward until there is no interference.

If the seat belt shoulder
anchor is ahead of the child
seat belt guide, move the
seat cushion forward.

When installing a junior seat, if the child in your child restraint
system is in a very upright position, adjust the seatback angle to
the most comfortable position. And if the seat belt shoulder
anchor is ahead of the child seat belt guide, move the seat cush-
ion forward.

76

1-2. Child safety

Detail information for child restraint systems installation

*

1

: All universal categories (group 0, 0+, I, II and III).

Seating position

Seat position number

Airbag manual 

on-off switch

ON

OFF

Left

Center

Right

Seating position suitable for uni-
versal belted (Yes/No)

*

1

Yes

For-

ward-

facing 

only

Yes

Yes

Yes

Yes

i-Size seating position (Yes/No)

No

No

No

No

No

Seating position suitable for lat-
eral fixture (L1/L2/No)

No

No

No

No

No

Suitable rearward facing fixture
(R1/R2X/R2/R3/No)

No

No

No

No

No

Suitable forward facing fixture
(F2X/F2/F3/No)

No

No

F2X

*

2

F2

*

2

F3

*

2

No

F2X

*

2

F2

*

2

F3

*

2

Suitable junior seat fixture (B2/
B3/No)

No

No

B2, B3

No

B2, B3

77

1-2. Child safety

1

Fo
r s

a

fe

ty a
n

d se
cu

rity

*

2

: Before installing a child restraint system to this seat, adjust the position of

the driver’s seat to between the 1st lock position and 22nd lock position
(4th lock position from the rear).

1st lock position
22nd lock position

Toyota suggests the users to use   and   seating positions.

1
2

78

1-2. Child safety

ISOFIX child restraint systems are divided into different “fixture”.
The child restraint system can be used in the seating positions for
“fixture” mentioned in the table above. For kind of “fixture” relation,
confirm the following table.
If your child restraint system has no kind of “fixture” (or if you can-
not find information in the table below), please refer to the child
restraint system “vehicle list” for compatibility information or ask the
retailer of your child seat.

Mass 

groups

Child weight

Size 

class

Fixture

Description

0

up to 10 kg 

(22 lb.)

E

R1

Rearward-facing infant seat

F

L1

Left lateral-facing infant seat 

(Carrycot)

G

L2

Right lateral-facing infant seat 

(Carrycot)

0+

up to 13 kg 

(28 lb.)

C

R3

Full-size, rearward-facing child 

restraint system

D

R2

Reduced-size, rearward-facing 

child restraint system

R2X

Reduced-size, rearward-facing 

child restraint system

E

R1

Rearward-facing infant seat

I

9 to 18 kg 

(20 to 39 lb.)

A

F3

Full-height, forward-facing child 

restraint system

B

F2

Reduced-height, forward-facing 

child restraint system

B1

F2X

Reduced-height, forward-facing 

child restraint system

C

R3

Full-size, rearward-facing child 

restraint system

D

R2

Reduced-size, rearward-facing 

child restraint system

II

15 to 25 kg 

(34 to 55 lb.)

B2, B3

Junior seat

III

22 to 36 kg 

(48 to 79 lb.)


Content      ..     2      3      4      5     ..