Toyota Sienna Hybrid (2023 year). Manual in english - page 11
 

  Index      Toyota     Toyota Sienna Hybrid (2023 year). Manual in english


Search            copyright infringement  


Content      ..     9      10      11      12     ..


Toyota Sienna Hybrid (2023 year). Manual in english - page 11


175

3-3. Adjusting the seats

3

Before 

driving

2

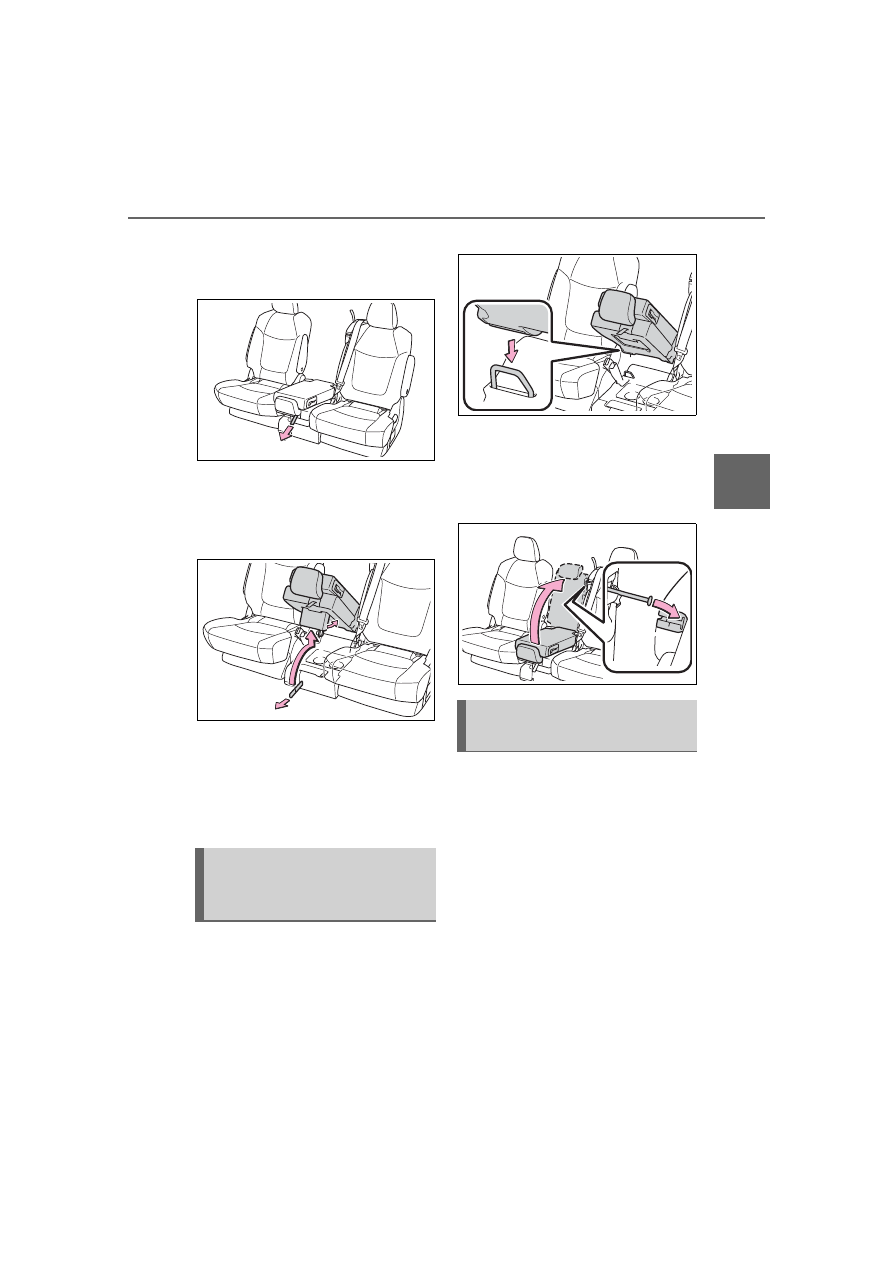
Pull the lock release strap in 
front of the cushion to 
release the rear latch.

3

Pull the lock release strap 
under the seat to remove the 
seat.

Retract the cushion leg.

4

After detaching the second 
center seat, remove it from 
the vehicle or store it 
securely in the luggage com-
partment.

1

Latch the buckles onto the 
anchors.

The cushion leg opens by itself.

2

Unfold the seatback and lock 
it.

Make sure the seat is locked in 

place by trying to shake the seat-

back and lift up the seat cushion.

Before folding the third 
seats

1

Fold the outside head 
restraints and lower the cen-
ter head restraint to the low-

Installing the second cen-
ter seat (8-passenger 
models)

Folding down the third 
seats

176

3-3. Adjusting the seats

est position (

P.183) and 

stow the seat belt buckles.

2

Stow the center seat belt. 
(

P.38)

Folding down the third seat-
backs

Pull the “TO RECLINE” strap 
and fold down the seatback.

Returning the third seat-
backs

Pull the “TO RECLINE” strap, 
and raise the seatback and the 
outside head restraints.

Before stowing or returning third 
seat, remove any items from the 
floor area to prevent interfer-
ence with moving parts.

Before stowing the third 
seats

1

Lower the center head 
restraint to the lowest posi-
tion (

P.183) and stow the 

seat belt buckles.

2

Stow the center seat belt. 
(

P.38)

Stowing the third seats

1

Pull the handle to move the 
seat rearward. Then push the 
seat down.

The outside head restraints are 

Stowing the third seats

177

3-3. Adjusting the seats

3

Before 

driving

folded automatically.

2

Push the seat against the 
floor.

Open the flaps.

Before returning the third 
seats

Be sure to move the second 
seats forward from the rearmost 
position, as they may interfere 
with the third seats returning 
operation.

Returning the third seats

1

Return the flaps.

Pull the handle and lift up the seat 

rearward.

2

Push the seat forward and 
then engage the front leg 
locks.

Make sure the front and rear legs 

are locked securely.

3

Raise the seatback and the 
outside head restraints. 
(

P.175)

WARNING

When folding the rear seat-

backs down

Observe the following precau-

tions. Failure to do so may result 

in death or serious injury.

Do not fold the seatbacks down 

while driving.

Stop the vehicle on level 

ground, set the parking brake 

and shift the shift lever to P.

178

3-3. Adjusting the seats

WARNING

Do not allow anyone to sit on a 

folded seatback or in the lug-

gage compartment while driv-

ing.

Do not allow children to enter 

the luggage compartment.

Be careful not to get any part of 

your body pinched by a seat.

After returning the rear seat-

backs or installing seats

Observe the following precau-

tions. Failure to do so may result 

in death or serious injury.

Make sure the seatback is 

securely locked by pushing it 

forward and rearward on the 

top.

Check that the seat belts are 

not twisted or caught in the 

seatback. If the seat belt gets 

caught between the seatback’s 

securing hook and latch, the 

seat belt may be damaged.

Make sure the seat is locked in 

place by trying to shake the 

seatback and lift up the seat 

cushion.

After removing the second 

center seat (8-passenger 

models)

Remove the second center seat 

from the vehicle or store it 

securely in the luggage com-

partment.

Do not sit on or place anything 

on a seat that has been 

removed from the vehicle.

Stowing the third seats

Make sure that the seat path is 

clear before moving the seat. 

Otherwise, injury may result 

from contact with, or by being 

pinched by parts of the seat.

Do not sit on the third seat when 

it is in the stowed position with 

the seatback upright.

NOTICE

To prevent damage to the 

seat

Avoid putting heavy loads on a 

folded seat that is being used as 

a temporary table.

Do not sit on or put heavy loads 

on the second center seat that 

has been removed from the 

vehicle. The metal tips of the 

seat leg may be damaged, pre-

venting reinstallation of the 

seat.

The second center seat must be 

reinstalled in its original position 

(8-passenger models). If it is 

installed in the wrong position, 

the seat locks or bezels will be 

damaged.

Make sure that the path the seat 

will move through is clear before 

stowing or returning the third 

seat.

8-passenger models: Be sure to 

raise the stowed second center 

seat above the outer trim, when 

removing from the storage box 

of the luggage room.

179

3-3. Adjusting the seats

3

Before 

driving

*

: If equipped

When all of the following have 
been performed, the driver’s 
seat and steering wheel are 
automatically adjusted to a posi-
tion that allows driver to enter 
and exit the vehicle easily.

NOTICE

Stowing the seat belt

The seat belts and the buckles 

must be stowed before you fold 

down the rear seatbacks.

Driving position mem-

ory

*

This feature automatically 
adjusts the positions of the 
driver’s seat, steering 
wheel, outside rear view 
mirrors and head-up display 
(if equipped) to make enter-
ing and exiting the vehicle 
easier or to suit your prefer-
ences.
Two different driving posi-
tions can be recorded into 
memory.
Each electronic key can be 
registered to recall your pre-
ferred driving position.

Enabling easier driver 
entry and exit (power easy 
access system)

180

3-3. Adjusting the seats

The shift lever has been 
shifted to P.

The power switch has been 
turned off.

The driver’ seat belt has been 
unfastened.

When any of the following has 
been performed, the driver’ seat 
and steering wheel automati-
cally return to their original posi-
tions.

The power switch has been 
turned to ACC or ON.

The driver’ seat belt has been 
fastened.

Recording procedure

1

Check that the shift lever is in 
P.

2

Turn the power switch to ON.

3

Adjust the driver’s seat, 
steering wheel, outside rear 
view mirrors and head-up 
display (if equipped) to the 
desired positions.

4

While pressing the “SET” but-
ton, press button “1” or “2” 
until the buzzer sounds.

If the selected button has already 

been preset, the previously 

recorded position will be overwrit-

ten.

Recall procedure

1

Check that the shift lever is in 
P.

2

Turn the power switch to ON.

3

Press one of the buttons for 
the driving position you want 
to recall until the buzzer 
sounds.

To stop the position recall oper-

ation part-way through

Perform any of the following:

Press the “SET” button.

Press button “1” or “2”.

Operate any of the seat adjust-

ment switches (only cancels seat 

position recall).

Operate the tilt and telescopic 

steering control switch (only can-

cels steering wheel position 

recall).

Recording/recalling a 
driving position

181

3-3. Adjusting the seats

3

Before 

driving

Seat positions that can be 

memorized (

P.170)

The adjusted positions other than 

the position adjusted by lumbar sup-

port switch can be recorded.

Operating the driving position 

memory after turning the power 

switch to OFF

Recorded seat positions can be 

activated up to 180 seconds after 

the driver’s door is opened and 

another 60 seconds after it is closed 

again.

In order to correctly use the 

driving position memory func-

tion

If a seat position is already in the 

furthest possible position and the 

seat is operated in the same direc-

tion, the recorded position may be 

slightly different when it is recalled.

When recalling the driving posi-

tion

Take care when recalling the driving 

position so that the head restraint 

does not touch the ceiling.

If the 12-volt battery is discon-

nected

The memorized positions are 

erased.

Registering procedure

Record your driving position to 
button “1” or “2” before perform-
ing the following:
Carry only the key you want to 
register, and then close the 
driver’s door. 
If 2 or more keys are in the vehi-
cle, the driving position cannot 
be recorded properly.

1

Check that the shift lever is in 
P.

2

Turn the power switch to ON.

3

Recall the driving position 
that you want to record.

4

While pressing the recalled 
button, press and hold the 
door lock switch (either lock 
or unlock) until the buzzer 
sounds.

If the button could not be regis-

tered, the buzzer sounds continu-

ously for approximately 3 seconds.

WARNING

Seat adjustment caution

Take care during seat adjustment 

so that the seat does not strike 

the rear passenger or squeeze 

your body against the steering 

wheel.

Registering/recall/cancel-
ing a driving position to 
an electronic key (mem-
ory recall function)

182

3-3. Adjusting the seats

Recall procedure

1

Make sure that the doors are 
locked before recalling the 
driving position. Carry the 
electronic key that has been 
registered to the driving posi-
tion, and then unlock and 
open the driver’s door using 
the smart key system or wire-
less remote control.

The driving position will move to the 

recorded position (not including the 

steering wheel and head-up display 

[if equipped]). However, the seat 

will move to a position slightly 

behind the recorded position in 

order to make entering the vehicle 

easier.

If the driving position is in a position 

that has already been recorded, the 

seat will not move.

2

Turn the power switch to 
ACC or ON, or fasten a seat 
belt.

The seat, steering wheel and head-

up display (if equipped) will move to 

the recorded position.

Cancelation procedure

Carry only the key you want to 
cancel and then close the 
driver’s door.
If 2 or more keys are in the vehi-
cle, the driving position cannot 
be canceled properly.

1

Check that the shift lever is in 
P.

2

Turn the power switch to ON.

3

While pressing the “SET” but-
ton, press and hold the door 
lock switch (either lock or 

unlock) until the buzzer 
sounds twice.

If the button could not be canceled, 

the buzzer sounds continuously for 

approximately 3 seconds.

Recalling the driving position 

using the memory recall func-

tion

Different driving positions can be 

registered for each electronic key. 

Therefore, the driving position that 

is recalled may be different 

depending on the key being car-

ried.

If a door other than the driver’s 

door is unlocked with smart key 

system, the driving position can-

not be recalled. In this case, press 

the driving position button which 

has been set.

Customization

Settings (e.g. the unlock door set-

tings of the memory recall function) 

can be customized. (Customizable 

features: 

P.545)

183

3-3. Adjusting the seats

3

Before 

driving

Front and second outside 
seats

1

Up

Pull the head restraints up.

2

Down

Push the head restraint down while 
pressing the lock release button 

.

Second center

*

 and third 

center seats

1

Up

Pull the head restraints up.

2

Down

Push the head restraint down while 
pressing the lock release button 

.

*

: 8-passenger models only

Third outside seats

1

To use

Pull the head restraints up.

2

To fold

Press the button.

Adjusting the height of the head 

restraints (Front and second 

outside seats)

Make sure that the head restraints 

are adjusted so that the center of 

the head restraint is closest to the 

Head restraints

Head restraints are pro-
vided for all seats.

WARNING

Head restraint precautions

Observe the following precautions 

regarding the head restraints.

Failure to do so may result in 

death or serious injury.

Use the head restraints 

designed for each respective 

seat.

Adjust the head restraints to the 

correct position at all times.

After adjusting the head 

restraints, push down on them 

and make sure they are locked 

in position.

Do not drive with the head 

restraints removed.

Vertical adjustment

A

A

184

3-3. Adjusting the seats

top of your ears.

Adjusting the center seat head 

restraint

Always raise the head restraint one 

level from the stowed position when 

using.

Front and second outside 
seats

Pull the head restraint up while 
pressing the lock release button 

.

If the head restraint touches the 
ceiling, making the removal difficult, 
change the seat height or angle. 
(

P.170)

Second center

*

 and third 

center seats

Pull the head restraint up while 
pressing the lock release button 

.

*

: 8-passenger models only

Third outside seats

The head restraint cannot be 
removed.

Front and second outside 
seats

Align the head restraint with the 
installation holes and push it 
down to the lock position.
Press and hold the lock release 
button 

 when lowering the 

head restraint.

Second center

*

 and third 

center seats

Align the head restraint with the 
installation holes and push it 
down to the lowest lock position.

Removing the head 
restraints

A

A

Installing the head 
restraints

A

185

3-3. Adjusting the seats

3

Before 

driving

Press and hold the lock release 
button 

 when lowering the 

head restraint.

*

: 8-passenger models only

A

186

3-4. Adjusting the steering wheel and mirrors

3-4.Adjusting the steering wheel and mirrors

Manual type

1

Hold the steering wheel and 
push the lever down.

2

Adjust to the ideal position by 
moving the steering wheel 
horizontally and vertically.

After adjustment, pull the lever up 

to secure the steering wheel.

Power type

Operating the switch moves the 
steering wheel in the following 
directions:

1

Up

2

Down

3

Toward the driver

4

Away from the driver

The steering wheel (power type) 

can be adjusted when

The power switch is in ACC or ON

*

.

*

: If the driver’ seat belt is fastened, 

the steering wheel can be 
adjusted regardless of power 
switch mode.

Automatic adjustment of the 

steering position (power type)

A desired steering position can be 

entered to memory and recalled 

automatically by the driving position 

memory system. (

P.179)

Power easy access system (if 

equipped)

The steering wheel and driver’ seat 

move in accordance with power 

switch mode and the driver’ seat 

belt condition. (

P.179)

After adjusting the steering 

wheel (manual type)

Make sure that the steering wheel is 

securely locked.

Steering wheel

Adjustment procedure

187

3-4. Adjusting the steering wheel and mirrors

3

Before 

driving

To sound the horn, press on or 
close to the 

 mark.

*

: If equipped

The height of the rear view mir-
ror can be adjusted to suit your 
driving posture.
Adjust the height of the rear 
view mirror by moving it up and 
down.

WARNING

Caution while driving

Do not adjust the steering wheel 

while driving.

Doing so may cause the driver to 

mishandle the vehicle and cause 

an accident, resulting in death or 

serious injury.

After adjusting the steering 

wheel (manual type)

Make sure that the steering wheel 

is securely locked.

Otherwise, the steering wheel 

may move suddenly, possibly 

causing an accident, and resulting 

in death or serious injury. Also, 

the horn may not sound if the 

steering wheel is not securely 

locked.

Sounding the horn

Inside rear view mir-

ror

*

The rear view mirror’s posi-
tion can be adjusted to 
enable sufficient confirma-
tion of the rear view.

Adjusting the height of 
rear view mirror

WARNING

Caution while driving

Do not adjust the position of the 

mirror while driving.

Doing so may lead to mishandling 

of the vehicle and cause an acci-

dent, resulting in death or serious 

injury.

188

3-4. Adjusting the steering wheel and mirrors

Reflected light from the head-
lights of vehicles behind can be 
reduced by operating the lever.

1

Normal position

2

Anti-glare position

Responding to the level of 
brightness of the headlights of 
vehicles behind, the reflected 
light is automatically reduced.
Changing automatic anti-glare 
function mode on/off

When the automatic anti-glare func-
tion is in ON mode, the indicator 


illuminates.
The function will set to ON mode 
each time the power switch is 
turned to ON.
Pressing the button turns the func-
tion to OFF mode. (The indicator 

 also turns off.)

Vehicles without garage door 
opener

Vehicles with garage door 
opener

To prevent sensor error (vehi-

cles with auto anti-glare inside 

rear view mirror)

To ensure that the sensors operate 

properly, do not touch or cover 

them.

Vehicles without garage door 

opener

Anti-glare function (vehi-
cles with manual anti-
glare inside rear view mir-
ror)

Anti-glare function (vehi-
cles with auto anti-glare 
inside rear view mirror)

A

A

189

3-4. Adjusting the steering wheel and mirrors

3

Before 

driving

Vehicles with garage door opener

*

: If equipped

Digital Rear-view Mir-

ror

*

The Digital Rear-view Mirror 
is a system that uses the 
camera on the rear of the 
vehicle and displays its 
image on the display of the 
Digital Rear-view Mirror.

The Digital Rear-view Mirror 
can be changed between 
optical mirror mode and dig-
ital mirror mode by operat-
ing the lever.

The Digital Rear-view Mirror 
allows the driver to see the 
rear view despite obstruc-
tions, such as the head 
restraints or luggage, 
ensuring rear visibility. 
Also, the rear seats are not 
displayed and privacy of the 
passengers is enhanced.

WARNING

Observe the following precau-

tions.

Failure to do so may result in 

death or serious injury.

Before using the Digital Rear-

view Mirror

Make sure to adjust the mirror 

before driving. (

P.191)

• Change to optical mirror mode 

and adjust the position of the 

Digital Rear-view Mirror so that 

the area behind your vehicle 

can be viewed properly.

190

3-4. Adjusting the steering wheel and mirrors

Icon display area

Displays icons, adjusting gauge, 
etc. (

P.191)

Lever

Operate to change between digital 
mirror mode and optical mirror 
mode.

Menu button

Press to display the icon display 
area and select the item you want 
to adjust.

Select/adjust button

Press to change the setting of the 
item you want to adjust.

Camera indicator

Indicates that the camera is operat-
ing normally.

Operate the lever to change 
between digital mirror mode and 
optical mirror mode.

1

Digital mirror mode

Displays an image of the area 
behind the vehicle.

 will illuminate in this mode.

2

Optical mirror mode

Turns off the display of the Digital 
Rear-view Mirror allows it to be 
used as an optical mirror.

Digital mirror mode operating 

condition

The power switch is turned to ON.
When the power switch is changed 

from ON to OFF or ACC, the image 

will disappear after several seconds.

When using the Digital Rear-

view Mirror in digital mirror 

mode

If it is difficult to see the displayed 

image due to light reflected off the 

Digital Rear-view Mirror, the cam-

era being dirty or covered with 

water droplets, or if lights of a 

vehicle behind your vehicle or the 

displayed image are bothering 

you, change to optical mirror 

mode.

When the back door is open, the 

Digital Rear-view Mirror image 

may not display properly. Before 

WARNING

• Change to digital mirror mode 

and adjust the display settings.

As the range of the image dis-

played by the Digital Rear-view 

Mirror is different from that of 

the optical mirror, make sure to 

check this difference before 

driving.

System components

A

B

C

D

E

Changing modes


Content      ..     9      10      11      12     ..