Toyota Sequoia Hybrid (2023 year). Manual in english - page 10
 

  Index      Toyota     Toyota Sequoia Hybrid (2023 year). Manual in english


Search            copyright infringement  


Content      ..     8      9      10      11     ..


Toyota Sequoia Hybrid (2023 year). Manual in english - page 10


160

3-4. Adjusting the steering wheel and mirrors

Responding to the level of 
brightness of the headlights of 
vehicles behind, the reflected 
light is automatically reduced.
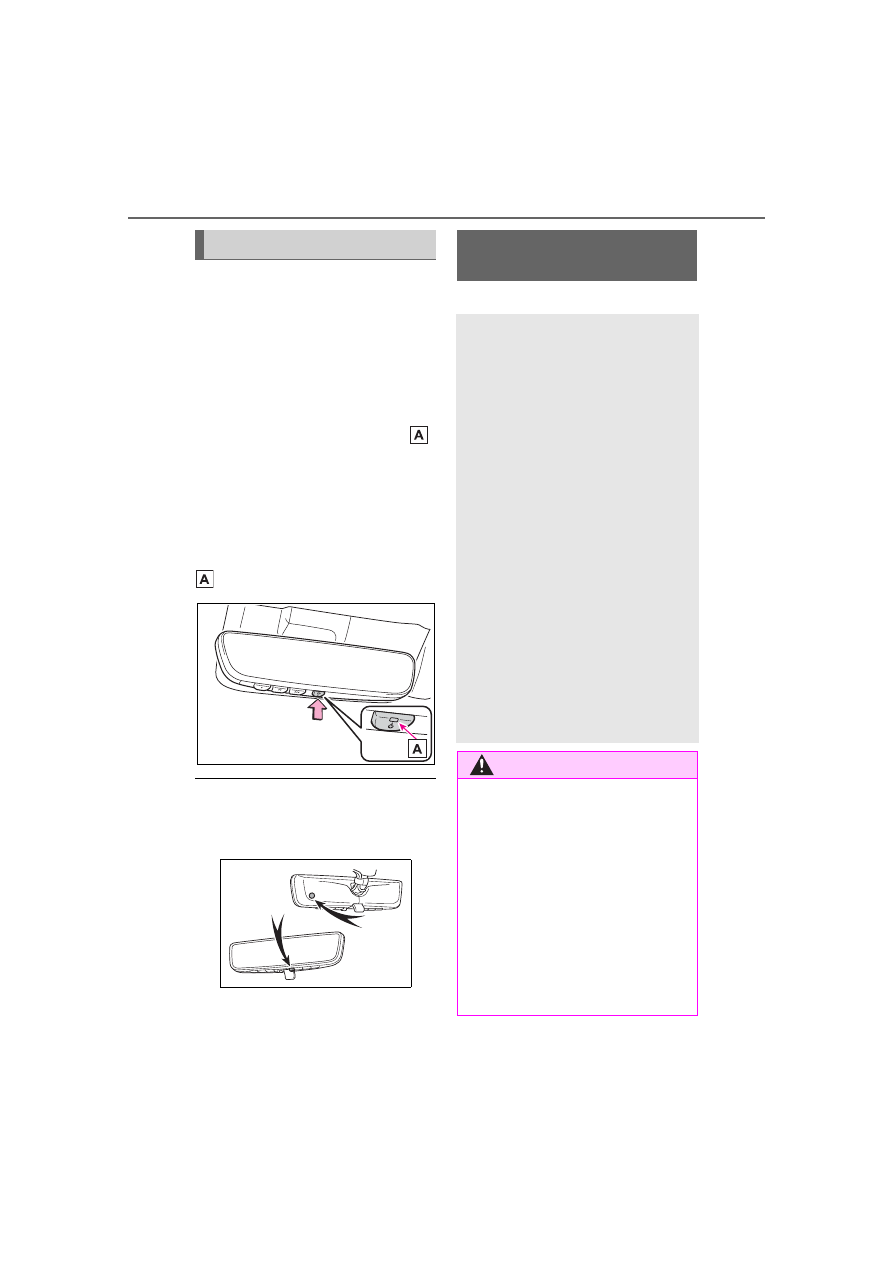
Turn the automatic anti-glare 
function mode on/off

When the automatic anti-glare func-
tion is in ON mode, the indicator 


illuminates.
The function will set to ON mode 
each time the power switch is 
turned to ON.
Pressing the button turns the func-
tion to OFF mode. (The indicator 

 also turns off.)

To prevent sensor error

To ensure that the sensors operate 

properly, do not touch or cover 

them.

*

: If equipped

Anti-glare function

Digital Rear-view Mir-

ror

*

The Digital Rear-view Mirror 
is a system that uses the 
camera on the rear of the 
vehicle and displays its 
image on the display of the 
Digital Rear-view Mirror.

The Digital Rear-view Mirror 
can be changed between 
optical mirror mode and dig-
ital mirror mode by operat-
ing the lever.

The Digital Rear-view Mirror 
allows the driver to see the 
rear view despite obstruc-
tions, such as the head 
restraints or luggage, ensur-
ing rear visibility. Also, the 
rear seats are not displayed 
and privacy of the passen-
gers is enhanced.

WARNING

Observe the following precau-

tions.

Failure to do so may result in 

death or serious injury.

Before using the Digital Rear-

view Mirror

Make sure to adjust the mirror 

before driving. (

P.162)

• Change to optical mirror mode 

and adjust the position of the 

Digital Rear-view Mirror so that 

the area behind your vehicle 

can be viewed properly.

161

3-4. Adjusting the steering wheel and mirrors

3

Before 

driving

Camera indicator

Indicates that the camera is operat-
ing normally.

Icon display area

Displays icons, adjusting gauge, 
etc. (

P.162)

Select/adjust button

Press to change the setting of the 
item you want to adjust.

Menu button

Press to display the icon display 
area and select the item you want 
to adjust.

Lever

Operate to change between digital 
mirror mode and optical mirror 
mode.

Operate the lever to change 
between digital mirror mode and 
optical mirror mode.

1

Digital mirror mode

Displays an image of the area 
behind the vehicle.

 will illuminate in this mode.

2

Optical mirror mode

Turns off the display of the Digital 
Rear-view Mirror allows it to be 
used as an optical mirror.

Digital mirror mode operating 

condition

The power switch is turned to ON.

When the power switch is changed 

from ON to OFF or ACC, the image 

will disappear after several seconds.

When using the Digital Rear-

view Mirror in digital mirror 

mode

If it is difficult to see the displayed 

image due to light reflected off the 

Digital Rear-view Mirror, the cam-

era being dirty, or if lights of a 

vehicle behind your vehicle or the 

displayed image are bothering 

you, change to optical mirror 

mode.

When it is raining, if the image is 

unclear due to water on the rear 

window, operate the rear wiper.

WARNING

• Change to digital mirror mode 

and adjust the display settings.

As the range of the image dis-

played by the Digital Rear-view 

Mirror is different from that of 

the optical mirror, make sure to 

check this difference before 

driving.

System components

Changing modes

162

3-4. Adjusting the steering wheel and mirrors

When the back door is open, the 

Digital Rear-view Mirror image 

may not display properly. Before 

driving, make sure the back door 

is closed.

If the display is difficult to see due 

to reflected light, close the elec-

tronic sunshade for the panoramic 

moon roof (if equipped).

Any of the following conditions 

may occur when driving in the 

dark, such as at night. None of 

them indicates that a malfunction 

has occurred.

• Colors of objects in the displayed 

image may differ from their actual 

color.

• Depending on the height of the 

lights of the vehicle behind, the 

area around the vehicle may 

appear white and blurry.

• Automatic image adjustment for 

brighter surrounding image may 

cause flickering.

If it is difficult to see the displayed 
image or flickering bothers you, 
change to optical mirror mode.

The Digital Rear-view Mirror may 

become hot while it is in digital 

mirror mode.

This is not a malfunction.

Depending on your physical con-

dition or age, it may take longer 

than usual to focus on the dis-

played image. In this case, 

change to optical mirror mode.

Do not let passengers stare at the 

displayed image when the vehicle 

is being driven, as doing so may 

cause motion sickness.

When the system malfunctions

If the symbol shown in the illustra-

tion is displayed when using the 

Digital Rear-view Mirror in digital 

mirror mode, the system may be 

malfunctioning. The symbol will dis-

appear in a few seconds. Operate 

the lever, change to optical mirror 

mode and have the vehicle 

inspected by your Toyota dealer.

Adjusting the mirror height

The height of the rear view mir-
ror can be adjusted to suit your 
driving posture.
Change to optical mirror mode, 
adjusting the height of the rear 
view mirror by moving it up and 
down.

Display settings (digital mir-
ror mode)

Settings of the display in the dig-
ital mirror mode, on/off operation 
of the automatic anti-glare func-
tion, etc. can be changed.

Adjusting the mirror

163

3-4. Adjusting the steering wheel and mirrors

3

Before 

driving

1

Press the menu button.

The icons will be displayed.

2

Press the menu button 
repeatedly and select the 
item you want to adjust.

3

Press 

 or 

 to 

change the setting.

The icons will disappear if a button 

is not operated for approximately 5 

seconds or more.

*

: This is a function for the optical 

mirror mode, however, the setting 
can also be changed while using 
the digital mirror mode.

Enabling/disabling the 
automatic anti-glare func-
tion (optical mirror mode)

The automatic anti-glare func-
tion in the optical mirror mode 
can be enabled/disabled. The 
setting can be changed in both 
the digital mirror mode and the 
optical mirror mode.

When using the digital mirror 
mode

P.162

Icons

Settings

Select to adjust the bright-
ness of the display.

Select to adjust the area 
displayed up/down.

Select to adjust the area 
displayed to the left/right.

Select to adjust the angle of 
the displayed image.

Select to zoom in/out the 
displayed image.

Select to enable/disable the 
automatic anti-glare func-
tion.

*

Responding to the bright-
ness of the headlights of 
vehicles behind, the 
reflected light is automati-
cally adjusted.
The automatic anti-glare 
function is enabled each 
time the power switch is 
changed to ON.

Select to display Home-
Link

®

 Training Tutorial to 

assist customers to train 
their Garage Door Opener 
System. (

P.441)

Select to change the lan-
guage of the HomeLink

®


Training Tutorial.

Icons

Settings

164

3-4. Adjusting the steering wheel and mirrors

When using the optical mirror 
mode

1

Press the menu button.

The setting display will be dis-

played.

2

Press 

 or 

 to 

enable (“ON”)/disable 
(“OFF”) the automatic anti-
glare function.

The icons will disappear if a button 

is not operated for approximately 5 

seconds or more.

Adjusting the display (digital 

mirror mode)

If the displayed image is adjusted, 

it may appear distorted. This is not 

a malfunction.

If the brightness of the Digital 

Rear-view Mirror is set too high, it 

may cause eye strain. Adjust the 

Digital Rear-view Mirror to an 

appropriate brightness. If your 

eyes become tired, change to 

optical mirror mode.

The brightness of the Digital Rear-

view Mirror will change automati-

cally according to the brightness 

of the area in front of your vehicle.

To prevent the light sensors 

from malfunctioning

To prevent the light sensors from 

malfunctioning, do not touch or 

cover them.

WARNING

Observe the following precau-

tions.

Failure to do so may result in 

death or serious injury.

While driving

Do not adjust the position of the 

Digital Rear-view Mirror or 

adjust the display settings while 

driving.

Stop the vehicle and operate 

the Digital Rear-view Mirror 

control switches.

Failure to do so may cause a 

steering wheel operation error, 

resulting in an unexpected acci-

dent.

Always pay attention to the 

vehicle’s surroundings.

The size of the vehicles and other 
objects may look different when in 
digital mirror mode and optical 
mirror mode.
When backing up, make sure to 
directly check the safety of the 
area around your vehicle, espe-
cially behind the vehicle.
Additionally, if a vehicle 
approaches from the rear in the 
dark, such as at night, the sur-
rounding area may appear dim.

165

3-4. Adjusting the steering wheel and mirrors

3

Before 

driving

Cleaning the mirror surface

If the mirror surface is dirty, the 
image on the display may be dif-
ficult to see.
Clean the mirror surface gently 
using a soft dry cloth.

Cleaning the camera

When the camera lens is dirty, a 
clear image cannot be captured. 
If the camera lens is covered 
with foreign matter, such as 
water droplets or dust, clean it 
with a damp soft cloth. When it 
is difficult to clean it with a cloth, 
use a swab. When cleaning the 
camera lens, wipe the inside of 
the rear window as well.

The camera

The camera for the Digital Rear-

view Mirror is located as shown.

WARNING

To prevent causes of fire

If the driver continues using the 

Digital Rear-view Mirror while 

smoke or odor comes from the 

mirror, it may result in fire. Stop 

using the system immediately and 

contact your Toyota dealer.

Cleaning the Digital Rear-
view Mirror

NOTICE

To prevent the Digital Rear-

view Mirror from malfunction-

ing

Do not use detergents, such as 

thinner, benzene, and alcohol to 

clean the mirror. They may dis-

color, deteriorate or damage the 

mirror surface.

Do not smoke, use matches, 

use cigarette lighters or allow 

open flames near the mirror. It 

may damage the mirror or 

cause a fire.

Do not remove, disassemble or 

modify the mirror.

To prevent the camera from 

malfunctioning

Observe the following precau-

tions, otherwise the Digital 

Rear-view Mirror may not oper-

ate properly.

• Do not strike or hit the camera 

or subject it to a strong impact, 

as the camera installation posi-

tion and angle may be changed.

• Do not remove, disassemble or 

modify the camera.

• Do not allow organic solvent, 

car wax, window cleaner or 

glass coat to adhere to the cam-

era. If this happens, wipe it off 

as soon as possible.

166

3-4. Adjusting the steering wheel and mirrors

If you notice any of the following symptoms, refer to the following 
table for the likely cause and the solution.
If the symptom is not resolved by the solution, have the vehicle 
inspected by your Toyota dealer.

NOTICE

• When cleaning the camera lens, 

wipe the camera lens with a 

damp soft cloth. When it is diffi-

cult to clean it with a cloth, use a 

swab. Do not strongly rub the 

camera lens, as it may be 

scratched and will not be able to 

transmit a clear image.

• When applying colored film 

(including transparent film) to 

the rear window glass, do not 

apply it to the area in front of the 

camera. If film is applied to the 

area in front of the camera, the 

image from the camera may not 

display properly.

Do not subject the camera to a 

strong impact as this could 

cause a malfunction.

If this happens, have the vehicle 

inspected by your Toyota dealer 

as soon as possible.

Do not block the vent holes of 

the mirror. Otherwise, the mirror 

may be hot, leading to a mal-

function or a fire.

If you notice any symptoms

167

3-4. Adjusting the steering wheel and mirrors

3

Before 

driving

Symptom

Likely cause

Solution

The image is diffi-
cult to see.

The mirror surface is dirty.

Clean the mirror surface 
gently, using a soft dry 
cloth.

Sunlight or headlights are 
shining directly into the Digi-
tal Rear-view Mirror.

Change to optical mirror 
mode.
(If the light is coming 
through the panoramic 
moon roof [if equipped], 
close the electronic 
sunshade.)

The vehicle is in a dark 
area.

The vehicle is near a TV 
tower, broadcasting sta-
tion, electric power plant, 
or other location where 
strong radio waves or 
electrical noise may be 
present.

The temperature around 
the camera is extremely 
high/low.

The ambient temperature 
is extremely low.

It is raining or humid.

Sunlight or headlights are 
shining directly into the 
camera lens.

The vehicle is under fluo-
rescent lights, sodium 
lights, mercury lights, etc.

Exhaust gas is obstruct-
ing the camera.

Change to optical mirror 
mode.
(Change back to digital 
mirror mode when the 
conditions have 
improved.)

Foreign matters such as 
water droplets or dust is on 
the camera lens.

Wipe the camera lens 
with a damp soft cloth. 
When it is difficult to 
clean it with a cloth, use 
a swab.

168

3-4. Adjusting the steering wheel and mirrors

The image is diffi-
cult to see.

The luggage in the luggage 
compartment is reflected off 
the rear window glass and 
obstructing the camera.

Change to optical mir-
ror mode.

Move the luggage to a 
position where it does 
not obstruct the cam-
era or cover it with a 
black cloth to reduce 
the amount it is 
reflected off the rear 
window glass.

The rear window glass is 
fogged up.

Change to optical mirror 
mode.
After defogging the rear 
window using the rear 
window defogger 
(

P.406), use the digi-

tal mirror mode again.

The outside of the rear win-
dow glass is dirty.

Use the rear window 
wiper to remove dirt.

The inside of the rear win-
dow glass is dirty.

Wipe the inside of rear 
window glass with a 
damp soft cloth.

The image is out of 
alignment.

The back door is not fully 
closed.

Fully close the back 
door.

The camera or its surround-
ing area has received a 
strong impact.

Change to optical mirror 
mode and have the 
vehicle inspected by 
your Toyota dealer.

The display is dim 
and 

 is dis-

played.

The system may be mal-
functioning.

Change to optical mirror 
mode and have the 
vehicle inspected by 
your Toyota dealer.

 goes off.

Symptom

Likely cause

Solution

169

3-4. Adjusting the steering wheel and mirrors

3

Before 

driving

 is displayed.

The Digital Rear-view Mirror 
is extremely hot.
(The display will gradually 
become more dim. If the 
temperature continues to 
increase, the Digital Rear-
view Mirror will turn off.)

Reducing the cabin 
temperature is recom-
mended to reduce the 
temperature of the mir-
ror.

(

 will disappear 

when the mirror 
becomes cool.)

If 

 does not disap-

pear even though the 
mirror is cool, have the 
vehicle inspected by 
your Toyota dealer.

The lever cannot be 
operated properly.

The lever may be malfunc-
tioning.

Change to optical mirror 
mode and have the 
vehicle inspected by 
your Toyota dealer.
(To change to optical 
mirror mode, press and 
hold the menu button 
for approximately 10 
seconds.)

Symptom

Likely cause

Solution

170

3-4. Adjusting the steering wheel and mirrors

Type A

1

To select a mirror to adjust, 
turn the switch.

Left

Right

2

To adjust the mirror, operate 
the switch.

Up

Right

Down

Left

Type B

Upper part mirror:

1

To select a mirror to adjust, 
turn the switch.

Left

Right

Outside rear view mir-

rors

The rear view mirror’s posi-
tion can be adjusted to 
change the rear view.

WARNING

Important points while driving

Observe the following precautions 

while driving.

Failure to do so may result in loss 

of control of the vehicle and cause 

an accident, resulting in death or 

serious injury.

Do not adjust the mirrors while 

driving.

Do not drive with the mirrors 

folded.

Both the driver and passenger 

side mirrors must be unfolded 

and properly adjusted before 

driving.

Adjustment procedure

171

3-4. Adjusting the steering wheel and mirrors

3

Before 

driving

2

To adjust the mirror, operate 
the switch.

Up

Right

Down

Left

Lower part mirror:
Adjust the mirror up and down, in or 

out by pushing the mirror surface.

Mirror angle can be adjusted 

when

The power switch is in ACC or ON.

Defogging the mirrors

The outside rear view mirrors can 

be cleared using the mirror defog-

gers. Turn on the rear window 

defogger to turn on the outside rear 

view mirror defoggers. (

P.408)

Automatic adjustment of the 

mirror angle (If equipped)

A desired mirror face angle can be 

entered to memory and recalled 

automatically by the driving position 

memory. (

P.152)

Auto anti-glare function

When the anti-glare inside rear view 

mirror is set to automatic mode, the 

outside rear view mirrors will acti-

vate in conjunction with the anti-

glare inside rear view mirror to 

reduce reflected light. (

P.160)

From outside

Push the mirror back in the 
direction of the vehicle’s rear.

From inside

WARNING

When the mirror defoggers 

are operating

Do not touch the rear view mirror 

surfaces, as they can become 

very hot and burn you.

Folding and unfolding the 
mirrors

172

3-4. Adjusting the steering wheel and mirrors

1

Folds the mirrors

2

Unfolds the mirrors

Putting the switch in the neutral 
position sets the mirrors to auto-
matic mode. Automatic mode 
allows the folding or unfolding of 
the mirrors to be linked to lock-
ing/unlocking of the doors.

Using automatic mode in cold 

weather

When automatic mode is used in 

cold weather, the door mirror could 

freeze up and automatic stowing 

and return may not be possible. In 

this case, remove any ice and snow 

from the door mirror, then either 

operate the mirror using manual 

mode or move the mirror by hand.

Customization

Some functions can be customized. 

(

P.570)

The mirror can be deployed to 
the outer side in order to 
improve rear visibility when tow-
ing a wide trailer.
Press the switch and extend the 
mirror.
Press the switch again to return 
the mirror to the original posi-
tion.

Recommended mirror angle 

when towing a trailer (vehicles 

with extending mirrors)

1

Power adjust the upper part of 
the mirror until an appropriate 
view is obtained. It is recom-
mended that the outer 2/3 of the 
upper mirror be filled with images 
other than the vehicle and trailer.

2

Manually adjust the lower part of 
the mirror until an appropriate 
view of the towed object is 
obtained. It is recommended that 
the outer 2/3 of the lower mirror 
be filled with images other than 

WARNING

When a mirror is moving

To avoid personal injury and mir-

ror malfunction, be careful not to 

get your hand caught by the mov-

ing mirror.

Extending the mirrors (if 
equipped)

173

3-4. Adjusting the steering wheel and mirrors

3

Before 

driving

the trailer.

When either “L” or “R” of the mir-
ror select switch is selected, the 
outside rear view mirrors will 
automatically angle downwards 
when the vehicle is reversing in 
order to give a better view of the 
ground.
To disable this function, select 
neither “L” nor “R”.

Adjusting the mirror angle 
when the vehicle is revers-
ing

With the shift lever in R, adjust 
the mirror angle at a desired 
position.
The adjusted angle will be mem-
orized and the mirror will auto-
matically tilt to the memorized 
angle whenever the shift lever is 
shifted to R from next time.

The memorized downward tilt posi-
tion of the mirror is linked to the 
normal position (angle adjusted 
with the shift position in other than 
R). Therefore, if the normal position 
is changed after adjustment, the tilt 
position will also change.
When the normal position is 
changed, readjust the angle in 
reversing.

Improves reverse operation for 
trailer parking by turning on the 
outer mirror lights at night.
These lights can be used as 
work lights.
When the shift lever is in P or R, 
press the switch.

Automatic light off system

The lights will automatically turn off 

when any of the following conditions 

are satisfied:

When the shift lever is in N or D

When the outer mirror is folded 

(

P.171)

Linked mirror function 
when reversing

Trailering light (if 
equipped)

174

3-5. Opening, closing the windows and moon roof

3-5.Opening, closing the windows and moon roof

The power windows can be 
opened and closed using the 
switches.
Operating the switch moves the 
windows as follows:

1

Closing

2

One-touch closing

*

3

Opening

4

One-touch opening

*

*

: To stop the window partway, 

operate the switch in the opposite 
direction.

The power windows can be 

operated when

The power switch is in ON

Operating the power windows 

after turning the hybrid system 

off

The power windows can be oper-

ated for approximately 45 seconds 

even after the power switch is 

turned to ACC or turned off. They 

cannot, however, be operated once 

either front door is opened.

Jam protection function

If an object becomes jammed 

between the window and the win-

dow frame while the window is clos-

ing, window movement is stopped 

and the window is opened slightly.

Catch protection function

If an object becomes caught 

between the door and window while 

the window is opening, window 

movement is stopped.

When the side window cannot 

be opened or closed

When the jam protection function or 

catch protection function operates 

unusually and the side window can-

not be opened or closed, perform 

the following operations with the 

power window switch of that door.

Stop the vehicle. With the power 

switch in ON, within 4 seconds of 

the jam protection function or 

catch protection function activat-

ing, continuously operate the 

power window switch in the one-

touch closing direction or one-

touch opening direction so that the 

side window can be opened and 

closed.

If the side window cannot be 

opened and closed even when 

performing the above operations, 

perform the following procedure 

for function initialization.

1

Turn the power switch to ON.

2

Pull and hold the power window 

switch in the one-touch closing 

direction and completely close 

the side window.

3

Release the power window 

switch for a moment, resume 

pulling the switch in the one-

touch closing direction, and hold 

it there for approximately 6 sec-

onds or more.

4

Press and hold the power win-

dow switch in the one-touch 

opening direction. After the side 

window is completely opened, 

continue holding the switch for 

an additional 1 second or more.

Power windows

Opening and closing the 
power windows

175

3-5. Opening, closing the windows and moon roof

3

Before 

driving

5

Release the power window 

switch for a moment, resume 

pushing the switch in the one-

touch opening direction, and 

hold it there for approximately 4 

seconds or more.

6

Pull and hold the power window 

switch in the one-touch closing 

direction again. After the side 

window is completely closed, 

continue holding the switch for a 

further 1 second or more.

If you release the switch while the 

window is moving, start again from 

the beginning.

If the window reverses and cannot 

be fully closed or opened, have the 

vehicle inspected by your Toyota 

dealer.

Door lock linked window opera-

tion

The power windows can be 

opened and closed using the 
mechanical key.

*

 (

P.536)

The power windows can be 

opened using the wireless remote 
control.

*

 (

P.115)

*

: These settings must be custom-

ized at your Toyota dealer.

Power windows open warning 

buzzer

A buzzer sounds and a message is 

shown on the multi-information dis-

play in the instrument cluster when 

the power switch is turned off and 

the driver’s door is opened with the 

power windows open.

Customization

Some functions can be customized. 

(

P.570)

WARNING

Observe the following precau-

tions.

Failure to do so may result in 

death or serious injury.

Closing the windows

The driver is responsible for all 

the power window operations, 

including the operation for the 

passengers. In order to prevent 

accidental operation, especially 

by a child, do not let a child 

operate the power windows. It is 

possible for children and other 

passengers to have body parts 

caught in the power window. 

Also, when riding with a child, it 

is recommended to use the win-

dow lock switch. (

P.176)

Check to make sure that all pas-

sengers do not have any part of 

their body in a position where it 

could be caught when a window 

is being operated.

When using the wireless remote 

control or mechanical key and 

operating the power windows, 

operate the power window after 

checking to make sure that 

there is no possibility of any 

passenger having any of their 

body parts caught in the win-

dow. Also do not let a child 

operate window by the wireless 

remote control or mechanical 

key. It is possible for children 

and other passengers to get 

caught in the power window.

When exiting the vehicle, turn 

the power switch off, carry the 

key and exit the vehicle along 

with the child. There may be 

accidental operation, due to 

mischief, etc., that may possibly 

lead to an accident.


Content      ..     8      9      10      11     ..