Toyota Sequoia Hybrid (2023 year). Manual in english - page 4
 

  Index      Toyota     Toyota Sequoia Hybrid (2023 year). Manual in english


Search            copyright infringement  


Content      ..     2      3      4      5     ..


Toyota Sequoia Hybrid (2023 year). Manual in english - page 4


62

1-2. Child safety

in lock mode. In lock mode, 
the belt cannot be extended.

6

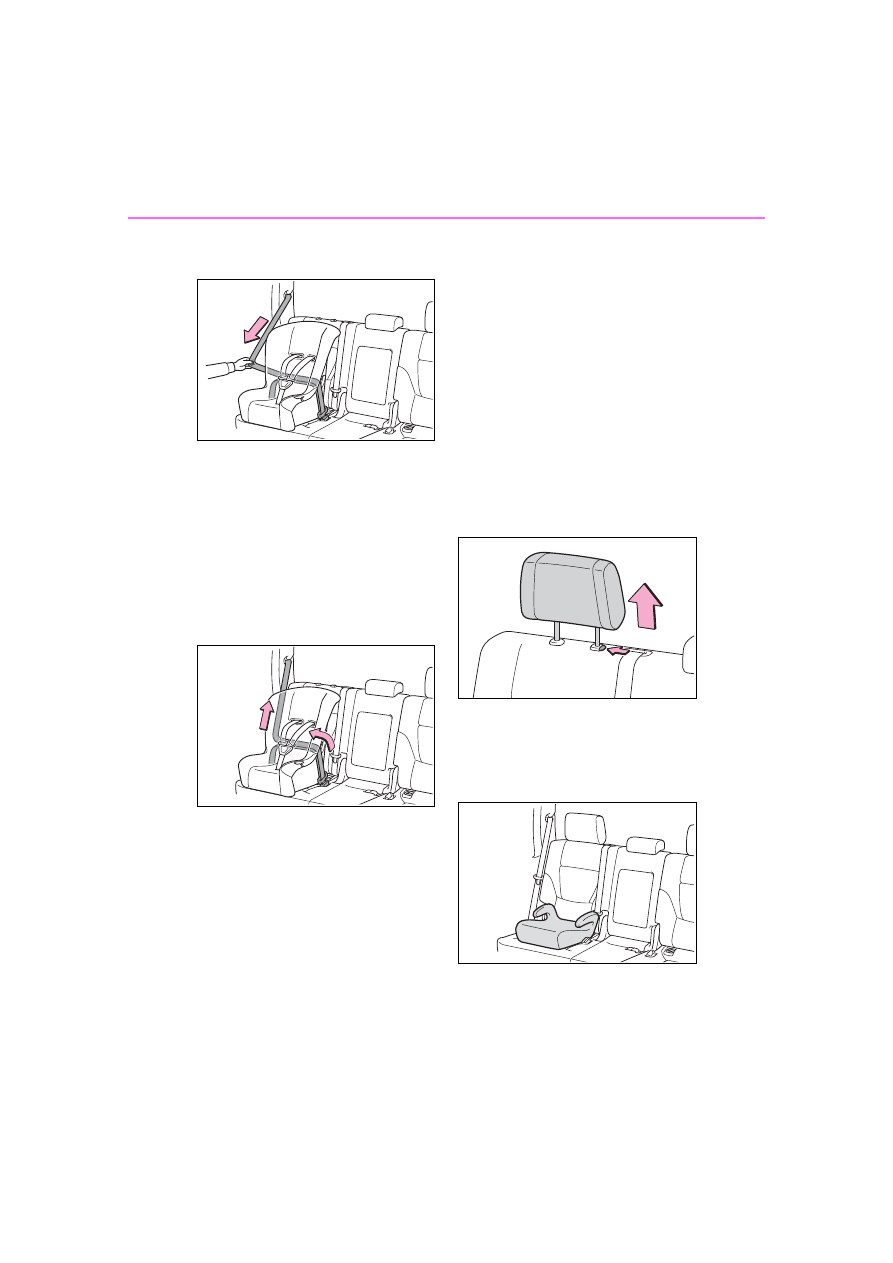
While pushing the child 
restraint system into the rear 
seat, allow the shoulder belt 
to retract until the child 
restraint system is securely in 
place.

After the shoulder belt has 

retracted to a point where there is 

no slack in the belt, pull the belt to 

check that it cannot be extended.

7

If the child restraint has a top 
tether strap, follow the child 
restraint manufacturer’s 
operation manual regarding 
the installation, using the top 
tether strap to latch onto the 
top tether strap anchor. 
(

P.67)

8

After installing the child 
restraint system, rock it back 

and forth to ensure that it is 
installed securely. (

P.63)

Booster seat

1

If installing the child restraint 
system to the front passen-
ger seat is unavoidable, refer 
to P.57 for front passenger 
seat adjustment.

2

High back type: If the head 
restraint interferes with your 
child restraint system, and 
the head restraint can be 
removed, remove the head 
restraint. (

P.156)

3

Place the child restraint sys-
tem on the seat facing the 
front of the vehicle.

Booster type

63

1-2. Child safety

1

For
 safety and secu

rity

High back type

4

Sit the child in the child 
restraint system. Fit the seat 
belt to the child restraint sys-
tem according to the manu-
facturer’s instructions and 
insert the plate into the 
buckle. Make sure that the 
belt is not twisted.

Check that the shoulder belt is cor-

rectly positioned over the child’s 

shoulder and that the lap belt is as 

low as possible. (

P.29)

Removing a child restraint 
system installed with a seat 
belt

Press the buckle release button 
and fully retract the seat belt.

When releasing the buckle, the 
child restraint system may spring 
up due to the rebound of the seat 
cushion. Release the buckle while 
holding down the child restraint 

system.
Since the seat belt automatically 
reels itself, slowly return it to the 
stowing position.

WARNING

When installing a child 

restraint system

Observe the following precau-

tions. 

Failure to do so may result in 

death or serious injury.

Do not allow children to play 

with the seat belt. If the seat belt 

becomes twisted around a 

child’s neck, it may lead to 

choking or other serious injuries 

that could result in death.

If this occurs and the buckle 

cannot be unfastened, scissors 

should be used to cut the belt.

Ensure that the belt and plate 

are securely locked and the 

seat belt is not twisted.

Shake the child restraint system 

left and right, and forward and 

backward to ensure that it has 

been securely installed.

After securing a child restraint 

system, never adjust the seat.

64

1-2. Child safety

Child restraint LATCH 
anchors

LATCH anchors are provided for 
the second seats (except for 
center seat).

WARNING

When a booster seat is 

installed, always ensure that the 

shoulder belt is positioned 

across the center of the child’s 

shoulder. The belt should be 

kept away from the child’s neck, 

but not so that it could fall off the 

child’s shoulder.

Follow all installation instruc-

tions provided by the child 

restraint system manufacturer.

When securing some types of 

child restraint systems in rear 

seats, it may not be possible to 

properly use the seat belts in 

positions next to the child 

restraint without interfering with 

it or affecting seat belt effective-

ness. Be sure your seat belt fits 

snugly across your shoulder 

and low on your hips. If it does 

not, or if it interferes with the 

child restraint, move to a differ-

ent position. Failure to do so 

may result in death or serious 

injury.

Second seats (8-passenger 

models): When installing a child 

restraint system on the second 

row center seat, adjust both 

seatbacks at the same angle. 

Otherwise, the child restraint 

system cannot be securely 

restrained and this may cause 

death or serious injuries in the 

event of sudden braking, sud-

den swerving or an accident.

When installing a child restraint 

system on the third row center 

seat, adjust both seat cushions 

to the same position and align 

both seatbacks at the same 

angle. The seatbacks must be 

adjusted to the same angle. 

Otherwise, the child restraint 

system cannot be securely 

restrained and this may cause 

death or serious injuries in the 

event of sudden braking, sud-

den swerving or an accident.

When installing a booster 

seat

To prevent the belt from going into 

ALR lock mode, do not fully 

extend the shoulder belt. ALR 

mode causes the belt to tighten 

only. This could cause injury or 

discomfort to the child. (

P.31, 

34)

Do not use a seat belt 

extender

If a seat belt extender is used 

when installing a child restraint 

system, the seat belt will not 

securely hold the child restraint 

system, which could cause death 

or serious injury to the child or 

other passengers in the event of 

sudden braking, sudden swerv-

ing or an accident.

Child restraint system 
fixed with a child restraint 
LATCH anchor

65

1-2. Child safety

1

For
 safety and secu

rity

7-passenger models

8-passenger models

When installing in the sec-
ond seats (except for center 
seat)

Install the child restraint system 
in accordance to the operation 
manual enclosed with the child 
restraint system.

1

Adjust the seat.

If there is a gap between the child 

restraint system and the seatback, 

adjust the seatback angle until 

good contact is achieved.

2

If the head restraint interferes 
with the child restraint system 
installation and the head 
restraint can be removed, 

remove the head restraint. 
(

P.157)

With flexible lower attach-
ments

3

Latch the hooks of the lower 
attachments onto the LATCH 
anchors. If the child restraint 
has a top tether strap, the top 
tether strap should be 
latched onto the top tether 
strap anchor.

The anchors are installed in the 

lower seatback. Confirm the posi-

tion of the anchors.
For owners in Canada: 
The symbol on a child restraint sys-
tem indicates 

 the presence of a 

66

1-2. Child safety

lower connector system.

Canada only

With rigid lower attachments

3

Latch the buckles onto the 
LATCH anchors. If the child 
restraint has a top tether 
strap, the top tether strap 
should be latched onto the 
top tether strap anchor.

The anchors are installed in the 

lower seatback. Confirm the posi-

tion of the anchors.
For owners in Canada: 
The symbol on a child restraint sys-
tem indicates 

 the presence of a 

lower connector system.

Canada only

4

If the child restraint has a top 
tether strap, follow the child 
restraint manufacturer’s 
operation manual regarding 
the installation, using the top 
tether strap to latch onto the 
top tether strap anchor. 
(

P.67)

5

After installing the child 
restraint system, rock it back 
and forth to ensure that it is 
installed securely. (

P.63)

Laws and regulations pertain-

ing to anchors

The LATCH system conforms to 

FMVSS225 or CMVSS210.2. 

Child restraint systems conforming 

to FMVSS213 or CMVSS213 speci-

fications can be used. 

This vehicle is designed to conform 

to SAE J1819.

67

1-2. Child safety

1

For
 safety and secu

rity

Anchor brackets (for top 
tether strap)

Anchor brackets are provided 
for the following seats:
Use anchor brackets when fix-
ing the top tether strap.

Second seats (8-passenger 
models)

Anchor brackets

Top tether strap

Second seats (7-passenger 
models)

Anchor bracket

Top tether strap

Third row center seat

*

Anchor brackets

WARNING

When installing a child 

restraint system

Observe the following precau-

tions. 

Failure to do so may result in 

death or serious injury.

When using the LATCH 

anchors, be sure that there are 

no foreign objects around the 

anchors and that the seat belt is 

not caught behind the child 

restraint system.

Follow all installation instruc-

tions provided by the child 

restraint system manufacturer.

When securing some types of 

child restraint systems in rear 

seats, it may not be possible to 

properly use the seat belts in 

positions next to the child 

restraint without interfering with 

it or affecting seat belt effective-

ness. Be sure your seat belt fits 

snugly across your shoulder 

and low on your hips. If it does 

not, or if it interferes with the 

child restraint, move to a differ-

ent position. Failure to do so 

may result in death or serious 

injury.

If the seat is adjusted, reconfirm 

the security of the child restraint 

system.

Using an anchor bracket 
(for top tether strap)

68

1-2. Child safety

Top tether strap

*

: The third seats are not equipped 

with Child restraint LATCH 
anchors.

Fixing the top tether strap 
to the anchor bracket

Install the child restraint system 
in accordance to the operation 
manual enclosed with the child 
restraint system.

Second seats

1

Adjust the head restraint to 
the upmost position.

If the head restraint interferes with 

the child restraint system or top 

strap installation and the head 

restraint can be removed, remove 

the head restraint. (

P.157)

2

Latch the hook onto the 
anchor bracket and tighten 
the top tether strap.

Make sure the top tether strap is 

securely latched.
When installing the child restraint 

system with the head restraint 

being raised, be sure to have the 

top tether strap pass underneath 

the head restraint.

Hook

Top tether strap

Third row center seat

1

Adjust the head restraint to 
the upmost position.

If the head restraint interferes with 

the child restraint system installa-

tion and the head restraint can be 

removed, remove the head 

restraint.(

P.157)

2

Latch the hook onto the 
anchor bracket and tighten 
the top tether strap.

Make sure the top tether strap is 

securely latched.
When installing the child restraint 

system with the head restraint 

being raised, be sure to have the 

top tether strap pass underneath 

69

1-2. Child safety

1

For
 safety and secu

rity

the head restraint.

Hook

Top tether strap

Laws and regulations pertain-

ing to anchors

The LATCH system conforms to 

FMVSS225 or CMVSS210.2. 

Child restraint systems conforming 

to FMVSS213 or CMVSS213 speci-

fications can be used. 

This vehicle is designed to conform 

to SAE J1819.

WARNING

When installing a child 

restraint system

Observe the following precau-

tions. 

Failure to do so may result in 

death or serious injury.

Firmly attach the top tether 

strap and make sure that the 

belt is not twisted.

Do not attach the top tether 

strap to anything other than the 

anchor bracket.

Follow all installation instruc-

tions provided by the child 

restraint system manufacturer.

When installing the child 

restraint system with the head 

restraint being raised, after the 

head restraint has been raised 

and then the anchor bracket has 

been fixed, do not lower the 

head restraint.

If the seat is adjusted, reconfirm 

the security of the child restraint 

system.

70

1-3. Emergency assistance

1-3.Emergency assistance

*

: If equipped

Microphone

“SOS” button

LED light indicators

Speaker

Certification

P.616

Subscribers have the following 
Safety Connect services avail-
able:

Automatic Collision Notifica-
tion

*

Helps drivers receive necessary 
response from emergency service 
providers. (

P.72)

*

: U.S. Patent No. 7,508,298 B2

Stolen Vehicle Location

Helps drivers in the event of vehicle 
theft. (

P.72)

Safety Connect

*

Safety Connect is a sub-
scription-based telematics 
service that uses Global 
Positioning System (GPS) 
data and embedded cellular 
technology to provide 
safety and security fea-
tures to subscribers. Safety 
Connect is supported by 
Toyota’s designated 
response center, which 
operates 24 hours per day, 7 
days per week.

Safety Connect service is 
available by subscription on 
select, telematics hardware-
equipped vehicles.

By using the Safety Con-
nect service, you are agree-
ing to be bound by the 
Telematics Subscription 
Service Agreement and its 
Terms and Conditions, as in 
effect and amended from 
time to time, a current copy 
of which is available at Toy-
ota.com. All use of the 
Safety Connect service is 
subject to such then-appli-
cable Terms and Condi-
tions.

System components

Services

71

1-3. Emergency assistance

1

For
 safety and secu

rity

Emergency Assistance Button 
(“SOS”)

Connects drivers to response-cen-
ter support. (

P.72)

Enhanced Roadside Assis-
tance

Provides drivers various on-road 
assistance. (

P.72)

After you have signed the 
Telematics Subscription Service 
Agreement and are enrolled, 
you can begin receiving ser-
vices.
A variety of subscription terms is 
available for purchase. Contact 
your Toyota dealer, call the fol-
lowing or push the “SOS” button 
in your vehicle for further sub-
scription details.

The United States

1-800-331-4331

Canada

1-888-869-6828

Puerto Rico

1-877-855-8377

Safety Connect Services Infor-

mation

Phone calls using the vehicles 
Bluetooth

®

 technology will not be 

possible during Safety Connect.

Safety Connect is available begin-

ning Fall 2009 on select Toyota 

models (in the contiguous United 

States only). Contact with the 

Safety Connect response center 

is dependent upon the telematics 

device being in operative condi-

tion, cellular connection availabil-

ity, and GPS satellite signal 

reception, which can limit the abil-

ity to reach the response center or 

receive emergency service sup-

port. Enrollment and Telematics 

Subscription Service Agreement 

required. A variety of subscription 

terms is available; charges vary 

by subscription term selected and 

location.

Automatic Collision Notification, 

Emergency Assistance and Stolen 

Vehicle Location will function in 

the United States, including 

Hawaii and Alaska, Puerto Rico 

and in Canada, and Enhanced 

Roadside Assistance will function 

in the United States, Puerto Rico 

and in Canada.

Automatic Collision Notification, 

Emergency Assistance, Stolen 

Vehicle and Enhanced Road 

Assistance will not function in the 

United States Virgin Islands.

For vehicles first sold in the USVI, 

no Safety Connect services will 

function in and outside the United 

States Virgin Islands.

Safety Connect services are not 

subject to section 255 of the Tele-

communications Act and the 

device is not TTY compatible.

Languages

The Safety Connect response cen-

ter will offer support in multiple lan-

guages. The Safety Connect system 

will offer voice prompts in English, 

Spanish, and French. Please indi-

cate your language of choice when 

enrolling.

When contacting the response 

center

You may be unable to contact the 

response center if the network is 

busy.

Subscription

72

1-3. Emergency assistance

When the power switch is turned 
to ON, the red indicator light 
comes on for 2 seconds then 
turns off. Afterward, the green 
indicator light comes on, indicat-
ing that the service is active.
The following indicator light pat-
terns indicate specific system 
usage conditions:

Green indicator light on = 
Active service

Green indicator light flashing 
= Safety Connect call in pro-
cess

Red indicator light (except at 
vehicle start-up) = System 
malfunction (contact your Toy-
ota dealer)

No indicator light (off) = 
Safety Connect service not 
active

Automatic Collision Notifi-
cation

In case of either airbag deploy-
ment or severe rear-end colli-
sion, the system is designed to 
automatically call the response 
center. The responding agent 
receives the vehicle’s location 
and attempts to speak with the 
vehicle occupants to assess the 
level of emergency. If the occu-

pants are unable to communi-
cate, the agent automatically 
treats the call as an emergency, 
contacts the nearest emer-
gency services provider to 
describe the situation, and 
requests that assistance be sent 
to the location.

Stolen Vehicle Location

If your vehicle is stolen, Safety 
Connect can work with local 
authorities to assist them in 
locating and recovering the 
vehicle. After filing a police 
report, call the Safety Connect 
response center at 1-800-331-
4331 in the United States, 1-
877-855-8377 in Puerto Rico or 
1-888-869-6828 in Canada, and 
follow the prompts for Safety 
Connect to initiate this service.
In addition to assisting law 
enforcement with recovery of a 
stolen vehicle, Safety-Connect-
equipped vehicle location data 
may, under certain circum-
stances, be shared with third 
parties to locate your vehicle. 
Further information is available 
at Toyota.com.

Emergency Assistance But-
ton (“SOS”)

In the event of an emergency on 
the road, push the “SOS” button 
to reach the Safety Connect 
response center. The answer-
ing agent will determine your 
vehicle’s location, assess the 
emergency, and dispatch the 

Safety Connect LED light 
Indicators

Safety Connect services

73

1-3. Emergency assistance

1

For
 safety and secu

rity

necessary assistance required.

If you accidentally press the “SOS” 
button, tell the response-center 
agent that you are not experiencing 
an emergency.

Enhanced Roadside Assis-
tance

Enhanced Roadside Assistance 
adds GPS data to the already 
included warranty-based Toyota 
roadside service.
Subscribers can press the 
“SOS” button to reach a Safety 
Connect response-center agent, 
who can help with a wide range 
of needs, such as: towing, flat 
tire, fuel delivery, etc. For a 
description of the Roadside 
Assistance services and their 
limitations, please see the 
Safety Connect Terms and Con-
ditions, which are available at 
Toyota.com.

Important! Read this informa-
tion about exposure to radio fre-
quency signals before using 
Safety Connect;
The Safety Connect system 
installed in your vehicle is a low-
power radio transmitter and 
receiver. It receives and also 
sends out radio frequency (RF) 
signals.
In August 1996, the Federal 
Communications Commission 

(FCC) adopted RF exposure 
guidelines with safety levels for 
mobile wireless phones. Those 
guidelines are consistent with 
the safety standards previously 
set by the following U.S. and 
international standards bodies.

ANSI (American National 
Standards Institute) C95.1 
[1992]

NCRP (National Council on 
Radiation Protection and 
Measurement) Report 86 
[1986]

ICNIRP (International Com-
mission on Non-Ionizing Radi-
ation Protection) [1996]

Those standards were based on 
comprehensive and periodic 
evaluations of the relevant sci-
entific literature. Over 120 scien-
tists, engineers, and physicians 
from universities, and govern-
ment health agencies and 
industries reviewed the avail-
able body of research to 
develop the ANSI Standard 
(C95.1).
The design of Safety Connect 
complies with the FCC guide-
lines in addition to those stan-
dards.

Safety information for 
Safety Connect

74

1-3. Emergency assistance

Free /Open Source Software 

Information

This product contains Free/Open 

Source Software (FOSS). The 

License information and/or the 

source code of such FOSS can be 

found at the following
https://www.denso.com/global/en/op

ensource/dcm/toyota/

75

1-4. Hybrid system

1

For
 safety and secu

rity

1-4.Hybrid system

System components

The illustration is an example for explanation and may differ from the actual 
item.

Gasoline engine

Electric motor (traction motor)

When stopped/during start 
off

The gasoline engine stops

*


when the vehicle is stopped. 
During start off, the electric 
motor (traction motor) drives the 

Hybrid system features

Your vehicle is a Hybrid Electric Vehicle. It has characteristics 
different from conventional vehicles. Be sure you are closely 
familiar with the characteristics of your vehicle, and operate it 
with care.
The hybrid system combines the use of a gasoline engine and 
an electric motor (traction motor) according to driving condi-
tions, improving fuel efficiency and reducing exhaust emis-
sions.

System components

76

1-4. Hybrid system

vehicle. At slow speeds or when 
traveling down a gentle slope, 
the engine is stopped

*

 and the 

electric motor (traction motor) is 
used.

*

: When the hybrid battery (traction 

battery) requires charging or the 
engine is warming up, etc., the 
gasoline engine will not automati-
cally stop. (

P.76)

During normal driving

The gasoline engine is predomi-
nantly used. The electric motor 
(traction motor) charges the 
hybrid battery (traction battery) 
as necessary.

When accelerating sharply

When the accelerator pedal is 
depressed heavily, the power of 
the hybrid battery (traction bat-
tery) is added to that of the gas-
oline engine via the electric 
motor (traction motor).

When braking (regenera-
tive braking)

The wheels operate the electric 
motor (traction motor) as a 
power generator, and the hybrid 
battery (traction battery) is 
charged.

Regenerative braking

In the following situations, kinetic 

energy is converted to electric 

energy and deceleration force can 

be obtained in conjunction with 

the recharging of the hybrid bat-

tery (traction battery).

• The accelerator pedal is released 

while driving with the shift lever in 

D or S.

• The brake pedal is depressed 

while driving with the shift lever in 

D or S.

Conditions in which the gaso-

line engine may not stop

The gasoline engine starts and 

stops automatically. However, it may 

not stop automatically in the follow-

ing conditions:

During gasoline engine warm-up

During hybrid battery (traction bat-

tery) charging

When the temperature of the 

hybrid battery (traction battery) is 

high or low

When the heater is switched on

When the “TOW HAUL” switch is 

on

When the “MTS” switch is on

When the front-wheel drive control 

switch is in “4H” or “4L”

When the hood is opened during 

“READY” indicator is illuminated

When the shift lever is shifted to S

Depending on the circumstances, 

the gasoline engine may also not 

stop automatically in other situa-

tions.

Charging the hybrid battery 

(traction battery)

As the gasoline engine charges the 

hybrid battery (traction battery), the 

battery does not need to be charged 

from an outside source. However, if 

the vehicle is left parked for a long 

time the hybrid battery (traction bat-

tery) will slowly discharge. For this 

reason, be sure to drive the vehicle 

at least once every few months for 

at least 30 minutes or 10 miles (16 

km). If the hybrid battery (traction 

battery) becomes fully discharged 

and you are unable to start the 

hybrid system, contact your Toyota 

dealer.

77

1-4. Hybrid system

1

For
 safety and secu

rity

Charging the 12-volt battery

P.540

After the 12-volt battery has dis-

charged or when the terminal 

has been removed and installed 

during exchange, etc.

The gasoline engine may not stop 

even if the vehicle is being driven by 

the hybrid battery (traction battery). 

If this continues for a few days, con-

tact your Toyota dealer.

Sounds and vibrations specific 

to a Hybrid Electric Vehicle

There may be no engine sound or 

vibration even though the vehicle is 

able to move with the “READY” indi-

cator is illuminated. For safety, apply 

the parking brake and make sure to 

shift the shift lever to P when 

parked.
The following sounds or vibrations 

may occur when the hybrid system 

is operating and are not a malfunc-

tion:

Motor sounds may be heard from 

the engine compartment.

Sounds may be heard from the 

hybrid battery (traction battery) 

under the rear seats when the 

hybrid system starts or stops.

Relay operating sounds such as a 

snap or soft clank will be emitted 

from the hybrid battery (traction 

battery), under the rear seats, 

when the hybrid system is started 

or stopped.

Sounds may be heard from the 

transmission when the gasoline 

engine starts or stops, when driv-

ing at low speeds, or during idling.

Engine sounds may be heard 

when accelerating sharply.

Sounds may be heard due to 

regenerative braking when the 

brake pedal is depressed or as 

the accelerator pedal is released.

Vibration may be felt when the 

gasoline engine starts or stops.

Cooling fan sounds may be heard 

from the air intake vents on the 

both sides of the behind the sec-

ond seat.

Maintenance, repair, recycling, 

and disposal

Contact your Toyota dealer regard-

ing maintenance, repair, recycling 

and disposal. Do not dispose of the 

vehicle yourself.

When the gasoline engine is off 
while driving, a sound is pro-
duced to warn pedestrians, peo-
ple riding bicycles or other 
people and vehicles in the sur-
rounding area that the vehicle is 
approaching. The pitch of the 
sound adjusts according to vehi-
cle speed. When vehicle speed 
is approximately 22 mph (35 
km/h) or more, the warning sys-
tem turns off.

Acoustic vehicle alerting sys-

tem

In the following cases, the acoustic 

vehicle alerting system sound may 

be difficult for pedestrians, people 

riding bicycles or other people and 

vehicles in the surrounding area to 

hear:

When there is a lot of noise in the 

vicinity

When it is raining or during strong 

winds

Acoustic vehicle alerting 
system


Content      ..     2      3      4      5     ..