Toyota Raize (2023 year). Manual in english - page 22
 

  Index      Toyota     Toyota Raize (2023 year). Manual in english


Search            copyright infringement  


Content      ..     20      21      22      23     ..


Toyota Raize (2023 year). Manual in english - page 22


354

6-3. Do-it-yourself maintenance

Bulb replacement procedure

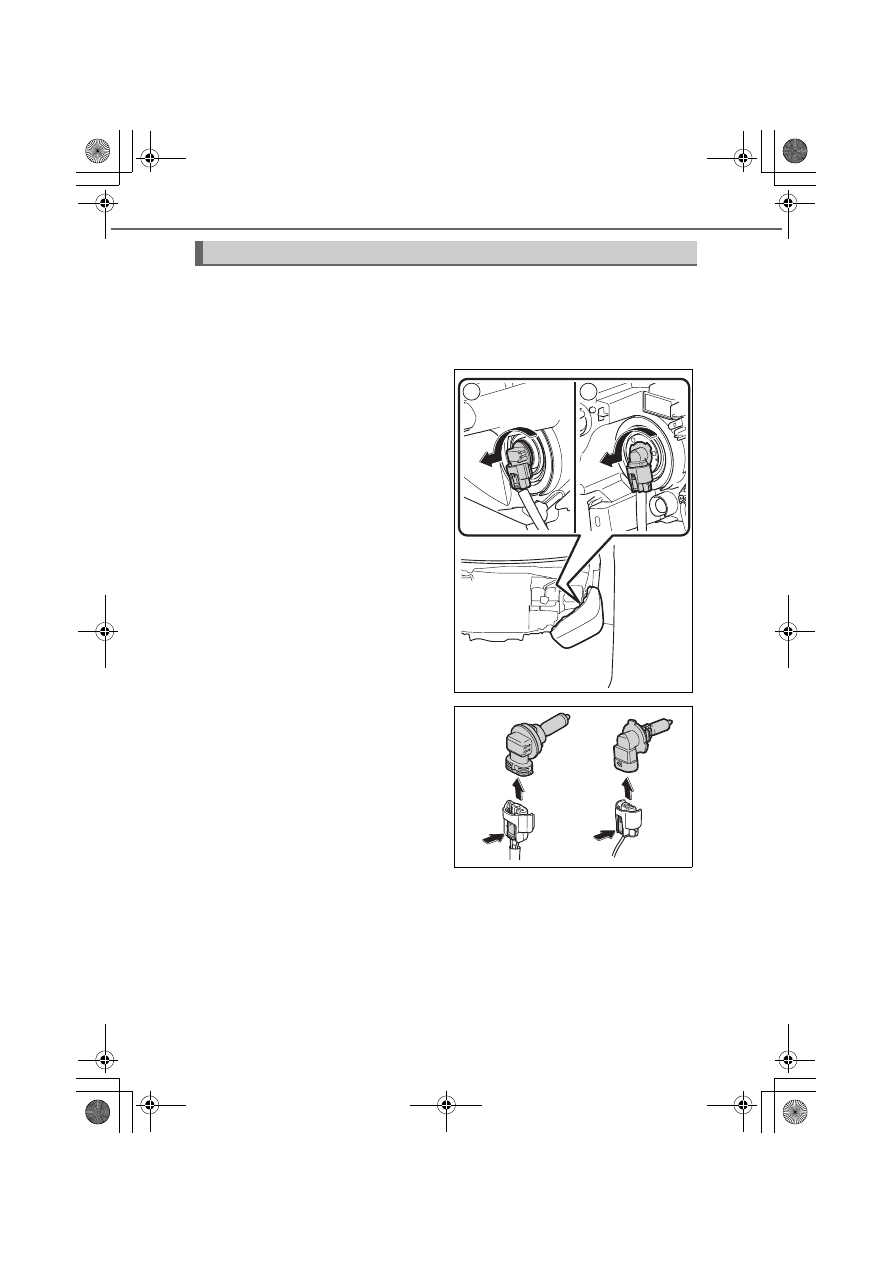
Vehicles with halogen headlights

Open the hood before you work on the headlights, front position lights, or

front turn signal/emergency flashers.

Headlight low beam/high beam (vehicles with halogen headlights)

a

Open the hood, and rotate the

socket to remove it

a

Low beam (outside)

b

High beam (inside)

b

Hold down the claw and remove

the light bulb

1

2

KBRO620816N

KBRO620817N

355

6-3. Do-it-yourself maintenance

Mai
ntenance and car

e

6

c

Replace and attach the light bulb

Align the light bulb’s claws (3 locations)

to the mounted area, insert it and

secure it in place.

a

Low beam (outside)

b

High beam (inside)

d

Attach the socket

After attaching the socket, turn on the

headlights and make sure there is no

light leaking out.

1

2

KBRO620818N

KBRO620819N

356

6-3. Do-it-yourself maintenance

Front turn signal/emergency flashers (vehicles with halogen 
headlights)

a

Open the hood, and rotate the

socket to remove it

b

Remove the light bulb

c

Attach the new light bulb, rotate

the socket and set it in place

KBRO620820N

KBRO620821N

KBRO620822N

357

6-3. Do-it-yourself maintenance

Mai
ntenance and car

e

6

Front position lights (vehicles with halogen headlights)

a

Open the hood, and rotate the

socket to remove it

b

Remove the light bulb

c

Attach the new light bulb, rotate

the socket and set it in place

KBRO620823N

KBRO620824N

KBRO620825N

358

6-3. Do-it-yourself maintenance

: If equipped

Front fog lights

a

Turn the steering wheel to the opposite side of the light bulb to be

replaced and change the direction of the tires

b

Remove the clips (3 pcs) and pull

off the fender liner

c

Hold down the claw and remove

the connector

d

Rotate the light bulb and remove

it

KBRO620826N

KBRO620827N

KBRO620828N

359

6-3. Do-it-yourself maintenance

Mai
ntenance and car

e

6

e

Replace and attach the light bulb

Align the light bulb’s claws (3 locations)

to the mounted area, insert it and

secure it in place.

f

Attach the connector

After attaching the connector, turn on

the front fog lights and make sure

there is no light leaking out.

g

Restore the fender liner to the

original position and attach the

clips (3 pcs)

KBRO620829N

KBRO620830N

KBRO620831N

360

6-3. Do-it-yourself maintenance

Back-up lights, rear turn signal/emergency flashers

a

Open the back door and remove

the 2 bolts

b

Pull the light body straight back

and disengage the fitting inside

a

Clip

b

Guide

c

Remove the socket

a

Back-up lights

b

Rear turn signal/emergency

flashers

d

Remove the light bulb

a

Rear turn signal/emergency

flashers

b

Back-up lights

KBRO620802

1

2

KBRO620803

2

1

KBRO620804

1

2

KBRO620805

361

6-3. Do-it-yourself maintenance

Mai
ntenance and car

e

6

e

Replace and attach the bulb

a

Rear turn signal/emergency

flashers

b

Back-up lights

f

Attach the socket

a

Back-up lights

b

Rear turn signal/emergency

flashers

g

Attach the light body

Align the clip (

a

) on the light body with

the hole on the vehicle side, and push

the lamp body straight in so that the

guide (

b

) fits into.

h

Install the 2 bolts

1

2

KBRO620806

2

1

KBRO620807

1

2

KBRO620808

KBRO620809

362

6-3. Do-it-yourself maintenance

License plate lights

a

Slide the lens and remove them

b

Remove the light bulb

c

Attach the new light bulb

d

Attach the lens

Insert the protruded part of the lens

into the groove of the light body (

a

),

push it toward the arrow direction (

b

)

and install it

KBRO620811N

KBRO620812

KBRO620813

1

2

KBRO620814

363

6-3. Do-it-yourself maintenance

: If equipped

Mai
ntenance and car

e

6

Other light bulbs

If any other light bulbs go out, replace them at your Toyota dealer.

Headlight high beam/low beam (vehicles with LED headlights)

Daytime running lights

Front position lights (vehicles with LED headlights)

Front turn signal/emergency flashers (vehicles with LED headlights)

Side turn signal lights/emergency flashers

Stop lights/tail lights

High mounted stoplight

Rear fog light

LED lights

Each unit of LED headlights,

 daytime running lights

, and high mounted stop-

light are made of several LEDs. If any one of the LEDs do not light up, replace it

at your Toyota dealer.

When replacing the front fog lights

Remove the retaining clips of the fender liner and replace the light bulb. After

replacement, be sure to hold the fender liner with the clips and secure it in

place.

When you remove the clip, use a
tool such as a flathead screwdriver

to pull out the center of the clip (

a

)

and take the clip off (

b

).

To prevent damage, wrap a cloth

around the tip of the flathead screw-

driver or the like to protect it.

When you attach the clip, insert the
clip (

a

) and push down the center

part (

b

).

1

2

KBGR620838

1

2

KBGR620839

364

6-3. Do-it-yourself maintenance

Water droplets and condensation in the lens

Temporary condensation build-up on the inside of the lens does not indicate a

malfunction. However, contact your Toyota dealer in the following situations:

Large drops of water have built up on the inside of the lens

Water has built up inside the light

When replacing light bulbs

P. 352

WARNING

When replacing light bulbs

Turn off the lights. Do not attempt to replace the bulb immediately after
turning off the lights. The bulbs become very hot and may cause burns.
There is also a danger of electric shock.

Do not touch the glass portion of the light bulb with bare hands.
When it is unavoidable to hold the glass portion, use and hold with a clean

dry cloth to avoid getting moisture and oils on the bulb.
Also, if the bulb is scratched or dropped, it may blow out or crack.

Fully install light bulbs and any parts used to secure them. Failure to do so
may result in heat damage, fire, or water entering the headlight unit. This

may damage the headlights or cause condensation to build up on the lens.

Do not repair or disassemble light bulbs, sockets, electrical circuits, or com-
ponents.
Electric shock may result in death or serious injury.

To prevent vehicle damage or fire

Make sure bulbs are securely installed in the correct position.

Check the wattage of the bulb before installing to prevent heat damage.

365

7

When trouble arises

7-1. Essential information

Emergency flashers .................. 366
If your vehicle has to be stopped in 

an emergency ......................... 367

Fire extinguisher........................ 369
If the vehicle is submerged or 

water on the road is rising ... 371

7-2. Steps to take in an emergency

If your vehicle needs to be 

towed ........................................ 372

If you think something is 

wrong ........................................ 377

Fuel pump shut off system ..... 378
If a warning light turns on....... 379
When warning messages are 

displayed .................................. 387

If you have a flat tire ................. 396
If the engine does not start .... 405
If the electronic key does not work 

properly (vehicles with key-free 

system)...................................... 406

If the vehicle battery is 

discharged ............................... 408

If your vehicle overheats ......... 412
If the vehicle has become 

stuck .......................................... 415

366

7-1. Essential information

Emergency flashers

Use the emergency flashers to warn other drivers when the vehicle

has to be stopped in the road due to a breakdown or other reason.

Press the switch

All the turn signal lights will flash.
To turn them off, press the switch once

again.

NOTICE

Emergency flashers

If the emergency flashers are used for a long time while the engine is not oper-

ating, the battery may discharge.

KBRO710201E

367

7-1. Essential information

When t

roubl
e arises

7

If your vehicle has to be stopped in an 

emergency

Only in an emergency when it becomes impossible to stop the vehi-

cle in the normal way, stop the vehicle using the following procedure:

a

Keep the brake pedal depressed firmly with your both feet

Do not pump the brake pedal repeatedly. This will increase the effort required, and

the braking distance will also become longer.

b

Set the shift lever to N

If the shift lever is set to N

c

After slowing down, stop the vehicle in a safe place by the roadside

d

Stop the engine

If the shift lever cannot be set to N

c

Keep the brake pedal depressed with your both feet to reduce vehicle

speed as much as possible

d

Vehicles without key-free sys-

tem: Stop the engine by turning

the engine switch to “ACC”

Vehicles with key-free system:

Stop the engine by pressing and

holding the engine switch for 3

seconds or longer, or press the

engine switch quickly for 3 con-

secutive times or more

e

Stop the vehicle in a safe place by the roadside

KBRO710401E

KBTA710402

Press and hold for 3 or more 

seconds or press in succession 3 

or more times

368

7-1. Essential information

WARNING

If the engine has to be turned off while driving

Power assist for the brakes and steering wheel will be lost, making the brake
pedal harder to depress and the steering wheel heavier to turn. Decelerate

as much as possible before turning off the engine.

Vehicles without key-free system: Never remove the key, since removing the
key will lock the steering wheel.

369

7-1. Essential information

: If equipped

When t

roubl
e arises

7

Fire extinguisher

A fire extinguisher is located in the under the front passenger seat.
It is for use in emergencies, such as in the event of a fire.

a

Release the fixed band and then

remove the fire extinguisher.

b

Push the button.

c

Aim the nozzle at the base of the fire.

Keep a distance of 2 m (6.6 ft.) to 4 m (13.1 ft.) from the nozzle to base of the fire.

d

Push the button.

KBRO710501E

Fixed band

KBRO710502N

KBRO710503N


Content      ..     20      21      22      23     ..