Toyota Raize (2023 year). Manual in english - page 21
 

  Index      Toyota     Toyota Raize (2023 year). Manual in english


Search            copyright infringement  


Content      ..     19      20      21      22     ..


Toyota Raize (2023 year). Manual in english - page 21


338

6-3. Do-it-yourself maintenance

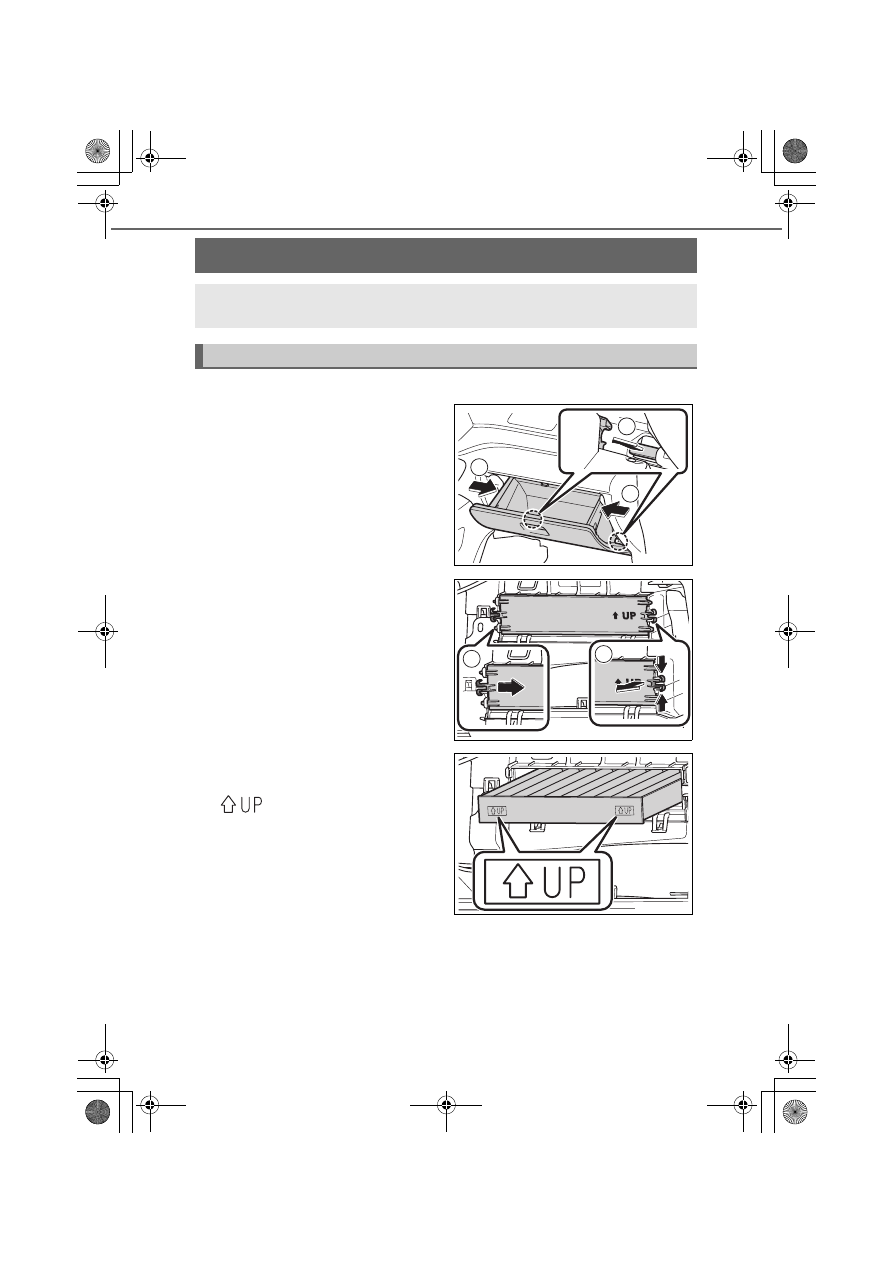
Replacing the air conditioning filter

The air conditioning filter must be changed regularly to maintain air

conditioning efficiency.

Replacement method

a

Turn the engine switch to “OFF”

b

Remove the glove box

a

Push the right side inward

and disengage the upper claw

b

Push the left side inward and

disengage the upper claw

c

Disengage the lower claws

c

Remove the filter cover

a

Unlock the filter cover

b

Slide the filter cover in the

direction of the arrow to

remove it

d

Remove the filter and replace it

with a new one

” Attach it so that the arrow

indicated with the icon faces upward.

1

3

2

KBRO620703E

2

1

KBRO620501E

KBRO620502E

339

6-3. Do-it-yourself maintenance

Mai
ntenance and car

e

6

e

To install, reverse the removal

procedure

Insert the filter into section A then

attach the filter cover.

Changing interval

Inspect and replace the air conditioning filter according to the maintenance

schedule. In dusty areas or areas with heavy traffic flow, early replacement may

be required. (

P. 294)

If air flow from the air conditioning system decreases

Replace the filter because it may be clogged.

NOTICE

Precautions when using the air conditioning system

Using the air conditioning system without a filter may cause damage to the
system. Make sure that a filter is always installed.

The filter is replaceable.
Do not wash it with water or blow air to clean it.

To prevent damage to the filter cover

When unlocking the filter cover, be

careful not to apply excessive force to

the claws when moving the filter

cover in the direction of the arrows.

The claws may be damaged.

A

KBRO620503E

KBRO620504E

340

6-3. Do-it-yourself maintenance

Replacing the wiper rubbers

When replacing the wiper rubbers, handle each part of the wipers as

follows.

Windshield wipers

Removing and attaching the windshield wiper blades

a

Raise the wiper arm. Insert a flat-

head screwdriver to lift the cover

To prevent damage, wrap a cloth

around the tip of the flathead screw-

driver or the like to protect it.

b

Slide the windshield wiper blade

and remove it from the wiper

arm

c

To attach the wiper blade, reverse the removal procedure

KBTC621001

KBTC621002

341

6-3. Do-it-yourself maintenance

Mai
ntenance and car

e

6

Replacing the windshield wiper rubbers

a

Pull the wiper rubber, remove

the stopper by pressing the claw

of the wiper blade, and pull out

the wiper rubber

b

Remove the 2 metal plates from

the old wiper rubber and attach

them to the new wiper rubber

Pay attention to the orientation of the

notch and upward curve of the metal

plate.

c

In attachment, insert it into the

wiper blade from the side with-

out the wiper rubber stopper

Insert the wiper rubber to the blade in

the arrow direction.

d

Carefully secure the wiper rubber stopper with the claw of the wiper

blade

KBTC621003

Claw

KBTC621004

KBTC621010

342

6-3. Do-it-yourself maintenance

Rear wiper

Removing and attaching the rear wiper blades

a

Raise the wiper arm and remove

the wiper blade

a

Rotate the wiper blade until

the claw fitting comes off

b

Remove the wiper blade from

the wiper arm

b

To attach the windshield wiper blade, do it in the reverse steps of the

procedure 

a

When returning the raised wiper arm, return it slowly while holding it with hands.
After attaching the wiper blade, make sure that the joint is securely locked.

Replacing the rear wiper rubbers

a

Pull out the wiper rubber from

the wiper blade’s stopper and

remove it all the way

b

Remove the 2 metal plates from

the old wiper rubber and attach

them to the new wiper rubber

Pay attention to the orientation of the

upward curve of the metal plate.

2

1

KBRO621005

KBRO621006

KBRO621007

343

6-3. Do-it-yourself maintenance

Mai
ntenance and car

e

6

c

Insert the wiper rubber through the 

b

 claw of the wiper blade. Once

the wiper rubber runs through the 

c

 claw, let it stick out from the

stopper and then slide it through the other 

a

 claw

Applying a small amount of washer fluid to the wiper rubber makes the insertion easier.

d

Check to see if the wiper blade

claw is placed in the groove of

the wiper rubber

When the wiper blade claw is not

placed in the groove of the wiper

rubber, pinch the wiper rubber and

slide it several times to put it into the

groove.

Lifting the center part of the wiper

rubber makes it easier to slide.

Handling of wiper blade and wiper rubber

Incorrect handling can damage the wiper blade and wiper rubber. If you are

not comfortable with replacing the wiper blade and wiper rubber yourself, con-

tact your Toyota dealer.

NOTICE

If you raise the wiper blade by holding the blade only, the blade may be
deformed. Be sure to lift it by holding the wiper arm.

When replacing the wiper, be careful not to damage the claws.

After removing the wiper blade from the wiper arm, place a cloth between the
window and the wiper arm to prevent the window from being damaged.

Do not force the wiper rubber out or deform the wiper rubber metal plates.

KBRO621008

a

c

b

KBRO621009

344

6-3. Do-it-yourself maintenance

Replacing the key battery

When the battery is low, replace it with a new battery.

What to prepare

A thin-bladed flathead screwdriver (narrow enough to fit in the dent)

Emergency key (vehicles with key-free system)

Lithium battery CR2032

How to replace the battery

Vehicles without key-free system

a

Remove the cover

To prevent damage, wrap a cloth

around the tip of the flathead screw-

driver or the like to protect it.

b

Remove the rubber cover from

the back of the module

c

Remove the depleted battery

Insert a new battery with the positive

side up.

KBTC620601

KBTA620602

KBTA620603

345

6-3. Do-it-yourself maintenance

Mai
ntenance and car

e

6

d

Attach the rubber cover to the

module

When inserting the rubber cover, insert

the protruded part first and then press

down the entire unit evenly. If the rub-

ber cover is not secured in place, it

could cause water or dust to enter

inside, leading to malfunction.

e

Attach the cover

Check to see if the indicator blinks

when you press the switch.

Vehicles without key-free system

a

Remove the emergency key (

P. 118)

b

Remove the cover

Place the Toyota logo side down when

removing it.
Insert the emergency key all the way to

the end.
To prevent damage, wrap a cloth

around the emergency key to protect

it.

c

Remove the depleted battery

To prevent damage, wrap a cloth

around the tip of the flathead screw-

driver or the like to protect it.
When you remove the cover, you may

encounter a situation where the elec-

tronic key’s module (substrate) is attached

to the top cover, hiding the battery sur-

face. In this case, flip over the electronic

key’s module (substrate) to make the bat-

tery visible as shown in the figure.
Insert a new battery with the positive

side up.

KBTA620604

KBTA620605

KBTA620606

KBTA620607

346

6-3. Do-it-yourself maintenance

: If equipped


d

Attach the cover

Check to see if the indicator blinks

when you press the switch


Replacing the battery

Incorrect handling could damage the key. If you are not comfortable with

replacing the battery yourself, contact your Toyota dealer.

When the components of the electronic key

 get separated

See the figure below and assemble them.

When you assemble, keep the protruded part to face down.

Use a CR2032 lithium battery

Batteries can be purchased at your Toyota dealer, local electrical appliance
shops or camera stores.

Replace only with the same or equivalent type recommended by the manufacturer.

Dispose of used batteries according to local laws.

When the battery of the electronic key

 is low

You will experience the following:

The key-free system or wireless remote control will not start

The activation range becomes short

The indicators do not flash

KBRO620604

KBRO620605

Protruded part

Maintenance.fm  346 ページ  2022年6月17日 金曜日 午前9時6分

347

6-3. Do-it-yourself maintenance

: If equipped

Mai
ntenance and car

e

6

WARNING

Battery precautions

Observe the following precautions.
Failure to do so may result in death or serious injury.

Do not swallow the battery. Doing so may cause chemical burns.

A coin battery or button battery is used in the wireless remote control

 or

the electronic key

. If a battery is swallowed, it may cause severe chemical

burns in as little as 2 hours and may result in death or serious injury.

Keep away new and removed batteries from children.

If the cover cannot be firmly closed, stop using the wireless remote control

or the electronic key

 and stow the key in the place where children cannot

reach, and then contact your Toyota dealer.

If you accidentally swallow a battery or put a battery into a part of your body,
get emergency medical attention immediately.

To prevent battery explosion or leakage of flammable liquid or gas

Replace the battery with a new battery of the same type. If a wrong type of
battery is used, it may explode.

Do not expose batteries to extremely low pressure due to high altitude or
extremely high temperatures.

Do not burn, break or cut a battery.

NOTICE

Important points when replacing the batteries

Before you replace the battery, make sure to discharge static electricity from

your body and clothing. Static electricity could damage the key. To discharge

static electricity, prepare items that can remove static electricity in advance or

touch metal parts with your hands.

To make it function properly after the replacement

Observe the following precautions.

Never replace the battery with wet hands
Doing so could cause rusting.

Do not touch or move the parts except the battery

Do not bend the electrodes

348

6-3. Do-it-yourself maintenance

Checking and replacing fuses

If a light or the electrical system does not operate, a fuse may have

blown. Check the fuse.

a

Turn the engine switch to “OFF”

b

Open the fuse box

Engine compartment

While pressing down the claw, lift

the cover

Instrument panel

For right-hand drive vehicles,

remove the glove box in the leg-

room of the passenger's seat

a

Push the left side inward and

disengage the upper claw

b

Push the right side inward

and disengage the upper claw

c

Disengage the lower claws

For left-hand drive vehicles, dis-

engage the claws at 8 locations

and remove the lower cover in

the legroom of the driver's seat

KBRO620702N

1

3

2

KBRO620703N

KBRO620704E

349

6-3. Do-it-yourself maintenance

Mai
ntenance and car

e

6

If the fuse box has a cover,

remove the cover

c

Remove the fuse removal tool

Engine compartment

Remove the fuse removal tool

from the inner side of the cover

Instrument panel

Remove the fuse removal tool

from the fuse box

d

Remove the fuse by pinching it

with the fuse removal tool

KBRO620705E

KBRO620706E

KBTA620704

KBTA620706

350

6-3. Do-it-yourself maintenance

e

Check if the fuse is blown.

a

Normal fuse

b

Blown fuse

Replace the blown fuse with a new fuse of an appropriate amperage rating. The

amperage rating can be found on the fuse box lid.

Type A

Type B

f

To install, reverse the removal procedure

After a fuse is replaced

If the lights do not turn on even after the fuse has been replaced, replace the
bulb. (

P. 352)

If the replaced fuse blows again, or if the electrical system does not work,
have the vehicle inspected by your Toyota dealer.

If there is an overload in a circuit

The fuses are designed to blow, protecting the wiring harness from damage.

When replacing light bulbs

We recommend that you use genuine Toyota products designated for this

vehicle. Because certain bulbs are connected to circuits designed to prevent

overload, products other than the Toyota genuine parts designated for this

vehicle may be unusable.

KBTE731003

KBTE731004

351

6-3. Do-it-yourself maintenance

Mai
ntenance and car

e

6

WARNING

To prevent system breakdowns and vehicle fire

Observe the following precautions.
Failure to do so may cause damage to the vehicle, and possibly a fire or injury.

Never use a fuse of a higher amperage rating than that indicated, or use any
other object in place of a fuse.

Always use a genuine Toyota fuse or equivalent.
Never replace a fuse with a wire, even as a temporary fix.

Do not modify the fuses or fuse boxes.

NOTICE

Before replacing fuses

If you find that the cause of the blown fuse is an overload of electricity, have

the vehicle inspected at your Toyota dealer.

352

6-3. Do-it-yourself maintenance

: If equipped

Replacing light bulbs

You can replace the bulbs listed below yourself. The difficulty of

replacing bulbs depends on the bulb. We recommend that you

replace the parts at your Toyota dealer because they may get dam-

aged.

Preparing light bulbs

Check the W (wattage) of the defective light bulb. (

P. 428)

Bulb position

Front

a

Front turn signal/emergency flashers (vehicles with halogen head-

lights)

b

Front fog lights

c

Front position lights (vehicles with halogen headlights)

d

Headlight low beam (vehicles with halogen headlights)

e

Headlight high beam (vehicles with halogen headlights)

1

2 3

4

5

KBRO620815E

353

6-3. Do-it-yourself maintenance

Mai
ntenance and car

e

6

Rear

a

Rear turn signal/emergency flashers

b

Back-up lights

c

License plate lights

3

1

2

KBRO620801N


Content      ..     19      20      21      22     ..