Toyota Mirai (2023 year). Manual in english - page 23
 

  Index      Toyota     Toyota Mirai (2023 year). Manual in english


Search            copyright infringement  


Content      ..     21      22      23      24     ..


Toyota Mirai (2023 year). Manual in english - page 23


372

6-4. Using the other interior features

The power outlet can be used 
for 12 V accessories that run on 
less than 10 A.

Open the console box and open 
the lid.

The power outlet can be used 

when

The power switch is in ACC or ON.

When stopping the fuel cell sys-

tem

Disconnect electrical devices with 

charging functions, such as mobile 

battery packs. If such devices are 

left connected, the fuel cell system 

may not stop normally.

WARNING

Assist grip

Do not use the assist grip when 

getting in or out of the vehicle or 

rising from your seat.

Doing so could damage the assist 

grip, or could cause you to injure 

yourself by falling over.

NOTICE

To prevent damage to the 

assist grip

Do not hang any heavy object or 

put a heavy load on the assist 

grip.

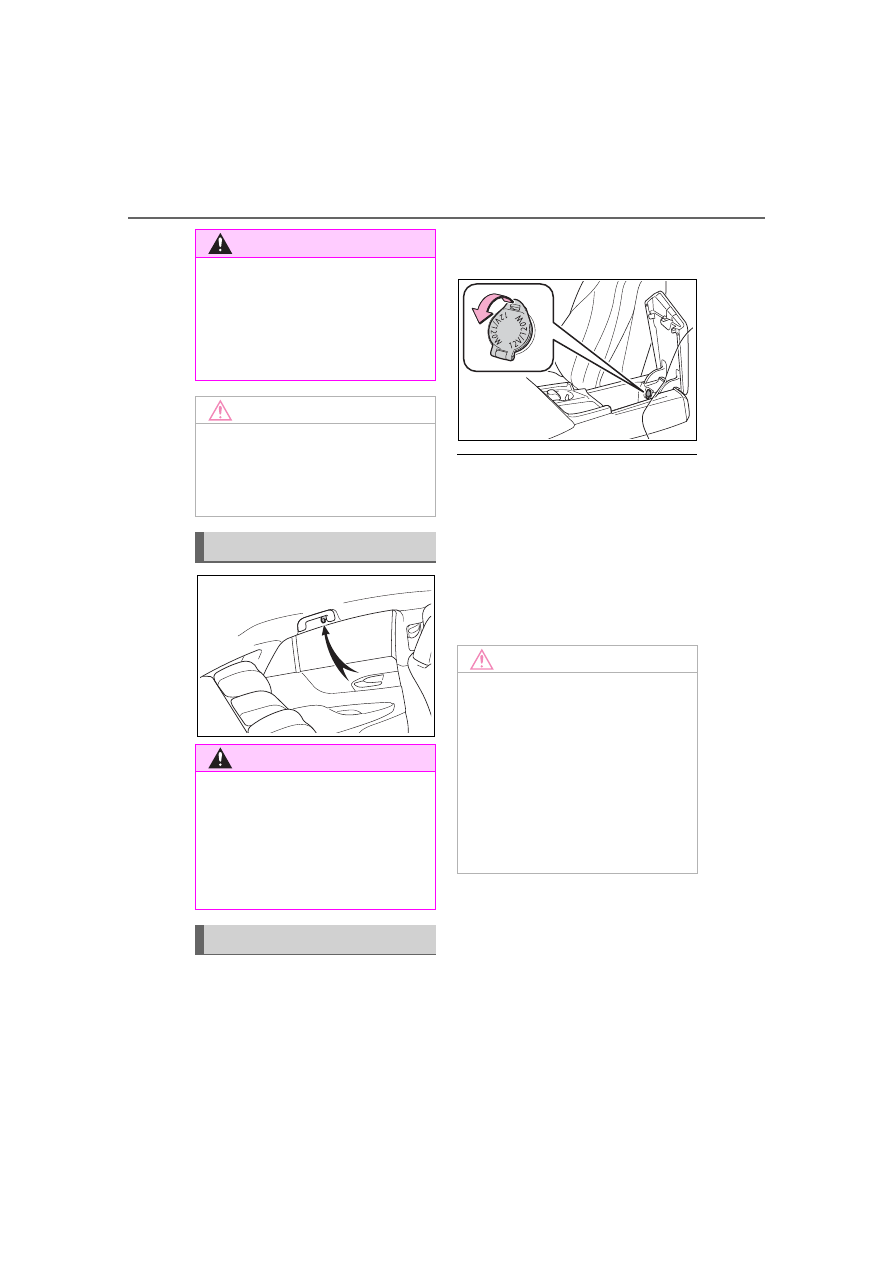
Coat hooks

WARNING

Items that must not be hung 

on the hook

Do not hang a coat hanger or 

other hard or sharp object on the 

hook. If the SRS curtain shield air-

bags deploy, these items may 

become projectiles that cause 

death or serious injury.

Power outlet (12 VDC)

NOTICE

To avoid damaging the power 

outlet

Close the power outlet lid when 

the power outlet is not in use. 

Foreign objects or liquids that 

enter the power outlet may cause 

a short circuit.

To prevent the fuse from 

being blown

Do not use an accessory that 

uses more than 12 V 10 A.

373

6-4. Using the other interior features

6

Interior

 featur

es

The power outlet can be used 
for 120 V accessories that run 
on less than 100 W.

Rear of the console box

Open the lid.

In the trunk

Open the lid.

The power outlet can be used 

when

The power switch is in ACC or ON.

When stopping the fuel cell sys-

tem

Disconnect electrical devices with 

charging functions, such as mobile 

battery packs.
If such devices are left connected, 

the fuel cell system may not stop 

normally.

NOTICE

To prevent incorrect opera-

tion of the vehicle

When turning the power switch 

off, make sure to disconnect 

accessories designed for 

charging, such as portable char-

gers, power banks, etc., from the 

power outlet.
If such an accessory is left con-

nected, the following may occur:

The doors cannot be locked 

using the smart key system or 

wireless remote control.

The opening screen will be dis-

played on the multi-information 

display.

The interior lights, instrument 

panel lights, etc., will illuminate.

To prevent 12-volt battery dis-

charge

Do not use the power outlet lon-

ger than necessary when the fuel 

cell system is off.

Power outlet (120 
VAC/100W) (if equipped)

NOTICE

To avoid damaging the power 

outlet

Close the power outlet lid when 

the power outlet is not in use.

Foreign objects or liquids that 

enter the power outlet may cause 

a short circuit.

To prevent the fuse from 

being blown

Do not use an accessory that 

uses more than 120 V 100 W.

374

6-4. Using the other interior features

This system allows the use of 
electrical devices with a total 
power consumption of 1500W at 
120 VAC in the vehicle. Supply-
ing power to electrical devices 
outside the vehicle is not recom-
mended, as it may violate the 
laws and regulations of the 
country or region where it is 
used. When supplying power to 
electrical devices outside the 
vehicle, check the laws and reg-
ulations with the relevant local 
government of each country or 

region in advance. Also, be 
careful not to drag electrical 
devices and cords when moving 
the vehicle.

Using the power outlets

Rear of the console box

Open the lid.

In the trunk

Open the lid.

When turning the power 
outlets on

1

Check that the parking brake 
is engaged, securely depress 
the brake pedal and press 
the power switch.

2

Check that the READY indi-
cator is illuminated, and 
press the AC120V switch.

The power outlets can be used 

when the indicator on the AC120V 

switch is illuminated.

NOTICE

To prevent incorrect opera-

tion of the vehicle

When turning the power switch 

off, make sure to disconnect 

accessories designed for 

charging, such as portable char-

gers, power banks, etc., from the 

power outlet.

If such an accessory is left con-

nected, the following may occur:

The doors cannot be locked 

using the smart key system or 

wireless remote control.

The opening screen will be dis-

played on the multi-information 

display.

The interior lights, instrument 

panel lights, etc., will illuminate.

To prevent 12-volt battery dis-

charge

Do not use the power outlet lon-

ger than necessary when the fuel 

cell system is off.

Power outlets (120 
VAC/1500W) (if equipped)

375

6-4. Using the other interior features

6

Interior

 featur

es

The power outlets are turned off/on 

each time the AC120V switch is 

pressed.

When connecting a device

Open the lid, and fully and 
securely insert the plug of the 
device into the power outlet.

Rear of the console box

In the trunk

When turning the power 
outlets off

1

Turn the connected devices 
off.

2

Press the AC120V switch to 
turn the power outlets off.

3

Disconnect each plug from 
the power outlets.

4

Close the lid of each power 
outlet.

The power outlet can be used 

when

The READY indicator is illuminated.

Electronic devices that can be 

connected to the power outlets

Use electronic devices in which the 

total power consumption of all 

devices connected to the 120 VAC 

power outlets is less than 1500 W. 

Depending on the device being 

used, the current flow may become 

high and the electric power for a 

moment may exceed the regulated 

capacity. If the regulated capacity is 

exceeded by the electronic devices 

being used, the protection function 

of the power outlet may operate and 

power outlet may not be able to be 

used, but this is not a malfunction. 

However, observe the following pre-

cautions:

Depending on the devices used, it 

may cause interference with TV 

and radio broadcasts.

Observe the precautions that are 

stated in the instruction manual of 

each electronic device being 

used.

Many common electronic devices 

are not intended for use within the 

vehicle. The following problems 

may occur when using electronic 

devices within the vehicle.

• Electronic device malfunction due 

to vibrations while driving.

• Electronic device malfunctions or 

operates poorly due to tempera-
ture changes

*

 within the vehicle.

• The installation is unstable and 

may not operate normally as the 

compartment within the vehicle is 

376

6-4. Using the other interior features

not flat.

*

: Depending on the weather, sea-

son, usage environment, etc., the 
vehicle compartment may 
undergo extreme high or low tem-
peratures.

When using while the vehicle is 

parked or stopped

The door cannot be locked or 

unlocked with the electronic key. 

The door can be locked/unlocked 

only with the mechanical key 

(

P.126).

When the surroundings become 

dark while power is being sup-

plied, the headlights will automati-

cally turn on.

Turn off the light (

P.198)

Power outlet

The power outlet is a device in 

order to use electronic devices 

within the vehicle.

While a power outlet is being 

used, a cooling fan sound may be 

heard from near a rear seat. This 

does not indicate a malfunction.

Devices which may not operate 

correctly

The following 120 VAC devices may 

not operate properly even if their 

power consumption is less than 

1500 W:

Devices with high initial peak watt-

age

Measuring devices that process 

precise data

Devices that require an extremely 

stable power supply

Devices that require a constant 

power supply from the power out-

let, such as a device with a timer.

When the power supply func-

tion cannot be used

If the AC120V switch is pressed but 

the switch indicator does not illumi-

nate, the protection circuit may have 

operated.

In this case, perform the appropriate 

procedures as follows.

Disconnect the plug of each 

device from the power outlets, 

check that the total power con-

sumption of all devices to be con-

nected to the power outlets is less 

than 1500 W, reconnect the 

devices and then press the 

AC120V switch again.

Disconnect the plug of each 

device from the power outlets, 

check that the devices are not 

malfunctioning, reconnect the 

devices and then press the 

AC120V switch again.

Check the charge of the traction 

battery (

P.119). If the charge is 

low, shift the shift position to P, 

allow the fuel cell system to oper-

ate to charge the traction battery, 

and then press the AC120V 

switch again.

If the temperature inside the vehi-

cle is high, such as after the vehi-

cle has been parked under the 

sun, move the vehicle to a shaded 

area, use the air conditioning sys-

tem to sufficiently cool the interior, 

and then press the AC120V 

switch again.

When it is particularly cold, the 

power outlets may not be able to 

be used, to protect the traction 

battery. In that case, drive the 

vehicle and use the power outlets 

after the traction battery has 

warmed up.

When the fuel door is open, close 

the door and press the AC120V 

switch again.

If the power outlets cannot be used 

even after performing the appropri-

ate procedures above, have the 

vehicle inspected by your Toyota 

dealer.

If any electrical device has mal-

functioned, park the vehicle in a 

safe location and turn the AC 

inverter off.

377

6-4. Using the other interior features

6

Interior

 featur

es

If the protection function activates 

and power is cut, perform the fol-

lowing procedure.

1

Stop the vehicle in a safe place 

and set the parking brake.

2

Ensure that the shift position is in 

P or N.

3

Check that the power consumed 

by the electrical devices is within 

1500 W and any device has not 

malfunctioned.

4

Press the AC 120 V switch.

If the inside of the vehicle is hot, 
open the windows to lower the tem-
perature and turn the switch back on 
once the inside of the vehicle 
reaches a normal temperature. If 
following the procedure above does 
not restore power, have the vehicle 
inspected at your Toyota dealer.

WARNING

For safe use

Observe the following precau-

tions.
Failure to do so may lead to an 

accident, resulting in death or 

serious injury.

Do not use devices such as the 

following when driving:

• Devices which cannot be prop-

erly secured within the vehicle.

• Devices which may distract the 

driver and be a hindrance to 

safe driving, such as a TV, DVD 

player, etc.

• Unsecured devices which gen-

erate heat, such as a toaster, 

microwave, electric heater, elec-

tric kettle, coffee maker, etc., as 

they may cause burns or a fire 

in the case of sudden braking or 

an accident.

• Devices which may fall under 

the pedals and prevent the 

brake pedal from being 

depressed.

Do not use devices which pro-

duce steam while the windows 

are closed. Doing so may cause 

the windows to fog up, reducing 

visibility and making it difficult to 

drive safely. Also, the steam 

may damage or negatively 

affect other devices. If the 

device must be used, stop the 

vehicle and open the windows 

before use.

Do not use damaged electronic 

devices. The power supply 

function may not be able to be 

used.

Do not disconnect the plug of a 

device while your hands are wet 

or insert a pin or other object 

into the power outlet. Also, if a 

liquid or snow is on the power 

outlet, dry the outlet before 

using it.

Do not attempt to modify, disas-

semble or repair a power outlet. 

For information on repairs, con-

tact your Toyota dealer.

Do not let children touch the 

power outlets.

Keep the power outlets free of 

dust and foreign matter. Also, 

regularly clean the power outlet.

If the plug of a device fits 

loosely in a power outlet, even 

though it is fully inserted, 

replace the power outlet. For 

information on replacement, 

contact your Toyota dealer.

378

6-4. Using the other interior features

WARNING

Using the power outlets while 

parked or stopped

Observe the following precau-

tions.
Failure to do so may lead to an 

accident, possibly resulting in 

death or serious injury.

Please note the following when 

using the cord outside the vehi-

cle.

• Take care of rainwater entering 

the vehicle.

• If the power outlet is wet, dry it 

before using.

• Do not pinch the cord with the 

windows or doors.

• Provide enough slack and avoid 

unusual tension from occurring.

• Do not move the vehicle.

Make sure to engage the park-

ing brake and shift the shift posi-

tion to P.

Do not leave the vehicle unat-

tended while the READY indica-

tor is illuminated and a device is 

connected to a power outlet.

Do not get near or place lug-

gage near the vicinity of the tail-

pipe.

Make sure that the hood is 

closed. Do not put your head or 

hands anywhere inside the fuel 

cell unit room, as the cooling 

fans may operate suddenly. If 

too close, hands and clothing 

(especially a tie, scarf, etc.) may 

get caught in a fan.

Do not stop the vehicle near 

objects which burn easily.

Install and use appropriately 

related devices to make air sup-

ply and exhaust ventilation pos-

sible in places where ventilation 

is poor, such as within garages, 

and places where the vehicle is 

surrounded (places where snow 

accumulates).

Do not use in places where ven-

tilation is poor, such as within 

garages where there are no air 

supply and exhaust ventilation 

devices, and places where the 

vehicle is surrounded (places 

where snow accumulates, etc.).

Do not use the power outlets if 

the vehicle has a vehicle cover 

installed.

Do not sleep in the vehicle while 

using devices such as an elec-

tric heater.

Devices to be connected

Read the instruction manual 

included with the electronic 

device being used and observe 

the precautions that are stated 

regarding the product.

Do not use when the power plug 

or electronic device are dam-

aged.

Malfunctions or poor operations 

may occur when the outside 

temperatures are particularly 

high or low.

Normal operations may not be 

possible for electronic devices 

that require level installation.

Excluding electronic devices 

with waterproof specifications, 

do not use in places where it 

can be covered by rain or water, 

or places with lots of humidity.

379

6-4. Using the other interior features

6

Interior

 featur

es

1

To set the visor in the forward 
position, flip it down.

2

To set the visor in the side 
position, flip down, unhook, 
and swing it to the side.

3

To use the side extender, 
place the visor in the side 
position, then slide it back-
ward.

WARNING

Do not use electrical devices 

that have been submerged in 

water, or that may be sub-

merged in water excluding elec-

tronic devices with waterproof 

specifications.

Do not use medical equipment 

as the power supply function 

may temporarily stop depending 

the conditions of the vehicle.

NOTICE

Observe the following precau-

tions.
Failure to do so may lead to the 

power outlets not operating cor-

rectly or damage to the vehicle or 

a connected device.

To avoid short circuit or mal-

function

Do not set a device which gen-

erates heat near the interior 

components or on a seat. Heat 

may cause these parts to melt 

or burn.

Do not use devices which are 

sensitive to vibration or heat in 

the vehicle.

These devices may malfunction 

due to vibration while driving or 

heat while the vehicle is parked 

in the sun.

When not using a power outlet, 

make sure to close the cover. If 

foreign matter or a liquid enters 

the power outlet, it may cause a 

malfunction or short circuit.

Do not use a multi-point outlet 

adapter as doing so may over-

load the power outlet.

Immediately stop using if there 

is an unusual amount of heat 

being felt from the power outlet.

When the ambient tempera-

ture is high

If the temperature inside the vehi-

cle is high, such as after the vehi-

cle has been parked under the 

sun, move the vehicle to a shaded 

area, use the air conditioning sys-

tem to sufficiently cool the interior, 

and then press the AC120V 

switch again.

When the ambient tempera-

ture is low

When it is particularly cold, the 

power outlets may not be able to 

be used, to protect the traction 

battery. In that case, drive the 

vehicle and use the power outlets 

after the traction battery has 

warmed up.

Sun visors

380

6-4. Using the other interior features

Slide the cover to open.

The vanity light turns on.

To prevent 12-volt battery dis-

charge

If the vanity lights remain on when 

the power switch is turned off, the 

lights will go off automatically after 

20 minutes.

Pull up the tab of the sunshade 
and hook the shade on using 
the anchors.

To retract the sunshade, unhook 
the sunshade and retract it slowly.

Vanity mirrors

NOTICE

To prevent the 12-volt battery 

from being discharged

Do not leave the vanity lights on 

for extended periods while the 

fuel cell system is off.

Rear door sunshades (if 
equipped)

NOTICE

To ensure normal operation 

of the sunshades

Observe the following precau-

tions:

Do not place anything where it 

may hinder the opening/closing 

of the rear door sunshades.

Do not attach items to the rear 

door sunshades.

Do not apply excessive load to 

the rear door sunshades while 

they are hanging from the 

hooks.

Do not operate the rear door 

sunshade while the rear door is 

opening/closing.

Do not store the rear door sun-

shade in a tilted position. If 

stored in a tilted position, the 

rear door sunshade screen may 

become creased.

To prevent damage to the rear 

door sunshade

Observe the following precau-

tions:

Do not use the rear door sun-

shade when either hook is 

detached. When the rear door is 

opened/closed, the rear door 

sunshade may be damaged.

Do not pull on the screen while 

the hooks are attached. The 

screen may be damaged.

381

6-4. Using the other interior features

6

Interior

 featur

es

The rear sunshade can be 
extended and retracted using 
the rear sunshade switch and 
rear control panel.

From front seat

Extend/retract

From rear seat

1

Using the rear control panel, 
press 

.

2

Select 

.

The rear sunshade will be extended 

or retracted.

The rear sunshade can be used 

when

The power switch is in ON.

Operating the rear sunshade 

after turning the fuel cell sys-

tem off

The rear sunshade can be operated 

for a while even after the power 

switch is switched to ACC or turned 

off.

Reverse operation feature

To ensure adequate rear visibility, 

the rear sunshade automatically 

lowers when the shift position is 

shifted to R.
However, the rear sunshade is 

raised again if any of the following 

occurs:

The button is pressed again.

The shift position is shifted to P.

The shift position is shifted out of 

P and R, and the vehicle reaches 

a speed of 9 mph (15 km/h).

If the fuel cell system is turned off 

when the rear sunshade has been 

lowered due to the reverse opera-

tion feature, it will not be raised 

even when the fuel cell system is 

turned on again and the vehicle 

reaches a speed of 9 mph (15 

km/h). To raise the sunshade again, 

press the button.

Customization

Some functions can be customized. 

(

P.512)

Rear sunshade (if 
equipped)

WARNING

When the rear sunshade is 

being extended or retracted

Do not place fingers or other 

objects in the shade mechanism 

or in the opening as injury may 

result.

382

6-4. Using the other interior features

*

: If equipped

HomeLink

®

 programming pro-

cedure

The programming procedures can 

also be found at the following URL.

Website: www.homelink.com/toyota

For support, contact customer sup-

port at the following.
Help Line: 1-800-355-3515

The HomeLink

®

 wireless control 

system in your vehicle has 3 
buttons which can be pro-
grammed to operate 3 different 
devices. Refer to the program-
ming methods on the following 
pages to determine the method 
which is appropriate for the 
device.

NOTICE

To ensure normal operation 

of the rear sunshade

Observe the following precau-

tions:

Do not place excessive load on 

the motor or other components.

Do not place objects where they 

may hinder opening and closing 

operations.

Do not attach items to the rear 

sunshade.

Keep the opening clean and 

clear of obstructions.

Do not operate the rear sun-

shade continuously for long 

periods of time.

Garage door opener

*

The garage door opener can 
be programmed using the 
HomeLink

®

 to operate 

garage doors, gates, entry 
doors, door locks, home 
lighting systems, security 
systems, and other devices.

System components

383

6-4. Using the other interior features

6

Interior

 featur

es

Vehicles with auto anti-glare 
inside rear view mirror

HomeLink

®

 indicator light

Garage door operation indi-
cators

HomeLink

®

 icon

Illuminates while HomeLink

®

 is 

operating.

Buttons

Vehicles with Digital Rear-
view Mirror

HomeLink

®

 logo

Appears while HomeLink

®

 is oper-

ating. When the menu button 
(

P.150) is pressed, the logo dis-

appears even while the HomeLink

®


is operating.

Garage door operation indi-
cators

HomeLink

®

 indicator light

Illuminates above each button 
selected.

Buttons

Codes stored in the Home-
Link

®

 memory

The registered codes are not 

erased even if the 12-volt battery 

cable is disconnected.

If learning failed when registering 
a different code to a HomeLink

®


button that already has a code 

registered to it, the already regis-

tered code will not be erased.

Certification

P.569

WARNING

When programming a garage 

door or other remote control 

device

The garage door or other device 

may operate, so ensure people 

and objects are out of danger to 

prevent potential harm.

Conforming to federal safety 

standards

Do not use the HomeLink

®

 com-

patible transceiver with any 

garage door opener or device that 

lacks safety stop and reverse fea-

tures as required by federal safety 

standards.
This includes any garage door 

that cannot detect an interfering 

object. A door or device without 

these features increases the risk 

of death or serious injury.

When operating or program-
ming HomeLink

®

Never allow a child to operate or 
play with the HomeLink

®

 buttons.

384

6-4. Using the other interior features

Before programming Home-
Link

®

During programming, it is pos-
sible that garage doors, 
gates, or other devices may 
operate. For this reason, 
make sure that people and 
objects are clear of the 
garage door or other devices 
to prevent injury or other 
potential harm.

It is recommended that a new 
battery be placed in the 
remote control transmitter for 
more accurate programming.

Garage door opener motors 
manufactured after 1995 may 
be equipped with rolling code 
protection. If this is the case, 
you may need a stepladder or 
other sturdy, safe device to 
reach the “Learn” or “Smart” 
button on the garage door 
opener motor.

Programming HomeLink

®

Steps 

1

 through 

3

 must be per-

formed within 60 seconds, oth-
erwise the indicator light will 
stop flashing and programming 
will not be successfully com-
pleted.

1

Press and release the Home-
Link

®

 button you want to pro-

gram and check that the 

HomeLink

®

 indicator light 

flashes (orange).

2

Point the remote control 
transmitter for the device at 
the rear view mirror, 1 to 3 in. 
(25 to 75 mm) from the 
HomeLink

®

 buttons.

Keep the HomeLink

®

 indicator light 

in view while programming.

Vehicles with auto anti-glare 
inside rear view mirror

Vehicles with Digital Rear-
view Mirror

3

Program a device.

Programming the Home-
Link

®

385

6-4. Using the other interior features

6

Interior

 featur

es

Vehicles with auto anti-glare 
inside rear view mirror

Vehicles with Digital Rear-
view Mirror

Programming a device other 
than an entry gate (for U.S.A. 
owners)

Press and hold the remote control 
transmitter button until the Home-
Link

®

 indicator light changes from 

slowly flashing orange to rapidly 
flashing green (rolling code) or con-
tinuously lit green (fixed code), then 
release the button.

Programming an entry gate 
(for U.S.A. owners)/Program-
ming a device in the Cana-
dian market

Press and release the remote con-
trol transmitter button at 2 second 
intervals, repeatedly, until the 
HomeLink

®

 indicator light changes 

from slowly flashing (orange) to 
rapidly flashing (green) (rolling 
code) or continuously lit (green) 
(fixed code).

4

Test the HomeLink

®

 opera-

tion by pressing the newly 
programmed button and 
observing the indicator light:

HomeLink

®

 indicator light illu-

minates: Programming of a 
fixed code device has com-
pleted. The garage door or 
other device should operate 
when a HomeLink

®

 button is 

pressed and released.

HomeLink

®

 indicator light 

flashes rapidly: The garage 
door opener motor or other 
device is equipped with a roll-
ing code. To complete pro-
gramming, firmly press and 
hold the HomeLink

®

 button 

for 2 seconds then release it.

If the garage door or other 
device does not operate, pro-
ceed to “Programming a roll-
ing code system”.

5

Repeat the steps above to 
program another device for 
any of the remaining Home-
Link

®

 buttons.

Programming a rolling code 
system

Two or more people may be 
necessary to complete rolling 
code programming.

386

6-4. Using the other interior features

1

Locate the “Learn” or “Smart” 
button on the garage door 
opener motor in the garage.

This button can usually be found 

where the hanging antenna wire is 

attached to the unit. The name and 

color of the button may vary by 

manufacturer. Refer to the owner’s 

manual supplied with the garage 

door opener motor for details.

2

Press and release the 
“Learn” or “Smart” button.

Perform 

3

 within 30 seconds after 

performing 

2

.

3

Press and hold the desired 
HomeLink

®

 button (inside the 

vehicle) for 2 seconds and 
release it. Repeat this 
sequence 
(press/hold/release) up to 3 
times to complete program-
ming.
If the garage door opener 
motor operates when the 

HomeLink

®

 button is 

pressed, the garage door 
opener motor recognizes the 
HomeLink

®

 signal.

Vehicles with auto anti-glare 
inside rear view mirror

Vehicles with Digital Rear-
view Mirror

Enabling 2-way communi-
cation with a garage door 
(only available for compati-
ble devices)

When enabled, 2-way communi-
cation allows you to check the 
status of the opening and clos-
ing of a garage door through 
indicators in your vehicle.
2-way communication is only 
available if the garage door 
opener motor used is a compati-
ble device. (To check device 

387

6-4. Using the other interior features

6

Interior

 featur

es

compatibility, refer to 
www.homelink.com.)

1

Within 5 seconds after pro-
gramming the garage door 
opener has been completed, 
if the garage door opener 
motor is trained to Home-
Link

®

, both garage door 

operation indicators will flash 
rapidly (green) and the light 
on the garage door opener 
motor will blink twice, indicat-
ing that 2-way communica-
tion is enabled.

If the indicators do not flash, per-

form 

2

 and 

3

 within the first 10 

presses of the HomeLink

®

 button 

after programming has been com-

pleted.

2

Press a programmed Home-
Link

®

 button to operate a 

garage door.

3

Within 1 minute of pressing 
the HomeLink

®

 button, after 

the garage door operation 
has stopped, press the 
“Learn” or “Smart” button on 
the garage door opener 
motor. Within 5 seconds of 
the establishment of 2-way 
communication with the 
garage door opener, both 
garage door operation indica-
tors in the vehicle will flash 
rapidly (green) and the light 
on the garage door opener 
motor will blink twice, indicat-
ing that 2-way communica-
tion is enabled.

Reprogramming a single 
HomeLink

®

 button

When the following procedure is 
performed, buttons which 
already have devices registered 
to them can be overwritten:

1

Press and hold the desired 
HomeLink

®

 button.

2

When the HomeLink

®

 indica-

tor starts flashing orange, 
release the HomeLink

®

 but-

ton and perform “Program-
ming HomeLink

®

” 

1

 (it takes 

20 seconds for the Home-
Link

®

 indicator to start flash-

ing).

Before programming

Install a new battery in the trans-

mitter.

The battery side of the transmitter 

must be pointed away from the 
HomeLink

®

 buttons.

Press the appropriate Home-
Link

®

 button. The HomeLink

®


indicator light should turn on.
The status of the opening and 
closing of a garage door is 
shown by the indicators.

Operating HomeLink

®


Content      ..     21      22      23      24     ..