Toyota Highlander Hybrid (2023 year). Manual in english - page 21
 

  Index      Toyota     Toyota Highlander Hybrid (2023 year). Manual in english


Search            copyright infringement  


Content      ..     19      20      21      22     ..


Toyota Highlander Hybrid (2023 year). Manual in english - page 21


335

5-1. Using the air conditioning system and defogger

5

Interior

 featur

es

presence of passengers and auto-

matic airflow control will not oper-

ate.

Operation of manual airflow 

control

Even if the function is manually 

switched to directing airflow to only 

the front seats, when a rear seat is 

occupied, it may automatically direct 

airflow to all seats.

To return to automatic airflow 

control

1

With the indicator off, turn the 

power switch off.

2

After 60 minutes or more elapse, 

turn the power switch to ON.

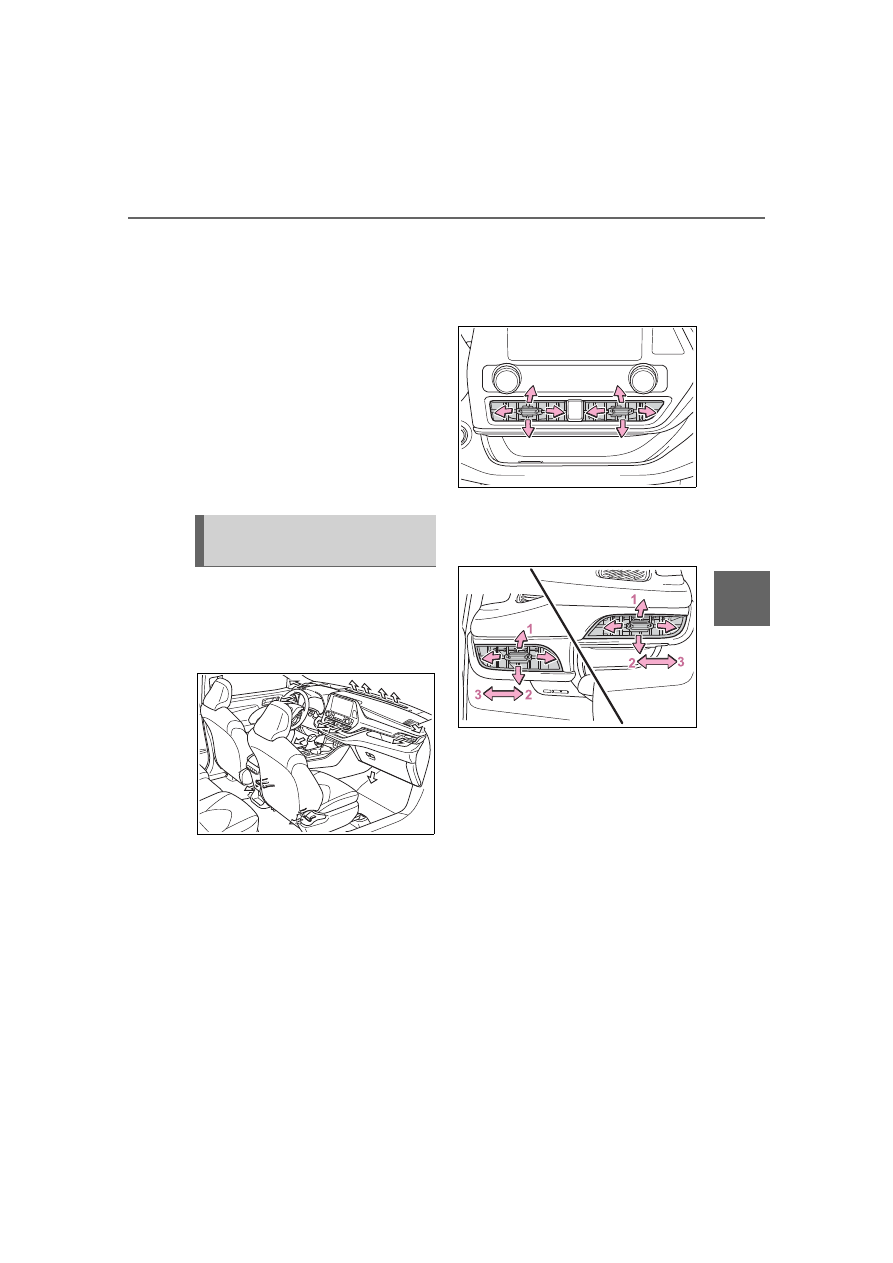
Location of air outlets

The air outlets and air volume 
change according to the 
selected air flow mode.

Adjusting the air flow direc-
tion and opening/closing 
the air outlets

Front center outlets

Direct air flow to the left or right, up 
or down

Front side outlets

1

Direct air flow to the left or 
right, up or down

2

Open the vent

3

Close the vent

Air outlet layout and oper-
ations

336

5-1. Using the air conditioning system and defogger

WARNING

To not interrupt the wind-

shield defogger from operat-

ing

Do not place anything on the 

instrument panel which may cover 

the air outlets. Otherwise, air flow 

may be obstructed, preventing the 

windshield defoggers from defog-

ging.

337

5-1. Using the air conditioning system and defogger

5

Interior

 featur

es

Rear air conditioning control panel

Adjust the rear seats fan speed setting

Press 

 to increase the fan speed and 

 to decrease the fan 

speed.

“OFF” switch

Pressing the “OFF” switch turns off the fan.

Air flow mode control switch
Automatic mode switch

When the function is on, the indicator illuminates on the control screen.

Adjust the rear seats temperature setting

Press 

 to increase the temperature and 

 to decrease the tem-

perature.

Rear automatic air conditioning system

The air outlets and fan speed are automatically adjusted 
according to the temperature setting.

The rear air conditioning system can be operated using the 
front air conditioning control panel and rear air conditioning 
control panel. Press the “REAR CLIMATE” switch on the front 
air conditioning control panel to change the rear air condition-
ing control mode.

The rear air conditioning system can also be operated on the 
audio system screen.

Rear air conditioning control operation

338

5-1. Using the air conditioning system and defogger

Front air conditioning control panel

Rear air conditioning system on/off switch
“REAR CLIMATE” switch

The mode switches between the rear air conditioning control mode and 
front air conditioning control mode each time the “REAR CLIMATE” switch 
is pressed.

Rear seat temperature control knob

To set temperature, move the rear seat temperature control knob upward or 
downward.
Upward: Increases the temperature
Downward: Decreases the temperature

Airflow mode control knob

The airflow mode control knob can be operated while the rear air condition-
ing control indicator is appeared.

Adjust the rear seats fan speed setting

Rear seats fan speed setting can be adjusted while the rear air conditioning 
control indicator is appeared.
To set the fan speed, move the fan speed control knob upward or down-
ward.
Upward: Increases the fan speed
Downward: Decreases the fan speed

Automatic mode switch (

P.340)

The automatic mode switch can be operated when the rear air conditioning 
control indicator is displayed.

Rear air conditioning control indicator

When the “REAR CLIMATE” switch is pressed, the rear air conditioning 
control indicator is displayed for several seconds.

339

5-1. Using the air conditioning system and defogger

5

Interior

 featur

es

Rear air conditioning con-
trol screen (audio system 
screen)

1

Touch 

 on the main menu.

2

Select "Climate".

3

Select "Rear".

Adjust the rear seats tem-
perature setting
Air flow mode control switch
Adjust the rear seats fan 
speed setting
“OFF” switch

Pressing the “OFF” switch turns off 
the fan.

Automatic mode switch

Rear air conditioning con-
trol panel

To change the airflow mode, 
press the airflow mode control 
switch.

The air outlets used are switched 
each time the switch is pressed.

1

Upper body

2

Upper body and feet

3

Feet

Front air conditioning con-
trol panel

To change the airflow mode, 
move the airflow mode control 
knob upward or downward.

1

Upper body

2

Upper body and feet

3

Feet

Change the airflow mode

340

5-1. Using the air conditioning system and defogger

Rear air conditioning con-
trol screen

To change the airflow mode, 
select the airflow mode control 
switch.

The air outlets used are switched 
each time the switch is selected.

: Air flows to the upper body

: Air flows to the upper body and 

feet

: Air flows to the feet

1

Press the automatic mode 
switch.

2

Adjust the temperature set-
ting.

3

To stop the operation, press 
the “OFF” switch.

If the fan speed setting or air 
flow modes are operated, the 
automatic mode indicator goes 
off. However, automatic mode 
for functions other than that 
operated is maintained.

Using automatic mode

Fan speed is adjusted automati-

cally according to the temperature 

setting and the ambient conditions.
Therefore, the fan may stop for a 

while until warm or cool air is ready 

to flow immediately after the auto-

matic mode switch is pressed.

Location of air outlets

The air outlets and air volume 
changes according to the 
selected air flow mode.

Adjusting the position of 
and opening and closing 
the air outlets

1

Direct air flow to the left or 
right, up or down

2

Open the vent

3

Close the vent

Using automatic mode

Air outlets

NOTICE

To prevent 12-volt battery dis-

charge

Do not leave the air conditioning 

system on longer than necessary 

when the hybrid system is off.

341

5-1. Using the air conditioning system and defogger

5

Interior

 featur

es

*

: If equipped

Turns the heated steering wheel 
on/off

The indicator light comes on when 
the heated steering wheel is oper-
ating.

Operation condition

The power switch is in ON.

Timer function

The heated steering wheel will auto-

matically turn off after a period of 

time.

Front

Each time the switch is pressed, 
the operation condition changes 
as follows.
Hi (3 segments lit)

Mid (2 seg-

ments lit)

Lo (1 segment 

lit)

Off

The level indicator (amber) 


lights up during operation.

Heated steering 

wheel

*

/seat heat-

ers

*

/seat ventilators

*

Heated steering wheel

Warms up the grip of the 
steering wheel

Seat heaters

Warm up the seat upholstery

Seat ventilators

Maintain good ventilation 
using a fan built into the seat

WARNING

To prevent minor burn inju-

ries

Care should be taken if anyone in 

the following categories comes in 

contact with the steering wheel or 

seats when the heater is on:

Babies, small children, the 

elderly, the sick and the physi-

cally challenged

Persons with sensitive skin

Persons who are fatigued

Persons who have taken alco-

hol or drugs that induce sleep 

(sleeping drugs, cold remedies, 

etc.)

NOTICE

To prevent damage to the 

seat heaters

Do not put heavy objects that 

have an uneven surface on the 

seat and do not stick sharp 

objects (needles, nails, etc.) into 

the seat.

To prevent 12-volt battery dis-

charge

Do not use the functions when the 

hybrid system is off.

Heated steering wheel

Seat heaters

342

5-1. Using the air conditioning system and defogger

Rear

Each time the switch is pressed, 
the operation condition changes 
as follows.
Hi (3 segments lit)

Mid (2 seg-

ments lit)

Lo (1 segment 

lit)

Off

The level indicator (amber) 


lights up during operation.

Operation condition

The power switch is in ON.

Each time the switch is pressed, 
the operation condition changes 
as follows.
Hi (3 segments lit)

Mid (2 seg-

ments lit)

Lo (1 segment 

lit)

Off

The level indicator (green) 

 lights 

up during operation.

Operation condition

The power switch is in ON.

WARNING

To prevent overheating and 

minor burn injuries

Observe the following precautions 

when using the seat heaters.

Do not cover the seat with a 

blanket or cushion when using 

the seat heater.

Do not use seat heater more 

than necessary.

Seat ventilators

343

5-2. Using the interior lights

5

Interior

 featur

es

5-2.Using the interior lights

Front personal lights (

P.344)

Front interior lights (

P.344)

Shift lever light
Open tray lights (if equipped)
Door courtesy lights
Ambient lights (if equipped)
Rear personal lights (if equipped) (

P.344)

Rear personal lights (if equipped) (

P.344)

Rear interior light (

P.344)

Outer foot lights (if equipped)

Interior lights list

Location of the interior lights

344

5-2. Using the interior lights

Front interior lights

1

Turns the lights on/off linked 
to door positions

2

Turns the lights on

3

Turns the lights off

Rear interior lights

1

Turns the door position on

The rear interior light turns on/off 
together the front interior lights.
When a door is opened while the 
front and rear interior light door 
position is on, the lights turn on.

2

Turns the light on

Front personal lights

Turns the lights on/off

Rear personal lights

Turns the lights on/off

Vehicles without panoramic 
moon roof

Vehicles with panoramic 
moon roof

Illuminated entry system

The lights automatically turn on/off 

according to the power switch 

mode, the presence of the elec-

tronic key, whether the doors are 

locked/unlocked, and whether the 

doors are opened/closed.

Operating the interior 
lights

Operating the personal 
lights

345

5-2. Using the interior lights

5

Interior

 featur

es

To prevent the 12-volt battery 

from being discharged

If the interior lights remain on when 

the power switch is turned off, the 

lights will go off automatically after 

20 minutes.

The interior lights may turn on 

automatically when

If any of the SRS airbags deploy 

(inflate) or in the event of a strong 

rear impact, the interior lights will 

turn on automatically.
The interior lights will turn off auto-

matically after approximately 20 

minutes.
The interior lights can be turned off 

manually. However, in order to help 

prevent further collisions, it is rec-

ommended that they be left on until 

safety can be ensured.
(The interior lights may not turn on 

automatically depending on the 

force of the impact and conditions of 

the collision.)

Customization

Some functions can be customized. 

(

P.510)

NOTICE

To prevent 12-volt battery dis-

charge

Do not leave the lights on longer 

than necessary when the hybrid 

system is off.

346

5-3. Using the storage features

5-3.Using the storage features

Auxiliary boxes (

P.349)

Open tray (if equipped) (

P.349)

Glove box (

P.347)

Bottle holders (

P.348)

Cup holders (

P.347)

Console box (

P.347)

List of storage features

Location of the storage features

WARNING

Items that should not be left 

in the storage spaces

Do not leave glasses, lighters or 

spray cans in the storage spaces, 

as this may cause the following 

when cabin temperature becomes 

high:

Glasses may be deformed by 

heat or cracked if they come 

into contact with other stored 

items.

Lighters or spray cans may 

explode. If they come into con-

tact with other stored items, the 

lighter may catch fire or the 

spray can may release gas, 

causing a fire hazard.

347

5-3. Using the storage features

5

Interior

 featur

es

1

Unlock with the mechanical 
key

2

Lock with the mechanical key

3

Open (pull lever)

Glove box light

The glove box light turns on when 

the tail lights are on.

Push the tab and slide the con-
sole box lid.

Tray inside console box

The tray can be slid forward/back-

ward.

Front seats

Second seats (8-seat models)

Pull the armrest down.

WARNING

When storage compartments 

are not in use

When driving or when the storage 

compartments are not in use, 

keep the lids closed.
In the event of sudden braking or 

sudden swerving, an accident 

may occur due to an occupant 

being struck by an open lid or the 

items stored inside.

Glove box

Console box

Cup holders

348

5-3. Using the storage features

Second seats (7-seat models)

Third seats

Front doors

Rear doors

Bottle holders

When storing a bottle, close the 

cap.

The bottle may not be stored 

depending on its size or shape.

WARNING

Items unsuitable for the cup 

holder

Do not place anything other than 

cups, aluminum cans, or water 

bottles in the cup holders. Other 

items may be thrown out of the 

holders in the event of an acci-

dent or sudden braking, possibly 

causing injury. If possible, cover 

hot drinks to prevent burns.

Bottle holders

NOTICE

Items unsuitable for the bottle 

holders

Do not place open bottle, glass or 

paper cups containing liquid in the 

bottle holders. Otherwise, con-

tained liquid may be spilled. Glass 

cups may break if used in the bot-

tle holders.

349

5-3. Using the storage features

5

Interior

 featur

es

Overhead

Push the lid.

Driver’s side instrument panel

Pull the tab to open.

Instrument panel

Front of console

Rear of console box (if 
equipped)

Cable pass through (Instru-

ment panel)

The open tray is provided with a 

hole that allows cables to be passed 

through the tray from the USB port, 

USB charging ports or power outlet.
Remove the cover.

Auxiliary boxes

WARNING

Items unsuitable for storing 

(Overhead)

Do not store items heavier than 

0.44 lb. (200 g).

Doing so may cause the auxiliary 

box to open and the items inside 

may fall out, resulting in an acci-

dent.

Caution while driving 

(Driver’s side instrument 

panel)

Keep the auxiliary box closed 

while driving. 

Injuries may result in the event of 

an accident or sudden braking.

Open tray

350

5-3. Using the storage features

Pull down the hook to use.

The cargo hooks are provided for 
securing loose items.

To hang the cargo net, use the 
cargo net hooks and cargo 
hooks.

WARNING

Items unsuitable for the open 

tray

Observe the following precautions 

when putting items in the open 

tray. Failure to do so may cause 

items to be thrown out of the tray 

in the event of sudden braking or 

steering. In these cases, the items 

may interfere with pedal operation 

or cause driver distraction, result-

ing in an accident.

Do not store items in the tray 

that can easily shift or roll out.

Do not stack items in the tray 

higher than the tray’s edge.

Do not put items in the tray that 

may protrude over the tray’s 

edge.

Luggage compart-

ment features

Cargo hooks

WARNING

When cargo hooks are not in 

use

To avoid injury, always return the 

hooks to their stowed positions 

when not in use.

Cargo net hooks


Content      ..     19      20      21      22     ..