Toyota C-HR (2023 year). Manual in english - page 16
 

  Index      Toyota     Toyota C-HR (2023 year). Manual in english


Search            copyright infringement  


Content      ..     14      15      16      17     ..


Toyota C-HR (2023 year). Manual in english - page 16


323

4

4-2. Driving procedures

D

riv

in

g

Parking brake

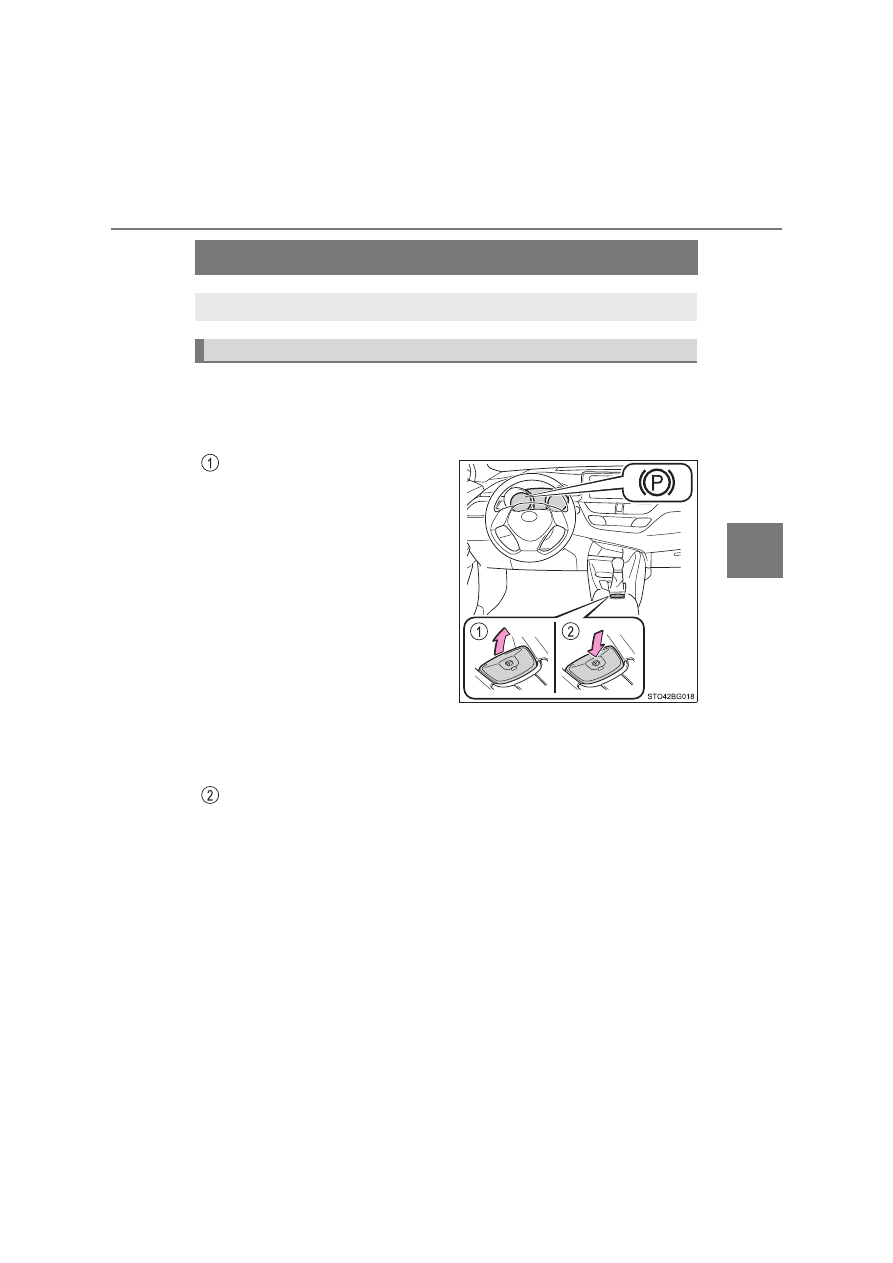
The parking brake is set or released automatically according to shift
lever operation. 
Even  when  in  automatic  mode,  the  parking  brake  can  be  set  and
released manually. (

P. 324)

Turns  automatic  mode  on
(while  the  vehicle  is  stopped,
pull and hold the parking brake
switch until “EPB Shift Interlock
Function Activated.” will be dis-
played  on  the  multi-information
display).

• When  the  shift  lever  is  moved

out  of  P,  the  parking  brake  will
be  released,  and  the  parking
brake indicator light and parking
brake lamp turn off.

• When  the  shift  lever  is  moved

into P, the parking brake will be
set,  and  the  parking  brake  indi-
cator  light  and  parking  brake
lamp turn on.

Operate the shift lever with the brake pedal depressed.

Turns automatic mode off (while the vehicle is stopped, press and
hold  the  parking  brake  switch  until  “EPB  Shift  Interlock  Function
Deactivated.” will be displayed on the multi-information display).

A selections can be made as desired from the following modes.

Automatic mode

324

4-2. Driving procedures

The parking brake can be set and released manually. 

Pull the parking brake switch to
set the parking brake

The  parking  brake  indicator  light
and  parking  brake  lamp  will  turn
on.
Pull  and  hold  the  parking  brake
switch if an emergency occurs and
it is necessary to operate the park-
ing brake while driving.

Push  the  parking  brake  switch
to release the parking brake

Operate  the  parking  brake  switch
while  depressing  the  brake  pedal.
Make  sure  that  the  parking  brake
indicator  light  and  parking  brake
lamp turn off.

If  the  parking  brake  indicator  light  and  parking  brake  lamp  flashes,
operate the switch again. (

P. 683)

Manual mode

325

4-2. Driving procedures

4

D

riv

in

g

Parking brake operation

When  the  power  switch  is  not  in  ON  mode,  the  parking  brake  cannot  be
released using the parking brake switch.

When the power switch is not in the ON mode, automatic mode (automatic
brake setting and releasing) is not available.

Automatic release function

The parking brake is automatically released when slowly depress the acceler-
ator pedal. 
The parking brake will be released  automatically under  the following  condi-
tions:

The driver’s door is closed.

The driver’s seatbelt is fastened.

Shift the shift lever is in a forward or reverse position.

The malfunction indicator lamp or brake system warning light is not illumi-
nated.

If the automatic release function does not operate, manually release the park-
ing brake.

If  “EPB  Frequently  Operated,  Wait  a  Minute.”  is  displayed  on  the
multi-information display

If  the  parking  brake  is  operated  repeatedly  over  a  short  period  of  time,  the
system may restrict operation to prevent overheating. If this happens, refrain
from operating the parking brake. Normal operation will return after about 1
minute.

If “EPB Activation Incomplete.” or “EPB Unavailable” is displayed on the
multi-information display

Operate the  parking  brake switch.  If the  message does not  disappear  after
operating the switch several times, the system may be malfunctioning. Have
the vehicle inspected by any authorized Toyota retailer or Toyota authorized
repairer, or any reliable repairer immediately.

Parking brake operation sound

When  the  parking  brake  operates,  a  motor  sound  (whirring  sound)  may  be
heard. This does not indicate a malfunction.

326

4-2. Driving procedures

Parking brake indicator light and parking brake lamp

Depending on the power switch position/mode, the parking brake indicator
light and parking brake lamp will turn on and stay on as described below:
ON mode: Comes on until the parking brake is released.
Not in ON mode: Stays on for approximately 15 seconds.

When the power switch is turned off with the parking brake set, the parking
brake indicator light and parking brake lamp will stay on for about 15 sec-
onds. This does not indicate a malfunction.

Changing the mode

When changing the automatic mode on/off, the message will be shown on the
multi-information display and the buzzer sounds.

Parking the vehicle

P. 283

Parking brake engaged warning buzzer

A buzzer will sound if the vehicle is driven with the parking brake engaged.
“EPB Applied.” is displayed on the multi-information display.

Warning messages and buzzers

Warning messages and buzzers are used to indicate a system malfunction or
to inform the driver of the need for caution. If a warning message is shown on
the multi-information display, read the message and follow the instructions.

If the brake system warning light comes on

P. 683

Usage in winter time

P. 542

327

4-2. Driving procedures

4

D

riv

in

g

WARNING

When parking the vehicle

Do  not  leave  a  child  in  the  vehicle  alone.  The  parking  brake  may  be
released unintentionally and there is the danger of the vehicle moving that
may lead to an accident resulting in death or serious injury.

Parking brake switch

Do not set any objects near the parking brake switch. Objects may interfere
with the switch and may lead the parking brake to unexpectedly operate.

NOTICE

When parking the vehicle

Before you leave the vehicle, shift the shift lever to P, set the parking brake
and make sure that the vehicle does not move.

When the system malfunctions

Stop the vehicle in a safe place and check the warning messages.

When the parking brake cannot be released due to a malfunction

Driving the vehicle with the parking brake set will lead to brake components
overheating,  which  may  affect  braking  performance  and  increase  brake
wear. Have the vehicle inspected by contact any authorized Toyota retailer
or  Toyota  authorized  repairer,  or  any  reliable  repairer  immediately  if  this
occurs.

328

4-2. Driving procedures

Brake Hold

Turns the brake hold system on

The  brake  hold  standby  indicator
(green)  comes  on.  While  the  sys-
tem is holding the brake, the brake
hold  operated  indicator  (yellow)
comes on.

Brake hold system operating conditions

The brake hold system cannot be turned on in the following conditions:

The driver’s door is not closed.

The driver is not wearing the seat belt.

If  any  of  the  conditions  above  are  detected  when  the  brake  hold  system  is
enabled, the system will turn off and the brake hold standby indicator light will
go off. In addition, if any of the conditions are detected while the system is
holding the brake, a warning buzzer will sound and a message will be shown
on the multi-information display. The parking brake will then be set automati-
cally.

The  brake  hold  system  keeps  the  brake  applied  when  the  shift
lever in D, S (M20A-FXS engine) or N with the system on and the
brake pedal has been depressed to stop the vehicle. The system
releases the brake when the accelerator pedal is depressed with
the shift lever in D or S (M20A-FXS engine) to allow smooth start
off.

329

4-2. Driving procedures

4

D

riv

in

g

Brake hold function

If the brake pedal is left released for a period of about 3 minutes after the
system has started holding the brake, the parking brake will be set automat-
ically. In this case, a warning buzzer sounds and a message is shown on the
multi-information display.

To turn the system off while the system is holding the brake, firmly depress
the brake pedal and press the button again.

The brake hold function may not hold the vehicle when the vehicle is on a
steep incline. In this situation, it may be necessary for the driver to apply the
brakes. A  warning  buzzer  will  sound  and  the  multi-information  display  will
inform  the  driver  of  this  situation.  If  a  warning  message  is  shown  on  the
multi-information display, read the message and follow the instructions.

When the parking brake is set automatically while the system is holding
the brakes

Perform any of the following operations to release the parking brake.

Depress the accelerator pedal. (The parking brake will not be released auto-
matically if the seat belt is not fastened.)

Operate  the  parking  brake  switch  with  the  brake  pedal  depressed.  Make
sure that the parking brake indicator light goes off. (

P. 323)

When an inspection at your Toyota dealer is necessary

When the brake hold standby indicator (green) does not illuminate even when
the brake hold switch is pressed with the brake hold system operating condi-
tions met, the system may be malfunctioning. Have the vehicle inspected at
any  authorized Toyota  retailer  or Toyota  authorized  repairer,  or  any  reliable
repairer.

If  “Brake  Hold  Fault  Depress  Brake  to  Deactivate  Visit Your  Dealer”  is
displayed on the multi-information display

The  system  may  be  malfunctioning.  Have  the  vehicle  inspected  by  contact
any  authorized Toyota  retailer  or Toyota  authorized  repairer,  or  any  reliable
repairer immediately.

Warning messages and buzzers

Warning messages and buzzers are used to indicate a system malfunction or
to inform the driver of the need for caution. If a warning message is shown on
the multi-information display, read the message and follow the instructions.

If the brake hold operated indicator flashes

P. 683

330

4-2. Driving procedures

WARNING

When the vehicle is on a steep incline

When using the brake hold system on a steep incline exercise caution. The
brake hold function may not hold the vehicle in such a situation.

When stopped on a slippery road

The system cannot stop the vehicle when the gripping ability of the tires has
been exceeded. Do not use the system when stopped on a slippery road.

NOTICE

When parking the vehicle

The brake hold system is not designed for use when parking the vehicle for
a long period of time. Turning the power switch off while the system is hold-
ing  the  brake  may  release  the  brake,  which  would  cause  the  vehicle  to
move. When operating the power switch, depress the brake pedal, shift the
shift lever to P and set the parking brake.

331

4

4-3. Operating the lights and wipers

D

riv

in

g

Headlight switch

Operating the 

 switch turns on the lights as follows:

The  headlights,  daytime
running lights (

P. 334)

and  all  the  lights  listed
below  turn  on  and  off
automatically. 
(When the power switch
is in ON mode)
The  front  position,  tail,
license plate and instru-
ment  panel  lights  turn
on.
The  headlights  and  all
lights  listed  above  turn
on.

The headlights can be operated manually or automatically. 

Operating instructions

332

4-3. Operating the lights and wipers

With  the  headlights  on,  push
the lever away from you to turn
on the high beams. 

Pull  the  lever  toward  you  to  the
center  position  to  turn  the  high
beams off.

Pull  the  lever  toward  you  and
release  it  to  flash  the  high
beams once.

You can flash the high beams with the headlights on or off.

This  system  allows  the  headlights  to  be  turned  on  for  30  seconds
when the power switch is off.

Pull  the  lever  toward  you  and
release it with the light switch is in

  after  turning  the  power

switch off.

The lights are turned off in the fol-
lowing situations.

• The  power  switch  is  turned  to

ON mode.

• The light switch is turned on.
• The light switch is pulled toward you and then released.

Turning on the high beam headlights

Extended headlight lighting system

333

4-3. Operating the lights and wipers

4

D

riv

in

g

The level of the headlights can be adjusted according to the number
of passengers and the loading condition of the vehicle.

Raises  the  level  of  the  head-
lights
Lowers  the  level  of  the  head-
lights

Guide to dial settings

AFS  (Adaptive  Front-lighting  System)  secures  excellent  visibility  at
intersections and on curves by automatically adjusting the direction of
the  light  axis  of  the  headlights  according  to  vehicle  speed  and  the
degree of the tire’s angle as controlled by steering input.

AFS operates at speeds of 10 km/h (6 mph) or higher.

Manual headlight leveling dial (if equipped)

Occupancy and luggage load conditions

Dial position

Occupants

Luggage load

Driver

None

0

Driver and front passenger

None

0

All seats occupied

None

1.5

All seats occupied

Full luggage loading

2

Driver

Full luggage loading

3.5

AFS (Adaptive Front-lighting System) (if equipped)

334

4-3. Operating the lights and wipers

Daytime running light system

To make your vehicle more visible to other drivers during daytime driving, the
daytime running  lights  turn  on  automatically  whenever the  hybrid  system  is
started and the parking brake is released with the headlight switch in 

.

(Illuminate brighter than the front position lights.) Daytime running lights are
not designed for use at night.

Headlight control sensor

Automatic light off system 

When  the  light  switch  is  in 


or 

:  The  headlights  and  front  fog

lights (if equipped) turn off automatically if the power switch is turned off.

When the light switch is in 

: All lights turn off automatically if the power

switch is turned off.

To turn the lights on again, turn the power switch to ON mode, or turn the light
switch to 

 once and then back to 


or 

.

Light reminder buzzer

A buzzer sounds and a message appears when the power switch is turned off
or  turned  to ACCESSORY  mode  and  the  driver’s  door  is  opened  while  the
lights are turned on.

The sensor may not function properly if an
object is placed on the sensor, or anything
that  blocks  the  sensor  is  affixed  to  the
windshield. 
Doing  so  interferes  with  the  sensor
detecting  the  level  of  ambient  light  and
may  cause  the  automatic  headlight  sys-
tem to malfunction.

335

4-3. Operating the lights and wipers

4

D

riv

in

g

Automatic headlight leveling system (vehicles without manual headlight
leveling dial)

The level of the headlights is automatically adjusted according to the number
of  passengers  and  the  loading  condition  of  the  vehicle  to  ensure  that  the
headlights do not interfere with other road users.

12-volt battery-saving function

In the following conditions, the remaining lights will go off automatically after
20  minutes  in  order  to  prevent  the  vehicle  12-volt  battery  from  being  dis-
charged:

The headlights and/or tail lights are on.

The power switch is turned to ACCESSORY mode or turned off.

The light switch is in 

 or 

.

This function will be canceled in any of the following situations:

When the power switch is turned to ON mode.

When the light switch is operated.

When a door is opened or closed.

If “Headlight System Malfunction Visit Your Dealer” is displayed on the
multi-information display

The system may be malfunctioning. Have the vehicle inspected by any autho-
rized Toyota retailer or Toyota authorized repairer, or any reliable repairer.

Customization

Settings (e.g. light sensor sensitivity) can be changed. 
(Customizable features: 

P. 779)

NOTICE

To prevent 12-volt battery discharge

Do not leave the lights on longer than necessary when the hybrid system is
off.

336

4-3. Operating the lights and wipers

Automatic High Beam

: If equipped

The  Automatic  High  Beam  uses  an  in-vehicle  front  camera  to
assess  the  brightness  of  streetlights,  the  lights  of  vehicles
ahead, etc., and automatically turns the high beam on or off as
necessary.

WARNING

Limitations of the Automatic High Beam

Do not rely on the Automatic High Beam. Always drive safely, taking care to
observe your surroundings and turning the high beam on or off manually if
necessary.

To prevent incorrect operation of the Automatic High Beam system

Do not overload the vehicle.

337

4-3. Operating the lights and wipers

4

D

riv

in

g

Push  the  lever  away  from  you
with the headlight switch in the

 or 

 position.

Press the Automatic High Beam switch.

The Automatic High Beam indicator will come on when the headlights are
turned on automatically to indicate that the system is active.

Activating the Automatic High Beam system

1

Left-hand drive vehicles

Right-hand drive vehicles

2

338

4-3. Operating the lights and wipers

Switching to low beam

Pull  the  lever  to  the  original
position.

The Automatic  High  Beam  indi-
cator will turn off.
Push the lever away from you to
activate  the  Automatic  High
Beam system again.

Switching to high beam

Press the Automatic High Beam switch.

The Automatic High Beam indicator will turn off and the high beam indi-
cator will turn on.
Press the switch to activate the Automatic High Beam system again.

Turning the high beam on/off manually

Left-hand drive vehicles

Right-hand drive vehicles


Content      ..     14      15      16      17     ..