Toyota 4Runner (2023 year). Manual in english - page 24
 

  Index      Toyota     Toyota 4Runner (2023 year). Manual in english


Search            copyright infringement  


Content      ..     22      23      24      25     ..


Toyota 4Runner (2023 year). Manual in english - page 24


386

5-4. Other interior features

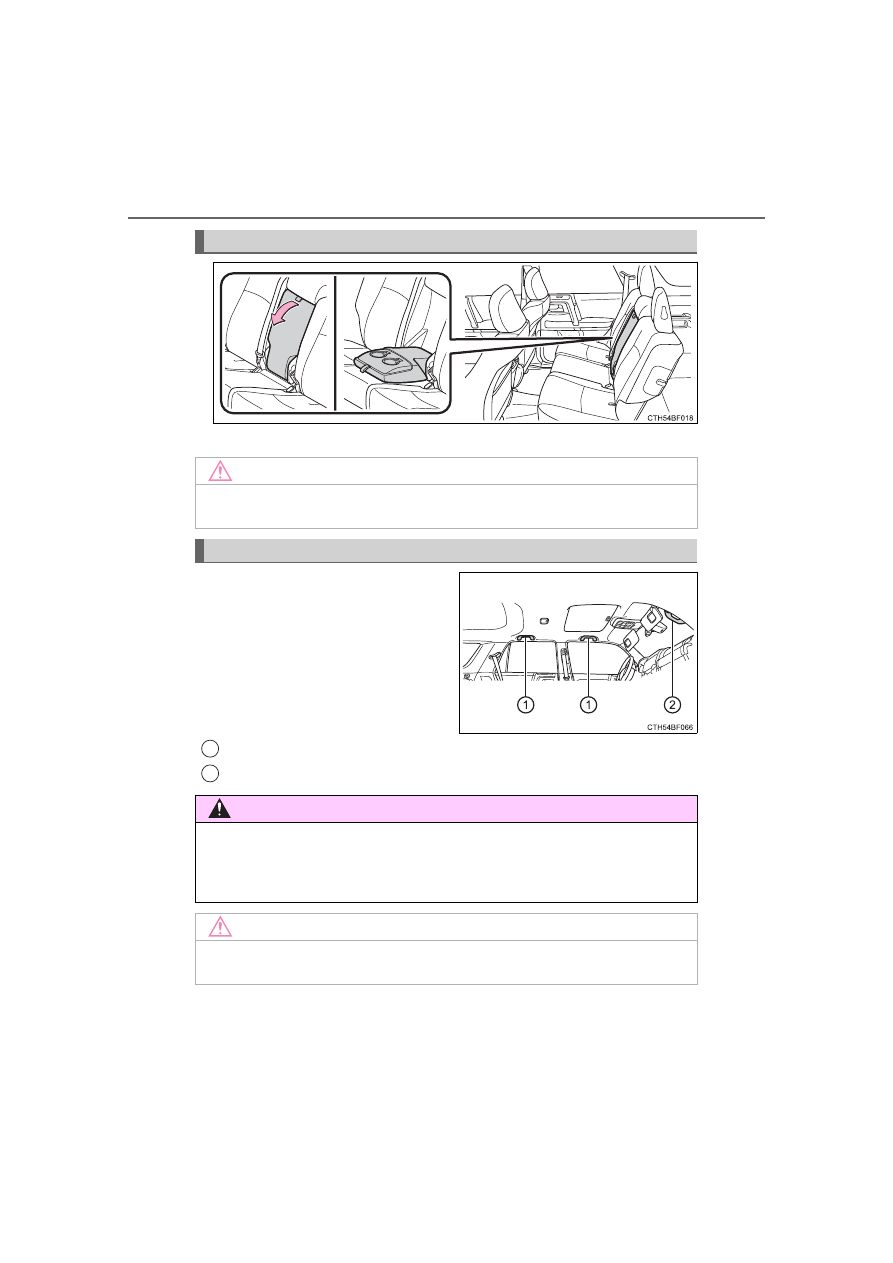
Pull down the armrest for use.

An assist grip (type A) installed on
the ceiling can be used to support
your  body  while  sitting  on  the
seat.
An assist grip (type B) installed on
the  pillar  can  be  used  when  get-
ting  in  or  out  of  the  vehicle  and
others.

Assist grip (type A)
Assist grip (type B)

Armrest

NOTICE

Do not apply too much load on the armrest.

Assist grips

1

2

WARNING

Assist grip (type A)

Do not use the assist grip (type A) when getting in or out of the vehicle or
rising from your seat.

NOTICE

Do not hang any heavy object or put a heavy load on the assist grip.

387

5-4. Other interior features

5

In

te

rior 

fe

at

ures

The garage door opener (HomeLink

®

 Universal Transceiver) is manu-

factured under license from HomeLink

®

.

HomeLink

®

 programming procedure

The HomeLink

®

 compatible transceiver in your vehicle has 3 buttons

which can be programmed to operate 3 different devices. Refer to the
programming method below appropriate for the device.

HomeLink

®

 Indicator light

Garage  door  operation  indica-
tors (

P. 392)

Buttons

Garage door opener

: If equipped

The garage door opener can be programmed to operate garage
doors,  gates,  entry  doors,  door  locks,  home  lighting  systems,
security systems, and other devices.

The programming procedures can also be
found at the following URL. 
Website: www.homelink.com/toyota
For support, contact customer support at
the following. Help Line: 1-800-355-3515

Programming the HomeLink

®

1

2

3

388

5-4. Other interior features

Before programming HomeLink

®

During programming, it is possible that garage doors, gates, or
other devices may operate. For this reason, make sure that peo-
ple and objects are clear of the garage door or other devices to
prevent injury or other potential harm.

It  is  recommended  that  a  new  battery  be  placed  in  the  remote
control transmitter for more accurate programming.

Garage door openers manufactured after 1995 may be equipped
with  rolling  code  protection.  If  this  is  the  case,  you  will  need  a
stepladder  or  other  sturdy,  safe  device  to  reach  the  “learn”  or
“smart” button on the garage door opener motor.

Programming HomeLink

®

Steps 

 through 

 must be performed within 60 seconds, other-

wise the indicator light will stop flashing and programming will not
be able to be completed.

Press  and  release  the  HomeLink

®

  button  you  want  to  program

and check that the HomeLink

®

 indicator light flashes orange.

Point  the  remote  control
transmitter for the device 1 to
3 in. (25 to 75 mm) from the
HomeLink

®

 buttons.

Keep  the  HomeLink

®

  indicator

light in view while programming.

Program a device.

1

3

1

2

3

389

5-4. Other interior features

5

In

te

rior 

fe

at

ures

Programming a device other than an entry gate (for U.S.A. own-
ers)

Press and hold the HomeLink

®

 button you want to program and the

remote control transmitter button simultaneously. When the Home-
Link

®

 indicator light changes from slowly flashing orange to rapidly

flashing green (rolling code) or continuously lit green (fixed code),
release both buttons.

Programming an entry gate (for U.S.A. owners)/Programming a
device in the Canadian market

With one hand, press and hold the HomeLink

®

 button you want to

program. With your other hand, press and release the remote con-
trol  transmitter  button every  2  seconds  and  repeat  this cycle until
the HomeLink

®

 indicator light starts to flash rapidly. Then, release

the buttons.

Test  the  HomeLink

®

  operation  by  pressing  the  newly  pro-

grammed button and observing the indicator light:

If the indicator light is solid/continuous, programming has been
completed  and  your  device  should  activate  when  the  Home-
Link

®

 button is pressed and released.

If the indicator light blinks rapidly for 2 seconds and then turns
into a solid/continuous light, proceed to the heading “Program-
ming a rolling code system”.

Repeat the steps above to program another device for any of
the remaining HomeLink

®

 buttons.

4

5

390

5-4. Other interior features

Programming a rolling code system

2 or more people may be necessary to complete rolling code pro-
gramming.

Locate  the  “learn”  or  “smart”
button  on  the  garage  door
opener motor in the garage.

This button can usually be found
where the hanging antenna wire
is  attached  to  the  unit.  The
name  and  color  of  the  button
may  vary  by  manufacturer.
Please refer to the owner’s man-
ual  supplied  with  the  garage
door opener motor for details.

Press and release the “learn”
or “smart” button. 
Perform 

  within  30  sec-

onds after performing 

.

Press  and  hold  the  pro-
grammed  HomeLink

®

  button

(located  inside  the  vehicle)
for 2 seconds and release it.
Repeat this sequence (press/
hold/release) up to 3 times to
complete programming.
If  the  garage  door  opener
motor  activates  when  the
HomeLink

®


button 

is

pressed,  the  garage  door
opener motor recognizes the
HomeLink

®

 signal.

1

2

3

2

3

391

5-4. Other interior features

5

In

te

rior 

fe

at

ures

Enabling 2-way communication with a garage door (only avail-
able for compatible devices)

When enabled, 2-way communication allows you to check the sta-
tus of the opening and closing of the garage door through indicators
in your vehicle.
2-way  communication  is  only  available  if  the  garage  door  opener
motor used is a compatible device. (To check device compatibility,
refer to the owner’s manual supplied with the garage door opener
motor.)

Press  a  programmed  HomeLink

®

  button  to  operate  a  garage

door. 
Within  1  minute  of  pressing  the  HomeLink

®

  button,  after  the

garage door operation has stopped, press the “learn” or “smart”
button on the garage door opener motor. Within 5 seconds of the
establishment  of  2-way  communication  with  the  garage  door
opener, both garage door operation indicators in the vehicle will
flash rapidly (green).

Reprogramming a single HomeLink

®

 button

When the following procedure is performed, buttons which already
have devices registered to them can be overwritten:

With one hand, press and hold the desired HomeLink

®

 button.

When the HomeLink

®

 indicator starts flashing, continue to hold

the  HomeLink

®

  button  and  perform  “Programming  HomeLink

®

from 

 (it takes 20 seconds for the HomeLink

®

 indicator to start

flashing).

1

2

1

2

1

392

5-4. Other interior features

Press  the  appropriate  HomeLink

®

  button.  The  HomeLink

®

  indicator

light should turn on.

The  status  of  the  opening  and
closing of a garage door is shown
by the indicators.

Opening
Closing

This function is only available if the
garage door opener motor used is
a  compatible  device.  (To  check
device  compatibility,  refer  to  the
owner’s  manual  supplied  with  the
garage door opener motor.)

The indicators can operate within approximately 820 ft. (250 m) of the
garage door. However, if there are obstacles between the garage door
and the vehicle, such as houses and trees, feedback signals from the
garage door may not be received. 
To recall the previous door operation status, press and release either
HomeLink

®

 buttons “1” and “2” or “2” and “3” simultaneously for 2 sec-

onds. The last recorded status will be displayed for 5 seconds.

Operating HomeLink

®

Garage door operation indicators

1

2

Color

Status

Orange (flashing)

Currently opening/closing

Green

Opening/closing has completed

Red (flashing)

Feedback signals cannot be received

393

5-4. Other interior features

5

In

te

rior 

fe

at

ures

Press and hold the 2 outside but-
tons  for  10  seconds  until  the
HomeLink

®


indicator 

light

changes  from  continuously  lit
(orange)  to  rapidly  flashing
(green).

If you sell your vehicle, be sure to
erase  the  programs  stored  in  the
HomeLink

®

 memory.

Programs stored in the HomeLink

®

 memory

The registered codes are not erased even if the 12-volt battery cable is dis-
connected.

If  learning  failed  when  registering  a  different  code  to  a  HomeLink

®

  button

that already has a code registered to it, the already registered code is not
erased.

Before programming

Install a new battery in the transmitter.

The battery side of the transmitter must be pointed away from the Home-
Link

®

.

Erasing the entire HomeLink

®

 memory (all three programs)

WARNING

When programming a garage door or other remote control device

The garage door may operate, so ensure people and objects are out of dan-
ger to prevent potential harm.

Conforming to federal safety standards

Do not use the HomeLink

®

 Compatible Transceiver with any garage door

opener or device that lacks safety stop and reverse features as required by
federal safety standards.
This includes any garage door that cannot detect an obstruction object. A
door or device without these features increases the risk of death or serious
injury.

When operating or programming HomeLink

®

Never allow a child to operate or play with the HomeLink

®

 buttons.

396

6-1. Maintenance and care

Working  from  top  to  bottom,  liberally  apply  water  to  the  vehicle
body, wheel wells and underside of the vehicle to remove any dirt
and dust.

Wash  the  vehicle  body  using  a  sponge  or  soft  cloth,  such  as  a
chamois.

For hard-to-remove marks, use car wash soap and rinse thoroughly
with water.

Wipe away any water.

Wax the vehicle when the waterproof coating deteriorates.

If  water  does  not  bead  on  a  clean  surface,  apply  wax  when  the  vehicle
body is cool.

Automatic car washes

Fold the mirrors before washing the vehicle. Start washing from the front of
the vehicle. Make sure to extend the mirrors before driving.

Brushes  used  in  automatic  car  washes  may  scratch  the  vehicle  surface,
parts (wheel, etc.) and harm your vehicle’s paint.

In  certain  automatic  car  washes,  the  roof  antenna  (if  equipped)  or  rear
spoiler may interfere with machine operation. This may prevent the vehicle
from  being  cleaned  properly  or  result  in  damage  to  the  antenna  or  rear
spoiler.

High pressure car washes

As  water  may  enter  the  cabin,  do  not  bring  the  nozzle  tip  near  the  gaps
around the doors or perimeter of the windows, or spray these areas continu-
ously.

Cleaning and protecting the vehicle 

exterior

Perform  the  following  to  protect  the  vehicle  and  maintain  it  in
prime condition:

397

6-1. Maintenance and care

6

Mainten

ance an

d ca

re

Wheels and wheel ornaments

Remove any dirt immediately by using a neutral detergent.

Wash detergent off with water immediately after use.

To protect the paint from damage, make sure to observe the following pre-
cautions.
• Do not use acidic, alkaline or abrasive detergent
• Do not use hard brushes
• Do not use detergent on the wheels when they are hot, such as after driv-

ing or parking in hot weather

Brake pads and calipers

Rust  may  form  if  the  vehicle  is  parked  with  wet  brake  pads  or  disc  rotors,
causing  them  to  stick.  Before  parking  the  vehicle  after  it  is  washed,  drive
slowly and apply the brakes several times to dry the parts.

Bumpers and side moldings

Do not scrub with abrasive cleaners.

Plated portions

If dirt cannot be remove, clean the parts as follows:

Use  a  soft  cloth  dampened  with  an  approximately  5%  solution  of  neutral
detergent and water to clean the dirt off.

Wipe the surface with a dry, soft cloth to remove any remaining moisture.

To remove oily deposits, use alcohol wet wipes or a similar product.

Notes for a smart key system

If the door handle becomes wet while the electronic key is within the effective
range, the door may lock and unlock repeatedly. In this case, follow the fol-
lowing correction procedures to wash the vehicle:
• Place the electronic key in a location 6 ft. (2 m) or more away from the vehi-

cle. (Take care to ensure that the key is not stolen.)

• Set the electronic key to battery-saving mode to disable the smart key sys-

tem. (

P. 116)

WARNING

When washing the vehicle

Do not apply water to the inside of the engine compartment. Doing so may
cause the electrical components etc. to catch fire.

Precautions regarding the exhaust pipe

Exhaust gases cause the exhaust pipe to become quite hot.
When  washing  the  vehicle,  be  careful  not  to  touch  the  pipe  until  it  has
cooled sufficiently, as touching hot exhaust pipe can cause burns.

398

6-1. Maintenance and care

NOTICE

To prevent paint deterioration and corrosion on the body and compo-
nents (aluminum wheels etc.)

Wash the vehicle immediately in the following cases:
• After driving near the sea coast
• After driving on salted roads
• If coal tar or tree sap is present on the paint surface
• If dead insects, insect droppings or bird droppings are present on the

paint surface

• After driving in an area contaminated with soot, oily smoke, mine dust,

iron powder or chemical substances

• If the vehicle becomes heavily soiled with dust or mud
• If liquids such as benzene and gasoline are spilled on the paint surface

If the paint is chipped or scratched, have it repaired immediately.

To prevent the wheels from corroding, remove any dirt and store in a place
with low humidity when storing the wheels.

Cleaning the exterior lights

Wash carefully. Do not use organic substances or scrub with a hard brush. 
This may damage the surfaces of the lights.

Do not apply wax to the surfaces of the lights.
Wax may cause damage to the lenses.

399

6-1. Maintenance and care

6

Mainten

ance an

d ca

re

NOTICE

When using a high pressure car wash

Vehicles with rear view monitor system: When washing the vehicle, do not
apply  intensive bursts  of water to  the camera or camera area. Doing  so
may result in the camera malfunctioning.

Do  not  spray  water  directly  on  the  radar  which  is  equipped  behind  the
emblem. Otherwise it may cause the device to be damaged.

Do not bring the nozzle tip close to boots (rubber or resin manufactured
cover),  connectors  or  the  following  parts. The  parts  may  be  damaged  if
they come into contact with high-pressure water.
• Traction related parts
• Steering parts
• Suspension parts
• Brake parts

Keep the cleaning nozzle at least 11.9 in. (30 cm) away from the vehicle
body.  Otherwise  resin  section,  such  as  moldings  and  bumpers,  may  be
deformed and damaged. Also, do not continuously hold the nozzle in the
same place.

Do not spray the lower part of the windshield continuously. If water enters
the air conditioning system intake located near the lower part of the wind-
shield, the air conditioning system may not operate correctly.

Do  not  wash  the  underside  of  the  vehicle  using  a  high  pressure  car
washer.

400

6-1. Maintenance and care

Remove dirt and dust using a vacuum cleaner. Wipe dirty surfaces
with a cloth dampened with lukewarm water.

If dirt cannot be removed, wipe it off with a soft cloth dampened with
neutral detergent diluted to approximately 1%. 
Wring out any excess water from the cloth and thoroughly wipe off
remaining traces of detergent and water.

Remove dirt and dust using a vacuum cleaner.

Wipe off any excess dirt and dust with a soft cloth dampened with
diluted detergent.

Use a diluted water solution of approximately 5% neutral wool detergent.

Wring out any excess water from the cloth and thoroughly wipe off
all remaining traces of detergent.

Wipe  the  surface  with  a  dry,  soft  cloth  to  remove  any  remaining
moisture. Allow the leather to dry in a shaded and ventilated area.

Remove dirt and dust using a vacuum cleaner.

Wipe it off with a soft cloth dampened with neutral detergent diluted
to approximately 1%.

Wring out any excess water from the cloth and thoroughly wipe off
remaining traces of detergent and water.

Cleaning and protecting the vehicle interior

The following procedures will help protect your vehicle’s interior
and keep it in top condition:

Protecting the vehicle interior

Cleaning the leather areas

Cleaning the synthetic leather areas

401

6-1. Maintenance and care

6

Mainten

ance an

d ca

re

Caring for leather areas

Toyota recommends cleaning the interior of the vehicle at least twice a year to
maintain the quality of the vehicle’s interior.

Shampooing the carpets

There are several commercial foaming-type cleaners available. Use a sponge
or  brush  to  apply  the  foam.  Rub  in  overlapping  circles.  Do  not  use  water.
Wipe dirty surfaces and let them dry. Excellent results are obtained by keep-
ing the carpet as dry as possible.

Seat belts

Clean  with  mild  soap  and  lukewarm  water  using  a  cloth  or  sponge.  Also
check the belts periodically for excessive wear, fraying or cuts.

WARNING

Water in the vehicle

Do not splash or spill liquid in the vehicle.
Doing  so  may  cause  electrical  components  etc.  to  malfunction  or  catch
fire.

Do not get any of the SRS components or wiring in the vehicle interior wet. 
(

P. 38)

An electrical malfunction may cause the airbags to deploy or not function
properly, resulting in death or serious injury.

Cleaning the interior (especially instrument panel)

Do not use polish wax or polish cleaner. The instrument panel may reflect
off the windshield, obstructing the driver’s view and leading to an accident,
resulting in death or serious injury.

402

6-1. Maintenance and care

NOTICE

Cleaning detergents

Do not use the following types of detergent, as they may discolor the vehi-
cle interior or cause streaks or damage to painted surfaces:
• Non-seat  portions:  Organic  substances  such  as  benzene  or  gasoline,

alkaline or acidic solutions, dye, and bleach

• Seats: Alkaline or acidic solutions, such as thinner, benzene, and alco-

hol

Do not use polish wax or polish cleaner. The instrument panel’s or other
interior part’s painted surface may be damaged.

Preventing damage to leather surfaces

Observe the following precautions to avoid damage to and deterioration of
leather surfaces:

Remove any dust or dirt from leather surfaces immediately.

Do not expose the vehicle to direct sunlight for extended periods of time.
Park the vehicle in the shade, especially during summer.

Do not place items made of vinyl, plastic, or containing wax on the uphol-
stery, as they may stick to the leather surface if the vehicle interior heats
up significantly.

Water on the floor

Do not wash the vehicle floor with water.
Vehicle systems such as the audio system may be damaged if water comes
into contact with electrical components such as the audio system above or
under the floor of the vehicle. Water may also cause the body to rust.

When cleaning the inside of the windshield

Do not allow glass cleaner to contact the lens. Also, do not touch the lens.
(

P. 233)

Cleaning the inside of the rear quarter windows and back window

Do not use glass cleaner to clean the rear quarter windows and back win-
dow, as this may cause damage to the rear window defogger heater wires
or antenna. Use a cloth dampened with lukewarm water to gently wipe the
window clean. Wipe the window in strokes running parallel to the heater
wires or antenna.

Be careful not to scratch or damage the heater wires or antenna.


Content      ..     22      23      24      25     ..