Toyota GR Supra (2022 year). Manual in english - page 6
 

  Index      Toyota     Toyota GR Supra (2022 year). Manual in english


Search            copyright infringement  


Content      ..     4      5      6      7     ..


Toyota GR Supra (2022 year). Manual in english - page 6


84

3-1. CONTROLS

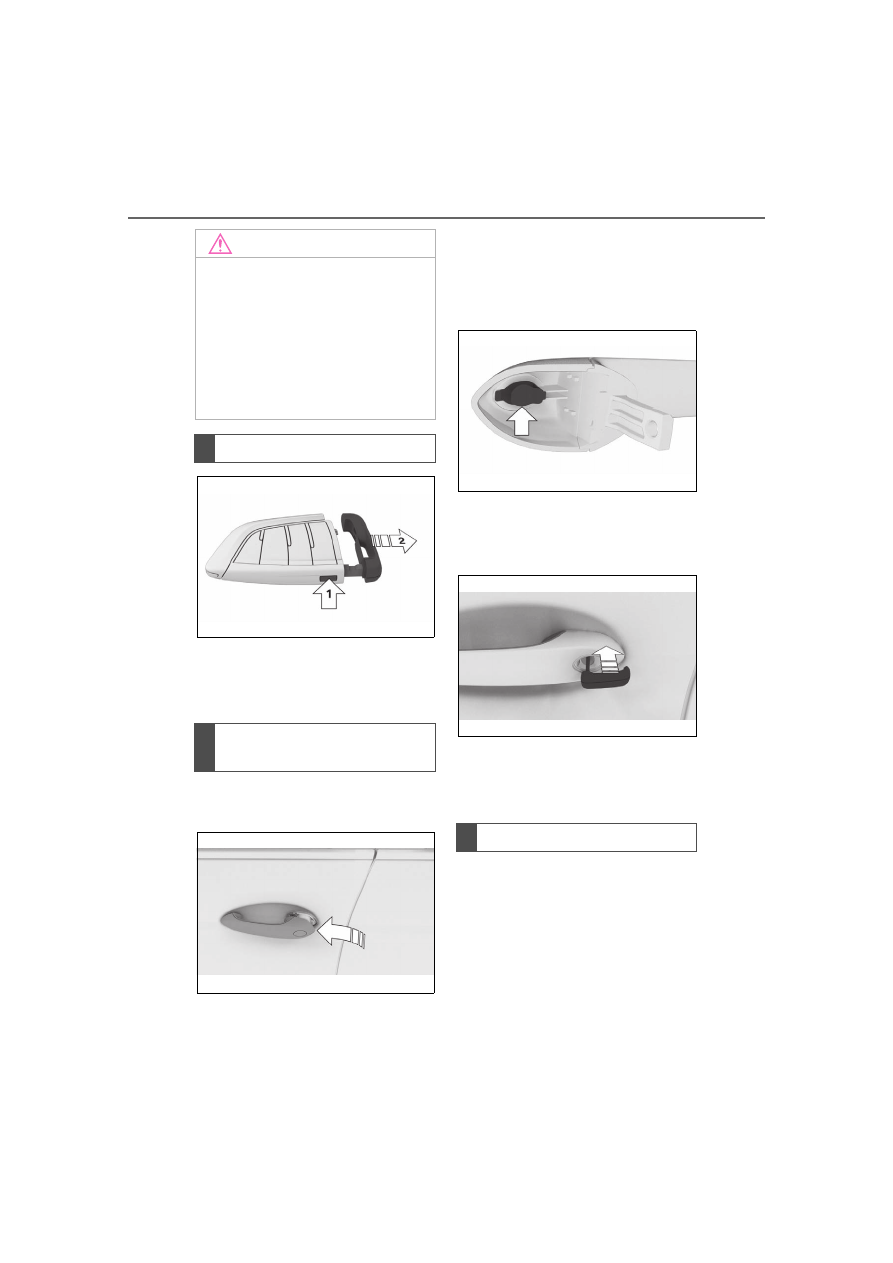
Press the button, arrow 

1

, and 

pull out the integrated key, arrow 

2

.

1

Pull and hold the door handle 

outward with one hand.

2

Guide one finger of your 

other hand from the back 

under the cover and push the 

cover out.

Use the thumb for counter support 

to prevent the cover from falling out 

of the door handle.

3

Remove the cover.

4

Unlock or lock the door lock 

using the integrated key.

The other doors must be 

unlocked or locked from the 

inside.

The activated alarm system is 

triggered when the door is 

opened, if the vehicle has been 

unlocked via the door lock.
The alarm system is not 

switched on if the vehicle is 

locked with the integrated key.

NOTICE

The door lock is permanently 

joined with the door. The door 

handle can be moved. When pull-

ing the door handle with the inte-

grated key inserted, paint or the 

integrated key can be damaged. 

There is a risk of damage to prop-

erty. Remove the integrated key 

before pulling the outside door 

handle.

Removing

Locking/unlocking via the 

door lock

Alarm system

85

3-1. CONTROLS

3

CON

T

ROLS

In the event of a severe acci-
dent, the vehicle is automatically 
unlocked. The hazard warning 
system and interior lights come 
on.

Buttons for the central locking 
system.

• The fuel filler flap remains 

unlocked.

• The vehicle is not secured 

against theft when locking.

• Pull the door handle on the 

door to open the door. The 
other doors remain locked.

 Press the button to 

unlock all the doors. Pull the 
door opener.

The vehicle can be accessed 
without operating the vehicle 
key.

Carrying the vehicle key with 
you, e.g., in your pants pocket, 
is sufficient.

The vehicle automatically 
detects the remote control when 
it is in close proximity or in the 
car's interior.

Comfort entry supports the fol-
lowing functions:
• Unlocking and locking the 

vehicle from the door handle.

• To lock the vehicle, the 

remote control must be 
located outside of the vehicle 
near the doors.

• The next unlocking and lock-

ing cycle is not possible until 

Buttons for the central 
locking system

General information

Overview

Locking

Press the button with the 
front doors closed.

Unlocking

Press the button.

Opening

Smart Key System

Concept

General information

Functional requirements

86

3-1. CONTROLS

after approx. 2 seconds.

The driver should always 

carry the remote control on 

their person and take it with 

them when they leave the 

vehicle.

Depending on the location of 

the vehicle or the surround-

ing radio wave conditions, the 

remote control may not oper-

ate normally. Make sure not to 

carry the remote control with 

an electronic device, such as 

a mobile phone or computer.

Make sure to always take the 

remote control with you when 

you leave the vehicle, in case 

the battery of the remote con-

trol is depleted or the remote 

control is malfunctioning.

Important points

Safety notes

WARNING

The vehicle transmits radio waves 

whenever the Smart Key System 

is used to lock or unlock the 

doors, open the trunk lid, or when 

the engine switch is operated. 

Therefore, this system may affect 

the operation of implantable car-

diac pacemakers and implantable 

cardioverter defibrillators.
Persons with implantable cardiac 

pacemakers or implantable car-

dioverter defibrillators should stay 

22 cm or more away from the 

vehicle when opening or closing a 

door. Also, they should refrain 

from leaning on the vehicle or 

looking through the windows from 

outside when a door is opened or 

closed.
Users of any electrical medical 

device other than implantable car-

diac pacemakers, cardiac resyn-

chronization therapy-pacemakers 

or implantable cardioverter 

defibrillators should consult their 

doctor or the manufacturer of the 

device for information about its 

operation under the influence of 

radio waves.

87

3-1. CONTROLS

3

CON

T

ROLS

Near the front of the center console

Near the rear of the center console

In the luggage compartment and near the rear bumper

Near each door and door handle

The behavior of the vehicle 
during unlocking via the Smart 
Key System depends on the fol-
lowing settings, refer to page 90:
• If the unlocking of vehicle is 

confirmed with a light signal 
or a sound signal.

• If the welcome light, refer to 

page 155, is switched on 
when the vehicle is being 

unlocked.

• If the exterior mirrors are 

automatically folded out and 
in when the vehicle is 
unlocked and locked.

Effective range (areas within which Smart Key System radio 
waves are transmitted)

A

B

C

D

Unlocking

General information

88

3-1. CONTROLS

Grasp the handle of a vehicle 
door completely.

In addition, the following func-
tions are executed:
• If a driver profile was 

assigned to the vehicle key, 
this driver profile will be acti-
vated and the settings that 
are stored in it will be applied.

• The interior lights are 

switched on, unless they were 
manually switched off.

• Folded in exterior mirrors are 

folded out.

If the exterior mirrors were folded in 
via the button in the car’s interior, 
they will not be folded out when 
unlocking.

• With alarm system: The alarm 

system will be switched off.

The behavior of the vehicle 
during locking via the Smart Key 
System depends on the follow-
ing settings, refer to page 90:

• If the locking of the vehicle is 

confirmed with a light signal 
or a sound signal.

• If the exterior mirrors are 

automatically folded in when 
the vehicle is locked. The 
exterior mirrors are not folded 
in when the hazard warning 
flashers are switched on.

• If the headlight courtesy delay 

feature is activated during 
locking.

Close the driver's door.

Touch the grooved surface on 
the handle of a closed vehicle 
door with your finger for approx. 
1 second without grasping the 
door handle.

The following functions are exe-
cuted:
• All doors, the trunk lid, and 

the fuel filler flap are locked.

• With alarm system: The alarm 

system will be switched on.

Unlocking the vehicle

Locking

General information

Locking the vehicle

89

3-1. CONTROLS

3

CON

TROLS

To avoid locking the vehicle key 

in the vehicle, do not place the 

vehicle key in the cargo area.
Depending on the vehicle equip-

ment and country version, it is 

also possible to have the doors 

unlocked. To perform settings, 

refer to page 90.

When unlocking with the vehicle 

key, refer to page 80, the doors 

may also be unlocked.

Trunk lid

General information

Safety information

WARNING

Body parts can be jammed when 

operating the trunk lid. There is a 

risk of injury. Make sure that the 

area of movement of the trunk lid 

is clear during opening and clos-

ing.

NOTICE

During opening, the trunk lid piv-

ots back and up. There is a risk of 

damage to property. Make sure 

that the area of movement of the 

trunk lid is clear during opening 

and closing.

NOTICE

When closing the trunk lid, make 

sure that the straps of the luggage 

cover are not caught.
If a strap is caught on the luggage 

cover, when the trunk lid is 

closed, the strap hanger on the 

trunk lid may be damaged.

Opening and closing

Opening from the outside

Press and hold the button 

on the remote control for 

approx. 1 second.

Opening from the inside

Press the button in the 

storage compartment of 

the driver's door.

90

3-1. CONTROLS

Grasp the recess grips and pull 
the trunk lid down.

Pull the handle inside the cargo 
area.

The trunk lid unlocks.

Depending on the package and 
country version, various settings 
are available for the remote con-
trol functions.

Via Toyota Supra Command:

1

"My Vehicle"

2

"Vehicle settings"

3

"Doors/Key"

4

 "Driver's door" or 

 "All 

doors"

5

Select the desired setting:

• "Driver's door only"

Only the driver's door and the fuel 
filler flap are unlocked. Pressing 
again unlocks the entire vehicle.

• "All doors"

The entire vehicle is unlocked.

Depending on the vehicle equip-
ment and country version, this 
setting may not be offered.

Via Toyota Supra Command:

1

"My Vehicle"

2

"Vehicle settings"

3

"Doors/Key"

4

 "Tailgate" or 

 "Tail-

gate and door(s)"

5

Select the desired setting:

• "Tailgate"

The trunk lid is opened.

• "Tailgate and door(s)"

The trunk lid is opened and the 
doors are unlocked.

Closing

Trunk emergency unlocking

Settings

General information

Unlocking

Doors

Trunk lid

91

3-1. CONTROLS

3

CON

T

ROLS

Via Toyota Supra Command:

1

"My Vehicle"

2

"Driver profiles"

3

Select driver profile.

 The setting can be made for the 

driver profile marked with this sym-
bol.

4

"Last seat position automatic"

When the vehicle is unlocked, 
the driver's seat and exterior 
mirrors resume their last set 
positions.

The most recent position is inde-
pendent of the positions saved 
via the seat memory.

Via Toyota Supra Command:

1

"My Vehicle"

2

"Vehicle settings"

3

"Doors/Key"

4

Deactivate or activate the 
desired confirmation signals:

• "Flash for lock/unlock"

Unlocking is signaled by two 
flashes, locking by one.

Via Toyota Supra Command:

1

"My Vehicle"

2

"Vehicle settings"

3

"Doors/Key"

4

"Lock automatically"

The vehicle locks automatically 
after a short period of time if no 
door is opened after unlocking.

Via Toyota Supra Command:

1

"My Vehicle"

2

"Vehicle settings"

3

"Doors/Key"

4

Select the desired setting:

• "Unlock doors when in Park"
• "Unlock at end of trip"

After drive-ready state is switched 
off by pressing the Start/Stop but-
ton, the locked vehicle is automati-
cally unlocked.

Via Toyota Supra Command:

1

"My Vehicle"

2

"Vehicle settings"

3

"Doors/Key"

4

"Fold mirrors in when locked"

The exterior mirrors are automati-
cally folded in during locking.

Via Toyota Supra Command:

1

"My Vehicle"

2

"Vehicle settings"

Adjusting the last seat and 
mirror position

Confirmation signals from 
the vehicle

Automatic locking

Automatic unlocking

Folding mirrors automati-
cally

Establishing idle state 
after opening the front 
doors

92

3-1. CONTROLS

3

"Doors/Key"

4

"Turn off after door opening"

Opening the front doors establishes 
the idle state, refer to page 43.

When the vehicle is locked, the 
vehicle alarm system reacts to 
the following changes:
• Opening a door, the hood or 

the trunk lid.

• Movements in the car's inte-

rior.

• Changes in the vehicle tilt, e. 

g., during attempts at stealing 
a wheel or when towing the 
vehicle.

• Disconnected battery voltage.
• Improper use of the socket for 

OBD Onboard Diagnosis.

• Locking the vehicle while a 

device is connected to the 
socket for the OBD Onboard- 
Diagnosis. For socket for the 
OBD Onboard Diagnosis, 
refer to page 302.

The alarm system signals the 
following changes visually and 
acoustically:
• Acoustic alarm: Depending on 

local regulations, the acoustic 
alarm may be suppressed.

• Visual alarm: By flashing of 

the hazard warning system 
and headlights, where 
required.

Do not modify the system to 
ensure function of the alarm 
system.

When you unlock and lock the 
vehicle, either with the remote 
control or with Comfort entry, the 
alarm system is switched off and 
on at the same time.

The alarm system is triggered 
when a door is opened if the 
door was unlocked using the 
integrated key in the door lock.

Switching off the alarm, refer to 
page 94.

The trunk lid can be opened 
even when the alarm system is 
switched on.

After the trunk lid is closed, it is 
locked and monitored again pro-
vided the doors are locked. The 
hazard warning system flashes 
once.

You can trigger the alarm sys-
tem if you find yourself in a dan-

Alarm system

General information

Switching on/off

Opening the doors with 
the alarm system switched 
on

Opening the trunk lid with 
the alarm system switched 
on

Panic mode

93

3-1. CONTROLS

3

CON

T

ROLS

gerous situation.

To switch off the alarm: press 
any button.

• The indicator light flashes 

briefly every 2 seconds: The 
alarm system is switched on.

• Indicator light flashes for 

approx. 10 seconds, then it 
flashes briefly every 2 sec-
onds: Interior motion sensor 
and tilt alarm sensor are not 
active, as doors, hood, or 
trunk lid are not correctly 
closed. Correctly closed 
access points are secured.

When the still open access points 
are closed, interior motion sensor 
and tilt alarm sensor will be 
switched on.

• The indicator light goes out 

after unlocking: The vehicle 

has not been tampered with.

• The indicator light flashes 

after unlocking until 
drive-ready state is switched 
on, but no longer than approx. 
5 minutes: An alarm has been 
triggered.

The tilt of the vehicle is moni-
tored.

The alarm system responds in 
situations such as attempts to 
steal a wheel or when the vehi-
cle is towed.

The car's interior is monitored to 
the height of the seats. The 
alarm system is switched on 
together with the interior motion 
sensor even when the window is 
open. Falling objects such as 
leaves can trigger the alarm 
unintentionally.

The tilt alarm sensor and interior 
motion sensor can trigger an 
alarm, although no unauthorized 
action occurred.

Possible situations for an 
unwanted alarm:
• In automatic vehicle washes.

• Press the button on the 

remote control and hold 
for at least 3 seconds.

• Briefly press the button 

on the remote control 
three times in succes-
sion.

Indicator light on the inte-
rior mirror

Tilt alarm sensor

Interior motion sensor

Avoiding unintentional 
alarms

General information

94

3-1. CONTROLS

• In duplex garages.

• During transport on trains car-

rying vehicles, at sea or on a 

trailer.

• With animals in the vehicle.

• When the vehicle is locked 

after start of fueling.

The tilt alarm sensor and the 

interior motion sensor can be 

switched off in such situations.

The indicator light lights up for 

approx. 2 seconds and then 

continues to flash.
The tilt alarm sensor and interior 

motion sensor are switched off 

until the vehicle is locked again.

• Unlock the vehicle with the 

remote control.

• Unlock the vehicle with the 

integrated key and activate 

the drive-ready state via 

emergency detection of the 

vehicle key, refer to page 82.

• With Smart Key System: 

when carrying the vehicle key, 

grasp the driver’s door or front 

passenger door handle com-

pletely.

The windows can be opened 

with the vehicle key from the 

outside as well as closed with 

Smart Key System.
Additional information: Vehicle 

key, refer to page 77.

The windows can be operated 

under the following conditions.

• Standby state is established.

• Drive-ready state is activated.

Switching off the tilt alarm 

sensor and interior motion 

sensor

Press the button on the 

remote control within 10 

seconds as soon as the 

vehicle is locked.

Switching off the alarm

Power windows

General information

Safety information

WARNING

When operating the windows, 

body parts and objects can be 

jammed. There is a risk of injury 

or risk of damage to property. 

Make sure that the area of move-

ment of the windows is clear 

during opening and closing.

Overview

Power windows

Functional requirements

95

3-1. CONTROLS

3

CON

TROLS

The remote control must be in 

the car’s interior.

 Press the switch to the 

resistance point.

The window opens while the switch 

is being held.

 Press the switch 

beyond the resistance point.

The window opens automatically. 

Pressing the switch again stops the 

motion.

 Pull the switch to the 

resistance point.

The window closes while the switch 

is being held.

 Pull the switch beyond 

the resistance point.

The window closes automatically if 

the door is closed. Pulling again 

stops the motion.

The jam protection prevents 

objects or body parts becoming 

jammed between the door frame 

and window while a window is 

being closed.

If resistance or a blockage is 

detected while a window is 

being closed, the closing action 

is interrupted.

In case of danger from the out-

side or if ice might prevent nor-

mal closing, proceed as follows:

1

 Pull the switch past the 

resistance point and hold it 

there.

The window closes with limited jam 

protection. If the closing force 

exceeds a specific threshold, clos-

ing is interrupted.

2

 Pull the switch past the 

resistance point again within 

approx. 4 seconds and hold it 

there.

The window closes without jam pro-

tection.

Opening

Closing

Jam protection system

Concept

General information

Safety information

WARNING

Accessories on the windows such 

as antennas can impact jam pro-

tection. There is a risk of injury. 

Do not install accessories in the 

area of movement of the win-

dows.

Closing without the jam pro-

tection system

96

3-1. CONTROLS

This chapter describes all stan-

dard, country-specific and 

optional features offered with 

the series. It also describes fea-

tures and functions that are not 

necessarily available in your 

vehicle, e.g., due to the selected 

options or country versions. This 

also applies to safety-related 

functions and systems. When 

using these functions and sys-

tems, the applicable laws and 

regulations must be observed.

An ideal seating position that 

meets the needs of the occu-

pants can make a vital contribu-

tion to relaxed, fatigue-free 

driving.
In the event of an accident, the 

correct seating position plays an 

important role. Follow the infor-

mation in the following chapters:

• Seats, refer to page 96.

• Safety belts, refer to page 

100.

• Head restraints, refer to page 

104.

• Airbags, refer to page 160.

Seats, mirrors, and 

steering wheel

Vehicle features and 

options

Sitting safely

Seats

Safety information

WARNING

Seat adjustments while driving 

can lead to unexpected move-

ments of the seat. Vehicle control 

could be lost. There is a risk of an 

accident. Only adjust the seat on 

the driver's side when the vehicle 

is stationary.

WARNING

With a backrest inclined too far to 

the rear, the efficacy of the safety 

belt can no longer be ensured. 

There is a risk of sliding under the 

safety belt in an accident. There is 

a risk of injuries or danger to life. 

Adjust the seat prior to starting the 

trip. Adjust the backrest so that it 

is in the most upright position as 

possible and do not adjust again 

while driving.

WARNING

There is a risk of jamming when 

moving the seats. There is a risk 

of injury or risk of damage to prop-

erty. Make sure that the area of 

movement of the seat is clear 

prior to any adjustment.

97

3-1. CONTROLS

3

CON

T

ROLS

1

Backrest angle

2

Height

3

Backrest width*

4

Lumbar support*

5

Forward/back

6

Seat angle*

*

: if equipped

Pull the lever and apply your 
weight to or lift your weight off 
the backrest as required.

Pull the lever up or press the 
lever down repeatedly until the 
seat reaches the desired height.

Pull the lever and slide the seat 
in the desired direction.

After releasing the lever, move 
the seat gently forward or back 
to make sure it engages prop-
erly.

Manually adjustable seats

Overview

Backrest angle

6

5

4 3

2

1

Height

Forward/back

98

3-1. CONTROLS

Pull the lever up or press the 
lever down repeatedly until the 
seat reaches the desired angle.

*

: if equipped

The seat adjustment for the 
driver’s seat is stored for the 
driver profile currently used. 
When the vehicle is unlocked 
via the vehicle key, the position 
is automatically retrieved if the 
function, refer to page 65, is 
activated for this purpose.

The current seat position can be 
stored using the memory func-
tion, refer to page 107.

1

Forward/backward, height, 
seat tilt

2

Driver's seat memory

3

Backrest tilt

4

Backrest width

5

Lumbar support

Push switch forward or back-
ward.

Seat angle

Electrically adjustable 
seats*

General information

Overview

Forward/backward

99

3-1. CONTROLS

3

CON

T

ROLS

Push switch up or down.

Move switch up or down.

Move switch forward or back-
ward.

The curvature of the seat back-
rest can be adjusted in a way 
that it supports the lumbar 
region of the spine. The lower 
back and the spine are sup-
ported for upright posture.

Adjusting the backrest width 
may improve lateral support 
when taking corners.

You can change the backrest 
width by adjusting the side 
wings of the backrest.

Height

Seat tilt

Backrest tilt

Lumbar support

Concept

Adjusting

• Press the front/rear sec-

tion of the button: The 
curvature is increased/ 
decreased.

• Press the upper/lower 

section of the button: 
The curvature is shifted 
up/ down.

Backrest width

Concept

General information


Content      ..     4      5      6      7     ..