Toyota GR Supra (2022 year). Manual in english - page 3
 

  Index      Toyota     Toyota GR Supra (2022 year). Manual in english


Search            copyright infringement  


Content      ..     1      2      3      4      ..


Toyota GR Supra (2022 year). Manual in english - page 3


36

3-1. CONTROLS

3-1.CONTROLS

This chapter describes all stan-
dard, country-specific and 
optional features offered with 
the series. It also describes fea-
tures and functions that are not 
necessarily available in your 
vehicle, e.g., due to the selected 

options or country versions. This 
also applies to safety-related 
functions and systems. When 
using these functions and sys-
tems, the applicable laws and 
regulations must be observed.

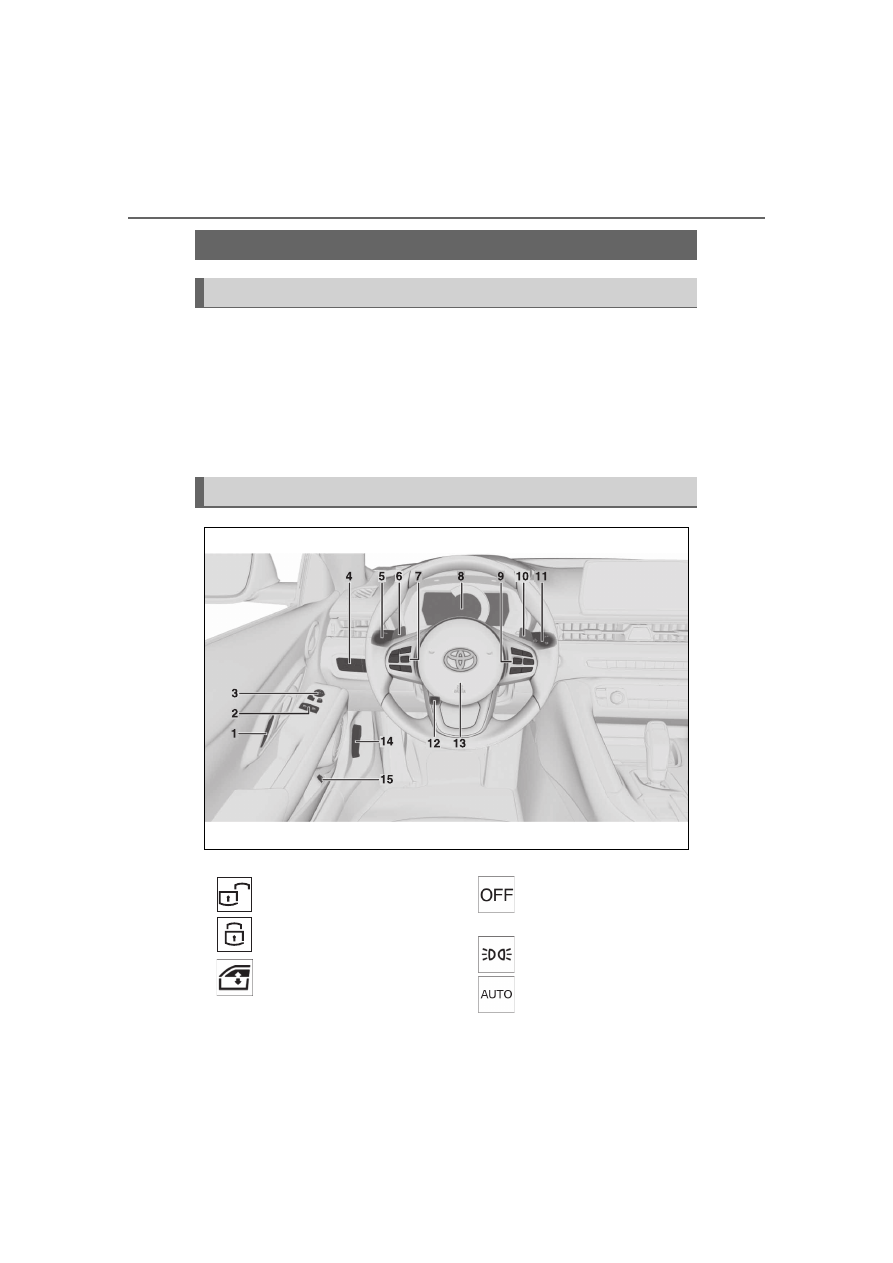
1

Central locking system

 Unlock P.85

 Lock P.85

2

 Power windows P.94

3

Exterior mirror operation 
P.105

4

Lights

 Lights off P.152

Daytime running lights P.155

 Parking lights P.154

 Automatic headlight 

control P.153

Cockpit

Vehicle features and options

In the vicinity of the steering wheel

37

3-1. CONTROLS

3

CON

T

ROLS

Automatic high-beam P.156

 Low beams P.154

 Instrument lighting 

P.158

 Right roadside parking 

light P.154

 Left roadside parking 

light P.154

5

Steering column stalk, left

 Turn signal P.121

 High beams, headlight 

flasher P.122

 Automatic high-beam 

P.156

 Onboard Computer 

P.133

6

Shift paddle P.129

7

Steering wheel buttons, left

 Cruise control on/off 

P.199

 Dynamic radar cruise 

control on/off P.203

 Cruise control: store 

speed
Speed Limit Assist: take over 
suggested speed P.211

 Continuing cruise con-

trol/Pausing cruise control 

P.199

 Dynamic radar cruise 

control: increase distance 
P.199

 Dynamic radar cruise 

control: reduce distance 
P.199
Cruise control rocker switch 
P.199

8

Instrument cluster P.133

9

Steering wheel buttons, right

 Selection lists P.145

 Volume, see Owner's 

Manual for Navigation, Enter-
tainment and Communication

 Voice activation system 

P.57

 Telephone, see 

Owner's Manual for Naviga-
tion, Entertainment and Com-
munication
Thumbwheel for selection 
lists P.145

10

Shift paddle P.129

11

Steering column stalk, right

 Wiper P.122

 Rain sensor P.123

 Clean the windshield 

P.124

12

Adjust the steering wheel 

P.107

38

3-1. CONTROLS

13

 Horn, entire surface

14

 Unlock hood P.292

15

 Unlocking the trunk lid 

P.80

1

Control Display P.48

2

 Hazard warning sys-

tem P.315

3

Ventilation P.231

4

Glove compartment P.244

5

Radio/multimedia, see 
Owner's Manual for Naviga-
tion, Entertainment, and 
Communication

6

Automatic air conditioning 
P.225

7

Controller with buttons P.48

8

 Sport mode button 

P.131
SPORT driving mode

 Toyota Supra Safety  

P.172

 Auto Start/Stop func-

tion P.116

 Parking Sensors P.40

Rearview cameraP.218
RCTA (Rear cross trafficalert) 
functionP.221

 VSC Vehicle Stability 

Control System P.195

In the vicinity of the center console

1

4

2
3

5

6

7

8

9

10

11

39

3-1. CONTROLS

3

CON

T

ROLS

9

 Parking brake P.119

10

Automatic transmission 

selector lever P.126

11

 Switch drive-ready 

state on/off P.115

1

 Indicator light, 

front-seat passenger airbag 
P.171

2

 Reading lights P.158

3

 Interior lights P.158

4

 Emergency call, SOS 

P.316

In the vicinity of the roofliner

40

3-1. CONTROLS

This chapter describes all stan-
dard, country-specific and 
optional features offered with 
the series. It also describes fea-
tures and functions that are not 
necessarily available in your 
vehicle, e.g., due to the selected 
options or country versions. This 
also applies to safety-related 
functions and systems. When 
using these functions and sys-
tems, the applicable laws and 
regulations must be observed.

Depending on the equipment, 
the following cameras and sen-
sors are installed in the vehicle:
• Cameras behind the wind-

shield.

• Rearview camera.
• Front radar sensor.
• Radar sensors, side, rear.
• Ultrasound sensors in the 

bumpers.

Keep the vehicle cameras and 
sensors, as well as surrounding 
areas, clean and unobstructed.

The cameras are located in the 
area of the interior mirror.

The camera is located in the 
handle of the trunk lid.

The cameras may not be fully 
functional and may provide 
incorrect information in the fol-
lowing situations:
• In heavy fog, wet conditions, 

or snow fall.

• On steep hills, in steep 

Sensors of the vehicle

Vehicle equipment

Overview

Cameras

Cameras behind the wind-
shield

Rearview camera

System limits of the cam-
eras

41

3-1. CONTROLS

3

CON

T

ROLS

depressions or in tight curves.

• When the camera field of view 

is covered, for instance by a 
fogged up windshield or 
labels.

• When the camera lens is dirty 

or damaged.

• When driving toward bright 

lights or strong reflections, 
e.g., because of a setting sun.

• When it is dark outside.
• Camera behind the wind-

shield: if the camera has over-
heated and been temporarily 
switched off due to exces-
sively high temperatures.

• Camera behind the wind-

shield: during calibration of 
the camera immediately after 
vehicle delivery.

If applicable, a Check Control 
message is displayed if the sys-
tem fails.

The radar sensor is located in 
the front bumper.

*

: if equipped

The radar sensors are located in 
the bumper.

The radar sensors may not be 
fully functional or may not be 
available in the following situa-
tions:
• If sensors are dirty, such as 

due to icing.

• If sensors are covered, such 

as by labels, films or a num-
ber plate baseplate.

• If the sensor is not aligned 

correctly, for instance due to 
parking damage.

• If the radiation range of the 

sensors is covered, e.g., by 
protruding cargo.

• If the field of view of the sen-

sors is covered, e.g., by 
garage walls, hedges or snow 
hills.

• After improperly performed 

work on the vehicle paint in 
the area of the sensors.

• On steep hilltops or in sharp 

Radar sensors

Front radar sensor

Radar sensors, side, rear*

System limits of the radar 
sensors

42

3-1. CONTROLS

dips in the road.

If applicable, a Check Control 
message is displayed if the sys-
tem fails.

*

: if equipped

The detection of objects with 
ultrasound measurements can 
run into physical limits, e.g., in 
the following situations:
• In case of dirty sensors.
• In case of covered sensors, 

such as due to labels.

• If the sensor is not aligned 

correctly, for instance due to 
parking damage.

• After improperly performed 

work on the vehicle paint in 
the area of the sensors.

• For small children and ani-

mals.

• For persons with certain cloth-

ing, for instance coats.

• In case of external interfer-

ence of the ultrasound, for 
instance from passing vehi-

cles, loud machines or other 
ultrasonic sources.

• Under certain weather condi-

tions, e.g., high relative 
humidity, wet conditions, 
snowfall, cold, extreme heat, 
or strong wind.

• With tow bars and trailer cou-

plings of other vehicles.

• With thin or wedge-shaped 

objects.

• With moving objects.
• With elevated, protruding 

objects such as ledges.

• With objects with corners, 

edges, and smooth surfaces.

• With objects with a fine sur-

face structure such as fences.

• For objects with porous sur-

faces.

• With small and low objects, 

for instance boxes.

• With soft obstacles or obsta-

cles covered in foam material.

• With plants and bushes.
• In automatic car washes.
• On uneven surfaces, such as 

speed bumps.

• Due to heavy exhaust.
• Cargo that extends beyond 

the perimeter of the vehicle is 
not taken into account by the 
ultrasonic sensors.

If applicable, a Check Control 
message is displayed if the sys-
tem fails.

Ultrasound sensors

Ultrasound sensors in the 
front/rear bumpers*

Ultrasound sensors of 
the Parking Sensor, for 
instance in the bum-
pers.

System limits of the ultra-
sound sensors

43

3-1. CONTROLS

3

CON

T

ROLS

This chapter describes all stan-
dard, country-specific and 
optional features offered with 
the series. It also describes fea-
tures and functions that are not 
necessarily available in your 
vehicle, e.g., due to the selected 
options or country versions. This 
also applies to safety-related 
functions and systems. When 
using these functions and sys-
tems, the applicable laws and 
regulations must be observed.

Depending on the situation, the 
vehicle is in one of the three 
states:
• Idle state.
• Standby state.
• Drive-ready state.

If the vehicle is in idle state, it is 
switched off.

The vehicle is in idle state prior 
to opening from the outside and 

after exiting and locking.

For instance, the idle state is 
automatically established under 
the following conditions:
• After several minutes, if no 

operation takes place on the 
vehicle.

• If the charge state of the vehi-

cle battery is low.

• Depending on the setting via 

Toyota Supra Command: 
when one or both front doors 
are opened after driving when 
exiting the vehicle.

In some situations, the idle state 
is not set automatically, for 
instance during a phone call or 
when the low beams are 
switched on.

After a trip, the sleep mode can 
be established by opening the 
front doors. For this purpose, 
the driver and front passenger 
must exit the vehicle.

Via Toyota Supra Command:

1

"My Vehicle"

2

"Vehicle settings"

3

"Doors/Key"

4

"Turn off after door opening"

Operating state of the 

vehicle

Vehicle features and 
options

General information

Idle state

Principle

General information

Automatic idle state

Establishing idle state 
when opening the front 
doors

44

3-1. CONTROLS

To establish idle state in the 

vehicle after end of trip:

When standby state is switched 

on, most functions can be used 

while the vehicle is stationary. 

Desired settings can be 

adjusted.

The vehicle is in the standby 

state after the front doors are 

opened from the outside.

Switching on drive-ready state 

corresponds to starting the 

engine.

Some functions, such as VSC 

Vehicle Stability Control System, 

can only be used with 

drive-ready state switched on.

Manual idle state

Press and hold the 

button until the 

OFF indicator on 

the instrument 

cluster goes out.

Standby state

Concept

General information

Display in the instrument 

cluster

OFF is displayed 

in the instrument 

cluster. The drive-

train is switched off 

and standby state 

switched on.

Drive-ready state

Concept

General information

Safety information

WARNING

If the exhaust pipe is blocked or 

ventilation is insufficient, harmful 

exhaust gases can enter into the 

vehicle. The exhaust gases con-

tain pollutants which are colorless 

and odorless. In enclosed areas, 

exhaust gases can also accumu-

late outside of the vehicle. There 

is danger to life. Keep the exhaust 

pipe free and ensure sufficient 

ventilation.

45

3-1. CONTROLS

3

CON

TROLS

1

Depress the brake pedal.

2

Press the Start/Stop button.

The ignition is activated auto-

matically for a brief time and is 

stopped as soon as the engine 

starts.
Most of the indicator/warning 

lights in the instrument cluster 

light up for a varied length of 

time.

Depending on the engine condi-

tion, the full drive power may not 

be available for approximately 

30 seconds after starting the 

engine. In this case, the vehicle 

will not accelerate as usual.

READY in the instrument cluster 

indicates that drive-ready state 

is switched on.

1

Engage selector lever posi-

tion P with the vehicle 

stopped.

2

Press the Start/Stop button.

The engine is switched off. The 

vehicle switches into standby state.

3

Set the parking brake.

WARNING

An unsecured vehicle can begin 

to move and possibly roll away. 

There is a risk of an accident. 

Before exiting, secure the vehicle 

against rolling.
In order to ensure that the vehicle 

is secured against rolling away, 

follow the following:
• Set the parking brake.
• On uphill grades or on a down-

hill slope, turn the front wheels 

in the direction of the curb.

• On uphill grades or on a down-

hill slope, also secure the vehi-

cle, for instance with a wheel 

chock.

NOTICE

In the case of repeated starting 

attempts or repeated starting in 

quick succession, the fuel is not 

burned or is inadequately burned. 

The catalytic converter can over-

heat. There is a risk of damage to 

property. Avoid repeated starting 

in quick succession.

Switching on drive-ready 

state

Concept

Drive-ready state 

is switched on via 

the Start/Stop but-

ton:

Automatic transmission

Gasoline engine

Display in the instrument 

cluster

Switching off drive-ready 

state

46

3-1. CONTROLS

This chapter describes all stan-

dard, country-specific and 

optional features offered with 

the series. It also describes fea-

tures that are not necessarily 

available in your vehicle, e. g., 

due to the selected options or 

country versions. This also 

applies to safety-related func-

tions and systems. When using 

these functions and systems, 

the applicable laws and regula-

tions must be observed.

The Toyota Supra Command 

combines the functions of many 

switches.

These functions can be oper-

ated as follows:

Via the Controller.

Via the touchscreen.

Via the voice activation sys-

tem.

Letters and numbers can be 

entered using the Controller or 

the touchscreen. The key-

board's display changes auto-

matically.

When entering names and 

addresses, the choice is nar-

rowed down with every letter 

entered and letters may be 

Toyota Supra Com-

mand

Vehicle features and 

options

Operating concept

Principle

General information

Safety information

WARNING

Operating the integrated informa-

tion systems and communication 

devices while driving can distract 

from traffic. It is possible to lose 

control of the vehicle. There is a 

risk of an accident. Only use the 

systems or devices when the traf-

fic situation allows. As warranted, 

stop and use the systems and 

devices while the vehicle is sta-

tionary.

Input and display

Letters and numbers

Symbol

Function

or

Change between capital 

and lower-case letters.

Insert blank space.
Use voice activation.

Confirm entry.

Entry comparison

47

3-1. CONTROLS

3

CON

T

ROLS

added automatically.

Entries are continuously com-
pared with data stored in the 
vehicle.
• Only those letters are offered 

during entry for which data is 
available.

• Destination search: place 

names can be entered in all 
languages that are available 
in Toyota Supra Command.

Several menu items are pre-
ceded by a checkbox. The 
checkbox indicates whether the 
function is activated or deacti-
vated. Selecting the menu item 
activates or deactivates the 
function.

 Function is activated.

 Function is deactivated.

General information

The status field can be found in 
the upper area of the Control 
Display. Status information is 
displayed in the form of sym-
bols.

Status field symbols

Radio

Telephone

Entertainment

Activating/deactivating the 
functions

Status information

Symbol

Meaning

HD Radio station is being 
received.

Satellite radio is switched 
on.

Symbol

Meaning

Incoming or outgoing call.

Missed call.

Signal strength of cellu-
lar network.

Network search.

Cellular network is not 
available.

The critical charge state 
of the mobile phone has 
been reached.

Roaming is active.

SMS text message 
received.

Message received.

Reminder.

Sending not possible.

Contacts are loaded.

Symbol

Meaning

Music hard disc.

48

3-1. CONTROLS

Additional symbols

General information

Additional information can be 
displayed in several menus on 
the right side of the split screen 
display, the so-called split 
screen, for instance information 
from the Onboard Computer.

The additional information 
remains visible even when 
switching to another menu on 
the split screen.

Switching on/off

1

 Press the button.

2

"Split screen"

Selecting the display

The display can be selected in 
menus, where the split screen is 
supported.

1

Move the Controller to the 
right until the split screen is 
selected.

2

Press the Controller.

3

Select the desired setting.

Specifying the number of 
displays

It is possible to specify the num-
ber of displays.

1

Move the Controller to the 
right until the split screen is 
selected.

2

Press the Controller.

3

"Personalize menu"

4

Select the desired setting.

5

Move the Controller to the 
left.

1

Control Display, with touch-
screen depending on the 
equipment version

2

Controller with buttons and, 
depending on the equipment 
version, with touchpad

Bluetooth audio.

USB audio interface.

Symbol

Meaning

Check Control message.

The sound output has 
been switched off.

Request for the current 
vehicle position.

Checking the current 
vehicle position.

Split screen, split screen dis-
play

Symbol

Meaning

Control elements

Overview

1

2

49

3-1. CONTROLS

3

CON

TROLS

To clean the Control Display, fol-

low the care instructions, refer to 

page 327.
In the case of very high tem-

peratures on the Control Dis-

play, for instance due to intense 

solar radiation, the brightness 

may be reduced down to com-

plete deactivation. Once the 

temperature is reduced, for 

instance through shade or air 

conditioning, the normal func-

tions are restored.

The Control Display is switched 

on automatically after unlocking.
In certain situations, the Control 

Display is switched off automati-

cally, for instance if no operation 

is performed on the vehicle for 

several minutes.

The Control Display can also be 

switched off manually.

1

 Press the button.

2

"Turn off control display"

Press the Controller or any but-

ton on the Controller to switch it 

back on again.

The buttons can be used to 

open the menus directly. The 

Controller can be used to select 

menu items and enter the set-

tings.
Some Toyota Supra Command 

functions can be operated using 

the touchpad on the Controller, 

refer to page 55.

• Turn to switch between menu 

items, for example.

• Press to select a menu item, 

Control Display

General information

Safety information

NOTICE

Objects in the area in the front of 

the Control Display can shift and 

damage the Control Display. 

There is a risk of damage to prop-

erty. Do not place objects in the 

area in front of the Control Dis-

play.

Switching on/off automati-

cally

Switching on/off manually

Controller with navigation 

system

General information

Operation

50

3-1. CONTROLS

for example.

• Tilt in four directions to switch 

between displays, for exam-
ple.

The buttons can be used to 
open the menus directly. The 
Controller can be used to select 
menu items and enter the set-
tings.

• Turn to switch between menu 

items, for example.

• Press to select a menu item, 

for example.

Buttons on the Controller

Button

Function

Press once: calls up the 
main menu.
Press twice: displays all 
menu items of the main 
menu.

Opens the Media/Radio 
menu.

Opens the Communica-
tion menu.

Press once: opens the 
previous display.
Press and hold: open the 
menus used last.

Opens the Options menu.

Controller without naviga-
tion system

General information

Operation

Button

Function

51

3-1. CONTROLS

3

CON

T

ROLS

• Tilt in two directions to switch 

between displays, for exam-
ple.

 Press the button.

The main menu is displayed.

All Toyota Supra Command 
functions can be called up via 
the main menu.

1

 Press the button twice.

All menu items of the main menu 
are displayed.

2

Select a menu item.

3

To move the menu item to the 
desired position, tilt the Con-
troller to the right or left.

Highlighted menu items can be 
selected.

Buttons on the Controller

Button

Function

Press once: call up main 
menu.
Press twice: display all 
menu items of the main 
menu.

Open the Media/Radio 
menu.

Open the Communication 
menu.

Press once: open the 
previous display.
Press and hold: open the 
menus used last.

Open the Options menu.

Operating with the Con-
troller

Opening the main menu

Adapting the main menu

Selecting menu items


Content      ..     1      2      3      4      ..