Toyota Mirai (2022 year). Manual in english - page 7
 

  Index      Toyota     Toyota Mirai (2022 year). Manual in english


Search            copyright infringement  


Content      ..     5      6      7      8     ..


Toyota Mirai (2022 year). Manual in english - page 7


113

3-1. Instrument cluster

3

Vehicle

 statu

s information an

d in
dicator

s

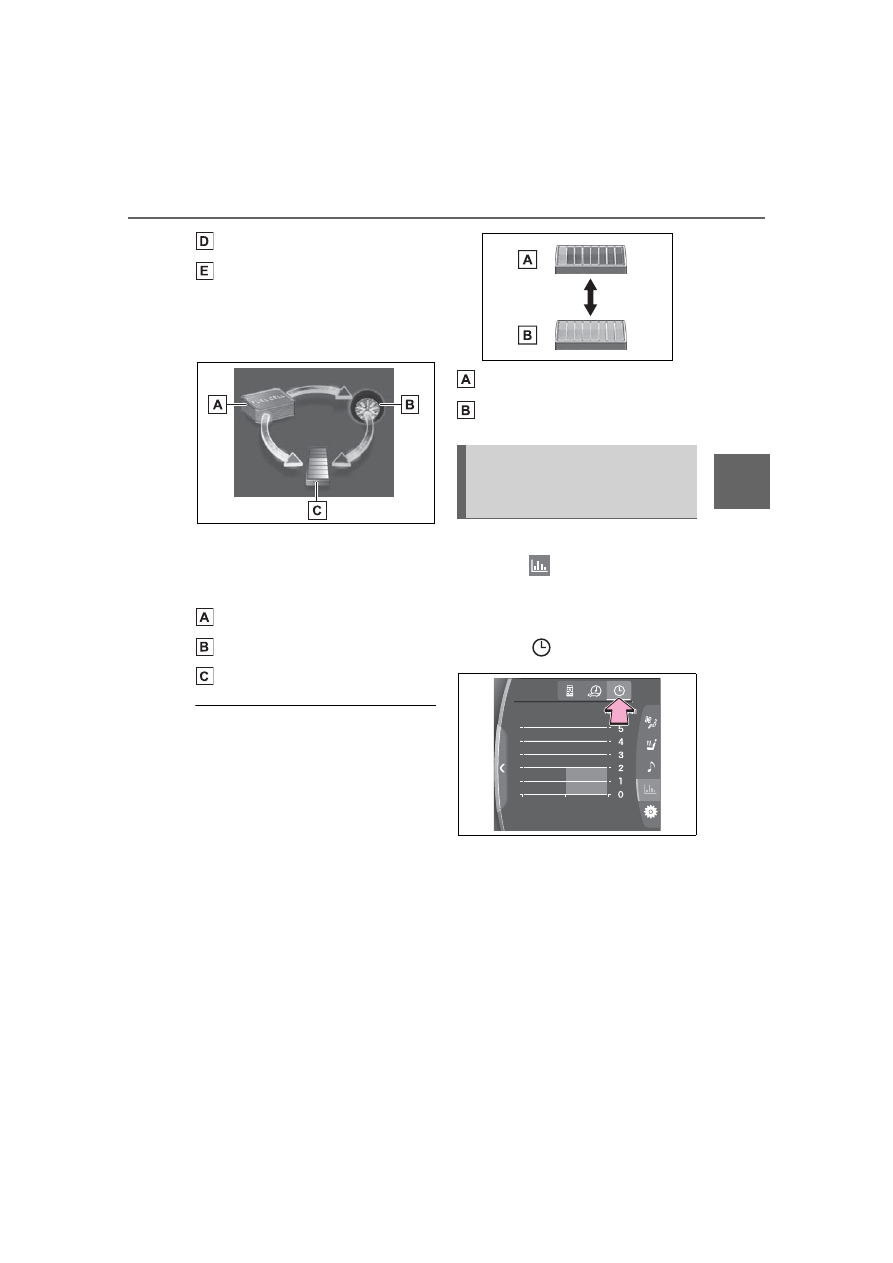
Front tires

Rear tires

Multimedia display (12.3-inch 
display only) (when displayed 
Toyota multi-operation touch)

The figure shows all the arrows for 
the purpose of this explanation, but 
the actual contents of the display 
will differ.

Fuel cell system

Tire

Traction battery

Traction battery status

The display changes in 8 levels 

according to the remaining charge 

amount of the traction battery.
• The figure shows the multi-infor-

mation display as an example for 

explanation.

• These images are examples only, 

and may vary slightly from actual 

conditions.

• The electrical charge and dis-

charge arrow display for the fluc-

tuations of the remaining battery 

charge display and fuel cell sys-

tem indicator may not always 

match. However, this is not a mal-

function.

Low

High

Display procedure

1

Select 

 on the Toyota 

multi-operation touch 
(

P.353).

2

Select 

 on the screen.

Displaying a screen in full screen 
(

P.354)

History screen (multime-
dia display [12.3-inch dis-
play only])

114

3-1. Instrument cluster

Display

Best recorded fuel consump-
tion

Latest fuel consumption

Previous fuel consumption 
record

Resetting the history data

Updating the latest fuel con-
sumption data

The average fuel consumption his-
tory is divided by color into past 
averages and the average fuel con-
sumption since the last updated.
Use the displayed average fuel 
consumption as a reference.
The image is an example only, and 
may vary slightly from actual condi-
tions.

Updating the history data

Update the latest fuel consumption 

by selecting “Update” to measure 

the current fuel consumption again.

Resetting the data

The fuel consumption data can be 

deleted by selecting “Clear”.

Displays the air amount that was 
cleaned by fuel cell system this 
time, with regards to optimal 
power generated by fuel cell 
system due to the accelerator 
and fuel cell system operation 
status.

Display procedure

1

Select 

 on the Toyota 

multi-operation touch. 
(

P.353)

2

Select 

 on the screen.

Displaying a screen in full screen 
(

P.354)

Display

Instant air cleaning amount

Air Purification screen 
(multimedia display [12.3-
inch display only])

115

3-1. Instrument cluster

3

Vehicle

 statu

s information an

d in
dicator

s

Displays the instant air cleaning 
amount per unit of time.

Air cleaning amount estima-
tion display

Displays the total amount of air 
cleaning from starting the fuel cell 
system.

Air cleaning amount between 
resets

Displays the total air cleaning esti-
mated amount after resets.

Runner display

Runners increase depending on the 
estimated amount of air cleaning 
between resets.

Resetting the data

Clear all the history up to now.
The image is an example only, and 
may vary slightly from actual condi-
tions.

Data in Air purification is 

reseted when

“Clear” is selected to reset data in 

air cleaning amount between resets 

and runner display.

Display Runner

When ten runners are collected, 

they are absorbed into a runner 

mark.

Display

The actual amount of air may dif-

fer because the amount of air 

required for power generation 

changes due to usage environ-

ment (climate, altitude, etc.) and 

the status of power generation, as 

well as driving conditions.

The instant air cleaning amount 

may operate slowly and may be 

delayed in operating, but this is 

not a malfunction.

117

4

4

Before 

driving

Before driving

4-1. Key information

Keys ............................

118

4-2. Opening, closing and 

locking the doors and 
trunk

Doors ..........................

121

Trunk ...........................

126

Smart key system .......

130

4-3. Adjusting the seats

Front seats ..................

135

Driving position memory

..................................

136

Head restraints............

139

4-4. Adjusting the steering 

wheel and mirrors

Steering wheel ............

141

Inside rear view mirror

143

Digital Rearview Mirror

144

Outside rear view mirrors

..................................

154

4-5. Opening, closing the win-

dows

Power windows ...........

156

118

4-1. Key information

4-1.Key information

The following keys are provided 
with the vehicle.

Electronic keys

• Operating the smart key system 

(

P.130)

• Operating the wireless remote 

control function (

P.119)

Mechanical keys

Key number plate

When riding in an aircraft

When bringing an electronic key 

onto an aircraft, make sure you do 

not press any buttons on the elec-

tronic key while inside the aircraft 

cabin. If you are carrying an elec-

tronic key in your bag, etc., ensure 

that the buttons are not likely to be 

pressed accidentally. Pressing a 

button may cause the electronic key 

to emit radio waves that could inter-

fere with the operation of the air-

craft.

Electronic key battery depletion

The standard battery life is 1 to 2 

years.

If the battery becomes low, an 

alarm will sound in the cabin and a 

message will be shown on the 

multi-information display when the 

fuel cell system is stopped.

To reduce key battery depletion 

when the electronic key is to not 

be used for long periods of time, 

set the electronic key to the bat-

tery-saving mode. (

P.131)

As the electronic key always 

receives radio waves, the battery 

will become depleted even if the 

electronic key is not used. The fol-

lowing symptoms indicate that the 

electronic key battery may be 

depleted. Replace the battery 

when necessary.

• The smart key system or the wire-

less remote control does not oper-

ate.

• The detection area becomes 

smaller.

• The LED indicator on the key sur-

face does not turn on.

To avoid serious deterioration, do 

not leave the electronic key within 

3 ft. (1 m) of the following electri-

cal appliances that produce a 

magnetic field:

• TVs

• Personal computers

• Cellular phones, cordless phones 

and battery chargers

• Recharging cellular phones or 

cordless phones

• Table lamps

• Induction cookers

Replacing the battery

P.423

Confirmation of the number of 

registered keys

The number of keys already regis-

tered to the vehicle can be con-

firmed. Ask your Toyota dealer for 

details.

If “A New Key has been Regis-

tered Contact Your Dealer for 

Details” is shown on the multi-

information display

This message will be displayed 

each time the driver’s door is 

opened when the doors are 

unlocked from the outside for 

Keys

The keys

119

4-1. Key information

4

Before 

driving

approximately 10 days after a new 

electronic key has been registered.

If this message is displayed but you 

have not had a new electronic key 

registered, ask your Toyota dealer to 

check if an unknown electronic key 

(other than those in your posses-

sion) has been registered.

The electronic keys are 
equipped with the following 
wireless remote control:

Locks the doors (

P.121)

Unlocks the doors (

P.121)

Opens the windows

*


(

P.121)

Opens the trunk (

P.127)

Sounds the alarm

*

: This setting must be customized 

at your Toyota dealer.

Theft deterrent panic mode

When 

 is pressed for longer 

than about one second, an alarm 
will sound intermittently and the 
vehicle lights will flash to deter any 
person from trying to break into or 
damage your vehicle.
To stop the alarm, press any button 

NOTICE

To prevent key damage

Do not drop the keys, subject 

them to strong shocks, or bend 

them.

Do not expose the keys to high 

temperatures for a long period 

of time.

Do not get the keys wet or wash 

them in an ultrasonic washer, 

etc.

Do not attach metallic or mag-

netic materials to the keys or 

place the keys close to such 

materials.

Do not disassemble the keys.

Do not attach a sticker or any-

thing else to the surface of the 

electronic key.

Do not place the keys near 

objects that produce magnetic 

fields, such as TVs, audio sys-

tems and induction cookers, or 

medical electrical equipment, 

such as low-frequency therapy 

equipment.

Carrying the electronic key 

on your person

Carry the electronic key 3.9 in. 

(10 cm) or more away from elec-

tric appliances that are turned on. 

Radio waves emitted from electric 

appliances within 3.9 in. (10 cm) 

of the electronic key may interfere 

with the key, causing the key to 

not function properly.

In case of a smart key system 

malfunction or other key-

related problems

P.468

When an electronic key is lost

P.467

Wireless remote control

120

4-1. Key information

on the electronic key.

To take out the mechanical key, 
slide the release lever   and 
take the key out.

The mechanical key can only be 
inserted in one direction, as the key 
only has grooves on one side. If the 
key cannot be inserted in a lock cyl-
inder, turn it over and re-attempt to 
insert it.
After using the mechanical key, 
store it in the electronic key. Carry 
the mechanical key together with 
the electronic key. If the electronic 
key battery is depleted or the entry 
function does not operate properly, 
you will need the mechanical key. 
(

P.468)

When required to leave the 

vehicle’s key with a parking 

attendant

Turn the trunk opener main switch 

off (

P.129) and lock the glove box 

(

P.349) as circumstances 

demand.

Remove the mechanical key for 

your own use and provide the atten-

dant with the electronic key only.

If you lose your mechanical 

keys

P.467

If a wrong key is used

The key cylinder rotates freely, iso-

lated from the internal mechanism.

Using the mechanical key

121

4-2. Opening, closing and locking the doors and trunk

4

Before 

driving

4-2.Opening, closing and locking the doors and trunk

Smart key system (entry 
function)

Carry the electronic key to 
enable this function.

1

Grip the driver’s door handle 
to unlock the door. Holding 
the driver’s door handle for 
approximately 2 seconds 
unlocks all the doors. Grip 
any passenger door handle 
to unlock all the doors.

*

Make sure to touch the sensor on 
the back of the handle.
The doors cannot be unlocked for 3 
seconds after the doors are locked.

2

Touch the lock sensor (inden-
tation on the surface of the 
door handle) to lock all the 
doors.

Check that the door is securely 
locked.

*

: The door unlock settings can be 

changed.

Wireless remote control

1

Locks all the doors

Check that the door is securely 
locked.

2

Unlocks all the doors

Pressing the button unlocks the 
driver’s door. Pressing the button 
again within 5 seconds unlocks the 
other door.
Press and hold to open the win-
dows.

*

*

: This setting must be customized 

at your Toyota dealer.

Switching the door unlock func-

tion

It is possible to set which doors the 

entry function unlocks using the 

wireless remote control.

1

Turn the power switch off.

2

When the indicator light on the 
key surface is not on, press and 
hold 

 or 

 for 

approximately 5 seconds while 
pressing and holding 

.

The setting changes each time an 

operation is performed, as shown 

below. (When changing the setting 

continuously, release the buttons, 

wait for at least 5 seconds, and 

repeat step 

2

.)

Doors

Unlocking and locking the 
doors from the outside

122

4-2. Opening, closing and locking the doors and trunk

To prevent unintended triggering of 
the alarm, unlock the doors using 
the wireless remote control and 
open and close a door once after 
the settings have been changed. (If 
a door is not opened within 60 sec-
onds after 

 is pressed, the doors 

will be locked again and the alarm 
will automatically be set.)
In a case that the alarm is triggered, 
immediately stop the alarm. (

P.70)

Impact detection door lock 

release system

In the event that the vehicle is sub-

ject to a strong impact, all the doors 

are unlocked. Depending on the 

force of the impact or the type of 

accident, however, the system may 

not operate.

Operation signals

A buzzer sounds and the emer-

gency flashers flash to indicate that 

the doors have been 

locked/unlocked. (Locked: once; 

Unlocked: twice)
A buzzer sounds to indicate that the 

windows are operating.

Security feature

If a door is not opened within 

approximately 60 seconds after the 

vehicle is unlocked, the security fea-

ture automatically locks the vehicle 

again.

When the doors cannot be 

locked by the lock sensor on 

the surface of the door handle

When the doors cannot be locked 

even if the lock sensor on the sur-

face of the door handle is touched 

by a finger, touch the lock sensor 

with the palm.
If you are wearing gloves, remove 

them.

Open door warning buzzer

If an attempt to lock the doors is 

made when a door is not fully 

closed, a buzzer sounds continu-

ously for 5 seconds. Fully close the 

door to stop the buzzer, and lock the 

vehicle once more.

Setting the alarm

Locking the doors will set the alarm 

system. (

P.70)

Conditions affecting the opera-

tion of the smart key system or 

wireless remote control

P.132

If the smart key system or the 

wireless remote control does 

not operate properly

Use the mechanical key to lock and 

unlock the doors. (

P.469)

Multi-informa-

tion display/Beep

Unlocking func-

tion

Exterior: Beeps 3 

times

Interior: Pings 

once

Holding the 
driver’s door 
handle unlocks 
only the driver’s 
door.

Holding any of 
the passenger 
door handles 
unlocks all the 
doors.

Exterior: Beeps 

twice

Interior: Pings 

once

Holding a door 
handle unlocks 
all the doors.

123

4-2. Opening, closing and locking the doors and trunk

4

Before 

driving

Replace the key battery with a new 

one if it is depleted. (

P.423)

If the 12-volt battery is dis-

charged

The doors cannot be locked and 

unlocked using the smart key sys-

tem or wireless remote control. Lock 

or unlock the doors using the 

mechanical key. (

P.469)

Rear seat reminder function

In order to remind you not to for-

get luggage, etc., in the rear seat, 

when the power switch is turned to 

OFF after any of the following con-

ditions are met, a buzzer will 

sound and a message will be dis-

played on the multi-information 

display for approximately 6 sec-

onds.

• The fuel cell system is started 

within 10 minutes after opening 

and closing a rear door.

• A rear door has been opened and 

closed after the fuel cell system 

was started.

However, if a rear door is opened 
and then closed within approxi-
mately 2 seconds, the rear seat 
reminder function may not operate.

The rear seat reminder function 

determines that luggage, etc., has 

been placed in a rear seat based 

on opening and closing of a rear 

door. Therefore, depending on the 

situation, the rear seat reminder 

function may not operate and you 

may still forget luggage, etc., in 

the rear seat, or it may operate 

unnecessarily.

The rear seat reminder function 

can be enabled/disabled. 

(

P.498)

Customization

Some functions can be customized. 

(

P.498)

WARNING

To prevent an accident

Observe the following precautions 

while driving the vehicle.

Failure to do so may result in a 

door opening and an occupant 

falling out of the vehicle, resulting 

in death or serious injury.

Ensure that all doors are prop-

erly closed and locked.

Do not pull the inside handle of 

the doors while driving.

Be especially careful for the front 
doors, as the doors may be 
opened even if the inside lock but-
tons are in locked position.

Set the rear door child-protector 

locks when children are seated 

in the rear seats.

When opening or closing a 

door

Check the surroundings of the 

vehicle such as whether the vehi-

cle is on an incline, whether there 

is enough space for a door to 

open and whether a strong wind 

is blowing. When opening or clos-

ing the door, hold the door handle 

tightly to prepare for any unpre-

dictable movement.

124

4-2. Opening, closing and locking the doors and trunk

Door lock switches (to 
lock/unlock)

1

Locks all the doors

2

Unlocks all the doors

Inside lock buttons (to lock)

Push down the inside lock but-
ton to lock the door.

Inside door handles (to 
unlock)

For the front doors

Pull the handle to unlock and 
open the door.

When the door is unlocked, the 
inside lock button will pop up.

For the rear doors

Pull the handle to unlock the 
door. Pull the handle a second 

time to open the door.

When the door is unlocked, the 
inside lock button will pop up.

Locking the front doors from 

the outside without a key

1

Push down the inside lock but-

ton.

2

Close the door.

The door cannot be locked if the 

power switch is in ACC or ON, or 

the electronic key is left inside the 

vehicle. However, the key may not 

be detected correctly and the door 

may be locked.

Open door warning buzzer

If a door or the trunk is not fully 

closed, a buzzer will sound when 

the vehicle speed reaches 3 mph (5 

km/h).

The open door(s) or trunk is indi-

cated on the multi-information dis-

play.

The door cannot be opened 
from inside the vehicle when the 
lock is set.

Unlocking and locking the 
doors from the inside

Rear door child-protector 
lock

125

4-2. Opening, closing and locking the doors and trunk

4

Before 

driving

1

Unlock

2

Lock

These locks can be set to prevent 
children from opening the rear 
doors. Push down on each rear 
door switch to lock both rear doors.

The following functions can be 
set or canceled:

For instructions on customizing, 
refer to P.498.

Automatic door locking 
and unlocking systems

Function

Operation

Speed linked 
door locking 
function

All doors are auto-
matically locked 
when vehicle 
speed is approxi-
mately 12 mph (20 
km/h) or higher.

Shift position 
linked door 
locking func-
tion

All doors are auto-
matically locked 
when the shift posi-
tion is shifted to a 
position other than 
P.

Shift position 
linked door 
unlocking 
function

All doors are auto-
matically unlocked 
when the shift posi-
tion is shifted to P.

Driver’s door 
linked door 
unlocking 
function

All doors are auto-
matically unlocked 
when driver’s door 
is opened within 
approximately 45 
seconds after turn-
ing the power 
switch off.

Function

Operation

126

4-2. Opening, closing and locking the doors and trunk

Trunk

The trunk can be opened 
using the trunk opener 
switch, entry function or 
wireless remote control.

WARNING

Observe the following precau-

tions.

Failure to do so may result in 

death or serious injury.

Before driving

Make sure that the trunk lid is 

fully closed. If the trunk lid is not 

fully closed, it may open unex-

pectedly while driving and hit 

near-by objects or luggage in 

the trunk may be thrown out, 

causing an accident.

Do not allow children to play in 

the trunk.

If a child is accidentally locked 

in the trunk, they could suffer 

from heat exhaustion, suffoca-

tion or other injuries.

Do not allow a child to open or 

close the trunk lid.

Doing so may cause the trunk 

lid to open unexpectedly, or 

cause the child’s hands, head, 

or neck to be caught by the 

closing trunk lid.

Important points while driving

Never let anyone sit in the trunk. 

In the event of sudden braking or 

a collision, they are susceptible to 

death or serious injury.

Using the trunk

Observe the following precau-

tions.

Failure to do so may cause parts 

of the body to be caught, resulting 

in serious injury.

Remove any heavy loads, such 

as snow and ice, from the trunk 

lid before opening it. Failure to 

do so may cause the trunk lid to 

suddenly shut again after it is 

opened.

When opening or closing the 

trunk lid, thoroughly check to 

make sure the surrounding area 

is safe.

If anyone is in the vicinity, make 

sure they are safe and let them 

know that the trunk is about to 

open or close.

Use caution when opening or 

closing the trunk lid in windy 

weather as it may move 

abruptly in strong wind.

The trunk lid may suddenly shut 

if it is not opened fully. It is more 

difficult to open or close the 

trunk lid on an incline than on a 

level surface, so beware of the 

trunk lid unexpectedly opening 

or closing by itself. Make sure 

that the trunk lid is fully open 

and secure before using the 

trunk.

When closing the trunk lid, take 

extra care to prevent your fin-

gers, etc., from being caught.

127

4-2. Opening, closing and locking the doors and trunk

4

Before 

driving

Trunk opener switch

Press the trunk opener switch.

Smart key system

While carrying the electronic 
key, press the button on the 
trunk lid.
When all the doors are unlocked 
using one of the following meth-
ods, the trunk can be opened 
without the electronic key:

Entry function

Wireless remote control

Door lock switches

Automatic door unlocking sys-
tem

Mechanical key

Wireless remote control

Press and hold the switch.

A buzzer will sound.

WARNING

When closing the trunk lid, 

make sure to press it lightly on 

its outer surface. If the trunk 

handle is used to fully close the 

trunk lid, it may result in hands 

or arms being caught.

Do not attach any accessories 

other than genuine Toyota parts 

to the trunk lid. Such additional 

weight on the trunk lid may 

cause the lid to suddenly shut 

again after it is opened.

Trunk easy closer (if 

equipped)

In the event that the trunk lid is left 

slightly open, the trunk easy 

closer will automatically close it to 

the fully closed position. It takes 

several seconds before the trunk 

easy closer begins to operate. Be 

careful not to get fingers caught or 

anything else in the trunk lid, as 

this may cause bone fractures or 

other serious injuries.

NOTICE

To prevent trunk easy closer 

malfunctions (if equipped)

Do not apply force to the trunk lid 

while the trunk easy closer is 

operating.

Opening/closing the trunk

128

4-2. Opening, closing and locking the doors and trunk

Trunk grip

Using the trunk grip, pull down 
the trunk lid without applying 
sideways force and push the 
trunk lid down from the outside 
to close it.

Trunk light

The trunk light turns on when the 

trunk is opened.

If the trunk light is left on when the 

power switch is turned off, the light 

will go off automatically after 20 

minutes.

Trunk easy closer (if equipped)

In the event that the trunk lid is left 

slightly open, the trunk easy closer 

will automatically close it to the fully 

closed position.

The trunk easy closer will operate 

regardless of the power switch 

mode.

If the trunk easy closer does not 

operate, open the trunk to the half 

open position or more and then 

close it.

Function to prevent the trunk 

being locked with the electronic 

key inside

When all doors are locked, closing 

the trunk lid with the electronic key 

left inside the trunk will sound an 

alarm.

In this case, the trunk lid can be 

opened pressing the trunk release 

button on the trunk lid.

If the spare electronic key is put in 

the trunk with all the doors locked, 

the key confinement prevention 

function is activated so the trunk 

can be opened. In order to pre-

vent theft, take all electronic keys 

with you when leaving the vehicle.

If the electronic key is put in the 

trunk with all the doors locked, the 

key may not be detected depend-

ing on the location of the key and 

the surrounding radio wave condi-

tions. In this case, the key con-

finement prevention function 

cannot be activated, causing the 

doors to lock when the trunk is 

closed. Make sure to check where 

the key is before closing the trunk.

The key confinement prevention 

function cannot be activated if any 

one of the doors is unlocked. In 

this case, open the trunk using the 

trunk opener.

Internal trunk release lever

The trunk lid can be opened by pull-

ing the glow-in-the-dark lever 

located on the inside of the trunk lid 

to the side.
The lever will continue to glow for 

some time after the trunk lid is 

closed.

129

4-2. Opening, closing and locking the doors and trunk

4

Before 

driving

Using the mechanical key

The trunk can be also opened using 

the mechanical key. (

P.469)

If the smart key system or the 

wireless remote control does 

not operate properly

Use the mechanical key to unlock 

the trunk. (

P.469)

Replace the key battery with a new 

one if it is depleted.

Open door warning buzzer

P.124

Customization

Some functions can be customized. 

(

P.498)

The trunk opener switch can be 
temporarily disabled to protect 
luggage stored in the trunk 
against theft.
Turn the main switch in the 
glove box off to disable the trunk 
opener.

On

Off

The trunk lid cannot be opened 
even with the wireless remote con-
trol or entry function.

When leaving a key to the vehi-

cle with a parking attendant

P.120

Luggage security system


Content      ..     5      6      7      8     ..