Toyota RAV4 (2022 year). Manual in english - page 12
 

  Index      Toyota     Toyota RAV4 (2022 year). Manual in english


Search            copyright infringement  


Content      ..     10      11      12      13     ..


Toyota RAV4 (2022 year). Manual in english - page 12


193

4-2. Driving procedures

4

Dr

iv

ing

engine switch mode.

If the engine does not start

The engine immobilizer system 

may not have been deactivated. 

(

P.71)

Contact your Toyota dealer.

If a message related to start-up is 

shown on the multi-information 

display, read the message and fol-

low the instructions.

If the door is unlocked with the 

mechanical key, the engine can-

not be started using the smart key 

system. Refer to P.649 to start the 

engine. However, if the electronic 

key is carried inside the vehicle 

and the doors are locked 

(

P.111), the engine can be 

started.

If the battery is discharged

The engine cannot be started using 

the smart key system. Refer to 

P.650 to restart the engine.

Electronic key battery depletion

P.102

Conditions affecting operation

P.128

Note for the entry function

P.129

If there is a malfunction in the 

smart key system

If “Smart Key System Malfunction” 

is displayed on the multi-information 

display, the system may be mal-

functioning. Have the vehicle 

inspected by your Toyota dealer 

immediately.

When “Check Fuel Cap” is dis-

played on the multi-information 

display

P.220

Electronic key battery

P.597

Operation of the engine switch

If the switch is not pressed shortly 

and firmly, the engine switch 

mode may not change or the 

engine may not start.

If attempting to restart the engine 

immediately after turning the 

engine switch to OFF, the engine 

may not start in some cases. After 

turning the engine switch to OFF, 

please wait a few seconds before 

restarting the engine.

Customization

If the smart key system has been 

deactivated in a customized setting, 

refer to P.649.

WARNING

When starting the engine

Always start the engine while sit-

ting in the driver’s seat. Do not 

depress the accelerator pedal 

while starting the engine under 

any circumstances.

Doing so may cause an accident 

resulting in death or serious 

injury.

NOTICE

When starting the engine

Do not race a cold engine.

If the engine becomes difficult to 

start or stalls frequently, have 

your vehicle checked by your 

Toyota dealer immediately.

194

4-2. Driving procedures

1

Stop the vehicle completely.

2

If the parking brake is in man-
ual mode, set the parking 
brake. (

P.201)

Check the parking brake indicator 

is illuminated.

3

Shift the shift lever to P.

4

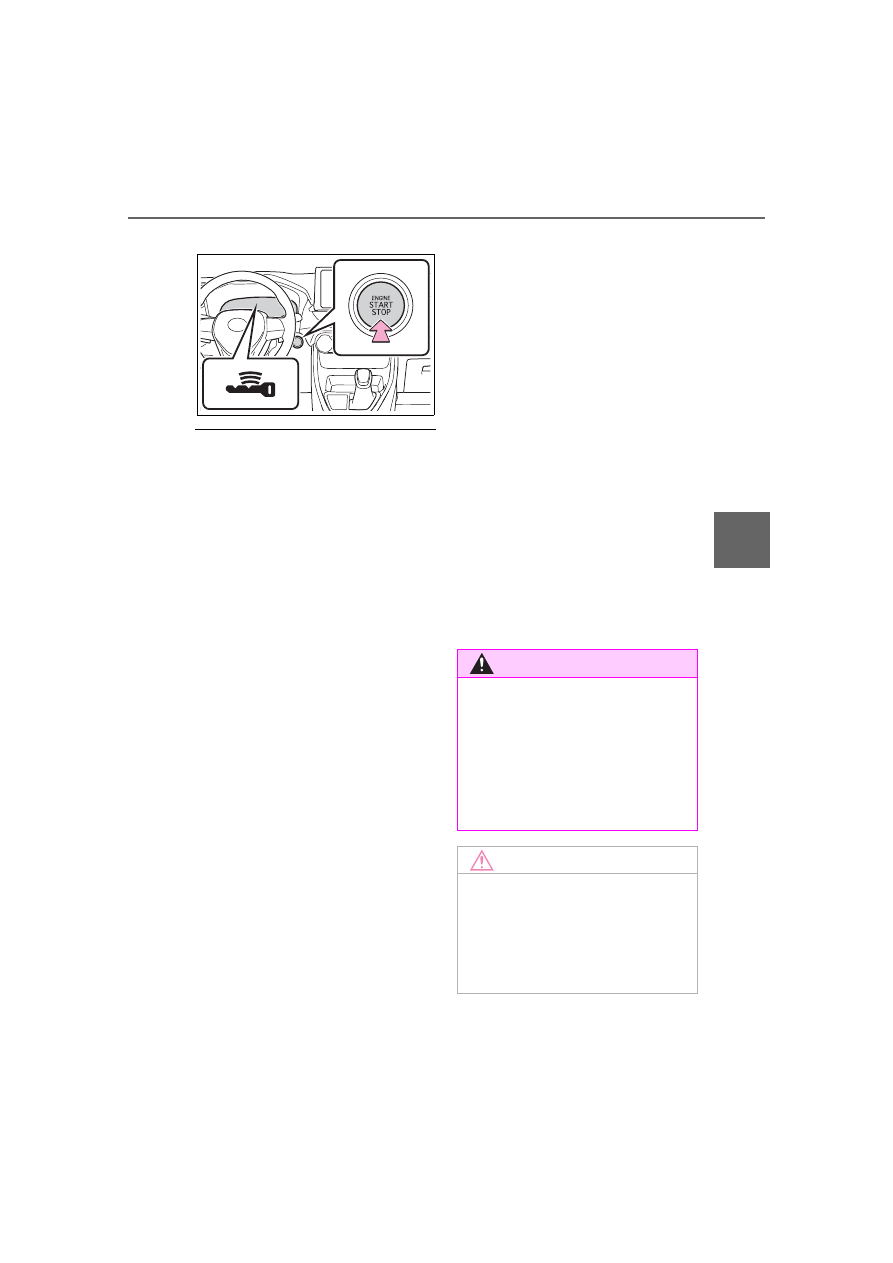
Press the engine switch 
shortly and firmly.

The engine will stop, and the meter 

display will be extinguished.

5

Release the brake pedal and 
check that “ACCESSORY” or 
“IGNITION ON” is not shown 
on the multi-information dis-
play.

Automatic engine shut off fea-

ture

The vehicle is equipped with a 

feature that automatically shuts off 

the engine when the shift lever is 

in P with the engine running for an 

extended period.

The engine will automatically shut 

off after approximately 1 hour if it 

has been left running while the 

shift lever is in P.

The timer for the automatic engine 

shut off feature will reset if the 

brake pedal is depressed or if the 

shift lever is in a position other 

than P.

After the vehicle is parked, if the 

door is locked with the door lock 

switch (

P.111) from the inside 

or the mechanical key (

P.649) 

from the outside, the automatic 

engine shut off feature will be dis-

abled. The timer for the automatic 

engine shut off feature will be re-

enabled if the driver’s door is 

opened.

NOTICE

Symptoms indicating a mal-

function with the engine 

switch

If the engine switch seems to be 

operating somewhat differently 

than usual, such as the switch 

sticking slightly, there may be a 

malfunction. Contact your Toyota 

dealer immediately.

Stopping the engine

WARNING

Stopping the engine in an 

emergency

If you want to stop the engine in 

an emergency while driving the 

vehicle, press and hold the 

engine switch for more than 2 

seconds, or press it briefly 3 

times or more in succession. 

(

P.612)

However, do not touch the 

engine switch while driving 

except in an emergency. Turn-

ing the engine off while driving 

will not cause loss of steering or 

braking control, but the power 

assist to these systems will be 

lost. This will make it more diffi-

cult to steer and brake, so you 

should pull over and stop the 

vehicle as soon as it is safe to 

do so.

If the engine switch is operated 

while the vehicle is running, a 

warning message will be shown 

on the multi-information display 

and a buzzer sounds.

When restarting the engine after 

an emergency shutdown, shift 

the shift lever to N and press the 

engine switch shortly and firmly.

195

4-2. Driving procedures

4

Dr

iv

ing

Modes can be changed by 
pressing the engine switch with 
brake pedal released. (The 
mode changes each time the 
switch is pressed.)

1

OFF

*

The emergency flashers can be 
used.
The multi-information display will 
not be displayed.

2

ACC

Some electrical components such 
as the audio system can be used.
“ACCESSORY” will be displayed 
on the multi-information display.

3

ON

All electrical components can be 
used.
“IGNITION ON” will be displayed on 
the multi-information display.

*

: If the shift lever is in a position 

other than P when turning off the 
engine, the engine switch will be 
turned to ACC, not to OFF.

Auto power off function

If the vehicle is left in ACC for more 

than 20 minutes or ON (the engine 

is not running) for more than an 

hour with the shift lever in P, the 

engine switch will automatically turn 

to OFF. However, this function can-

not entirely prevent battery dis-

charge. Do not leave the vehicle 

with the engine switch in ACC or ON 

WARNING

When parking

Exhaust gases include harmful 

carbon monoxide (CO), which is 

colorless and odorless. Observe 

the following precautions.
Failure to do so may cause 

exhaust gases to enter the vehicle 

and may lead to an accident 

caused by light-headedness, or 

may lead to death or a serious 

health hazard.

If the vehicle is in a poorly venti-

lated area or a closed area, 

such as a garage, stop the 

engine.

Do not leave the vehicle with 

the engine running for a long 

time. If such a situation cannot 

be avoided, park the vehicle in 

an open space and ensure that 

exhaust fumes do not enter the 

vehicle interior.

Do not leave the engine running 

in an area with snow build-up, 

or where it is snowing. If snow-

banks build up around the vehi-

cle while the engine is running, 

exhaust gases may collect and 

enter the vehicle.

Changing engine switch 
modes

196

4-2. Driving procedures

for long periods of time when the 

engine is not running.

If the engine is stopped with the 
shift lever in a position other 
than P, the engine switch will 
not be turned to OFF but instead 
be turned to ACC. Perform the 
following procedure to turn the 
switch to OFF:

1

Check that the parking brake 
is set.

2

Shift the shift lever to P.

3

Check that “ACCESSORY” is 
displayed on the multi-infor-
mation display and then 
press the engine switch 
shortly and firmly.

4

Check that “ACCESSORY” 
or “IGNITION ON” on the 
multi-information display is 
off.

NOTICE

To prevent battery discharge

Do not leave the engine switch 

in ACC or ON for long periods of 

time without the engine running.

If “ACCESSORY” or “IGNITION 

ON” is displayed on the multi-

information display, the engine 

switch is not in OFF. Exit the 

vehicle after turning the engine 

switch to OFF.

When stopping the engine 
with the shift lever in a 
position other than P

NOTICE

To prevent battery discharge

Do not stop the engine when the 

shift lever is in a position other 

than P. If the engine is stopped in 

another shift lever position, the 

engine switch will not be turned to 

OFF but instead be turned to 

ACC. If the vehicle is left in ACC, 

battery discharge may occur.

197

4-2. Driving procedures

4

Dr

iv

ing

*1

:Shifting to the D position allows 

the system to select a gear suit-
able for the driving conditions. 
Setting the shift lever to the D 
position is recommended for nor-
mal driving.

*2

:Selecting shift ranges using S 

mode restricts the upper limit of 
the possible gear ranges, con-
trols engine braking force, and 
prevents unnecessary upshifting.

When driving with dynamic 

radar cruise control with full-

speed range activated

Even when performing the following 

actions with the intent of enabling 

engine braking, engine braking will 

not activate because dynamic radar 

cruise control with full-speed range 

will not be canceled.

While driving in S mode, down-

shifting to 7, 6, 5, or 4. (

P.199)

When switching the driving mode 

to sport mode while driving in D. 

(

P.347)

If “High Transmission Fluid 

Temp See Owner’s Manual” is 

displayed on the multi-informa-

tion display (AWD models)

Make sure to return to D position 
driving and reduce speed by easing 
off the accelerator pedal. Stop the 
vehicle in a safe place, shift the shift 
lever to P and let the engine idle 
until the warning message goes out.
When the warning message goes 
out, the vehicle can be driven again.
If the warning message does not go 
out after waiting a while, have your 
vehicle inspected by your Toyota 
dealer.

Restraining sudden start (Drive-

Start Control)

P.173

AI-SHIFT

The AI-SHIFT automatically selects 

the suitable gear according to driver 

performance and driving conditions.

The AI-SHIFT automatically oper-

ates when the shift lever is in D. 

(Shifting the shift lever to S cancels 

the function.)

Automatic transmis-

sion

Select the shift position 
depending on your purpose 
and situation.

Shift position purpose 
and functions

Shift 

position

Objective or function

P

Parking the vehi-

cle/starting the engine

R

Reversing

N

Neutral

D

Normal driving

*1

S

S mode driving

*2

(

P.199)

WARNING

When driving on slippery 

road surfaces

Do not accelerate or shift gears 

suddenly.

Sudden changes in engine brak-

ing may cause the vehicle to spin 

or skid, resulting in an accident.

198

4-2. Driving procedures

 While the engine switch 

is in ON and the brake pedal 
depressed

*

, shift the shift lever 

while pushing the shift release 
button on the shift knob.

 Shift the shift lever while 

pushing the shift release button 
on the shift knob.

 Shift the shift lever nor-

mally.

When shifting the shift lever 
between P and D, make sure that 
the vehicle is completely stopped.

*

: For the vehicle to be able to be 

shifted from P, the brake pedal 
must be depressed before the 
shift release button is pushed. If 
the shift release button is pushed 

first, the shift lock will not be 
released.

Shift lock system

The shift lock system is a system to 

prevent accidental operation of the 

shift lever in starting.

The shift lever can be shifted from P 

only when the engine switch is in 

ON, the brake pedal is depressed 

and the shift release button is 

pushed.

If the shift lever cannot be 

shifted from P

First, check whether the brake pedal 

is being depressed.

If the shift lever cannot be shifted 

even though the brake pedal is 

depressed and the shift release but-

ton is pushed, there may be a prob-

lem with the shift lock system. Have 

the vehicle inspected by your 

Toyota dealer immediately. 

The following steps may be used as 

an emergency measure to ensure 

that the shift lever can be shifted.
Releasing the shift lock:

1

Pull the parking brake switch to 

check that the parking brake is 

set. (

P.201)

2

Turn the engine switch to OFF.

3

Depress the brake pedal.

4

Pry the cover up with a flathead 

screwdriver or equivalent tool. 

To prevent damage to the cover, 

cover the tip of the screwdriver 

with a rag.

5

Press and hold the shift lock 

override button and then push 

the button on the shift knob. 

Shifting the shift lever

199

4-2. Driving procedures

4

Dr

iv

ing

The shift lever can be shifted 

while both buttons are pressed.

P.347, 352

When the shift lever is in the S 
position, the shift lever can be 
operated as follows:

1

Upshifting

2

Downshifting

The selected shift range, from S1 to 
S8 will be displayed on the multi-
information display.

The initial shift range in S mode 
is set automatically to 4, 5 or 6 
according to vehicle speed. 
However, the initial shift range 
may be set to 3 if AI-SHIFT has 
operated while the shift lever 
was in the D position. (

P.197)

S mode

You can choose from 8 levels of 

accelerating force and engine 

braking force.

A lower shift range will provide 

greater accelerating force and 

engine braking force than a higher 

shift range, and the engine revolu-

tions will also increase.

To prevent the engine from over-

revving, upshifting may automati-

cally occur.

To protect the automatic transmis-

sion, a function is adopted that 

automatically selects a higher shift 

range when the fluid temperature 

is high.

When the shift range is 7 or lower, 

holding the shift lever toward “+” 

sets the shift range to 8.

WARNING

To prevent an accident when 

releasing the shift lock

Before pressing the shift lock 

override button, make sure to set 

the parking brake and depress the 

brake pedal.
If the accelerator pedal is acci-

dentally depressed instead of the 

brake pedal when the shift lock 

override button is pressed and the 

shift lever is shifted out of P, the 

vehicle may suddenly start, possi-

bly leading to an accident result-

ing in death or serious injury.

Selecting the driving 
mode and snow mode (if 
equipped)

Changing shift ranges in 
S mode

200

4-2. Driving procedures

Downshifting restriction warn-

ing buzzer

To help ensure safety and driving 

performance, downshifting opera-

tion may sometimes be restricted. In 

some circumstances, downshifting 

may not be possible even when the 

shift lever is operated. (A buzzer will 

sound twice.)

If the “S” indicator does not 

come on or the “D” indicator is 

displayed even after shifting the 

shift lever to S

This may indicate a malfunction in 

the automatic transmission system. 

Have the vehicle inspected by your 

Toyota dealer immediately. (In this 

situation, the transmission will oper-

ate in the same manner as when the 

shift lever is in D.)

1

Right turn

2

Lane change to the right 
(move the lever partway and 
release it)

The right hand signals will flash 3 
times.

3

Lane change to the left 
(move the lever partway and 
release it)

The left hand signals will flash 3 
times.

4

Left turn

Turn signals can be operated 

when

The engine switch is in ON.

If the indicator flashes faster 

than usual

Check that a light bulb in the front or 

rear turn signal lights has not 

Turn signal lever

Operating instructions

201

4-2. Driving procedures

4

Dr

iv

ing

burned out.

If the turn signals stop flashing 

before a lane change has been 

performed

Operate the lever again.

To discontinue flashing of the 

turn signals during a lane 

change

Operate the lever in the opposite 

direction.

Using the manual mode

The parking brake can be set 
and released manually.

Parking brake indicator light 
(U.S.A.)

Parking brake indicator light 
(Canada)

Parking brake switch indica-
tor

1

Pull the switch to set the 

Parking brake

The parking brake can be 
set or released automati-
cally or manually. In auto-
matic mode, the parking 
brake can be set or released 
automatically according to 
shift lever operation. Also, 
even in automatic mode, the 
parking brake can be set or 
released manually.

Operating instructions

A

B

C

202

4-2. Driving procedures

parking brake.

The parking brake indicator light 
and parking brake switch indicator 
will turn on.
Pull and hold the parking brake 
switch if an emergency occurs and 
it is necessary to operate the park-
ing brake while driving.

2

Push the switch to release 
the parking brake.

• Operate the parking brake switch 

while depressing the brake pedal.

• Parking brake automatic release 

function (

P.203)

Make sure that the parking brake 
indicator light and parking brake 
switch indicator turn off.

If the parking brake indicator 
light and parking brake switch 
indicator flash, operate the 
switch again. (

P.628)

Turning the automatic 
mode on

While the vehicle is stopped, 
pull and hold the parking brake 
switch until a buzzer sounds and 
a message is shown on the 
multi-information display.

When the automatic mode is 
turned on, the parking brake 
operates as follows.

When the shift lever is shifted 
from P, the parking brake will 
be released, and the parking 
brake indicator light and park-
ing brake switch indicator will 
turn off.

When the shift lever is shifted 
to P, the parking brake will be 
set, and the parking brake 
indicator light and parking 
brake switch indicator will turn 
on.

Operate the shift lever with the 
vehicle stopped and the brake 
pedal depressed.

Turning the automatic 
mode off

While the vehicle is stopped and 
depressing the brake pedal, 
press and hold the parking 
brake switch until a buzzer 
sounds and a message is 
shown on the multi-information 
display.

Parking brake operation

When the engine switch is not in 

ON, the parking brake cannot be 

released using the parking brake 

switch.

When the engine switch is not in 

203

4-2. Driving procedures

4

Dr

iv

ing

ON, automatic mode (automatic 

brake setting and releasing) is not 

available.

Parking brake automatic 

release function

The parking brake will be released 

automatically when the accelerator 

pedal is slowly depressed under the 

following conditions:

The driver’s door is closed

The driver is wearing the seat belt

The shift lever is in a forward or 

reverse position.

The malfunction indicator lamp or 

brake system warning light is not 

illuminated

If the automatic release function 
does not operate, release the park-
ing brake manually.

If “Parking Brake Temporarily 

Unavailable” is displayed on 

the multi-information display

If the parking brake is operated 

repeatedly over a short period of 

time, the system may restrict opera-

tion to prevent overheating. If this 

happens, refrain from operating the 

parking brake. Normal operation will 

return after about 1 minute.

If “Parking Brake Unavailable” 

is displayed on the multi-infor-

mation display

Operate the parking brake switch. If 

the message does not disappear 

after operating the switch several 

times, the system may be malfunc-

tioning. Have the vehicle inspected 

by your Toyota dealer.

Parking brake operation sound

When the parking brake operates, a 

motor sound (whirring sound) may 

be heard. This does not indicate a 

malfunction.

Parking brake indicator light

Depending on the engine switch 

position/mode, the parking brake 

indicator light will turn on and stay 

on as described below:

ON: Comes on until the parking 

brake is released.

Not in ON: Stays on for approxi-

mately 15 seconds.

When the engine switch is turned 

off with the parking brake set, the 

parking brake indicator light will 

stay on for about 15 seconds. This 

does not indicate a malfunction.

When the parking brake switch 

malfunctions

Automatic mode (automatic brake 

setting and releasing) will be turned 

on automatically.

Parking the vehicle

P.167

Parking brake engaged warning 

buzzer

A buzzer will sound if the vehicle is 

driven with the parking brake 

engaged. “Parking Brake ON” is dis-

played on the multi-information dis-

play (with the vehicle reaching a 

speed of 3 mph [5 km/h]).

If the brake system warning 

light comes on

P.622

Usage in winter time

P.362

WARNING

When parking the vehicle

Do not leave a child in the vehicle 

alone. The parking brake may be 

released unintentionally by a child 

and there is the danger of the 

vehicle moving that may lead to 

an accident resulting in death or 

serious injury.

Parking brake switch

Do not set any objects near the 

parking brake switch. Objects 

may interfere with the switch and 

may lead the parking brake to 

unexpectedly operate.

204

4-2. Driving procedures

Turn the brake hold system on

The brake hold standby indicator 
(green) 

 comes on. While the 

system is holding the brake, the 
brake hold operated indicator (yel-
low) 

 comes on.

Brake hold system operating 

conditions

The brake hold system cannot be 

turned on in the following condi-

tions:

The driver’s door is not closed.

The driver is not wearing the seat 

belt.

NOTICE

When parking the vehicle

Before you leave the vehicle, shift 

the shift lever to P, set the parking 

brake and make sure that the 

vehicle does not move.

When the system malfunc-

tions

Stop the vehicle in a safe place 

and check the warning messages.

When the parking brake can-

not be released due to a mal-

function

Driving the vehicle with the park-

ing brake set will lead to brake 

components overheating, which 

may affect braking performance 

and increase brake wear. Have 

the vehicle inspected by your 

Toyota dealer immediately if this 

occurs.

Brake Hold

The brake hold system 
keeps the brake applied 
when the shift lever is in D, 
S or N with the system on 
and the brake pedal has 
been depressed to stop the 
vehicle. The system 
releases the brake when the 
accelerator pedal is 
depressed with the shift 
lever in D or S to allow 
smooth start off.

Enabling the system

A

B

205

4-2. Driving procedures

4

Dr

iv

ing

If any of the conditions above are 

detected when the brake hold sys-

tem is enabled, the system will turn 

off and the brake hold standby indi-

cator light will go off. In addition, if 

any of the conditions are detected 

while the system is holding the 

brake, a warning buzzer will sound 

and a message will be shown on the 

multi-information display. The park-

ing brake will then be set automati-

cally.

Brake hold function

If the brake pedal is left released 

for a period of about 3 minutes 

after the system has started hold-

ing the brake, the parking brake 

will be set automatically. In this 

case, a warning buzzer sounds 

and a message is shown on the 

multi-information display.

To turn the system off while the 

system is holding the brake, firmly 

depress the brake pedal and 

press the button again.

The brake hold function may not 

hold the vehicle when the vehicle 

is on a steep incline. In this situa-

tion, it may be necessary for the 

driver to apply the brakes. A warn-

ing buzzer will sound and the 

multi-information display will 

inform the driver of this situation. If 

a warning message is shown on 

the multi-information display, read 

the message and follow the 

instructions.

When the parking brake is set 

automatically while the system 

is holding the brakes

Perform any of the following opera-

tions to release the parking brake.

Depress the accelerator pedal. 

(The parking brake will not be 

released automatically if the seat 

belt is not fastened.)

Operate the parking brake switch 

with the brake pedal depressed.

Make sure that the parking brake 

indicator light goes off. (

P.201)

When an inspection at your 

Toyota dealer is necessary

When the brake hold standby indi-

cator (green) does not illuminate 

even when the brake hold switch is 

pressed with the brake hold system 

operating conditions met, the sys-

tem may be malfunctioning. Have 

the vehicle inspected at your Toyota 

dealer.

If “Brake Hold Malfunction 

Press Brake to Deactivate Visit 

Your Dealer” or “Brake Hold 

Malfunction Visit Your Dealer” 

is displayed on the multi-infor-

mation display

The system may be malfunctioning. 

Have the vehicle inspected by your 

Toyota dealer.

Warning messages and buzzers

Warning messages and buzzers are 

used to indicate a system malfunc-

tion or to inform the driver of the 

need for caution. If a warning mes-

sage is shown on the multi-informa-

tion display, read the message and 

follow the instructions.

If the brake hold operated indi-

cator flashes

P.627

WARNING

When the vehicle is on a 

steep incline

Take care when using the brake 

hold system on a steep incline, 

exercise caution. The brake hold 

function may not hold brakes in 

such situations.
Also, the system may not activate 

depending on the angle of the 

slope.

206

4-2. Driving procedures

WARNING

When stopped on a slippery 

road

The system cannot stop the vehi-

cle when the gripping ability of the 

tires has been exceeded. Do not 

use the system when stopped on 

a slippery road.

NOTICE

When parking the vehicle

The brake hold system is not 

designed for use when parking 

the vehicle for a long period of 

time. Turning the engine switch 

off while the system is holding the 

brake may release the brake, 

which would cause the vehicle to 

move. When operating the engine 

switch, depress the brake pedal, 

shift the shift lever to P and set 

the parking brake.

207

4-3. Operating the lights and wipers

4

Dr

iv

ing

4-3.Operating the lights and wipers

Operating the 

 switch 

turns on the lights as follows:

U.S.A. (Type A)

1

 The side marker, park-

ing, tail, license plate, instru-
ment panel lights, and 
daytime running lights 
(

P.208) turn on.

2

 The headlights and all 

lights listed above (except 
daytime running lights) turn 
on.

3

 The headlights, daytime 

running lights (

P.208) and 

all the lights listed above turn 
on and off automatically.

4

 Off

U.S.A. (Type B)

1

 The side marker, park-

ing, tail, license plate, instru-
ment panel lights, and 
daytime running lights 
(

P.208) turn on.

2

 The headlights and all 

lights listed above (except 
daytime running lights) turn 
on.

3

 The daytime running 

lights turn on. (

P.208)

4

 Off

Headlight switch

The headlights can be oper-
ated manually or automati-
cally.

Turning on the headlights

208

4-3. Operating the lights and wipers

Canada

1

 The side marker, park-

ing, tail, license plate, instru-
ment panel lights, and 
daytime running lights 
(

P.208) turn on.

2

 The headlights and all 

lights listed above (except 
daytime running lights) turn 
on.

3

 The headlights, daytime 

running lights (

P.208) and 

all the lights listed above turn 
on and off automatically.

AUTO mode can be used when

The engine switch is in ON.

Daytime running light system

Vehicles with multi-LED head-

lights and LED projector head-

lights with bulb type front turn 

signal lights: The daytime running 

lights illuminate using the same 

lights as the low beam headlights 

and illuminate dimmer than the 

low beam headlights.

Vehicles with LED projector head-

lights with LED type front turn sig-

nal lights: The daytime running 

lights illuminate using the same 

lights as the parking lights and illu-

minate brighter than the parking 

lights.

To make your vehicle more visible 

to other drivers during daytime 

driving, the daytime running lights 

turn on automatically when all of 

the following conditions are met. 

(The daytime running lights are 

not designed for use at night.)

• The engine is running

• The parking brake is released

• For the U. S. A.: The headlight 

switch is in the 

 or 

*


position

• For Canada: The headlight switch 

is in the 

 or 

*

 position

*

: When the surroundings are bright

The daytime running lights remain 
on after they illuminate, even if the 
parking brake is set again.

For the U.S.A.: Daytime running 

lights can be turned off by operat-

ing the switch.

Compared to turning on the head-

lights, the daytime running light 

system offers greater durability 

and consumes less electricity, so 

it can help improve fuel economy.

Headlight control sensor (if 

equipped)

The sensor may not function prop-

erly if an object is placed on the sen-

sor, or anything that blocks the 

sensor is affixed to the windshield. 

Doing so interferes with the sensor 

detecting the level of ambient light 

and may cause the automatic head-

light system to malfunction.


Content      ..     10      11      12      13     ..