Toyota Hilux (2022 year). Manual in english - page 17
7-3. Do-it-yourself maintenance
483
WARNING
The engine compartment contains many mechanisms and fluids that may
move suddenly, become hot, or become electrically energized. To avoid death
or serious injury, observe the following precautions.
Q When working on the engine compartment
O Keep hands, clothing and tools away from the moving fan and engine
drive belt.
O Be careful not to touch the engine, radiator, exhaust manifold, etc. right
after driving as they may be hot. Oil and other fluids may also be hot.
ODo not leave anything that may burn easily, such as paper and rags, in the
engine compartment.
ODo not smoke, cause sparks or expose an open flame to fuel or the bat-
tery. Fuel and battery fumes are flammable.
O Be extremely cautious when working on the battery. It contains poisonous
and corrosive sulfuric acid.
O Take care because brake fluid can harm your hands or eyes and damage
painted surfaces. If fluid gets on your hands or in your eyes, flush the
affected area with clean water immediately.
If you still experience discomfort, consult a doctor.
Q Safety glasses
Wear safety glasses to prevent flying or falling material, fluid spray, etc.
from getting in your eyes.
NOTICE
7
Q If you remove the air cleaner filter
Driving with the air cleaner filter removed may cause excessive engine wear
due to dirt in the air.
Q If the fluid level is low or high
It is normal for the brake fluid level to go down slightly as the brake pads
wear or when the fluid level in the accumulator is high.
If the reservoir needs frequent refilling, it may indicate a serious problem.
484
7-3. Do-it-yourself maintenance
Hood
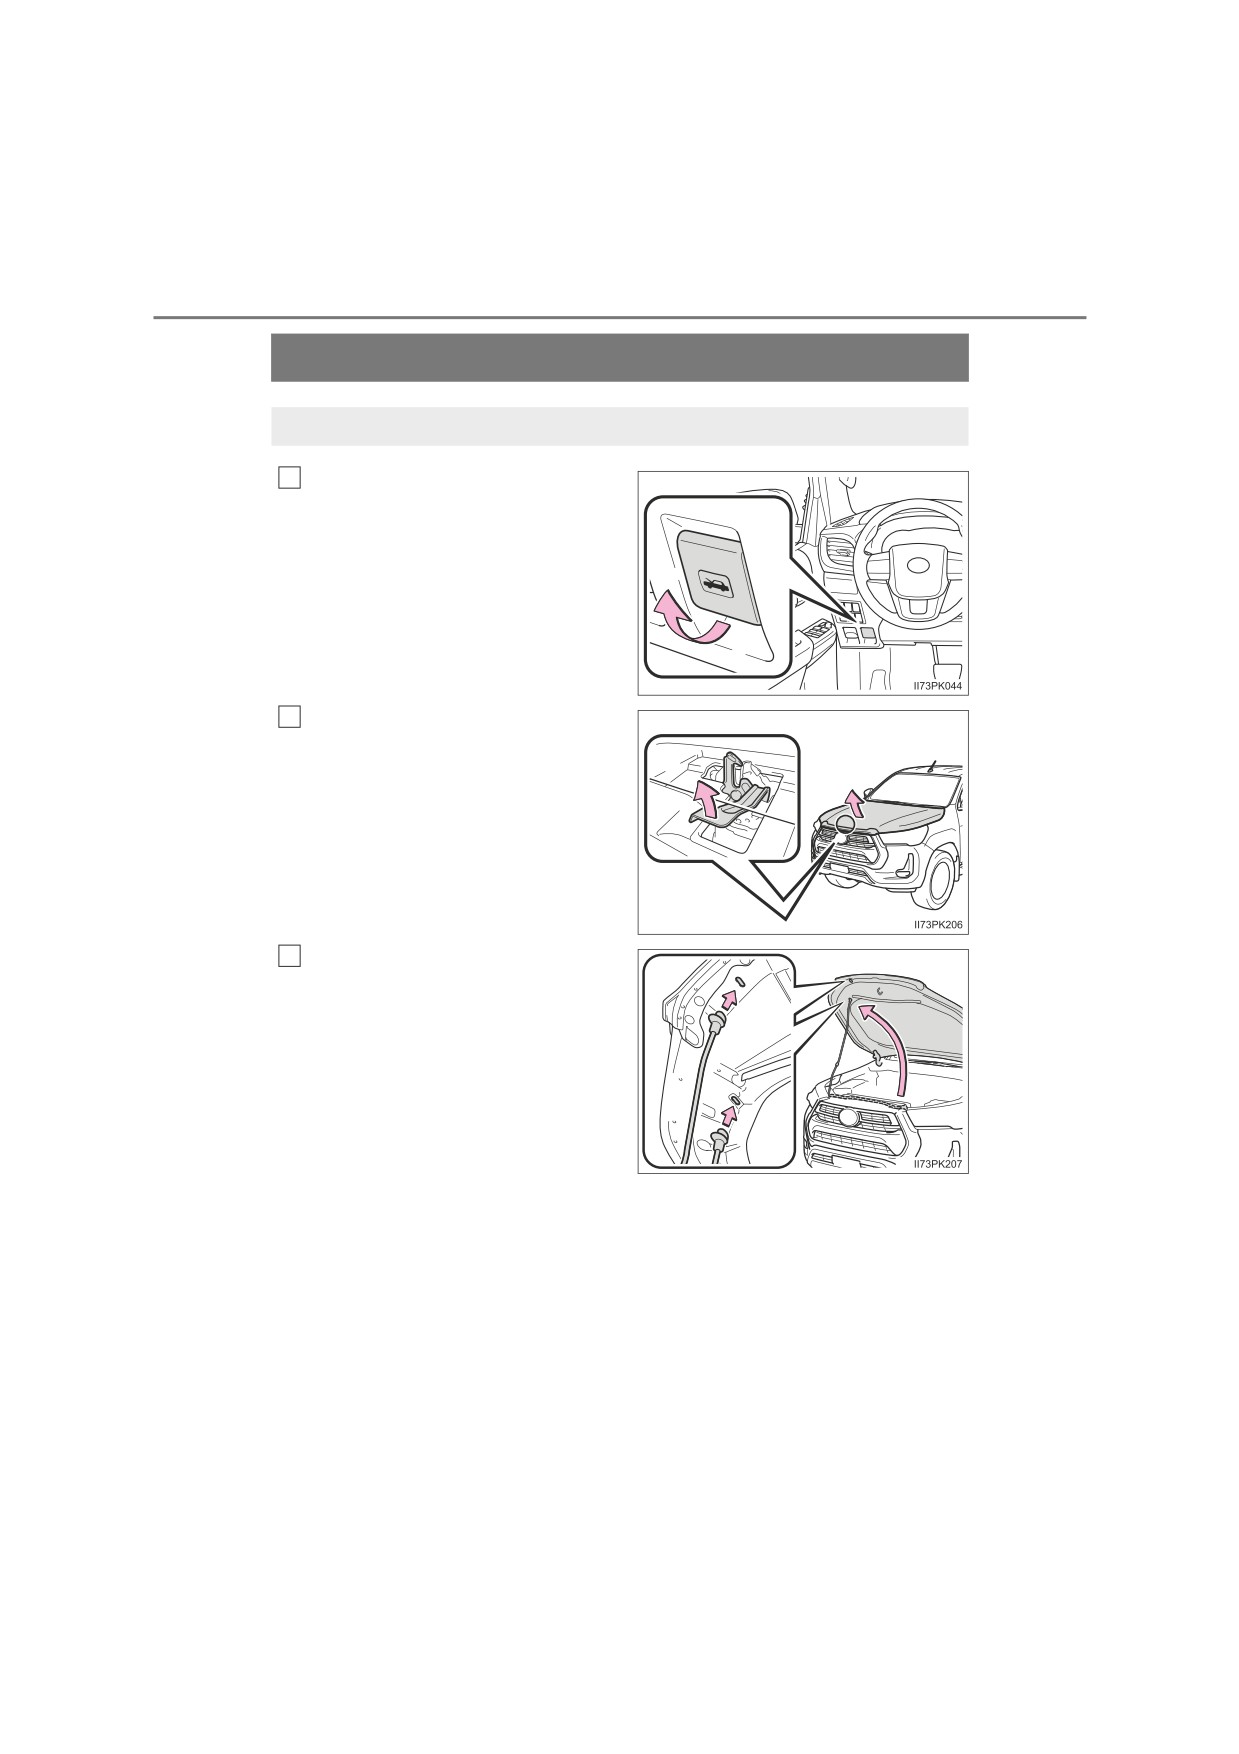
Release the lock from the inside of the vehicle to open the hood.
1
Pull the hood lock release lever.
The hood will pop up slightly.
2
Pull up the auxiliary catch lever
and lift the hood.
Hold the hood open by inserting
3
the supporting rod into either of
the slots.
Use the upper slots to open the
hood normally, or use the lower
slots when the hood needs to be
opened wide.
7-3. Do-it-yourself maintenance
485
WARNING
Q Pre-driving check
Check that the hood is fully closed and locked.
If the hood is not locked properly, it may open while the vehicle is in motion
and cause an accident, which may result in death or serious injury.
Q After installing the support rod into the slot
Make sure the rod supports the hood securely from falling down on to your
head or body.
NOTICE
Q When closing the hood
Be sure to return the support rod to its clip before closing the hood. Closing
the hood with the support rod up could cause the hood to bend.
7
486
7-3. Do-it-yourself maintenance
Engine compartment
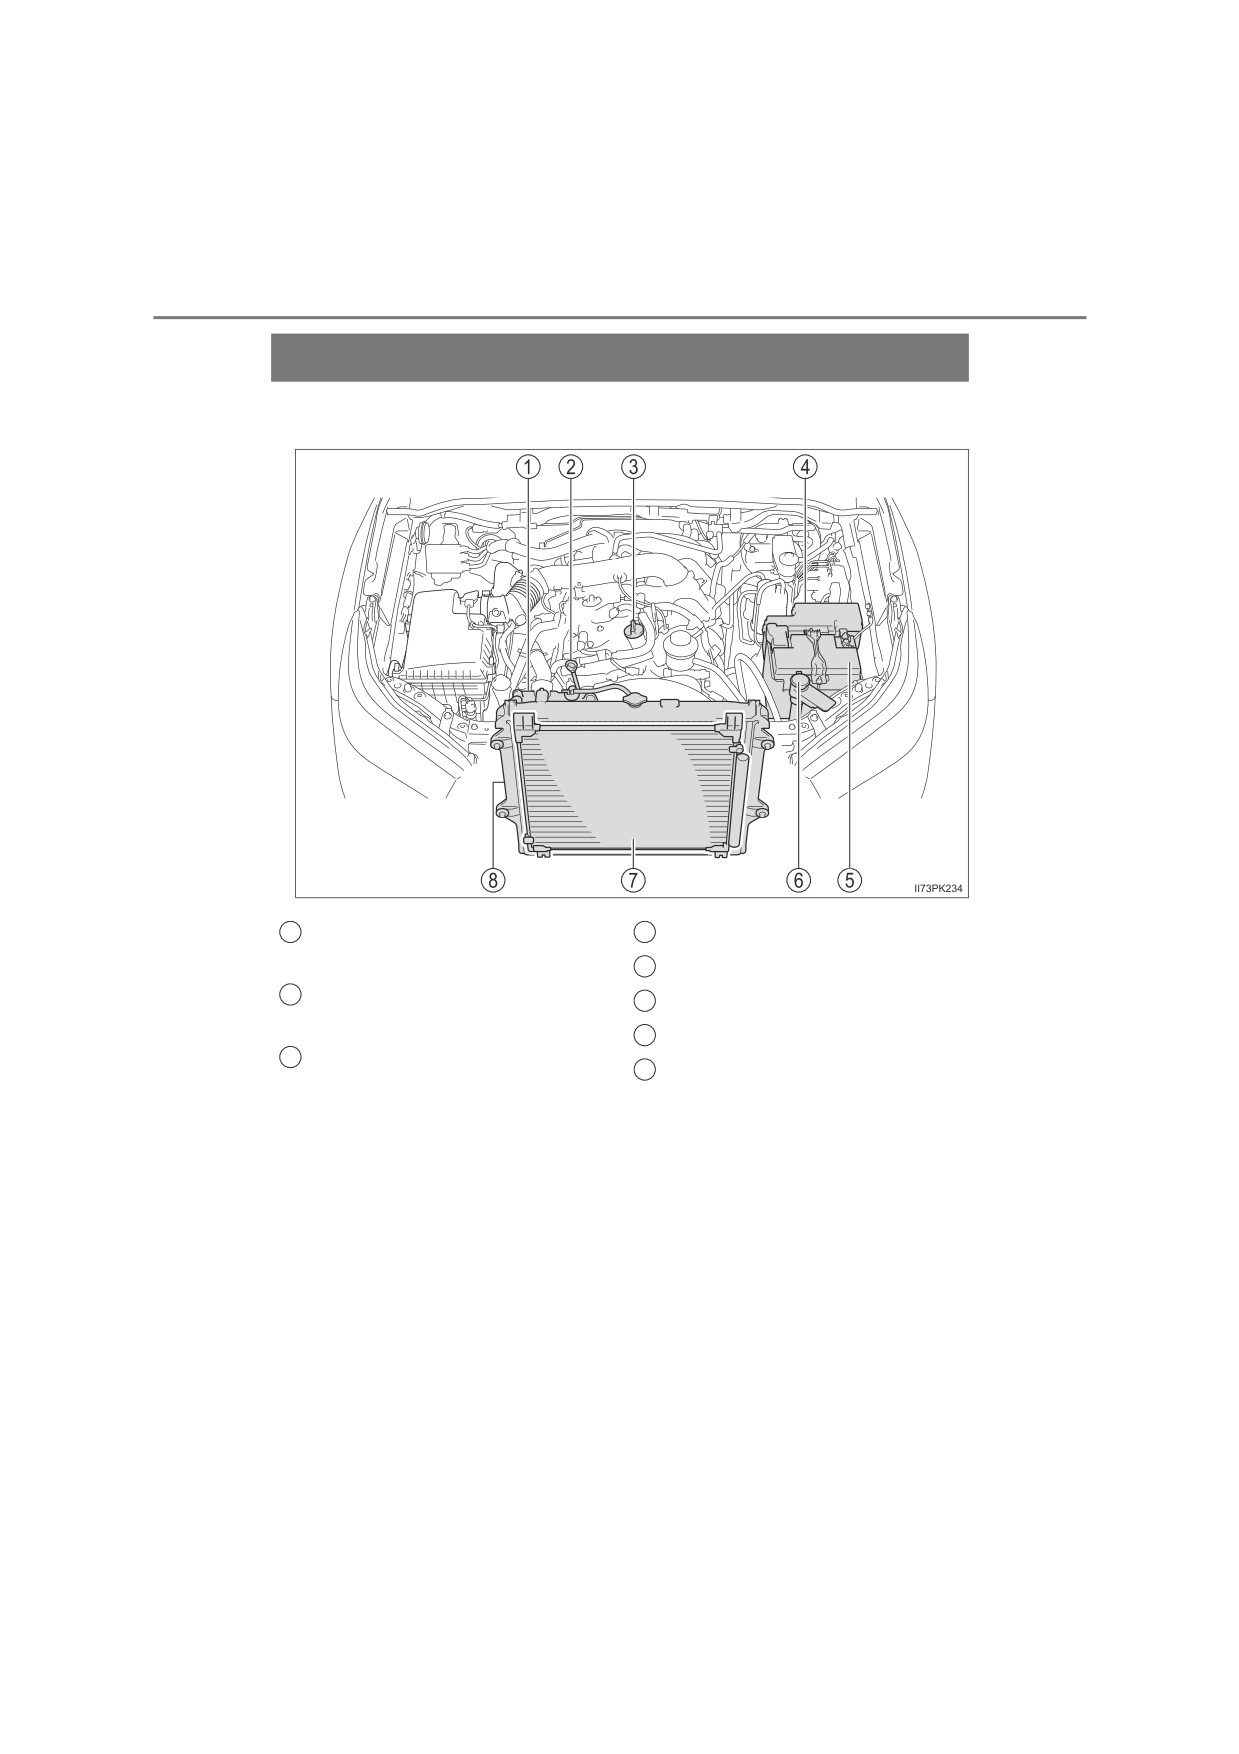
Gasoline engine
1
Engine coolant reservoir
4
Fuse box
(P. 520)
(P. 492)
5
Battery
(P. 494)
2
Engine oil level dipstick
6
Washer fluid tank
(P. 498)
(P. 489)
7
Condenser
(P. 493)
3
Engine oil filler cap (P. 490)
8
Radiator
(P. 493)
7-3. Do-it-yourself maintenance
487
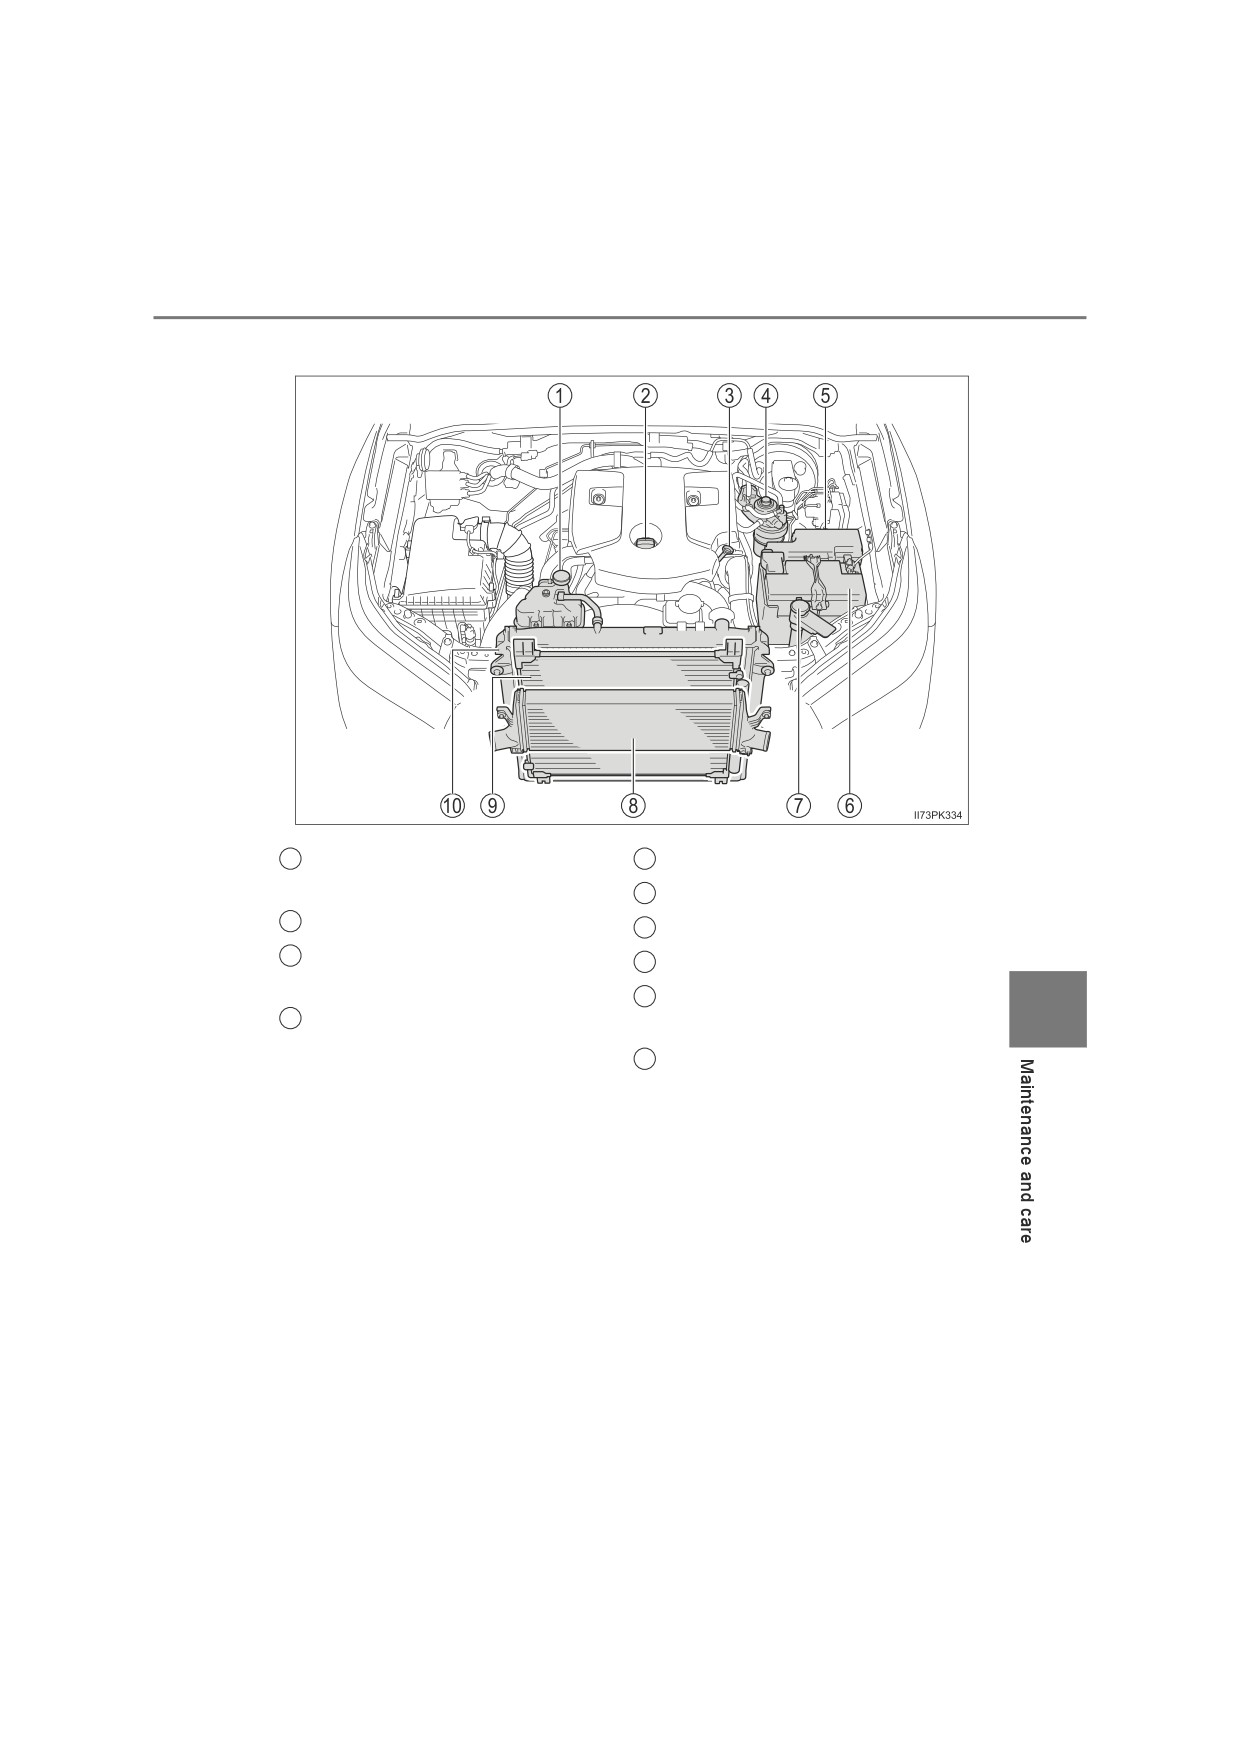
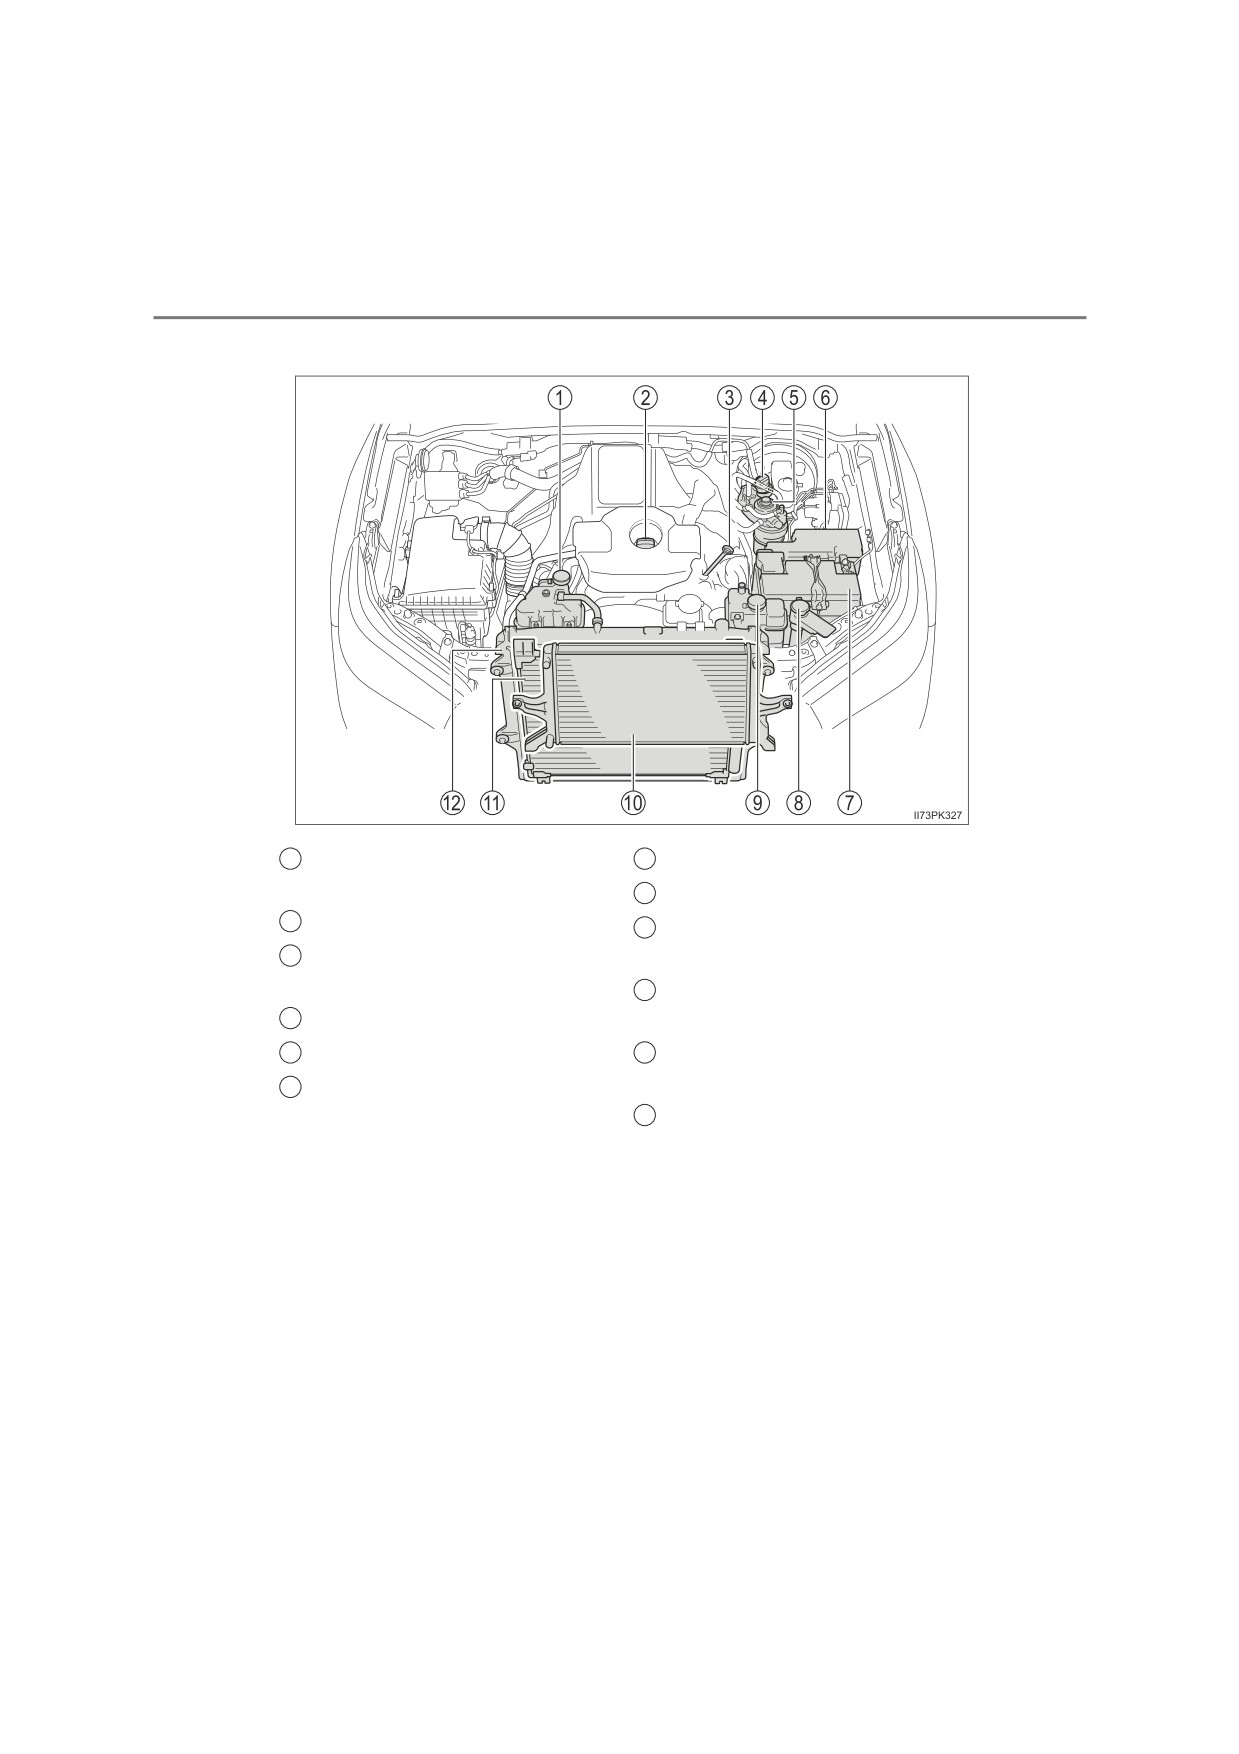
Diesel engine (vehicles without water-cooled intercooler)
1
Engine coolant reservoir
5
Fuse box
(P. 520)
(P. 492)
6
Battery
(P. 494)
2
Engine oil filler cap (P. 490)
7
Washer fluid tank
(P. 498)
3
Engine oil level dipstick
8
Intercooler
(P. 493)
(P. 489)
9
Condenser (if equipped)
7
4
Fuel filter
(P. 499, 614)
(P. 493)
10
Radiator
(P. 493)
488
7-3. Do-it-yourself maintenance
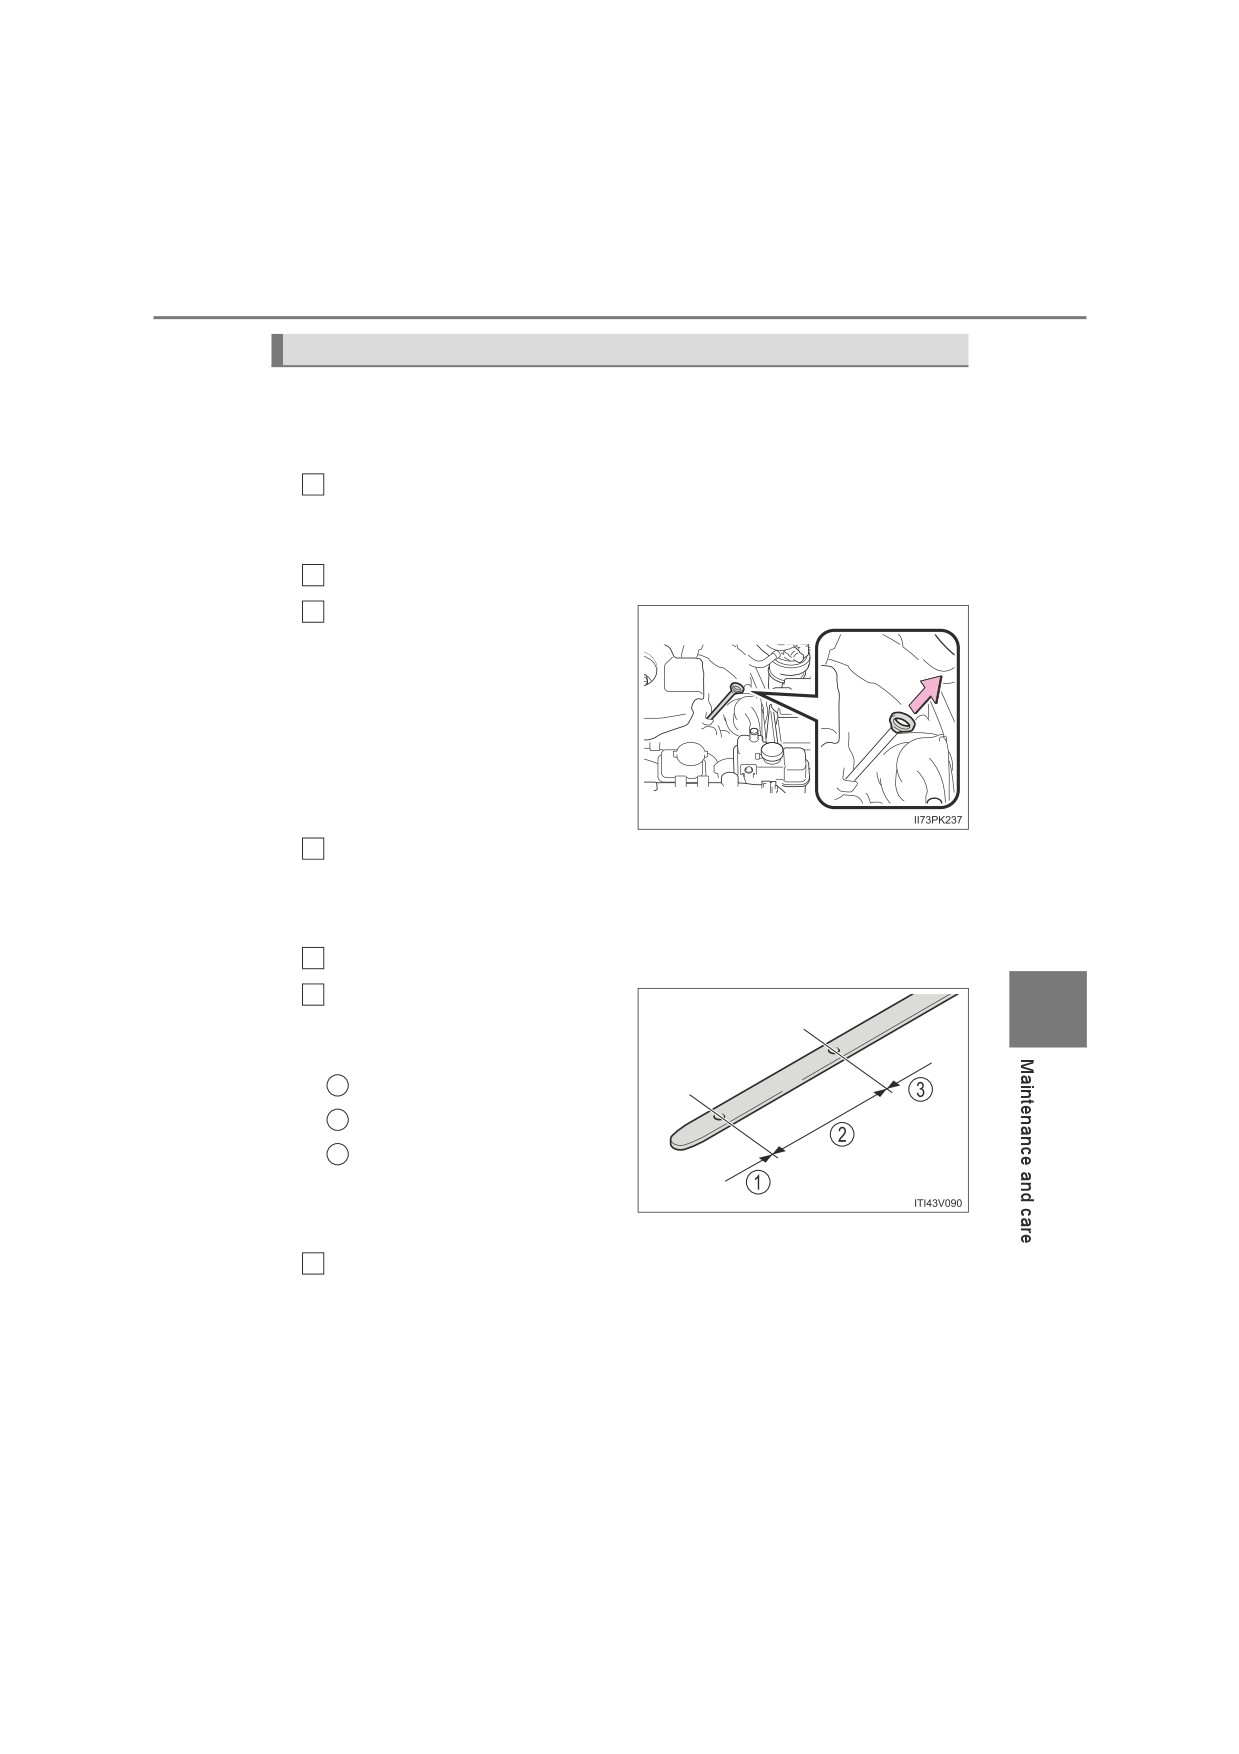
Diesel engine (vehicles with water-cooled intercooler)
1
Engine coolant reservoir
7
Battery
(P. 494)
(P. 492)
8
Washer fluid tank
(P. 498)
2
Engine oil filler cap (P. 490)
9
Intercooler coolant reservoir
3
Engine oil level dipstick
(P. 492)
(P. 489)
10
Intercooler cooling radiator
4
AdBlue™ tank cap (P. 500)
(P. 493)
5
Fuel filter
(P. 499, 614)
11
Condenser (if equipped)
6
Fuse box
(P. 520)
(P. 493)
12
Radiator
(P. 493)
7-3. Do-it-yourself maintenance
489
Engine oil
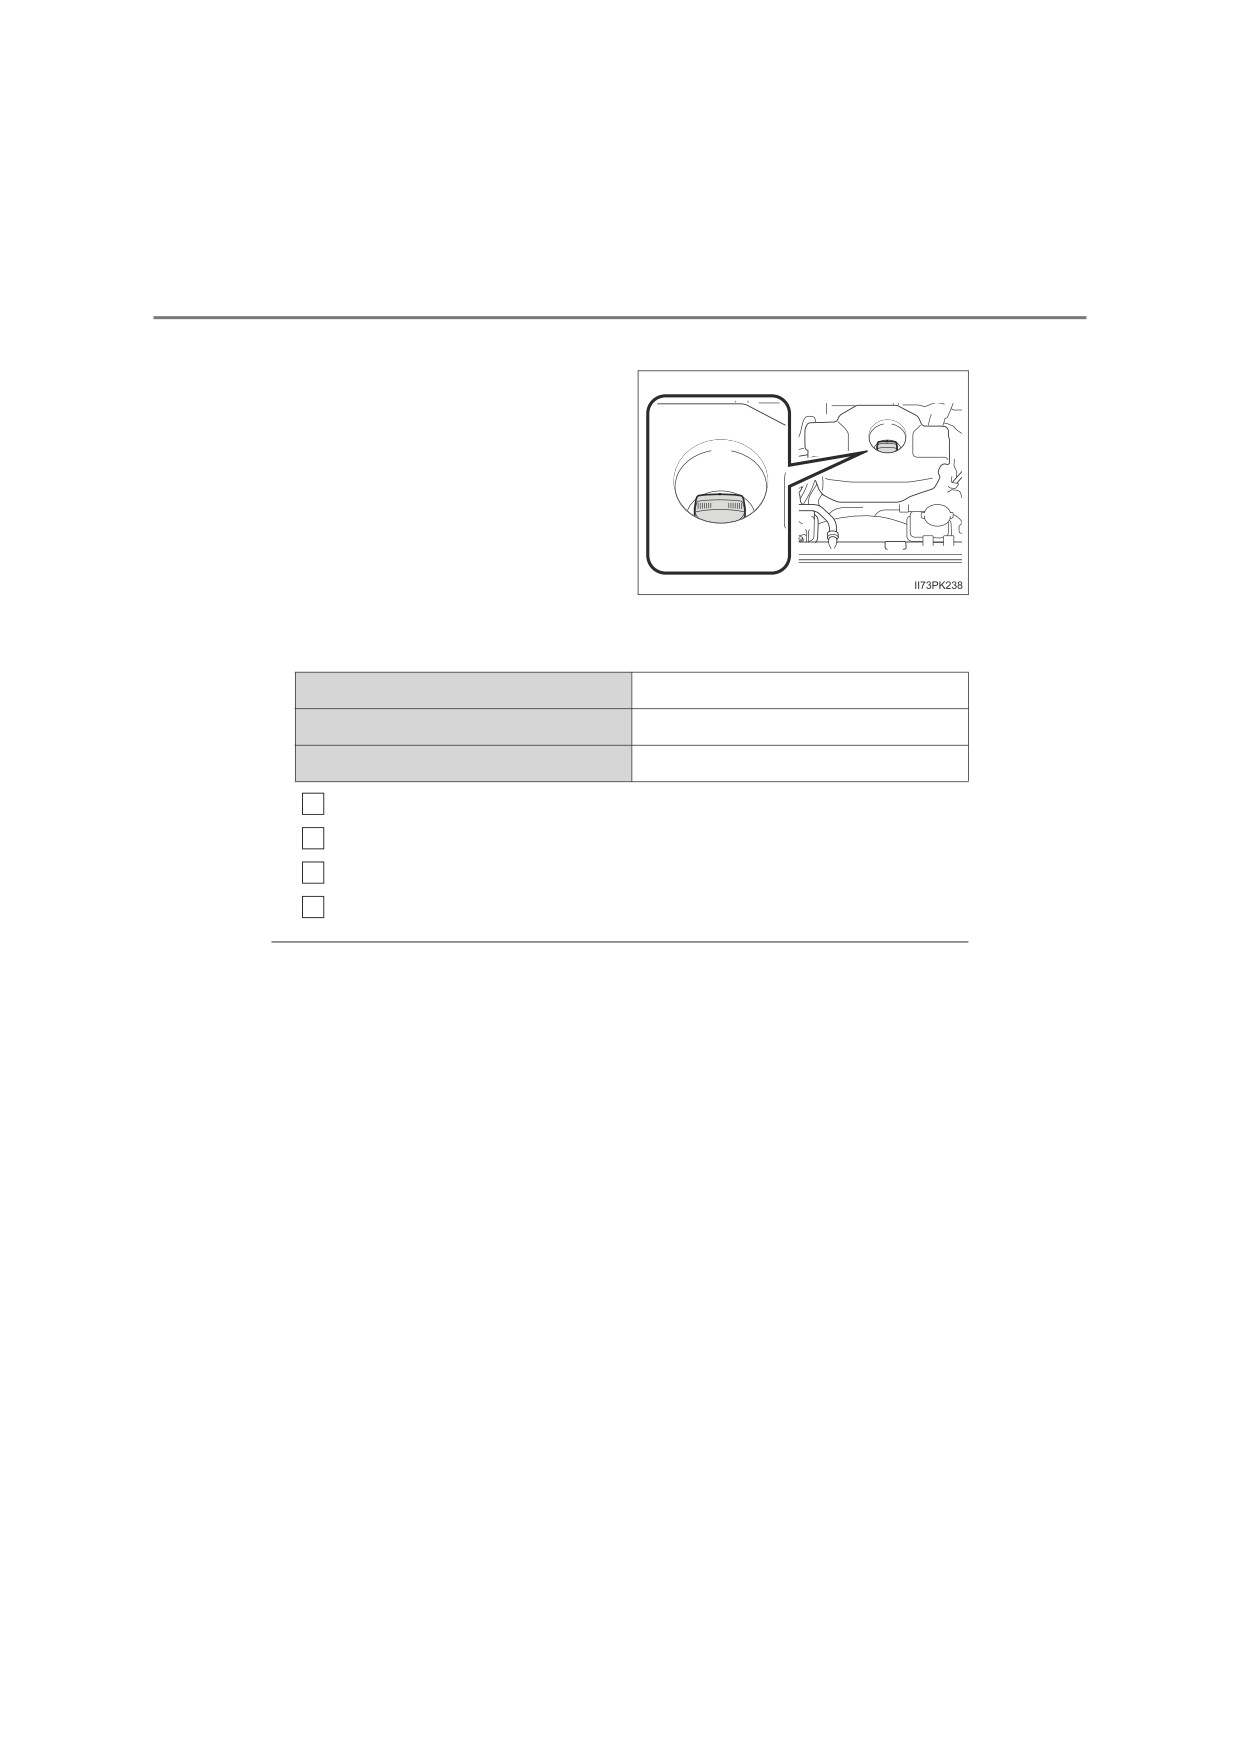
With the engine at operating temperature and turned off, check the oil
level on the dipstick.
Q Checking the engine oil
Park the vehicle on level ground. After warming up the engine
1
and turning it off, wait more than 5 minutes for the oil to drain
back into the bottom of the engine.
2
Remove the sand and dust from around the dipstick.
3
Holding a rag under the end,
pull the dipstick out.
4
Wipe the dipstick clean.
Make sure that the inlet of the oil level gauge guide and O-ring of the
dipstick are free from sand and dust.
If the O-ring is damaged, replace it with a new one.
5
Reinsert the dipstick fully.
6
Holding a rag under the end,
7
pull the dipstick out and
check the oil level.
1
Low
2
Normal
3
Excessive
The shape of the dipstick may
differ depending on the type
of vehicle or engine.
Wipe the dipstick and reinsert it fully.
7
490
7-3. Do-it-yourself maintenance
Q Adding engine oil
If the oil level is below or near
the low level mark, add engine
oil of the same type as that
already in the engine.
Make sure to check the oil type and prepare the items needed
before adding oil.
Engine oil selection
P. 628
Oil quantity (Low Full)
1.5 L (1.6 qt., 1.3 Imp.qt.)
Items
Clean funnel
1
Remove the sand and dust from around the oil filler cap.
2
Remove the oil filler cap by turning it counterclockwise.
3
Add engine oil slowly, checking the dipstick.
4
Install the oil filler cap by turning it clockwise.
QEngine oil consumption
A certain amount of engine oil will be consumed while driving. In the following
situations, oil consumption may increase, and engine oil may need to be
refilled in between oil maintenance intervals.
O When the engine is new, for example directly after purchasing the vehicle or
after replacing the engine
O If low quality oil or oil of an inappropriate viscosity is used
O When driving at high engine speeds or with a heavy load, when towing (with
towing hitch), or when driving while accelerating or decelerating frequently
O When leaving the engine idling for a long time, or when driving frequently
through heavy traffic
7-3. Do-it-yourself maintenance
491
Q After changing the engine oil (models for model code destination W*)
The engine oil maintenance data should be reset. Perform the following pro-
cedures:
Switch the display to the trip meter A (P. 132) when the engine switch is
1
in the “ON” position (vehicles without smart entry & start system) or IGNI-
TION ON mode (vehicles with smart entry & start system).
Turn the engine switch to the “LOCK” position (vehicles without smart entry
2
& start system) or off (vehicles with smart entry & start system).
While pressing the odometer/trip meter display change button (P. 132),
3
turn the engine switch to the “ON” position (vehicles without smart entry &
start system) or IGNITION ON mode (vehicles with smart entry & start sys-
tem). (Do not start the engine because reset mode will be canceled.) Con-
tinue to press and hold the button for more than one second after the trip
meter displays “000000”.
*: See “Checking your vehicle’s model” if you are not sure of which model
your vehicle is. (P. 12)
WARNING
Q Used engine oil
OUsed engine oil contains potentially harmful contaminants which may
cause skin disorders such as inflammation and skin cancer, so care
should be taken to avoid prolonged and repeated contact. To remove used
engine oil from your skin, wash thoroughly with soap and water.
ODispose of used oil and filters only in a safe and acceptable manner. Do
not dispose of used oil and filters in household trash, in sewers or onto the
ground. Call any authorized Toyota retailer or Toyota authorized repairer,
7
or any reliable repairer, service station or auto parts store for information
concerning recycling or disposal.
ODo not leave used engine oil within the reach of children.
NOTICE
Q To prevent serious engine damage
Check the oil level on a regular basis.
Q When replacing the engine oil
OBe careful not to spill engine oil on the vehicle components.
O Avoid overfilling, or the engine could be damaged.
OCheck the oil level on the dipstick every time you refill the vehicle.
O Be sure the engine oil filler cap is properly tightened.
492
7-3. Do-it-yourself maintenance
Coolant
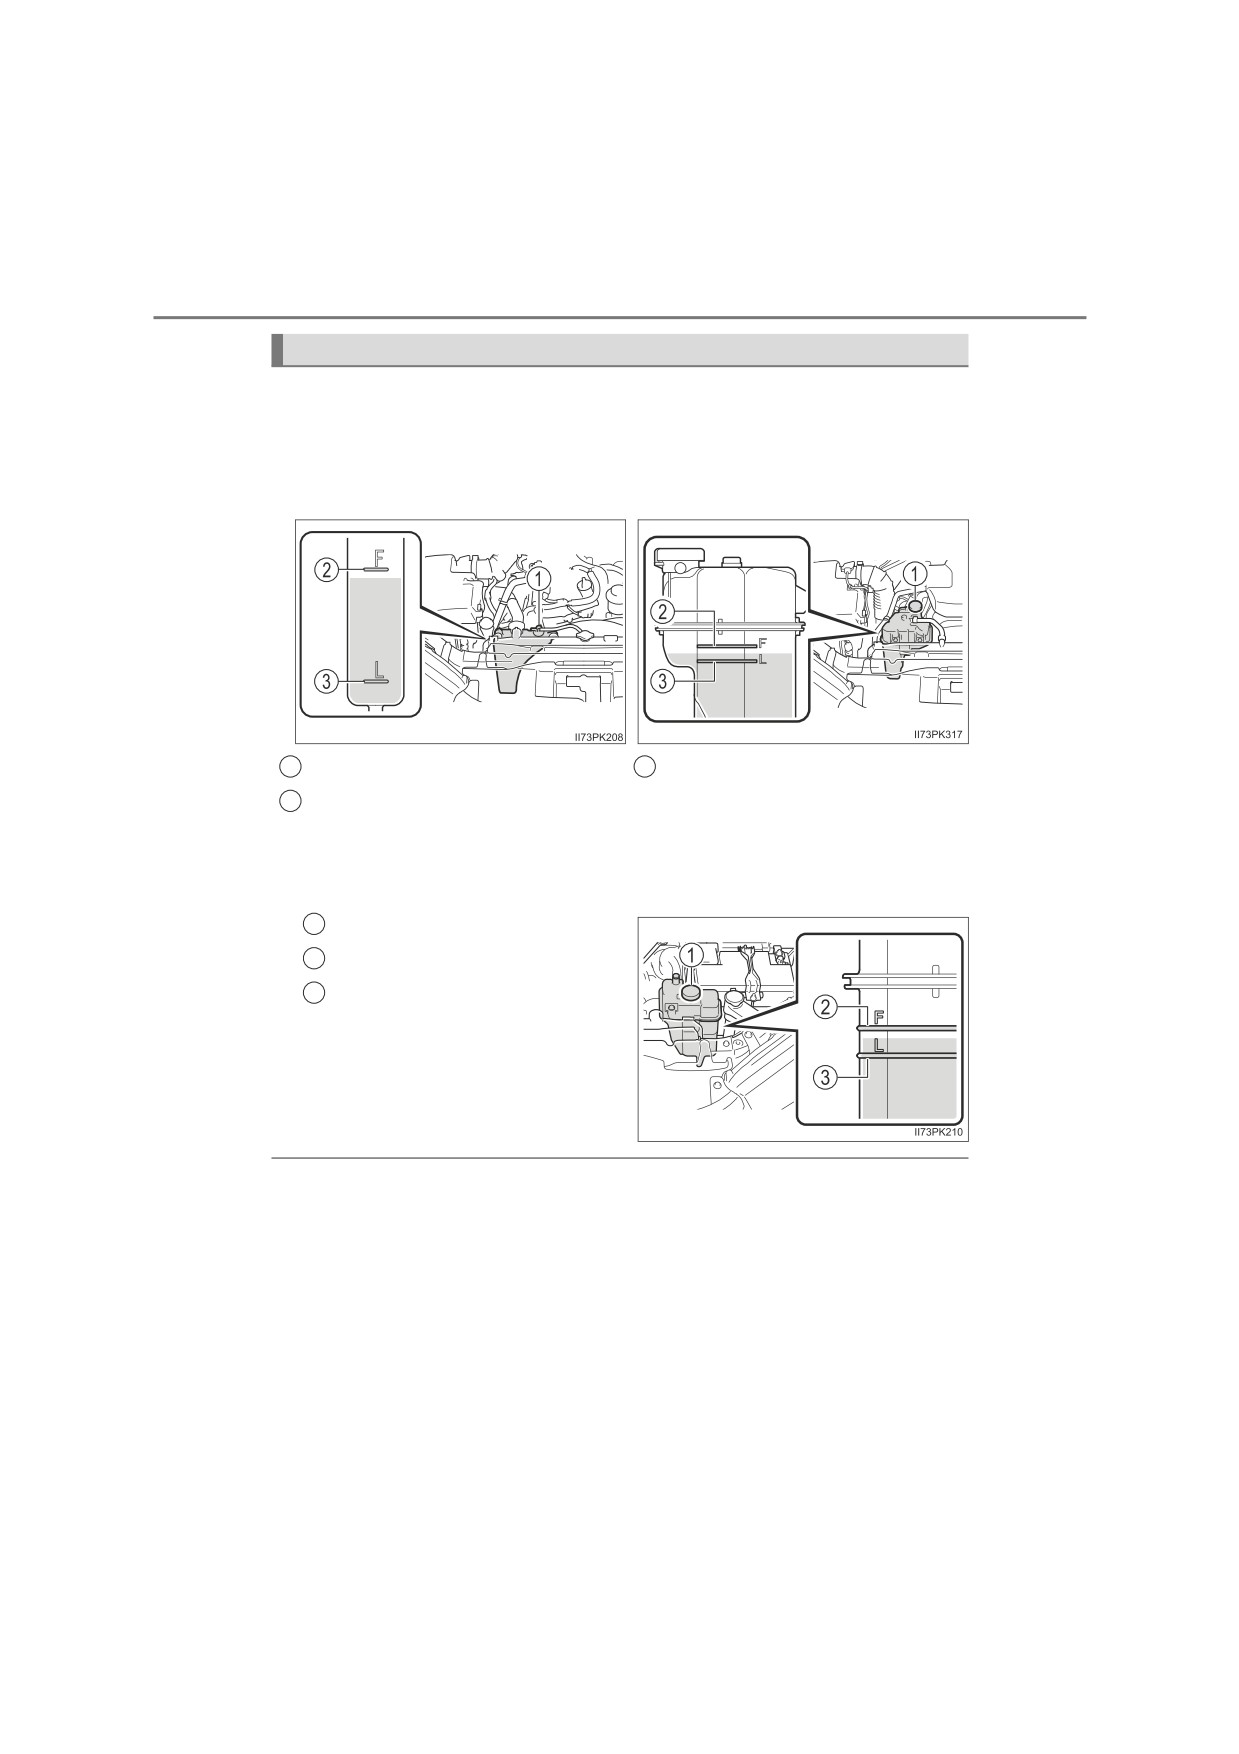
The coolant level is satisfactory if it is between the “F” and “L” lines on
the reservoir when the engine is cold.
Q Engine coolant reservoir
Gasoline engine
Diesel engine
1
Reservoir cap
3
“L” line
2
“F” line
If the level is on or below the “L” line, add coolant up to the “F” line.
(P. 610)
Q Intercooler coolant reservoir (if equipped)
1
Reservoir cap
2
“F” line
3
“L” line
If the level is on or below the “L”
line, add coolant up to the “F”
line. (P. 610)
Q Coolant selection
Only use “Toyota Super Long Life Coolant” or a similar high quality ethylene
glycol based non-silicate, non-amine, non-nitrite, and non-borate coolant with
long-life hybrid organic acid technology.
“Toyota Super Long Life Coolant” is a mixture of 50% coolant and 50% deion-
ized water. (Minimum temperature: -35C [-31F])
For more details about engine coolant, contact any authorized Toyota retailer
or Toyota authorized repairer, or any reliable repairer.

7-3. Do-it-yourself maintenance
493
Q If the coolant level drops within a short time of replenishing
Visually check the radiator, hoses, engine coolant reservoir cap, intercooler
coolant reservoir cap (if equipped), drain cock and water pump. If you cannot
find a leak, have any authorized Toyota retailer or Toyota authorized repairer,
or any reliable repairer test the cap and check for leaks in the cooling system.
WARNING
Q When the engine is hot
Do not remove the radiator cap (if equipped), the engine coolant reservoir
cap or intercooler coolant reservoir cap (if equipped).
The cooling system may be under pressure and may spray hot coolant if the
cap is removed, causing serious injuries, such as burns.
NOTICE
Q When adding coolant
Coolant is neither plain water nor straight antifreeze. The correct mixture of
water and antifreeze must be used to provide proper lubrication, corrosion
protection and cooling. Be sure to read the antifreeze or coolant label.
Q If you spill coolant
Be sure to wash it off with water to prevent it from damaging parts or paint.
Q Notice on coolant quality
Do not use improper coolant. If improper coolant is used, the engine cooling
system may be damaged.
7
Radiator, condenser and intercooler coolant radiator/intercooler
(if equipped)
Check the radiator, condenser and intercooler coolant radiator/inter-
cooler and clear away any foreign objects. If any of the above parts is
extremely dirty or you are not sure of their condition, have your vehi-
cle inspected by any authorized Toyota retailer or Toyota authorized
repairer, or any reliable repairer.
WARNING
Q When the engine is hot
Do not touch the radiator, condenser or intercooler coolant radiator/inter-
cooler as they may be hot and cause serious injuries, such as burns.
494
7-3. Do-it-yourself maintenance
Battery
Check the battery as follows.
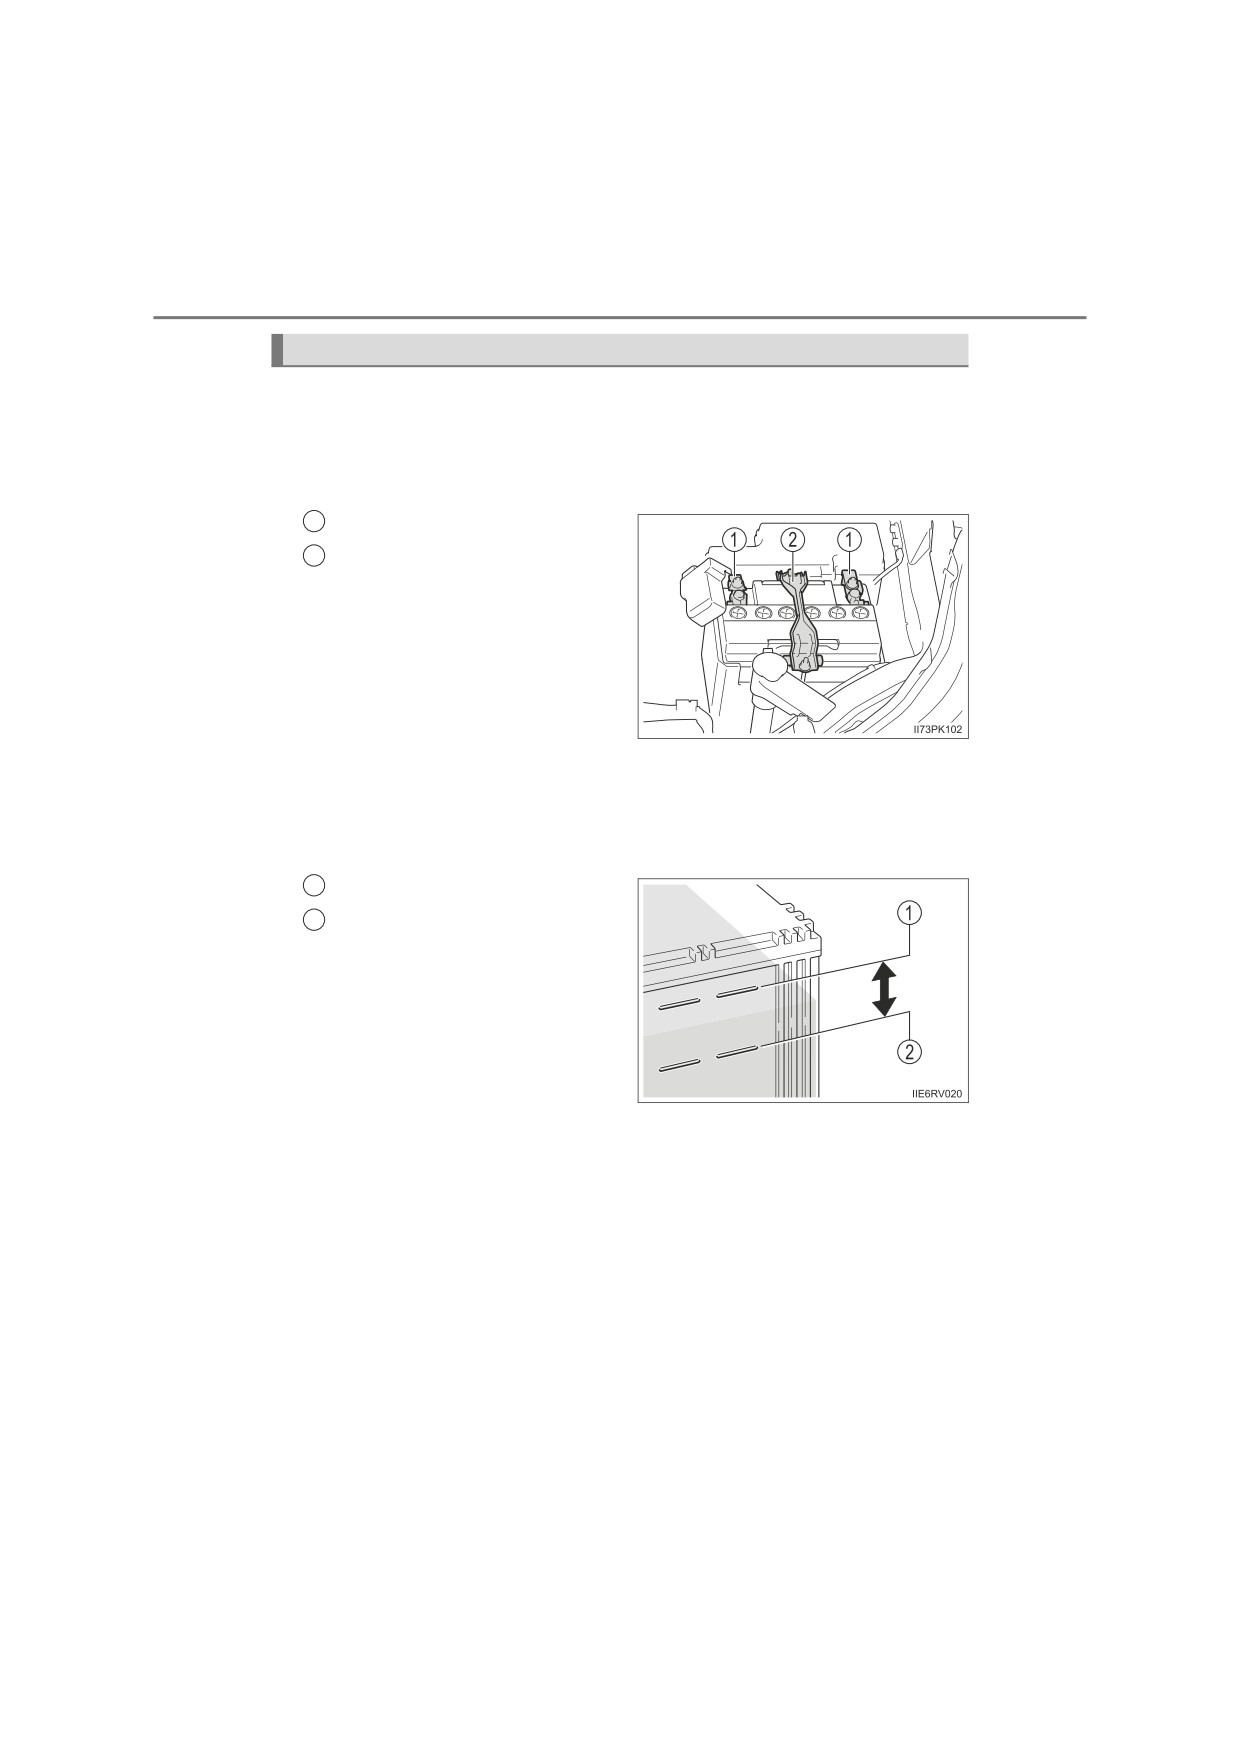
Q Battery exterior
Make sure that the battery terminals are not corroded and that
there are no loose connections, cracks, or loose clamps.
1
Terminals
2
Hold-down clamp
Q Checking battery fluid (vehicles with maintenance type bat-
tery)
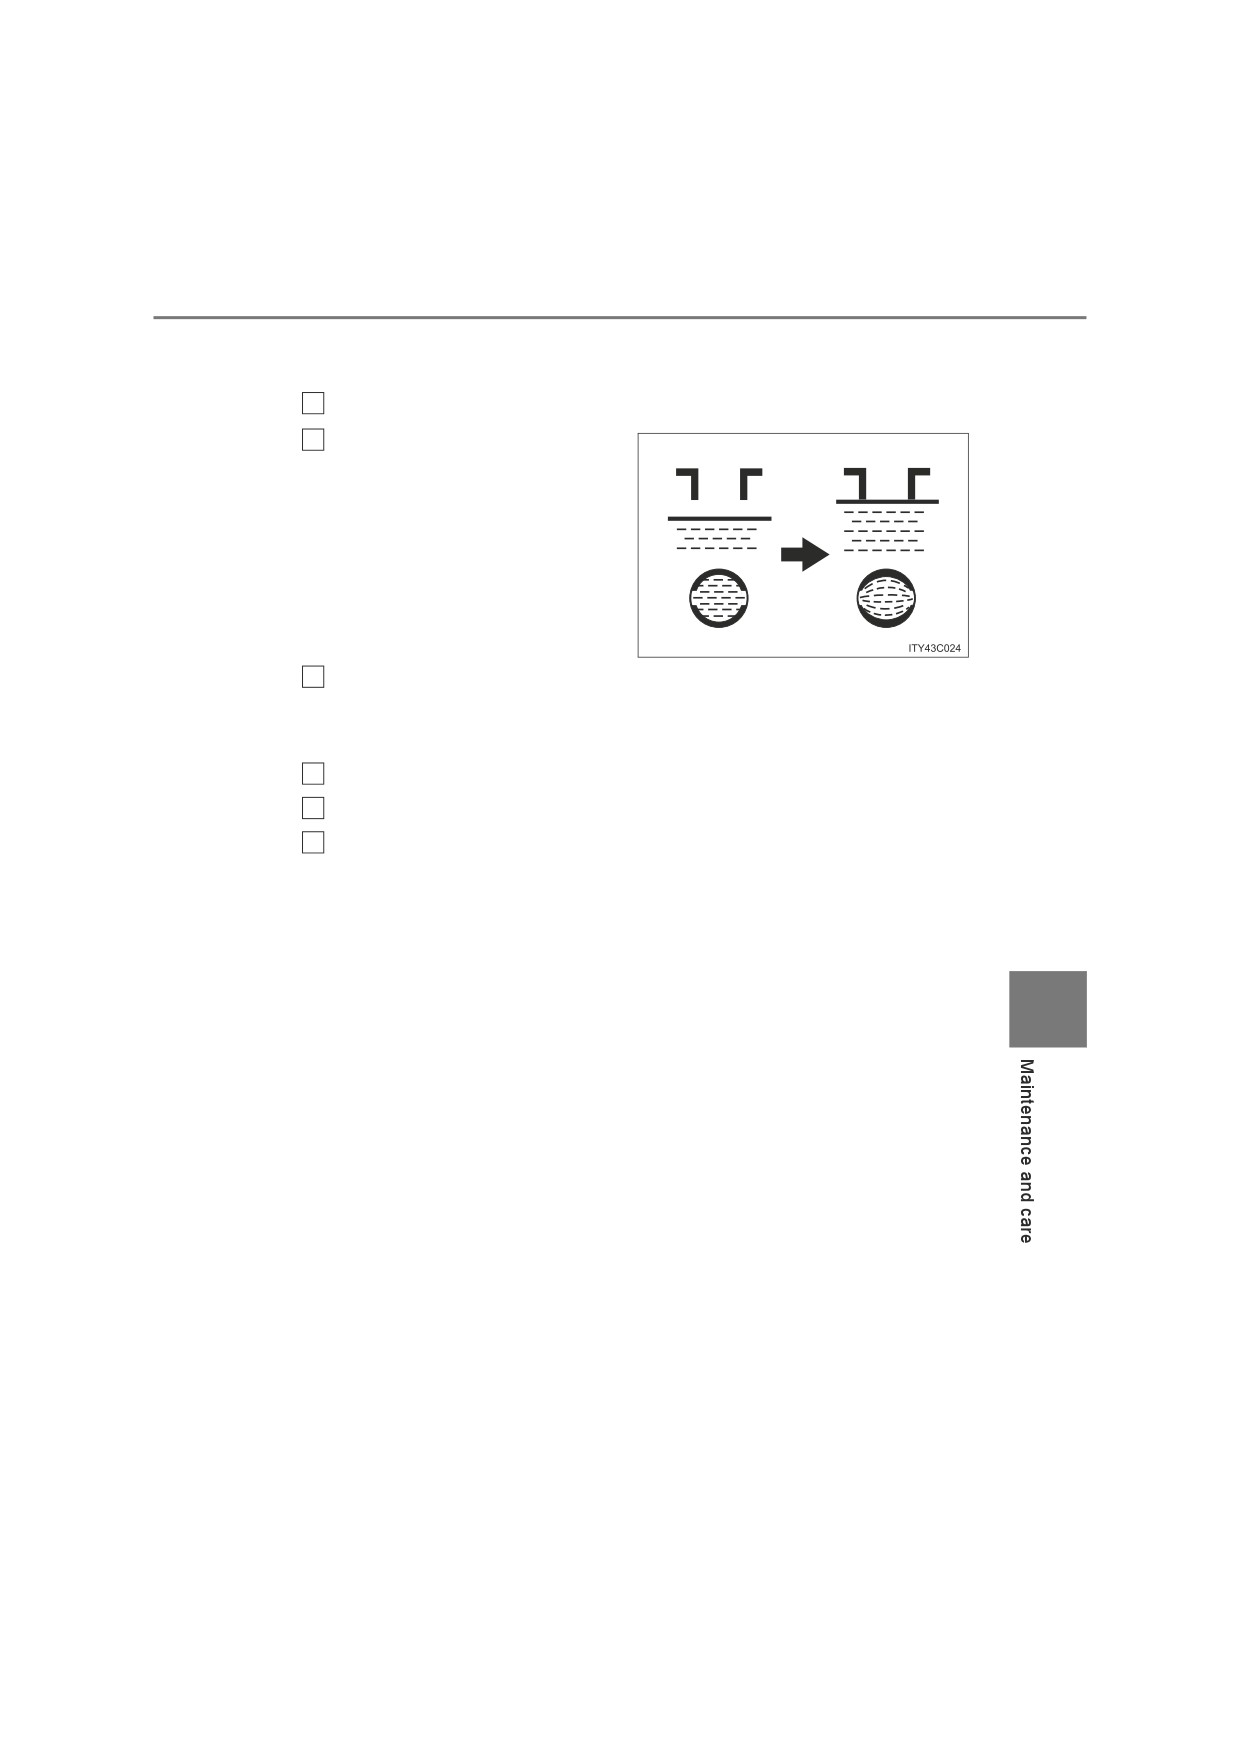
If there are lines on the side of the battery:
Check that the level is between the upper and lower lines.
1
Upper line
2
Lower line
If the fluid level is at or below the
lower line, add distilled water.
7-3. Do-it-yourself maintenance
495
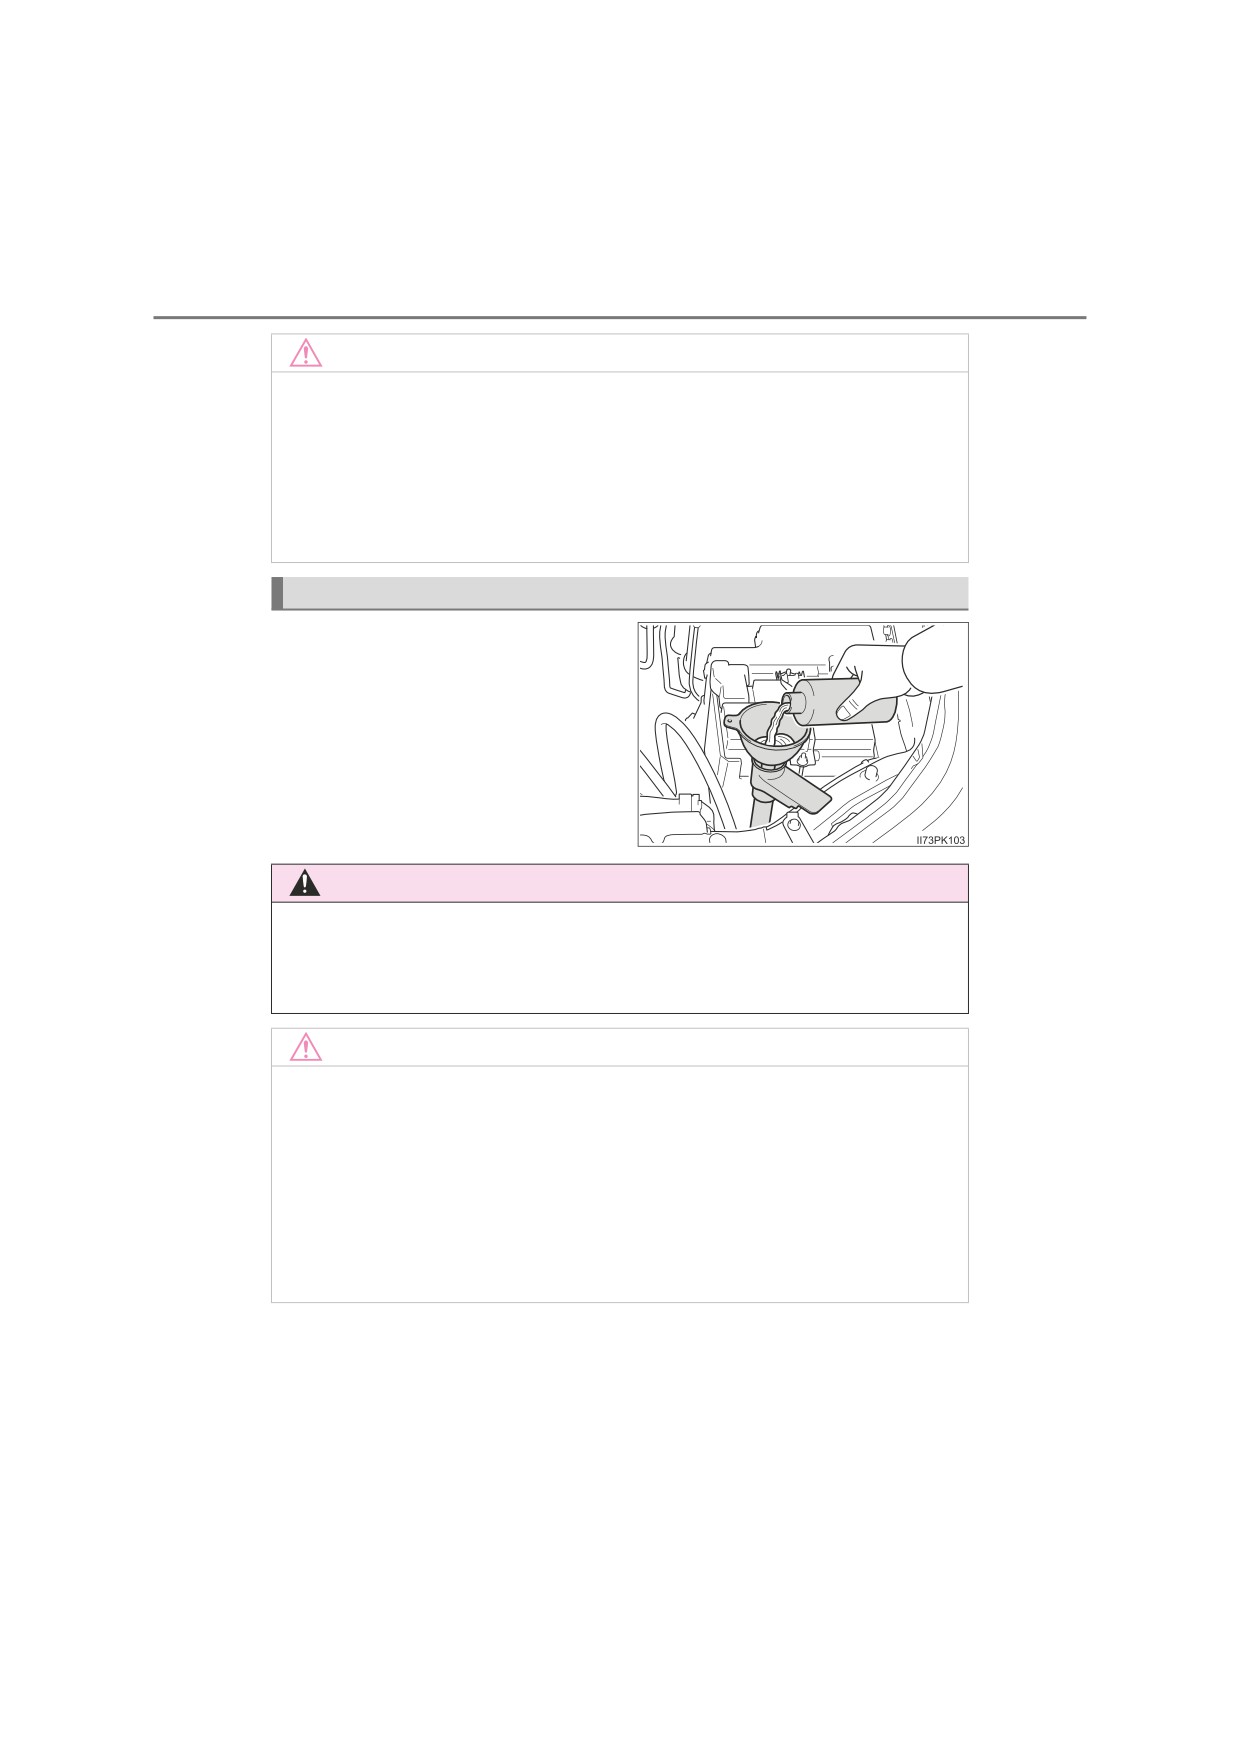
If there are not lines on the side of the battery:
Check the fluid level as follows.
1
Remove the vent plug.
2
Check the fluid level by look-
Low
O.K.
ing directly at the cell.
If the fluid level is low, add dis-
tilled water.
3
Put the vent plug back on and close it securely.
Q Adding distilled water (vehicles with maintenance type bat-
tery)
1
Remove the vent plug.
2
Add distilled water.
3
Put the vent plug back on and close it securely.
7
496
7-3. Do-it-yourself maintenance
Q Before recharging
When recharging, the battery produces hydrogen gas which is flammable and
explosive. Therefore, observe the following before recharging:
O If recharging with the battery installed on the vehicle, be sure to disconnect
the ground cable.
O Make sure the power switch on the charger is off when connecting and dis-
connecting the charger cables to the battery.
Q After recharging/reconnecting the battery (vehicles with smart entry &
start system)
The engine may not start. Follow the procedure below to initialize the system.
Shift the shift lever to P (automatic transmission) or depress the brake
1
pedal with the shift lever in N (manual transmission).
2
Open and close any of the doors.
3
Restart the engine.
O Unlocking the doors using the smart entry & start system may not be possi-
ble immediately after reconnecting the battery. If this happens, use the wire-
less remote control or the mechanical key to lock/unlock the doors.
OStart the engine with the engine switch in ACCESSORY mode. The engine
may not start with the engine switch turned off. However, the engine will
operate normally from the second attempt.
O The engine switch mode is recorded by the vehicle. If the battery is recon-
nected, the vehicle will return the engine switch mode to the status it was in
before the battery was disconnected. Make sure to turn off the engine
before disconnect the battery. Take extra care when connecting the battery
if the engine switch mode prior to discharge is unknown.
If the system will not start even after multiple attempts, contact any authorized
Toyota retailer or Toyota authorized repairer, or any reliable repairer.
Q If a symbol of a battery is shown on the multi-information display
There is a malfunction in the vehicle’s charging system.
Immediately stop the vehicle in a safe place and contact any authorized
Toyota retailer or Toyota authorized repairer, or any reliable repairer. Continu-
ing to drive the vehicle may be dangerous.
7-3. Do-it-yourself maintenance
497
WARNING
Q Chemicals in the battery
Batteries contain poisonous and corrosive sulfuric acid and may produce
hydrogen gas which is flammable and explosive. To reduce the risk of death
or serious injury, take the following precautions while working on or near the
battery:
ODo not cause sparks by touching the battery terminals with tools.
ODo not smoke or light a match near the battery.
O Avoid contact with eyes, skin and clothes.
ONever inhale or swallow electrolyte.
O Wear protective safety glasses when working near the battery.
O Keep children away from the battery.
Q Where to safely charge the battery
Always charge the battery in an open area. Do not charge the battery in a
garage or closed room where there is insufficient ventilation.
Q How to recharge the battery (vehicles with maintenance-free type bat-
tery)
Only perform a slow charge (5 A or less). The battery may explode if
charged at a quicker rate.
Q Emergency measures regarding electrolyte
OIf electrolyte gets in your eyes
Flush your eyes with clean water for at least 15 minutes and get immedi-
ate medical attention. If possible, continue to apply water with a sponge or
cloth while traveling to the nearest medical facility.
OIf electrolyte gets on your skin
7
Wash the affected area thoroughly. If you feel pain or burning, get medical
attention immediately.
O If electrolyte gets on your clothes
It can soak through clothing on to your skin. Immediately take off the cloth-
ing and follow the procedure above if necessary.
OIf you accidentally swallow electrolyte
Drink a large quantity of water or milk. Get emergency medical attention
immediately.
OWhen there is insufficient battery fluid
Do not use if there is insufficient fluid in the battery. There is a possible
danger that the battery may explode.
Q When disconnecting the battery
Do not disconnect the negative (-) terminal on the body. The disconnected
negative (-) terminal may touch the positive (+) terminal, which may cause a
short and result in death or serious injury.
498
7-3. Do-it-yourself maintenance
NOTICE
Q When recharging the battery
Never recharge the battery while the engine is running. Also, be sure all
accessories are turned off.
Q When adding distilled water (vehicles with maintenance type battery)
Avoid overfilling. Water spilled during battery recharging may cause corro-
sion.
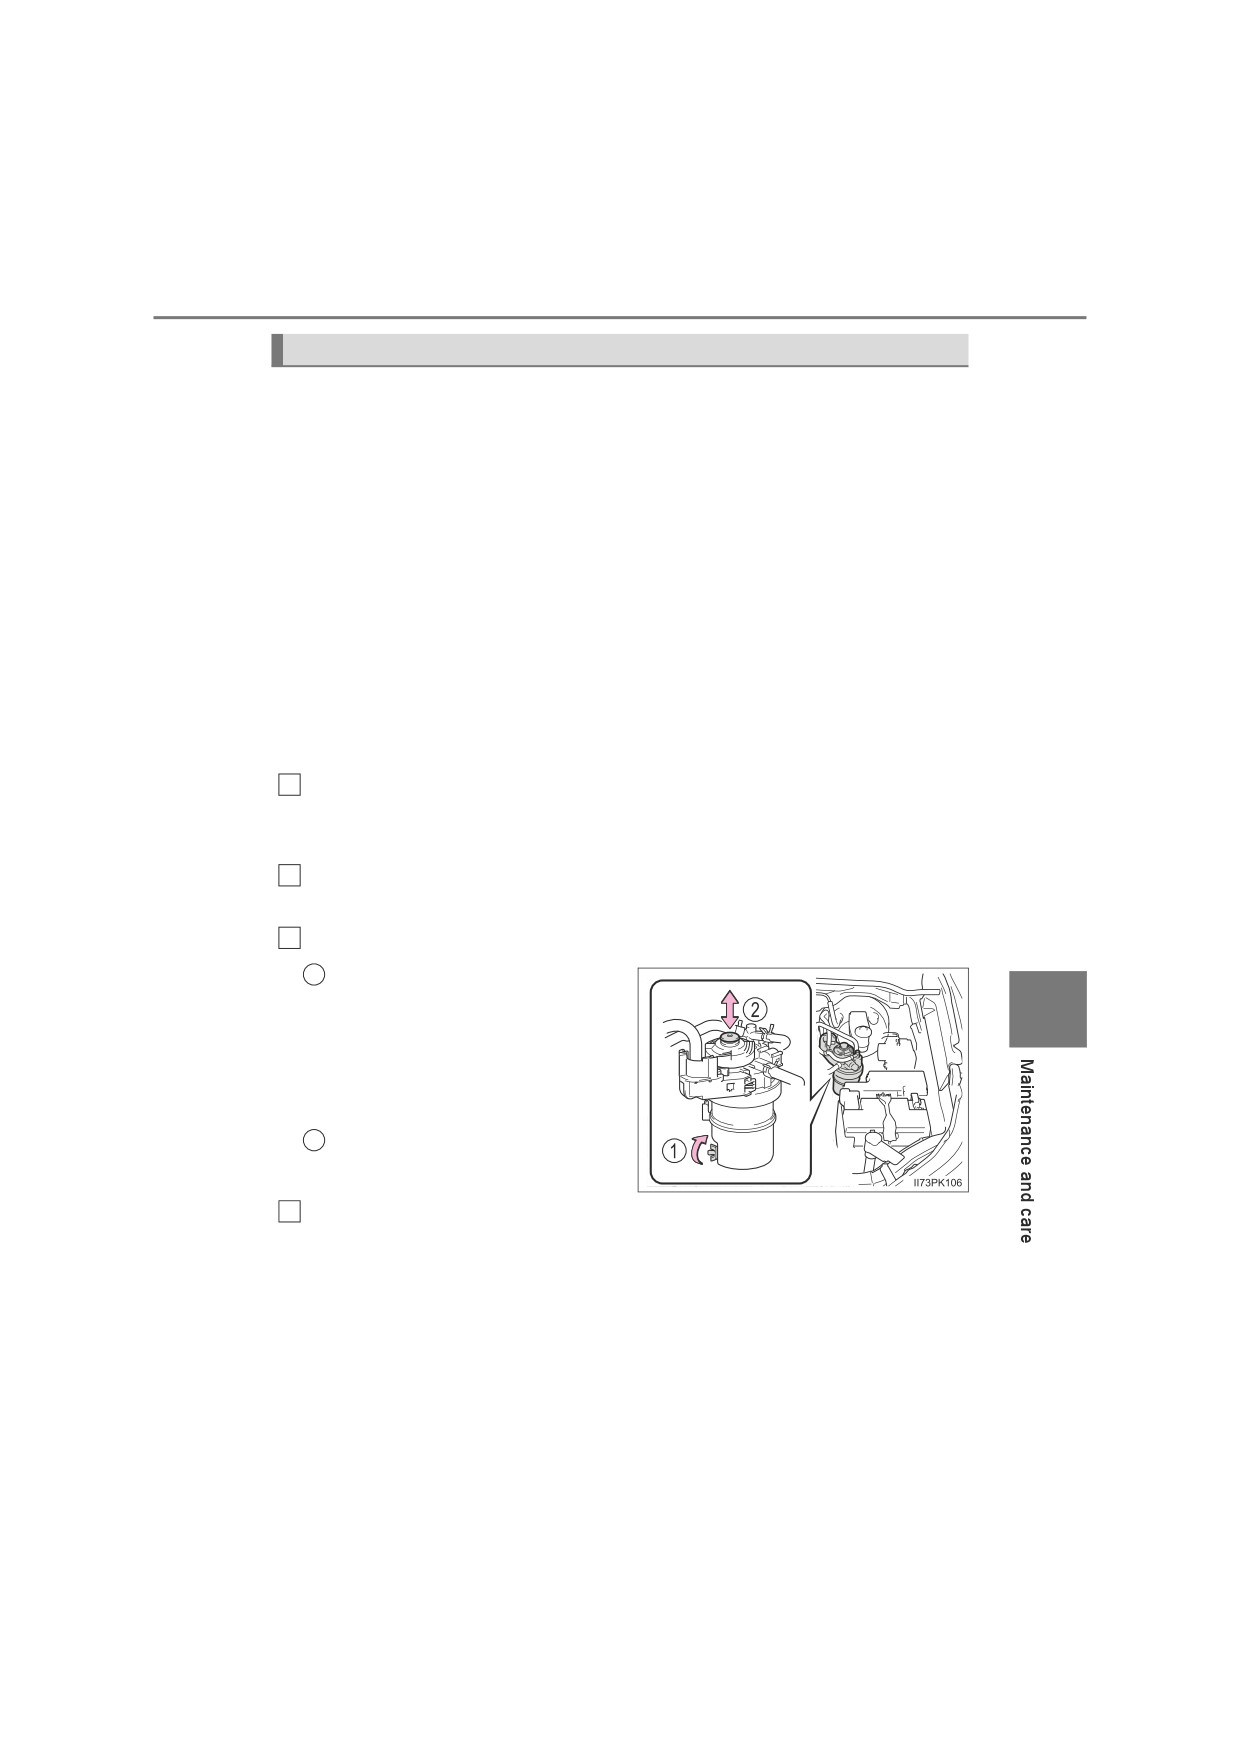
Washer fluid
Add washer fluid in the following
situations:
O A washer does not work.
O The warning message appears
on the multi-information display
(if equipped).
WARNING
Q When adding washer fluid
Do not add washer fluid when the engine is hot or running as washer fluid
contains alcohol and may catch fire if spilled on the engine etc.
NOTICE
Q Do not use any fluid other than washer fluid
Do not use soapy water or engine antifreeze instead of washer fluid.
Doing so may cause streaking on the vehicle’s painted surfaces as well as
damaging the pump leading to problems of the washer fluid not spraying.
Q Diluting washer fluid
Dilute washer fluid with water as necessary.
Refer to the freezing temperatures listed on the label of the washer fluid bot-
tle.
7-3. Do-it-yourself maintenance
499
Fuel filter (diesel engine only)
You may drain the fuel filter yourself. However, as the operation is dif-
ficult, we recommend having it drained by any authorized Toyota
retailer or Toyota authorized repairer, or any reliable repairer. Even if
you decide to drain it yourself, contact any authorized Toyota retailer
or Toyota authorized repairer, or any reliable repairer.
The water in the fuel filter needs to be drained if one of the following
symptoms occurs:
Vehicles without multi-information display
When the fuel system warning light flashes and a buzzer sounds.
(P. 569)
Vehicles with multi-information display
When “Water accumulation in fuel filter See owner’s manual” is
shown on the multi-information display and a buzzer sounds*1.
1
Vehicles without smart entry & start system: Turn the engine switch
to the “LOCK” position.
Vehicles with smart entry & start system: Turn the engine switch off.
2
Place a small tray under the drain plug or drain hose to catch the
water and any fuel that comes out.
3
Perform the draining as shown in the illustration.
1
Turn the drain plug counter-
clockwise about 2 to 2 1/2
7
turns.
Loosening more than this will
cause water oozing from around
the drain plug.
Operate the priming pump
2
until fuel begins to run out.
4
After draining, tighten the drain
plug by
hand.
1: Models for model code destination Blank*2
*2: See “Checking your vehicle’s model” if you
are
not sure of which model
your vehicle is. (P. 12)
500
7-3. Do-it-yourself maintenance
AdBlue™ (if equipped)
AdBlue™ is used to reduce the amount of nitrogen oxides in exhaust
gas. Make sure to observe the following precautions regarding
AdBlue™.
O AdBlue™ is consumed in the process of driving.
O When AdBlue™ is depleted, the engine cannot be restarted.
O When AdBlue™ needs to be refilled, have it refilled at any autho-
rized Toyota retailer or Toyota authorized repairer, or any reliable
repairer.
It may be a criminal offence to use a vehicle that does not consume
any reagent if it is required for the reduction of emissions.
Q Possible driving range
The amount of AdBlue™ that is consumed while driving differs
according to the driving conditions and driving environment. When
the amount of AdBlue™ that is consumed increases, the possible
driving range until it is necessary to refill AdBlue™ decreases.
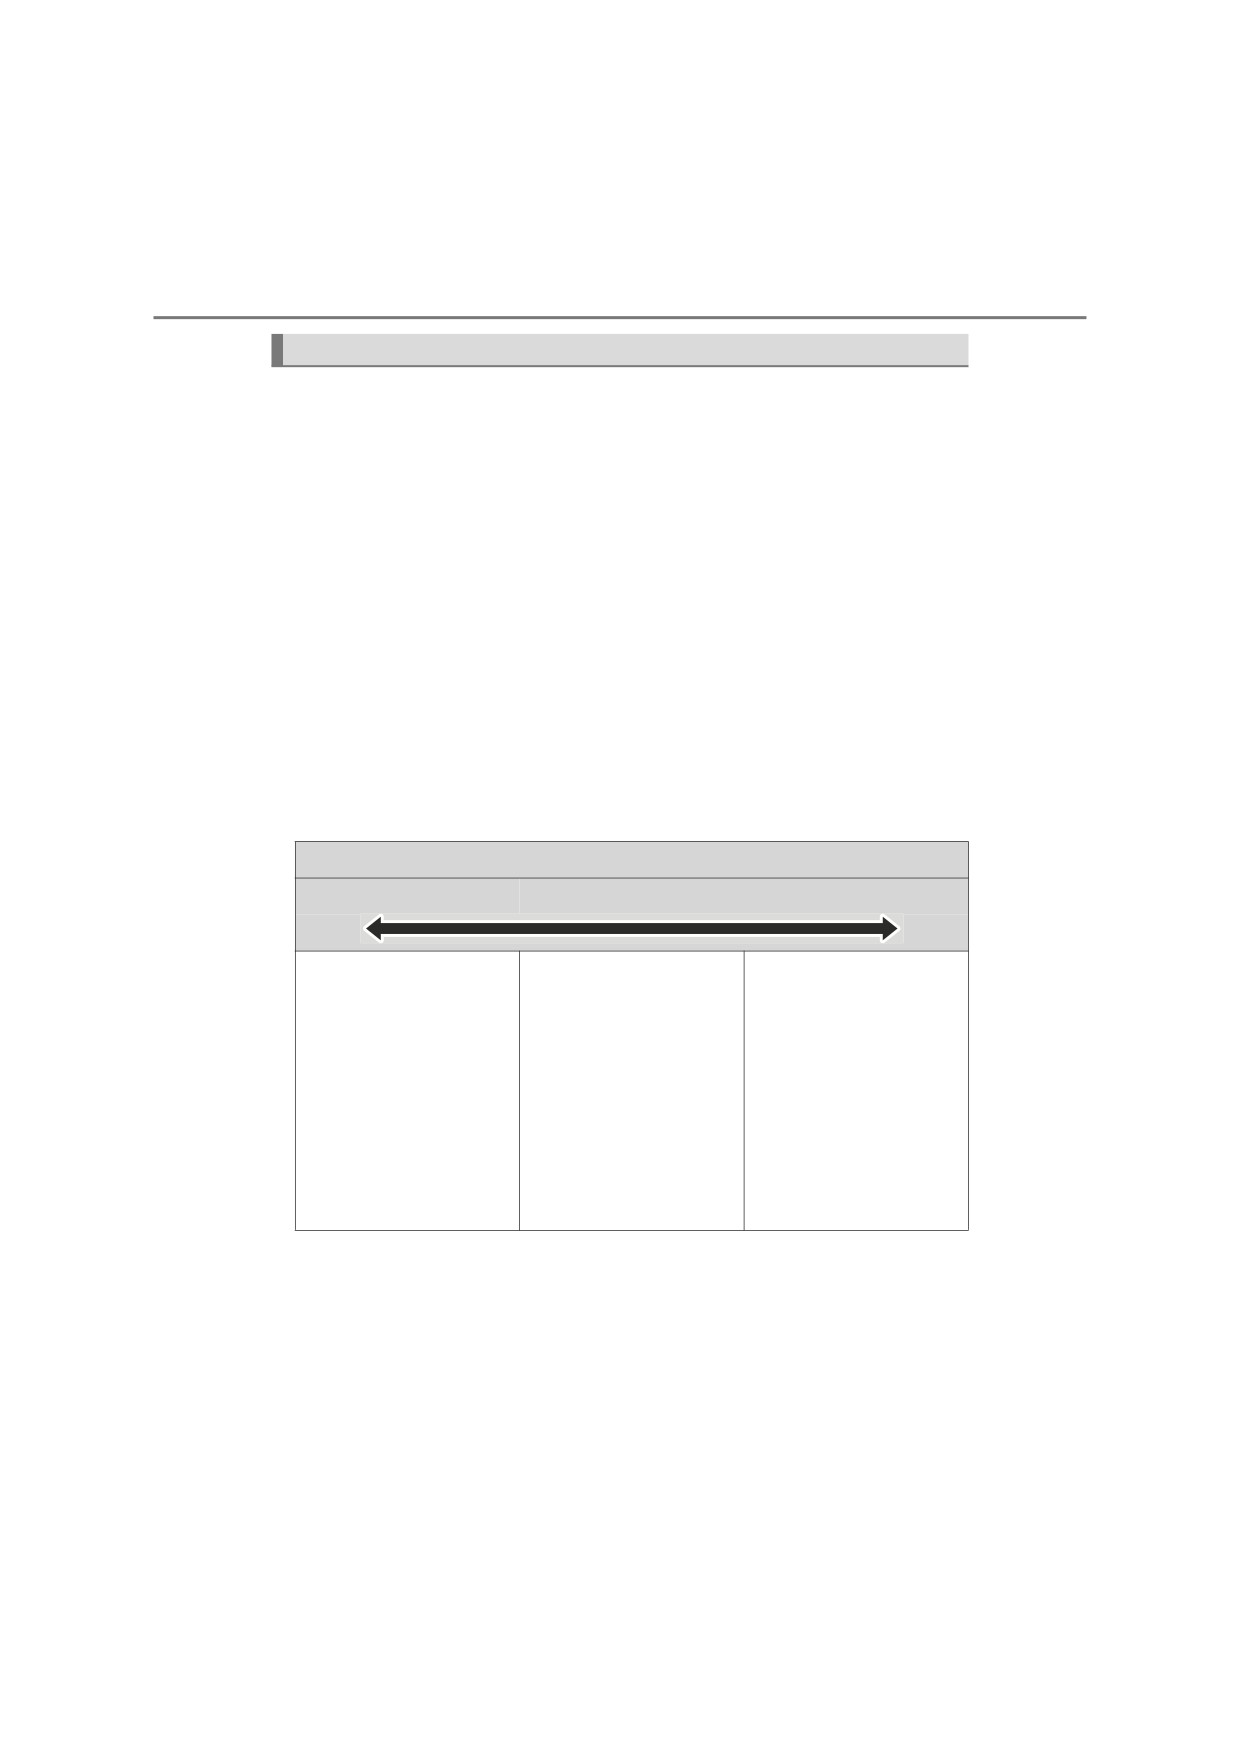
Possible driving range
Short*1
Long
[High-load driving]
[Normal driving]*2
[Low-load driving]
• When your vehicle is
• When driving short
towing a trailer (with
distances
towing hitch)
• When in traffic con-
• When firmly depress-
gestion
ing the accelerator
pedal
• When driving on long
uphill slopes
• When the DPF sys-
tem is operating
*1: When the vehicle is used at high elevations and in low temperatures, the
amount of AdBlue™ that is consumed increases.
*2: During normal driving, 1.0 L (1.1 qt., 0.9 Imp.qt.) of AdBlue™ is con-
sumed approximately every 600 km (373 miles). Also, after a full refill, the
vehicle can be driven for approximately 10000 km (6214 miles) before all
AdBlue™ is depleted.
7-3. Do-it-yourself maintenance
501
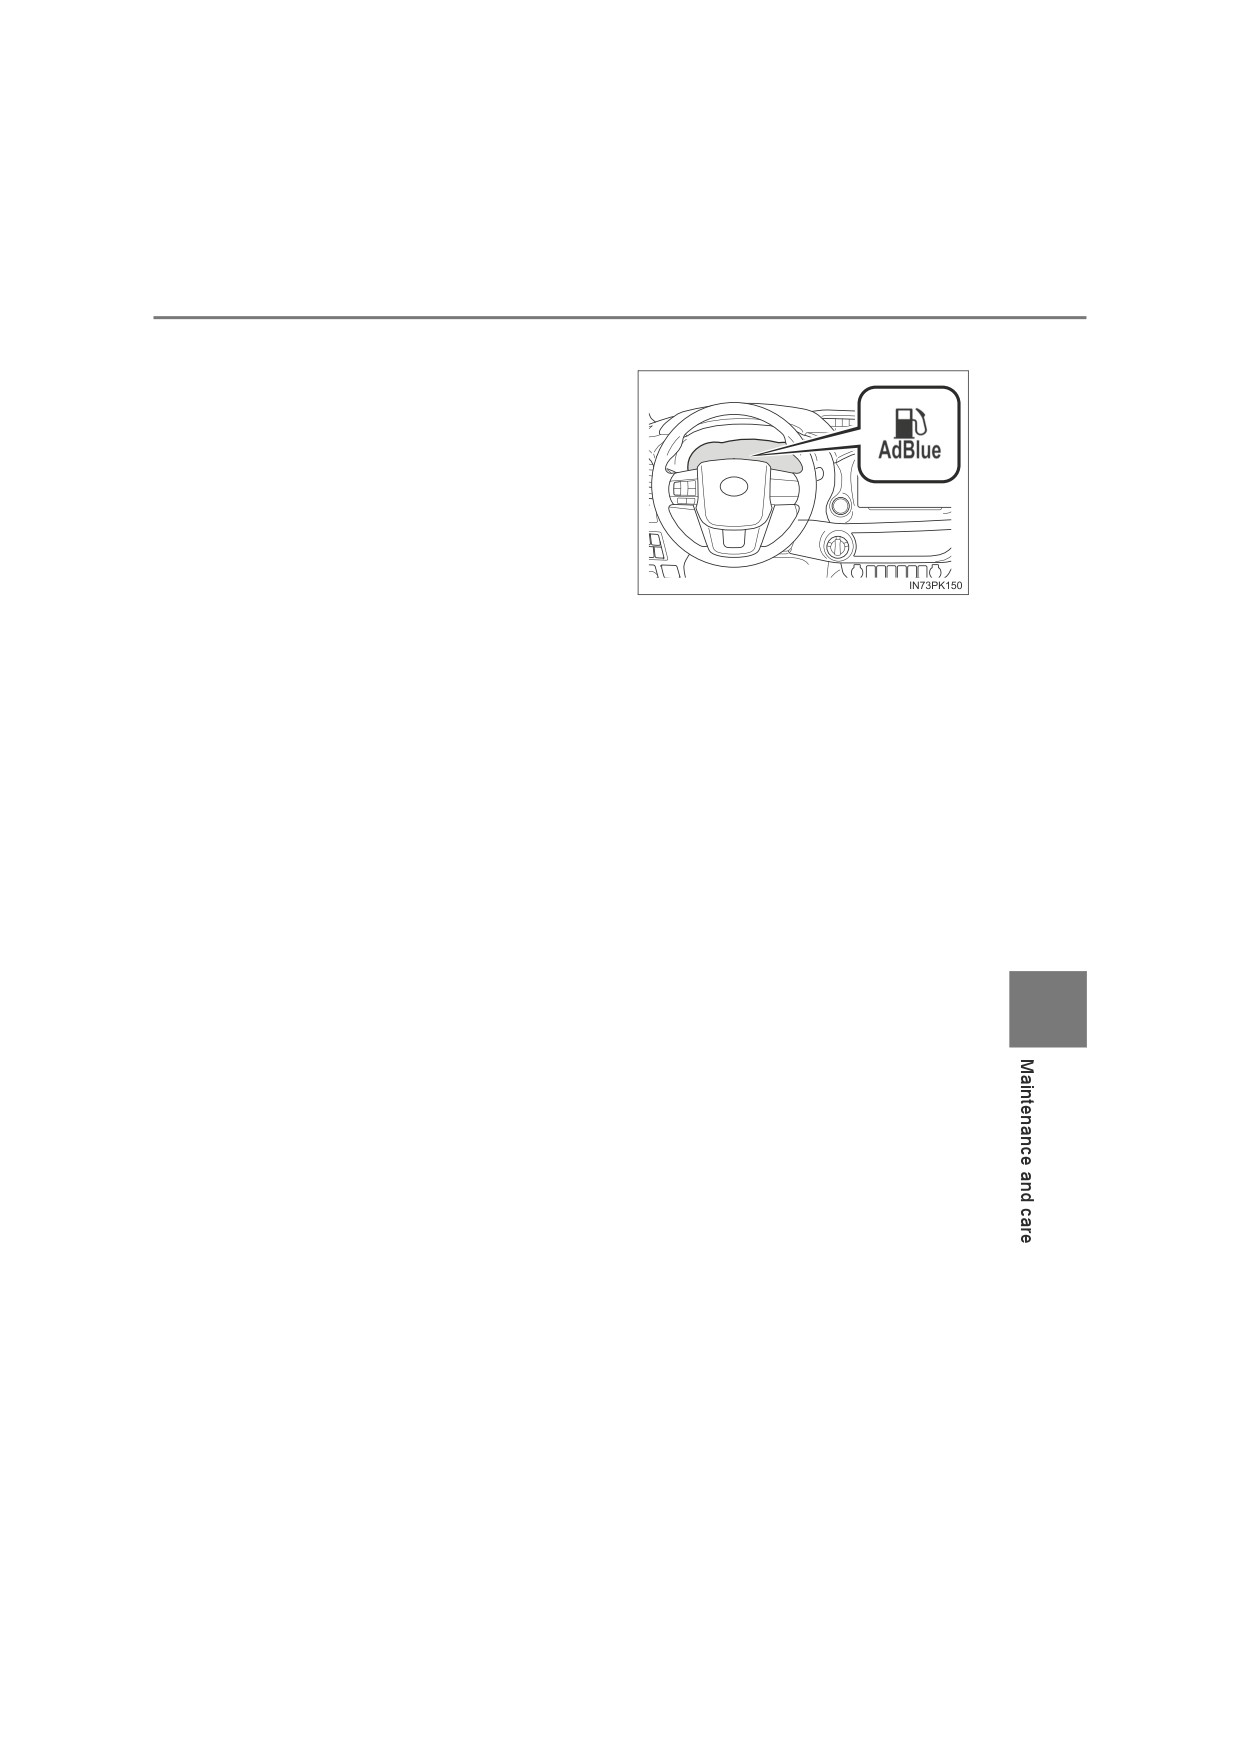
Q AdBlue™ warning light and warning message
When the AdBlue™ level is low,
the low AdBlue™ level warning
light turns on and a warning
message appears on the multi-
information display. (P. 502)
When the possible driving range
based on the remaining amount
of AdBlue™ reaches approxi-
mately 2400 km (1492 miles),
the low AdBlue™ level warning
light turns on and a warning
message is displayed.
When refilling AdBlue™ by yourself in an emergency, be sure to follow
the correct refilling procedures. (P. 503)
7

502
7-3. Do-it-yourself maintenance
Q Warning message
If the following warning message is displayed on the multi-information dis-
play, follow the appropriate troubleshooting procedure.
Warning message
Details/Actions
When AdBlue™ needs to be refilled
“AdBlue Level Low Fill up
Have AdBlue™ refilled at any autho-
AdBlue in 2400 km See
rized Toyota retailer or Toyota autho-
Owner’s Manual”*1
rized repairer, or any reliable repairer.
When AdBlue™ needs to be refilled
If the displayed driving distance is
exceeded, the engine cannot be
“AdBlue level Low No start in
restarted.
800 km Top up AdBlue See
Have AdBlue™ refilled at any autho-
Owner’s Manual”*1, 2
rized Toyota retailer or Toyota autho-
rized repairer, or any reliable repairer
immediately.
When AdBlue™ needs to be refilled
If the engine is stopped, it cannot be
“AdBlue empty Unable to
restarted.
Restart Engine Fill up AdBlue
Without stopping the engine, contact
See Owner’s Manual”*2
any authorized Toyota retailer or
Toyota authorized repairer, or any
reliable repairer immediately.
*1: Use the driving range as a reference. The possible driving range that is dis-
played may differ from the actual driving range depending on the refill
method, driving conditions and driving environment. (P. 500)
*2: The master warning light turns on and the buzzer sounds in accordance
with the warning message.
Q AdBlue™ gauge
The quantity of AdBlue™ remaining in the tank is displayed on the multi-infor-
mation display. (P. 137)
NOTICE
Q When the AdBlue™ level is low
When AdBlue™ is depleted, the engine cannot be restarted.
Be sure to have AdBlue™ refilled at any authorized Toyota retailer or Toyota
authorized repairer, or any reliable repairer before it is completely depleted.
7-3. Do-it-yourself maintenance
503
Q Refilling AdBlue™ by yourself in an emergency
When the engine cannot be restarted due to the depletion of
AdBlue™, adding approximately 11.0 L (11.6 qt., 9.7 Imp.qt.) or
more of AdBlue™ will allow the engine to be started again. Perform
the following procedures to refill AdBlue™. (The AdBlue™ tank has
a capacity of 17.0 L [18.0 qt., 15.0 Imp.qt.].)
Refilling with the refilling equipment
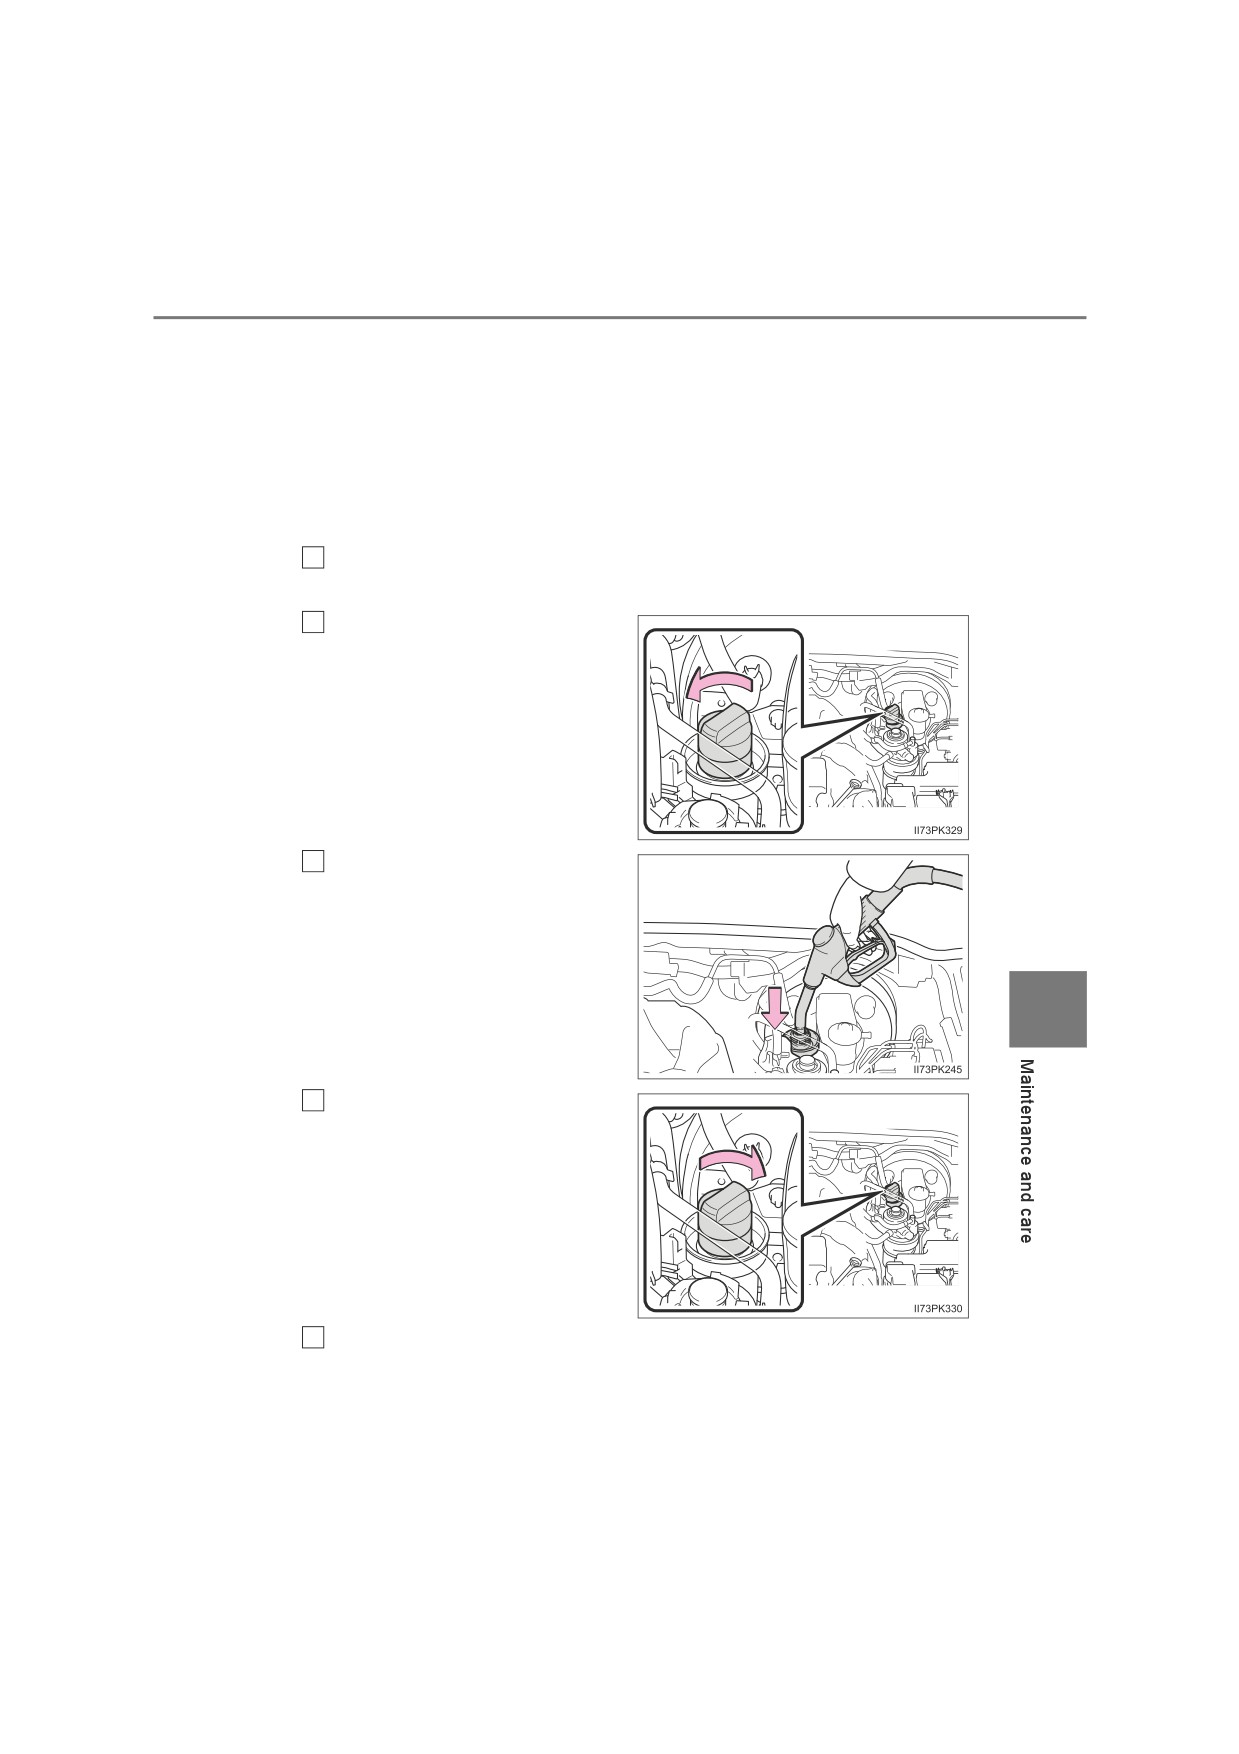
1
Park the vehicle on a level surface, turn the engine switch off,
and then open the hood. (P. 484)
2
Open the AdBlue™ tank cap.
3
Insert the nozzle and refill
AdBlue™.
7
4
Close the AdBlue™ tank cap.
Turn the cap until you hear a
click.
5
Check that the engine starts.
504
7-3. Do-it-yourself maintenance
Refilling with the bottle
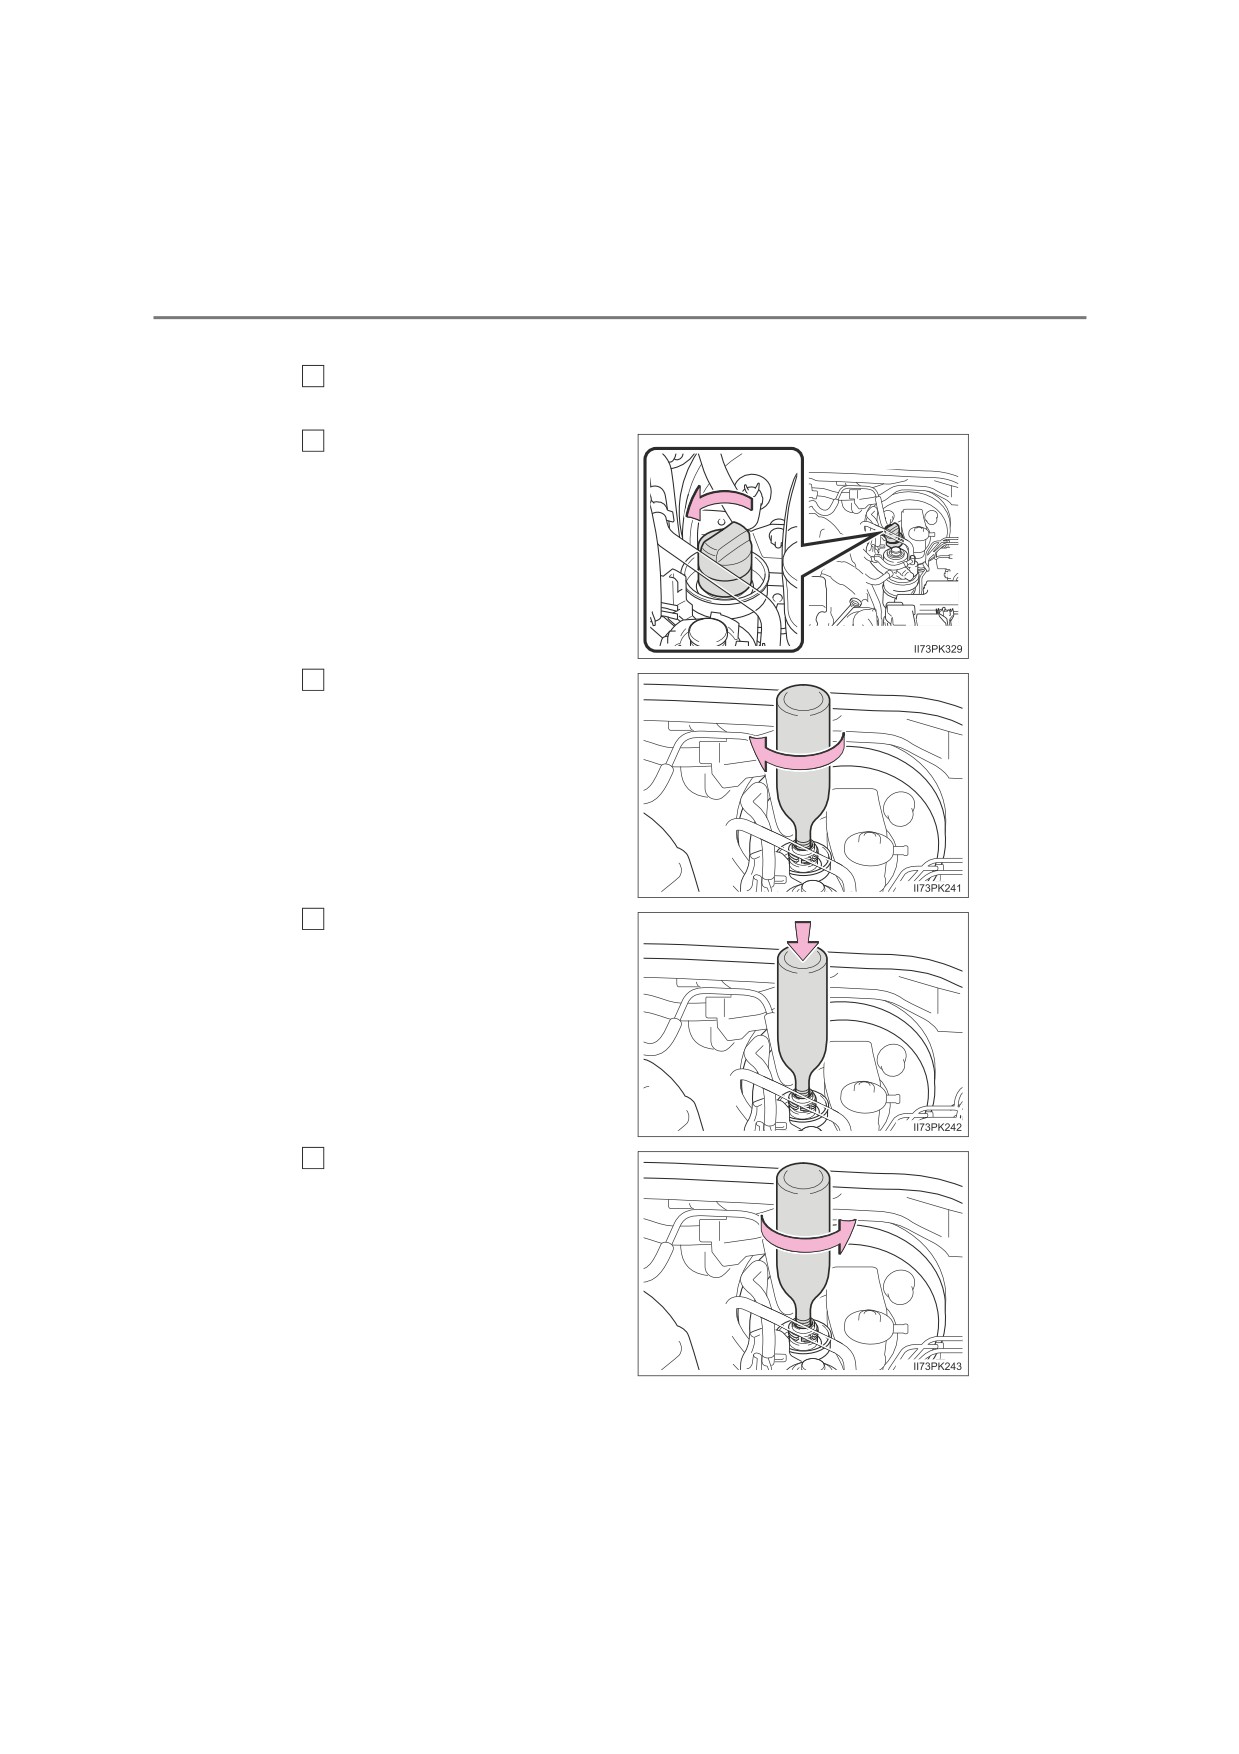
1
Park the vehicle on a level surface, turn the engine switch off,
and then open the hood. (P. 484)
2
Open the AdBlue™ tank cap.
3
Insert a bottle of AdBlue™
and fully tighten it.
Push down on the bottle.
4
AdBlue™ will begin to be
refilled. Refill AdBlue™ slowly
so that it does not spill. Do not
remove the bottle until it is
empty.
Check that no AdBlue™
5
remains in the bottle, and
then remove it.
Repeat steps 3 to 5 until approx-
imately
11.0 L
(11.6 qt.,
9.7
Imp.qt.) or more of AdBlue™
have been refilled.
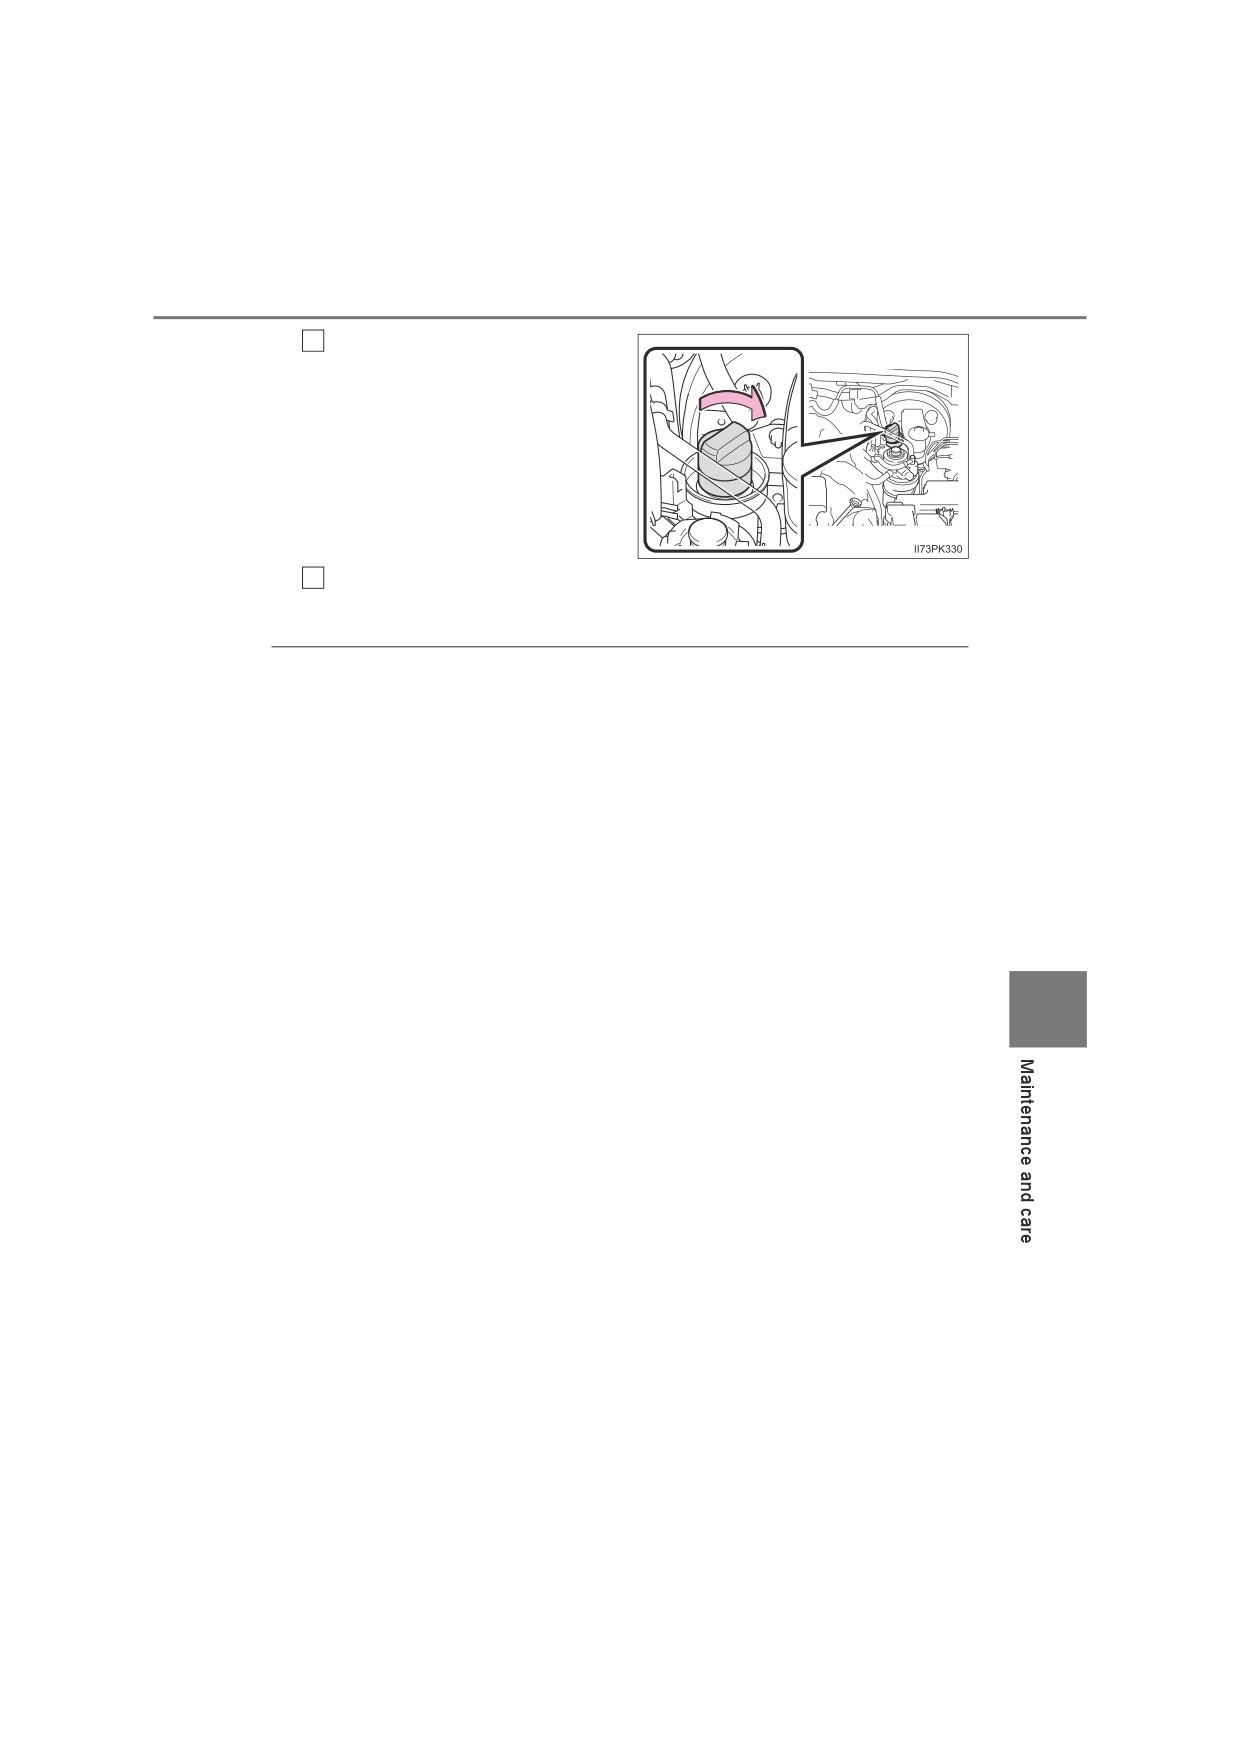
7-3. Do-it-yourself maintenance
505
6
Close the AdBlue™ tank cap.
Turn the cap until you hear a
click.
Check that the engine starts.
7
The way of refilling may differ from those shown in the illustration.
Q Refilling AdBlue™
O Use AdBlue™ (compliant with ISO 22241-1).
AdBlue™ is a trademark of the German Association of the Automotive
Industry (VDA).
O Before driving for a long period of time in an area where AdBlue™ cannot
be refilled, consult any authorized Toyota retailer or Toyota authorized
repairer, or any reliable repairer.
Q When refilling AdBlue™
After refilling AdBlue™, the engine may take a few seconds longer than nor-
mal to start.
7
506
7-3. Do-it-yourself maintenance
NOTICE
Q When refilling AdBlue™
Observe the following precautions.
Failure to do so may result in damage to the vehicle parts, paint, etc.
ODo not use urea solution other than AdBlue™.
O If AdBlue™ comes into contact with any painted surfaces on the vehicle,
immediately wash the affected areas with water.
O If AdBlue™ is spilled inside the engine compartment, immediately wipe it
with a wet cloth.
Q When refilling AdBlue™ with the refilling equipment
Observe the following precautions to prevent AdBlue™ overflowing from the
AdBlue™ tank:
OSecurely insert the nozzle into the AdBlue™ filler neck.
OStop filling the tank after the nozzle automatically clicks off.
ODo not top off the AdBlue™ tank.
Q When storing AdBlue™ containers
Observe the following precautions.
Failure to do so may result in damage to vehicle parts, paint, etc., and
changes in the chemical compounds of AdBlue™ may cause unpleasant
odors.
ODo not leave AdBlue™ containers inside the vehicle.
O Tightly seal AdBlue™ containers and store them in a cool, dry location
with good ventilation and no exposure to direct sunlight.
7-3. Do-it-yourself maintenance
507
Tires
Replace or rotate tires in accordance with maintenance sched-
ules and treadwear.
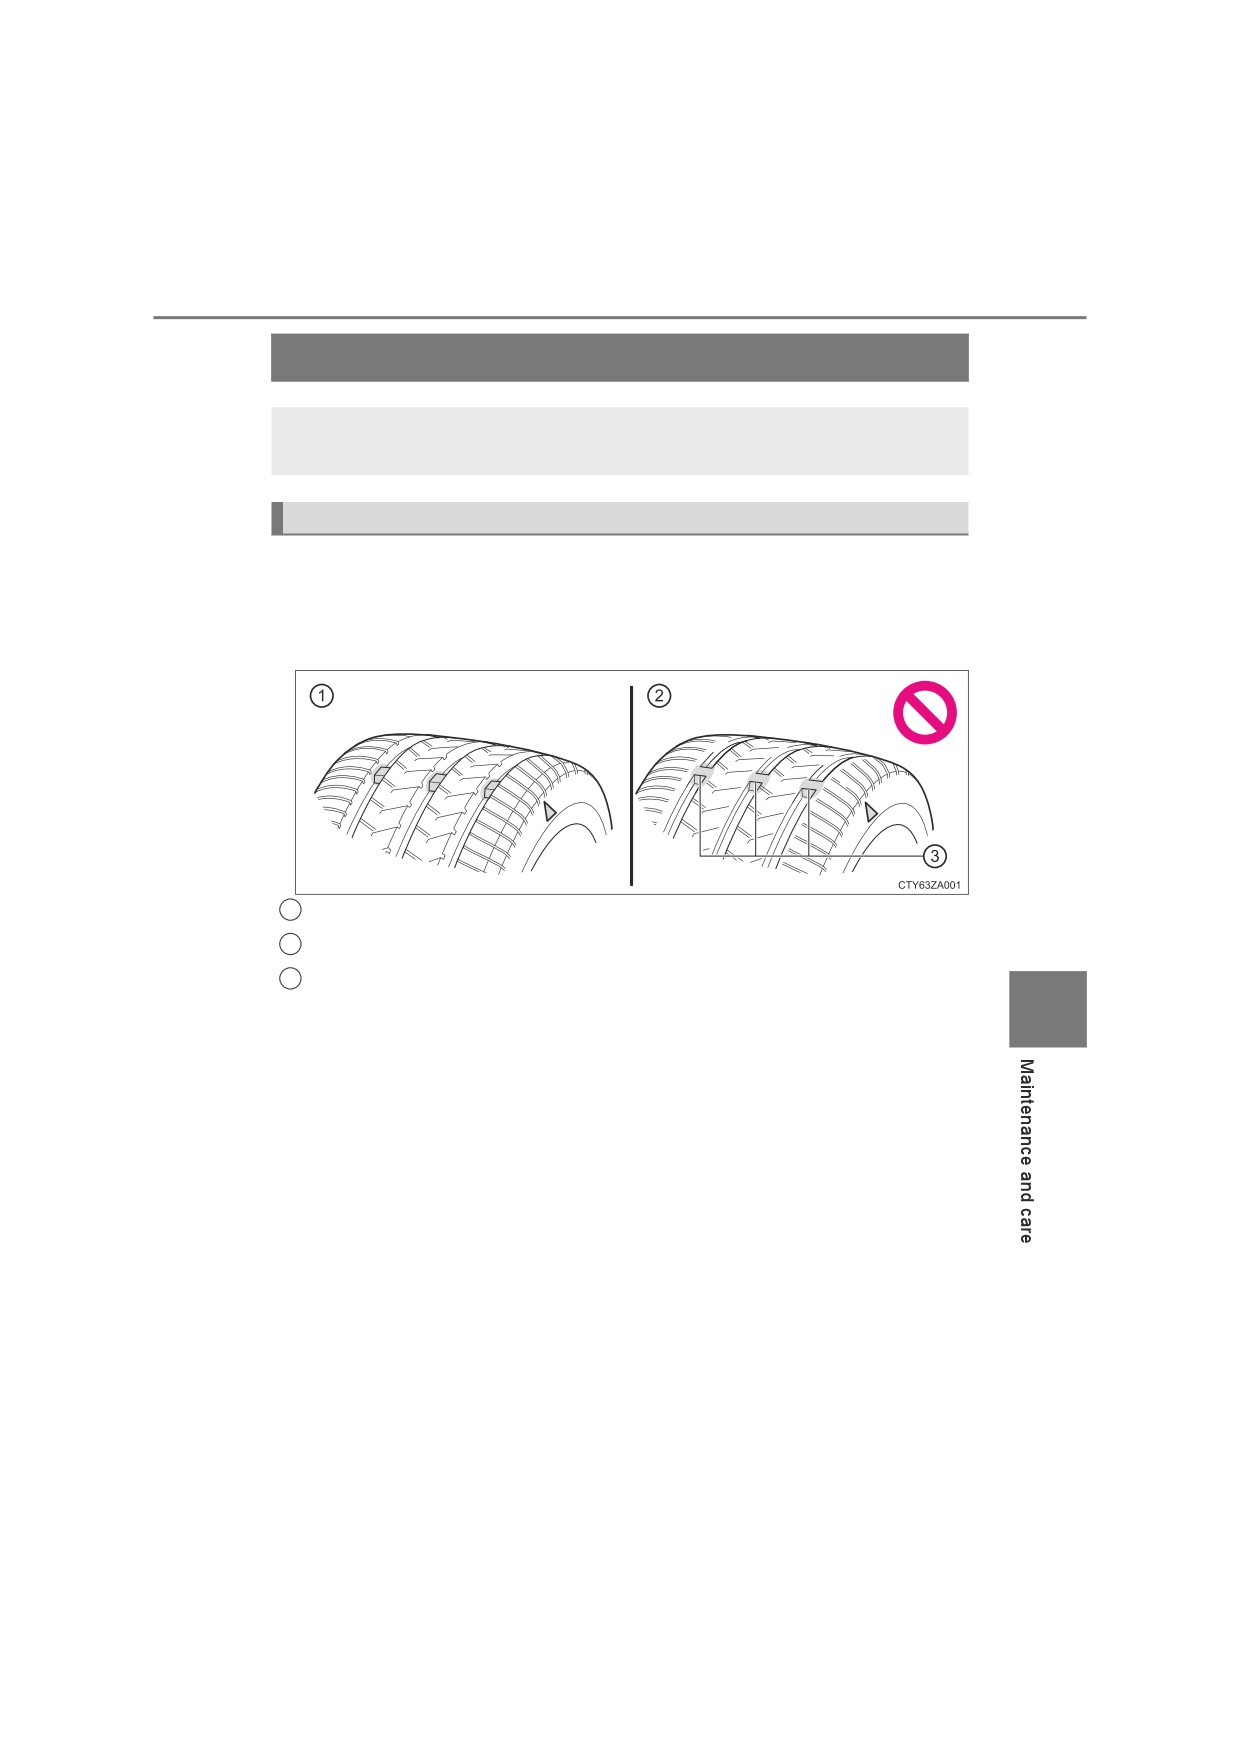
Checking tires
Check if the treadwear indicators are showing on the tires. Also check
the tires for uneven wear, such as excessive wear on one side of the
tread.
Check the spare tire condition and pressure if not rotated.
1
New tread
2
Worn tread
3
Treadwear indicator
7
The location of
treadwear indicators
is shown by
a “TWI”
or “” mark, etc.,
molded into
the
sidewall of each tire.
Replace the tires if the treadwear indicators are showing
on a tire.
508
7-3. Do-it-yourself maintenance
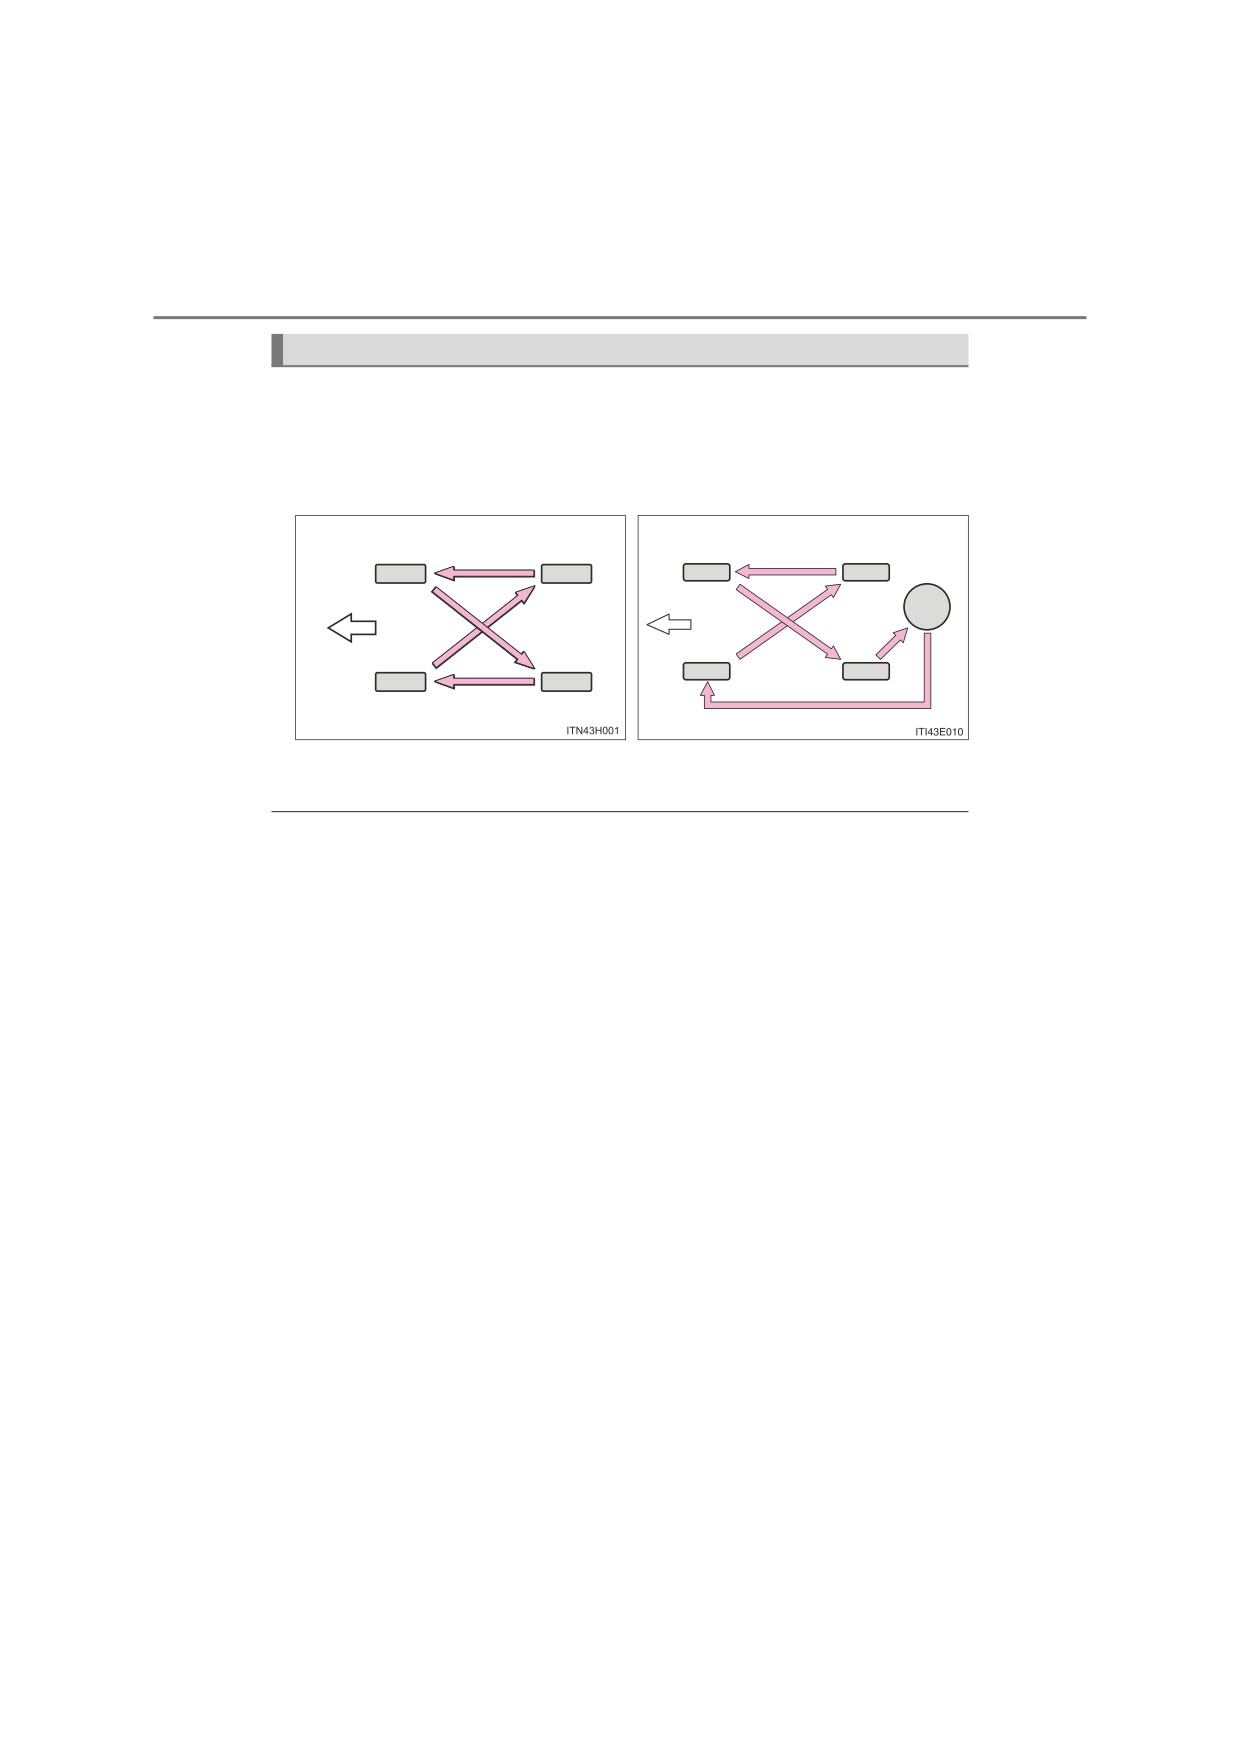
Tire rotation
Rotate the tires in the order shown.
Vehicles with spare tire of a dif-
Vehicles with spare tire of the
ferent wheel type from the
same wheel type as the
installed tires
installed tires
Front
Front
To equalize tire wear and help extend tire life, Toyota recommends that tire
rotation is carried out approximately every 10000 km (6000 miles).
Q When to replace your vehicle’s tires
Tires should be replaced if:
O The treadwear indicators are showing on a tire.
O You have tire damage such as cuts, splits, cracks deep enough to expose
the fabric, and bulges indicating internal damage
O A tire goes flat repeatedly or cannot be properly repaired due to the size or
location of a cut or other damage
If you are not sure, consult with any authorized Toyota retailer or Toyota
authorized repairer, or any reliable repairer.
Q Tire life
Any tire over 6 years old must be checked by a qualified technician even if it
has seldom or never been used or damage is not obvious.
Q If the tread on snow tires wears down below 4 mm (0.16 in.)
The effectiveness of the tires as snow tires is lost.
7-3. Do-it-yourself maintenance
509
WARNING
Q When inspecting or replacing tires
Observe the following precautions to prevent accidents.
Failure to do so may cause damage to parts of the drive train as well as
dangerous handling characteristics, which may lead to an accident resulting
in death or serious injury.
ODo not mix tires of different makes, models or tread patterns.
Also, do not mix tires of remarkably different treadwear.
ODo not use tire sizes other than those recommended by Toyota.
ODo not mix differently constructed tires (radial, bias-belted or bias-ply
tires).
ODo not mix summer, all season and snow tires.
ODo not use tires that have been used on another vehicle.
Do not use tires if you do not know how they were used previously.
NOTICE
Q Driving on rough roads
Take particular care when driving on roads with loose surfaces or potholes.
These conditions may cause losses in tire inflation pressure, reducing the
cushioning ability of the tires. In addition, driving on rough roads may cause
damage to the tires themselves, as well as the vehicle’s wheels and body.
Q If tire inflation pressure of each tire becomes low while driving
Do not continue driving, or your tires and/or wheels may be ruined.
7
510
7-3. Do-it-yourself maintenance
Tire inflation pressure
Make sure to maintain proper tire inflation pressure. Tire infla-
tion pressure should be checked at least once per month. How-
ever, Toyota recommends that tire inflation pressure be checked
once every two weeks. (P. 639)
Q Effects of incorrect tire inflation pressure
Driving with incorrect tire inflation pressure may result in the following:
OReduced fuel economy
O Reduced driving comfort and poor handling
O Reduced tire life due to wear
O Reduced safety
O Damage to the drive train
If a tire needs frequent inflating, have it checked by any authorized Toyota
retailer or Toyota authorized repairer, or any reliable repairer.
Q Instructions for checking tire inflation pressure
When checking tire inflation pressure, observe the following:
O Check only when the tires are cold.
If your vehicle has been parked for at least 3 hours or has not been driven
for more than 1.5 km or 1 mile, you will get an accurate cold tire inflation
pressure reading.
O Always use a tire pressure gauge.
It is difficult to judge if a tire is properly inflated based only on its appear-
ance.
O It is normal for the tire inflation pressure to be higher after driving as heat is
generated in the tire. Do not reduce tire inflation pressure after driving.
OPassengers and luggage weight should be placed so that the vehicle is bal-
anced.
7-3. Do-it-yourself maintenance
511
WARNING
Q Proper inflation is critical to save tire performance
Keep your tires properly inflated.
If the tires are not properly inflated, the following conditions may occur
which could lead to an accident resulting in death or serious injury:
OExcessive wear
OUneven wear
OPoor handling
O Possibility of blowouts resulting from overheated tires
O Air leaking from between tire and wheel
O Wheel deformation and/or tire damage
OGreater possibility of tire damage while driving (due to road hazards,
expansion joints, sharp edges in the road, etc.)
NOTICE
Q When inspecting and adjusting tire inflation pressure
Be sure to put the tire valve caps back on.
If a valve cap is not installed, dirt or moisture may get into the valve and
cause an air leak, resulting in decreased tire inflation pressure.
7

512
7-3. Do-it-yourself maintenance
Wheels
If a wheel is bent, cracked or heavily corroded, it should be
replaced. Otherwise, the tire may separate from the wheel or
cause a loss of handling control.
Wheel selection
When replacing wheels, care should be taken to ensure that they are
equivalent to those removed in load capacity, diameter, rim width and
inset*.
Replacement wheels are available at any authorized Toyota retailer or
Toyota authorized repairer, or any reliable repairer.
*: Conventionally referred to as “offset”.
Toyota does not recommend using the following:
O Wheels of different sizes or types
O Used wheels
O Bent wheels that have been straightened
Aluminum wheel precautions (if equipped)
O Use only Toyota wheel nuts and wrenches designed for use with
your aluminum wheels.
O When rotating, repairing or changing your tires, check that the
wheel nuts are still tight after driving 1600 km (1000 miles).
O Be careful not to damage the aluminum wheels when using tire
chains.
O Use only Toyota genuine balance weights or equivalent and a plas-
tic or rubber hammer when balancing your wheels.