Toyota Hilux (2022 year). Manual in english - page 13

4-5. Using the driving support systems
363
WARNING
Q Trailer Sway Control precaution
The Trailer Sway Control system is not able to reduce trailer sway in all situ-
ations. Depending on many factors such as the conditions of the vehicle,
trailer, road surface, and driving environment, the Trailer Sway Control sys-
tem may not be effective. Refer to your trailer owner’s manual for informa-
tion on how to tow your trailer properly.
Q If trailer sway occurs (vehicles with Trailer Sway Control)
Observe the following precautions.
Failing to do so may cause death or serious injury.
OFirmly grip the steering wheel. Steer straight ahead.
Do not try to control trailer sway by turning the steering wheel.
O Begin releasing the accelerator pedal immediately but very gradually to
reduce speed.
Do not increase speed. Do not apply vehicle brakes.
If you make no extreme correction with the steering or brakes, your vehicle
4
and trailer should stabilize. (P. 215)
364
4-5. Using the driving support systems
Downhill assist control system
The downhill assist control system helps to prevent excessive
speed on steep downhill slopes.
The system will operate when the vehicle is traveling under
30 km/h (18 mph) and transfer mode is in L4 or H4.
System operation
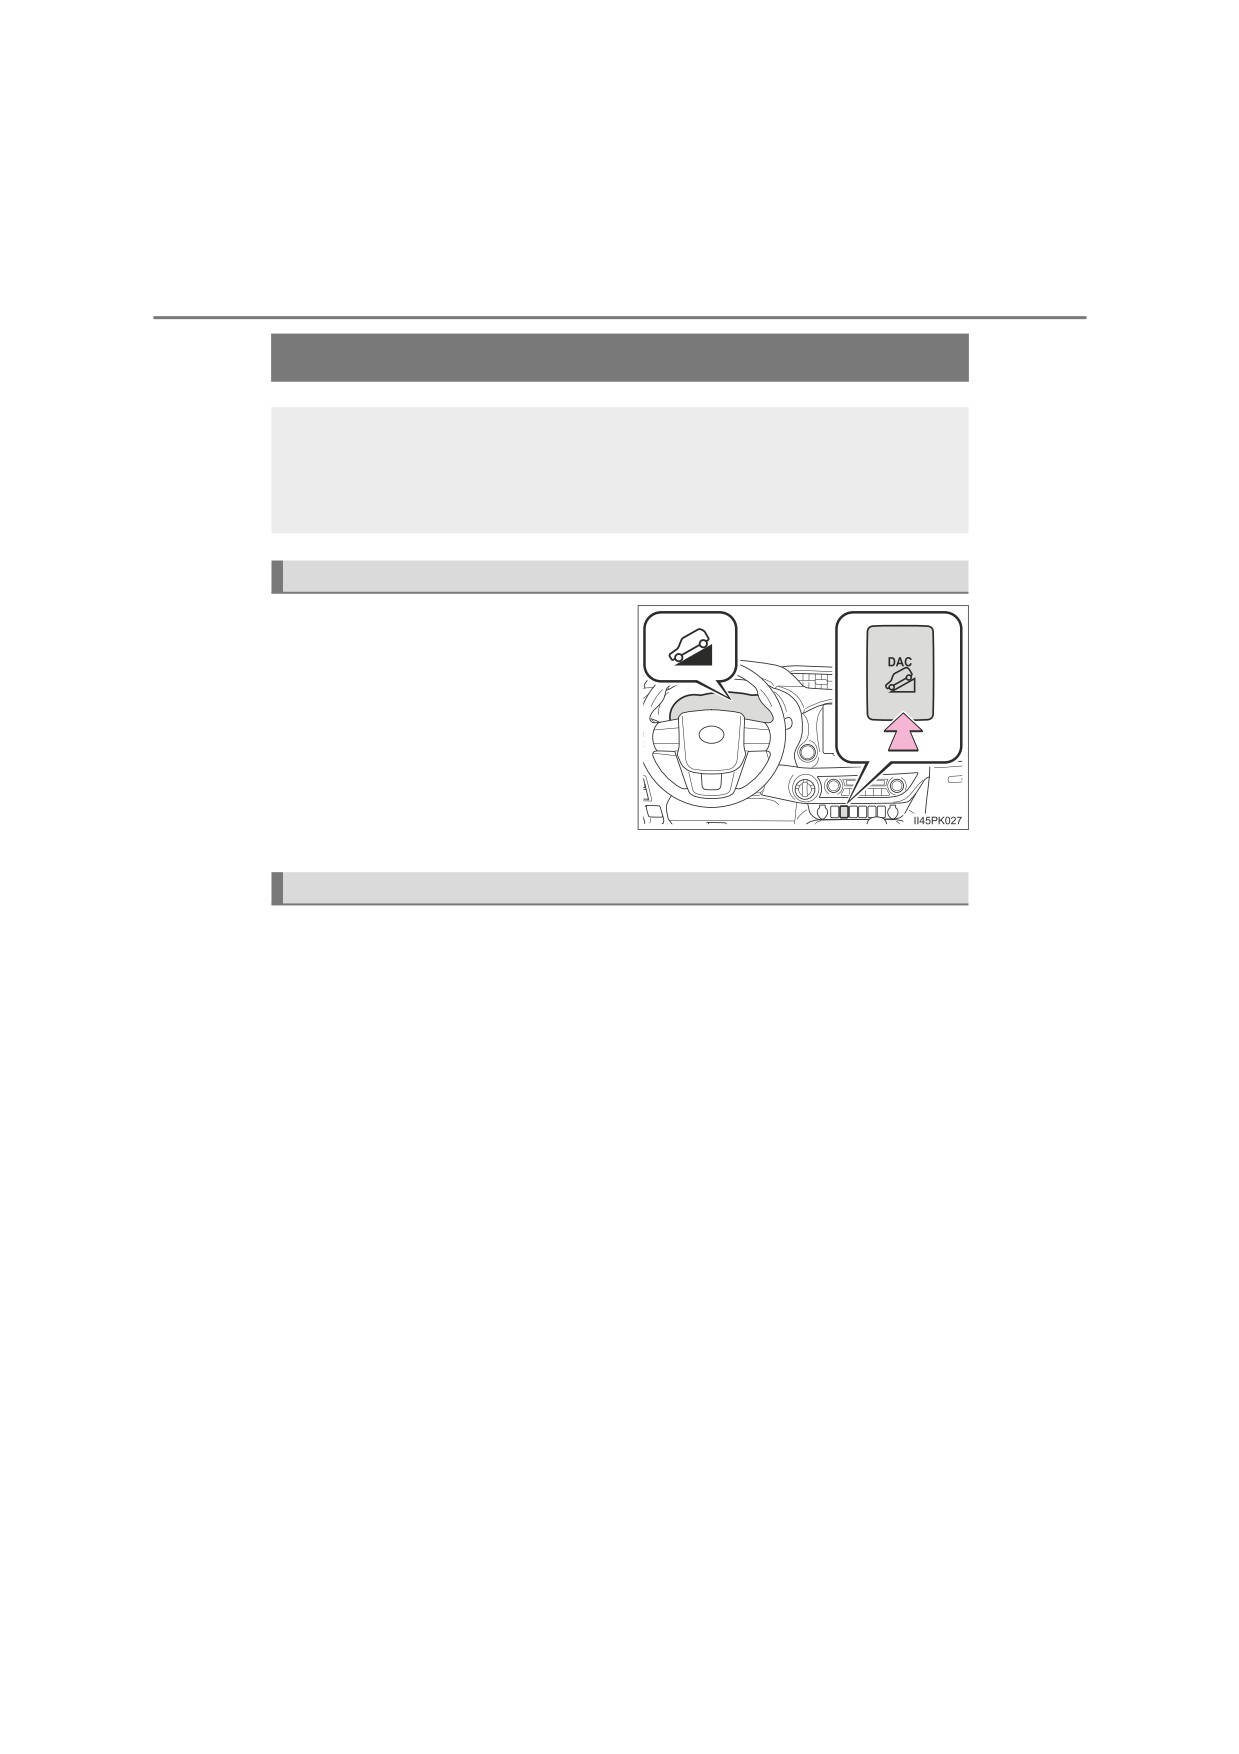
Press the
“DAC” switch. The
downhill assist control system
indicator will come on and the sys-
tem will operate.
When the system is in operation,
the slip indicator will flash, and the
stop lights/high mounted stop lights
will be lit. A sound may also occur
during the operation. This does not
indicated a malfunction.
Turning off the system
Press the “DAC” switch while the system is in operation. The downhill
assist control system indicator will flash as the system gradually
ceases operation, and will turn off when the system is fully off.
Press the “DAC” switch while the downhill assist control system indi-
cator is flashing to start the system again.
: If equipped
4-5. Using the driving support systems
365
Q Operating tips (vehicles with automatic transmission)
The system will operate when the shift lever is in a position other than P, how-
ever to make effective use of the system it is recommended to select a lower
shift range.
Q The system will not operate when
O The transfer mode is in H2.
O The rear differential is locked. (if equipped)
Q If the downhill assist control system indicator flashes
OIn the following situations, the indicator flashes and the system will not oper-
ate:
• The transfer mode is not in L4 or H4.
• The rear differential is locked. (if equipped)
• The shift lever is in P. (vehicles with automatic transmission)
• The accelerator or brake pedal is depressed.
• The vehicle speed exceeds approximately 30 km/h (18 mph).
• The brake system overheats.
4
OIn the following situations, the indicator flashes to alert the driver, but the
system will operate:
• The shift lever is in N. (vehicles with automatic transmission)
• The clutch pedal is depressed. (vehicles with manual transmission)
• The “DAC” switch is turned off while the system is operating.
The system will gradually ceases operation. The indicator will flash during
operation, and then go off when the system is fully off.
Q When the downhill assist control system is operated continuously
This may cause the brake actuator to overheat. In this case, the downhill
assist control system will stop operating, a buzzer will sound and the downhill
assist control system indicator will start flashing, and “TRC turned off” will be
shown on the multi-information display. Refrain from using the system until
the downhill assist control system indicator stays on and the message goes
off. (The vehicle can be driven normally during this time.)
Q Sounds and vibrations caused by the downhill assist control system
O A sound may be heard from the engine compartment when the engine is
started or just after the vehicle begins to move. This sound does not indicate
that a malfunction has occurred in downhill assist control system.
O Either of the following conditions may occur when the downhill assist control
system is operating. None of these are indicators that a malfunction has
occurred.
• Vibrations may be felt through the vehicle body and steering.
• A motor sound may be heard after the vehicle comes to a stop.
366
4-5. Using the driving support systems
Q System malfunction
In the following cases, have your vehicle checked by any authorized Toyota
retailer or Toyota authorized repairer, or any reliable repairer.
O The downhill assist control system indicator does not come on when the
engine switch is turned to the “ON” position (vehicles without smart entry &
start system) or IGNITION ON mode (vehicles with smart entry & start sys-
tem).
O The downhill assist control system indicator does not come on when the
“DAC” switch is pressed.
OThe slip indicator comes on.
WARNING
Q When using downhill assist control system
ODo not rely overmuch on the downhill assist control system. This function
does not extend the vehicle’s performance limitations. Always thoroughly
check the road conditions, and drive safely.
O Vehicles with manual transmission: Drive in a low gear. Driving in a high
gear when using downhill assist control system may cause the engine to
stall, which may lose the brake effectiveness and lock the tires, resulting in
an accident.
O Vehicles with manual transmission: On a steep slope, use the engine brak-
ing efficiently. If the vehicle is driven in N or with the clutch pedal
depressed on a steep slope, the load on the brake increases and con-
trolling the vehicle speed may be impossible, resulting in an accident.
Q The system may not operate on the following surfaces, which may lead
to an accident causing death or serious injury
O Slippery surfaces such as wet or muddy roads
O Icy surface
OUnpaved roads
4-5. Using the driving support systems
367
AUTO LSD
The AUTO LSD system aids traction by using the traction con-
trol system to control engine performance and braking when
one of the drive wheels begins to spin. The system should be
used only when one of the drive wheels spinning occurs in a
ditch or rough surface.
System operation
The system can be used on Pre Runner and in 2WD mode on 4WD
models.
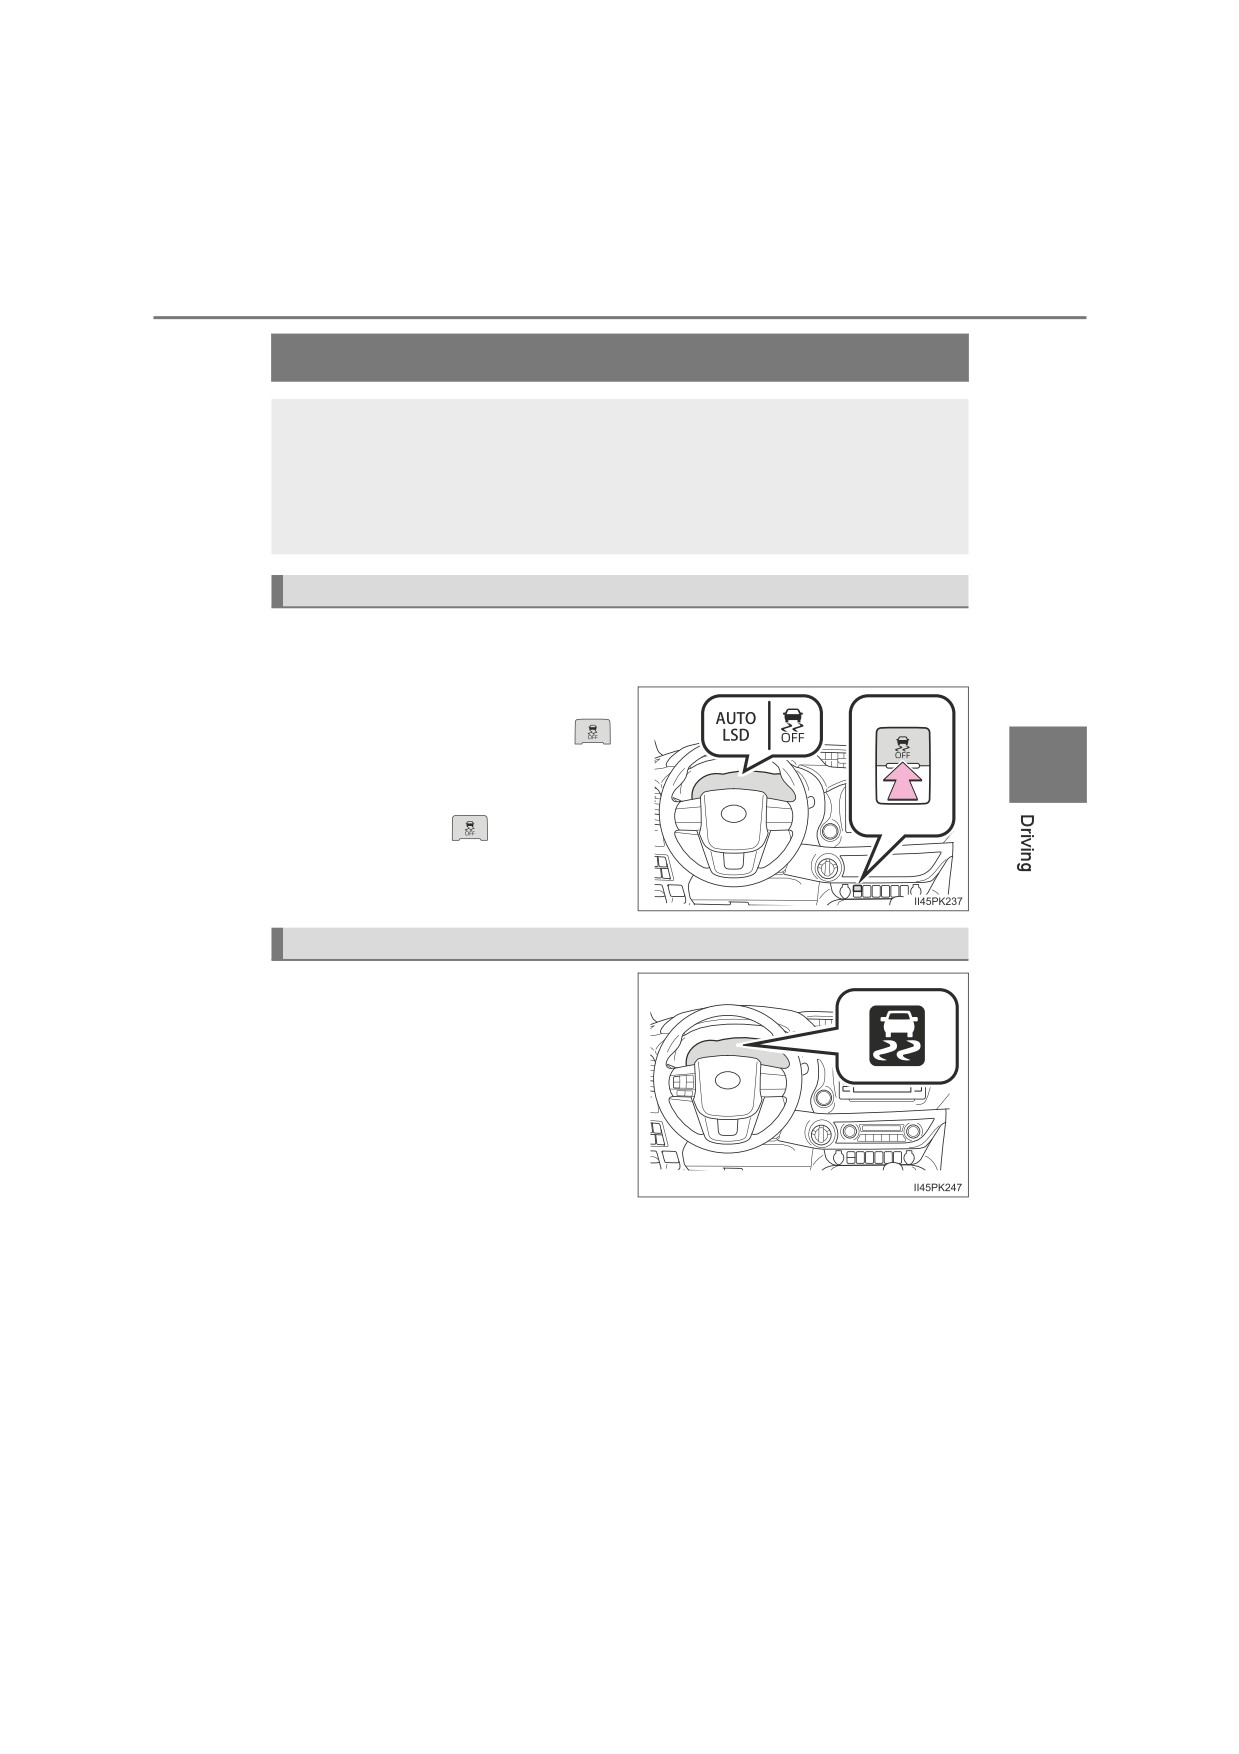
To turn the AUTO LSD system on,
quickly press and release
4
The “AUTO LSD” indicator light
and VSC OFF indicator light will
come on. Press
again to turn
the system off.
When the AUTO LSD system is operating
If the drive wheels spin, the slip
indicator flashes to indicate that
the AUTO LSD system has con-
trolled the spinning of the drive
wheels.
: If equipped

368
4-5. Using the driving support systems
Q If the engine is turned off and restarted
The AUTO LSD system and the indicators are automatically turned off.
Q Reactivation of the VSC system linked to vehicle speed
When the AUTO LSD system is turned on, the VSC and TRC systems will
turn on automatically if vehicle speed increase.
Q If the brake system overheats
The system will cease operation and a buzzer will alert the driver. At this time,
the “AUTO LSD” indicator will flash and “TRC turned off” will be shown on the
multi-information display. Stop the vehicle in a safe place. (There is no prob-
lem with continuing normal driving.) The system will be automatically restored
after a short time.
WARNING
Q To avoid an accident
Failure to do so, a much greater steering effort and more careful cornering
control will be required.
ODo not use the AUTO LSD system in conditions other than when one of
the drive wheels spinning occurs in a ditch or rough surface.
ODo not drive with the AUTO LSD system continuously turned on.
NOTICE
Q Activating while driving
Do not activate the AUTO LSD system if the wheel is slipping. Stop the slip-
ping or spinning before activating.
4-5. Using the driving support systems
369
DPF (Diesel Particulate Filter) system
When the deposit collected by the filter reaches a predetermined
amount, it is automatically regenerated.
WARNING
Q During regeneration
Observe the following precautions.
Failure to do so may result in serious injury such as burns caused by the hot
exhaust pipe and exhaust gases, or may cause a fire.
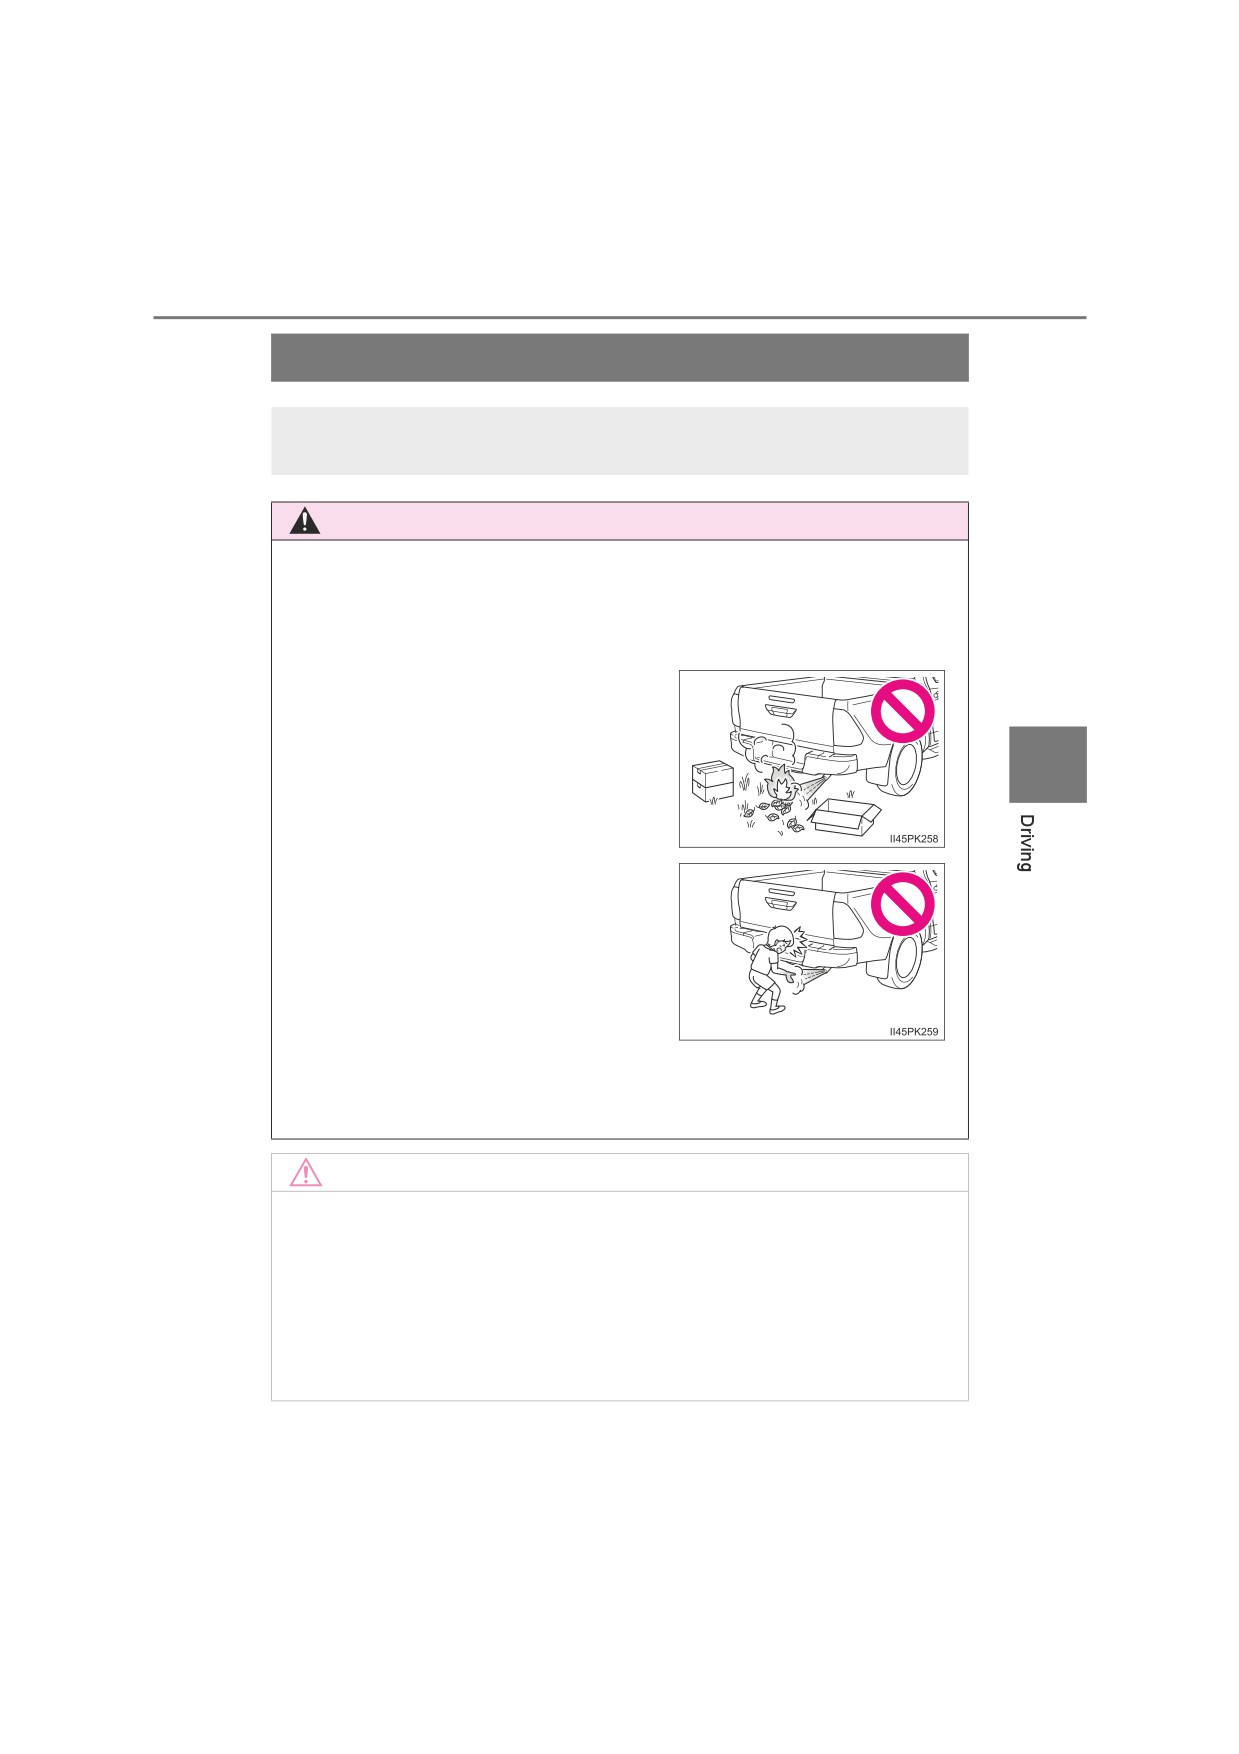
ODo not stop the vehicle where flamma-
ble materials, such as dry grass, are
near the exhaust pipe.
4
O Make sure that there are no people
near the exhaust pipe.
ODo not carry out regeneration when the vehicle is in an enclosed area,
such as a garage.
ODo not touch the exhaust pipe and exhaust gases during regeneration.
NOTICE
Q To prevent the DPF system from failing
ODo not drive for long periods of time while the DPF system warning mes-
sage “DPF full Visit your dealer” appears on the multi-information display
and a buzzer sounds (malfunction indicator lamp comes on)
ODo not use fuel other than the specified type
ODo not use engine oil other than the recommended type
ODo not modify the exhaust pipe
: If equipped
370
4-5. Using the driving support systems
X Regeneration
O During normal driving, the filter is automatically regenerated
every several hundred kilometers*. During regeneration, the DPF
system warning message “DPF regeneration in progress” is dis-
played on the multi-information display.
O When the amount of accumulated deposit reaches a certain
level, regeneration can be performed. (P. 371)
*: Differs in accordance with weather, driving conditions, etc.
X System characteristics
The DPF system has the following characteristics:
O Idle speed increases during regeneration
O The smell of the exhaust gas differs from that of a conventional
diesel vehicle
O White smoke may be emitted from the exhaust pipe during
regeneration. However, this does not indicate a malfunction.
DPF deposition status
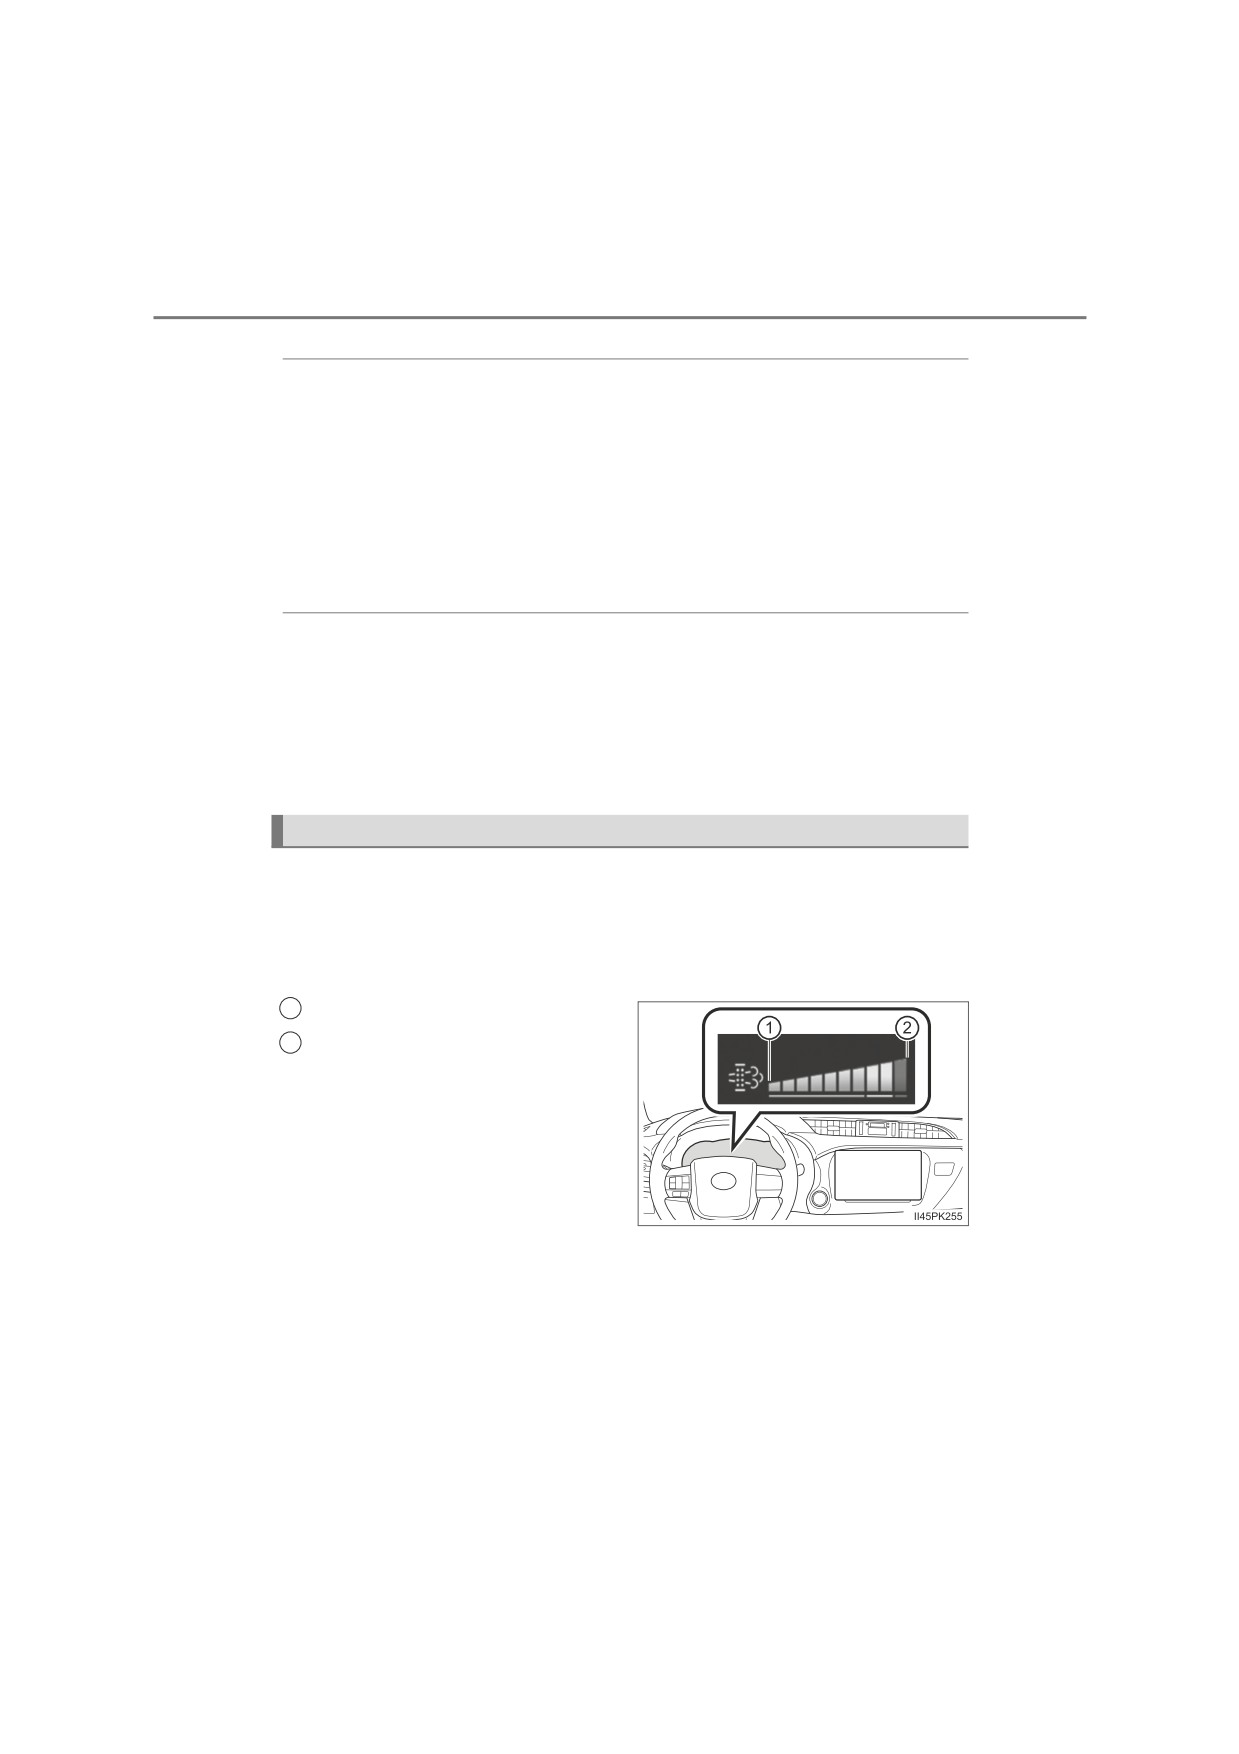
The amount of accumulated deposit in the DPF system can be con-
firmed on the multi-information display.
The DPF deposition status appears when the DPF system switch is
pressed or the warning massage is displayed. Use the displayed DPF
deposition as a reference.
1
Low
2
Full
4-5. Using the driving support systems
371
DPF system failure warning
O If the DPF system warning message “DPF full See owner’s manual”
appears on the multi-information display, follow the procedure
below to regenerate.
When regenerating the filter during driving the vehicle
To regenerate the filter, the following driving methods are recom-
mended.*1
• By driving continuously (for example, at around 60 km/h [37 mph]
for 20 to 30 minutes).
• By avoiding short trips, or by driving continuously
(leaving the
engine running for long periods of time).
Check the engine is warmed up before driving the vehicle to regenerate
the filter. If the engine is cold, warm up the engine by driving the vehicle
downshifting to increase the engine speed.*2
4
The warning message will disappear on the multi-information display when
regeneration is complete. However, depending on the driving condition
such as heavy traffic, the amount of accumulated deposit increases and
the warning message may not disappear on the multi-information display.
If the warning message does not disappear on the multi-information dis-
play after driving, press the DPF system switch to manually regenerate the
filter.
Regeneration during driving cannot be performed when the vehicle is
higher than 4000 m (13124 ft.) above sea level.
*1: When driving, pay sufficient attention to weather, road conditions, ter-
rain and traffic conditions, and drive according to traffic laws.
*2: Depending on the situation, it may be necessary to downshift until the
engine speed is increased to 3000 rpm. If the engine coolant tempera-
ture or exhaust gas temperature is low, it may take a long time to
regenerate, or regeneration may be impossible.
372
4-5. Using the driving support systems
When regenerating the filter by pressing the DPF system switch
1
Stop the vehicle in a safe place.
2
Shift the shift lever to P (automatic transmission) or N (manual
transmission), and firmly set the parking brake.
Do not stop the engine.
Also, make sure that there are no flammable materials near the exhaust
pipe. (P. 369)
Check the engine is warmed up. If the engine is cold, warm up the engine
by depressing the accelerator pedal.*1
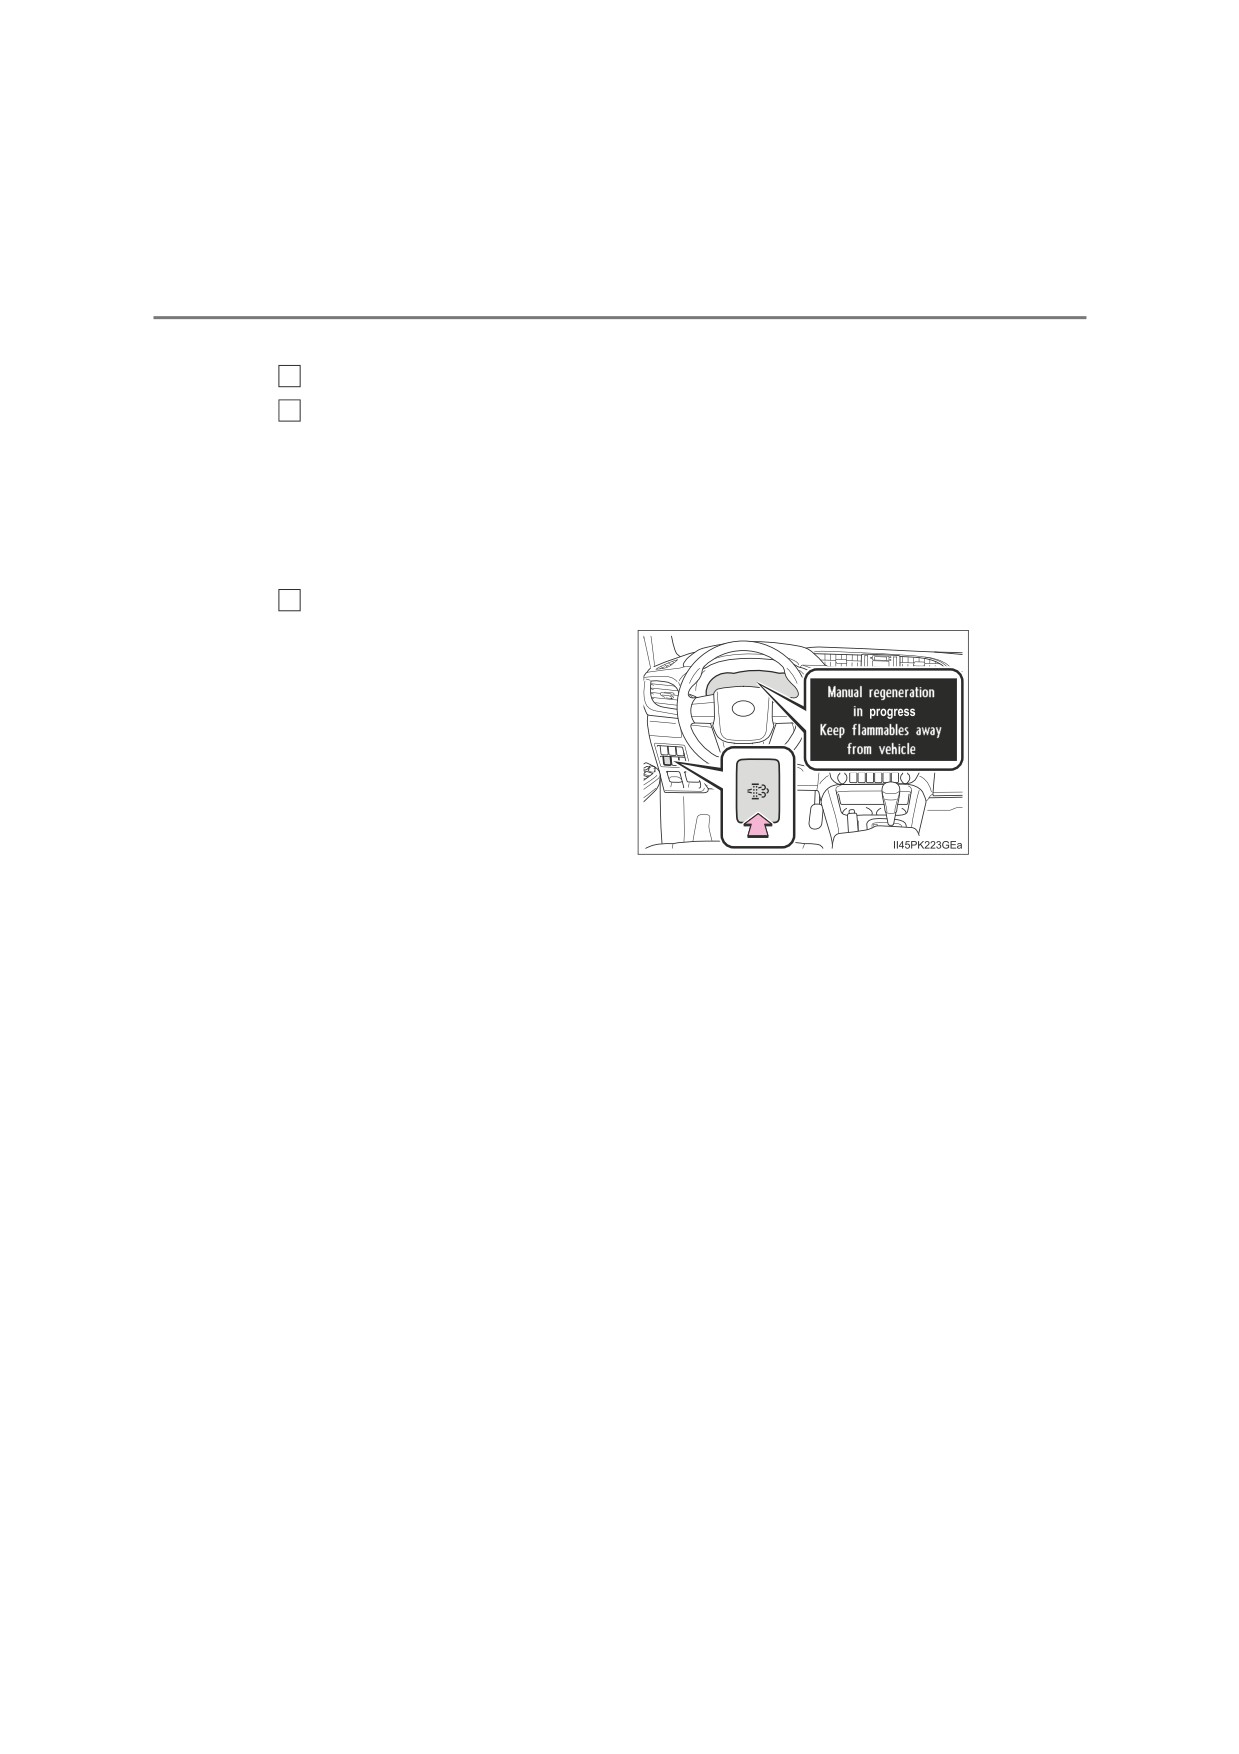
Press the DPF system switch.
3
The DPF system warning message
shown in the illustration appears
on the multi-information display,
and the idling engine speed will
increase.
Regeneration will take around 15 -
40 minutes to complete.*2
When the DPF system warning message disappears
on the multi-
information display, the idling engine speed will have finished return-
ing to normal.
The DPF system switch may not operate when the vehicle is higher
than 4000 m (13123 ft.) above sea level.
*1: Depending on the situation, it may be necessary to depress the acceler-
ator pedal until the engine speed is increased to 3000 rpm. If the engine
coolant temperature or exhaust gas temperature is low, it may take a
long time to regenerate, or regeneration may be impossible.
*2: Time required for regeneration differs in accordance with the outside
temperature. Also, if the engine speed is still approximately 2000 rpm
10 minutes after pressing the DPF system switch, the exhaust gas tem-
perature may be low. In this case, depress the accelerator pedal to run
the engine at approximately 3000 rpm for a while.
When depressing the accelerator pedal, regeneration will be stopped. In
this case, restart regeneration.

4-5. Using the driving support systems
373
O If the “DPF full Manual regeneration required See owner’s manual”
appears on the multi-information display, press the DPF system
switch to regenerate the filter. (P. 371)
O If the DPF system warning message “DPF full Visit your dealer”
appears on the multi-information display and a buzzer sounds (mal-
function indicator lamp comes on), have the vehicle inspected by
any authorized Toyota retailer or Toyota authorized repairer, or any
reliable repairer immediately.
Q Regeneration with the DPF system switch
O After pressing the DPF system switch, depressing the accelerator pedal or
clutch pedal (manual transmission) will stop regeneration. If regeneration
has been stopped, restart regeneration as soon as possible.
O After regeneration is finished, race the engine several time to clean the
exhaust system.
Q DPF system warning
4
Under the following driving conditions, the DPF system warning message
may be displayed on the multi-information display earlier than normal.*
O When only driving at low speeds (for example 20 km/h [12 mph] or below).
OIf the engine is turned on and off frequently (if the engine is not left running
for more than 10 minutes at a time).
*: Differs in accordance with weather, driving conditions, etc.
NOTICE
Q If the malfunction indicator lamp comes on (warning buzzer)
The malfunction indicator lamp comes on if you continue driving while the
DPF system warning message appears on the multi-information display. In
this event, damage may be caused to the vehicle or an accident may occur.
Have the vehicle inspected by any authorized Toyota retailer or Toyota
authorized repairer, or any reliable repairer immediately.

374
4-6. Driving tips
Winter driving tips
Carry out the necessary preparations and inspections before
driving the vehicle in winter. Always drive the vehicle in a man-
ner appropriate to the prevailing weather conditions.
Preparation for winter
O Use fluids that are appropriate to the prevailing outside tempera-
tures.
• Engine oil
• Engine coolant
• Washer fluid
O Have a service technician inspect the condition of the battery.
O Have the vehicle fitted with four snow tires or purchase a set of tire
chains for the rear tires.
Ensure that all tires are the same size and brand, and that chains match
the size of the tires.
Before driving the vehicle
Perform the following according to the driving conditions:
O Do not try to forcibly open a window or move a wiper that is frozen.
Pour warm water over the frozen area to melt the ice. Wipe away
the water immediately to prevent it from freezing.
O To ensure proper operation of the climate control system fan,
remove any snow that has accumulated on the air inlet vents in
front of the windshield.
O Check for and remove any excess ice or snow that may have accu-
mulated on the exterior lights, vehicle’s roof, chassis, around the
tires or on the brakes.
O Remove any snow or mud from the bottom of your shoes before
getting in the vehicle.
4-6. Driving tips
375
When driving the vehicle
Accelerate the vehicle slowly, keep a safe distance between you and
the vehicle ahead, and drive at a reduced speed suitable to road con-
ditions.
When parking the vehicle (in the winter time or in the cold lati-
tudes)
O Park the vehicle and move the shift lever to P (automatic transmis-
sion) or 1 or R (manual transmission) without setting the parking
brake. The parking brake may freeze up, preventing it from being
released. If the vehicle is parked without setting the parking brake,
make sure to block the wheels.
Failure to do so may be dangerous because it may cause the vehi-
cle to move unexpectedly, possibly leading to an accident.
4
O Vehicles with automatic transmission: If the vehicle is parked with-
out setting the parking brake, confirm that the shift lever cannot be
moved out of P*.
*: The shift lever will be locked if it is attempted to be shifted from P to any
other position without depressing the brake pedal. If the shift lever can be
shifted from P, there may be a problem with the shift lock system. Have the
vehicle inspected by any authorized Toyota retailer or Toyota authorized
repairer, or any reliable repairer.
Selecting tire chains
Use the correct tire chain size when mounting the snow chains.
Chain size is regulated for each tire size.
Regulations on the use of tire chains
Regulations regarding the use of tire chains vary depending on loca-
tion and type of road. Always check local regulations before installing
chains.
376
4-6. Driving tips
Q Tire chain installation
Observe the following precautions when installing and removing chains:
OInstall and remove tire chains in a safe location.
O Install tire chains on the rear tires. Do not install tire chains on the front tires.
O Install tire chains on rear tires as tightly as possible. Retighten chains after
driving 0.5 - 1.0 km (1/4 - 1/2 mile).
O Install tire chains following the instructions provided with the tire chains.
WARNING
Q Driving with snow tires
Observe the following precautions to reduce the risk of accidents.
Failing to do so may result in a loss of vehicle control and cause death or
serious injury.
OUse tires of the specified size.
O Maintain the recommended level of air pressure.
ODo not drive at speeds in excess of the speed limit or the speed limit spec-
ified for the snow tires being used.
OUse snow tires on all, not just some wheels.
Q Driving with tire chains
Observe the following precautions to reduce the risk of accidents.
Failing to do so may result in the vehicle being unable to be driven safely,
and may cause death or serious injury.
ODo not drive in excess of the speed limit specified for the tire chains being
used, or 50 km/h (30 mph), whichever is lower.
O Avoid driving on bumpy road surfaces or over potholes.
O Avoid sudden acceleration, abrupt steering, sudden braking and shifting
operations that cause sudden engine braking.
OSlow down sufficiently before entering a curve to ensure that vehicle con-
trol is maintained.
ODo not use LDA (Lane Departure Alert with Yaw Assist Function) system.
(if equipped)
377
Audio system
5
5-1.
Basic Operations
5-5. Using an external device
Audio system types
378
Listening to an iPod
395
Using the steering wheel
Listening USB memory
audio switches
379
device
401
AUX port/USB port
381
Using the AUX port
407
5-2.
Using the audio system
5-6. Using Bluetooth® devices
Optimal use of the audio
Bluetooth® audio/phone
408
system
382
Using the steering
5-3.
Using the radio
wheel switches
413
Radio operation
384
Registering a Bluetooth®
device
414
5-4.
Playing an audio CD and
MP3/WMA/AAC discs
5-7.
“SETUP” menu
CD player operation
387
Using the “SETUP” menu
(“Bluetooth” menu)
415
Using the “SETUP” menu
(“TEL” menu)
419
5-8. Bluetooth® Audio
Operating a Bluetooth®
enabled portable
player
424
5-9. Bluetooth® Phone
Making a phone call
426
When receiving a phone
call
427
Speaking on the phone
428
5-10. Bluetooth®
Bluetooth®
430
378
5-1. Basic Operations
Audio system types
Vehicles with navigation system or multimedia system
Refer to the “Navigation and multimedia system Owner’s manual” or
“Multimedia Owner’s Manual”
Vehicles without navigation system or multimedia system
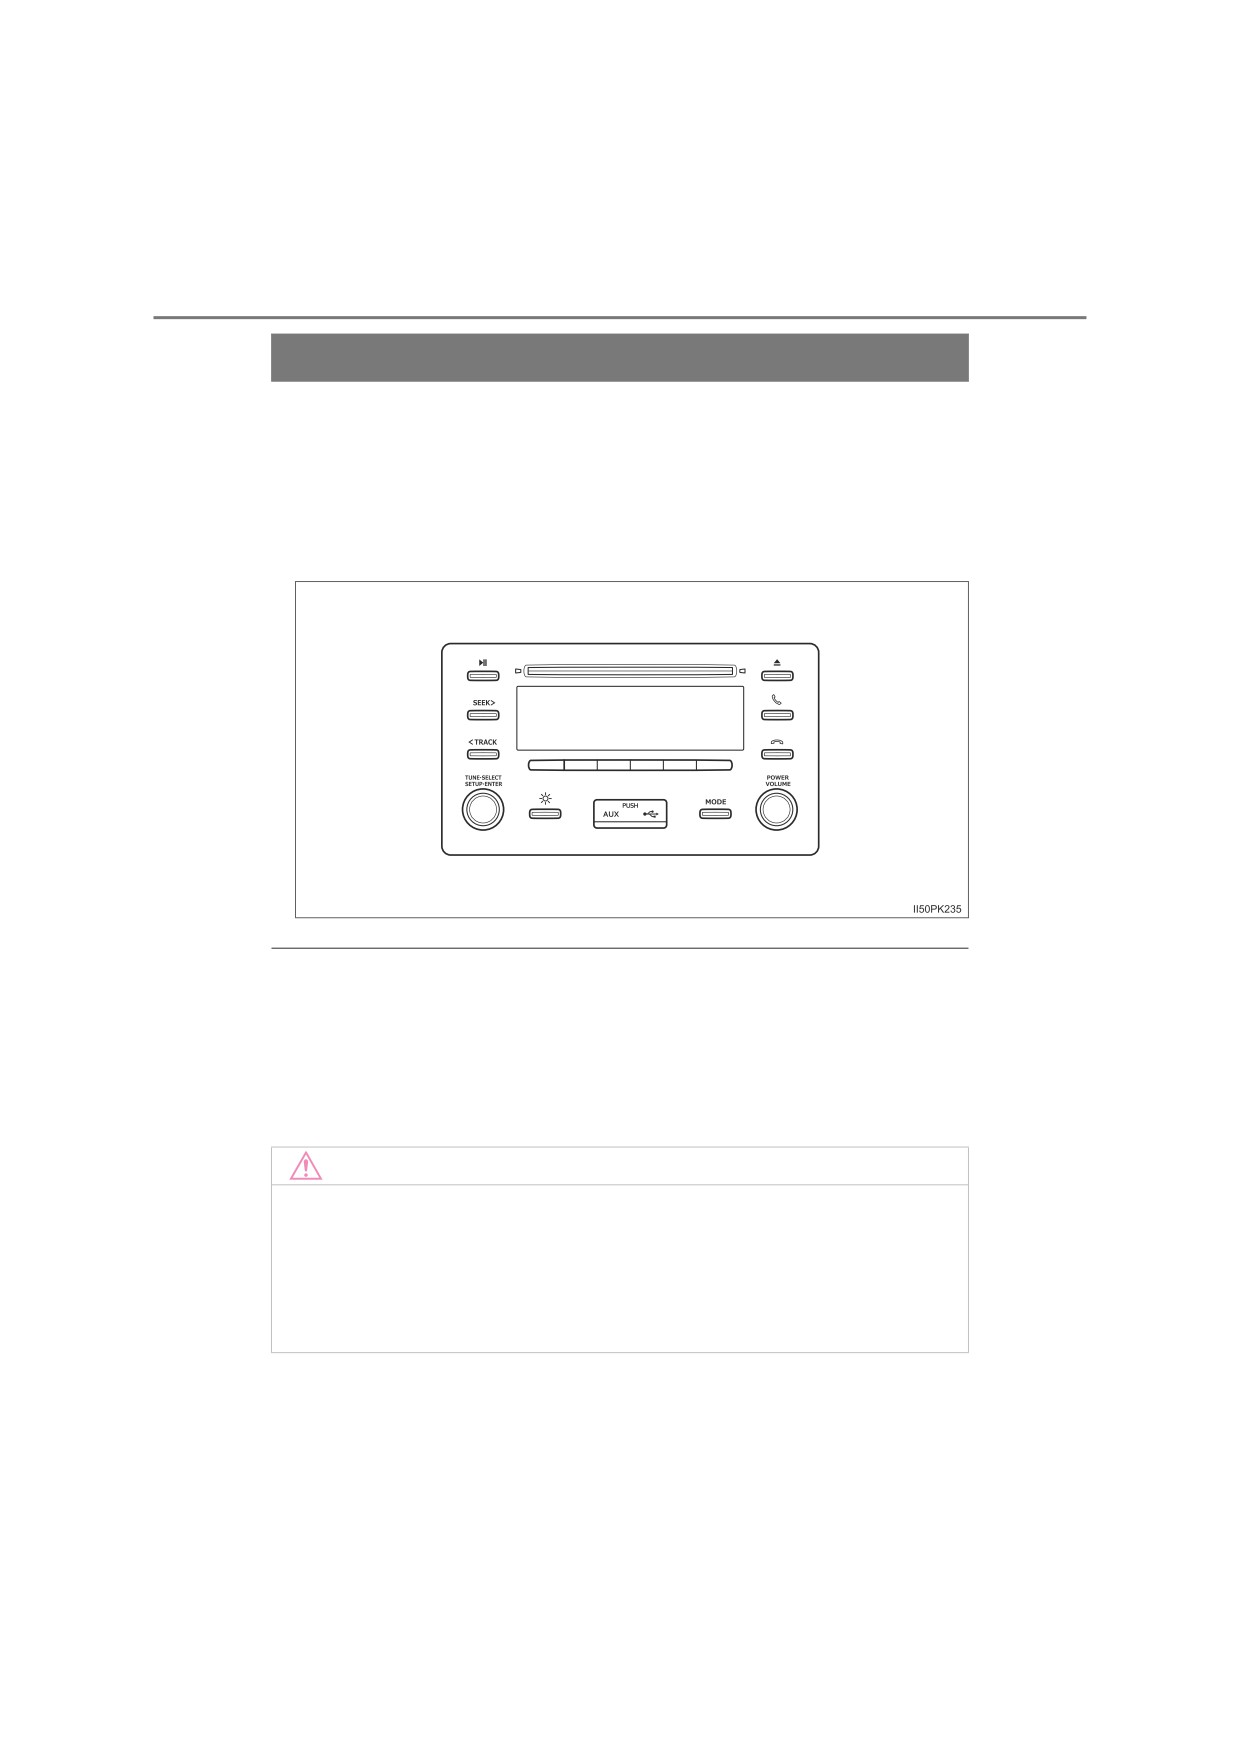
CD player with AM/FM radio
Q Using cellular phones
Interference may be heard through the audio system’s speakers if a cellular
phone is being used inside or close to the vehicle while the audio system is
operating.
Q Trademarks and registered trademarks
The company names and product names regarding the audio system are the
trademarks or registered trademarks of their respective companies.
NOTICE
Q To prevent battery discharge
Do not leave the audio system on longer than necessary with the engine
stopped.
Q To avoid damaging the audio system
Be careful not to spill drinks or other fluids over the audio system.
: If equipped
5-1. Basic Operations
379
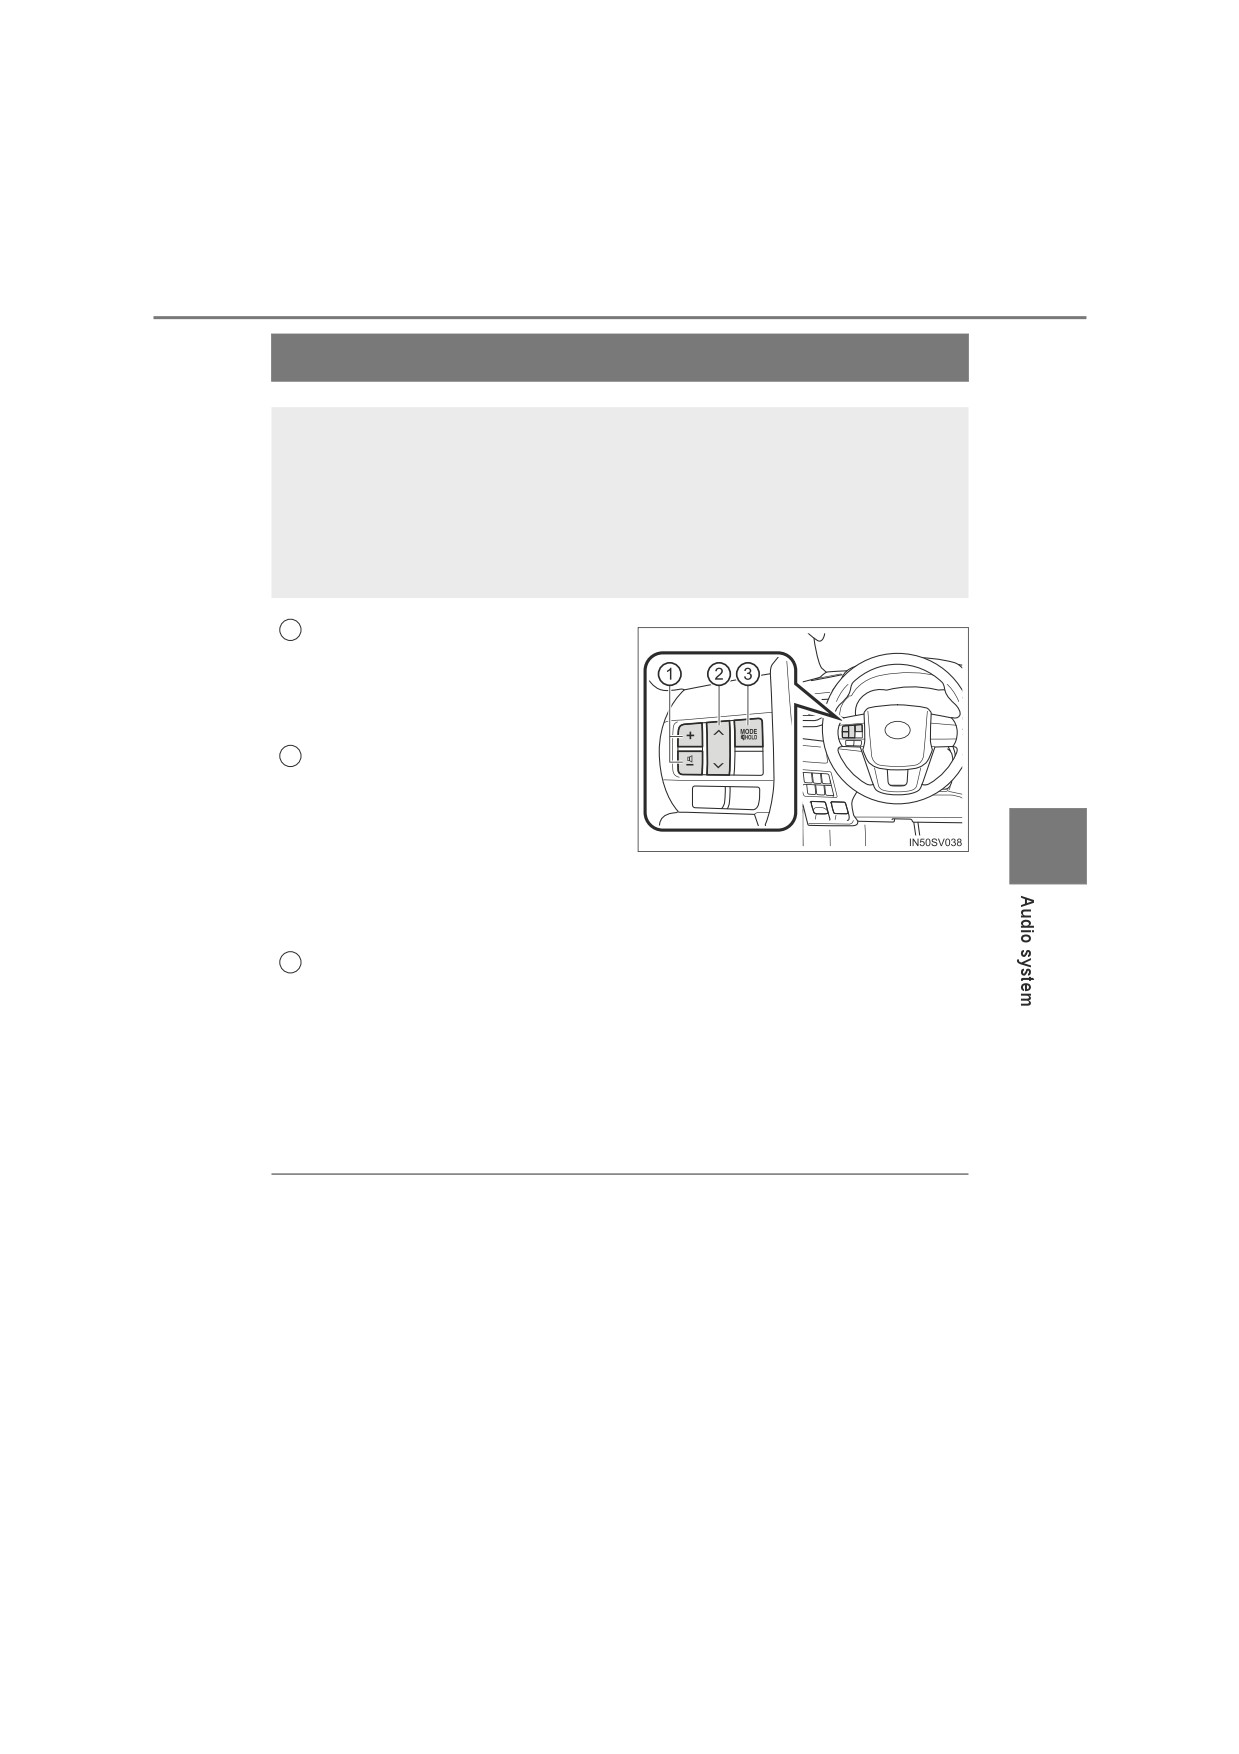
Using the steering wheel audio switches
Some audio features can be controlled using the switches on
the steering wheel.
Operation may differ depending on the type of audio system or
navigation system. For details, refer to the manual provided with
the audio system or navigation system.
Vehicles without audio system: P. 470
1
Volume
• Press: Increases/decreases vol-
ume
• Press and hold: Continuously
increases/decreases volume
2
Radio mode:
• Press: Select a radio station
saved in preset stations
• Press and hold until you hear
a
5
beep: Seek up/down
CD, MP3/WMA/AAC disc, iPod, USB or Bluetooth® audio mode:
• Press: Select a track/file
• Press and hold until you hear a beep: Select a folder or album
3
“MODE” switch
• Press: Turn the power on, select an audio source
• Press and hold until you hear a beep:
Radio or AUX mode: Mute
CD, MP3/WMA/AAC disc, iPod, USB or Bluetooth® audio mode:
Pause the current operation.
To cancel the mute or pause, press and hold the switch again.
Q Changing the audio source
Press the “MODE” switch when the audio system is turned on. The audio
source changes as follows each time the button is pressed. If a mode cannot
be used, it will be skipped.
AMFMCD modeiPod or USB memoryBluetooth® audioAUX
380
5-1. Basic Operations
WARNING
Q To reduce the risk of an accident
Exercise care when operating the audio switches on the steering wheel.
5-1. Basic Operations
381
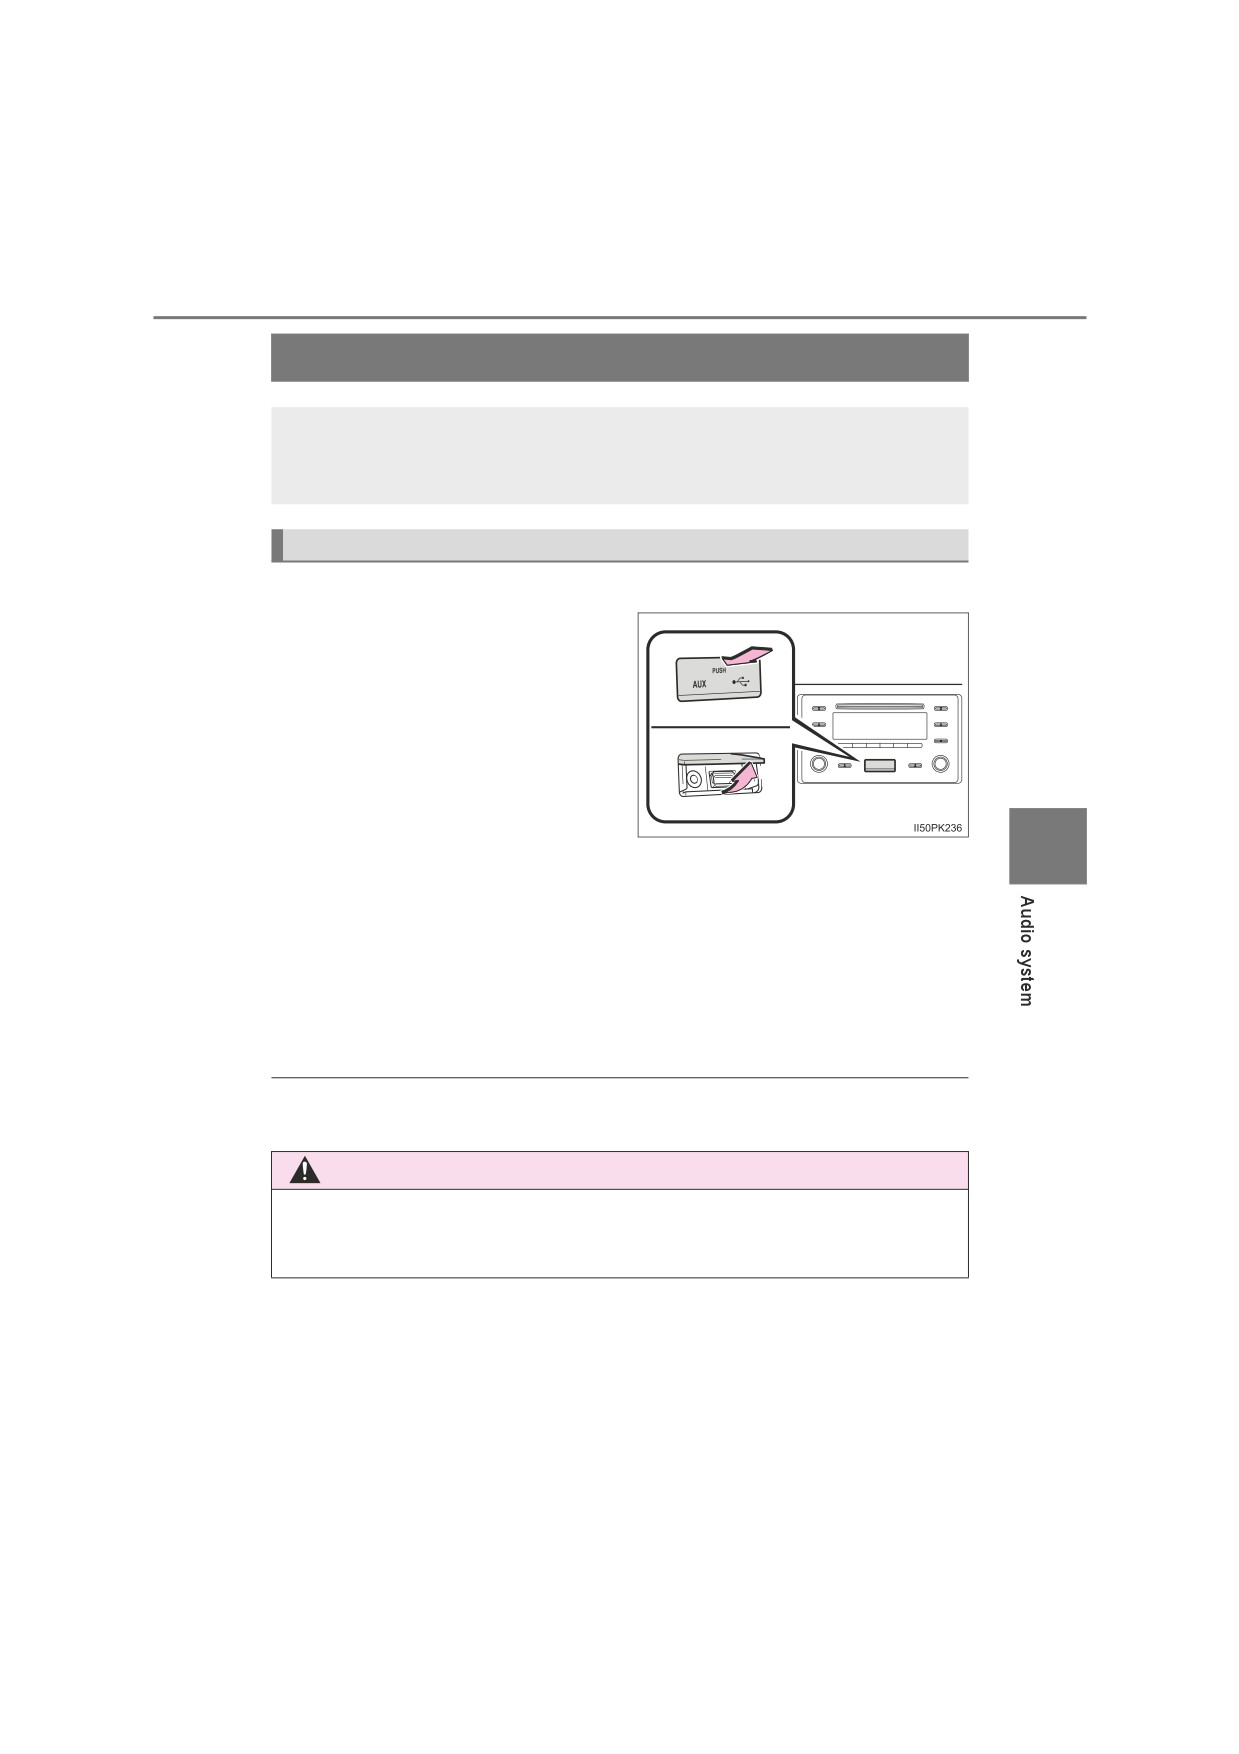
AUX port/USB port
Connect an iPod, USB memory device or portable audio player
to the AUX port/USB port as indicated below. Press the “MODE”
button to select “iPod”, “USB” or “AUX”.
Connecting using the AUX port/USB port
Q iPod
Open the cover and connect an
iPod using an iPod cable.
Turn on the power of the iPod if
it is not turned on.
5
Q USB memory
Open the cover and connect the USB memory device.
Turn on the power of the USB memory device if it is not turned on.
Q Portable audio player
Open the cover and connect the portable audio player using an
AUX cable.
Turn on the power of the portable audio player if it is not turned on.
Q AUX port
The AUX port only supports audio input.
WARNING
Q While driving
Do not connect a device or operate the device controls.
382
5-2. Using the audio system
Optimal use of the audio system
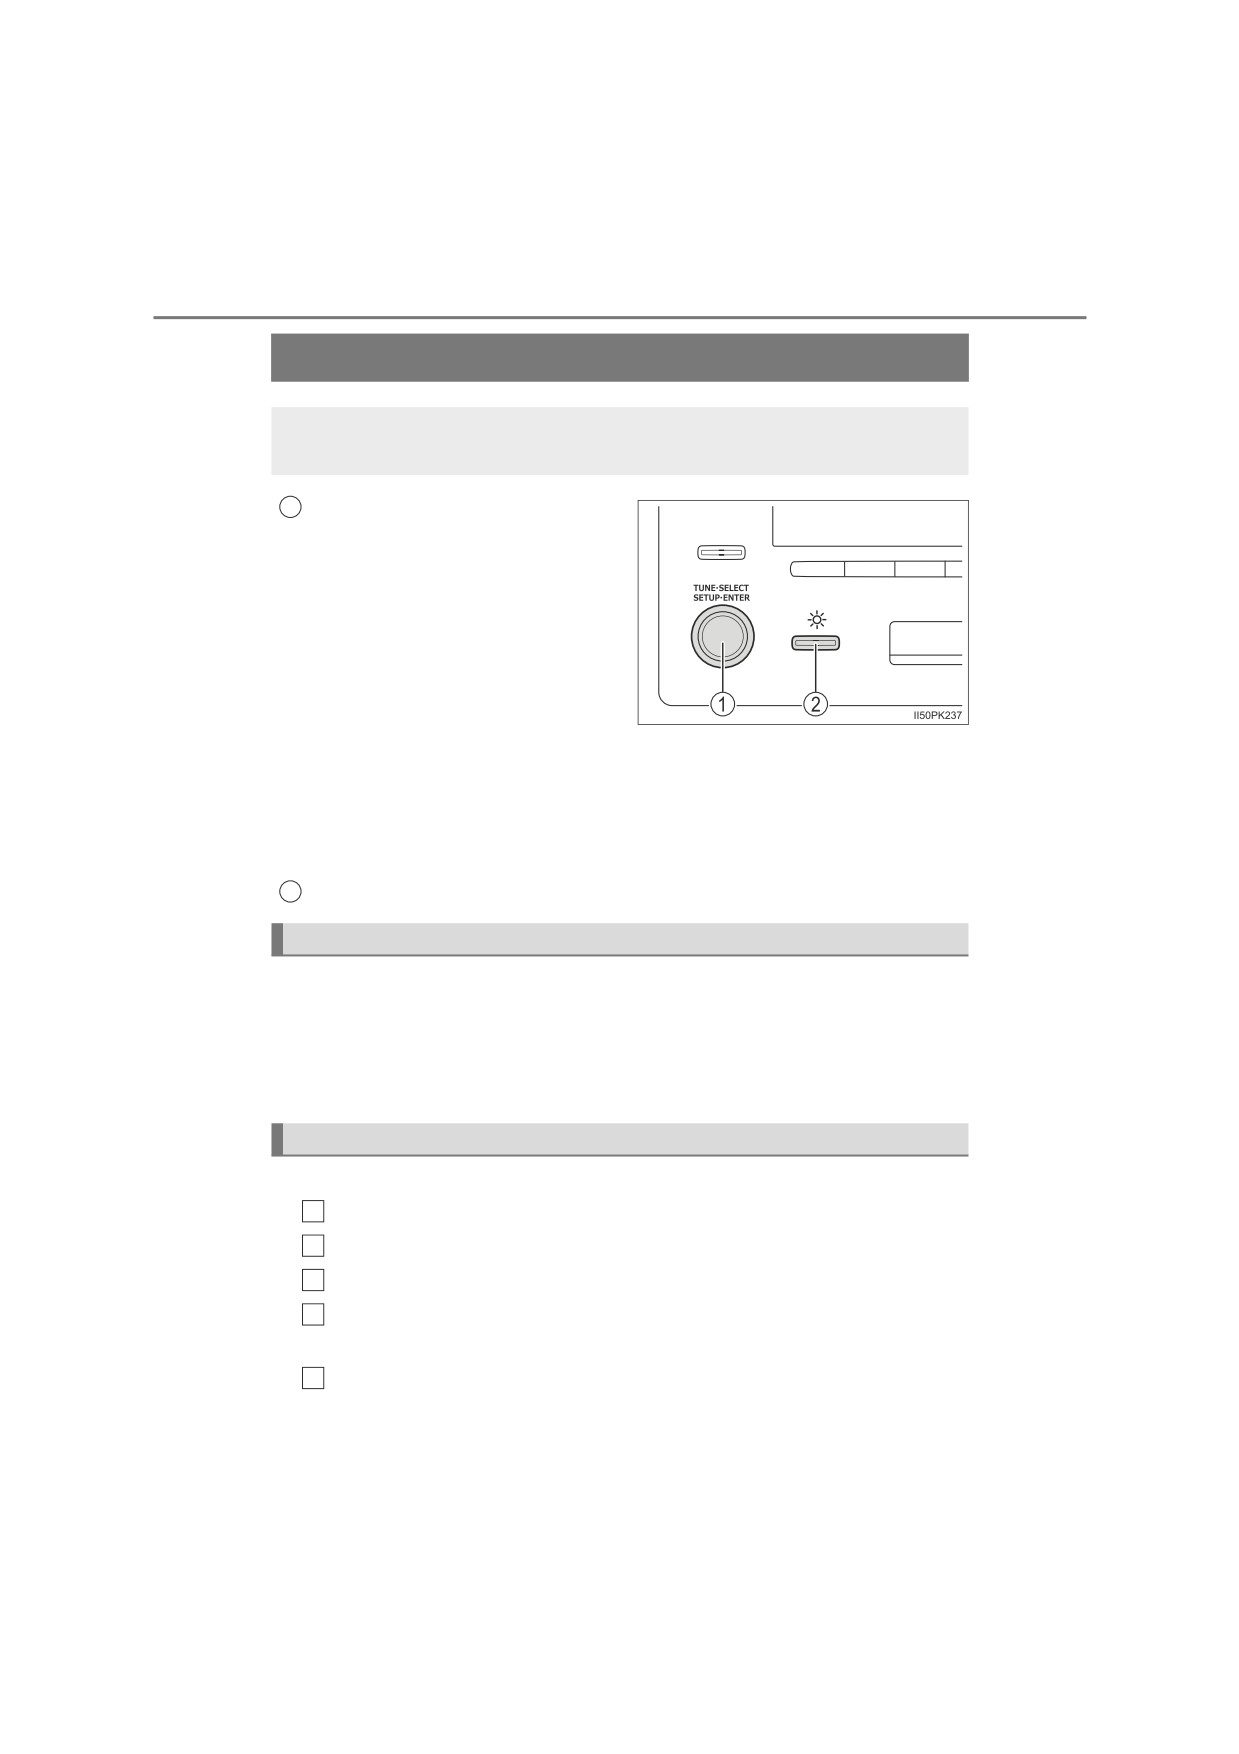
The sound quality, volume balance and ASL settings can be
adjusted and the day mode can be selected.
1
“TUNE•SELECT” knob
Press: Displays the
“SETUP”
menu/Selects the mode
Turn: Changes the following
settings
•
“Sound Setting”
P. 382
•
“RADIO”
P. 384
•
“Bluetooth”
P. 415
•
“TEL”
P. 419
2
Day mode button
Day mode
When the headlights are turned on, the screen dims.
However, the screen can be switched to day mode (full brightness) by
selecting day mode.
The screen will stay in day mode when the headlights are turned on until
day mode is selected again.
Using the audio control function
Q Changing sound quality modes
1
Press the “TUNE•SELECT” knob.
2
Turn the knob to select “Sound Setting”.
3
Press the knob.
4
Turn the knob as corresponds to the desired mode.
“BASS”, “TREBLE”, “FADER”, “BALANCE”, or “ASL” can be selected.
5
Press the knob.
5-2. Using the audio system
383
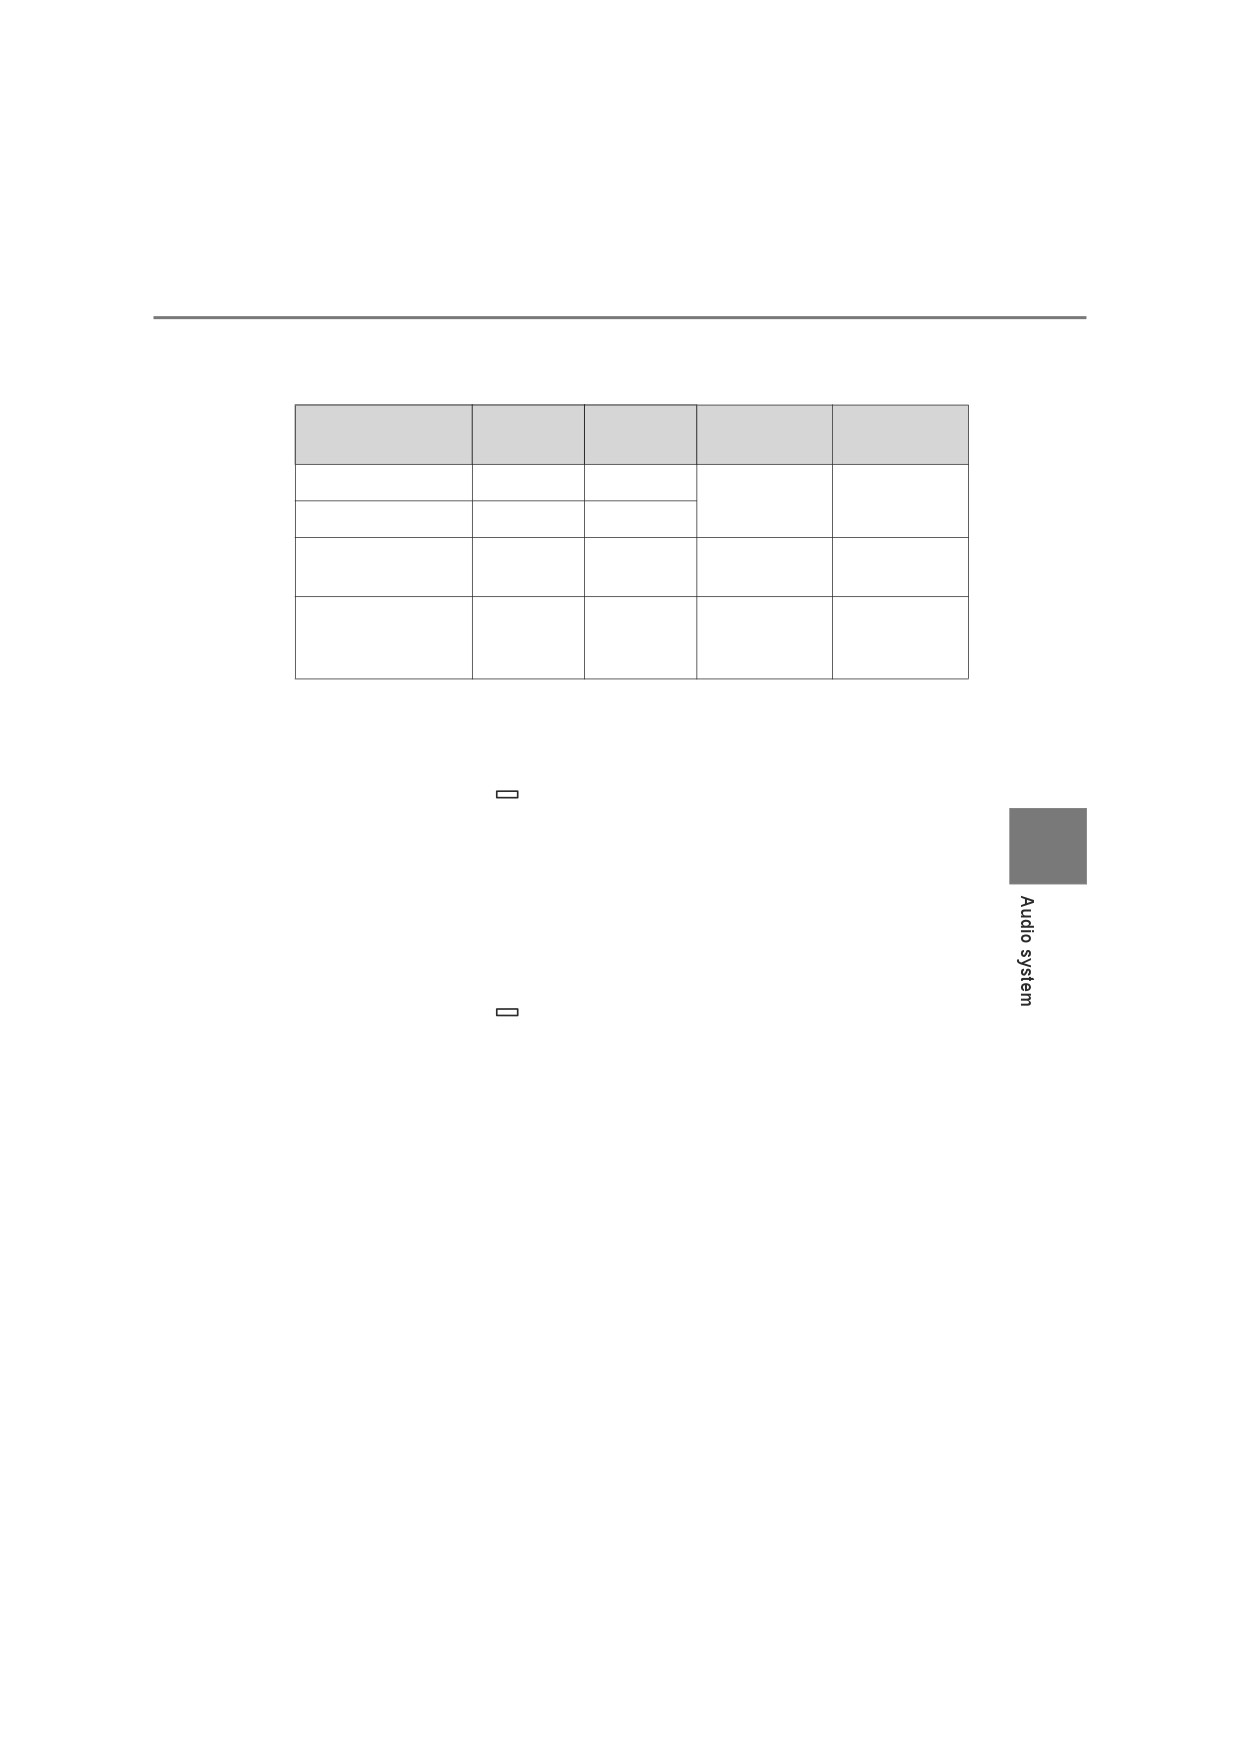
Q Adjusting sound quality
Turning the “TUNE•SELECT” knob adjusts the level.
Sound
Mode
Turn to the
Turn to the
Level
quality mode
displayed
left
right
Bass*1
“BASS”
-5 to 5
Low
High
Treble*1
“TREBLE”
-5 to 5
Front/rear volume
“FADER”
R7 to F7
Shifts to rear
Shifts to front
balance*2
Left/right
volume
“BALANCE”
L7 to R7
Shifts to left
Shifts to right
balance
*1: The sound quality level is adjusted individually in each audio mode.
*2: For the vehicles with 2 speakers system, the sound will be mute if the
sound balance is adjusted to the maximum level at the rear.
Press the knob or
(BACK) to return to the sound setting menu.
Q Adjusting the Automatic Sound Levelizer (ASL)
5
When ASL is selected, turn the “TUNE•SELECT” knob to change
the amount of ASL.
“LOW”, “MID”, “HIGH”, or “OFF” can be selected.
ASL automatically adjusts the volume and tone quality according to
vehicle speed.
Press the knob or
(BACK) to return to the sound setting menu.
384
5-3. Using the radio
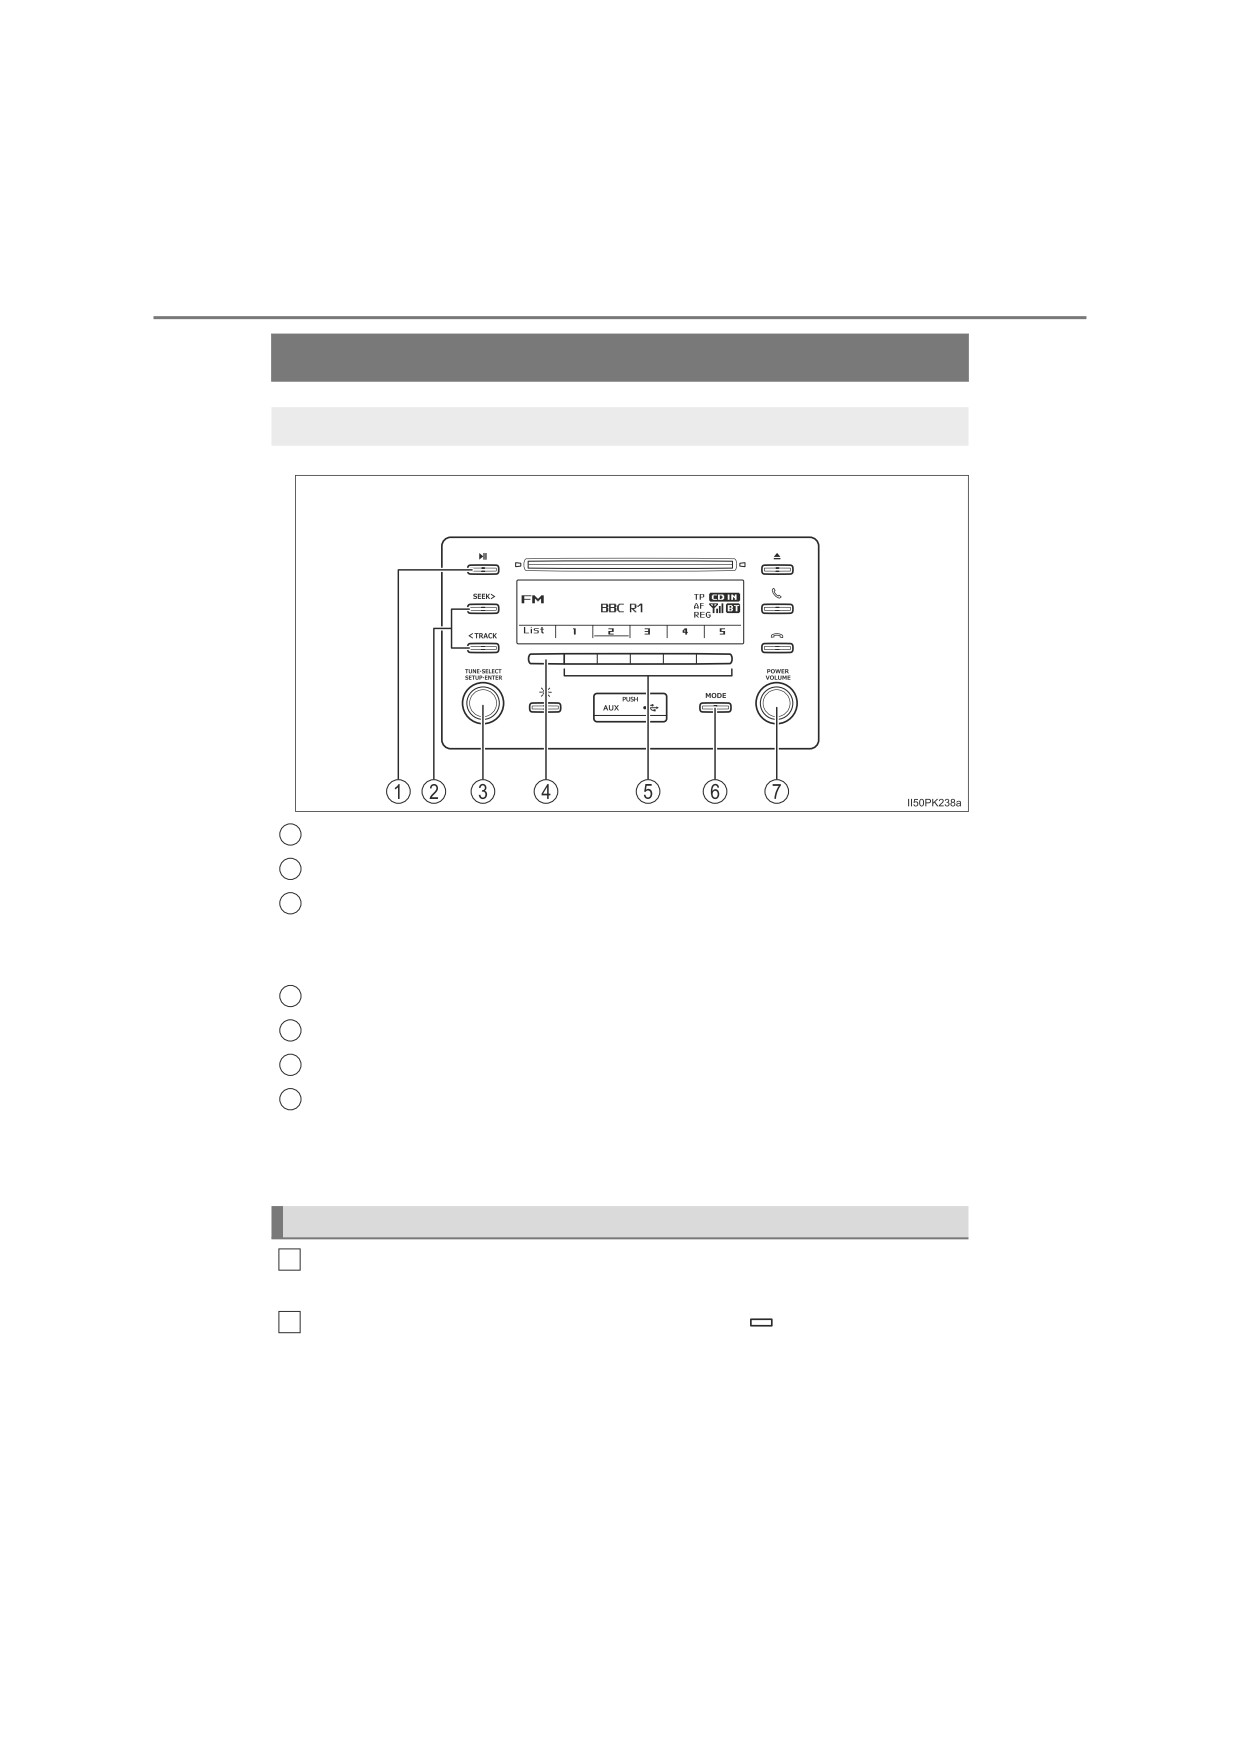
Radio operation
Press the “MODE” button until “AM” or “FM” is displayed.
1
Mute
2
Seeking the frequency
3
“TUNE•SELECT” knob
Press: AF/region code/TA mode setup
Turn: Adjusting the frequency/selecting the station list (FM mode only)
4
Displaying the station list (FM mode only)
5
Station selectors
6
AM/FM mode button
7
“POWER VOLUME” knob
Press: Turning the audio system on or off
Turn: Adjusting the volume
Setting station presets
1
Search for the desired stations by turning the “TUNE•SELECT”
knob or pressing the “SEEK >” or “< TRACK” button.
2
Press and hold one of the station selectors
to be set until you
hear a beep.
5-3. Using the radio
385
Using the station list
Q Updating the station list
1
Press
(LIST)
The station list will be displayed.
2
Press
(UPDATE) to update the list.
“Updating” is displayed while the searching is in process, beep will be
heard after the searching and then available stations will be listed on the
display.
To cancel the updating process, press
(BACK).
Q Selecting a station from the station list
1
Press
(LIST).
The station list will be displayed.
2
Turn the “TUNE•SELECT” knob to select a station.
To return to the previous display, press
(BACK).
3
Press the knob to tune in the station.
RDS (Radio Data System)
5
This feature allows your radio to receive station.
Q Listening to stations of the same network
1
Press the “TUNE•SELECT” knob.
2
Turn the knob to “RADIO” and press the knob.
3
Turn the knob as corresponds to the desired mode: “FM AF” or
“Region code”.
4
Press the knob to select “ON” or “OFF”.
FM AF ON mode:
The station among those of the same network with strong recep-
tion is selected.
Region code ON mode:
The station among those of the same network with strong recep-
tion and broadcasting the same program is selected.
386
5-3. Using the radio
Q Traffic information
1
Press the “TUNE•SELECT” knob.
2
Turn the knob to “RADIO” and press the knob.
3
Turn the knob to “FM TA” mode.
4
Press the knob to select “ON” or “OFF”.
TP mode:
The system automatically switches to traffic information when a
broadcast with a traffic information signal is received.
The station returns to the previous one when the traffic information
ends.
TA mode:
The system automatically switches to traffic information when a
broadcast with a traffic information signal is received. In FM
modes, the system will be mute unless traffic information is being
broadcast.
The audio system returns to the previous mode when the traffic informa-
tion ends.
Q EON (Enhanced Other Network) system (for traffic announcement func-
tion)
If the RDS station (with EON data) you are listening to is not broadcasting a
traffic information program and the audio system is in the TA
(traffic
announcement) mode, the radio will be switched automatically to a station
broadcasting a traffic information program in the EON AF list when traffic
information begins.
Q Reception sensitivity
O Maintaining perfect radio reception at all times is difficult due to the continu-
ally changing position of the antenna, differences in signal strength and sur-
rounding objects, such as trains, transmitters, etc.
O The radio antenna is mounted on the roof. The antenna can be removed
from the base by turning it.
NOTICE
Q To prevent damage, remove the antenna in the following cases
OThe antenna will touch the ceiling of a garage.
O A cover will be put on the roof.
OWhen driving through an automatic car wash.
O Any other cases where there is a risk of touching surrounding parts.
5-4. Playing an audio CD and MP3/WMA/AAC discs
387
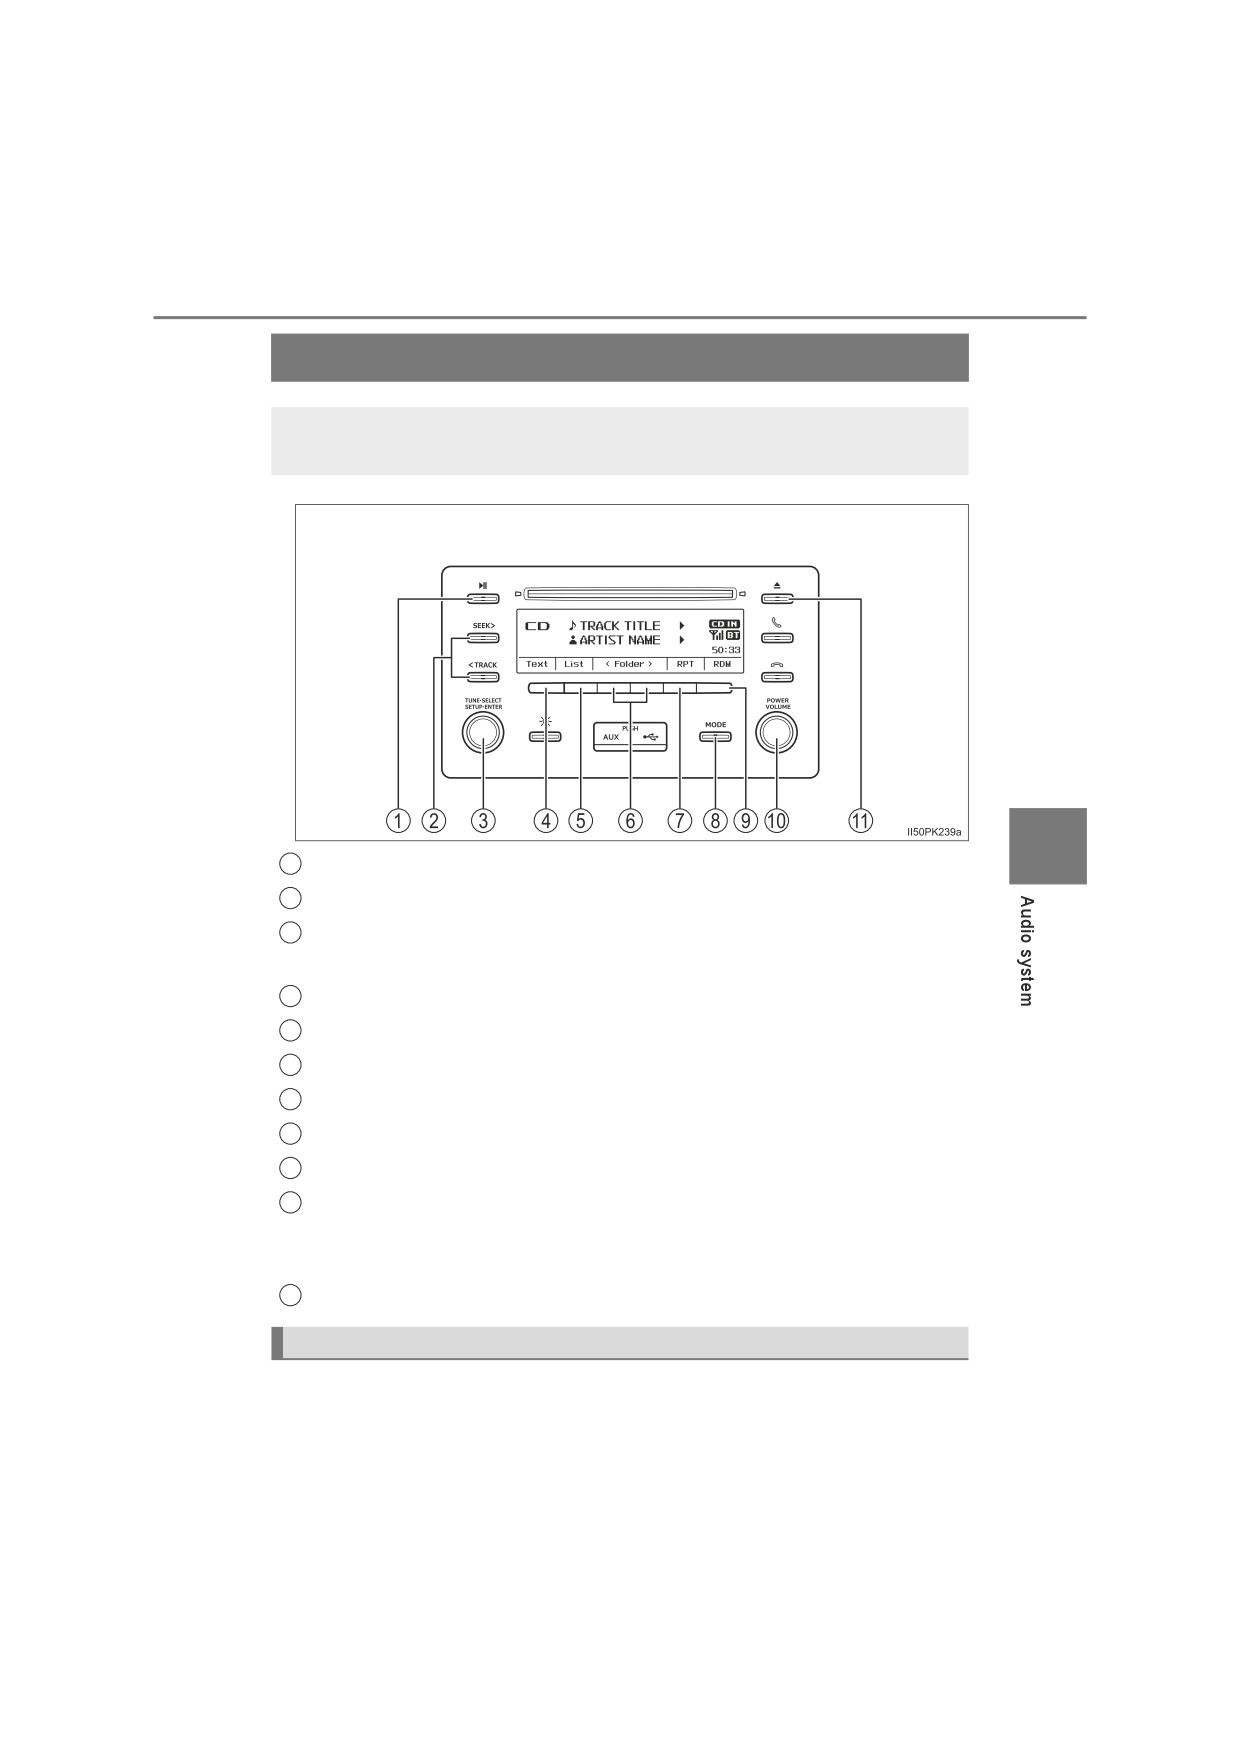
CD player operation
Insert a disc or press the “MODE” button (CD is already loaded)
to begin listening to a CD.
5
1
Pause/playback
2
Selecting a track, fast-forwarding or rewinding
3
“TUNE•SELECT” knob
Selecting a track/file
4
Displaying text message
5
Displaying track/folder list
6
Selecting a folder (MP3/WMA/AAC discs only)
7
Repeat play
8
Changing the audio source/playback
9
Random play or back button
10
“POWER VOLUME” knob
Press: Turning the audio system on or off
Turn: Adjusting the volume
11
Disc eject
Loading a CD or MP3/WMA/AAC disc
Insert a disc.
388
5-4. Playing an audio CD and MP3/WMA/AAC discs
Ejecting a CD or MP3/WMA/AAC disc
Press the disc eject button and remove the disc.
Using the CD player
Q Selecting a track
Turn the
“TUNE•SELECT” knob or press the
“SEEK
>” or
“< TRACK” button to move up or down until the desired track num-
ber is displayed.
Q Selecting a track from a track list
1
Press
(LIST).
The track list will be displayed.
2
Turn and press the “TUNE•SELECT” knob to select a track.
To return to the previous display, press
(BACK).
Q Fast-forwarding and rewinding tracks
Press and hold the “SEEK >” or “< TRACK” button until you hear a
beep.
Q Random play
Press
(RDM).
To cancel, press
(RDM) again.
Q Repeat play
Press
(RPT).
To cancel, press
(RPT) again.
Q Switching the display
Press
(TEXT) to display or hide the CD title.
If there are continuing texts,
is displayed.
Press and hold
(TEXT) until you hear a beep to display the remain-
ing texts.
5-4. Playing an audio CD and MP3/WMA/AAC discs
389
Playing back MP3/WMA/AAC disc
Q Selecting folders one at a time
Press
(<FOLDER) or
(FOLDER>) to select the desired
folder.
Q Selecting a folder and file from folder list
1
Press
(LIST).
The folder list will be displayed.
2
Turn and press the knob to select a folder and a file.
To return to the previous display, press
(BACK).
Q Returning to the first folder
Press and hold
(<FOLDER) until you hear a beep.
Q Selecting a file
Turn the
“TUNE•SELECT” knob or press the
“SEEK
>” or
“< TRACK” button to move up or down to select the desired file.
Q Fast-forwarding and rewinding files
5
Press and hold the “SEEK >” or “< TRACK” button until you hear a
beep.
Q Random play
Pressing
(RDM) changes modes in the following order: Folder
randomDisc randomOff
Q Repeat play
Pressing
(RPT) changes modes in the following order: File
repeatFolder repeat*Off
*: Available except when “RDM” (random play) is selected
Q Switching the display
Press
(TEXT) to display or hide the album title.
If there are continuing texts,
is displayed.
Press and hold
(TEXT) until you hear a beep to display the remain-
ing texts.
390
5-4. Playing an audio CD and MP3/WMA/AAC discs
Q Display
Depending on the contents recorded, the characters may not be displayed
properly or may not be displayed at all.
QError messages
If an error message is displayed, refer to the following table and take the
appropriate measures. If the problem is not rectified, take the vehicle to any
authorized Toyota retailer or Toyota authorized repairer, or any reliable
repairer.
Message
Cause/Correction procedures
The disc may be dirty, damaged or inserted
“CD CHECK”
upside-down. Clean the disc or insert it cor-
rectly.
There is a trouble inside the system.
“ERROR 3”
Eject the disc.
An over current error has occurred.
“ERROR 4”
Turn the engine switch off.
Operation has stopped due to a high tempera-
ture inside the player. Wait for a while and
then press the “MODE” button. If the CD still
“WAIT”
cannot be played back, contact any autho-
rized Toyota retailer or Toyota authorized
repairer, or any reliable repairer.
This indicates that the MP3, WMA or AAC file
“NO SUPPORT”
is not included in the CD.
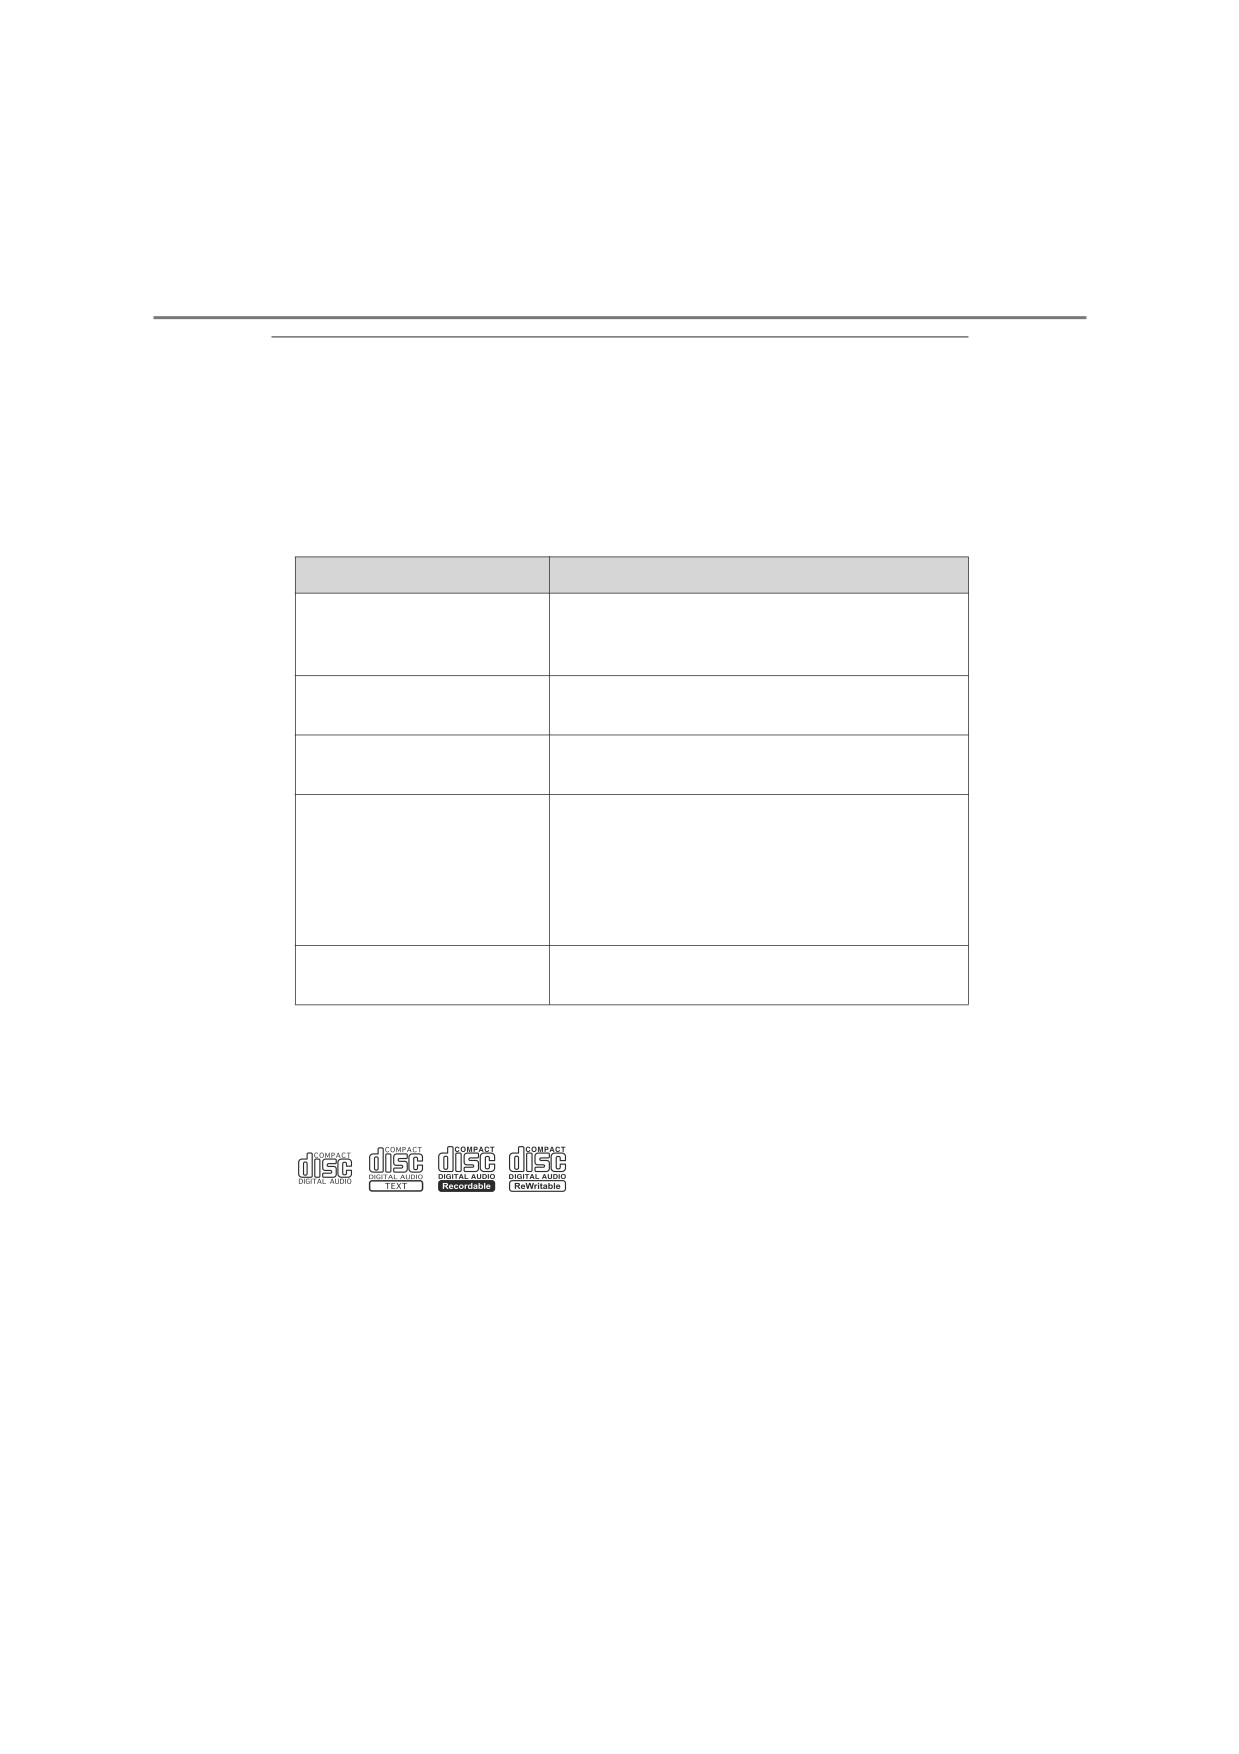
Q Discs that can be used
Discs with the marks shown below can be used.
Playback may not be possible depending on recording format or disc fea-
tures, or due to scratches, dirt or deterioration.
CDs with copy-protect features may not play correctly.
Q CD player protection feature
To protect the internal components, playback is automatically stopped when a
problem is detected while the CD player is being used.
Q If a CD is left inside the CD player or in the ejected position for extended
periods
The CD may be damaged and may not play properly.
5-4. Playing an audio CD and MP3/WMA/AAC discs
391
Q Lens cleaners
Do not use lens cleaners. Doing so may damage the CD player.
Q MP3, WMA and AAC files
MP3 (MPEG Audio LAYER3) is a standard audio compression format.
Files can be compressed to approximately 1/10 of their original size by using
MP3 compression.
WMA (Windows Media Audio) is a Microsoft audio compression format.
This format compresses audio data to a size smaller than that of the MP3 for-
mat.
AAC is short for Advanced Audio Coding and refers to an audio compression
technology standard used with MPEG2 and MPEG4.
There is a limit to the MP3, WMA and AAC file standards and to the media/
formats recorded by them that can be used.
OMP3 file compatibility
• Compatible standards
MP3 (MPEG1 LAYER3, MPEG2 LSF LAYER3)
• Compatible sampling frequencies
MPEG1 LAYER3: 32, 44.1, 48 (kHz)
MPEG2 LSF LAYER3: 16, 22.05, 24 (kHz)
5
• Compatible bit rates (compatible with VBR)
MPEG1 LAYER3: 32320 (kbps)
MPEG2 LSF LAYER3: 8160 (kbps)
• Compatible channel modes: stereo, joint stereo, dual channel and mon-
aural
O WMA file compatibility
• Compatible standards
WMA Ver. 7, 8, 9 (9.1/9.2)
• Compatible sampling frequencies
32, 44.1, 48 (kHz)
• Compatible bit rates (only compatible with 2-channel playback)
Ver. 7, 8: CBR 48-192 (kbps)
Ver. 9 (9.1/9.2): CBR 48-320 (kbps)
OAAC file compatibility
• Compatible standards
MPEG4/AAC-LC
• Compatible sampling frequencies
11.025/12/16/22.05/24/32/44.1/48 (kHz)
• Compatible bit rates (compatible with VBR)
8-320 (kbps)
• Compatible channel modes
1ch, 2ch (Dual channel is not supported)
392
5-4. Playing an audio CD and MP3/WMA/AAC discs
OCompatible media
Media that can be used for MP3, WMA and AAC playback are CD-ROMs,
CD-Rs and CD-RWs.
Playback in some instances may not be possible, depending on the status
of the CD-ROM, CD-R or CD-RW. Playback may not be possible or the
audio may jump if the disc is scratched or marked with fingerprints.
OCompatible disc formats
The following disc formats can be used.
• Disc formats:
CD-ROM Mode 1 and Mode 2
CD-ROM XA Mode 2, Form 1 and Form 2
• File formats:
ISO9660 Level 1, Level 2, (Romeo, Joliet)
UDF (2.01)
MP3, WMA and AAC files written in any format other than those listed
above may not play correctly, and their file names and folder names may
not be displayed correctly.
Items related to standards and limitations are as follows.
• Maximum directory hierarchy: 8 levels (including the root)
• Maximum length of folder names/file names: 32 characters
• Maximum number of folders: 192 (including the root)
• Maximum number of files per disc: 255
OFile names
The only files that can be recognized as MP3/WMA/AAC and played are
those with the extension .mp3, .wma or .m4a.
OMulti-sessions
As the audio system is compatible with multi-sessions, it is possible to play
discs that contain MP3, WMA and AAC files. However, only the first session
can be played.
OID3, WMA and AAC tags
ID3 tags can be added to MP3 files, making it possible to record the track
title and artist name, etc.
The system is compatible with ID3 Ver. 1.0, 1.1, and Ver. 2.2, 2.3 ID3 tags.
(The number of characters is based on ID3 Ver. 1.0 and 1.1.)
WMA tags can be added to WMA files, making it possible to record the
track title, artist and album name in the same way as with ID3 tags.
AAC tags can be added to AAC files, making it possible to record the track
title, artist and album name in the same way as with ID3 tags.