Toyota Yaris Hatchback (2020 year). Manual in english - part 8
 

  Index      Toyota     Toyota Yaris Hatchback (2020 year). Manual in english


Search            copyright infringement  


Content      ..     6      7      8      9     ..


Toyota Yaris Hatchback (2020 year). Manual in english - part 8


460

6-2. Flat Tire

YARIS_YARIS HATCHBACK_OM_OM99V59z_(U)

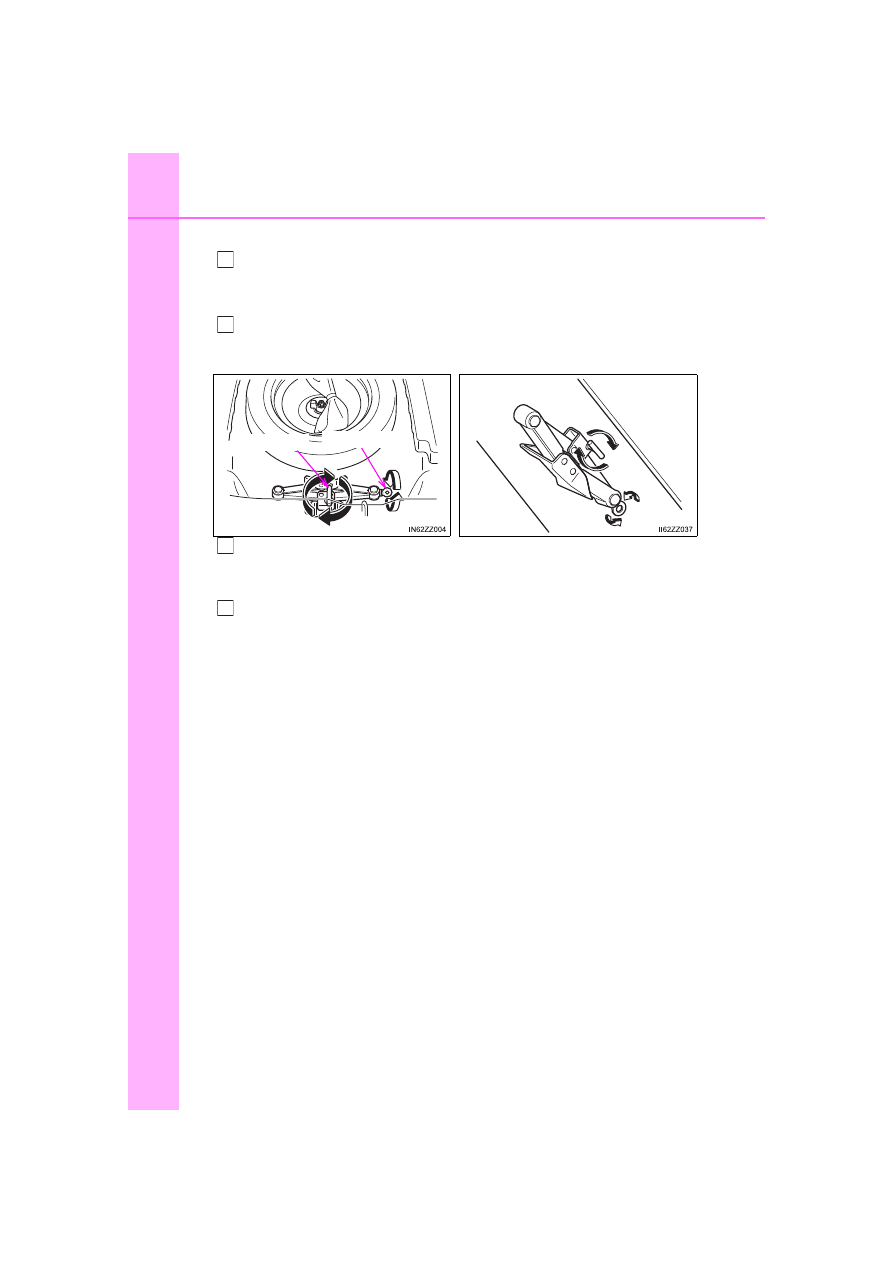
To secure the jack

Insert the wing bolt into the jack with the jack screw pointing to
the right (4-Door) or down (5-Door) and turn the wing bolt clock-
wise to temporarily tighten it.
Turn the jack screw in the direction shown in the figure.

Turn the wing bolt completely to secure the jack.

If the jack is not completely secured, it could rattle while driving. Make
sure the jack screw is sufficiently tightened.

Return the trunk board to its original position (4-Door), or insert
the cover tabs and install the cover (5-Door).

Verify that the trunk board is securely installed.

Maintenance

• Always keep the jack clean.
• Make sure the moving parts are kept free from dirt or rust.
• Make sure the screw thread is adequately lubricated.

1

2

4-Door

5-Door

Wing bolt

Jack screw

3

4

-------------------------------------------------------------------------------------------------------------------------------------------------------------

YARIS_YARIS HATCHBACK_OM_OM99V59z_(U)

461

6-2. Flat Tire

6

If Trouble Arises

Your Toyota has a temporary spare tire. The temporary spare tire is
lighter and smaller than a conventional tire, and is designed only for
emergency  use  and  should  be  used  only  for  VERY  short  periods.
Temporary  spare  tires  should  NEVER  be  used  for  long  drives  or
extended periods.

To remove the spare tire

Lift  the  trunk/luggage  com-
partment mat.

Turn the spare tire hold-down
bolt counterclockwise.

To secure the spare tire

Store the spare tire in the reverse order of removal. After storing,
verify that the spare tire is stored securely.

Spare Tire

1

Spare tire hold-down bolt

2

WARNING

Do not install the temporary spare tire on the front wheels (driving

wheels)

Driving with the temporary spare tire on one of the front driving wheels

is  dangerous.  Handling  will  be  affected.  You  could  lose  control  of  the

vehicle, especially on ice or snow bound roads, and have an accident.

Move a regular tire to the front wheel and install the temporary spare tire

to the rear.

-------------------------------------------------------------------------------------------------------------------------------------------------------------

462

6-2. Flat Tire

YARIS_YARIS HATCHBACK_OM_OM99V59z_(U)

NOTICE

When  using  the  temporary  spare  tire,  driving  stability  may  decrease

compared to when using only the conventional tire. Drive carefully.

To avoid damage to the temporary spare tire or to the vehicle, observe

the following precautions:
• Do not exceed 50 mph (80 km/h).

• Avoid  driving  over  obstacles. Also,  do  not  drive  through  an  auto-

matic car wash. This tire’s diameter is smaller than a conventional

tire, so the ground clearance is reduced.

• Do not use a tire chain on this tire because it will not fit properly.

• Do  not  use  your  temporary  spare  tire  on  any  other  vehicle,  it  has

been designed only for your Toyota.

• Use only one temporary spare tire on your vehicle at the same time.

-------------------------------------------------------------------------------------------------------------------------------------------------------------

463

YARIS_YARIS HATCHBACK_OM_OM99V59z_(U)

6-2. Flat Tire

6

If Trouble Arises

Changing a Flat Tire

Park on a level surface off the right-of-way and firmly set the park-
ing brake.
Put  a  vehicle  with  an  automatic  transaxle  in  Park  (P),  a  manual
transaxle in Reverse (R) or 1, and turn off the engine.
Turn on the hazard warning flasher.
Have  everyone  get  out  of  the  vehicle  and  away  from  the  vehicle
and traffic.
Remove the jack, tool, and spare tire (

P. 457).

Block  the  wheel  diagonally
opposite  the  flat  tire.  When
blocking  a  wheel,  place  a  tire
block  both  in  front  and  behind
the tire.

When  blocking  a  tire,  use  rocks

or wood blocks of sufficient size if

possible to hold the tire in place.

If the following occurs while driving, it could indicate a flat tire.
• Steering becomes difficult.

• The vehicle begins to vibrate excessively.

• The vehicle pulls in one direction.

Make sure the jack is well lubricated before using it.

If you have a flat tire, drive slowly to a level spot that is well off
the road and out of the way of traffic to change the tire.
Stopping in traffic or on the shoulder of a busy road is danger-
ous.

1

2

3

4

5

6

-------------------------------------------------------------------------------------------------------------------------------------------------------------

464

6-2. Flat Tire

YARIS_YARIS HATCHBACK_OM_OM99V59z_(U)

WARNING

Be sure to follow the directions for changing a tire

Changing a tire is dangerous if not done properly. The vehicle can slip

off the jack and seriously injure someone. No person should place any

portion of their body under a vehicle that is supported by a jack.

Never allow anyone inside a vehicle supported by a jack

Allowing someone to remain in a vehicle supported by a jack is danger-

ous.  The  occupant  could  cause  the  vehicle  to  fall  resulting  in  serious

injury.

-------------------------------------------------------------------------------------------------------------------------------------------------------------

YARIS_YARIS HATCHBACK_OM_OM99V59z_(U)

465

6-2. Flat Tire

6

If Trouble Arises

If your vehicle is equipped with
a wheel cover, pry off the wheel
cover  with  the  beveled  end  of
the jack lever.

Force  the  end  of  the  jack  lever
firmly between wheel and cover, or
removal will be difficult.

Loosen  the  lug  nuts  by  turning
them counterclockwise one turn
each,  but  do  not  remove  any
lug  nuts  until  the  tire  has  been
raised off the ground.

Place the jack on the ground.
Turn the jack screw in the direc-
tion  shown  in  the  figure  and
adjust the jack head so that it is
close to the jack-up position.

Place  the  jack  under  the  jack-
up  position  closest  to  the  tire
being  changed  with  the  jack
head  squarely  under  the  jack-
up point.

Removing a Flat Tire

1

2

3

Jack head

4

Jacking position

5

-------------------------------------------------------------------------------------------------------------------------------------------------------------

466

6-2. Flat Tire

YARIS_YARIS HATCHBACK_OM_OM99V59z_(U)

Continue  raising  the  jack  head
gradually  by  rotating  the  screw
with  your  hand  until  the  jack
head is inserted into the jack-up
position.

When raising the jack head into the
jacking  position  and  aligning  the
groove in the jack head with the rail
under  the  vehicle  body,  the  top  of
the  jack  head  contacts  the  vehi-
cle’s  underbody  without  the  rail
contacting  the  bottom  of  the
groove.

Insert the jack lever and attach
the lug wrench to tire jack.

Turn  the jack  handle clockwise
and  raise  the  vehicle  high
enough  so  that  the  spare  tire
can be installed. Before remov-
ing  the  lug  nuts,  make  sure
your Toyota is firmly in position
and that it cannot slip or move.

Remove  the  lug  nuts  by  turning  them  counterclockwise;  then
remove the wheel and center cap.

Tire blocks

Jacking 
position

6

7

8

9

-------------------------------------------------------------------------------------------------------------------------------------------------------------

YARIS_YARIS HATCHBACK_OM_OM99V59z_(U)

467

6-2. Flat Tire

6

If Trouble Arises

WARNING

When jacking-up a vehicle, always shift the shift lever to 1st or R

position (manual transaxle vehicle) or shift the selector lever to P

position (automatic transaxle vehicle), apply the parking brake, and

place wheel blocks in the position diagonally opposed to the jack

Changing  a  flat tire  without  using wheel  blocks is dangerous because

the vehicle may move and fall off the jack even with the shift lever in 1st

or R position, or the selector lever is in P position, which could result in

an accident.

Use only the front and rear jacking positions recommended in this

manual

Attempting  to  jack  the  vehicle  in  positions  other  than  those  recom-

mended in this manual is dangerous. The vehicle could slip off the jack

and seriously injure or even kill someone. Use only the front and rear

jacking positions recommended in this manual.

Do not jack up the vehicle in a position other than the designated

jack-up position or place any objects on or under the jack

Jacking up the vehicle in a position other than the designated jack-up

position or placing objects on or under the jack is dangerous as it could

deform the vehicle body or the vehicle could fall off the jack resulting in

an accident.

Use only the jack provided with your Toyota

Using a jack that is not designed for your Toyota is dangerous. The vehi-

cle could slip off the jack and seriously injure someone.

Never place objects under the jack

Jacking the vehicle with an object under the jack is dangerous. The jack

could slip and someone could be seriously injured by the jack or the fall-

ing vehicle.

Do not jack up the vehicle higher than is necessary

Jacking up the vehicle higher than is necessary is dangerous as it could
destabilize the vehicle resulting in an accident.

Do not start the engine or shake the vehicle while it is jacked up

Starting the engine or shaking the vehicle while it is jacked up is danger-

ous as it could cause the vehicle to fall off the jack resulting in an acci-

dent.

Never go under the vehicle while it is jacked up

Going under  the  vehicle while it is  jacked  up is  dangerous as  it could

result in death or serious injury if the vehicle were to fall off the jack.
Damage could occur during installation if the wheel cover is not properly

aligned.

-------------------------------------------------------------------------------------------------------------------------------------------------------------

468

6-2. Flat Tire

YARIS_YARIS HATCHBACK_OM_OM99V59z_(U)

WARNING

When installing the wheel cover

Align the notch on the wheel cover with

the valve stem.
Damage could occur during installation

if  the  wheel  cover  is  not  properly

aligned.

Notch

Tire valve

-------------------------------------------------------------------------------------------------------------------------------------------------------------

YARIS_YARIS HATCHBACK_OM_OM99V59z_(U)

469

6-2. Flat Tire

6

If Trouble Arises

If your Toyota is equipped with the optional antitheft wheel lug nuts, a
special key must be used to unlock the locking lug nut for each wheel.
The key is stored in the glove compartment, center console storage,
storage box, or trunk. Register the key and lug nuts with the lock man-
ufacturer by filling out the registration card and mailing it in using the
accompanying envelope. If the key is lost, consult your Toyota dealer
or use the lock manufacturer’s order form to order a new key. Antitheft
wheel lug nuts cannot be installed on a steel wheel spare tire. When
installing  a  temporary  spare  tire,  use  one  of  the  original  lug  nuts  in
place  of  the  locking  lug  nut.  The  original  lug  nuts  are  stored  inside
your Toyota.

Antitheft lug nut
Special key

To remove an antitheft lug nut

Obtain the special key for the antitheft lug nut.
Place the special key on top of the antitheft lug nut, and be sure
to hold the key square to it. If you hold the key at an angle, you
may  damage  both  key  and  nut.  Do  not  use  a  power  impact
wrench.
Place the lug wrench on top of the key and apply pressure. Turn
the wrench counterclockwise.

To install the antitheft lug nut

Place the special key on top of the nut, and be sure to hold the
key square to it. If you hold the key at an angle, you may damage
both key and nut. Do not use a power impact wrench.
Place the lug wrench on top of the special key, apply pressure,
and turn it clockwise.

Locking Lug Nuts (if equipped)

1
2

1

2

3

1

2

Nut tightening torque

ft•lbf (N•m, kgf•m)

80-108 (108-147, 12-14)

-------------------------------------------------------------------------------------------------------------------------------------------------------------

470

6-2. Flat Tire

YARIS_YARIS HATCHBACK_OM_OM99V59z_(U)

4-Door

Remove dirt and grime from the
mounting surfaces of the wheel
and  hub,  including  the  hub
bolts, with a cloth.

Mount the spare tire.
Install the lug nuts with the bev-
eled edge inward; tighten them
by hand.

Turn the lug wrench counterclockwise and lower the vehicle.
Use  the  lug  wrench  to  tighten
the nuts in the order shown.

If  you  are  unsure  of  how  tight  the  nuts  should  be,  have  them
inspected at your Toyota dealer.

Mounting the Spare Tire

1

2

3

4

5

Nut tightening torque

ft•lbf (N•m, kgf•m)

80-108 (108-147, 12-14)

-------------------------------------------------------------------------------------------------------------------------------------------------------------

YARIS_YARIS HATCHBACK_OM_OM99V59z_(U)

471

6-2. Flat Tire

6

If Trouble Arises

Open the trunk mat.

Remove the belt for securing the flat tire.
Put the flat tire into the trunk on
the left and toward the back.

Fold the rear seatback forward on the right side of the rear seat.
Unlock the rear seatback on the left side and assure a clearance to
pass the belt.
Pass  the  belt  through  the  rear
seatback  as  shown  in  the  fig-
ure.

After  passing  the  belt  through,

return  the  rear  seatback  to  the

original position.

Trunk mat

6

7

8

9

10

Belt

11

-------------------------------------------------------------------------------------------------------------------------------------------------------------

472

6-2. Flat Tire

YARIS_YARIS HATCHBACK_OM_OM99V59z_(U)

Pass  the  buckle  through  the  wheel  as  shown  in  the  figure  and
secure it so that the buckle does not contact the wheel.

Pass  the  belt  through  the
buckle, then pull the belt end to
secure the flat tire.

Return the rear seatback on the right side of the rear seatback to its
original position.
Remove the tire blocks and store the tools and jack.
Check the inflation pressure.
Refer to Tires on P. 553.
Have the flat tire repaired or replaced as soon as possible.

12

Aluminum wheel

Steel wheel

13

1

14

15

16

17

-------------------------------------------------------------------------------------------------------------------------------------------------------------

YARIS_YARIS HATCHBACK_OM_OM99V59z_(U)

473

6-2. Flat Tire

6

If Trouble Arises

5-Door

Remove dirt and grime from the
mounting surfaces of the wheel
and  hub,  including  the  hub
bolts, with a cloth.

Mount the spare tire.
Install the lug nuts with the bev-
eled edge inward; tighten them
by hand.

Turn the lug wrench counterclockwise and lower the vehicle.
Use  the  lug  wrench  to  tighten
the nuts in the order shown.

If  you  are  unsure  of  how  tight  the  nuts  should  be,  have  them
inspected at your Toyota dealer.

1

2

3

4

5

Nut tightening torque

ft•lbf (N•m, kgf•m)

80-108 (108-147, 12-14)

-------------------------------------------------------------------------------------------------------------------------------------------------------------

474

6-2. Flat Tire

YARIS_YARIS HATCHBACK_OM_OM99V59z_(U)

Remove  the  luggage  compart-
ment cover (if equipped).

Refer to Luggage Compartment on
P. 117.

Remove the belt for securing the flat tire.
Return the rear seatback to its original position.

Refer to Rear Seat on P. 26.

Remove the tire blocks and store the tools and jack.
Remove the center cap by tapping it with the lug wrench.
Thread the belt through the rear
seat as shown in the figure.

6

7

8

9

10

11

-------------------------------------------------------------------------------------------------------------------------------------------------------------

YARIS_YARIS HATCHBACK_OM_OM99V59z_(U)

475

6-2. Flat Tire

6

If Trouble Arises

Place the flat tire in the luggage
compartment.

Thread  the  buckle  through  the
wheel as shown in the figure.

Thread  the  belt  through  the
buckle while pressing the tire to
the seatback.

Pull  the  belt  end  to  secure  the
flat tire.

12

13

14

15

-------------------------------------------------------------------------------------------------------------------------------------------------------------

476

6-2. Flat Tire

YARIS_YARIS HATCHBACK_OM_OM99V59z_(U)

Insert the luggage compartment
cover  from  the  top  of  the  lug-
gage  compartment  opening
with the cloth side of the cover
facing  outward,  and  slide  it
between  the  flat  tire  and  the
inside perimeter of the luggage
compartment opening.

Check the tire inflation pressure.
Refer to the specification charts on P. 553.
Have the flat tire repaired or replaced as soon as possible.

Do not press the tire pressure monitoring system set switch after install-

ing  the spare  tire. The  switch is  only  to  be  pressed  after  installing  the

repaired flat tire or installing a replacement tire (

P. 164).

To prevent the jack and tool from rattling, store them properly.

1

16

Pass  the  belt  underneath  the  seat-

belts.

17

18

Seat belt

Belt

-------------------------------------------------------------------------------------------------------------------------------------------------------------

YARIS_YARIS HATCHBACK_OM_OM99V59z_(U)

477

6-2. Flat Tire

6

If Trouble Arises

WARNING

Make  sure  the  mounting  surfaces  of  the  wheel,  hub  and  lug  nuts

are clean before changing or replacing tires

When changing or replacing a tire, not removing dirt and grime from the

mounting surfaces of the wheel, hub and hub bolts is dangerous. The

lug nuts could loosen while driving and cause the tire to come off, result-

ing in an accident.

Do not apply oil or grease to lug nuts and bolts and do not tighten

the lug nuts beyond the recommended tightening torque

Applying oil or grease to lug nuts and bolts is dangerous. The lug nuts

could loosen while driving and cause the tire to come off, resulting in an

accident. In addition, lug nuts and bolts could be damaged if tightened

more than necessary.

Always securely and correctly tighten the lug nuts

Improperly  or  loosely  tightened  lug  nuts  are  dangerous.  The  wheel

could wobble or come off. This could result in loss of vehicle control and

cause a serious accident.

Be  sure  to  reinstall  the  same  nuts  you  removed  or  replace  them

with metric nuts of the same configuration

Because  the  wheel  studs  and  lug  nuts  on  your  Toyota  have  metric

threads, using a non-metric nut is dangerous. On a metric stud, it would

not secure the wheel and would damage the stud, which could cause

the wheel to slip off and cause an accident.

Do not drive with any tires that have incorrect air pressure

Driving  on  tires  with  incorrect  air  pressure  is  dangerous.  Tires  with

incorrect pressure could affect handling and result in an accident. When

you check the regular tires’ air pressure, check the spare tire, too.

-------------------------------------------------------------------------------------------------------------------------------------------------------------

478

YARIS_YARIS HATCHBACK_OM_OM99V59z_(U)

6-3. Battery Runs Out

Jump-Starting

Jump-starting  is  dangerous  if  done  incorrectly.  So  follow  the  proce-
dure carefully. If you feel unsure about jump-starting, we strongly rec-
ommend that you have a competent service technician do the work.

Move the booster vehicle so that its battery is as close as possible
to your vehicle’s battery.
Make sure that the power such as for the headlights and air condi-
tioner is turned off.
Remove the battery cover.

1

2

3

-------------------------------------------------------------------------------------------------------------------------------------------------------------

YARIS_YARIS HATCHBACK_OM_OM99V59z_(U)

479

6-3. Battery Runs Out

6

If Trouble Arises

Turn off the booster vehicle’s engine and connect the jumper cables
in the following order.

Make sure that the jumper cables are securely connected so that they do
not disconnect due to engine vibrations.

1st lead: 

Positive (+) terminal on the discharged battery
Positive (+) terminal on booster vehicle’s battery

2nd lead: 

Negative (-) terminal on booster vehicle’s battery 
Location shown in the figure (do not connect to the negative (-)
terminal of the battery)

Start the booster vehicle’s engine and rev the engine.
Start the engine of your vehicle. Run the engines for about 3 min-
utes to temporarily charge the battery of your vehicle.
Disconnect the jumper cables in the reverse order of their connec-
tion.
Install the battery cover.
Have your vehicle inspected by your Toyota dealer as soon as pos-
sible.

4

1
2

3
4

Jumper cables

Booster battery

Discharged battery

5

6

7

8

9

-------------------------------------------------------------------------------------------------------------------------------------------------------------

480

6-3. Battery Runs Out

YARIS_YARIS HATCHBACK_OM_OM99V59z_(U)

WARNING

 Follow These Precautions Carefully

To ensure safe and correct handling of the battery, read the following pre-
cautions carefully before using the battery or inspecting it.

 Keep flames and sparks away from open battery cells and do

not allow metal tools to contact the positive (+) or negative (-) terminal
of the battery when working near a battery. Do not allow the positive (+)
terminal to contact the vehicle body

Flames and sparks near open battery cells are dangerous. Hydrogen gas,
produced during normal battery operation, could ignite and cause the bat-
tery to explode. An exploding battery can cause serious burns and injuries.
Keep  all  flames  including  cigarettes  and  sparks  away  from  open  battery
cells.

  Keep  all  flames  and  sparks  away  from  open  battery  cells

because  hydrogen  gas  is  produced  from  open  battery  cells  while
charging the battery or adding battery fluid

Flames and sparks near open battery cells are dangerous. Hydrogen gas,
produced during normal battery operation, could ignite and cause the bat-
tery to explode. An exploding battery can cause serious burns and injuries.
Keep  all  flames  including  cigarettes  and  sparks  away  from  open  battery
cells.

Do not jump-start a frozen battery or one with a low fluid level

Jump-starting a frozen battery or one with a low fluid level is dangerous. It
may rupture or explode, causing serious injury.

Connect the negative cable to a good ground point away from the bat-
tery

Connecting the end of the second jumper cable to the negative (-) terminal
of the discharged battery is dangerous.
A spark could cause the gas around the battery to explode and injure some-
one.

Route the jumper cables away from parts that will be moving

Connecting a jumper cable near or to moving parts (cooling fans, belts) is
dangerous. The cable could get caught when the engine starts and cause
serious injury.

-------------------------------------------------------------------------------------------------------------------------------------------------------------

YARIS_YARIS HATCHBACK_OM_OM99V59z_(U)

481

6-3. Battery Runs Out

6

If Trouble Arises

NOTICE

Use only a 12 V booster system. You can damage a 12 V starter, ignition
system, and other electrical parts beyond repair with a 24 V power supply
(two 12 V batteries in series or a 24 V motor generator set).

-------------------------------------------------------------------------------------------------------------------------------------------------------------

482

YARIS_YARIS HATCHBACK_OM_OM99V59z_(U)

6-4. Emergency Starting

Starting a Flooded Engine

Follow this procedure:

If the engine does not start within 5 seconds on the first try, wait 10
seconds and try again.
Make sure the parking brake is on.
Depress the accelerator all the way and hold it there.
Depress  the  clutch  pedal  (Manual  transaxle)  or  the  brake  pedal
(Automatic  transaxle),  then  press  the  push  button  start.  If  the
engine  starts,  release  the  accelerator  immediately  because  the
engine will suddenly rev up.
If the engine fails to start, crank it without depressing the accelera-
tor.

If the engine still does not start using the above procedure, have your
vehicle inspected by your Toyota dealer.

If  the engine  fails  to  start,  it may be flooded  (excessive  fuel  in
the engine).

1

2

3

4

5

-------------------------------------------------------------------------------------------------------------------------------------------------------------

483

YARIS_YARIS HATCHBACK_OM_OM99V59z_(U)

6-4. Emergency Starting

6

If Trouble Arises

Push-Starting

Do not push-start your Toyota.

You cannot start a vehicle with an automatic transaxle by pushing it.

WARNING

Never tow a vehicle to start it

Towing  a  vehicle  to  start  it  is  dangerous.  The  vehicle  being  towed  could
surge forward when its engine starts, causing the 2 vehicles to collide. The
occupants could be injured.

NOTICE

Do not push-start a vehicle that has a manual transaxle. It can damage the
emission control system.

-------------------------------------------------------------------------------------------------------------------------------------------------------------

484

YARIS_YARIS HATCHBACK_OM_OM99V59z_(U)

6-5. Overheating

Overheating

If the high engine coolant temperature warning light turns on:

Drive safely to the side of the road and park off the right-of-way.
Put a vehicle with an automatic transaxle in park (P), a manual tran-
saxle in neutral.
Apply the parking brake.
Turn off the air conditioner.
Check whether coolant or steam is escaping from the engine com-
partment.

If steam is coming from the engine compartment

Do not go near the front of the vehicle. Stop the engine.
Wait until the steam dissipates,  then open the hood and  start the
engine.

If neither coolant nor steam is escaping

Open the hood and idle the engine until it cools.
Make sure the cooling fan is operating, then turn off the engine after
the temperature has decreased.
When cool, check the coolant level.
If it is low, look for coolant leaks from the radiator and hoses.

If you find a leak or other damage, or if coolant is still leaking:

Stop the engine and call your Toyota dealer.

Cooling fan
Cooling system cap
Coolant reservoir

If  the  high  engine  coolant  temperature  warning  light  turns  on,
the vehicle loses power, or you hear a loud knocking or pinging
noise, the engine is probably too hot.

1

2

3

4

5

6

7

1
2
3

-------------------------------------------------------------------------------------------------------------------------------------------------------------

YARIS_YARIS HATCHBACK_OM_OM99V59z_(U)

485

6-5. Overheating

6

If Trouble Arises

If you find no problems, the engine is cool, and no leaks are
obvious:

Carefully add coolant as required (

P. 398).

WARNING

 Pull over to a safe location, then switch the ignition to off and

make  sure  the  fan  is  not  running  before  attempting  to  work  near  the
cooling fan

Working near the cooling fan when it is running is dangerous. The fan could
continue running indefinitely even if the engine has stopped and the engine
compartment temperature is high. You could be hit by the fan and seriously
injured.

 Do not remove either cooling system cap when the engine and

radiator are hot

When  the  engine  and  radiator  are  hot,  scalding  coolant  and  steam  may
shoot out under pressure and cause serious injury.

Open the hood ONLY after steam is no longer escaping from the engine

Steam from an overheated engine is dangerous. The escaping steam could
seriously burn you.

NOTICE

If the cooling fan does not operate while the engine is running, the engine
temperature will increase. Stop the engine and call your Toyota dealer.

If the engine continues to overheat or frequently overheats, have the cool-
ing  system  inspected.  The  engine  could  be  seriously  damaged  unless
repairs are made. Consult your Toyota dealer.

-------------------------------------------------------------------------------------------------------------------------------------------------------------

486

YARIS_YARIS HATCHBACK_OM_OM99V59z_(U)

6-6. Emergency Towing

Towing Description

A  towed  vehicle  usually  should
have  its  drive  wheels  (front
wheels)  off  the  ground.  If  exces-
sive  damage  or  other  conditions
prevent this, use wheel dollies.
When towing with the rear wheels
on the ground, release the parking
brake.

We recommend that towing be done only by your Toyota dealer
or a commercial tow-truck service.
Proper  lifting  and  towing  are  necessary  to  prevent  damage  to
the vehicle. Government and local laws must be followed.

Wheel dollies

NOTICE

Do  not  tow  the  vehicle  pointed  back-
ward with driving wheels on the ground.
This may cause internal damage to the
transaxle.

Do  not  tow  with  sling-type  equipment.
This  could  damage  your  vehicle.  Use
wheel-lift or flatbed equipment.

-------------------------------------------------------------------------------------------------------------------------------------------------------------

487

YARIS_YARIS HATCHBACK_OM_OM99V59z_(U)

6-6. Emergency Towing

6

If Trouble Arises

Tiedown Hooks

Remove the  tiedown eyelet and  the lug wrench  from the  luggage
compartment (

P. 457).

Wrap a jack lever or similar tool
with a soft cloth to prevent dam-
age  to  a  painted  bumper,  and
open  the  cap  located  on  the
front bumper.

Remove  the  cap  completely  and
store it so as not to lose it.

Securely  install  the  tiedown
eyelet using the lug wrench.

Lug wrench
Tiedown eyelet

Hook the tying rope to the tiedown eyelet.

: If equipped

NOTICE

Do not use the front tiedown eyelet for towing the vehicle.
They have been designed only for securing the vehicle to a transport vessel
during shipping.
Using  the  eyelet  for  any  other  purpose  could  result  in  the  vehicle  being
damaged.

Tiedown Hook-Front

1

2

3

1
2

4

-------------------------------------------------------------------------------------------------------------------------------------------------------------

488

6-6. Emergency Towing

YARIS_YARIS HATCHBACK_OM_OM99V59z_(U)

The  hook  positioned  under  the
rear bumper on the right side is for
tying  down  the  vehicle  during
transport,  and  it  cannot  be  used
for towing other vehicles. 
It  can  be  used  as  a  towing  hook
only  when  the  vehicle  must  be
towed  by  another  vehicle  in  an
emergency  case  such  as  when
the vehicle is stuck in snow, how-
ever, it may damage the bumper.

NOTICE

Do  not  use  excessive  force  as  it  may  damage  the  cap  or  scratch  the
painted bumper surface.

If the tiedown eyelet is not securely tightened, it may loosen or disengage
from the bumper when tying the vehicle. Make sure that the tiedown eyelet
is securely tightened to the bumper.

Tiedown Hook-Rear

Tiedown hook

NOTICE

When using the hook in such emergency cases, observe the following so as
not to damage the tiedown hook or the vehicle body.

The vehicle must be pulled straight to the rear so that no load is applied to
the vehicle in the lateral direction.

The  bumper  may  be  damaged  if  the  tie  down  hook  is  used  as  a  towing
hook.

When using a metal chain or wire cable, wrap a cloth around the attach-
ment area. If the metal chain or wire cable contacts the bumper directly,
the bumper could be scratched or damaged.

-------------------------------------------------------------------------------------------------------------------------------------------------------------

489

YARIS_YARIS HATCHBACK_OM_OM99V59z_(U)

6-7. Warning/Indicator Lights and Warning Sounds

6

If Trouble Arises

If a Warning Light Turns On or Flashes

The details for some warnings can be viewed on the center display.

If the warning light is turned on, select the 

 icon on the home

screen to display the applications screen.
Select “Vehicle Status Monitor”.
Select “Warning Guidance” to display the current warnings.
Select the applicable warning to view the warning details.

If any of the following warning lights turns on, the system may have a
malfunction. Stop the vehicle in a safe place immediately and contact
your Toyota dealer.

If any warning light turns on/flashes, take appropriate action for
each light. There is no problem if the light turns off, however if
the light does not turn off or turns on/flashes again, consult your
Toyota dealer.

Stop Vehicle in Safe Place Immediately

Signal

Warning

Brake System Warning Light

This warning has the following functions:
• Parking brake warning/Warning light inspection

The light illuminates when the parking brake is applied
with  the  ignition  switched  to  START  or  ON.  It  turns  off
when the parking brake is fully released.

• Low brake fluid level warning

If  the  brake  warning  light  remains  illuminated  even
though  the  parking  brake  is  released,  the  brake  fluid
may be low or there could be a problem with the brake
system.  Park  the  vehicle  in  a  safe  place  immediately
and contact your Toyota dealer.

1

2

3

4

-------------------------------------------------------------------------------------------------------------------------------------------------------------

490

6-7. Warning/Indicator Lights and Warning Sounds

YARIS_YARIS HATCHBACK_OM_OM99V59z_(U)

Electronic Brake Force Distribution System Warning

If the electronic brake force distribution control unit deter-
mines  that  some  components  are  operating  incorrectly,
the control unit may illuminate the brake system warning
light and the ABS warning light simultaneously. The prob-
lem  is  likely  to  be  the  electronic  brake  force  distribution
system.

Charging System Warning Light

If the warning light illuminates while driving, it indicates a
malfunction of the alternator or of the charging system. 
Drive to the side of the road and park off the right-of-way.
Consult your Toyota dealer. 

Engine Oil Warning Light

This warning light indicates low engine oil pressure.
If  the  light  illuminates  or  the  warning  indication  is  dis-
played while driving:

Drive to the side of the road and park off the right-of-
way on level ground.
Turn  off  the  engine  and  wait  5  minutes  for  the  oil  to
drain back into the oil pan.
Inspect the engine oil level P. 397. If it’s low, add the
appropriate  amount  of  engine  oil  while  being  careful
not to overfill.
Start the engine and check the warning light.

If the light remains illuminated even though the oil level is
normal  or  after  adding  oil,  stop  the  engine  immediately
and have your vehicle towed to your Toyota dealer.

Signal

Warning

1

2

3

4

-------------------------------------------------------------------------------------------------------------------------------------------------------------

YARIS_YARIS HATCHBACK_OM_OM99V59z_(U)

491

6-7. Warning/Indicator Lights and Warning Sounds

6

If Trouble Arises

(Red)

High Engine Coolant Temperature Warning Light

The light flashes when the engine coolant temperature is
extremely  high,  and  illuminates  when  the  engine  coolant
temperature increases further.
Handling Procedure:
• Flashing light

Drive slowly to reduce engine load until you can find a
safe place to stop the vehicle and wait for the engine to
cool down.

• Illuminated light

This  indicates  the  possibility  of  overheating.  Park  the
vehicle in a safe place immediately and stop the engine.
Refer to Overheating P. 484.

Power Steering Malfunction Indicator Light

The light illuminates/flashes if the electric power steering
has a malfunction.
If  the  light  illuminates/flashes,  stop  the  vehicle  in  a  safe
place and do not operate the steering wheel. There is no
problem  if  the  light  turns  off  after  a  while.  Contact  your
Toyota dealer if the light illuminates/flashes continuously.

Signal

Warning

-------------------------------------------------------------------------------------------------------------------------------------------------------------

492

6-7. Warning/Indicator Lights and Warning Sounds

YARIS_YARIS HATCHBACK_OM_OM99V59z_(U)

Power Steering Malfunction Indicator Light

If the indicator light illuminates/flashes, the power steering will not operate
normally. If this happens, the steering wheel can still be operated, however,
the  operation  may  feel  heavy  compared  to  normal,  or  the  steering  wheel
could vibrate when turning.

Repeatedly  jerking  the  steering  wheel  left  and  right  while  the  vehicle  is
stopped or moving extremely slowly will cause the power steering system to
go  into  protective  mode  which  will  make  the  steering  feel  heavy,  but  this
does not indicate a problem. If this occurs, park the vehicle safely and wait
several minutes for the system to return to normal.

WARNING

Do not drive with the brake system warning light illuminated. Contact
your Toyota dealer to have the brakes inspected as soon as possible

Driving with the brake system warning light illuminated is dangerous. It indi-
cates that your brakes may not work at all or that they could completely fail
at any time. If this light remains illuminated, after checking that the parking
brake is fully released, have the brakes inspected immediately.
In addition, the effectiveness of the braking may diminish so you may need
to depress the brake pedal more strongly than normal to stop the vehicle.

Do not drive with both the ABS warning light and brake warning light
illuminated. Have the vehicle towed to your Toyota dealer to have the
brakes inspected as soon as possible

Driving when the brake system warning light and ABS warning light are illu-
minated simultaneously is dangerous.
When both lights are illuminated, the rear wheels could lock more quickly in
an emergency stop than under normal circumstances.

NOTICE

Charging System Warning Light

Do  not  continue  driving  when  the  charging  system  warning  light  is  illumi-
nated because the engine could stop unexpectedly.

Engine Oil Warning Light

Do not run the engine if the oil pressure is low. Otherwise, it could result in
extensive engine damage.

Do  not  run  the  engine  if  the  oil  level  is  low.  Otherwise,  it  could  result  in
extensive engine damage.

High Engine Coolant Temperature Warning Light

Do not drive the vehicle with the high engine coolant temperature warning
light illuminated. Otherwise, it could result in damage to the engine.

-------------------------------------------------------------------------------------------------------------------------------------------------------------

YARIS_YARIS HATCHBACK_OM_OM99V59z_(U)

493

6-7. Warning/Indicator Lights and Warning Sounds

6

If Trouble Arises

If any of the following warning lights turns on/flashes, the system may
have a malfunction. Contact your Toyota dealer to have your vehicle
inspected.

Contact Your Toyota Dealer and Have Vehicle Inspected

Signal

Warning

Master Warning Light

The  light  turns  on  when  the  system  has  a  malfunction.
Operate the center display and verify the content.
Refer to If a Warning Light Turns On or Flashes on P. 489.

ABS Warning Light

If the ABS warning light stays on while you’re driving, the
ABS control unit has detected a system malfunction. If this
occurs, your brakes will function normally as if the vehicle
had no ABS.
Should this happen, consult your Toyota dealer as soon as
possible.

Check Engine Light

If this light illuminates while driving, the vehicle may have
a  problem.  It  is  important  to  note  the  driving  conditions
when the light illuminated and consult your Toyota dealer.
The  check  engine  light  may  illuminate  in  the  following
cases:
• The fuel tank level being very low or approaching empty.
• The engine’s electrical system has a problem.
• The emission control system has a problem.
• The fuel-filler cap is missing or not tightened securely.
If the check engine light remains on, or it flashes continu-
ously, do not drive at high speeds and consult your Toyota
dealer as soon as possible.

(if equipped)

Automatic Transaxle Warning Light

The light illuminates when the transaxle has a problem.

(Illuminate)

TCS/DSC Indicator Light

If the light stays on, the TCS, DSC or the brake assist sys-
tem  may  have  a  malfunction  and  they  may  not  operate
correctly. Take your vehicle to your Toyota dealer.

Air  Bag/Front  Seat  Belt  Pretensioner  System  Warning
Light

A system malfunction is indicated if the warning light con-
stantly  flashes,  constantly  illuminates  or  does  not  illumi-
nate at all when the ignition is switched ON. If any of these
occur,  consult  your  Toyota  dealer  as  soon  as  possible.
The system may not operate in an accident.

-------------------------------------------------------------------------------------------------------------------------------------------------------------

494

6-7. Warning/Indicator Lights and Warning Sounds

YARIS_YARIS HATCHBACK_OM_OM99V59z_(U)

ABS Warning Light

When the engine is jump-started to charge the battery, uneven rpm occurs
and the ABS warning light may illuminate. If this occurs, it is the result of the
weak battery and does not indicate an ABS malfunction.
Recharge the battery.

The brake assist system does not operate while the ABS warning light is illu-
minated.

(Flashing)

(if equipped) 

Tire Pressure Monitoring System Warning Light

If  the  tire  pressure  monitoring  system  has  a  malfunc-

tion, the tire pressure warning light flashes for about 1

minute when the ignition is switched ON and then con-

tinues illuminating. Have your vehicle checked by your

Toyota dealer as soon as possible.

(Red)

(Illuminate)

KEY Warning Light

If  any  malfunction  occurs  in  the  keyless  entry  system,  it
illuminates continuously.
Refer to Emergency Operation for Starting the Engine on
P. 162.

(if equipped)

LED Headlight Warning Light

This  light  illuminates  if  there  is  a  malfunction  in  the  LED
headlight.  Have  your  vehicle  inspected  by  your  Toyota
dealer.

Signal

Warning

-------------------------------------------------------------------------------------------------------------------------------------------------------------

YARIS_YARIS HATCHBACK_OM_OM99V59z_(U)

495

6-7. Warning/Indicator Lights and Warning Sounds

6

If Trouble Arises

WARNING

Never tamper with the air bag/pretensioner systems and always have
your Toyota dealer perform all servicing and repairs

Self-servicing or tampering with the systems is dangerous. An air bag/pre-
tensioner  could  accidentally  activate  or  become  disabled  causing  serious
injury or death.

If the tire pressure monitoring system warning light illuminates or

flashes, or the tire pressure warning beep sound is heard, decrease

vehicle  speed  immediately  and  avoid  sudden  maneuvering  and

braking

If  the  tire  pressure  monitoring  system  warning  light  illuminates  or

flashes, or the tire pressure warning beep sound is heard, it is danger-

ous to drive the vehicle at high speeds, or perform sudden maneuvering

or braking. Vehicle drivability could worsen and result in an accident.
To determine if you have a slow leak or a flat, pull over to a safe position

where you can check the visual condition of the tire and determine if you

have enough air to proceed to a place where air may be added and the

system monitored again by your Toyota dealer or a tire repair station.

Do not ignore the TPMS Warning Light

Ignoring the TPMS warning light is dangerous, even if you know why it

is  illuminated.  Have  the  problem  taken  care  of  as  soon  as  possible

before  it  develops  into  a  more  serious  situation  that  could  lead  to  tire

failure and a dangerous accident.

NOTICE

Automatic Transaxle Warning Light

If  the  automatic  transaxle  warning  light  illuminates,  the  transaxle  has  an
electrical  problem.  Continuing  to  drive  your Toyota  in  this  condition  could
cause  damage  to  your  transaxle.  Consult  your  Toyota  dealer  as  soon  as
possible.

KEY Warning Light

If the key warning indicator light illuminates or the push button start indicator
light  (amber)  flashes,  the  engine  may  not  start.  If  the  engine  cannot  be
started, try starting it using the emergency operation for starting the engine,
and have the vehicle inspected at your Toyota dealer as soon as possible.

-------------------------------------------------------------------------------------------------------------------------------------------------------------

496

6-7. Warning/Indicator Lights and Warning Sounds

YARIS_YARIS HATCHBACK_OM_OM99V59z_(U)

Take the appropriate action and verify that the warning light turns off.

Taking Action

Signal

Warning

Action to be taken

Low Fuel Warning Light

The  light  turns  on  when  the
remaining  fuel  is  about  2.3
gal. (9.0 L, 1.9 Imp.gal.).

Add fuel.

Check  Fuel  Cap  Warning
Light

If the check fuel cap warning
light illuminates while driving,
the  fuel-filler  cap  may  not  be
installed properly.

Stop the engine and rein-
stall the fuel-filler cap.
Refer to Refueling on 
P. 125

Seat Belt Warning Light

The  seat  belt  warning  light
turns  on  if  the  driver  or  front
passenger’s seat is occupied
and  the  seat  belt  is  not  fas-
tened 

with 

the 

ignition

switched ON.
If  the  driver  or  front  passen-
ger’s  seat  belt  is  unfastened
(only  when  the  front  passen-
ger’s  seat  is  occupied)  and
the  vehicle  is  driven  at  a
speed  faster  than  about  12
mph  (20  km/h),  the  warning
light  flashes.  After  a  short
time,  the  warning  light  stops
flashing,  but  remains  illumi-
nated.

Fasten the seat belts.

Door-Ajar Warning Light

The light turns on if any door/
trunk  lid/liftgate  is  not  closed
securely.

Close  the  door/trunk  lid/
liftgate securely.

(if equipped) 

Low  Washer  Fluid  Level
Warning Light

This  warning  light  indicates
that 

little 

washer 

fluid

remains.

Add washer fluid 
(

P. 402).

-------------------------------------------------------------------------------------------------------------------------------------------------------------

YARIS_YARIS HATCHBACK_OM_OM99V59z_(U)

497

6-7. Warning/Indicator Lights and Warning Sounds

6

If Trouble Arises

KEY Warning Light

Take the appropriate action and verify that the warning light turns
off.

(Illuminate)

(if equipped)

Tire  Pressure  Monitoring

System Warning Light

When  the  warning  light  illu-

minates,  and  the  warning

beep sound is heard (about

3  seconds),  tire  pressure  is

too low in one or more tires.

Inspect  the  tires  and

adjust  to  the  specified

inflation pressure 

(

P. 413).

(Amber)

Low Speed Pre-Collision Sys-
tem Warning Light

The light turns on if the wind-
shield  is  dirty  or  there  is  a
malfunction in the system.

Verify the reason why the
warning light is illuminated
on the center display 
(

P. 489).

If  the  reason  why  the
warning light is illuminated
is  due  to  a  dirty  wind-
shield,  clean  the  wind-
shield.
For  any  other  reasons,
have 

the 

vehicle

inspected  at  your  Toyota
dealer.

Signal

Warning

Action to be taken

Signal

Cause

Action to be taken

(Red) 

(Flashing)

The smart key battery is dead.

Replace  the  key  battery
(

P. 410).

The smart key is not within the
operation range.

Bring  the  smart  key  into
the operation range 
(

P. 98).

The  smart  key  is  placed  in
areas inside the cabin where it
is  difficult  for  the  key  to  be
detected.

A  key  from  another  manufac-
turer similar to the smart key is
in the operation range.

Take the key from another
manufacturer  similar  to
the  smart  key  out  of  the
operation range.

Without  the  ignition  switched
off, the smart key is taken out of
the  cabin,  and  then  all  the
doors are closed.

Bring  the  smart  key  back
into the cabin.

-------------------------------------------------------------------------------------------------------------------------------------------------------------

498

6-7. Warning/Indicator Lights and Warning Sounds

YARIS_YARIS HATCHBACK_OM_OM99V59z_(U)

Low Fuel Warning Light

The light illumination timing may vary because fuel inside the fuel tank moves
around according to the driving conditions and the vehicle posture.

Seat Belt Warning Light

The warning light flashes for about 6 seconds if the driver’s seat belt is not
fastened when the ignition is switched ON.

To allow the front passenger occupant classification sensor to function prop-
erly, do not place and sit on an additional seat cushion on the front passen-
ger’s  seat.  The  sensor  may  not  function  properly  because  the  additional
seat cushion could cause sensor interference.

If a small child is seated on the front passenger’s seat, the warning light may
not operate.

Tire Pressure Monitoring System Warning Light

Perform tire pressure adjustment when the tires are cold. Tire pressure

will vary according to the tire temperature, therefore let the vehicle stand

for 1 hour or only drive it 1 mile (1.6 km) or less before adjusting the tire

pressures. When pressure is adjusted on hot tires to the cold inflation

pressure, the TPMS warning light/beep may turn on after the tires cool

and pressure drops below specification.

Also, an illuminated TPMS warning light, resulting from the tire air pres-

sure dropping due to cold ambient temperature will remain illuminated

even if the ambient temperature rises. In this case, it will also be neces-

sary to adjust the tire air pressures. If the TPMS warning light illuminates

due to a drop in tire air pressure, make sure to check and adjust the tire

air pressures.

Tires lose air naturally over time and the TPMS cannot tell if the tires are

getting too soft over time or you have a flat. However, when you find one

low tire in a set of four-that is an indication of trouble; you should have

someone  drive  the  vehicle  slowly  forward  so  you  can  inspect  any  low

tire for cuts and any metal objects sticking through tread or sidewall. Put

a few drops of water in the valve stem to see if it bubbles indicating a

bad valve. Leaks need to be addressed by more than simply reinflating

the tire as leaks are dangerous - take it to your Toyota dealer.

-------------------------------------------------------------------------------------------------------------------------------------------------------------

YARIS_YARIS HATCHBACK_OM_OM99V59z_(U)

499

6-7. Warning/Indicator Lights and Warning Sounds

6

If Trouble Arises

WARNING

If the tire pressure monitoring system warning light illuminates or

flashes, or the tire pressure warning beep sound is heard, decrease

vehicle  speed  immediately  and  avoid  sudden  maneuvering  and

braking

If  the  tire  pressure  monitoring  system  warning  light  illuminates  or

flashes, or the tire pressure warning beep sound is heard, it is danger-

ous to drive the vehicle at high speeds, or perform sudden maneuvering

or braking. Vehicle drivability could worsen and result in an accident.
To determine if you have a slow leak or a flat, pull over to a safe position

where you can check the visual condition of the tire and determine if you

have enough air to proceed to a place where air may be added and the

system monitored again by your Toyota dealer or a tire repair station.

Do not ignore the TPMS Warning Light

Ignoring the TPMS warning light is dangerous, even if you know why it

is  illuminated.  Have  the  problem  taken  care  of  as  soon  as  possible

before  it  develops  into  a  more  serious  situation  that  could  lead  to  tire

failure and a dangerous accident.

-------------------------------------------------------------------------------------------------------------------------------------------------------------

500

YARIS_YARIS HATCHBACK_OM_OM99V59z_(U)

6-7. Warning/Indicator Lights and Warning Sounds

Message Indicated on Display

Display example

If a message is displayed in the center display, take appropriate
action (in a calm manner) according to the displayed message.

-------------------------------------------------------------------------------------------------------------------------------------------------------------

YARIS_YARIS HATCHBACK_OM_OM99V59z_(U)

501

6-7. Warning/Indicator Lights and Warning Sounds

6

If Trouble Arises

If the following messages are displayed in the center display, a vehicle
system may be malfunctioning. Stop the vehicle in a safe place and
contact your Toyota dealer.

Displays in the following cases:

Stop Vehicle in Safe Place Immediately

Display

Indicated Condition

Displays  if  the  engine  coolant
temperature 

has 

increased

excessively.

Displays  if  the  charging  system
has a malfunction.

Verify Display Content

Display

Indicated Condition/

Action to be taken

The  following  message  is  dis-
played  when  the  temperature
around the center display is high.
Lowering  the  temperature  in  the
cabin or the temperature around
the  center  display  by  avoiding
direct sunlight is recommended.

-------------------------------------------------------------------------------------------------------------------------------------------------------------

502

YARIS_YARIS HATCHBACK_OM_OM99V59z_(U)

6-7. Warning/Indicator Lights and Warning Sounds

Warning Sound is Activated

The lights-on reminder is operable when the time setting

*

1

 of the auto

headlight off function is off.
If  lights are on and the ignition is switched to ACC or the ignition is
switched off, a continuous beep sound will be heard when the driver’s
door is opened.

*

1

: If  the  light  switch  is  left  on,  the  auto  headlight  off  function  automatically

turns  off  the  lights  about  30  seconds  after  switching  the  ignition  off.  The
time setting can be changed.
Refer to Customizable Features on P. 555.

When the ignition is switched to ACC, the “Ignition Not Switched Off (STOP)
Warning Beep” (

P. 504) overrides the lights-on reminder.

A  personalized  function  is  available  to  change  the  sound  volume  for  the
lights-on reminder.
Refer to Customizable Features on P. 555.

If there is a problem with the air bag/front seat belt pretensioner sys-
tems and the warning light illumination, a warning beep sound will be
heard for about 5 seconds every minute.
The  air  bag  and  front  seat  belt  pretensioner  system  warning  beep
sound will continue to be heard for approximately 35 minutes. Have
your vehicle inspected at your Toyota dealer as soon as possible.

Lights-On Reminder

Air Bag/Front Seat Belt Pretensioner System Warning Beep

WARNING

Do  not  drive  the  vehicle  with  the  air  bag/front  seat  belt  pretensioner
system warning beep sounding

Driving the vehicle with the air bag/front seat belt pretensioner system warn-
ing  beep sounding is dangerous. In a  collision, the  air  bags  and the front
seat belt pretensioner system will not deploy and this could result in death
or serious injury. Contact your Toyota dealer to have the vehicle inspected
as soon as possible.

-------------------------------------------------------------------------------------------------------------------------------------------------------------

YARIS_YARIS HATCHBACK_OM_OM99V59z_(U)

503

6-7. Warning/Indicator Lights and Warning Sounds

6

If Trouble Arises

If the driver’s seat belt is not fastened when the ignition is  switched
ON, a beep sound will be heard for about 6 seconds. If the driver or
the  front  passenger’s  seat  belt  is  not  fastened  and  the  vehicle  is
driven at a speed faster than about 12 mph (20 km/h), a beep sound
will be heard again for a specified period of time.
Until a seat belt is fastened or a given period of time has elapsed, the
beep sound will not stop even if the vehicle speed falls below 12 mph
(20 km/h).

To allow the front passenger occupant classification sensor to function prop-
erly, do not place and sit on an additional seat cushion on the front passen-
ger’s  seat.  The  sensor  may  not  function  properly  because  the  additional
seat cushion could cause sensor interference.

If a  small child  is  seated  on the front passenger’s  seat, the warning  beep
may not operate.

Seat Belt Warning Beep

-------------------------------------------------------------------------------------------------------------------------------------------------------------

504

6-7. Warning/Indicator Lights and Warning Sounds

YARIS_YARIS HATCHBACK_OM_OM99V59z_(U)

If the driver’s door is opened while the ignition is switched to ACC, a
continuous beep sound will be heard to notify the driver that the igni-
tion has not been switched off (STOP). Left in this condition, the key-
less entry system will not operate, the car cannot be locked, and the
battery power will be depleted.

Vehicles with advanced keyless function

If  the  key  is  taken  out  of  the  vehicle  while  the  ignition  is  not
switched OFF and all the doors are closed, the beep which sounds
outside of the vehicle will be heard 6 times, the beep which sounds
inside the vehicle will be heard 6 times.

Vehicles without advanced keyless function

If  the  key  is  taken  out  of  the  vehicle  while  the  ignition  is  not
switched OFF and all the doors are closed, a beep will be heard in
the cabin 6 times.

Because the key utilizes low-intensity radio waves, the Key Removed From
Vehicle Warning may activate if the key is carried together with a metal object
or it is placed in a poor signal reception area.

If the request switch is pressed with the door open or ajar, or the igni-
tion is not switched OFF with a key being carried, a beep will be heard
outside for about 2 seconds to notify the driver that the door or liftgate/
trunk lid cannot be locked.

If the key is left in the luggage compartment/trunk with all the doors
locked and the liftgate/trunk lid closed, a beep will be heard outside for
about  10  seconds  to  notify  the  driver  that  the  key  is  in  the  luggage
compartment/trunk. In this case, take out the key by pressing the elec-
tric liftgate/trunk lid opener and opening the liftgate/trunk lid. The key
taken out of the luggage compartment/trunk may not operate because
its functions have been temporarily stopped. To restore the key’s func-
tions, perform the applicable procedure (

P. 98).

Ignition Not Switched Off (STOP) Warning Beep

Key Removed from Vehicle Warning Beep

Request  Switch  Inoperable  Warning  Beep  (With  the  advanced
keyless function)

Key  Left-in-Compartment/trunk  Warning  Beep  (With  the
advanced keyless function)

-------------------------------------------------------------------------------------------------------------------------------------------------------------

YARIS_YARIS HATCHBACK_OM_OM99V59z_(U)

505

6-7. Warning/Indicator Lights and Warning Sounds

6

If Trouble Arises

If  all  the  doors  and  luggage  compartment/trunk  are  locked  using
another key while the key is left in the cabin, the beep which sounds
outside of the vehicle will be heard for about 10 seconds to notify the
driver  that  the  key  is  in  the  cabin.  In  this  case,  take  out  the  key  by
opening  the  door. A  key  taken  out  of  the  vehicle  using  this  method
may  not  operate  because  its  functions  have  been  temporarily
stopped. To restore the key’s functions, perform the applicable proce-
dure (

P. 98).

The  warning  beep  sound  will  be  heard  for  about  3  seconds  when
there is any abnormality in tire inflation pressures (

P. 241).

If there is the possibility of a collision with a vehicle ahead, the beep
sounds continuously and a warning is indicated in the display.

If  the  power  steering  system  has  a  malfunction,  the  power  steering
malfunction indicator light turns on or flashes and the buzzer operates
at the same time. 
Refer to Stop Vehicle in Safe Place Immediately on P. 489.

Key  Left-in-vehicle  Warning  Beep  (With  the  advanced  keyless
function)

Tire Inflation Pressure Warning Beep (if equipped)

Collision warning

Power Steering Warning Buzzer

-------------------------------------------------------------------------------------------------------------------------------------------------------------

506

YARIS_YARIS HATCHBACK_OM_OM99V59z_(U)

6-8. When Trunk Lid Cannot be Opened

When Liftgate/Trunk Lid Cannot be Opened

5-Door
Fold down the rear seatbacks.

Refer to Split Folding the Seatback on P. 26.

Pull  the  center  section  of  the
plastic fastener and remove the
fasteners,  then  remove  cover
on the interior surface of the lift-
gate.

If the vehicle battery is dead or there is a malfunction in the elec-
trical  system  and  the  liftgate/trunk  lid  cannot  be  opened,  per-
form the following procedure as an emergency measure to open
it:

WARNING

NOTICE

Perform  the  procedure  carefully  when  using  a  flathead  screwdriver  as  it
could cause damage to the surrounding area or vehicle parts.

Perform  the  procedure  using  a  cloth  to
cover  sharp  edges  which  could  injure
your hands.

Cloth

1

2

-------------------------------------------------------------------------------------------------------------------------------------------------------------

YARIS_YARIS HATCHBACK_OM_OM99V59z_(U)

507

6-8. When Trunk Lid Cannot be Opened

6

If Trouble Arises

Using  a  flathead  screwdriver,
open the inner cover.

Using  a  flathead  screwdriver,
turn  the  lever  to  the  right  to
unlock the liftgate.

4-Door

Open the cover.
Move the lever to the left to fold
the seatback.

Move  the  lever  to  the  left  to
open the trunk lid.

After performing this emergency measure, have the vehicle inspected
at your Toyota dealer as soon as possible.

3

Lever

4

Lever

Cover

1

2

3

-------------------------------------------------------------------------------------------------------------------------------------------------------------

508

6-8. When Trunk Lid Cannot be Opened

YARIS_YARIS HATCHBACK_OM_OM99V59z_(U)

-------------------------------------------------------------------------------------------------------------------------------------------------------------

509

YARIS_YARIS HATCHBACK_OM_OM99V59z_(U)

7

Customer Information and

Reporting Safety Defects

7-1. Reporting Safety Defects

Reporting Safety 

Defects (U.S.A.) .............. 510

Reporting Safety 

Defects (Canada)............ 511

7-2. Warranty

Warranties for Your 

Toyota ............................. 512

Outside the United 

States/Canada ................ 513

Add-On Non-Genuine 

Parts and 
Accessories..................... 514

7-3. Cell Phones

Cell Phones Warning ........ 515

7-4. Event Data Recorder

Event Data Recorder 

(U.S.A. and Canada) ...... 516

7-5. Vehicle Data Recordings

Vehicle Data 

Recordings...................... 518

7-6. Uniform Tire Quality 

Grading System (UTQGS)

Uniform Tire Quality 

Grading System 
(UTQGS)......................... 519

7-7. Tire Information (U.S.A.)

Tire Labeling ..................... 522
Location of the Tire 

Label (Placard) ............... 528

Tire Maintenance .............. 531
Vehicle Loading ................ 534
Steps for Determining the 

Correct Load Limit .......... 539

7-8. Declaration of Conformity

Declaration of 

Conformity ...................... 540

-------------------------------------------------------------------------------------------------------------------------------------------------------------

510

YARIS_YARIS HATCHBACK_OM_OM99V59z_(U)

7-1. Reporting Safety Defects

Reporting Safety Defects (U.S.A.)

If you believe that your vehicle has a defect which could cause a
crash  or  could  cause  injury  or  death,  you  should  immediately
inform  the  National  Highway  Traffic  Safety  Administration
(NHTSA) in addition to notifying Toyota Motor Sales, U.S.A., Inc.
(Toll-free: 1-800-331-4331).
If  NHTSA  receives  similar  complaints,  it  may  open  an  investiga-
tion, and if it finds that a safety defect exists in a group of vehicles,
it may order a recall and remedy campaign. However, NHTSA can-
not  become  involved  in  individual  problems  between  you,  your
dealer, or Toyota Motor Sales, U.S.A., Inc.
To contact NHTSA, you may call the Vehicle Safety Hotline toll-free at 
1-888-327-4236 (TTY: 1-800-424-9153); go to 

http://www.safercar.gov

 ;

or  write  to:  Administrator,  NHTSA,  1200  New  Jersey  Ave,  S.E.,
Washington, DC 20590. You can also obtain other information about
motor vehicle safety from 

http://www.safercar.gov

.

-------------------------------------------------------------------------------------------------------------------------------------------------------------

511

YARIS_YARIS HATCHBACK_OM_OM99V59z_(U)

7-1. Reporting Safety Defects

7

Customer In

fo

rma
tio

n and 

Re
porting Safety D

efects

Reporting Safety Defects (Canada)

Canadian  customers  who  wish  to  report  a  safety-related  defect  to
Transport  Canada,  Defect  Investigations  and  Recalls,  may  tele-
phone  the  toll  free  hotline  1-800-333-0510,  or  contact  Transport
Canada by mail at: Transport Canada, ASFAD, Place de Ville Tower
C, 330 Sparks Street, Ottawa ON K1A 0N5.
For additional road safety information, please visit the Road Safety
website at: http://www.tc.gc.ca/roadsafety/menu.htm

-------------------------------------------------------------------------------------------------------------------------------------------------------------

512

YARIS_YARIS HATCHBACK_OM_OM99V59z_(U)

7-2. Warranty

Warranties for Your Toyota

New Vehicle Limited Warranty

Powertrain Limited Warranty

Safety Restraint System Limited Warranty

Anti-perforation Limited Warranty

Federal  Emission  Control  Warranty/California  Emission  Control
Warranty

• Emission Defect Warranty
• Emission Performance Warranty

Emission Control Warranty

Replacement Parts and Accessories Limited Warranty

Tire Warranty

Warranty information varies depending on the country. Refer to the “Owner’s
Warranty  Information  Booklet”  or  “Owner’s  Manual  Supplement/Scheduled
Maintenance Guide” for detailed warranty information.

-------------------------------------------------------------------------------------------------------------------------------------------------------------

513

YARIS_YARIS HATCHBACK_OM_OM99V59z_(U)

7-2. Warranty

7

Customer In

fo

rma
tio

n and 

Re
porting Safety D

efects

Outside the United States/Canada

Government  regulations  in  the  United  States/Canada  require  that
automobiles meet specific emission regulations and safety standards.
Therefore, vehicles built for use in the United States/Canada may dif-
fer from those sold in other countries.
The differences may make it difficult or even impossible for your vehi-
cle  to  receive  satisfactory  servicing  in  other  countries.  We  strongly
recommend that you NOT take your Toyota outside the United States/
Canada.

United States

However,  in  the  event  that  you  are  moving  to  Canada  permanently,
Toyota vehicles built for use in the United States could be eligible for
exportation  to  Canada  with  specific  vehicle  modifications  to  comply
with the Canadian Motor Vehicle Safety Standards (CMVSS).

Canada

However, in the event that you are moving to the United States per-
manently, Toyota vehicles built for use in Canada could be eligible for
exportation to the United States with specific vehicle modifications to
comply with the United States Federal Motor Vehicle Safety Standards
(FMVSS).
You may have the following problems if you do take your vehicle out-
side of the United States/Canada:

• Recommended fuel may be unavailable. Any kind of leaded fuel or

low-octane  fuel  will  affect  vehicle  performance  and  damage  the
emission controls and engine.

• Proper  repair  facilities,  tools,  testing  equipment,  and  replacement

parts may not be available.

Please  refer  to  your  Manufacturer’s  “Owner’s  Warranty  Information
Booklet”  or  “Owner’s  Manual  Supplement/Scheduled  Maintenance
Guide” for more information.

The  above  is  applicable  for  a  permanent  import/export  situation  and  not
related to travelers on vacation.

-------------------------------------------------------------------------------------------------------------------------------------------------------------

514

YARIS_YARIS HATCHBACK_OM_OM99V59z_(U)

7-2. Warranty

Add-On Non-Genuine Parts and Accesso-

ries

Non-genuine parts and accessories for Toyota vehicles can be found
in stores.
These may fit your vehicle, but they are not approved by Toyota for
use  with  Toyota  vehicles.  When  you  install  non-genuine  parts  or
accessories,  they  could  affect  your  vehicle’s  performance  or  safety
systems;  the  Toyota  warranty  doesn’t  cover  this.  Before  you  install
any non-genuine parts or accessories, consult your Toyota dealer.
Toyota  assumes  no  responsibility  for  death,  injury,  or  expenses  that
may result from the installation of add-on non-genuine parts or acces-
sories.

WARNING

Always  consult  your  Toyota  dealer  before  you  install  non-genuine
parts or accessories

Improperly designed parts or accessories could seriously affect your vehi-
cle’s performance or safety systems. This could cause you to have an acci-
dent or increase your chances of injuries in an accident.

Be very careful in choosing and installing add-on electrical equipment,
such  as  mobile  telephones,  two-way  radios,  stereo  systems,  and  car
alarm systems

Incorrectly  choosing  or  installing  improper  add-on  equipment  or  choosing
an improper installer is dangerous. Essential systems could be damaged,
causing  engine  stalling,  airbag  (SRS)  activation, ABS/TCS/DSC  inactiva-
tion, or a fire in the vehicle.

-------------------------------------------------------------------------------------------------------------------------------------------------------------

515

YARIS_YARIS HATCHBACK_OM_OM99V59z_(U)

7-3. Cell Phones

7

Customer In

fo

rma
tio

n and 

Re
porting Safety D

efects

Cell Phones Warning

WARNING

Please comply with the legal regulations concerning the use of com-
munication equipment in vehicles in your country

Use  of  any  electrical  devices  such  as  cell  phones,  computers,  portable
radios, vehicle navigation or other devices by the driver while the vehicle is
moving is dangerous. Dialing a number on a cell phone while driving also
ties-up the driver’s hands. Use of these devices will cause the driver to be
distracted and could lead to a serious accident. If a passenger is unable to
use the device, pull off the right-of-way to a safe area before use.
If use of a cell phone is necessary despite this warning, use a hands-free
system to at least leave the hands free to drive the vehicle. Never use a cell
phone or other electrical devices while the vehicle is moving and, instead,
concentrate on the full-time job of driving.

-------------------------------------------------------------------------------------------------------------------------------------------------------------

516

YARIS_YARIS HATCHBACK_OM_OM99V59z_(U)

7-4. Event Data Recorder

Event Data Recorder (U.S.A. and Canada)

This vehicle is equipped with an event data recorder (EDR). The main
purpose of an EDR is to record, in certain crash or near crash-like sit-
uations, such as an air bag deployment or hitting a road obstacle, data
that will assist in understanding how a vehicle’s systems performed.
The EDR is designed to record data related to vehicle dynamics and
safety systems for a short period of time, typically 30 seconds or less.
The EDR in this vehicle is designed to record such data as:

How various systems in your vehicle were operating;

Whether or not the driver and passenger safety belts were buckled/
fastened;

How far (if at all) the driver was depressing the accelerator and/or
brake pedal; and,

How fast the vehicle was traveling.

These  data  can  help  provide  a  better  understanding  of  the  circum-
stances in which crashes and injuries occur.
NOTE: 
EDR data are recorded by your vehicle only if a non-trivial crash or
near  crash-like  situation  occurs;  no  data  are  recorded  by  the  EDR
under  normal  driving  conditions  and  no  personal  data  (e.g.,  name,
gender,  age,  and  crash  location)  are  recorded.  However,  other  par-
ties, such as law enforcement, could combine the EDR data with the
type  of  personally  identifying  data  routinely  acquired  during  a  crash
investigation.
To read data recorded by an EDR, special equipment is required, and
access to the vehicle or the EDR is needed. In addition to the vehicle
manufacturer, other parties, such as law enforcement, that have the
special equipment, can read the information if they have access to the
vehicle or the EDR.
Toyota will not disclose any of the data recorded in an EDR to a third
party unless:

A  written  agreement  from  the  vehicle  owner  or  the  lessee  is
obtained

Officially requested by the police or other law enforcement authori-
ties

Used as a defense for Toyota in a lawsuit, claim, or arbitration

Ordered by a judge or court

-------------------------------------------------------------------------------------------------------------------------------------------------------------

YARIS_YARIS HATCHBACK_OM_OM99V59z_(U)

517

7-4. Event Data Recorder

7

Customer In

fo

rma
tio

n and 

Re
porting Safety D

efects

However, if necessary Toyota will:

Use the data for research on Toyota vehicle performance, including
safety.

Disclose  the  data  or  the  summarized  data  to  a  third  party  for
research purposes without disclosing vehicle or owner identification
information.

-------------------------------------------------------------------------------------------------------------------------------------------------------------

518

YARIS_YARIS HATCHBACK_OM_OM99V59z_(U)

7-5. Vehicle Data Recordings

Vehicle Data Recordings

Your Toyota is equipped with several sophisticated computers that will
record certain data, such as:

• Engine speed
• Accelerator status
• Brake status
• Vehicle speed
• Shift position

The  recorded  data  varies  according  to  the  vehicle  grade  level  and
options with which it is equipped.

Data usage
Toyota may use the data recorded in these computers to diagnose
malfunctions,  conduct  research  and  development,  and  improve
quality.
Toyota will not disclose the recorded data to a third party except:

• With the consent of the vehicle owner or with the consent of the

lessee if the vehicle is leased

• In response to an official request by the police, a court of law or a

government agency

• For use by Toyota in a lawsuit
• For  research  purposes  where  the  data  is  not  tied  to  a  specific

vehicle or vehicle owner

-------------------------------------------------------------------------------------------------------------------------------------------------------------

519

YARIS_YARIS HATCHBACK_OM_OM99V59z_(U)

7-6. Uniform Tire Quality Grading System (UTQGS)

7

Customer In

fo

rma
tio

n and 

Re
porting Safety D

efects

Uniform Tire Quality Grading System 

(UTQGS)

This information relates to the tire grading system developed by the
U.S.  National  Highway Traffic  Safety Administration  for  grading  tires
by tread wear, traction, and temperature performance.

The tread wear grade is a comparative rating based on the wear rate
of the tire when tested under controlled conditions on a specified gov-
ernment test course.
For example, a tire graded 150 would wear one-and-a-half times as
well on the government course as a tire graded 100.
The relative performance of tires depends upon the actual conditions
of  their  use,  however,  and  may  depart  significantly  from  the  norm
because  of  variations  in  driving  habits,  service  practices  and  differ-
ences in road characteristics and climate.

The  traction  grades,  from  highest  to  lowest,  are AA,  A,  B,  and  C.
These grades represent the tire’s ability to stop on wet pavement as
measured  under  controlled  conditions  on  specified  government  test
surfaces  of  asphalt  and  concrete. A  tire  marked  C  may  have  poor
traction performance.

Tread Wear

Traction-AA, A, B, C

WARNING

The  traction  grade  assigned  to  this  tire  is  based  on  braking  (straight

ahead) traction tests and does not include acceleration cornering (turn-

ing), hydroplaning, or peak traction characteristics.

-------------------------------------------------------------------------------------------------------------------------------------------------------------

520

YARIS_YARIS HATCHBACK_OM_OM99V59z_(U)

7-6. Uniform Tire Quality Grading System (UTQGS)

The temperature grades A (the highest), B, and C, represent the tire’s
resistance  to  the  generation  of  heat  and  its  ability  to  dissipate  heat
when tested under controlled conditions on a specified indoor labora-
tory test wheel.
Sustained  high  temperature  can  cause  the  material  of  the  tire  to
degenerate and reduce tire life, and excessive temperatures can lead
to sudden tire failure.
Grade C corresponds to a level of performance which all passenger
vehicle tires must meet under the Federal Motor Vehicle Safety Stan-
dard No. 109. Grades B and A represent higher levels of performance
on the laboratory test wheel than the minimum required by law.
These grades will be added to the sidewalls of passenger vehicle tires
over  the  next  several  years  according  to  a  schedule  established  by
the NHTSA and the tire manufacturers.
The grade of tires available as standard or optional equipment on Toy-
ota vehicles may vary with respect to grade.
ALL  PASSENGER  VEHICLE  TIRES  MUST  CONFORM  TO  THESE
GRADES AND TO ALL OTHER FEDERAL TIRE-SAFETY REQUIRE-
MENTS.

Temperature-A, B, C

WARNING

Keep your vehicle’s tires properly inflated and not overloaded

Driving with improperly inflated or overloaded tires is dangerous. Exces-

sive speed, underinflation, or excessive loading, either separately or in

combination, can cause heat buildup and possible tire failure. The tem-

perature  grade  for  this  tire  is  established  for  a  tire  that  is  properly

inflated and not overloaded.

-------------------------------------------------------------------------------------------------------------------------------------------------------------

YARIS_YARIS HATCHBACK_OM_OM99V59z_(U)

521

7-6. Uniform Tire Quality Grading System (UTQGS)

7

Customer In

fo

rma
tio

n and 

Re
porting Safety D

efects

Quality  grades  can  be  found  where  applicable  on  the  tire  sidewall
between tread shoulder and maximum section width.
For example:
TREADWEAR 200 TRACTION AA TEMPERATURE A
UTQGS MARK (example):

UNIFORM TIRE QUALITY GRADING

TREADWEAR 200 TRACTION 

AA TEMPERATURE A

-------------------------------------------------------------------------------------------------------------------------------------------------------------

522

YARIS_YARIS HATCHBACK_OM_OM99V59z_(U)

7-7. Tire Information (U.S.A.)

Tire Labeling

Please refer to the sample below.

Federal  law  requires  tire  manufacturers  to  place  standardized
information on the sidewall of all tires. This information identi-
fies  and  describes  the  fundamental  characteristics  of  the  tire
and  also  provides  a  tire  identification  number  for  safety  stan-
dard certification and in case of a recall.

Information on Passenger Vehicle Tires

TIN: U.S. DOT tire identification
number
Passenger car tire
Nominal width of tire in millime-
ters
Ratio of height to width (aspect
ratio)
Radial
Run-flat tire
Rim diameter code

Load index & speed symbol
Severe snow conditions
Tire  ply  composition  and
materials used
Max. load rating
Tread  wear,  traction  and  tem-
perature grades
Max. 

permissible 

inflation

pressure
SAFETY WARNING

1

2
3

4

5
6
7

8
9

10

11
12

13

14

-------------------------------------------------------------------------------------------------------------------------------------------------------------

YARIS_YARIS HATCHBACK_OM_OM99V59z_(U)

523

7-7. Tire Information (U.S.A.)

7

Customer In

fo

rma
tio

n and 

Re
porting Safety D

efects

P215/65R15 95H is an example of a tire size and load index rating.
Here is an explanation of the various components of that tire size and
load index rating. Note that the tire size and load index rating may be
different from the example.

P
Indicates a tire that may be installed on cars, SUVs, minivans and
light trucks as designated by the Tire and Rim Association (T&RA).

If your tire size does not begin with a letter this may mean it is desig-

nated by either ETRTO (European Tire and Rim Technical Organiza-

tion) or JATMA (Japan Tire Manufacturing Association).

215
“215” is the nominal width of the tire in millimeters. This three-digit
number gives the width in millimeters of the tire from sidewall edge
to sidewall edge. In general, the larger the number, the wider  the
tire.

65
“65”  is  the  aspect  ratio.  This  two-digit  number  indicates  the  tire’s
ratio of height to width.

R
“R” is the tire construction symbol. R indicates “Radial ply construc-
tion”.

15
“15” is the wheel rim diameter in inches.

95
“95” is the Load Index. This two-or three-digit number indicates how
much weight each tire can support.

H
“H”  is  the  speed  rating.  The  speed  rating  denotes  the  maximum
speed for which the use of the tire is rated.

-------------------------------------------------------------------------------------------------------------------------------------------------------------


Content      ..     6      7      8      9     ..