Toyota Venza Hybrid (2021 year). Manual in english - part 3
 

  Index      Toyota     Toyota Venza Hybrid (2021 year). Manual in english


Search            copyright infringement  


Content      ..     1      2      3      4      ..


Toyota Venza Hybrid (2021 year). Manual in english - part 3


140

3-2. Opening, closing and locking the doors

2

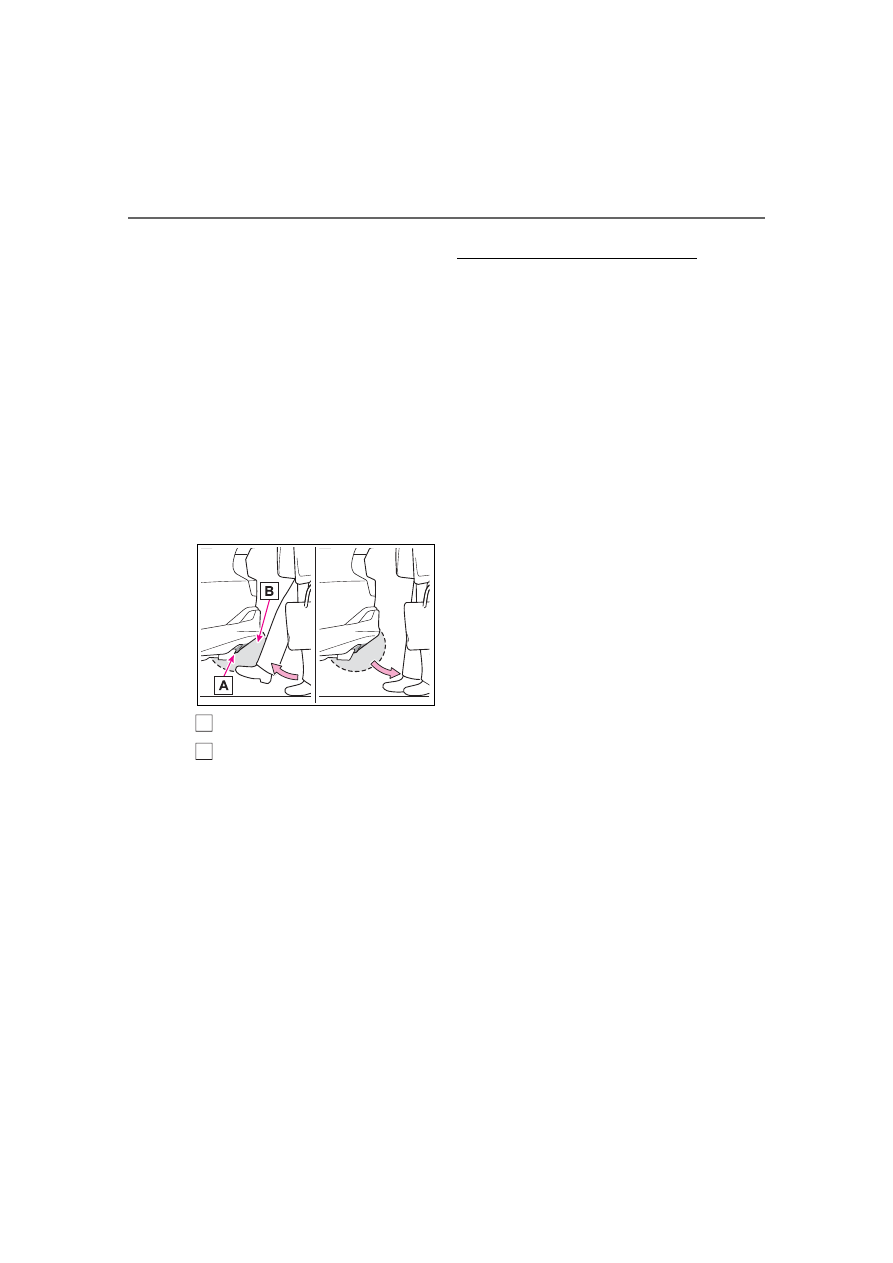
Perform a kick operation by 
moving your foot to within 
approximately 3.9 in. (10 cm) 
of the rear bumper and then 
pulling it back.

Perform the entire kick operation 

within 1 second.
The back door will not start operat-

ing while a foot is detected under 

the rear bumper.
Operate the Hands Free Power 

Back Door without contacting the 

rear bumper with your foot.
If another electronic key is in the 

cabin or luggage compartment, it 

may take slightly longer than nor-

mal for the operation to occur.

Kick sensor

Hands Free Power Back 
Door operation detection 
area

3

When the kick sensor detects 
that your foot is pulled back, 
a buzzer will sound and the 
back door will automatically 
fully open/close.

If a foot is moved under the rear 

bumper while the back door is 

opening/closing, the back door will 

stop moving.
If a foot is moved under the rear 

bumper again during the halted 

operation, the back door will per-

form the reverse operation.

Luggage compartment light

The luggage compartment light 

turns on when the back door is 

opened.

When the power switch is turned 

to OFF, the light will go off auto-

matically after 20 minutes.

Back door closer

In the event that the back door is left 

slightly open, the back door closer 

will automatically close it to the fully 

closed position.
Whatever the state of the power 

switch, the back door closer oper-

ates.

Power back door operating con-

ditions

The power back door can automati-

cally open and close under the fol-

lowing conditions:

When the power back door sys-

tem is enabled. (

P.100, 111)

When the power switch is in ON, 

in addition to the above for the 

opening operations, the back door 

operates for any of the following 

conditions:

• Parking brake is engaged

• The brake pedal is depressed

• The shift lever is in P.

Operation of the power back 

door

A buzzer sounds and the emer-

gency flashers flash twice to indi-

cate that the back door is 

opening/closing.

When the power back door sys-

tem is disabled, the power back 

door does not operate but it can 

be opened and closed by hand.

When the power back door auto-

matically opens, if an abnormality 

due to people or objects is 

detected, operation will stop.

A

B

-------------------------------------------------------------------------------------------------------------------------------------------------------------

141

3-2. Opening, closing and locking the doors

3

Before 

driving

Jam protection function

Sensors are equipped on both sides 

of the power back door. If anything 

obstructs the power back door while 

it is closing, the back door will auto-

matically operate in the opposite 

direction or stop.

Fall-down protection function

While the power back door is open-

ing automatically, applying exces-

sive force to it will stop the opening 

operation to prevent the power back 

door from suddenly shutting.

Back door closing assist

If the back door is lowered manually 

when the back door is stopped at an 

open position, the back door will 

fully close automatically.

Back door reserve lock function

This function is a function which 

reserves locking of all doors, before-

hand, when the power back door is 

open.
When the following procedure is 

performed, all the doors except the 

power back door are locked and 

then power back door will also be 

locked at the same time it is closed.

1

Close all doors, except the back 

door.

2

During the power back door clos-

ing operation, lock the doors 

using the smart key system from 

the side doors (

P.131) or the 

wireless remote control. 

(

P.131)

Operation signals will indicate that 

all the doors have been closed and 

locked. (

P.132)

If the electronic key is placed 

inside the vehicle after starting a 

close operation via the door 

reserve lock function, the elec-

tronic key may become locked 

inside the vehicle.

If the power back door does not 

fully close due to the operation of 

the jam protection function, etc., 

while the back door is automati-

cally closing after a door reserve 

lock operation is performed, the 

door reserve lock function is can-

celed and all the doors will unlock.

Before leaving the vehicle, make 

sure that all the doors are closed 

and locked.

Close & lock function operat-

ing conditions

This function can be operated when 

all of the following conditions are 

met:

An electronic key is not detected 

within the vehicle.

All of the doors other than the 

power back door are closed.

The power switch is in OFF.

Situations in which the close & 

lock function may not operate 

properly

In the following situations, the close 

& lock function may not operate 

properly:

If the 

 switch on the lower 

part of the power back door is 

pressed by a hand which is hold-

ing an electronic key

If the 

 switch on the lower 

part of the power back door is 

pressed when the electronic key is 

in a bag, etc. that is placed on the 

ground

If the 

 switch on the lower 

part of the power back door is 

pressed with the electronic key 

-------------------------------------------------------------------------------------------------------------------------------------------------------------

142

3-2. Opening, closing and locking the doors

not near the vehicle

Kick sensor operating condi-

tions (vehicles with Hands Free 

Power Back Door)

The Hands Free Power Back Door 

will open/close automatically when 

the following conditions are met:

The kick sensor operation is 

enabled (

P.100, 111)

The power switch is in OFF.

The electronic key is within the 

operational range. (

P.149)

A foot is put near the lower center 

part of the rear bumper and 

moved away from the rear 

bumper.

The power back door may also be 

operated by putting a hand, an 

elbow, a knee, etc. near the lower 

center part of the rear bumper and 

moving it away from the rear 

bumper. Make sure to put it close 

enough to the center part of the 

rear bumper.

Situations in which the Hands 

Free Power Back Door may not 

operate properly (vehicles with 

Hands Free Power Back Door)

In the following situations, the 

Hands Free Power Back Door may 

not operate properly:

When a foot remains under the 

rear bumper

If the rear bumper is strongly hit 

with a foot or is touched for a while

If the rear bumper has been touched 
for a while, wait for a short time 
before attempting to operate the 
Hands Free Power Back Door 
again.

When operated while a person is 

too close to the rear bumper

When an external radio wave 

source interferes with the commu-

nication between the electronic 

key and the vehicle (

P.150)

When the vehicle is parked near 

an electrical noise source which 

affects the sensitivity of the Hands 

Free Power Back Door, such as a 

pay parking spot, gas station, 

electrically heated road, or fluo-

rescent light

When the vehicle is near a TV 

tower, electric power plant, radio 

station, large display, airport or 

other facility that generates strong 

radio waves or electrical noise

When a large amount of water is 

applied to the rear bumper, such 

as when the vehicle is being 

washed or in heavy rain

When mud, snow, ice, etc. is 

attached to the rear bumper

When the vehicle has been 

parked for a while near objects 

that may move and contact the 

rear bumper, such as plants

When an accessory is installed to 

the rear bumper

If an accessory has been installed, 
turn the Hands Free Power Back 
Door (kick sensor) operation setting 
off.

Preventing unintentional opera-

tion of the Hands Free Power 

Back Door (vehicles with Hands 

Free Power Back Door)

When an electronic key is in the 

operation range, the Hands Free 

Power Back Door may operate unin-

tentionally, so be careful in the fol-

lowing situations.
To prevent unintentional operation, 
turn the Hands Free Power Back 
Door (kick sensor) operation setting 
off. (

P.100, 111)

When a large amount of water is 

applied to the rear bumper, such 

as when the vehicle is being 

washed or in heavy rain

When dirt is wiped off the rear 

bumper

When a small animal or small 

-------------------------------------------------------------------------------------------------------------------------------------------------------------

143

3-2. Opening, closing and locking the doors

3

Before 

driving

object, such as a ball, moves 

under the rear bumper

When an object is moved from 

under the rear bumper

If someone is swinging their legs 

while sitting on the rear bumper

If the legs or another part of some-

one’s body contacts the rear 

bumper while passing by the vehi-

cle

When the vehicle is parked near 

an electrical noise source which 

affects the sensitivity of the Hands 

Free Power Back Door, such as a 

pay parking spot, gas station, 

electrically heated road, or fluo-

rescent light

When the vehicle is near a TV 

tower, electric power plant, radio 

station, large display, airport or 

other facility that generates strong 

radio waves or electrical noise

When the vehicle is parked in a 

place where objects such as 

plants are near the rear bumper

If luggage, etc. is set near the rear 

bumper

If accessories or a vehicle cover is 

installed/removed near the rear 

bumper

When the vehicle is being towed

When reconnecting the 12-volt 

battery

To enable the power back door to 

operate properly, close the back 

door manually.

If the back door opener is inop-

erative

The back door can be unlocked 

from the inside.

1

Remove the cover.

To prevent damage, cover the tip of 

the screwdriver with a rag.

2

Loosen the screw.

3

Turn the cover.

4

Move the lever.

5

When installing, reverse the 

steps listed.

Customization

Settings (e.g. power back door 

opening angle) can be changed. 

(Customizable features: 

P.506)

-------------------------------------------------------------------------------------------------------------------------------------------------------------

144

3-2. Opening, closing and locking the doors

WARNING

Back door closer

In the event that the back door 

is left slightly open, the back 

door closer will automatically 

close it to the fully closed posi-

tion. It takes several seconds 

before the back door closer 

begins to operate. Be careful 

not to catch fingers or anything 

else in the back door, as this 

may cause bone fractures or 

other serious injuries.

Use caution when using the 

back door closer as it still oper-

ates when the power back door 

system is canceled.

Power back door

Observe the following precautions 

when operating the power back 

door. 

Failure to do so may cause death 

or serious injury.

Check the safety of the sur-

rounding area to make sure 

there are no obstacles or any-

thing that could cause any of 

your belongings to get caught.

If anyone is in the vicinity, make 

sure they are safe and let them 

know that the back door is 

about to open or close.

If the power back door system is 

turned off while the back door is 

operating automatically, the 

automatic operation is stopped. 

The back door then has to be 

operated manually. Take extra 

care when on an incline, as the 

back door may open or close 

unexpectedly.

If the operating conditions of the 

power back door are no longer 

met, a buzzer may sound and 

the back door may stop opening 

or closing. The back door then 

has to be operated manually. 

Take extra care when on an 

incline, as the back door may 

open or close abruptly.

On an incline, the back door 

may suddenly shut after it 

opens. Make sure the back door 

is fully open and secure.

In the following situations, the 

power back door may detect an 

abnormality and automatic 

operation may be stopped. In 

this case, the back door has to 

be operated manually. Take 

extra care when on an incline, 

as the back door may open or 

close abruptly.

• When the back door contacts an 

obstacle

• When the 12-volt battery volt-

age suddenly drops, such as 

when the power switch is turned 

to ON or the hybrid system is 

started during automatic opera-

tion

-------------------------------------------------------------------------------------------------------------------------------------------------------------

145

3-2. Opening, closing and locking the doors

3

Before 

driving

WARNING

If a bicycle carrier or similar 

heavy object is attached to the 

back door, the power back door 

may not operate, causing itself 

to malfunction, or the back door 

may suddenly shut again after 

being opened, causing some-

one’s hands, head or neck to be 

caught and injured. When 

installing an accessory part to 

the back door, using a genuine 

Toyota part is recommended.

Jam protection function

Observe the following precau-

tions. 

Failure to do so may cause death 

or serious injury.

Never use any part of your body 

to intentionally activate the jam 

protection function.

The jam protection function may 

not work if something gets 

caught just before the back door 

fully closes. Be careful not to 

catch fingers or anything else.

The jam protection function may 

not work depending on the 

shape of the object that is 

caught. Be careful not to catch 

fingers or anything else.

Hands Free Power Back Door 

(if equipped)

Observe the following precautions 

when operating the Hands Free 

Power Back Door.

Failure to do so may cause death 

or serious injury.

Check the safety of the sur-

rounding area to make sure 

there are no obstacles or any-

thing that could cause any of 

your belongings to get caught.

When putting your foot near the 

lower center part of the rear 

bumper and moving it from the 

rear bumper, be careful not to 

touch the exhaust pipes until 

they have cooled down suffi-

ciently, as touching hot exhaust 

pipes can cause burns.

Do not leave the electronic key 

within the effective range 

(detection area) of the luggage 

compartment.

NOTICE

Back door spindles

The back door is equipped with 

spindles that hold the back door in 

place.

Observe the following precau-

tions. 

Failure to do so may cause dam-

age to the back door spindle, 

resulting in malfunction.

Do not attach any foreign 

objects, such as stickers, plastic 

sheets, or adhesives to the 

spindle rod.

Do not attach any accessories 

other than genuine Toyota parts 

to the back door.

Do not place your hand on the 

spindle or apply lateral forces to 

it.

-------------------------------------------------------------------------------------------------------------------------------------------------------------

146

3-2. Opening, closing and locking the doors

NOTICE

To prevent back door closer 

malfunction

Do not apply excessive force to 

the back door while the back door 

closer is operating. Applying 

excessive force may cause the 

back door closer to malfunction.

To prevent damage to the 

power back door

Make sure that there is no ice 

between the back door and 

frame that would prevent move-

ment of the back door. Operat-

ing the power back door when 

excessive load is present on the 

back door may cause a mal-

function.

Do not apply excessive force to 

the back door while the power 

back door is operating.

Take care not to damage the 

sensors (installed on the right 

and left edges of the power 

back door) with a knife or other 

sharp object. If the sensor is 

disconnected, the power back 

door will not close automati-

cally.

Close & lock function

When closing the power back 

door using the close & lock func-

tion, a different buzzer than the 

normal one will sound before the 

operation begins.
To check that the operation has 

started correctly, check that a dif-

ferent buzzer than the normal one 

has sounded.
Additionally, when the power back 

door is fully closed and locked, 

operation signals will indicate that 

all of the doors have been locked. 

(

P.132)

Before leaving the vehicle, make 

sure that the operational signals 

have operated and that all of the 

doors are locked.

Hands Free Power Back Door 

precautions (if equipped)

The kick sensor is located behind 

lower center part of the rear 

bumper. Observe the following to 

ensure that the Hands Free 

Power Back Door function oper-

ates properly:

Keep the lower center part of 

the rear bumper clean at all 

times.

If the lower center part of the 

rear bumper is dirty or covered 

with snow, the kick sensor may 

not operate. In this situation, 

clean off the dirt or snow, move 

the vehicle from the current 

position and then check if the 

kick sensor operates.

If it does not operate, have the 

vehicle inspected by your 

Toyota dealer.

Do not apply coatings that have 

a rain clearing (hydrophilic) 

effect, or other coatings, to the 

lower center part of the rear 

bumper.

-------------------------------------------------------------------------------------------------------------------------------------------------------------

147

3-2. Opening, closing and locking the doors

3

Before 

driving

The settings of the power back 
door system can be changed by 
displaying the “Vehicle Set-
tings” - “PBD” screen from the 

 screen of the multi-informa-

tion display. (

P.100, 111)

The changed power back door set-
tings are not reset by turning the 
power switch to OFF. In order to 
restore the original settings, they 
need to be changed back on the 

 screen of the multi-information 

display.

The open position of the power 
back door can be adjusted.

1

Stop the back door in the 
desirable position. (

P.137)

2

Press and hold the 


switch on the lower part of 
the back door for approxi-
mately 2 seconds.

When the settings are completed, 

the buzzer sounds 4 times.
When opening the back door the 

next time, the back door will stop at 

NOTICE

Do not park the vehicle near 

objects that may move and con-

tact the lower center part of the 

rear bumper, such as grass or 

trees.

If the vehicle has been parked 

for a while near objects that 

may move and contact the 

lower center part of the rear 

bumper, such as grass or trees, 

the kick sensor may not oper-

ate. In this situation, move the 

vehicle from the current position 

and then check if the kick sen-

sor operates. If it does not oper-

ate, have the vehicle inspected 

by your Toyota dealer.

Do not subject the kick sensor 

or its surrounding area to a 

strong impact.

If the kick sensor or its sur-

rounding area has been sub-

jected to a strong impact, the 

kick sensor may not operate 

properly. If the kick sensor does 

not operate in the following situ-

ations, have the vehicle 

inspected by your Toyota 

dealer.

• The kick sensor or its surround-

ing area has been subjected to 

a strong impact.

• The lower center part of the rear 

bumper is scratched or dam-

aged.

Do not disassemble the rear 

bumper.

Do not attach stickers to the 

rear bumper.

Do not paint the rear bumper.

If a bicycle carrier or similar 

heavy object is attached to the 

power back door, disable the 

kick sensor. (

P.100, 111)

Changing settings of the 
power back door system

Adjusting the open posi-
tion of the back door

-------------------------------------------------------------------------------------------------------------------------------------------------------------

148

3-2. Opening, closing and locking the doors

that position.

Canceling the adjusted open 

position of the back door

Press and hold the 

 switch on 

the lower part of the back door for 

approximately 7 seconds.
After the buzzer sounds 4 times, it 

sounds twice more. When the 

power back door does the opening 

operation the next time, the door will 

open to the initial settings position.

Customization

The opening position can be set 

with the multi-information display. 

(

P.100, 111)

Priority for the stop position is given 

to the last position set by either the 

 switch on the lower part of the 

back door or multi-information dis-

play.

Antenna location

Antennas outside the cabin 
(front)

Antennas outside the cabin 
(rear) (if equipped)

Antenna outside the luggage 
compartment

Antennas inside the cabin

Smart key system

The following operations 
can be performed simply by 
carrying the electronic key 
on your person, for example 
in your pocket. The driver 
should always carry the 
electronic key.

Locks and unlocks the 
doors (

P.131)

Locks and unlocks the back 
door (

P.137)

Starts the hybrid system 
(

P.196)

A

B

C

D

-------------------------------------------------------------------------------------------------------------------------------------------------------------

149

3-2. Opening, closing and locking the doors

3

Before 

driving

Effective range (areas within 

which the electronic key is 

detected)

When locking or unlocking the 
doors

The system can be operated when 
the electronic key is within about 2.3 
ft. (0.7 m) of the front door handles, 
rear door handles (if equipped) and 
back door opener switch. (Only the 
doors detecting the key can be 
operated.)

When starting the hybrid system 
or changing power switch modes

The system can be operated when 
the electronic key is inside the vehi-
cle.

If an alarm sounds or a warning 

message is displayed

An alarm sounds and warning mes-

sage displays shown on the multi-

information display are used to pro-

tect against unexpected accidents 

or theft of the vehicle resulting from 

erroneous operation. When a warn-

ing message is displayed, take 

appropriate measures based on the 

displayed message.
When only an alarm sounds, cir-

cumstances and correction proce-

dures are as follows.

When an exterior alarm sounds 

once for 5 seconds

When an interior alarm pings con-

tinuously

Battery-saving function

The battery-saving function will be 

activated in order to prevent the 

electronic key battery and the 12-

volt battery from being discharged 

while the vehicle is not in operation 

for a long time.

In the following situations, the 

smart key system may take some 

time to unlock the doors.

• The electronic key has been left in 

an area of approximately 11.5 ft. 

(3.5 m) of the outside of the vehi-

cle for 2 minutes or longer.

• The smart key system has not 

been used for 5 days or longer.

If the smart key system has not 

been used for 14 days or longer, 

the doors cannot be unlocked at 

any doors except the driver’s 

door. In this case, take hold of the 

driver’s door handle, or use the 

wireless remote control or the 

A

B

Situation

Correction pro-

cedure

An attempt was 
made to lock the 
vehicle while a 
door was open.

Close all of the 
doors and lock 
the doors again.

Situation

Correction pro-

cedure

The power 
switch was 
turned to ACC 
while the driver’s 
door was open 
(or the driver’s 
door was opened 
while the power 
switch was in 
ACC).

Turn the power 
switch to OFF 
and close the 
driver’s door.

-------------------------------------------------------------------------------------------------------------------------------------------------------------

150

3-2. Opening, closing and locking the doors

mechanical key, to unlock the 

doors.

Turning an electronic key to 

battery-saving mode

When battery-saving mode is set, 

battery depletion is minimized by 

stopping the electronic key from 

receiving radio waves.

Press 

 twice while pressing 

and holding 

.

Confirm that the electronic key indi-
cator flashes 4 times. 
While the battery-saving mode is 
set, the smart key system cannot be 
used. To cancel the function, press 
any of the electronic key buttons.

Electronic keys that will not be 

used for long periods of time can 

be set to the battery-saving mode 

in advance.

Conditions affecting operation

The smart key system uses weak 

radio waves. In the following situa-

tions, the communication between 

the electronic key and the vehicle 

may be affected, preventing the 

smart key system, wireless remote 

control and immobilizer system from 

operating properly.

When the electronic key battery is 

depleted

Near a TV tower, electric power 

plant, gas station, radio station, 

large display, airport or other facil-

ity that generates strong radio 

waves or electrical noise

When the electronic key is in con-

tact with, or is covered by the fol-

lowing metallic objects

• Cards to which aluminum foil is 

attached

• Cigarette boxes that have alumi-

num foil inside

• Metallic wallets or bags

• Coins

• Hand warmers made of metal

• Media such as CDs and DVDs

When other wireless key (that 

emits radio waves) is being used 

nearby

When carrying the electronic key 

together with the following devices 

that emit radio waves

• Portable radio, cellular phone, 

cordless phone or other wireless 

communication devices

• Another vehicle’s electronic key or 

a wireless key that emits radio 

waves

• Personal computers or personal 

digital assistants (PDAs)

• Digital audio players

• Portable game systems

If window tint with a metallic con-

tent or metallic objects are 

attached to the rear window

When the electronic key is placed 

near a battery charger or elec-

tronic devices

When the vehicle is parked in a 

pay parking spot where radio 

waves are emitted.

If the doors cannot be 

locked/unlocked using the smart key 

system, lock/unlock the doors by 

performing any of the following:

Bring the electronic key close to 

either front door handle and oper-

ate the entry function.

Operate the wireless remote con-

trol.

If the doors cannot be 

locked/unlocked using the above 

methods, use the mechanical key. 

(

P.130)

If the hybrid system cannot be 

started using the smart key system, 

refer to P.468.

-------------------------------------------------------------------------------------------------------------------------------------------------------------

151

3-2. Opening, closing and locking the doors

3

Before 

driving

Note for the entry function

Even when the electronic key is 

within the effective range (detec-

tion areas), the system may not 

operate properly in the following 

cases:

• The electronic key is too close to 

the window or outside door han-

dle, near the ground, or in a high 

place when the doors are locked 

or unlocked.

• The electronic key is on the instru-

ment panel, luggage cover or 

floor, or in the door pockets or 

glove box when the hybrid system 

is started or power switch modes 

are changed.

Do not leave the electronic key on 

top of the instrument panel or near 

the door pockets when exiting the 

vehicle. Depending on the radio 

wave reception conditions, it may 

be detected by the antenna out-

side the cabin and the door will 

become lockable from the outside, 

possibly trapping the electronic 

key inside the vehicle.

As long as the electronic key is 

within the effective range, the 

doors may be locked or unlocked 

by anyone. However, only the 

doors detecting the electronic key 

can be used to unlock the vehicle.

Even if the electronic key is not 

inside the vehicle, it may be possi-

ble to start the hybrid system if the 

electronic key is near the window.

The doors may unlock if a large 

amount of water splashes on the 

door handle, such as in the rain or 

in a car wash when the electronic 

key is within the effective range. 

(The doors will automatically be 

locked after approximately 60 sec-

onds if the doors are not opened 

and closed.)

If the wireless remote control is 

used to lock the doors when the 

electronic key is near the vehicle, 

there is a possibility that the door 

may not be unlocked by the entry 

function. (Use the wireless remote 

control to unlock the doors.)

Touching the door lock sensor 

while wearing gloves may delay or 

prevent lock operation. Remove 

the gloves and touch the lock sen-

sor again.

When the lock operation is per-

formed using the lock sensor, rec-

ognition signals will be shown up 

to two consecutive times. After 

this, no recognition signals will be 

given.

If the door handle becomes wet 

while the electronic key is within 

the effective range, the door may 

lock and unlock repeatedly. In that 

case, follow the following correc-

tion procedures to wash the vehi-

cle:

• Place the electronic key in a loca-

tion 6 ft. (2 m) or more away from 

the vehicle. (Take care to ensure 

that the key is not stolen.)

• Set the electronic key to battery-

saving mode to disable the smart 

key system. (

P.150)

If the electronic key is inside the 

vehicle and a door handle 

becomes wet during a car wash, a 

message may be shown on the 

multi-information display and a 

buzzer will sound outside the vehi-

cle. To turn off the alarm, lock all 

the doors.

The lock sensor may not work 

properly if it comes into contact 

with ice, snow, mud, etc. Clean 

the lock sensor and attempt to 

operate it again.

A sudden approach to the effec-

tive range or door handle may pre-

vent the doors from being 

unlocked. In this case, return the 

door handle to the original position 

and check that the doors unlock 

before pulling the door handle 

again.

If there is another electronic key in 

the detection area, it may take 

slightly longer to unlock the doors 

after the door handle is gripped.

-------------------------------------------------------------------------------------------------------------------------------------------------------------

152

3-2. Opening, closing and locking the doors

When the vehicle is not driven 

for extended periods

To prevent theft of the vehicle, do 

not leave the electronic key within 

6 ft. (2 m) of the vehicle.

The smart key system can be 

deactivated in advance. (

P.505)

Battery-saving mode can reduce 

the power consumption of elec-

tronic keys. (

P.150)

To operate the system properly

Make sure to carry the electronic 

key when operating the system. Do 

not get the electronic key too close 

to the vehicle when operating the 

system from the outside of the vehi-

cle.
Depending on the position and hold-

ing condition of the electronic key, 

the key may not be detected cor-

rectly and the system may not oper-

ate properly. (The alarm may go off 

accidentally, or the door lock pre-

vention may not operate.)

If the smart key system does 

not operate properly

Locking and unlocking the doors: 

Use the mechanical key. 

(

P.467)

Starting the hybrid system: 

P.468

Customization

Settings (e.g. smart key system) 

can be changed.

(Customizable features: 

P.505)

If the smart key system has been 

deactivated in a customized setting, 

refer to the explanations for the fol-

lowing operations.

Locking and unlocking the doors:

Use the wireless remote control or 

mechanical key. (

P.131, 467)

Starting the hybrid system and 

changing power switch modes: 

P.468

Stopping the hybrid system: 

P.198

Certification for the smart key system

For vehicles sold in the U.S.A., Hawaii, Guam, Saipan and Puerto Rico

-------------------------------------------------------------------------------------------------------------------------------------------------------------

153

3-2. Opening, closing and locking the doors

3

Before 

driving

For vehicles sold in Canada

-------------------------------------------------------------------------------------------------------------------------------------------------------------

154

3-2. Opening, closing and locking the doors

WARNING

Caution regarding interfer-

ence with electronic devices

People with implantable car-

diac pacemakers, cardiac 

resynchronization therapy-

pacemakers or implantable car-

dioverter defibrillators should 

keep away from the smart key 

system antennas. (

P.148)

The radio waves may affect the 

operation of such devices. If 

necessary, the entry function 

can be disabled. Ask your 

Toyota dealer for details, such 

as the frequency of radio waves 

and timing of the emitted radio 

waves. Then, consult your doc-

tor to see if you should disable 

the entry function.

User of any electrical medical 

device other than implantable 

cardiac pacemakers, cardiac 

resynchronization therapy-

pacemakers or implantable car-

dioverter defibrillators should 

consult the manufacturer of the 

device for information about its 

operation under the influence of 

radio waves.

Radio waves could have unex-

pected effects on the operation 

of such medical devices.

Ask your Toyota dealer for details 

for disabling the entry function.

-------------------------------------------------------------------------------------------------------------------------------------------------------------

155

3-3. Adjusting the seats

3

Before 

driving

3-3.Adjusting the seats

Power seat

1

Seat position adjustment 
switch

2

Seatback angle adjustment 
switch

3

Seat cushion (front) angle 
adjustment switch (for 
driver’s side)

4

Vertical height adjustment 
switch (for driver’s side)

5

Lumbar support adjustment 
switch (for driver’s side)

6

Pelvic support adjustment (if 
equipped for driver’s side)

Manual seat

1

Seat position adjustment 
lever

2

Seatback angle adjustment 
lever

When adjusting the seat

Take care when adjusting the seat 

so that the head restraint does not 

touch the ceiling.

Power easy access system (if 

equipped)

The driver’s seat and steering wheel 

move in accordance with power 

switch mode and the driver’s seat 

belt condition. (

P.158)

Front seats

The seats can be adjusted 
(longitudinally, vertically, 
etc.). Adjust the seat to 
ensure the correct driving 
posture.

Adjustment procedure

WARNING

When adjusting the seat posi-

tion

Take care when adjusting the 

seat position to ensure that 

other passengers are not 

injured by the moving seat.

Do not put your hands under the 

seat or near the moving parts to 

avoid injury.

Fingers or hands may become 

jammed in the seat mechanism.

-------------------------------------------------------------------------------------------------------------------------------------------------------------

156

3-3. Adjusting the seats

Pull the seatback angle adjust-
ment lever 

, and adjust the 

seatback angle.

WARNING

Make sure to leave enough 

space around the feet so they 

do not get stuck.

Manual seat only: After adjust-

ing the seat, make sure that the 

seat is locked in position.

Seat adjustment

To reduce the risk of sliding under 

the lap belt during a collision, do 

not recline the seat more than 

necessary.

If the seat is too reclined, the lap 

belt may slide past the hips and 

apply restraint forces directly to 

the abdomen, or your neck may 

contact the shoulder belt, increas-

ing the risk of death or serious 

injury in the event of an accident.

Adjustments should not be made 

while driving as the seat may 

unexpectedly move and cause 

the driver to lose control of the 

vehicle.

Rear seats

Reclining adjustments and 
folding the seatbacks can 
be done with lever opera-
tion.

Adjustment procedure

WARNING

When operating the seatback

Observe the following precau-

tions.

Failure to do so may cause death 

or serious injury.

Keep other passengers from 

being hit with the seatback.

Do not bring your hands close 

to the moving parts or between 

the seats, as well as do not let 

any part of your body get 

caught.

A

-------------------------------------------------------------------------------------------------------------------------------------------------------------

157

3-3. Adjusting the seats

3

Before 

driving

Before folding down the 
seatbacks

1

Park the vehicle in a safe 
place.

Apply the parking brake (

P.208) 

and shift the shift lever to P. 

(

P.205)

2

Adjust the position of the 
front seat and the angle of 
the seatback. (

P.155)

Depending on the position of the 

front seat, if the seatback is folded 

backward, it may interfere with the 

operation of the rear seat.

3

Lift up and push down the 
head restraints of the rear 
outboard seats, and lower 
the head restraint of the rear 
center seat. (

P.162)

4

Stow the armrest of the rear 
seat if it is pulled out. 
(

P.359)

This step is not necessary when 

operating the left side seat only.

Folding down the seat-
backs

While pulling the seatback angle 
adjustment lever 

, fold the 

seatback down.

Returning the rear seat-
backs

To avoid trapping the seat belt 
between the seat and the inside 
of the vehicle, pass the seat belt 
outside the seat belt guide 


and then return the seatback 
securely to the locked position.

WARNING

After adjusting the seat, make 

sure that the seat is locked in 

position. 

If the seatback is not securely 

locked, the red marking will be 

visible. Make sure that the red 

marking is not visible.

Folding down the rear 
seatbacks

WARNING

Observe the following precau-

tions.

Failure to do so may result in 

death or serious injury.

A

A

-------------------------------------------------------------------------------------------------------------------------------------------------------------

158

3-3. Adjusting the seats

*

: If equipped

When all of the following have 
been performed, the driver’s 
seat and steering wheel are 
automatically adjusted to a posi-
tion that allows driver to enter 
and exit the vehicle easily.

The shift lever has been 
shifted to P.

WARNING

When folding the rear seat-

backs down

Do not fold the seatbacks down 

while driving.

Stop the vehicle on level 

ground, set the parking brake 

and shift the shift lever to P.

Do not allow anyone to sit on a 

folded seatback or in the lug-

gage compartment while driv-

ing.

Do not allow children to enter 

the luggage compartment.

Do not operate the rear seat if it 

is occupied.

Be careful not to get feet or 

hands caught in the moving 

parts or joints of the seats 

during operation.

Do not allow children to operate 

the seat.

After returning the rear seat-

back to the upright position

Make sure that the seatback is 

securely locked in position by 

lightly pushing it back and forth. 

If the seatback is not securely 

locked, the red marking will be 

visible. Make sure that the red 

marking is not visible.

Check that the seat belts are 

not twisted or caught in the 

seatback.

Driving position mem-

ory

*

This feature automatically 
adjusts the positions of the 
driver’s seat, steering wheel 
and head-up display (if 
equipped) to make entering 
and exiting the vehicle eas-
ier or to suit your prefer-
ences.
Up to 2 different driving 
positions can be recorded.
Each electronic key can be 
registered to recall your pre-
ferred driving position.

Enabling easier driver 
entry and exit (power easy 
access system)

-------------------------------------------------------------------------------------------------------------------------------------------------------------

159

3-3. Adjusting the seats

3

Before 

driving

The power switch has been 
turned to OFF.

The driver’s seat belt has 
been unfastened.

When any of the following has 
been performed, the driver’s 
seat and steering wheel auto-
matically return to their original 
positions.

The power switch has been 
turned to ACC or ON.

The driver’s seat belt has 
been fastened.

Operation of the power easy 

access system

When exiting the vehicle, the power 

easy access system may not oper-

ate if the seat is already close to the 

rearmost position, etc.

Customization

The seat movement amount set-

tings of the power easy access sys-

tem can be customized. 

(Customizable features: 

P.507)

Recording procedure

1

Check that the shift lever is in 
P.

2

Turn the power switch to ON.

3

Adjust the driver’s seat, 
steering wheel and head-up 
display (if equipped) to the 
desired positions.

4

While pressing the “SET” but-
ton, or within 3 seconds after 
the “SET” button is pressed, 

press button “1” or “2” until 
the buzzer sounds.

If the selected button has already 

been preset, the previously 

recorded position will be overwrit-

ten.

Recall procedure

1

Check that the shift lever is in 
P.

2

Turn the power switch to ON.

3

Press one of the buttons for 
the driving position you want 
to recall until the buzzer 
sounds.

To stop the position recall oper-

ation part-way through

Perform any of the following:

Press the “SET” button.

Press button “1” or “2”.

Operate any of the seat adjust-

ment switches (only cancels seat 

position recall).

Recording/recalling a 
driving position

-------------------------------------------------------------------------------------------------------------------------------------------------------------

160

3-3. Adjusting the seats

Operate the tilt and telescopic 

steering control switch (only can-

cels steering wheel position 

recall).

Seat positions that can be 

memorized (

P.155)

The positions adjusted by the fol-

lowing procedure can be recorded:

Seat position adjustment

Seatback angle adjustment

Seat cushion (front) angle adjust-

ment

Vertical height adjustment

Operating the driving position 

memory after turning the power 

switch to OFF

Recorded seat positions can be 

activated up to 180 seconds after 

the driver’s door is opened and 

another 60 seconds after it is closed 

again.

In order to correctly use the 

driving position memory func-

tion

If a seat position is already in the 

furthest possible position and the 

seat is operated in the same direc-

tion, the recorded position may be 

slightly different when it is recalled.

When recalling the driving posi-

tion

Take care when recalling the driving 

position so that the head restraint 

does not touch the ceiling.

When the recorded seat posi-

tion cannot be recalled

The seat position may not be 

recalled in some situations when the 

seat position is recorded in a certain 

range. For details, contact your 

Toyota dealer.

Registering procedure

Record your driving position to 
button “1” or “2” before perform-
ing the following:
Carry only the key you want to 
register, and then close the 
driver’s door. 
If 2 or more keys are in the vehi-
cle, the driving position cannot 
be recorded properly.

1

Check that the shift lever is in 
P.

2

Turn the power switch to ON.

3

Recall the driving position 
that you want to record.

4

While pressing the recalled 
button, press and hold the 
door lock switch (either lock 
or unlock) until the buzzer 
sounds.

If the button could not be regis-

tered, the buzzer sounds continu-

WARNING

Seat adjustment caution

Take care during seat adjustment 

so that the seat does not strike 

the rear passenger or squeeze 

your body against the steering 

wheel.

Registering/recall/cancel-
ing a driving position to 
an electronic key (mem-
ory recall function)

-------------------------------------------------------------------------------------------------------------------------------------------------------------

161

3-3. Adjusting the seats

3

Before 

driving

ously for approximately 3 seconds.

Recall procedure

1

Make sure that the doors are 
locked before recalling the 
driving position.Carry the 
electronic key that has been 
registered to the driving posi-
tion, and then unlock and 
open the driver’s door using 
the smart key system or wire-
less remote control.

The driving position will move to the 

recorded position (not including the 

steering wheel and head-up display 

[if equipped]). However, the seat 

will move to a position slightly 

behind the recorded position in 

order to make entering the vehicle 

easier.

If the driving position is in a position 

that has already been recorded, the 

seat will not move.

2

Turn the power switch to 
ACC or ON, or fasten a seat 
belt.

The seat, steering wheel and head-

up display (if equipped) will move to 

the recorded position. (The head-

up display only moves when the 

power switch is turned to ON.)

Cancelation procedure

Carry only the key you want to 
cancel and then close the 
driver’s door.

If 2 or more keys are in the vehi-
cle, the driving position cannot 
be canceled properly.

1

Check that the shift lever is in 
P.

2

Turn the power switch to ON.

3

While pressing the “SET” but-
ton, press and hold the door 
lock switch (either lock or 
unlock) until the buzzer 
sounds twice.

If the button could not be canceled, 

the buzzer sounds continuously for 

approximately 3 seconds.

Recalling the driving position 

using the memory recall func-

tion

Different driving positions can be 

registered for each electronic key. 

Therefore, the driving position that 

is recalled may be different 

depending on the key being car-

ried.

If a door other than the driver’s 

door is unlocked with smart key 

system, the driving position can-

not be recalled. In this case, press 

the driving position button which 

has been set.

Customization

Settings (e.g. the unlock door set-

tings of the memory recall function) 

can be customized. (Customizable 

features: 

P.507)

-------------------------------------------------------------------------------------------------------------------------------------------------------------

162

3-3. Adjusting the seats

Front seats

1

Up

Pull the head restraints up.

2

Down

Push the head restraint down while 
pressing the lock release button 

.

Center rear seat

1

Up

Pull the head restraints up.

2

Down

Push the head restraint down while 
pressing the lock release button 

.

Outboard rear seats

Head restraints cannot be 
adjusted.

Adjusting the height of the head 

restraints (front seats)

Make sure that the head restraints 

are adjusted so that the center of 

the head restraint is closest to the 

top of your ears.

Adjusting the center rear seat 

head restraint

Always raise the head restraint one 

level from the stowed position when 

using.

Head restraints

Head restraints are pro-
vided for all seats.

WARNING

Head restraint precautions

Observe the following precautions 

regarding the head restraints.

Failure to do so may result in 

death or serious injury.

Use the head restraints 

designed for each respective 

seat.

Adjust the head restraints to the 

correct position at all times.

After adjusting the head 

restraints, push down on them 

and make sure they are locked 

in position.

Do not drive with the head 

restraints removed.

Vertical adjustment

A

A

-------------------------------------------------------------------------------------------------------------------------------------------------------------

163

3-3. Adjusting the seats

3

Before 

driving

Pull the head restraint up while 
pressing the lock release button 

.

If the head restraint touches the 
ceiling, making the removal difficult, 
change the seat height or angle. 
(

P.155)

Front and center rear seats

Align the head restraint with the 
installation holes and push it 
down to the lock position.

Press and hold the lock release 
button 

 when lowering the head 

restraint.

Outboard rear seats

Align the head restraint with the 
installation holes and push it 
down to the lowest lock position.

Removing the head 
restraints

Installing the head 
restraints

A

A

-------------------------------------------------------------------------------------------------------------------------------------------------------------

164

3-4. Adjusting the steering wheel and mirrors

3-4.Adjusting the steering wheel and mirrors

Operating the switch moves the 
steering wheel in the following 
directions:

1

Up

2

Down

3

Toward the driver

4

Away from the driver

The steering wheel can be 

adjusted when

The power switch is in ACC or ON

*

.

*

: If the driver’s seat belt is fastened, 

the steering wheel can be 
adjusted regardless of power 
switch mode.

Power easy access system (if 

equipped)

The steering wheel and driver’s seat 

move in accordance with power 

switch mode and the driver’s seat 

belt condition. (

P.158)

Automatic adjustment of the 

steering position (if equipped)

A desired steering position can be 

entered to memory and recalled 

automatically by the driving position 

memory system. (

P.159)

To sound the horn, press on or 
close to the 

 mark.

Steering wheel

Adjustment procedure

WARNING

Caution while driving

Do not adjust the steering wheel 

while driving.

Doing so may cause the driver to 

mishandle the vehicle and cause 

an accident, resulting in death or 

serious injury.

Sounding the horn

-------------------------------------------------------------------------------------------------------------------------------------------------------------

165

3-4. Adjusting the steering wheel and mirrors

3

Before 

driving

*

: If equipped

The height of the rear view mir-
ror can be adjusted to suit your 
driving posture.
Adjust the height of the rear 
view mirror by moving it up and 
down.

Manual anti-glare inside rear 
view mirror

Reflected light from the head-
lights of vehicles behind can be 
reduced by operating the lever.

1

Normal position

2

Anti-glare position

Auto anti-glare inside rear 
view mirror

Responding to the level of 
brightness of the headlights of 
vehicles behind, the reflected 
light is automatically reduced.
Turn the automatic anti-glare 
function mode on/off

When the automatic anti-glare func-
tion is in ON mode, the indicator 


illuminates.
The function will set to ON mode 
each time the power switch is 
turned to ON.
Pressing the button turns the func-
tion to OFF mode. (The indicator 

 also turns off.)

Inside rear view mir-

ror

*

The rear view mirror’s posi-
tion can be adjusted to 
enable sufficient confirma-
tion of the rear view.

Adjusting the height of 
rear view mirror

WARNING

Caution while driving

Do not adjust the position of the 

mirror while driving.

Doing so may lead to mishandling 

of the vehicle and cause an acci-

dent, resulting in death or serious 

injury.

Anti-glare function

A

A

-------------------------------------------------------------------------------------------------------------------------------------------------------------

166

3-4. Adjusting the steering wheel and mirrors

To prevent sensor error (vehi-

cles with auto anti-glare inside 

rear view mirror)

To ensure that the sensors operate 

properly, do not touch or cover 

them.

*

: If equipped

Digital Rear-view Mir-

ror

*

The Digital Rear-view Mirror 
is a system that uses the 
camera on the rear of the 
vehicle and displays its 
image on the display of the 
Digital Rear-view Mirror.
The Digital Rear-view Mirror 
can be changed between 
optical mirror mode and dig-
ital mirror mode by operat-
ing the lever.
The Digital Rear-view Mirror 
allows the driver to see the 
rear view despite obstruc-
tions, such as the head 
restraints or luggage, 
ensuring rear visibility. 
Also, the rear seats are not 
displayed and privacy of the 
passengers is enhanced.

WARNING

Observe the following precau-

tions.

Failure to do so may result in 

death or serious injury.

Before using the Digital Rear-

view Mirror

Make sure to adjust the mirror 

before driving. (

P.168)

• Change to optical mirror mode 

and adjust the position of the 

Digital Rear-view Mirror so that 

the area behind your vehicle 

can be viewed properly.

-------------------------------------------------------------------------------------------------------------------------------------------------------------

167

3-4. Adjusting the steering wheel and mirrors

3

Before 

driving

Camera indicator

Indicates that the camera is operat-
ing normally.

Icon display area

Displays icons, adjusting gauge, 
etc. (

P.168)

Select/adjust button

Press to change the setting of the 
item you want to adjust.

Menu button

Press to display the icon display 
area and select the item you want 
to adjust.

Lever

Operate to change between digital 
mirror mode and optical mirror 
mode.

Operate the lever to change 
between digital mirror mode and 
optical mirror mode.

1

Digital mirror mode

Displays an image of the area 
behind the vehicle.

 will illuminate in this mode.

2

Optical mirror mode

Turns off the display of the Digital 
Rear-view Mirror allows it to be 
used as an optical mirror.

Digital mirror mode operating 

condition

The power switch is turned to ON.
When the power switch is changed 

from ON to OFF or ACC, the image 

will disappear after several seconds.

When using the Digital Rear-

view Mirror in digital mirror 

mode

If it is difficult to see the displayed 

image due to light reflected off the 

Digital Rear-view Mirror, the cam-

era being dirty or covered with 

water droplets, snow, etc., or if 

lights of a vehicle behind your 

vehicle or the displayed image are 

bothering you, change to optical 

mirror mode.

When the back door is open, the 

Digital Rear-view Mirror image 

may not display properly. Before 

WARNING

• Change to digital mirror mode 

and adjust the display settings.

As the range of the image dis-

played by the Digital Rear-view 

Mirror is different from that of 

the optical mirror, make sure to 

check this difference before 

driving.

System components

A

B

C

D

E

Changing modes

-------------------------------------------------------------------------------------------------------------------------------------------------------------

168

3-4. Adjusting the steering wheel and mirrors

driving, make sure the back door 

is closed.

Vehicles with panoramic fixed 

moon roof with one-touch frosted 

glass control: If the display is diffi-

cult to see due to reflected light, 

close the electronic sunshade.

Any of the following conditions 

may occur when driving in the 

dark, such as at night. None of 

them indicates that a malfunction 

has occurred.

• Colors of objects in the displayed 

image may differ from their actual 

color.

• Depending on the height of the 

lights of the vehicle behind, the 

area around the vehicle may 

appear white and blurry.

• Automatic image adjustment for 

brighter surrounding image may 

cause flickering.

If it is difficult to see the displayed 

image or flickering bothers you, 

change to optical mirror mode.

The Digital Rear-view Mirror may 

become hot while it is in digital 

mirror mode.

This is not a malfunction.

Depending on your physical con-

dition or age, it may take longer 

than usual to focus on the dis-

played image. In this case, 

change to optical mirror mode.

Do not let passengers stare at the 

displayed image when the vehicle 

is being driven, as doing so may 

cause motion sickness.

When the system malfunctions

If the symbol shown in the illustra-

tion is displayed when using the 

Digital Rear-view Mirror in digital 

mirror mode, the system may be 

malfunctioning. The symbol will dis-

appear in a few seconds. Operate 

the lever, change to optical mirror 

mode and have the vehicle 

inspected by your Toyota dealer.

Adjusting the mirror height

The height of the rear view mir-
ror can be adjusted to suit your 
driving posture.
Change to optical mirror mode, 
adjusting the height of the rear 
view mirror by moving it up and 
down.

Display settings (digital 
mirror mode)

Settings of the display in the dig-
ital mirror mode, on/off opera-
tion of the automatic anti-glare 
function, etc. can be changed.

1

Press the menu button.

Adjusting the mirror

-------------------------------------------------------------------------------------------------------------------------------------------------------------

169

3-4. Adjusting the steering wheel and mirrors

3

Before 

driving

The icons will be displayed.

2

Press the menu button 
repeatedly and select the 
item you want to adjust.

3

Press 

 or 

 to 

change the setting.

The icons will disappear if a button 

is not operated for approximately 5 

seconds or more.

*

: This is a function for the optical 

mirror mode, however, the setting 
can also be changed while using 
the digital mirror mode.

Enabling/disabling the 
automatic anti-glare func-
tion (optical mirror mode)

The automatic anti-glare func-
tion in the optical mirror mode 
can be enabled/disabled. The 
setting can be changed in both 
the digital mirror mode and the 
optical mirror mode.

When using the digital mirror 
mode

P.168

Icons

Settings

Select to adjust the bright-
ness of the display.

Select to adjust the area 
displayed up/down.

Select to adjust the area 
displayed to the left/right.

Select to adjust the angle of 
the displayed image.

Select to zoom in/out the 
displayed image.

Select to enable/disable the 
automatic anti-glare func-
tion.

*

Responding to the bright-
ness of the headlights of 
vehicles behind, the 
reflected light is automati-
cally adjusted.
The automatic anti-glare 
function is enabled each 
time the power switch is 
changed to ON.

Select to display 
HomeLink

®

 Training Tuto-

rial to assist customers to 
train their Garage Door 
Opener System. (

P.361)

Select to change the lan-
guage of the Homelink

®


Training Tutorial.

Icons

Settings

-------------------------------------------------------------------------------------------------------------------------------------------------------------

170

3-4. Adjusting the steering wheel and mirrors

When using the optical mirror 
mode

1

Press the menu button.

The icons will be displayed.

2

Press the menu button 
repeatedly and select 

.

The setting display will be dis-

played.

3

Press 

 or 

 to 

enable (ON)/disable (OFF) 
the automatic anti-glare func-
tion.

The icons will disappear if a button 

is not operated for approximately 5 

seconds or more.

Adjusting the display (digital 

mirror mode)

If the displayed image is adjusted, 

it may appear distorted. This is not 

a malfunction.

If the brightness of the Digital 

Rear-view Mirror is set too high, it 

may cause eye strain. Adjust the 

Digital Rear-view Mirror to an 

appropriate brightness. If your 

eyes become tired, change to 

optical mirror mode.

The brightness of the Digital Rear-

view Mirror will change automati-

cally according to the brightness 

of the area in front of your vehicle.

To prevent the light sensors 

from malfunctioning

To prevent the light sensors from 

malfunctioning, do not touch or 

cover them.

WARNING

Observe the following precau-

tions.

Failure to do so may result in 

death or serious injury.

While driving

Do not adjust the position of the 

Digital Rear-view Mirror or 

adjust the display settings while 

driving.

Stop the vehicle and operate 

the Digital Rear-view Mirror 

control switches. 

Failure to do so may cause a 

steering wheel operation error, 

resulting in an unexpected acci-

dent.

Always pay attention to the 

vehicle’s surroundings.

The size of the vehicles and other 

objects may look different when in 

digital mirror mode and optical 

mirror mode.

When backing up, make sure to 

directly check the safety of the 

area around your vehicle, espe-

cially behind the vehicle.

Additionally, if a vehicle 

approaches from the rear in the 

dark, such as at night, the sur-

rounding area may appear dim.

-------------------------------------------------------------------------------------------------------------------------------------------------------------

171

3-4. Adjusting the steering wheel and mirrors

3

Before 

driving

Cleaning the mirror surface

If the mirror surface is dirty, the 
image on the display may be dif-
ficult to see.
Clean the mirror surface gently 
using a soft dry cloth.

Cleaning the camera

When the camera lens is dirty, a 
clear image cannot be captured.
If the camera lens is covered 
with foreign matter, such as 
water droplets or dust, clean it 
with a damp soft cloth.

When it is difficult to clean it with a 
cloth, use a swab.
When cleaning the camera lens, 
wipe the inside of the rear window 
as well.

The camera

The camera for the Digital Rear-

view Mirror is located as shown.

The cooling fan

There is a cooling fan in the Digital 

Rear-view Mirror. Cooling fan 

sounds may be heard when using 

the system.

WARNING

To prevent causes of fire

If the driver continues using the 

Digital Rear-view Mirror while 

smoke or odor comes from the 

mirror, it may result in fire. Stop 

using the system immediately and 

contact your Toyota dealer.

Cleaning the Digital Rear-
view Mirror

NOTICE

To prevent the Digital Rear-

view Mirror from malfunction-

ing

Do not use detergents, such as 

thinner, benzene, and alcohol to 

clean the mirror. They may dis-

color, deteriorate or damage the 

mirror surface.

Do not smoke, use matches, 

use cigarette lighters or allow 

open flames near the mirror. It 

may damage the mirror or 

cause a fire.

Do not remove, disassemble or 

modify the mirror.

To prevent the camera from 

malfunctioning

Observe the following precau-

tions, otherwise the Digital 

Rear-view Mirror may not oper-

ate properly.

• Do not strike or hit the camera 

or subject it to a strong impact, 

as the camera installation posi-

tion and angle may be changed.

-------------------------------------------------------------------------------------------------------------------------------------------------------------

172

3-4. Adjusting the steering wheel and mirrors

If you notice any of the following symptoms, refer to the following 

NOTICE

• Do not remove, disassemble or 

modify the camera.

• Do not allow an organic solvent, 

car wax, window cleaner or 

glass coating to adhere to the 

camera. If this happens, wipe it 

off as soon as possible.

• When cleaning the camera lens, 

wipe the camera lens with a 

damp soft cloth.

Do not strongly rub the camera 

lens, as it may be scratched and 

will not be able to transmit a 

clear image.

• When applying colored film 

(including transparent film) to 

the rear window glass, do not 

apply it to the area in front of the 

camera.

If film is applied to the area in 

front of the camera, the image 

from the camera may not dis-

play properly.

Do not subject the camera to a 

strong impact as this could 

cause a malfunction.

If this happens, have the vehicle 

inspected by your Toyota dealer 

as soon as possible.

Do not block the vent holes of 

the mirror. Otherwise, the mirror 

may be hot, leading to a mal-

function or a fire.

If you notice any symptoms

-------------------------------------------------------------------------------------------------------------------------------------------------------------

173

3-4. Adjusting the steering wheel and mirrors

3

Before 

driving

table for the likely cause and the solution.
If the symptom is not resolved by the solution, have the vehicle 
inspected by your Toyota dealer.

-------------------------------------------------------------------------------------------------------------------------------------------------------------

174

3-4. Adjusting the steering wheel and mirrors

Symptom

Likely cause

Solution

The image is difficult to 
see.

The mirror surface is 
dirty.

Clean the mirror surface 
gently, using a soft dry 
cloth.

Sunlight or headlights 
are shining directly into 
the Digital Rear-view 
Mirror.

Change to optical mirror 
mode.
(Vehicles with pan-
oramic fixed moon roof 
with one-touch frosted 
glass control: If the light 
is coming through the 
moon roof, close the 
electronic sunshade.)

• The vehicle is in a dark 

area.

• The vehicle is near a 

TV tower, broadcast-
ing station, electric 
power plant, or other 
location where strong 
radio waves or electri-
cal noise may be pres-
ent.

• The temperature 

around the camera is 
extremely high/low.

• The ambient tempera-

ture is extremely low.

• It is raining or humid.
• Sunlight or headlights 

are shining directly into 
the camera lens.

• The vehicle is under 

fluorescent lights, 
sodium lights, mer-
cury lights, etc.

• Exhaust gas is 

obstructing the cam-
era.

Change to optical mirror 
mode.
(Change back to digital 
mirror mode when the 
conditions have 
improved.)

Foreign matters such as 
water droplets or dust is 
on the camera lens.

Wipe the camera lens 
with a damp soft cloth.

-------------------------------------------------------------------------------------------------------------------------------------------------------------

175

3-4. Adjusting the steering wheel and mirrors

3

Before 

driving

The image is difficult to 
see.

The luggage in the lug-
gage compartment is 
reflected off the rear win-
dow glass and obstruct-
ing the camera.

• Change to optical mir-

ror mode.

• Move the luggage to a 

position where it does 
not obstruct the cam-
era or cover it with a 
black cloth to reduce 
the amount it is 
reflected off the rear 
window glass.

The rear window glass is 
fogged up.

Change to optical mirror 
mode.
After defogging the rear 
window using the rear 
window defogger 
(

P.316, 323), use the 

digital mirror mode 
again.

The outside of the rear 
window glass is dirty.

Use the rear window 
wiper to remove dirt.

The inside of the rear 
window glass is dirty.

Wipe the inside of rear 
window glass with a 
damp soft cloth.

The image is out of 
alignment.

The back door is not fully 
closed.

Fully close the back 
door.

The camera or its sur-
rounding area has 
received a strong 
impact.

Change to optical mirror 
mode and have the vehi-
cle inspected by your 
Toyota dealer.

The display is dim and 

 is displayed.

The system may be mal-
functioning.

Change to optical mirror 
mode and have the vehi-
cle inspected by your 
Toyota dealer.

 goes off.

Symptom

Likely cause

Solution

-------------------------------------------------------------------------------------------------------------------------------------------------------------

176

3-4. Adjusting the steering wheel and mirrors

 is displayed.

The Digital Rear-view 
Mirror is extremely hot.
(The display will gradu-
ally become more dim. If 
the temperature contin-
ues to increase, the Digi-
tal Rear-view Mirror will 
turn off.)

Reducing the cabin tem-
perature is recom-
mended to reduce the 
temperature of the mir-
ror.
(

 will disappear when 

the mirror becomes 
cool.)

If 

 does not disap-

pear even though the 
mirror is cool, have the 
vehicle inspected by 
your Toyota dealer.

The lever cannot be 
operated properly.

The lever may be mal-
functioning.

Change to optical mirror 
mode and have the vehi-
cle inspected by your 
Toyota dealer.
(To change to optical 
mirror mode, press and 
hold the menu button for 
approximately 10 sec-
onds.)

Symptom

Likely cause

Solution

-------------------------------------------------------------------------------------------------------------------------------------------------------------

177

3-4. Adjusting the steering wheel and mirrors

3

Before 

driving

Defogging the mirrors

The outside rear view mirrors can 

be cleared using the mirror defog-

gers. Turn on the rear window 

defogger to turn on the outside rear 

view mirror defoggers.

(

P.316, 323)

1

To select a mirror to adjust, 
turn the switch.

Left

Right

2

To adjust the mirror, operate 
the switch.

Up

Right

Down

Left

Mirror angle can be adjusted 

when

The power switch is in ACC or ON.

Outside rear view mir-

rors

The rear view mirror’s posi-
tion can be adjusted to 
enable sufficient confirma-
tion of the rear view.

WARNING

Important points while driving

Observe the following precautions 

while driving.

Failing to do so may result in loss 

of control of the vehicle and cause 

an accident, resulting in death or 

serious injury.

Do not adjust the mirrors while 

driving.

Do not drive with the mirrors 

folded.

Both the driver and passenger 

side mirrors must be extended 

and properly adjusted before 

driving.

When the mirror defoggers 

are operating

Do not touch the rear view mirror 

surfaces, as they can become 

very hot and burn you.

Adjustment procedure

A

B

A

B

C

D

-------------------------------------------------------------------------------------------------------------------------------------------------------------

178

3-4. Adjusting the steering wheel and mirrors

Folds the mirrors

Extends the mirrors

Putting the outside rear view mirror 
folding switch in the neutral position 
(A) sets the mirrors to automatic 
mode. Automatic mode allows the 
folding or extending of the mirrors 
to be linked to locking/unlocking of 
the doors.

Using automatic mode in cold 

weather

When automatic mode is used in 

cold weather, the outside rear view 

mirrors could freeze up and auto-

matic stowing and return may not be 

possible. In this event, remove any 

ice and snow from the outside rear 

view mirrors, then either operate the 

mirror using manual mode or move 

the mirror by hand.

Customization

The automatic mirror folding and 

extending operation can be 

changed. (Customizable features: 

P.508)

Folding the mirrors

WARNING

When a mirror is moving

To avoid personal injury and mir-

ror malfunction, be careful not to 

get your hand caught by the mov-

ing mirror.

A

B

-------------------------------------------------------------------------------------------------------------------------------------------------------------

179

3-5. Opening, closing the windows

3

Before 

driving

3-5.Opening, closing the windows

The power windows can be 
opened and closed using the 
switches.
Operating the switch moves the 
side windows as follows:

1

Closing

2

One-touch closing

*

3

Opening

4

One-touch opening

*

*

: To stop the side window partway, 

operate the switch in the opposite 
direction.

The power windows can be 

operated when

The power switch is in ON.

Operating the power windows 

after turning the hybrid system 

off

The power windows can be oper-

ated for approximately 45 seconds 

even after the power switch is 

turned to ACC or OFF. They cannot, 

however, be operated once either 

front door is opened.

Jam protection function

If an object becomes jammed 

between the side window and the 

window frame while the side window 

is closing, side window movement is 

stopped and the side window is 

opened slightly.

Catch protection function

If an object becomes caught 

between the door and side window 

while the side window is opening, 

side window movement is stopped.

When the power window cannot 

be opened or closed

When the jam protection function or 

catch protection function operates 

unusually and the side window can-

not be opened and closed, perform 

the following operations with the 

power window switch of that door.

Stop the vehicle. With the power 

switch in ON, within 4 seconds of 

the jam protection function or 

catch protection function activat-

ing, continuously operate the 

power window switch in the one-

touch closing direction or one-

touch opening direction so that the 

side window can be opened and 

closed.

If the side window cannot be 

opened and closed even when 

performing the above operations, 

perform the following procedure 

for function initialization.

1

Turn the power switch to ON.

2

Pull and hold the power window 

switch in the one-touch closing 

direction and completely close 

the side window.

3

Release the power window 

switch for a moment, resume 

pulling the switch in the one-

touch closing direction, and hold 

it there for approximately 6 sec-

onds or more.

4

Press and hold the power win-

dow switch in the one-touch 

opening direction. After the side 

window is completely opened, 

continue holding the switch for 

an additional 1 second or more.

Power windows

Opening and closing the 
power windows

-------------------------------------------------------------------------------------------------------------------------------------------------------------

180

3-5. Opening, closing the windows

5

Release the power window 

switch for a moment, resume 

pushing the switch in the one-

touch opening direction, and 

hold it there for approximately 4 

seconds or more.

6

Pull and hold the power window 

switch in the one-touch closing 

direction again. After the side 

window is completely closed, 

continue holding the switch for a 

further 1 second or more.

If you release the switch while the 

side window is moving, start again 

from the beginning.

If the side window reverses and 

cannot be fully closed or opened, 

have the vehicle inspected by your 

Toyota dealer.

Door lock linked power window 

operation

The power windows can be 

opened and closed using the 
mechanical key.

*

 (

P.468)

The power windows can be 

opened using the wireless remote 
control.

*

 (

P.131)

Vehicles with alarm: The alarm 

may be triggered if the alarm is set 

and the power window is closed 

using the door lock linked power 

window operation function. 

(

P.78)

*

: These settings must be custom-

ized at your Toyota dealer.

Power window open reminder 

function

A message is shown on the multi-

information display when the power 

switch is turned to OFF and the 

driver’s door is opened with the 

power windows open.

Customization

Settings (e.g. linked door lock oper-

ation) can be changed. (Customiz-

able features: 

P.508)

WARNING

Observe the following precau-

tions.

Failing to do so may result in 

death or serious injury.

Closing the power windows

The driver is responsible for all 

the power window operations, 

including the operation for the 

passengers. In order to prevent 

accidental operation, especially 

by a child, do not let a child 

operate the power windows. It is 

possible for children and other 

passengers to have body parts 

caught in the power window. 

Also, when riding with a child, it 

is recommended to use the win-

dow lock switch. (

P.181)

Check to make sure that all pas-

sengers do not have any part of 

their body in a position where it 

could be caught when a power 

window is being operated.

When using the wireless remote 

control or mechanical key and 

operating the power windows, 

operate the power window after 

checking to make sure that 

there is no possibility of any 

passenger having any of their 

body parts caught in the side 

window. Also, do not let a child 

operate the power window by 

the wireless remote control or 

mechanical key. It is possible 

for children and other passen-

gers to get caught in the power 

window.

-------------------------------------------------------------------------------------------------------------------------------------------------------------

181

3-5. Opening, closing the windows

3

Before 

driving

This function can be used to 
prevent children from acciden-
tally opening or closing a pas-
senger window.
Press the switch.

The indicator 

 will come on and 

the passenger windows will be 

locked.
The passenger windows can still be 
opened and closed using the 
driver’s switch even if the lock 
switch is on.

The window lock switch can be 

operated when

The power switch is in ON.

When the 12-volt battery is dis-

connected

The window lock switch is disabled. 

If necessary, press the window lock 

switch after reconnecting the 12-volt 

battery.

WARNING

When exiting the vehicle, turn 

the power switch to OFF, carry 

the key and exit the vehicle 

along with the child. There may 

be accidental operation, due to 

mischief, etc., that may possibly 

lead to an accident.

Jam protection function

Never use any part of your body 

to intentionally activate the jam 

protection function.

The jam protection function may 

not work if something gets 

jammed just before the side 

window is fully closed. Be care-

ful not to get any part of your 

body jammed in the side win-

dow.

Catch protection function

Never use any part of your body 

or clothing to intentionally acti-

vate the catch protection func-

tion.

The catch protection function 

may not work if something gets 

caught just before the side win-

dow is fully opened. Be careful 

not to get any part of your body 

or clothing caught in the side 

window.

Preventing accidental 
operation (window lock 
switch)

A

-------------------------------------------------------------------------------------------------------------------------------------------------------------

183

4

4

Dr

iv

ing

Driving

4-1. Before driving

Driving the vehicle.......

184

Cargo and luggage .....

191

Vehicle load limits .......

194

Trailer towing ..............

195

Dinghy towing .............

195

4-2. Driving procedures

Power (ignition) switch

196

EV drive mode ............

202

Hybrid transmission ....

204

Turn signal lever .........

207

Parking brake..............

208

Brake Hold ..................

211

4-3. Operating the lights and 

wipers

Headlight switch..........

214

AHB (Automatic High 

Beam)........................

217

Windshield wipers and 

washer.......................

220

Rear window wiper and 

washer.......................

224

4-4. Refueling

Opening the fuel tank cap

..................................

226

4-5. Using the driving support 

systems

Toyota Safety Sense 2.0

..................................

229

PCS (Pre-Collision System)

..................................

235

LTA (Lane Tracing Assist)

..................................

243

RSA (Road Sign Assist)

..................................

253

Dynamic radar cruise con-

trol with full-speed range

..................................

256

BSM (Blind Spot Monitor)

..................................

267

Intuitive parking assist.

276

PKSB (Parking Support 

Brake)........................

283

Parking Support Brake func-

tion (static objects) ....

287

Parking Support Brake func-

tion (rear-crossing vehi-
cles)...........................

293

Driving mode select switch

..................................

297

Driving assist systems.

298

4-6. Driving tips

Hybrid vehicle driving tips

..................................

304

Winter driving tips........

306

Utility vehicle precautions

..................................

309

-------------------------------------------------------------------------------------------------------------------------------------------------------------

184

4-1. Before driving

4-1.Before driving

Starting the hybrid system

P.196

Driving

1

With the brake pedal 
depressed, shift the shift 
lever to D. (

P.205)

2

Release the parking brake. 
(

P.208)

If the parking brake is in automatic 

mode, the parking brake is 

released automatically when shift-

ing the shift lever to any position 

other than P. (

P.209)

3

Gradually release the brake 
pedal and gently depress the 
accelerator pedal to acceler-
ate the vehicle.

Stopping

1

With the shift lever in D, 
depress the brake pedal.

2

If necessary, set the parking 
brake. (

P.208)

If the vehicle is to be stopped for an 

extended period of time, shift the 

shift lever to P. (

P.205)

Parking the vehicle

1

With the shift lever in D, 
depress the brake pedal.

2

Set the parking brake 
(

P.208), and shift the shift 

lever to P (

P.205).

3

Turn the power switch to 
OFF to stop the hybrid sys-
tem.

4

Lock the door, making sure 
that you have the electronic 
key on your person.

If parking on a hill, block the wheels 

as needed.

Starting off on a steep 
uphill

1

With the brake pedal 
depressed, shift the shift 
lever to D. (

P.205)

2

Pull the parking brake switch 
and parking brake is set 
manually. (

P.208)

3

Release the brake pedal and 
gently depress the accelera-
tor pedal to accelerate the 
vehicle.

4

Press the parking brake 
switch and parking brake is 
released manually.

When starting off on an uphill

The hill-start assist control will acti-

vate. (

P.299)

For fuel-efficient driving

Keep in mind that hybrid vehicles 

are similar to conventional vehicles, 

and it is necessary to refrain from 

activities such as sudden accelera-

tion, etc. Refer to “Hybrid vehicle 

driving tips”. (

P.304)

Driving in the rain

Drive carefully when it is raining, 

because visibility will be reduced, 

Driving the vehicle

The following procedures 
should be observed to 
ensure safe driving:

Driving procedure

-------------------------------------------------------------------------------------------------------------------------------------------------------------

185

4-1. Before driving

4

Dr

iv

ing

the windows may become fogged-

up, and the road will be slippery.

Drive carefully when it starts to 

rain, because the road surface will 

be especially slippery.

Refrain from high speeds when 

driving on an expressway in the 

rain, because there may be a 

layer of water between the tires 

and the road surface, preventing 

the steering and brakes from 

operating properly.

ECO Accelerator Guidance 

(

P.96, 107)

It is easier to drive in an Eco-friendly 

manner by driving while referring to 

the ECO Accelerator Guidance dis-

play. Also, by using the ECO Accel-

erator Guidance it is easier to 

increase the “Eco Score” evaluation.

When starting off:

While staying within the ECO Accel-
erator Guidance range, gradually 
depress the accelerator pedal and 
accelerate to the desired speed. If 
excessive acceleration is avoided, 
the “Start” score will increase.

When driving:

After accelerating to the desired 
speed, release the accelerator 
pedal and drive at a stable speed 
within the ECO Accelerator Guid-
ance range. By keeping the vehicle 
within the ECO Accelerator Guid-
ance range, the “Cruise” score will 
increase.

When stopping:

When stopping the vehicle, early 
releasing the accelerator pedal will 
cause the “Stop” score to increase.

Restraining the hybrid system 

output (Brake Override System)

When the accelerator and brake 

pedals are depressed at the same 

time, the hybrid system output 

may be restrained.

A warning message is displayed 

on the multi-information display 

and head-up display (if equipped) 

while the system is operating. 

(

P.453)

Restraining sudden start (Drive-

Start Control)

When the following unusual oper-

ation is performed, the hybrid sys-

tem output may be restrained.

• When the shift lever is shifted from 

R to D, D to R, N to R, P to D

*

, or 

P to R

*

 (D includes S) with the 

accelerator pedal depressed, a 

warning message appears on the 

multi-information display and 

head-up display (if equipped). If a 

warning message is shown on the 

multi-information display and 

head-up display (if equipped), 

read the message and follow the 

instructions.

• When the accelerator pedal is 

depressed too much while the 

vehicle is in reverse.

*

: Depending on the situation, the 

shift position may not be changed.

While Drive-Start Control is being 

activated, your vehicle may have 

trouble escaping from the mud or 

fresh snow. In such case, deacti-

vate TRAC (

P.299) to cancel 

Drive-Start Control so that the 

vehicle may become able to 

escape from the mud or fresh 

snow.

Breaking in your new Toyota

To extend the life of the vehicle, 

observing the following precautions 

is recommended:

For the first 200 miles (300 km):

Avoid sudden stops.

For the first 600 miles (1000 km):

• Do not drive at extremely high 

speeds.

• Avoid sudden acceleration.

• Do not drive continuously in low 

gears.

• Do not drive at a constant speed 

for extended periods.

-------------------------------------------------------------------------------------------------------------------------------------------------------------

186

4-1. Before driving

Operating your vehicle in a for-

eign country

Comply with the relevant vehicle 

registration laws and confirm the 

availability of the correct fuel. 

(

P.481)

WARNING

Observe the following precau-

tions.

Failure to do so may result in 

death or serious injury.

When starting the vehicle

Always keep your foot on the 

brake pedal while stopped with 

the “READY” indicator is illumi-

nated. This prevents the vehicle 

from creeping.

When driving the vehicle

Do not drive if you are unfamil-

iar with the location of the brake 

and accelerator pedals to avoid 

depressing the wrong pedal.

• Accidentally depressing the 

accelerator pedal instead of the 

brake pedal will result in sudden 

acceleration that may lead to an 

accident.

• When backing up, you may twist 

your body around, leading to a 

difficulty in operating the pedals. 

Make sure to operate the pedals 

properly.

• Make sure to keep a correct 

driving posture even when mov-

ing the vehicle only slightly. This 

allows you to depress the brake 

and accelerator pedals properly.

• Depress the brake pedal using 

your right foot. Depressing the 

brake pedal using your left foot 

may delay response in an emer-

gency, resulting in an accident.

The driver should pay extra 

attention to pedestrians when 

the vehicle is powered only by 

the electric motor (traction 

motor). As there is no engine 

noise, the pedestrians may mis-

judge the vehicle’s movement. 

Even though the vehicle is 

equipped with the Acoustic 

Vehicle Alerting System, drive 

with care as pedestrians in the 

vicinity may still not notice the 

vehicle if the surrounding area 

is noisy.

Do not drive the vehicle over or 

stop the vehicle near flammable 

materials such as leaves, paper 

or rags.

The exhaust system and 

exhaust gases can be 

extremely hot. These hot parts 

may cause a fire if there is any 

flammable material nearby.

During normal driving, do not 

turn off the hybrid system. Turn-

ing the hybrid system off while 

driving will not cause loss of 

steering or braking control. 

However, power assist for the 

steering wheel may be lost mak-

ing it difficult to steer smoothly 

before stopping the vehicle 

depending on the remaining 

charge in the 12-volt battery or 

usage conditions. In this situa-

tion, you should pull over and 

stop the vehicle as soon as it is 

safe to do so.

In the event of an emergency, 

such as if it becomes impossible 

to stop the vehicle in the normal 

way: 

P.435

Use engine braking (downshift) 

to maintain a safe speed when 

driving down a steep hill.

Using the brakes continuously 

may cause the brakes to over-

heat and lose effectiveness. 

(

P.204)

-------------------------------------------------------------------------------------------------------------------------------------------------------------

187

4-1. Before driving

4

Dr

iv

ing

WARNING

Do not adjust the position of the 

steering wheel, the seat, inside 

rear view mirror (if equipped), 

Digital Rear-view Mirror (if 

equipped) or outside rear view 

mirrors while driving.

Doing so may result in a loss of 

vehicle control.

Always check that all passen-

gers’ arms, head or other parts 

of their body are not outside the 

vehicle.

Do not drive the vehicle off-

road.

This is not an AWD vehicle 

designed for off-road driving. 

Proceed with all due caution if it 

becomes unavoidable to drive 

off-road.

Do not drive across a river or 

through other bodies of water.

This may cause electric/elec-

tronic components to short cir-

cuit, damage the hybrid system 

or cause other serious damage 

to the vehicle.

Do not drive in excess of the 

speed limit. Even if the legal 

speed limit permits it, do not 

drive over 85 mph (140 km/h) 

unless your vehicle has high-

speed capability tires. Driving 

over 85 mph (140 km/h) may 

result in tire failure, loss of con-

trol and possible injury. Be sure 

to consult a tire dealer to deter-

mine whether the tires on your 

vehicle are high-speed capabil-

ity tires or not before driving at 

such speeds.

When driving on slippery 

road surfaces

Sudden braking, acceleration 

and steering may cause tire 

slippage and reduce your ability 

to control the vehicle.

Sudden acceleration, engine 

braking due to shifting, or 

changes in engine speed could 

cause the vehicle to skid.

After driving through a puddle, 

lightly depress the brake pedal 

to make sure that the brakes 

are functioning properly. Wet 

brake pads may prevent the 

brakes from functioning prop-

erly. If the brakes on only one 

side are wet and not functioning 

properly, steering control may 

be affected.

When shifting the shift lever

Do not let the vehicle roll back-

ward while the shift lever is in a 

driving position, or roll forward 

while the shift lever is in R. 

Doing so may result in an acci-

dent or damage to the vehicle.

Do not shift the shift lever to P 

while the vehicle is moving.

Doing so can damage the trans-

mission and may result in a loss 

of vehicle control.

Do not shift the shift lever to R 

while the vehicle is moving for-

ward.

Doing so can damage the trans-

mission and may result in a loss 

of vehicle control.

Do not shift the shift lever to a 

driving position while the vehicle 

is moving backward.

Doing so can damage the trans-

mission and may result in a loss 

of vehicle control.

Moving the shift lever to N while 

the vehicle is moving will disen-

gage the hybrid system. Engine 

braking is not available with the 

hybrid system disengaged.

-------------------------------------------------------------------------------------------------------------------------------------------------------------

188

4-1. Before driving

WARNING

Be careful not to shift the shift 

lever with the accelerator pedal 

depressed.

Shifting the shift lever to a gear 

other than P or N may lead to 

unexpected rapid acceleration 

of the vehicle that may cause an 

accident and result in death or 

serious injury. Doing so can 

damage the transmission and 

may result in a loss of vehicle 

control.

If you hear a squealing or 

scraping noise (brake pad 

wear limit indicators)

Have the brake pads checked and 

replaced by your Toyota dealer as 

soon as possible.

Rotor damage may result if the 

pads are not replaced when 

needed.

It is dangerous to drive the vehicle 

when the wear limits of the brake 

pads and/or those of the brake 

discs are exceeded.

When the vehicle is stopped

Do not depress the accelerator 

pedal unnecessarily. 

If the vehicle is in any gear other 

than P or N, the vehicle may 

accelerate suddenly and unex-

pectedly, causing an accident.

In order to prevent accidents 

due to the vehicle rolling away, 

always keep depressing the 

brake pedal while stopped with 

the “READY” indicator is illumi-

nated, and apply the parking 

brake as necessary.

If the vehicle is stopped on an 

incline, in order to prevent acci-

dents caused by the vehicle roll-

ing forward or backward, always 

depress the brake pedal and 

securely apply the parking 

brake as needed.

Avoid revving or racing the 

engine.

Running the engine at high 

speed while the vehicle is 

stopped may cause the exhaust 

system to overheat, which could 

result in a fire if combustible 

material is nearby.

When the vehicle is parked

Do not leave glasses, cigarette 

lighters, spray cans, or soft 

drink cans in the vehicle when it 

is in the sun.

Doing so may result in the fol-

lowing:

• Gas may leak from a cigarette 

lighter or spray can, and may 

lead to a fire.

• The temperature inside the 

vehicle may cause the plastic 

lenses and plastic material of 

glasses to deform or crack.

• Soft drink cans may fracture, 

causing the contents to spray 

over the interior of the vehicle, 

and may also cause a short cir-

cuit in the vehicle’s electrical 

components.

Do not leave cigarette lighters in 

the vehicle. If a cigarette lighter 

is in a place such as the glove 

box or on the floor, it may be lit 

accidentally when luggage is 

loaded or the seat is adjusted, 

causing a fire.

Do not attach adhesive discs to 

the windshield or windows. Do 

not place containers such as air 

fresheners on the instrument 

panel or dashboard. Adhesive 

discs or containers may act as 

lenses, causing a fire in the 

vehicle.

-------------------------------------------------------------------------------------------------------------------------------------------------------------

189

4-1. Before driving

4

Dr

iv

ing

WARNING

Do not leave a door or window 

open if the curved glass is 

coated with a metallized film 

such as a silver-colored one. 

Reflected sunlight may cause 

the glass to act as a lens, caus-

ing a fire.

Always apply the parking brake, 

shift the shift lever to P, stop the 

hybrid system and lock the vehi-

cle. 

Do not leave the vehicle unat-

tended while the “READY” indi-

cator is illuminated. 

If the vehicle is parked with the 

shift lever in P but the parking 

brake is not set, the vehicle may 

start to move, possibly leading 

to an accident.

Do not touch the exhaust pipes 

while the “READY” indicator is 

illuminated or immediately after 

turning the hybrid system off. 

Doing so may cause burns.

When taking a nap in the 

vehicle

Always turn the hybrid system off. 

Otherwise, if you accidentally 

move the shift lever or depress 

the accelerator pedal, this could 

cause an accident or fire due to 

hybrid system overheating. Addi-

tionally, if the vehicle is parked in 

a poorly ventilated area, exhaust 

gases may collect and enter the 

vehicle, leading to death or a seri-

ous health hazard.

When braking

When the brakes are wet, drive 

more cautiously.

Braking distance increases 

when the brakes are wet, and 

this may cause one side of the 

vehicle to brake differently than 

the other side. Also, the parking 

brake may not securely hold the 

vehicle.

If the electronically controlled 

brake system does not operate, 

do not follow other vehicles 

closely and avoid hills or sharp 

turns that require braking. 

In this case, braking is still pos-

sible, but the brake pedal 

should be depressed more 

firmly than usual. Also, the brak-

ing distance will increase. Have 

your brakes fixed immediately.

The brake system consists of 2 

or more individual hydraulic sys-

tems; if one of the systems fails, 

the other(s) will still operate. In 

this case, the brake pedal 

should be depressed more 

firmly than usual and the brak-

ing distance will increase. Have 

your brakes fixed immediately.

If the vehicle becomes stuck

Do not spin the wheels exces-

sively when any of the tires is up 

in the air, or the vehicle is stuck in 

sand, mud, etc. This may damage 

the driveline components or pro-

pel the vehicle forward or back-

ward, causing an accident.

NOTICE

When driving the vehicle

Do not depress the accelerator 

and brake pedals at the same 

time during driving, as this may 

restrain the hybrid system out-

put.

Do not use the accelerator 

pedal or depress the accelera-

tor and brake pedals at the 

same time to hold the vehicle on 

a hill.

-------------------------------------------------------------------------------------------------------------------------------------------------------------

190

4-1. Before driving

NOTICE

Avoiding damage to vehicle 

parts

Do not turn the steering wheel 

fully in either direction and hold 

it there for an extended period 

of time.

Doing so may damage the 

power steering motor.

When driving over bumps in the 

road, drive as slowly as possible 

to avoid damaging the wheels, 

underside of the vehicle, etc.

If you get a flat tire while driv-

ing

A flat or damaged tire may cause 

the following situations. Hold the 

steering wheel firmly and gradu-

ally depress the brake pedal to 

slow down the vehicle.

It may be difficult to control your 

vehicle.

The vehicle will make abnormal 

sounds or vibrations.

The vehicle will lean abnor-

mally.

Information on what to do in case 

of a flat tire (

P.457)

When encountering flooded 

roads

Do not drive on a road that has 

flooded after heavy rain, etc. 

Doing so may cause the following 

serious damage to the vehicle:

Engine stalling

Short in electrical components

Engine damage caused by 

water immersion

In the event that you drive on a 

flooded road and the vehicle is 

flooded, be sure to have your 

Toyota dealer check the following:

Brake function

Changes in quantity and quality 

of oil and fluid used for the 

engine, hybrid transaxle (front 

and rear), etc.

Lubricant condition for the bear-

ings and suspension joints 

(where possible), and the func-

tion of all joints, bearings, etc.

When parking the vehicle

Always set the parking brake, and 

shift the shift lever to P. Failure to 

do so may cause the vehicle to 

move or the vehicle may acceler-

ate suddenly if the accelerator 

pedal is accidentally depressed.

-------------------------------------------------------------------------------------------------------------------------------------------------------------

191

4-1. Before driving

4

Dr

iv

ing

Cargo and luggage

Take notice of the following 
information about storage 
precautions, cargo capacity 
and load:

WARNING

Things that must not be car-

ried in the luggage compart-

ment

The following things may cause a 

fire if loaded in the luggage com-

partment:

Receptacles containing gaso-

line

Aerosol cans

Storage precautions

Observe the following precau-

tions.

Failure to do so may prevent the 

pedals from being depressed 

properly, may block the driver’s 

vision, or may result in items hit-

ting the driver or passengers, pos-

sibly causing an accident.

Stow cargo and luggage in the 

luggage compartment when-

ever possible.

Do not stack cargo and luggage 

in the luggage compartment 

higher than the seatbacks.

When you fold down the rear 

seats, long items should not be 

placed directly behind the front 

seats.

Never allow anyone to ride in 

the luggage compartment. It is 

not designed for passengers. 

They should ride in their seats 

with their seat belts properly 

fastened.

Do not place cargo or luggage 

in or on the following locations.

• At the feet of the driver
• On the front passenger or rear 

seats (when stacking items)

• On the luggage cover
• On the instrument panel
• On the dashboard

Secure all items in the occupant 

compartment.

When loading cargo on the 

roof luggage carrier (if 

equipped)

Observe the following precau-

tions:

Place the cargo so that its 

weight is distributed evenly 

between the front and rear 

axles.

If loading long or wide cargo, 

never exceed the vehicle overall 

length or width. (

P.480)

Before driving, make sure the 

cargo is securely fastened on 

the roof luggage carrier.

Loading cargo on the roof lug-

gage carrier will make the cen-

ter of gravity of the vehicle 

higher. Avoid high speeds, sud-

den starts, sharp turns, sudden 

braking or abrupt maneuvers, 

otherwise it may result in loss of 

control or vehicle rollover due to 

failure to operate this vehicle 

correctly and result in death or 

serious injury.

If driving for a long distance, on 

rough roads, or at high speeds, 

stop the vehicle now and then 

during the trip to make sure the 

cargo remains in its place.

Do not exceed 176.4 lb. (80 kg) 

cargo weight on the roof lug-

gage carrier.

-------------------------------------------------------------------------------------------------------------------------------------------------------------

192

4-1. Before driving

Cargo capacity depends on the 
total weight of the occupants.
(Cargo capacity) = (Total load 
capacity) - (Total weight of occu-
pants)

Steps for Determining Correct 
Load Limit 

(1) Locate the statement “The 
combined weight of occupants 
and cargo should never exceed 
XXX kg or XXX lbs.” on your 
vehicle’s placard.
(2) Determine the combined 
weight of the driver and passen-
gers that will be riding in your 
vehicle.
(3) Subtract the combined 
weight of the driver and passen-
gers from XXX kg or XXX lbs.
(4) The resulting figure equals 
the available amount of cargo 
and luggage load capacity.
For example, if the “XXX” 
amount equals 1400 lbs. and 
there will be five 150 lb passen-
gers in your vehicle, the amount 
of available cargo and luggage 
load capacity is 650 lbs. (1400 - 

750 (5 

 150) = 650 lbs.)

(5) Determine the combined 
weight of luggage and cargo 
being loaded on the vehicle. 
That weight may not safely 
exceed the available cargo and 
luggage load capacity calcu-
lated in Step 4.
(6) If your vehicle will be towing 
a trailer, load from your trailer 
will be transferred to your vehi-
cle. Consult this manual to 
determine how this reduces the 
available cargo and luggage 
load capacity of your vehicle. 
(

P.194)

Toyota does not recommend 
towing a trailer with your vehicle. 
Your vehicle is not designed for 
trailer towing.

NOTICE

When loading cargo on the 

roof luggage carrier (if 

equipped)

Be careful not to scratch the sur-

face of the panoramic fixed moon 

roof with one-touch frosted glass 

control (if equipped).

Capacity and distribution

WARNING

Capacity and distribution

Do not exceed the maximum 

axle weight rating or the total 

vehicle weight rating.

Even if the total load of occu-

pant’s weight and the cargo 

load is less than the total load 

capacity, do not apply the load 

unevenly. Improper loading may 

cause deterioration of steering 

or braking control which may 

cause death or serious injury.

-------------------------------------------------------------------------------------------------------------------------------------------------------------

193

4-1. Before driving

4

Dr

iv

ing

Cargo capacity

Total load capacity (vehicle 
capacity weight) (

P.480)

When 2 people with the com-
bined weight of A lb. (kg) are rid-
ing in your vehicle, which has a 
total load capacity (vehicle 
capacity weight) of B lb. (kg), 
the available amount of cargo 
and luggage load capacity will 
be C lb. (kg) as follows:

B

*2

 lb. (kg) - A

*1

 lb. (kg) = C

*3

 lb. 

(kg)

*1

:A = Weight of people

*2

:B = Total load capacity

*3

:C = Available cargo and luggage 

load

In this condition, if 3 more passen-
gers with the combined weight of D 
lb. (kg) get on, the available cargo 
and luggage load will be reduced E 
lb. (kg) as follows:

C lb. (kg) - D

*4

 lb. (kg) = E

*5

 lb. 

(kg)

*4

:D = Additional weight of people

*5

:E = Available cargo and luggage 

load

As shown in the example above, 
if the number of occupants 
increases, the cargo and lug-
gage load will be reduced by an 
amount that equals the 
increased weight due to the 
additional occupants. In other 
words, if an increase in the num-
ber of occupants causes an 
excess of the total load capacity 
(combined weight of occupants 
plus cargo and luggage load), 
you must reduce the cargo and 
luggage on your vehicle.

Calculation formula for 
your vehicle

A

B

-------------------------------------------------------------------------------------------------------------------------------------------------------------

194

4-1. Before driving

Total load capacity and seating 

capacity

These details are also described on 

the tire and loading information 

label. (

P.412)

Vehicle load limits

Vehicle load limits include 
total load capacity, seating 
capacity, towing capacity 
and cargo capacity.

Total load capacity (vehicle 
capacity weight): 

P.480

Total load capacity means the 
combined weight of occu-
pants, cargo and luggage.

Seating capacity: 

P.480

Seating capacity means the 
maximum number of occu-
pants whose estimated aver-
age weight is 150 lb. (68 kg) 
per person.

Towing capacity

Toyota does not recommend 
towing a trailer with your vehi-
cle.

Cargo capacity

Cargo capacity may increase 
or decrease depending on the 
weight and the number of 
occupants.

WARNING

Overloading the vehicle

Do not overload the vehicle. It 

may not only cause damage to 

the tires, but also degrade steer-

ing and braking ability, resulting in 

an accident.

-------------------------------------------------------------------------------------------------------------------------------------------------------------

195

4-1. Before driving

4

Dr

iv

ing

Trailer towing

Toyota does not recom-
mend towing a trailer with 
your vehicle. Toyota also 
does not recommend the 
installation of a tow hitch. 
Your vehicle is not designed 
for trailer towing.

Dinghy towing

Your vehicle is not designed 
to be dinghy towed (with 4 
wheels on the ground) 
behind a motor home.

NOTICE

To avoid serious damage to 

your vehicle

Do not tow your vehicle with 4 

wheels on the ground.

To prevent causing serious 

damage to the transmission 

and AWD system

Never tow this vehicle with any of 

the wheels on the ground. This 

may cause serious damage to the 

transmission and AWD system.

-------------------------------------------------------------------------------------------------------------------------------------------------------------

196

4-2. Driving procedures

4-2.Driving procedures

1

Pull the parking brake switch 
to check that the parking 
brake is set. (

P.208)

The parking brake indicator will 

come on.

2

Check that the shift lever is 
set in P.

3

Firmly depress the brake 
pedal.


*1

 or 


*2

 and a mes-

sage will be displayed on the multi-

information display.

If it is not displayed, the hybrid sys-

tem cannot be started.

*1

:Vehicles with 4.2-inch display

*2

:Vehicles with 7-inch display

4

Press the power switch 
shortly and firmly.

When operating the power switch, 

one short, firm press is enough. It is 

not necessary to press and hold the 

switch.
If the “READY” indicator turns on, 

the hybrid system will operate nor-

mally.
Continue depressing the brake 

pedal until the “READY” indicator is 

illuminated.

The hybrid system can be started 

from any power switch mode.

5

Check that the “READY” indi-
cator is illuminated.

If the “READY” indicator changes 

from a flashing light to a solid light 

and the buzzer sounds, the hybrid 

system is starting normally.
The vehicle will not move when the 

“READY” indicator is off.
The vehicle can move when the 

“READY” indicator is on even if the 

gasoline engine is stopped. (The 

gasoline engine starts or stops 

automatically in accordance with 

the state of the vehicle.)

Power switch illumination

According to the situation, the 

power switch illumination operates 

as follows.

When driver’s door or front pas-

senger’s door is opened, the 

power switch illumination illumi-

nates.

When the power switch is in OFF 

and depressing the brake pedal 

with carrying the electronic key on 

your person, the power switch illu-

mination blinks.

When the power switch is in ACC 

or ON, the power switch illumina-

tion illuminates.

When the power switch mode is 

changed from ACC or ON to OFF, 

the power switch illumination illu-

minates for a certain amount of 

time. Afterwards, the power switch 

Power (ignition) 

switch

Performing the following 
operations when carrying 
the electronic key on your 
person starts the hybrid 
system or changes power 
switch modes.

Starting the hybrid sys-
tem

-------------------------------------------------------------------------------------------------------------------------------------------------------------

197

4-2. Driving procedures

4

Dr

iv

ing

illumination turns off.

If the hybrid system does not 

start

The immobilizer system may not 

have been deactivated. (

P.77)

Contact your Toyota dealer.

If a message related to start-up is 

shown on the multi-information 

display, read the message and fol-

low the instructions.

When the ambient temperature 

is low, such as during winter 

driving conditions

When starting the hybrid system, 

the flashing time of the “READY” 

indicator may be long. Leave the 

vehicle as it is until the “READY” 

indicator is steady on, as steady 

means the vehicle is able to move.

When the hybrid battery (traction 

battery) is extremely cold (below 

approximately -22°F [-30°C]) 

under the influence of the outside 

temperature, it may not be possi-

ble to start the hybrid system. In 

this case, try to start the hybrid 

system again after the tempera-

ture of the hybrid battery 

increases due to the outside tem-

perature increase etc.

Sounds and vibrations specific 

to a hybrid vehicle

P.70

If the 12-volt battery is dis-

charged

The hybrid system cannot be 

started using the smart key system. 

Refer to P.469to restart the hybrid 

system.

Electronic key battery depletion

P.128

Conditions affecting operation

P.150

Note for the entry function

P.151

Steering lock function

After turning the power switch to 

OFF and opening and closing the 

doors, the steering wheel will be 

locked due to the steering lock 

function. Operating the power 

switch again automatically can-

cels the steering lock.

When the steering lock cannot be 

released, “Push Power Switch 

while Turning Steering Wheel in 

Either Direction” will be displayed 

on the multi-information display.

Check that the shift lever is set in 

P. Press the power switch shortly 

and firmly while turning the steer-

ing wheel left and right.

To prevent the steering lock motor 

from overheating, the motor may 

be suspended if the hybrid system 

is turned on and off repeatedly in 

a short period of time. In this case, 

refrain from operating the power 

switch. After about 10 seconds, 

the steering lock motor will 

resume functioning.

If there is a malfunction in the 

smart key system

If “Smart Key System Malfunction 

See Owner’s Manual” is displayed 

on the multi-information display, the 

system may be malfunctioning. 

Have the vehicle inspected by your 

Toyota dealer immediately.

If the “READY” indicator does 

not come on

In the event that the “READY” indi-

cator does not come on even after 

performing the proper procedures 

for starting the vehicle, contact your 

Toyota dealer immediately.

-------------------------------------------------------------------------------------------------------------------------------------------------------------

198

4-2. Driving procedures

When “Check Fuel Cap” is dis-

played on the multi-information 

display

P.228

If the hybrid system is malfunc-

tioning

P.76

Electronic key battery

P.425

Operation of the power switch

If the switch is not pressed shortly 

and firmly, the power switch mode 

may not change or the hybrid sys-

tem may not start.

If attempting to restart the hybrid 

system immediately after turning 

the power switch to OFF, the 

hybrid system may not start in 

some cases. After turning the 

power switch to OFF, please wait 

a few seconds before restarting 

the hybrid system.

Customization

If the smart key system has been 

deactivated in a customized setting, 

refer to P.468.

1

Stop the vehicle completely.

2

If the parking brake is in man-
ual mode, set the parking 
brake. (

P.208)

Check the parking brake indicator 

is illuminated.

3

Shift the shift position to P. 
(

P.205)

4

Press the power switch 
shortly and firmly.

The hybrid system will stop, and the 

meter display will be extinguished.
Release the shift lever when press-

WARNING

When starting the hybrid sys-

tem

Always start the hybrid system 

while sitting in the driver’s seat. 

Do not depress the accelerator 

pedal while starting the hybrid 

system under any circumstances. 

Doing so may cause an accident 

resulting in death or serious 

injury.

Caution while driving

If hybrid system failure occurs 

while the vehicle is moving, do not 

lock or open the doors until the 

vehicle reaches a safe and com-

plete stop. Activation of the steer-

ing lock in this circumstance may 

lead to an accident, resulting in 

death or serious injury.

NOTICE

When starting the hybrid sys-

tem

If the hybrid system becomes diffi-

cult to start, have your vehicle 

checked by your Toyota dealer 

immediately.

Symptoms indicating a mal-

function with the power 

switch

If the power switch seems to be 

operating somewhat differently 

than usual, such as the switch 

sticking slightly, there may be a 

malfunction. Contact your Toyota 

dealer immediately.

Stopping the hybrid sys-
tem

-------------------------------------------------------------------------------------------------------------------------------------------------------------

199

4-2. Driving procedures

4

Dr

iv

ing

ing the power switch.

5

Release the brake pedal and 
check that “ACCESSORY” or 
“IGNITION ON” is not shown 
on the multi-information dis-
play.

Automatic hybrid system shut 

off feature

The vehicle is equipped with a 

feature that automatically shuts off 

the hybrid system when the shift 

lever is in P with the hybrid system 

operating for an extended period.

The hybrid system will automati-

cally shut off after approximately 1 

hour if it has been left operating 

while the shift lever is in P.

The message asking if you wish to 

enable/disable the automatic 

hybrid system shut off feature will 

sometimes be displayed on the 

multi-information display.

Leaving the vehicle as is or select-

ing “Perform Auto Off” keeps the 

automatic hybrid system shut off 

feature enabled, and selecting 

“Keep Vehicle On” disables the 

automatic hybrid system shut off 

feature.

The timer for the automatic hybrid 

system shut off feature will reset if 

the brake pedal is depressed or if 

the shift lever is in a position other 

than P.

After the vehicle is parked, if the 

door is locked with the door lock 

switch (

P.134) from the inside 

or the mechanical key (

P.467) 

from the outside, the automatic 

hybrid system shut off feature will 

be disabled. The timer for the 

automatic hybrid system shut off 

feature will be re-enabled if the 

driver’s door is opened.

WARNING

Stopping the hybrid system 

in an emergency

If you want to stop the hybrid 

system in an emergency while 

driving the vehicle, press and 

hold the power switch for more 

than 2 seconds, or press it 

briefly 3 times or more in suc-

cession. (

P.435)

However, do not touch the 

power switch while driving 

except in an emergency. Turn-

ing the hybrid system off while 

driving will not cause loss of 

steering or braking control. 

However, power assist for the 

steering wheel may be lost mak-

ing it difficult to steer smoothly 

before stopping the vehicle 

depending on the remaining 

charge in the 12-volt battery or 

usage conditions. In this situa-

tion, you should pull over and 

stop the vehicle as soon as it is 

safe to do so.

If the power switch is operated 

while the vehicle is running, a 

warning message will be shown 

on the multi-information display 

and a buzzer sounds.

When restarting the hybrid sys-

tem after an emergency shut-

down, shift the shift lever to N 

and press the power switch 

shortly and firmly.

-------------------------------------------------------------------------------------------------------------------------------------------------------------

200

4-2. Driving procedures

Modes can be changed by 
pressing the power switch with 
the brake pedal released. (The 
mode changes each time the 
switch is pressed.)

1

OFF

*

The emergency flashers can be 
used.

2

ACC

Some electrical components such 
as the audio system can be used.
“ACCESSORY” will be displayed 
on the multi-information display.

3

ON

All electrical components can be 
used.
“IGNITION ON” will be displayed on 
the multi-information display.

*

: If the shift lever is in a position 

other than P when turning off the 
hybrid system, the power switch 
will remain ON, will not turn to 
OFF.

Auto power off function

If the vehicle is left in ACC or ON 

(the hybrid system is not operat-

ing) for more than 20 minutes with 

the shift lever in P, the power 

switch will automatically turn to 

OFF.

If the 12-volt battery is low with the 

shift lever is in P and the power 

switch is in ACC or ON (the hybrid 

system is not operating), a buzzer 

WARNING

When parking

Exhaust gases include harmful 

carbon monoxide (CO), which is 

colorless and odorless. Observe 

the following precautions.
Failure to do so may cause 

exhaust gases to enter the vehicle 

and may lead to an accident 

caused by light-headedness, or 

may lead to death or a serious 

health hazard.

If the vehicle is in a poorly venti-

lated area or a closed area, 

such as a garage, stop the 

hybrid system.

Do not leave the vehicle with 

the hybrid system operating for 

a long time. If such a situation 

cannot be avoided, park the 

vehicle in an open space and 

ensure that exhaust fumes do 

not enter the vehicle interior.

Do not leave the hybrid system 

operating in an area with snow 

build-up, or where it is snowing. 

If snowbanks build up around 

the vehicle while the hybrid sys-

tem is operating, exhaust gases 

may collect and enter the vehi-

cle.

Changing power switch 
modes

-------------------------------------------------------------------------------------------------------------------------------------------------------------

201

4-2. Driving procedures

4

Dr

iv

ing

sounds and a message will be dis-

played on the multi-information 

display. If this continues, the 

power switch is automatically turn 

to OFF.

However, this function cannot 

entirely prevent the 12-volt battery 

discharge. Do not leave the vehicle 

with the power switch in ACC or ON 

for long periods of time when the 

hybrid system is not operating.

If the hybrid system is stopped 
with the shift lever in a position 
other than P, the power switch 
will not be turned to OFF but 
instead be turned to ACC. Per-
form the following procedure to 
turn the switch to OFF:

1

Check that the parking brake 
is set.

2

Shift the shift lever to P.

3

Check that “IGNITION ON” is 
displayed on the multi-infor-
mation display and press the 

power switch shortly and 
firmly.

4

Check that “ACCESSORY” 
or “IGNITION ON” on the 
multi-information display is 
off.

NOTICE

To prevent 12-volt battery dis-

charge

Do not leave the power switch 

in ACC or ON for long periods of 

time without the hybrid system 

on.

If “ACCESSORY” or “IGNITION 

ON” is displayed on the multi-

information display, the power 

switch is not in OFF. Exit the 

vehicle after turning the power 

switch to OFF.

When stopping the hybrid 
system with the shift lever 
in a position other than P

NOTICE

To prevent 12-volt battery dis-

charge

Do not stop the hybrid system 

when the shift lever is in a position 

other than P. If the hybrid system 

is stopped in another shift lever 

position, the power switch will not 

be turned to OFF but instead 

remain ON. If the vehicle is left in 

ON, 12-volt battery discharge 

may occur.

-------------------------------------------------------------------------------------------------------------------------------------------------------------

202

4-2. Driving procedures

Turns EV drive mode on/off

When EV drive mode is turned on, 
the EV drive mode indicator will 
come on. Pressing the switch when 
in EV drive mode will return the 
vehicle to normal driving (using the 
gasoline engine and electric motor 
[traction motor]).

Situations in which EV drive 

mode cannot be turned on

It may not be possible to turn EV 

drive mode on in the following situa-

tions. If it cannot be turned on, a 

buzzer will sound and a message 

will be shown on the multi-informa-

tion display.

The temperature of the hybrid sys-

tem is high. 

The vehicle has been left in the 

sun, driven on a hill, driven at high 

speeds, etc.

The temperature of the hybrid sys-

tem is low. 

The vehicle has been left in tem-

peratures lower than about 32°F 

(0°C) for a long period of time etc.

The gasoline engine is warming 

up.

The hybrid battery (traction bat-

tery) is low.

The remaining battery level indi-

cated in the Energy monitor dis-

play is low. (

P.120)

Vehicle speed is high.

The accelerator pedal is 

depressed firmly or the vehicle is 

on a hill etc.

The windshield defogger is in use.

Use the EV drive mode when it 
becomes available.

Switching to EV drive mode 

when the gasoline engine is 

cold

If the hybrid system is started while 

the gasoline engine is cold, the gas-

oline engine will start automatically 

after a short period of time in order 

to warm up.
In this case, you will become unable 

to switch to EV drive mode. After the 

hybrid system has started and the 

“READY” indicator has illuminated, 

press the EV drive mode switch 

before the gasoline engine starts to 

switch to EV drive mode.

EV drive mode

In EV drive mode, electric 
power is supplied by the 
hybrid battery (traction bat-
tery), and only the electric 
motor (traction motor) is 
used to drive the vehicle.
This mode allows you to 
drive in residential areas 
early in the morning and 
late at night, or in indoor 
parking lots etc. without 
concern for noises and gas 
emissions.
However, when the Acous-
tic Vehicle Alerting System 
is active, the vehicle may 
produce sound.

Operating instructions

-------------------------------------------------------------------------------------------------------------------------------------------------------------

203

4-2. Driving procedures

4

Dr

iv

ing

Automatic cancelation of EV 

drive mode

When driving in EV drive mode, the 

gasoline engine may automatically 

restart in the following situations. 

When EV drive mode is canceled, a 

buzzer will sound, the EV drive 

mode indicator will flash and go off 

and a message will be shown on the 

multi-information display.

The hybrid battery (traction bat-

tery) becomes low.

The remaining battery level indi-

cated in the Energy monitor dis-

play is low. (

P.120)

Vehicle speed is high.

The accelerator pedal is 

depressed firmly or the vehicle is 

on a hill etc.

Drive the vehicle for a while before 

attempting to turn on the EV drive 

mode again.

Possible driving distance when 

driving in EV drive mode

EV drive mode’s possible driving 

distance ranges from a few hundred 

meters to approximately 0.6 mile (1 

km). However, depending on vehi-

cle conditions, there are situations 

when EV drive mode cannot be 

used. 

(The distance that is possible 

depends on the hybrid battery [trac-

tion battery] level and driving condi-

tions.)

Fuel economy

The hybrid system is designed to 

achieve the best possible fuel econ-

omy during normal driving (using 

the gasoline engine and electric 

motor [traction motor]). Driving in 

EV drive mode more than neces-

sary may lower fuel economy.

WARNING

Caution while driving

When driving in EV drive mode, 

pay special attention to the area 

around the vehicle. Because 

there is no engine noise, pedestri-

ans, people riding bicycles or 

other people and vehicles in the 

area may not be aware of the 

vehicle starting off or approaching 

them, so take extra care while 

driving.

-------------------------------------------------------------------------------------------------------------------------------------------------------------

204

4-2. Driving procedures

*1

:To improve fuel efficiency and 

reduce noise, shift the shift lever 
to D for normal driving.

*2

:By selecting shift ranges using S 

mode, you can control accelerat-
ing force and engine braking 
force.

When driving with dynamic 

radar cruise control with full-

speed range activated

Even when performing the following 

actions with the intent of enabling 

engine braking, engine braking will 

not activate because dynamic radar 

cruise control with full-speed range 

will not be canceled.

While driving in S mode, down-

shifting to 5 or 4. (

P.206)

When switching the driving mode 

to sport mode while driving in D 

position. (

P.297)

Restraining sudden start (Drive-

Start Control)

P.185

Hybrid transmission

Select the shift position 
depending on your purpose 
and situation.

Shift position purpose 
and functions

Shift 

position

Objective or function

P

Parking the vehi-

cle/starting the hybrid 

system

R

Reversing

N

Neutral

D

Normal driving

*1

S

S mode driving

*2

WARNING

When driving on slippery 

road surfaces

Be careful of downshifting and 

sudden acceleration, as this could 

result in the vehicle skidding to 

the side or spinning.

NOTICE

Hybrid battery (traction bat-

tery) charge

If the shift lever is in N, the hybrid 

battery (traction battery) will not 

be charged even when the engine 

is running. Therefore, if the vehi-

cle is left with the shift lever in N 

for a long period of time, the 

hybrid battery (traction battery) 

will discharge, and this may result 

in the vehicle not being able to 

start.

-------------------------------------------------------------------------------------------------------------------------------------------------------------


Content      ..     1      2      3      4      ..