Toyota Highlander (2021 year). Manual in english - part 4
 

  Index      Toyota     Toyota Highlander (2021 year). Manual in english


Search            copyright infringement  


Content      ..     2      3      4      5     ..


Toyota Highlander (2021 year). Manual in english - part 4


205

4-2. Driving procedures

4

Dr

iv

ing

HIGHLANDER_U

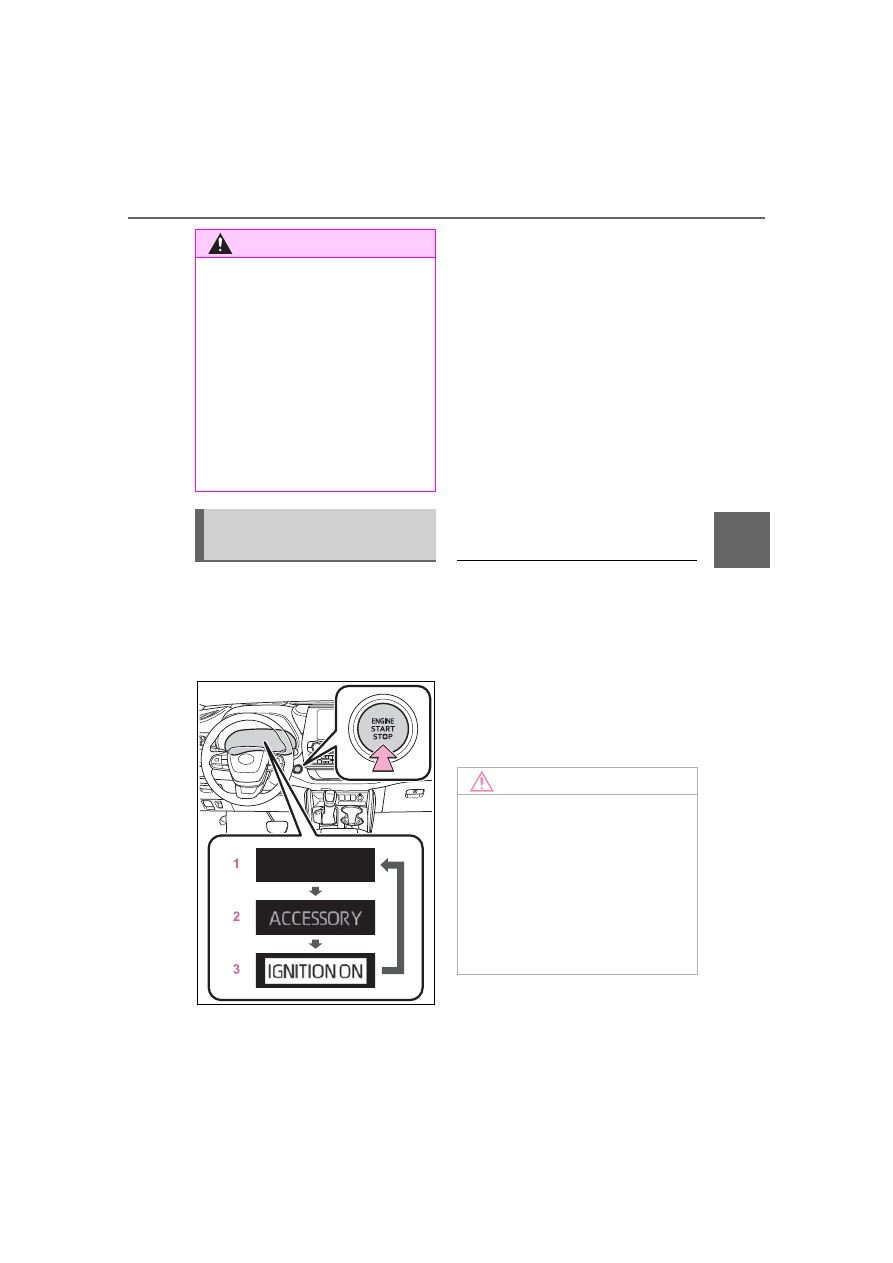
Modes can be changed by 
pressing the engine switch with 
brake pedal released. (The 
mode changes each time the 
switch is pressed.)

1

OFF

*

The emergency flashers can be 
used.

2

ACC

Some electrical components such 
as the audio system can be used.
“ACCESSORY” will be displayed 
on the multi-information display.

3

ON

All electrical components can be 
used.
“IGNITION ON” will be displayed on 
the multi-information display.

*

: If the shift lever is in a position 

other than P when turning off the 
engine, the engine switch will be 
turned to ACC, not to OFF.

Auto power off function

If the vehicle is left in ACC for more 

than 20 minutes or ON (the engine 

is not running) for more than an 

hour with the shift lever in P, the 

engine switch will automatically turn 

off. However, this function cannot 

entirely prevent battery discharge. 

Do not leave the vehicle with the 

engine switch in ACC or ON for long 

periods of time when the engine is 

not running.

WARNING

Do not leave the vehicle with 

the engine running for a long 

time. If such a situation cannot 

be avoided, park the vehicle in 

an open space and ensure that 

exhaust fumes do not enter the 

vehicle interior.

Do not leave the engine running 

in an area with snow build-up, 

or where it is snowing. If snow-

banks build up around the vehi-

cle while the engine is running, 

exhaust gases may collect and 

enter the vehicle.

Changing engine switch 
modes

NOTICE

To prevent battery discharge

Do not leave the engine switch 

in ACC or ON for long periods of 

time without the engine running.

If “ACCESSORY” or “IGNITION 

ON” is displayed on the 

multi-information display, the 

engine switch is not off. Exit the 

vehicle after turning the engine 

switch off.

-------------------------------------------------------------------------------------------------------------------------------------------------------------

206

4-2. Driving procedures

HIGHLANDER_U

If the engine is stopped with the 
shift lever in a position other 
than P, the engine switch will not 
be turned off but instead be 
turned to ACC. Perform the fol-
lowing procedure to turn the 
switch off:

1

Check that the parking brake 
is set.

2

Shift the shift lever to P.

3

Check that “ACCESSORY” is 
displayed on the multi-infor-
mation display and press the 
engine switch shortly and 
firmly.

4

Check that “ACCESSORY” 
or “IGNITION ON” on the 
multi-information display are 
off.

*1

:Shifting to the D position allows 

the system to select a gear suit-
able for the driving conditions. 
Setting the shift lever to the D 
position is recommended for nor-
mal driving.

*2

:Selecting gears using M mode 

fixes the gear step, controls 
engine braking force, and pre-
vents unnecessary upshifting.

To protect the automatic trans-

mission

If the automatic transmission fluid 

temperature is high, “High Trans-

mission Fluid Temp See Owner's 

Manual” will be displayed on the 

multi-information display and the 

vehicle will go into transmission pro-

tection mode automatically. Have 

the vehicle inspected by your Toyota 

dealer.

When stopping the engine 
with the shift lever in a 
position other than P

NOTICE

To prevent battery discharge

Do not stop the engine when the 

shift lever is in a position other 

than P. If the engine is stopped in 

another shift lever position, the 

engine switch will not be turned 

off but instead be turned to ACC. 

If the vehicle is left in ACC, bat-

tery discharge may occur.

Automatic transmis-

sion

Select the shift position 
depending on your purpose 
and situation.

Shift position purpose

Shift posi-

tion

Objective or function

P

Parking the vehi-

cle/starting the engine

R

Reversing

N

Neutral

D

Normal driving

*1

M

M mode driving

*2


(

P.208)

-------------------------------------------------------------------------------------------------------------------------------------------------------------

207

4-2. Driving procedures

4

Dr

iv

ing

HIGHLANDER_U

When driving with dynamic 

radar cruise control with 

full-speed range activated

Even when switching the driving 

mode to sport mode with the intent 

of enabling engine braking, engine 

braking will not activate because 

dynamic radar cruise control with 

full-speed range will not be can-

celed.

Restraining sudden start 

(Drive-Start Control)

P.180

AI-SHIFT

The AI-SHIFT automatically 

selects the suitable gear accord-

ing to driver performance and driv-

ing conditions.

The AI-SHIFT automatically oper-

ates when the shift lever is in D. 

(Shifting the shift lever to the M posi-

tion cancels the function.)

G AI-SHIFT automatically selects 

a suitable gear for sporty driving 

according to driver’s input and 

driving conditions. G AI-SHIFT 

operates automatically when the 

shift lever is in D and sport mode 

is selected for the driving mode. 

(Selecting normal mode with the 

driving mode select switch or shift-

ing the shift lever to the M position 

cancels this function.)

: While the engine switch is in 

ON and the brake pedal 
depressed

*

, shift the shift lever 

while pushing the shift release 
button on the shift knob.

: Shift the shift lever while 

pushing the shift release button 
on the shift knob.

: Shift the shift lever normally.

When shifting the shift lever 
between P and D, make sure that 
the vehicle is completely stopped.

*

: For the vehicle to be able to be 

shifted from P, the brake pedal 
must be depressed before the 
shift release button is pushed. If 
the shift release button is pushed 
first, the shift lock will not be 
released.

Shift lock system

The shift lock system is a system to 

prevent accidental operation of the 

shift lever in starting.
The shift lever can be shifted from P 

only when the engine switch is in 

WARNING

When driving on slippery 

road surfaces

Be careful of downshifting and 

sudden acceleration, as this could 

result in the vehicle skidding to 

the side or spinning.

Shifting the shift lever

-------------------------------------------------------------------------------------------------------------------------------------------------------------

208

4-2. Driving procedures

HIGHLANDER_U

ON and the brake pedal is being 

depressed.

If the shift lever cannot be 

shifted from P

First, check whether the brake pedal 

is being depressed.
If the shift lever cannot be shifted 

with your foot on the brake pedal, 

there may be a problem with the 

shift lock system. Have the vehicle 

inspected by your Toyota dealer 

immediately.
The following steps may be used as 

an emergency measure to ensure 

that the shift lever can be shifted.
Releasing the shift lock:

1

Turn the engine switch to ON 

and check that the parking brake 

is set. (

P.205, 211)

2

Turn the engine switch to off.

3

Depress the brake pedal.

4

Pry the cover up with a flathead 

screwdriver or equivalent tool.

To prevent damage to the cover, 

cover the tip of the screwdriver with 

a rag.

5

Press and hold the shift lock 

override button.

The shift lever can be shifted while 

both buttons are pressed.

P.314, 318

To enter M mode, shift the shift 
lever to M. Gears can then be 
selected by operating the shift 
lever, allowing you to drive in the 
gear of your choosing.

WARNING

To prevent an accident when 

releasing the shift lock

Before pressing the shift lock 

override button, make sure to set 

the parking brake and depress the 

brake pedal.

If the accelerator pedal is acci-

dentally depressed instead of the 

brake pedal when the shift lock 

override button is pressed and the 

shift lever is shifted out of P, the 

vehicle may suddenly start, possi-

bly leading to an accident result-

ing in death or serious injury.

Selecting the driving 
mode and snow mode

Selecting gears in the M 
position

-------------------------------------------------------------------------------------------------------------------------------------------------------------

209

4-2. Driving procedures

4

Dr

iv

ing

HIGHLANDER_U

1

Upshifting

2

Downshifting

The gear changes once every time 
the shift lever or paddle shift switch 
is operated.
The selected gear, from M1 to M8, 
will be fixed and displayed on the 
meters.

When in the M position, the gear 
will not change unless the shift 
lever is operated.
However, even when in the M 
position, the gears will be auto-
matically changed in the follow-
ing situation:

When vehicle speed drops 
(downshift only).

When the automatic transmis-
sion fluid or engine coolant 
temperature is low.

When automatic transmis-
sion fluid temperature is high 
(upshift only).

When the needle of the 
tachometer is in the red zone 
(the range which exceeds the 
allowable revs of the engine).

In the following situation, the 
gear will not shift even if the shift 
lever is operated.

The vehicle speed is low 
(upshift only).

Downshifting restriction warn-

ing buzzer

To help ensure safety and driving 

performance, downshifting opera-

tion may sometimes be restricted. In 

some circumstances, downshifting 

may not be possible even when the 

paddle shift switch is operated. (A 

buzzer will sound twice.)

-------------------------------------------------------------------------------------------------------------------------------------------------------------

210

4-2. Driving procedures

HIGHLANDER_U

1

Right turn

2

Lane change to the right 
(move the lever partway and 
release it)

The right hand signals will flash 3 
times.

3

Lane change to the left 
(move the lever partway and 
release it)

The left hand signals will flash 3 
times.

4

Left turn

Turn signals can be operated 

when

The engine switch is in ON.

If the indicator flashes faster 

than usual

Check that a light bulb in the front or 

rear turn signal lights has not 

burned out.

Turn signal lever

Operating instructions

-------------------------------------------------------------------------------------------------------------------------------------------------------------

211

4-2. Driving procedures

4

Dr

iv

ing

HIGHLANDER_U

Using the manual mode

The parking brake can be set 
and released manually.

U.S.A.
Canada

1

Pull the switch to set the 
parking brake

The parking brake indicator light 
and parking brake light will turn on.

Pull and hold the parking brake 
switch if an emergency occurs and 
it is necessary to operate the park-
ing brake while driving.

2

Push the switch to release 
the parking brake

• Operate the parking brake switch 

while depressing the brake pedal.

• Parking brake automatic release 

function (

P.212)

Make sure that the parking brake 
indicator light and parking brake 
light turn off.
If the parking brake indicator light 
and parking brake light flashes, 
operate the switch again. (

P.465)

Turns automatic mode on

While the vehicle is stopped, 
pull and hold the parking brake 
switch until a “EPB Shift Inter-
lock Function Activated” is 
shown on the multi-information 
display.

When the automatic mode is 
turned on, the parking brake 
operates as follows.

When the shift lever is moved 
out of P, the parking brake will 
be released, and the parking 
brake indicator light and park-
ing brake light turn off.

Parking brake

The parking brake can be 
set or released automati-
cally or manually.

In automatic mode, the 
parking brake can be set or 
released automatically 
according to the shift lever 
operation. Also, even in 
automatic mode, the park-
ing brake can be set or 
released manually.

Operating instructions

-------------------------------------------------------------------------------------------------------------------------------------------------------------

212

4-2. Driving procedures

HIGHLANDER_U

When the shift lever is moved 
into P, the parking brake will 
be set, and the parking brake 
indicator light and parking 
brake light turn on.

Operate the shift lever with the 
brake pedal depressed.

Turns automatic mode off

While the vehicle is stopped, 
press and hold the parking 
brake switch until a “EPB Shift 
Interlock Function Deactivated” 
is shown on the multi-informa-
tion display.

Parking brake operation

When the engine switch is not in 

ON, the parking brake cannot be 

released using the parking brake 

switch.

When the engine switch is not in 

ON, automatic mode (automatic 

brake setting and releasing) is not 

available.

Parking brake automatic 

release function

The parking brake will be released 

automatically when the accelerator 

pedal is slowly depressed under the 

following conditions:

The driver’s door is closed

The driver is wearing the seat belt

The shift lever is in a forward or 

reverse position.

The malfunction indicator lamp or 

brake system warning light is not 

illuminated

If the automatic release function 

does not operate, release the park-

ing brake manually.

If “Parking Brake Temporarily 

Unavailable” is displayed on 

the multi-information display

If the parking brake is operated 

repeatedly over a short period of 

time, the system may restrict opera-

tion to prevent overheating. If this 

happens, refrain from operating the 

parking brake. Normal operation will 

return after about 1 minute.

If “Parking Brake Unavailable” 

is displayed on the multi-infor-

mation display

Operate the parking brake switch. If 

the message does not disappear 

after operating the switch several 

times, the system may be malfunc-

tioning. Have the vehicle inspected 

by your Toyota dealer immediately.

Parking brake operation sound

When the parking brake operates, a 

motor sound (whirring sound) may 

be heard. This does not indicate a 

malfunction.

Parking brake indicator light 

and parking brake light

Depending on the engine switch 

mode, the parking brake indicator 

light and parking brake light will 

turn on and stay on as described 

below:

ON: Comes on until the parking 

brake is released.

Not in ON: Stays on for approxi-

mately 15 seconds.

When the engine switch is turned 

off with the parking brake set, the 

parking brake indicator light and 

parking brake light will stay on for 

about 15 seconds. This does not 

indicate a malfunction.

-------------------------------------------------------------------------------------------------------------------------------------------------------------

213

4-2. Driving procedures

4

Dr

iv

ing

HIGHLANDER_U

When the parking brake switch 

malfunctions

Automatic mode (automatic brake 

setting and releasing) will be turned 

on automatically.

Parking the vehicle

P.179

Parking brake engaged warning 

buzzer

A buzzer will sound if the vehicle is 

driven with the parking brake 

engaged. “Parking Brake ON” is dis-

played on the multi-information dis-

play.

Warning messages and buzzers

Warning messages and buzzers are 

used to indicate a system malfunc-

tion or to inform the driver of the 

need for caution. If a warning mes-

sage is shown on the multi-informa-

tion display, read the message and 

follow the instructions.

If the brake system warning 

light comes on

P.458

Usage in winter time

P.327

WARNING

When parking the vehicle

Do not leave a child in the vehicle 

alone. The parking brake may be 

released unintentionally and there 

is the danger of the vehicle mov-

ing that may lead to an accident 

resulting in death or serious injury.

Parking brake switch

Do not set any objects near the 

parking brake switch. Objects 

may interfere with the switch and 

may lead the parking brake to 

unexpectedly operate.

NOTICE

When parking the vehicle

Before you leave the vehicle, shift 

the shift lever to P, set the parking 

brake and make sure that the 

vehicle does not move.

When the system malfunc-

tions

Stop the vehicle in a safe place 

and check the warning messages.

When the parking brake can-

not be released due to a mal-

function

Driving the vehicle with the park-

ing brake set will lead to brake 

components overheating, which 

may affect braking performance 

and increase brake wear.
Have the vehicle inspected by 

your Toyota dealer immediately if 

this occurs.

-------------------------------------------------------------------------------------------------------------------------------------------------------------

214

4-2. Driving procedures

HIGHLANDER_U

Turns the brake hold system on

The brake hold standby indicator 
(green) 

 comes on. While the 

system is holding the brake, the 
brake hold operated indicator (yel-
low) 

 comes on.

Brake hold system operating 

conditions

The brake hold system cannot be 

turned on in the following condi-

tions:

The driver’s door is not closed.

The driver is not wearing the seat 

belt.

The parking brake is engaged.

If any of the conditions above are 

detected when the brake hold sys-

tem is enabled, the system will turn 

off and the brake hold standby indi-

cator light will go off. In addition, if 

any of the conditions are detected 

while the system is holding the 

brake, a warning buzzer will sound 

and a message will be shown on the 

multi-information display. The park-

ing brake will then be set automati-

cally.

Brake hold function

If the brake pedal is left released 

for a period of about 3 minutes 

after the system has started hold-

ing the brake, the parking brake 

will be set automatically. In this 

case, a warning buzzer sounds 

and a message is shown on the 

multi-information display.

To turn the system off while the 

system is holding the brake, firmly 

depress the brake pedal and 

press the button again.

The brake hold function may not 

hold the vehicle when the vehicle 

is on a steep incline. In this situa-

tion, it may be necessary for the 

driver to apply the brakes. A warn-

ing buzzer will sound and the 

multi-information display will 

inform the driver of this situation. If 

a warning message is shown on 

the multi-information display, read 

the message and follow the 

instructions.

When the parking brake is set 

automatically while the system 

is holding the brakes

Perform any of the following opera-

tions to release the parking brake.

Depress the accelerator pedal. 

(The parking brake will not be 

released automatically if the seat 

belt is not fastened.)

Operate the parking brake switch 

with the brake pedal depressed.

Make sure that the parking brake 

Brake Hold

The brake hold system 
keeps the brake applied 
when the shift lever is in D, 
M or N with the system on 
and the brake pedal has 
been depressed to stop the 
vehicle. The system 
releases the brake when the 
accelerator pedal is 
depressed with the shift 
lever in D or M to allow 
smooth start off.

Enabling the system

-------------------------------------------------------------------------------------------------------------------------------------------------------------

215

4-2. Driving procedures

4

Dr

iv

ing

HIGHLANDER_U

indicator light goes off. (

P.211)

When an inspection at your 

Toyota dealer is necessary

When the brake hold standby indi-

cator (green) does not illuminate 

even when the brake hold switch is 

pressed with the brake hold system 

operating conditions met, the sys-

tem may be malfunctioning. Have 

the vehicle inspected at your Toyota 

dealer.

If “Brake Hold Malfunction 

Press Brake to Deactivate Visit 

Your Dealer” or “Brake Hold 

Malfunction Visit Your Dealer” 

is displayed on the multi-infor-

mation display

The system may be malfunctioning. 

Have the vehicle inspected by your 

Toyota dealer.

Warning messages and buzzers

Warning messages and buzzers are 

used to indicate a system malfunc-

tion or to inform the driver of the 

need for caution. If a warning mes-

sage is shown on the multi-informa-

tion display, read the message and 

follow the instructions.

If the brake hold operated indi-

cator flashes

P.465

WARNING

When the vehicle is on a 

steep incline

When using the brake hold sys-

tem on a steep incline, exercise 

caution. The brake hold function 

may not hold the vehicle in such a 

situation.

When stopped on a slippery 

road

The system cannot stop the vehi-

cle when the gripping ability of the 

tires has been exceeded. Do not 

use the system when stopped on 

a slippery road.

NOTICE

When parking the vehicle

The brake hold system is not 

designed for use when parking 

the vehicle for a long period of 

time. Turning the engine switch off 

while the system is holding the 

brake may release the brake, 

which would cause the vehicle to 

move. When operating the engine 

switch, depress the brake pedal, 

shift the shift lever to P and set 

the parking brake.

-------------------------------------------------------------------------------------------------------------------------------------------------------------

216

4-3. Operating the lights and wipers

HIGHLANDER_U

4-3.Operating the lights and wipers

Operating the 

 switch 

turns on the lights as follows:

U.S.A.
Canada

1

 The headlights, daytime 

running lights (

P.216) and 

all the lights listed below turn 
on and off automatically. 
(When the engine switch is in 
ON.)

2

 The side marker, park-

ing, tail, license plate, instru-
ment panel lights, and 
daytime running lights 
(

P.216) turn on.

3

 The headlights and all 

lights listed above (except 
daytime running lights) turn 
on.

4

 (U.S.A.) Off

Daytime running light system

Vehicles without projector head-

lights: The daytime running lights 

illuminate using the same lights as 

the low beam headlights and illu-

minate dimmer than the low beam 

headlights.

Vehicles with projector head-

lights: The daytime running lights 

illuminate using the same lights as 

the parking lights and illuminate 

brighter than the parking lights.

To make your vehicle more visible 

to other drivers during daytime 

driving, the daytime running lights 

turn on automatically when all of 

the following conditions are met. 

(The daytime running lights are 

not designed for use at night.)

• The engine is running

• The parking brake is released
• The headlight switch is in the 


or 

*

 position

*

: When the surroundings are bright

The daytime running lights remain 

on after they illuminate, even if the 

parking brake is set again.

For the U.S.A.: Daytime running 

lights can be turned off by operat-

ing the switch.

Compared to turning on the head-

lights, the daytime running light 

system offers greater durability 

and consumes less electricity, so 

it can help improve fuel economy.

Headlight switch

The headlights can be oper-
ated manually or automati-
cally.

Operating instructions

-------------------------------------------------------------------------------------------------------------------------------------------------------------

217

4-3. Operating the lights and wipers

4

Dr

iv

ing

HIGHLANDER_U

Headlight control sensor

The sensor may not function prop-

erly if an object is placed on the sen-

sor, or anything that blocks the 

sensor is affixed to the windshield.

Doing so interferes with the sensor 

detecting the level of ambient light 

and may cause the automatic head-

light system to malfunction.

Automatic light off system

When the headlights are on: The 

headlights and tail lights turn off 

30 seconds after a door is opened 

and closed if the engine switch is 

turned to ACC or OFF. (The lights 
turn off immediately if 

 on the 

key is pressed after all the doors 

are closed.)

When only the tail lights are on: 

The tail lights turn off automati-

cally if the engine switch is turned 

to ACC or OFF and the driver’s 

door is opened.

Except for Canada: To turn the lights 

on again, turn the engine switch to 

ON, or turn the light switch off once 
and then back to 

 or 

.

For Canada: To turn the lights on 

again, turn the engine switch to ON, 
or turn the light switch to 

 once 

and then back to 

 or 

.

Automatic headlight leveling 

system (if equipped)

The level of the headlights is auto-

matically adjusted according to the 

number of passengers and the load-

ing condition of the vehicle to 

ensure that the headlights do not 

interfere with other road users.

Light reminder buzzer

A buzzer sounds when the engine 

switch is turned off or turned to ACC 

and the driver’s door is opened 

while the lights are turned on.

Welcome lighting

The parking lights and tail lights 

automatically turn on at night when 

the doors are unlocked using the 

entry function or wireless remote 

control if the light switch is in the 

 position.

Windshield wiper linked head-

light illumination

When driving during daytime with 
the headlight switch turned to 

, if 

the windshield wipers are used, the 

headlights will turn on automatically 

after several seconds to help 

enhance the visibility of your vehi-

cle.

Battery-saving function

In order to prevent the battery of the 

vehicle from discharging, if the 

headlights and/or tail lights are on 

when the engine switch is turned off 

the battery saving function will oper-

ate and automatically turn off all the 

lights after approximately 20 min-

utes. When the engine switch is 

turned to ON, the battery-saving 

function will be disabled.

When any of the following are per-

formed, the battery-saving function 

is canceled once and then reacti-

vated. All the lights will turn off auto-

matically 20 minutes after the 

battery-saving function has been 

reactivated:

When the headlight switch is oper-

ated

When a door is opened or closed

Customization

Some functions can be customized. 

(

P.521)

-------------------------------------------------------------------------------------------------------------------------------------------------------------

218

4-3. Operating the lights and wipers

HIGHLANDER_U

1

With the headlights on, push 
the lever away from you to 
turn on the high beams.

Pull the lever toward you to the 
center position to turn the high 
beams off.

2

Pull the lever toward you and 
release it to flash the high 
beams once.

You can flash the high beams with 
the headlights on or off.

AFS (Adaptive Front-lighting 
System) secures excellent visi-
bility at intersections and on 
curves by automatically adjust-
ing the direction of the light axis 
of the headlights according to 
vehicle speed and the degree of 
the tire’s angle as controlled by 

steering input.

AFS operates at speeds of 6 mph 
(10 km/h) or higher.

Customization

Some functions can be customized. 

(

P.521)

NOTICE

To prevent battery discharge

Do not leave the lights on longer 

than necessary when the engine 

is off.

Turning on the high beam 
headlights

AFS (Adaptive Front-light-
ing System) (if equipped)

-------------------------------------------------------------------------------------------------------------------------------------------------------------

219

4-3. Operating the lights and wipers

4

Dr

iv

ing

HIGHLANDER_U

1

Press the Automatic High 
Beam switch.

2

Push the lever away from 
you with the headlight switch 

in the 

 or 

 position.

The Automatic High Beam indicator 

will come on when the system is 

operating.

Conditions to turn the high 

beams on/off automatically

When all of the following condi-

tions are met, the high beams will 

be turned on automatically (after 

approximately 1 second):

• The vehicle speed is approxi-

mately 21 mph (34 km/h) or more.

• The area ahead of the vehicle is 

dark.

• There are no vehicles ahead with 

headlights or tail lights turned on.

• There are few streetlights on the 

road ahead.

If any of the following conditions is 

met, the high beams will turn off 

automatically:

• The vehicle speed is below 

approximately 17 mph (27 km/h).

• The area ahead of the vehicle is 

not dark.

• Vehicles ahead have their head-

lights or tail lights turned on.

• There are many streetlights on the 

road ahead.

Camera sensor detection infor-

mation

The high beams may not be auto-

matically turned off in the following 

situations:

• When a vehicle suddenly appears 

Automatic High Beam

The Automatic High Beam 
uses a camera sensor 
located behind the upper 
portion of the windshield to 
assess the brightness of the 
lights of vehicles ahead, 
streetlights, etc., and auto-
matically turns the high 
beams on or off as neces-
sary.

WARNING

Limitations of the Automatic 

High Beam

Do not overly rely on the Auto-

matic High Beam. Always drive 

safely, taking care to observe your 

surroundings and turning the high 

beams on or off manually if nec-

essary.

To prevent incorrect opera-

tion of the Automatic High 

Beam system

Do not overload the vehicle.

Activating the Automatic 
High Beam

-------------------------------------------------------------------------------------------------------------------------------------------------------------

220

4-3. Operating the lights and wipers

HIGHLANDER_U

from around a curve

• When the vehicle is cut in front of 

by another vehicle

• When vehicles ahead cannot be 

detected due to repeated curves, 

road dividers or roadside trees

• When vehicles ahead appear in a 

faraway lane on a wide road

• When the lights of vehicles ahead 

are not on

The high beams may be turned off 

if a vehicle ahead that is using fog 

lights without its headlights turned 

on is detected.

House lights, street lights, traffic 

signals, and illuminated billboards 

or signs and other reflective 

objects may cause the high 

beams to change to the low 

beams, or the low beams to 

remain on.

The following factors may affect 

the amount of time taken for the 

high beams to turn on or off:

• The brightness of the headlights, 

fog lights, and tail lights of vehi-

cles ahead

• The movement and direction of 

vehicles ahead

• When a vehicle ahead only has 

operational lights on one side

• When a vehicle ahead is a 

two-wheeled vehicle

• The condition of the road (gradi-

ent, curve, condition of the road 

surface, etc.)

• The number of passengers and 

amount of luggage in the vehicle

The high beams may turn on or off 

unexpectedly.

Bicycles or similar vehicles may 

not be detected.

In the following situations the sys-

tem may not be able to correctly 

detect the surrounding brightness 

level. This may cause the low 

beams to remain on or the high 

beams to flash or dazzle pedestri-

ans or vehicles ahead. In such a 

case, it is necessary to manually 

switch between the high and low 

beams.

• When driving in inclement weather 

(heavy rain, snow, fog, sand-

storms, etc.)

• When the windshield is obscured 

by fog, mist, ice, dirt, etc.

• When the windshield is cracked or 

damaged

• When the camera sensor is 

deformed or dirty

• When the temperature of the cam-

era sensor is extremely high

• When the surrounding brightness 

level is equal to that of headlights, 

tail lights or fog lights

• When headlights or tail lights of 

vehicles ahead are turned off, 

dirty, changing color, or not aimed 

properly

• When the vehicle is hit by water, 

snow, dust, etc. from a preceding 

vehicle

• When driving through an area of 

intermittently changing brightness 

and darkness

• When frequently and repeatedly 

driving ascending/descending 

roads, or roads with rough, bumpy 

or uneven surfaces (such as 

stone-paved roads, gravel roads, 

etc.)

• When frequently and repeatedly 

taking curves or driving on a wind-

ing road

• When there is a highly reflective 

object ahead of the vehicle, such 

as a sign or mirror

• When the back of a preceding 

vehicle is highly reflective, such as 

a container on a truck

• When the vehicle’s headlights are 

damaged or dirty, or are not aimed 

properly

• When the vehicle is listing or titling 

due to a flat tire, a trailer being 

towed, etc.

• When the headlights are changed 

between the high beams and low 

beams repeatedly in an abnormal 

manner

• When the driver believes that the 

high beams may be flashing or 

dazzling pedestrians or other driv-

ers

-------------------------------------------------------------------------------------------------------------------------------------------------------------

221

4-3. Operating the lights and wipers

4

Dr

iv

ing

HIGHLANDER_U

Temporarily lowering sensor 

sensitivity

The sensitivity of the sensor can be 

temporarily lowered.

1

Turn the engine switch off while 

the following conditions are met.

The headlight switch is in 

 or 

.

The headlight switch lever is in 

high beam position.

Automatic High Beam switch is 

on.

2

Turn the engine switch to ON.

3

Within 60 seconds after step 

2

repeat pulling the headlight 

switch lever to the original posi-

tion then pushing it to the high 

beam position quickly 10 times, 

then leave the lever in high beam 

position.

4

If the sensitivity is changed, the 

Automatic High Beam indicator 

is turn on and off 3 times.

Automatic High Beam (headlights) 

may turn on even when the vehicle 

is stopped.

Switching to the low beams

Pull the lever to its original posi-
tion.

The Automatic High Beam indicator 
will turn off.
Push the lever away from you to 
activate the Automatic High Beam 
system again.

Switching to the high 
beams

Press the Automatic High Beam 
switch.

The Automatic High Beam indicator 
will turn off and the high beam indi-
cator will turn on.
Press the switch to activate the 
Automatic High Beam system 
again.

Turning the high beams 
on/off manually

-------------------------------------------------------------------------------------------------------------------------------------------------------------

222

4-3. Operating the lights and wipers

HIGHLANDER_U

*

: If equipped

1

 (U.S.A.) or 

 (Canada) 

Turns the fog lights off

2

 Turns the fog lights on

Fog lights can be used when

The headlights are on in low beam.

Operate the 

 lever oper-

ates the wipers or washer as fol-
lows.

Intermittent windshield wip-
ers with interval adjuster

1

 (U.S.A.) or 

 (Canada) 

Off

2

 (U.S.A.) or 

 (Canada) 

Intermittent operation

Fog light switch

*

The fog lights secure excel-
lent visibility in difficult driv-
ing conditions, such as in 
rain and fog.

Operating instructions

Windshield wipers and 

washer

Operating the lever can 
switch between automatic 
operation and manual oper-
ation, or can use the 
washer.

NOTICE

When the windshield is dry

Do not use the wipers, as they 

may damage the windshield.

Operating the wiper lever

-------------------------------------------------------------------------------------------------------------------------------------------------------------

223

4-3. Operating the lights and wipers

4

Dr

iv

ing

HIGHLANDER_U

3

 (U.S.A.) or 

 (Canada) 

Low speed operation

4

 (U.S.A.) or 

 (Canada) 

High speed operation

5

 (U.S.A.) or 

 (Canada) 

Temporary operation

Wiper intervals can be adjusted 
when intermittent operation is 
selected.

6

Increases the intermittent 
windshield wiper frequency

7

Decreases the intermittent 
windshield wiper frequency

8

 Washer/wiper dual 

operation

Pulling the lever operates the wip-
ers and washer.
Wipers will automatically operate a 
couple of times after the washer 
squirts.

Rain-sensing windshield wip-
ers

When “AUTO” is selected, the 
wipers will operate automatically 
when the sensor detects falling 
rain. The system automatically 
adjusts wiper timing in accor-
dance with rain volume and 
vehicle speed.
The sensor sensitivity can be 
adjusted when “AUTO” is 
selected.

1

 (U.S.A.) or 

 (Canada) 

Off

2

 Rain-sensing wiper oper-

ation

3

 (U.S.A.) or 

 (Canada) 

Low speed operation

4

 (U.S.A.) or 

 (Canada) 

High speed operation

5

 (U.S.A.) or 

 (Canada) 

Temporary operation

When AUTO mode is selected, 

-------------------------------------------------------------------------------------------------------------------------------------------------------------

224

4-3. Operating the lights and wipers

HIGHLANDER_U

the sensor sensitivity can be 
adjusted by turning the switch 
ring.

6

Increases the sensitivity

7

Decreases the sensitivity

8

 Washer/wiper dual 

operation

Pulling the lever operates the wip-
ers and washer.
The wipers will automatically oper-
ate a couple of times after the 
washer squirts.

The windshield wipers and 

washer can be operated when

The engine switch is in ON.

Dripping prevention wiper 

sweep

After washing and wiping operation 

several times, the wipers operate 

one more time after a short delay to 

prevent dripping. However, this 

function will not operate while driv-

ing.

Effects of vehicle speed on 

wiper operation

Vehicle speed affects the intermit-

tent wiper interval.

Raindrop sensor (vehicles with 

rain-sensing windshield wipers)

The raindrop sensor judges the 

amount of raindrops.

An optical sensor is adopted. It 

may not operate properly when 

sunlight from the rising or setting 

of the sun intermittently strikes the 

windshield, or if bugs, etc. are 

present on the windshield

If the wiper switch is turned to the 

“AUTO” position while the engine 

switch is in ON, the wipers will 

operate once to show that AUTO 

mode is activated.

When the sensor sensitivity ring is 

turned toward high while in 

“AUTO” position, the wipers will 

operate once to indicate that the 

sensor sensitivity is enhanced.

If the temperature of the raindrop 

sensor is 185°F (85°C) or higher, 

or 5°F (-15°C) or lower, automatic 

operation may not occur. In this 

case, operate the wipers in any 

mode other than AUTO mode.

If no windshield washer fluid 

sprays

Check that the washer nozzles are 

not blocked, if there is washer fluid 

in the washer fluid tank.

Front door opening linked wind-

shield wiper stop function 

(vehicles with rain-sensing 

windshield wipers)

When “AUTO” is selected and the 

-------------------------------------------------------------------------------------------------------------------------------------------------------------

225

4-3. Operating the lights and wipers

4

Dr

iv

ing

HIGHLANDER_U

windshield wipers are operating, if a 

front door is opened, the operation 

of the windshield wipers will be 

stopped to prevent anyone enter-

ing/exiting the vehicle from being 

sprayed by water from the wipers, 

provided the vehicle is stopped with 

the parking brake applied or the shift 

lever in P. When the front door is 

closed, wiper operation will resume.

Operating the 

 switch 

operates the rear wiper as fol-
lows.

1

 (U.S.A.) or 

 (Canada) 

Off

2

 (U.S.A.) or 

 (Canada) 

Intermittent operation

3

 (U.S.A.) or 

 (Canada) 

Normal operation

WARNING

Caution regarding the use of 

windshield wipers in AUTO 

mode (vehicles with 

rain-sensing windshield wip-

ers)

The windshield wipers may oper-

ate unexpectedly if the sensor is 

touched or the windshield is sub-

ject to vibration in AUTO mode. 

Take care that your fingers, etc. 

do not become caught in the 

windshield wipers.

Caution regarding the use of 

washer fluid

When it is cold, do not use the 

washer fluid until the windshield 

becomes warm. The fluid may 

freeze on the windshield and 

cause low visibility. This may lead 

to an accident, resulting in death 

or serious injury.

NOTICE

When the washer fluid tank is 

empty

Do not operate the switch continu-

ally as the washer fluid pump may 

overheat.

When a nozzle becomes 

blocked

In this case, contact your Toyota 

dealer.

Do not try to clear it with a pin or 

other object. The nozzle will be 

damaged.

Rear windshield wiper 

and washer

NOTICE

When the rear window is dry

Do not use the wiper, as it may 

damage the rear window.

Operating the wiper lever

-------------------------------------------------------------------------------------------------------------------------------------------------------------

226

4-3. Operating the lights and wipers

HIGHLANDER_U

4

 Washer/wiper dual 

operation

Pushing the lever operates the 
wiper and washer.
The wiper will automatically operate 
a couple of times after the washer 
squirts.
The washer will automatically oper-
ate and clean the camera for the 
Digital Rearview Mirror

*1

 (

P.160) 

and rear camera

*2

.

*1

:If equipped

*2

:Refer to “NAVIGATION AND 

MULTIMEDIA SYSTEM 
OWNER’S MANUAL”.

The rear window wiper and 

washer can be operated when

The engine switch is in ON.

If no washer fluid sprays

Check that the washer nozzle is not 

blocked if there is washer fluid in the 

washer fluid tank.

Reverse-linked rear window 

wiper function

When the shift lever is shifted to R 

when the front wipers are operating, 

the rear window wiper will operate 

once.

Customization

Setting of the reverse-linked func-

tion can be changed. (

P.521)

NOTICE

When the washer fluid tank is 

empty

Do not operate the switch continu-

ally as the washer fluid pump may 

overheat.

-------------------------------------------------------------------------------------------------------------------------------------------------------------

227

4-4. Refueling

4

Dr

iv

ing

HIGHLANDER_U

4-4.Refueling

Close all the doors and win-
dows, and turn the engine 
switch off.

Confirm the type of fuel.

Fuel types

P.509

Fuel tank opening for unleaded 

gasoline

To help prevent incorrect fueling, 

your vehicle has a fuel tank opening 

that only accommodates the spe-

cial nozzle on unleaded fuel pumps.

If the malfunction indicator 

lamp illuminates

The malfunction indicator lamp may 

illuminate erroneously if refueling is 

performed repeatedly when the fuel 

tank is nearly full.

Opening the fuel tank 

cap

Perform the following steps 
to open the fuel tank cap:

Before refueling the vehi-
cle

WARNING

When refueling the vehicle

Observe the following precautions 

while refueling the vehicle. Failure 

to do so may result in death or 

serious injury.

After exiting the vehicle and 

before opening the fuel door, 

touch an unpainted metal sur-

face to discharge any static 

electricity. It is important to dis-

charge static electricity before 

refueling because sparks result-

ing from static electricity can 

cause fuel vapors to ignite while 

refueling.

Always hold the grips on the 

fuel tank cap and turn it slowly 

to remove it.

A whooshing sound may be 

heard when the fuel tank cap is 

loosened. Wait until the sound 

cannot be heard before fully 

removing the cap. In hot 

weather, pressurized fuel may 

spray out of the filler neck and 

cause injury.

Do not allow anyone that has 

not discharged static electricity 

from their body to come close to 

an open fuel tank.

Do not inhale vaporized fuel.

Fuel contains substances that 

are harmful if inhaled.

Do not smoke while refueling 

the vehicle.

Doing so may cause the fuel to 

ignite and cause a fire.

Do not return to the vehicle or 

touch any person or object that 

is statically charged.

This may cause static electricity 

to build up, resulting in a possi-

ble ignition hazard.

When refueling

Observe the following precautions 

to prevent fuel overflowing from 

the fuel tank:

Securely insert the fuel nozzle 

into the fuel filler neck.

Stop filling the tank after the fuel 

nozzle automatically clicks off.

-------------------------------------------------------------------------------------------------------------------------------------------------------------

228

4-4. Refueling

HIGHLANDER_U

1

Press the switch to open the 
fuel filler door.

2

Turn the fuel tank cap slowly 
to remove it and hang it on 
the back of the fuel filler door.

If the fuel filler door cannot be 

opened

P.488

After refueling, turn the fuel tank 
cap until you hear a click. Once 
the cap is released, it will turn 
slightly in the opposite direction.

WARNING

Do not top off the fuel tank.

NOTICE

Refueling

Do not spill fuel during refueling.

Doing so may damage the vehi-

cle, such as causing the emission 

control system to operate abnor-

mally or damaging fuel system 

components or the vehicle’s 

painted surface.

Opening the fuel tank cap

Closing the fuel tank cap

WARNING

When replacing the fuel tank 

cap

Do not use anything but a genu-

ine Toyota fuel tank cap designed 

for your vehicle. Doing so may 

cause a fire or other incident 

which may result in death or seri-

ous injury.

-------------------------------------------------------------------------------------------------------------------------------------------------------------

229

4-5. Using the driving support systems

4

Dr

iv

ing

HIGHLANDER_U

4-5.Using the driving support systems

PCS (Pre-Collision System)

P.235

LTA (Lane Tracing Assist)

P.246

AHB (Automatic High 
Beam)

P.219

RSA (Road Sign Assist)

*

P.269

*

: If equipped

Dynamic radar cruise con-
trol with full-speed range

P.257

Two types of sensors, located 
behind the front grille and wind-
shield, detect information neces-
sary to operate the drive assist 
systems.

Radar sensor
Front camera

Toyota Safety Sense 

2.5 +

The Toyota Safety Sense 2.5 
+ consists of the following 
drive assist systems and 
contributes to a safe and 
comfortable driving experi-
ence:

Driving assist system

WARNING

Toyota Safety Sense 2.5 +

The Toyota Safety Sense 2.5 + is 

designed to operate under the 

assumption that the driver will 

drive safely, and is designed to 

help reduce the impact to the 

occupants and the vehicle in the 

case of a collision or assist the 

driver in normal driving condi-

tions.
As there is a limit to the degree of 

recognition accuracy and control 

performance that this system can 

provide, do not overly rely on this 

system. The driver is always 

responsible for paying attention to 

the vehicle’s surroundings and 

driving safely.

Sensors

-------------------------------------------------------------------------------------------------------------------------------------------------------------

230

4-5. Using the driving support systems

HIGHLANDER_U

WARNING

To avoid malfunction of the 

radar sensor

Observe the following precau-

tions.
Otherwise, the radar sensor may 

not operate properly, possibly 

leading to an accident resulting in 

death or serious injury.

Keep the radar sensor and the 

radar sensor cover clean at all 

times.

Radar sensor
Radar sensor cover

If the front of the radar sensor or 
the front or back of the radar sen-
sor cover is dirty or covered with 
water droplets, snow, etc., clean 
it.
Clean the radar sensor and radar 
sensor cover with a soft cloth to 
avoid damaging them.

Do not attach accessories, 

stickers (including transparent 

stickers) or other items to the 

radar sensor, radar sensor 

cover or surrounding area.

Do not subject the radar sensor 

or its surrounding area to a 

strong impact. 

If the radar sensor, front grille, 

or front bumper has been sub-

jected to a strong impact, have 

the vehicle inspected by your 

Toyota dealer.

Do not disassemble the radar 

sensor.

Do not modify or paint the radar 

sensor or radar sensor cover.

In the following cases, the radar 

sensor must be recalibrated. 

Contact your Toyota dealer for 

details.

• When the radar sensor or front 

grille are removed and installed, 

or replaced

• When the front bumper is 

replaced

To avoid malfunction of the 

front camera

Observe the following precau-

tions.
Otherwise, the front camera may 

not operate properly, possibly 

leading to an accident resulting in 

death or serious injury.

Keep the windshield clean at all 

times.

• If the windshield is dirty or cov-

ered with an oily film, water 

droplets, snow, etc., clean the 

windshield.

• If a glass coating agent is 

applied to the windshield, it will 

still be necessary to use the 

windshield wipers to remove 

water droplets, etc. from the 

area of the windshield in front of 

the front camera.

• If the inner side of the wind-

shield where the front camera is 

installed is dirty, contact your 

Toyota dealer.

-------------------------------------------------------------------------------------------------------------------------------------------------------------

231

4-5. Using the driving support systems

4

Dr

iv

ing

HIGHLANDER_U

WARNING

Do not attach objects, such as 

stickers, transparent stickers, 

etc., to the outer side of the 

windshield in front of the front 

camera (shaded area in the 

illustration).

From the top of the windshield 
to approximately 0.4 in. (1 cm) 
below the bottom of the front 
camera
Approximately 7.9 in. (20 cm) 
(Approximately 4.0 in. [10 cm] 
to the right and left from the 
center of the front camera)

If the part of the windshield in 

front of the front camera is 

fogged up or covered with con-

densation or ice, use the wind-

shield defogger to remove the 

fog, condensation or ice. 

(

P.337, 343)

If water droplets cannot be 

properly removed from the area 

of the windshield in front of the 

front camera by the windshield 

wipers, replace the wiper insert 

or wiper blade.

Do not attach window tint to the 

windshield.

Replace the windshield if it is 

damaged or cracked. 

After replacing the windshield, 

the front camera must be recali-

brated. Contact your Toyota 

dealer for details.

Do not allow liquids to contact 

the front camera.

Do not allow bright lights to 

shine into the front camera.

Do not dirty or damage the front 

camera. 

When cleaning the inside of the 

windshield, do not allow glass 

cleaner to contact the lens of 

the front camera. Also, do not 

touch the lens.

If the lens is dirty or damaged, 

contact your Toyota dealer.

Do not subject the front camera 

to a strong impact.

Do not change the installation 

position or direction of the front 

camera or remove it.

Do not disassemble the front 

camera.

Do not modify any components 

of the vehicle around the front 

camera (inside rear view mirror, 

etc.) or ceiling.

Do not attach any accessories 

to the hood, front grille or front 

bumper that may obstruct the 

front camera. Contact your Toy-

ota dealer for details.

If a surfboard or other long 

object is to be mounted on the 

roof, make sure that it will not 

obstruct the front camera.

Do not modify the headlights or 

other lights.

-------------------------------------------------------------------------------------------------------------------------------------------------------------

232

4-5. Using the driving support systems

HIGHLANDER_U

Certification

Except for vehicles sold in Canada

For vehicles sold in Canada

-------------------------------------------------------------------------------------------------------------------------------------------------------------

233

4-5. Using the driving support systems

4

Dr

iv

ing

HIGHLANDER_U

If a warning message is displayed on the multi-information display

A system may be temporarily unavailable or there may be a malfunction in 

the system.

In the following situations, perform the actions specified in the table. When 

the normal operating conditions are detected, the message will disappear 

and the system will become operational.

If the message does not disappear, contact your Toyota dealer.

Situation

Actions

When the area around a camera is 
covered with dirt, moisture (fogged 
up, covered with condensation, ice, 
etc.), or other foreign matter

Using the wiper and A/C function, 
remove the dirt and other attached 
matter (

P.337, 343).

-------------------------------------------------------------------------------------------------------------------------------------------------------------

234

4-5. Using the driving support systems

HIGHLANDER_U

In the following situations, if the situation has changed (or the vehicle has 

been driven for some time) and the normal operating conditions are 

detected, the message will disappear and the system will become opera-

tional.

If the message does not disappear, contact your Toyota dealer.

• When the temperature around the radar sensor is outside of the opera-

tional range, such as when the vehicle is in the sun or in an extremely cold 

environment

• When the front camera cannot detect objects in front of the vehicle, such 

as when driving in the dark, snow, or fog, or when bright lights are shining 

into the front camera

• Depending on the conditions in the vicinity of the vehicle, the radar may 

judge the surrounding environment can not be properly recognized. In that 

case, “Pre-Collision System Unavailable See Owner's Manual” is dis-

played.

When the temperature around the 
front camera is outside of the opera-
tional range, such as when the vehi-
cle is in the sun or in an extremely 
cold environment

If the front camera is hot, such as 
after the vehicle had been parked in 
the sun, use the air conditioning sys-
tem to decrease the temperature 
around the front camera.
If a sunshade was used when the 
vehicle was parked, depending on its 
type, the sunlight reflected from the 
surface of the sunshade may cause 
the temperature of the front camera 
to become excessively high.

If the front camera is cold, such after 
the vehicle is parked in an extremely 
cold environment, use the air condi-
tioning system to increase the tem-
perature around the front camera.

The area in front of the front camera 
is obstructed, such as when the 
hood is open or a sticker is attached 
to the part of the windshield in front 
of the front camera.

Close the hood, remove the sticker, 
etc. to clear the obstruction.

When “Pre-Collision System Radar 
In Self Calibration Unavailable See 
Owner's Manual” is displayed.

Check whether there is attached 
materials on the radar sensor and 
radar sensor cover, and if there is, 
remove it.

Situation

Actions

-------------------------------------------------------------------------------------------------------------------------------------------------------------

235

4-5. Using the driving support systems

4

Dr

iv

ing

HIGHLANDER_U

The system can detect the fol-
lowing (The detectable objects 
differs depending on the func-
tion.):

Vehicles

Bicyclists

Pedestrians

Pre-collision warning

When the system determines 
that the possibility of a frontal 
collision is high, a buzzer will 
sound and a warning message 
will be displayed on the 
multi-information display to urge 
the driver to take evasive action.

Pre-collision brake assist

When the system determines 
that the possibility of a frontal 
collision is high, the system 
applies greater braking force in 
relation to how strongly the 
brake pedal is depressed.

Pre-collision braking

If the system determines that 
the possibility of a frontal colli-
sion is extremely high, the 
brakes are automatically applied 
to help avoid the collision or 
reduce the impact of the colli-
sion.

Emergency steering assist

If the system determines that 
the possibility of a frontal colli-

PCS (Pre-Collision Sys-

tem)

The pre-collision system 
uses a radar sensor and 
front camera to detect 
objects (

P.235) in front of 

the vehicle. When the sys-
tem determines that the 
possibility of a frontal colli-
sion with an object is high, a 
warning operates to urge 
the driver to take evasive 
action and the potential 
brake pressure is increased 
to help the driver avoid the 
collision. If the system 
determines that the possi-
bility of a frontal collision 
with an object is extremely 
high, the brakes are auto-
matically applied to help 
avoid the collision or help 
reduce the impact of the col-
lision.

The pre-collision system can 
be disabled/enabled and the 
warning timing can be 
changed. (

P.238)

Detectable objects

System functions

-------------------------------------------------------------------------------------------------------------------------------------------------------------

236

4-5. Using the driving support systems

HIGHLANDER_U

sion is high and that there is suf-
ficient space for the vehicle to 
be steered into within its lane, 
and the driver has begun eva-
sive maneuver or steering, 
emergency steering assist will 
assist the steering movements 
to help enhance the vehicle sta-
bility and for lane departure pre-
vention. During operation, the 
indicator will illuminate in green.

Intersection right/left turn 
assistance

If the system determines that 
there is a high possibility of a 
collision in the following situa-
tions, it will assist with Pre-colli-
sion warning and, if necessary 
Pre-collision braking.
Depending on the configuration 
of the intersection, it may not be 
possible to support.

When you turn right/left at an 
intersection and cross the 
path of an oncoming vehicle

When you turn right/left, 
pedestrian is detected in the 
forward direction and esti-
mated to enter your vehicle’s 
path (bicyclists are not 
detected.)

WARNING

Limitations of the pre-colli-

sion system

The driver is solely responsible 

for safe driving. Always drive 

safely, taking care to observe 

your surroundings.

Do not use the pre-collision sys-

tem instead of normal braking 

operations under any circum-

stances. This system will not 

prevent collisions or lessen col-

lision damage or injury in every 

situation. Do not overly rely on 

this system. Failure to do so 

may lead to an accident, result-

ing in death or serious injury.

-------------------------------------------------------------------------------------------------------------------------------------------------------------

237

4-5. Using the driving support systems

4

Dr

iv

ing

HIGHLANDER_U

WARNING

Although this system is 

designed to help avoid a colli-

sion or help reduce the impact 

of the collision, its effectiveness 

may change according to vari-

ous conditions, therefore the 

system may not always be able 

to achieve the same level of 

performance.

Read the following conditions 

carefully. Do not overly rely on 

this system and always drive 

carefully.

• Conditions under which the sys-

tem may operate even if there is 

no possibility of a collision: 

P.242

• Conditions under which the sys-

tem may not operate properly: 

P.243

Do not attempt to test the oper-

ation of the pre-collision system 

yourself.

Depending on the objects used 

for testing (dummies, card-

board objects imitating detect-

able objects, etc.), the system 

may not operate properly, possi-

bly leading to an accident.

Pre-collision braking

When the pre-collision braking 

function is operating, a large 

amount of braking force will be 

applied.

If the vehicle is stopped by the 

operation of the pre-collision 

braking function, the pre-colli-

sion braking function operation 

will be canceled after approxi-

mately 2 seconds. Depress the 

brake pedal as necessary.

The pre-collision braking func-

tion may not operate if certain 

operations are performed by the 

driver. If the accelerator pedal is 

being depressed strongly or the 

steering wheel is being turned, 

the system may determine that 

the driver is taking evasive 

action and possibly prevent the 

pre-collision braking function 

from operating.

In some situations, while the 

pre-collision braking function is 

operating, operation of the func-

tion may be canceled if the 

accelerator pedal is depressed 

strongly or the steering wheel is 

turned and the system deter-

mines that the driver is taking 

evasive action.

If the brake pedal is being 

depressed, the system may 

determine that the driver is tak-

ing evasive action and possibly 

delay the operation timing of the 

pre-collision braking function.

Emergency steering assist

As emergency steering assist 

operation will be canceled when 

the system determines that lane 

departure prevention function 

has been completed.

Emergency steering assist may 

not operate or may be cancel in 

the following cases as the sys-

tem may determine the driver is 

taking actions.

• If the accelerator pedal is being 

depressed strongly, the steering 

wheel is being operated sharply, 

the brake pedal is being 

depressed or the turn signal 

lever is being operated. In this 

case, the system may deter-

mine that the driver is taking 

evasive action and the emer-

gency steering assist may not 

operate.

-------------------------------------------------------------------------------------------------------------------------------------------------------------

238

4-5. Using the driving support systems

HIGHLANDER_U

Enabling/disabling the 
pre-collision system

The pre-collision system can be 
enabled/disabled on 

 (

P.89, 

98) of the multi-information dis-
play.

The system is automatically 
enabled each time the engine 
switch is turned to ON.

If the system is disabled, the 
PCS warning light will turn on 
and a message will be displayed 
on the multi-information display.

WARNING

• In some situations, while the 

emergency steering assist is 

operating, operation of the func-

tion may be canceled if the 

accelerator pedal is depressed 

strongly, the steering wheel is 

operated sharply or the brake 

pedal is being depressed and 

the system determines that the 

driver is taking evasive action.

• When the emergency steering 

assist is operating, if the steer-

ing wheel is held firmly or is 

operated in the opposite direc-

tion to that which the system is 

generating torque, the function 

may be canceled.

When to disable the pre-colli-

sion system

In the following situations, disable 

the system, as it may not operate 

properly, possibly leading to an 

accident resulting in death or seri-

ous injury:

When the vehicle is being towed

When your vehicle is towing 

another vehicle

When transporting the vehicle 

via truck, boat, train or similar 

means of transportation

When the vehicle is raised on a 

lift with the engine running and 

the tires are allowed to rotate 

freely

When inspecting the vehicle 

using a drum tester such as a 

chassis dynamometer or speed-

ometer tester, or when using an 

on vehicle wheel balancer

When a strong impact is applied 

to the front bumper or front 

grille, due to an accident or 

other reasons

If the vehicle cannot be driven in 

a stable manner, such as when 

the vehicle has been in an acci-

dent or is malfunctioning

When the vehicle is driven in a 

sporty manner or off-road

When the tires are not properly 

inflated

When the tires are very worn

When tires of a size other than 

specified are installed

When tire chains are installed

When a compact spare tire or 

an emergency tire puncture 

repair kit is used

If equipment (snow plow, etc.) 

that may obstruct the radar sen-

sor or front camera is temporar-

ily installed to the vehicle

Changing settings of the 
pre-collision system

-------------------------------------------------------------------------------------------------------------------------------------------------------------

239

4-5. Using the driving support systems

4

Dr

iv

ing

HIGHLANDER_U

Changing the pre-collision 
warning timing

The pre-collision warning timing 
can be changed on 

 (

P.89, 

98) of the multi-information dis-
play.

The warning timing setting is 
retained when the engine switch is 
turned OFF. However, if the pre-col-
lision system is disabled and 
re-enabled, the operation timing will 
return to the default setting (mid-
dle).

If the pre-collision warning tim-
ing is changed, emergency 

steering assist timing will also 
be changed accordingly. If late 
is selected, emergency steering 
assist would not operate in case 
of an emergency.

1

Early

2

Middle

This is the default setting.

3

Late

Operational conditions for each pre-collision function

The pre-collision system is enabled and the system determines that the pos-

sibility of a frontal collision with a detected object is high.
The system may not operate in the following situations:
• If a battery terminal has been disconnected and reconnected and then the 

vehicle has not been driven for a certain amount of time

• If the shift lever is in R
• When the VSC OFF indicator is illuminated (only the pre-collision warning 

function will be operational)

The operation speeds and operation cancellation for each function is listed 

below.

Pre-collision warning

-------------------------------------------------------------------------------------------------------------------------------------------------------------

240

4-5. Using the driving support systems

HIGHLANDER_U

While the pre-collision warning function is operating, if the steering wheel is 

operated heavily or suddenly, the pre-collision warning may be cancelled.

Pre-collision brake assist

Pre-collision braking

If either of the following occur while the pre-collision braking function is oper-

ating, it will be canceled:
• The accelerator pedal is depressed strongly.
• The steering wheel is turned sharply or abruptly.

Emergency steering assist

When the turn signal lights are flashing, emergency steering assist will not 

operate in case of an emergency.

Detectable objects

Vehicle speed

Relative speed between 

your vehicle and object

preceding and stopped 
vehicles

Approx. 7 to 110 mph 
(10 to 180 km/h)

Approx. 7 to 110 mph 
(10 to 180 km/h)

Oncoming vehicles

Approx. 7 to 110 mph 
(10 to 180 km/h)

Approx. 13 to 110 mph 
(20 to 180 km/h)

Bicyclists and pedestri-
ans

Approx. 7 to 50 mph (10 
to 80 km/h)

Approx. 7 to 50 mph (10 
to 80 km/h)

Detectable objects

Vehicle speed

Relative speed between 

your vehicle and object

Preceding and stopped 
vehicles

Approx. 20 to 110 mph 
(30 to 180 km/h)

Approx. 20 to 110 mph 
(30 to 180 km/h)

Bicyclists and pedestri-
ans

Approx. 20 to 50 mph 
(30 to 80 km/h)

Approx. 20 to 50 mph 
(30 to 80 km/h)

Detectable objects

Vehicle speed

Relative speed between 

your vehicle and object

Preceding and stopped 
vehicles

Approx. 7 to 110 mph 
(10 to 180 km/h)

Approx. 7 to 110 mph 
(10 to 180 km/h)

Oncoming vehicles

Approx. 7 to 110 mph 
(10 to 180 km/h)

Approx. 13 to 110 mph 
(20 to 180 km/h)

Bicyclists and pedestri-
ans

Approx. 7 to 50 mph (10 
to 80 km/h)

Approx. 7 to 50 mph (10 
to 80 km/h)

-------------------------------------------------------------------------------------------------------------------------------------------------------------

241

4-5. Using the driving support systems

4

Dr

iv

ing

HIGHLANDER_U

If any of the following occur while the emergency steering assist function is 

operating, it will be canceled:
• The accelerator pedal is depressed strongly.
• The steering wheel is turned sharply or abruptly.
• The brake pedal is depressed.

Intersection right/left turn assistance (pre-collision warning)

When the turn signal lights are not flashing, support for turning left or right at 

an intersection which targets oncoming vehicles does not work.

Intersection right/left turn assistance (pre-collision braking)

When the turn signal lights are not flashing, support for turning left or right at 

an intersection which targets oncoming vehicles does not work.

Object detection function

The system detects objects based 

on their size, profile, motion, etc. 

However, an object may not be 

detected depending on the sur-

rounding brightness and the motion, 

posture, and angle of the detected 

object, preventing the system from 

operating properly. (

P.243)

The illustration shows an image of 

Detectable objects

Vehicle speed

Relative speed between 

your vehicle and object

Preceding and stopped 
vehicles, bicyclists and 
pedestrians

Approx. 25 to 50 mph 
(40 to 80 km/h)

Approx. 25 to 50 mph 
(40 to 80 km/h)

Detectable 

objects

Vehicle speed

Oncoming vehicle 

speed

Relative speed 

between your 

vehicle and object

Oncoming vehi-
cles

Approx. 7 to 15 
mph (10 to 25 
km/h)

Approx. 20 to 35 
mph (30 to 55 
km/h)

Approx. 25 to 50 
mph (40 to 80 
km/h)

Pedestrians

Approx. 7 to 15 
mph (10 to 25 
km/h)

Approx. 7 to 15 
mph (10 to 25 
km/h)

Detectable 

objects

Vehicle speed

Oncoming vehicle 

speed

Relative speed 

between your 

vehicle and object

Oncoming vehi-
cles

Approx. 10 to 15 
mph (15 to 25 
km/h)

Approx. 20 to 28 
mph (30 to 45 
km/h)

Approx. 28 to 43 
mph (45 to 70 
km/h)

Pedestrians

Approx. 7 to 15 
mph (10 to 25 
km/h)

Approx. 7 to 15 
mph (10 to 25 
km/h)

-------------------------------------------------------------------------------------------------------------------------------------------------------------

242

4-5. Using the driving support systems

HIGHLANDER_U

detectable objects.

Conditions under which the 

system may operate even if 

there is no possibility of a colli-

sion

In some situations such as the fol-

lowing, the system may determine 

that there is a possibility of a fron-

tal collision and operate.

• When passing a detectable object, 

etc.

• When changing lanes while over-

taking a detectable object, etc.

• When approaching a detectable 

object in an adjacent lane or on 

the roadside, such as when 

changing the course of travel or 

driving on a winding road

• When rapidly closing on a detect-

able object, etc.

• When approaching objects on the 

roadside, such as detectable 

objects, guardrails, utility poles, 

trees, or walls

• When there is a detectable object 

or other object by the roadside at 

the entrance of a curve

• When there are patterns or paint 

in front of your vehicle that may be 

mistaken for a detectable object

• When the front of your vehicle is 

hit by water, snow, dust, etc.

• When overtaking a detectable 

object that is changing lanes or 

making a right/left turn

• When passing a detectable object 

in an oncoming lane that is 

stopped to make a right/left turn

• When a detectable object 

approaches very close and then 

stops before entering the path of 

your vehicle

• If the front of your vehicle is raised 

or lowered, such as when on an 

uneven or undulating road surface

• When driving on a road sur-

rounded by a structure, such as in 

a tunnel or on an iron bridge

• When there is a metal object 

(manhole cover, steel plate, etc.), 

steps, or a protrusion in front of 

your vehicle

• When passing under an object 

-------------------------------------------------------------------------------------------------------------------------------------------------------------

243

4-5. Using the driving support systems

4

Dr

iv

ing

HIGHLANDER_U

(road sign, billboard, etc.)

• When approaching an electric toll 

gate barrier, parking area barrier, 

or other barrier that opens and 

closes

• When using an automatic car 

wash

• When driving through or under 

objects that may contact your 

vehicle, such as thick grass, tree 

branches, or a banner

• When driving through steam or 

smoke

• When driving near an object that 

reflects radio waves, such as a 

large truck or guardrail

• When driving near a TV tower, 

broadcasting station, electric 

power plant, radar equipped vehi-

cles, etc., or other location where 

strong radio waves or electrical 

noise may be present

• When there are many things 

which can reflect the radio waves 

of the radar in the vicinity (tunnels, 

truss bridges, gravel roads, snow 

covered road that have tracks, 

etc.)

• While making a right/left turn, 

when an oncoming vehicle or a 

crossing pedestrian has already 

exited the path of your vehicle

• While making a right/left turn, 

closely in front of an oncoming 

vehicle or a crossing pedestrian.

• While making a right/left turn, 

when an oncoming vehicle or a 

crossing pedestrian stops before 

entering the path of your vehicle

• While making a right/left turn, 

when an oncoming vehicle turns 

right/left in front of your vehicle

• While steering into the direction of 

oncoming traffic

Situations in which the system 

may not operate properly

In some situations such as the fol-

lowing, an object may not be 

detected by the radar sensor and 

front camera, preventing the sys-

tem from operating properly:

• When a detectable object is 

approaching your vehicle

• When your vehicle or a detectable 

object is wobbling

• If a detectable object makes an 

abrupt maneuver (such as sudden 

swerving, acceleration or deceler-

ation)

• When your vehicle approaches a 

detectable object rapidly

• When a detectable object is not 

directly in front of your vehicle

• When a detectable object is near 

a wall, fence, guardrail, manhole 

cover, vehicle, steel plate on the 

road, etc.

• When a detectable object is under 

a structure

-------------------------------------------------------------------------------------------------------------------------------------------------------------

244

4-5. Using the driving support systems

HIGHLANDER_U

• When part of a detectable object 

is hidden by an object, such as 

large baggage, an umbrella, or 

guardrail

• When there are many things 

which can reflect the radio waves 

of the radar in the vicinity (tunnels, 

truss bridges, gravel roads, snow 

covered road that have tracks, 

etc.)

• When there is an effect on the 

radio waves to the radar that is 

installed on another vehicle

• When multiple detectable objects 

are close together

• If the sun or other light is shining 

directly on a detectable object

• When a detectable object is a 

shade of white and looks 

extremely bright

• When a detectable object appears 

to be nearly the same color or 

brightness as its surroundings

• If a detectable object cuts or sud-

denly emerges in front of your 

vehicle

• When the front of your vehicle is 

hit by water, snow, dust, etc.

• When a very bright light ahead, 

such as the sun or the headlights 

of oncoming traffic, shines directly 

into the front camera

• When approaching the side or 

front of a vehicle ahead

• If a vehicle ahead is a motorcycle

• If a vehicle ahead is narrow, such 

as a personal mobility vehicle

• If a preceding vehicle has a small 

rear end, such as an unloaded 

truck

• If a preceding vehicle has a low 

rear end, such as a low bed trailer

• If a vehicle ahead has extremely 

high ground clearance

• If a vehicle ahead is carrying a 

load which protrudes past its rear 

bumper

• If a vehicle ahead is irregularly 

shaped, such as a tractor or side 

car

• If a vehicle ahead is a child sized 

bicycle, a bicycle that is carrying a 

large load, a bicycle ridden by 

more than one person, or a 

uniquely shaped bicycle (bicycle 

with a child seat, tandem bicycle, 

etc.)

• If a pedestrian/or the riding height 

of a bicyclist ahead is shorter than 

approximately 3.2 ft. (1 m) or taller 

than approximately 6.5 ft. (2 m)

• If a pedestrian/bicyclist is wearing 

oversized clothing (a rain coat, 

long skirt, etc.), making their sil-

houette obscure

• If a pedestrian is bending forward 

or squatting or bicyclist is bending 

forward

• If a pedestrian/bicyclist is moving 

fast

• If a pedestrian is pushing a 

stroller, wheelchair, bicycle or 

other vehicle

• When driving in inclement weather 

such as heavy rain, fog, snow or a 

sandstorm

• When driving through steam or 

smoke

• When the surrounding area is dim, 

such as at dawn or dusk, or while 

at night or in a tunnel, making a 

detectable object appear to be 

nearly the same color as its sur-

roundings

• When driving in a place where the 

surrounding brightness changes 

suddenly, such as at the entrance 

or exit of a tunnel

• After the engine has started the 

-------------------------------------------------------------------------------------------------------------------------------------------------------------

245

4-5. Using the driving support systems

4

Dr

iv

ing

HIGHLANDER_U

vehicle has not been driven for a 

certain amount of time

• While making a left/right turn and 

for a few seconds after making a 

left/right turn

• While driving on a curve and for a 

few seconds after driving on a 

curve

• If your vehicle is skidding

• If the front of the vehicle is raised 

or lowered

• If the wheels are misaligned

• If a wiper blade is blocking the 

front camera

• The vehicle is being driven at 

extremely high speeds

• When driving on a hill

• If the radar sensor or front camera 

is misaligned

• When driving in a traffic lane sep-

arated by more than one lane 

where oncoming vehicles are driv-

ing while making a right/left turn

• When largely out of place with the 

opposite facing targeted oncom-

ing vehicle during a right/left turn

• While making a right/left turn, 

when a pedestrian approaches 

from behind or side of your vehicle

In addition to the above, in some 

situations, such as the following, 

the emergency steering assist 

may not operate.

• When the white (yellow) lane lines 

are difficult to see, such as when 

they are faint, diverging/merging, 

or a shadow is cast upon them

• When the lane is wider or nar-

rower than normal

• When there is a light and dark pat-

tern on the road surface, such as 

due to road repairs

• When the target is too close

• When there is insufficient safe or 

unobstructed space for the vehicle 

to be steered into

• If oncoming vehicle is present

• If VSC function is operating

In some situations such as the fol-

lowing, sufficient braking force or 

steering force may not be 

obtained, preventing the system 

from performing properly:

• If the braking functions cannot 

operate to their full extent, such as 

when the brake parts are 

extremely cold, extremely hot, or 

wet

• If the vehicle is not properly main-

tained (brakes or tires are exces-

sively worn, improper tire inflation 

pressure, etc.)

• When the vehicle is being driven 

on a gravel road or other slippery 

surface

• When the road surface has deep 

wheel tracks

• When driving on a hill road

• When driving on a road that has 

inclines to the left or right

If VSC is disabled

If VSC is disabled (

P.323), th

-------------------------------------------------------------------------------------------------------------------------------------------------------------

246

4-5. Using the driving support systems

HIGHLANDER_U

pre-collision brake assist and 

pre-collision braking functions are 

also disabled.

The PCS warning light will turn on 

and “VSC Turned OFF Pre-Colli-

sion Brake System Unavailable” 

will be displayed on the 

multi-information display.

LTA (Lane Tracing 

Assist)

While driving on a road with 
clear white (yellow) lane 
lines, the LTA system warns 
the driver if the vehicle may 
deviate from the current 
lane or course

*

, and also 

can slightly operate the 
steering wheel to help avoid 
deviation from the lane or 
course

*

. Also, while the 

dynamic radar cruise con-
trol with full-speed range 
(

P.257) is operating, this 

system will operate the 
steering wheel to maintain 
the vehicle’s lane position.

The LTA system recognizes 
white (yellow) lane lines or a 
course

*

 using the front cam-

era. Additionally, it detects 
preceding vehicles using 
the front camera and radar.

*

: Boundary between asphalt and 

the side of the road, such as 
grass, soil, or a curb

-------------------------------------------------------------------------------------------------------------------------------------------------------------

247

4-5. Using the driving support systems

4

Dr

iv

ing

HIGHLANDER_U

WARNING

Before using LTA system

Do not rely solely upon the LTA 

system. The LTA system does 

not automatically drive the vehi-

cle or reduce the amount of 

attention that must be paid to 

the area in front of the vehicle. 

The driver must always assume 

full responsibility for driving 

safely by paying careful atten-

tion to the surrounding condi-

tions and operating the steering 

wheel to correct the path of the 

vehicle. Also, the driver must 

take adequate breaks when 

fatigued, such as from driving 

for a long period of time.

Failure to perform appropriate 

driving operations and pay care-

ful attention may lead to an 

accident, resulting in death or 

serious injury.

Situations unsuitable for LTA 

system

In the following situations, use the 

LTA switch to turn the system off. 

Failure to do so may lead to an 

accident, resulting in death or 

serious injury.

Vehicle is driven on a road sur-

face which is slippery due to 

rainy weather, fallen snow, 

freezing, etc.

Vehicle is driven on a snow-cov-

ered road.

White (yellow) lines are difficult 

to see due to rain, snow, fog, 

dust, etc.

Vehicle is driven in a temporary 

lane or restricted lane due to 

construction work.

Vehicle is driven in a construc-

tion zone.

A spare tire, tire chains, etc. are 

equipped.

When the tires have been 

excessively worn, or when the 

tire inflation pressure is low.

When your vehicle is towing a 

trailer or during emergency tow-

ing.

Preventing LTA system mal-

functions and operations per-

formed by mistake

Do not modify the headlights or 

place stickers, etc. on the sur-

face of the lights.

Do not modify the suspension 

etc. If the suspension etc. needs 

to be replaced, contact your 

Toyota dealer.

Do not install or place anything 

on the hood or grille. Also, do 

not install a grille guard (bull 

bars, kangaroo bar, etc.).

If your windshield needs 

repairs, contact your Toyota 

dealer.

Conditions in which functions 

may not operate properly

In the following situations, the 

functions may not operate prop-

erly and the vehicle may depart 

from its lane. Drive safely by 

always paying careful attention to 

your surroundings and operate 

the steering wheel to correct the 

path of the vehicle without relying 

solely on the functions.

-------------------------------------------------------------------------------------------------------------------------------------------------------------

248

4-5. Using the driving support systems

HIGHLANDER_U

WARNING

When the follow-up cruising dis-

play is displayed (

P.252) and 

the preceding vehicle changes 

lanes. (Your vehicle may follow 

the preceding vehicle and also 

change lanes.)

When the follow-up cruising dis-

play is displayed (

P.252) and 

the preceding vehicle is sway-

ing. (Your vehicle may sway 

accordingly and depart from the 

lane.)

When the follow-up cruising dis-

play is displayed (

P.252) and 

the preceding vehicle departs 

from its lane. (Your vehicle may 

follow the preceding vehicle and 

depart from the lane.)

When the follow-up cruising dis-

play is displayed (

P.252) and 

the preceding vehicle is being 

driven extremely close to the 

left/right lane line. (Your vehicle 

may follow the preceding vehi-

cle and depart from the lane.)

Vehicle is being driven around a 

sharp curve.

Objects or patterns that could 

be mistaken for white (yellow) 

lines are present on the side of 

the road (guardrails, reflective 

poles, etc.).

Vehicle is driven where the road 

diverges, merges, etc.

Repair marks of asphalt, white 

(yellow) lines, etc. are present 

due to road repair.

There are shadows on the road 

that run parallel with, or cover, 

the white (yellow) lines.

-------------------------------------------------------------------------------------------------------------------------------------------------------------

249

4-5. Using the driving support systems

4

Dr

iv

ing

HIGHLANDER_U

WARNING

The vehicle is driven in an area 

without white (yellow) lines, 

such as in front of a tollgate or 

checkpoint, or at an intersec-

tion, etc.

The white (yellow) lines are 

cracked, “Botts’ dots”, “Raised 

pavement marker” or stones are 

present.

The white (yellow) lines cannot 

be seen or are difficult to see 

due to sand, etc.

The vehicle is driven on a road 

surface that is wet due to rain, 

puddles, etc.

The traffic lines are yellow 

(which may be more difficult to 

recognize than lines that are 

white).

The white (yellow) lines cross 

over a curb, etc.

The vehicle is driven on a bright 

surface, such as concrete.

If the edge of the road is not 

clear or straight.

The vehicle is driven on a sur-

face that is bright due to 

reflected light, etc.

The vehicle is driven in an area 

where the brightness changes 

suddenly, such as at the 

entrances and exits of tunnels, 

etc.

Light from the headlights of an 

oncoming vehicle, the sun, etc. 

enters the camera.

The vehicle is driven on a slope.

The vehicle is driven on a road 

which tilts left or right, or a wind-

ing road.

The vehicle is driven on an 

unpaved or rough road.

The traffic lane is excessively 

narrow or wide.

The vehicle is extremely tilted 

due to carrying heavy luggage 

or having improper tire pres-

sure.

The distance to the preceding 

vehicle is extremely short.

The vehicle is moving up and 

down a large amount due to 

road conditions during driving 

(poor roads or road seams).

When driving in a tunnel or at 

night with the headlights off or 

when a headlight is dim due to 

its lens being dirty or it being 

misaligned.

The vehicle is struck by a cross-

wind.

The vehicle is affected by wind 

from a vehicle driven in a 

nearby lane.

The vehicle has just changed 

lanes or crossed an intersec-

tion.

Tires which differ by structure, 

manufacturer, brand or tread 

pattern are used.

When tires of a size other than 

specified are installed.

Snow tires, etc. are equipped.

The vehicle is being driven at 

extremely high speeds.

-------------------------------------------------------------------------------------------------------------------------------------------------------------

250

4-5. Using the driving support systems

HIGHLANDER_U

Lane departure alert func-
tion

When the system determines 
that the vehicle might depart 
from its lane or course

*

, a warn-

ing is displayed on the 
multi-information display, and a 
warning buzzer will sound to 
alert the driver.

When the warning buzzer sounds, 
check the area around your vehicle 
and carefully operate the steering 
wheel to move the vehicle back to 
the center of the lane.
Vehicle with BSM: When the sys-
tem determines that the vehicle 
might depart from its lane and that 
the possibility of a collision with an 
overtaking vehicle in the adjacent 
lane is high, the lane departure 
alert will operate even if the turn 
signals are operating.

*

: Boundary between asphalt and 

the side of the road, such as 
grass, soil, or a curb

Steering assist function

When the system determines 
that the vehicle might depart 
from its lane or course

*

, the sys-

tem provides assistance as nec-
essary by operating the steering 
wheel in small amounts for a 
short period of time to keep the 
vehicle in its lane.

Vehicle with BSM: When the sys-
tem determines that the vehicle 
might depart from its lane and that 
the possibility of a collision with an 
overtaking vehicle in the adjacent 
lane is high, the steering assist 
function will operate even if the turn 
signals are operating.

*

: Boundary between asphalt and 

the side of the road, such as 
grass, soil, or a curb

Functions included in LTA 
system

-------------------------------------------------------------------------------------------------------------------------------------------------------------

251

4-5. Using the driving support systems

4

Dr

iv

ing

HIGHLANDER_U

Vehicle sway warning func-
tion

When the vehicle is swaying 
within a lane, the warning 
buzzer will sound and a mes-
sage will be displayed on the 
multi-information display to alert 
the driver.

Lane centering function

This function is linked with 
dynamic radar cruise control 
with full-speed range and pro-
vides the required assistance by 
operating the steering wheel to 
keep the vehicle in its current 
lane.

When dynamic radar cruise control 
with full-speed range is not operat-
ing, the lane centering function 
does not operate.
In situations where the white (yel-
low) lane lines are difficult to see or 
are not visible, such as when in a 
traffic jam, this function will operate 
to help follow a preceding vehicle 
by monitoring the position of the 
preceding vehicle.

-------------------------------------------------------------------------------------------------------------------------------------------------------------

252

4-5. Using the driving support systems

HIGHLANDER_U

Press the LTA switch to turn the 
LTA system on.

The LTA indicator illuminates and a 
message is displayed on the 
multi-information display.
Press the LTA switch again to turn 
the LTA system off.
When the LTA system is turned on 
or off, operation of the LTA system 
continues in the same condition the 
next time the engine is started.

LTA indicator

The illumination condition of the 
indicator informs the driver of the 
system operation status.
Illuminated in white: LTA system is 
operating.
Illuminated in green: Steering wheel 
assistance of the steering assist 
function or lane centering function 
is operating.
Flashing in orange: Lane departure 
alert function is operating.

Operation display of steering 
wheel operation support

Displayed when the multi-informa-
tion display is switched to the driv-

Turning LTA system on

Indications on multi-infor-
mation display

-------------------------------------------------------------------------------------------------------------------------------------------------------------

253

4-5. Using the driving support systems

4

Dr

iv

ing

HIGHLANDER_U

ing support system information 
display.
Indicates that steering wheel assis-
tance of the steering assist function 
or lane centering function is operat-
ing.
Both outer sides of the lane are dis-
played: Indicates that steering 
wheel assist of the lane centering 
function is operating.
One outer side of the lane is dis-
played: Indicates that steering 
wheel assist of the steering assist 
function is operating.
Both outer sides of the lane are 
flashing: Alerts the driver that their 
input is necessary to stay in the 
center of the lane (lane centering 
function).

Lane departure alert function 
display

Displayed when the multi-informa-
tion display is switched to the driv-
ing support system information 
display.

Inside of displayed lines is 
white

Indicates that the system is rec-
ognizing white (yellow) lines or a 
course

*

. When the vehicle 

departs from its lane, the white 
line displayed on the side the 

vehicle departs from flashes 
orange.

Inside of displayed lines is 
black

Indicates that the system is not 
able to recognize white (yellow) 
lines or a course

*

 or is temporar-

ily canceled.

*

: Boundary between asphalt and 

the side of the road, such as 
grass, soil, or a curb

Follow-up cruising display

Displayed when the multi-informa-
tion display is switched to the driv-
ing support system information 
display.
Indicates that steering assist of the 
lane centering function is operating 
by monitoring the position of a pre-
ceding vehicle.
When the follow-up cruising display 
is displayed, if the preceding vehi-
cle moves, your vehicle may move 
in the same way. Always pay care-
ful attention to your surroundings 
and operate the steering wheel as 
necessary to correct the path of the 
vehicle and ensure safety.

Operation conditions of each 

function

Lane departure alert function

-------------------------------------------------------------------------------------------------------------------------------------------------------------

254

4-5. Using the driving support systems

HIGHLANDER_U

This function operates when all of 

the following conditions are met.

• LTA is turned on.

• Vehicle speed is approximately 32 

mph (50 km/h) or more.

*1

• System recognizes white (yellow) 

lane lines or a course

*2

. (When a 

white [yellow] line or course

*2

 is 

recognized on only one side, the 

system will operate only for the 

recognized side.)

• Width of traffic lane is approxi-

mately 9.8 ft. (3 m) or more.

• Turn signal lever is not operated. 

(Vehicle with BSM: Except when 

another vehicle is in the lane on 

the side where the turn signal was 

operated)

• Vehicle is not being driven around 

a sharp curve.

• No system malfunctions are 

detected. (

P.256)

*1

:The function operates even if the 

vehicle speed is less than 
approximately 32 mph (50 km/h) 
when the lane centering function 
is operating.

*2

:Boundary between asphalt and 

the side of the road, such as 
grass, soil, or a curb

Steering assist function

This function operates when all of 

the following conditions are met in 

addition to the operation conditions 

for the lane departure alert function.

• Vehicle is not accelerated or 

decelerated by a fixed amount or 

more.

• Steering wheel is not operated 

with a steering force level suitable 

for changing lanes.

• ABS, VSC, TRAC and PCS are 

not operating.

• TRAC or VSC is not turned off.

Vehicle sway warning function

This function operates when all of 

the following conditions are met.
• Setting for “Sway Warning” in 


of the multi-information display is 

set to “ON”. (

P.89, 98)

• Vehicle speed is approximately 32 

mph (50 km/h) or more.

• Width of traffic lane is approxi-

mately 9.8 ft. (3 m) or more.

• No system malfunctions are 

detected. (

P.256)

Lane centering function

This function operates when all of 

the following conditions are met.

• LTA is turned on.
• Setting for “Lane Center” in 

 of 

the multi-information display are 

set to “ON”. (

P.89, 98)

• This function recognizes white 

(yellow) lane lines or the position 

of a preceding vehicle (except 

when the preceding vehicle is 

small, such as a motorcycle).

• The dynamic radar cruise control 

with full-speed range is operating 

in vehicle-to-vehicle distance con-

trol mode.

• Width of traffic lane is approxi-

mately 10 to 13 ft. (3 to 4 m).

• Turn signal lever is not operated.

• Vehicle is not being driven around 

a sharp curve.

• No system malfunctions are 

detected. (

P.256)

• Vehicle does not accelerate or 

decelerate by a fixed amount or 

more.

• Steering wheel is not operated 

with a steering force level suitable 

for changing lanes.

• ABS, VSC, TRAC and PCS are 

not operating.

• TRAC or VSC is not turned off.

• Hands off steering wheel warning 

is not displayed. (

P.255)

• The vehicle is being driven in the 

center of a lane.

• Steering assist function is not 

operating.

Temporary cancelation of func-

tions

When operation conditions are no 

longer met, a function may be 

temporarily canceled. However, 

when the operation conditions are 

met again, operation of the func-

-------------------------------------------------------------------------------------------------------------------------------------------------------------

255

4-5. Using the driving support systems

4

Dr

iv

ing

HIGHLANDER_U

tion is automatically restored. 

(

P.253)

If the operation conditions 

(

P.253) are no longer met while 

the lane centering function is 

operating, the buzzer may sound 

to indicate that the function has 

been temporarily canceled.

Steering assist function/lane 

centering function

Depending on the vehicle speed, 

lane departure situation, road con-

ditions, etc., the driver may not 

feel the function is operating or 

the function may not operate at 

all.

The steering control of the func-

tion is overridden by the driver’s 

steering wheel operation.

Do not attempt to test the opera-

tion of the steering assist function.

Lane departure alert function

The warning buzzer may be diffi-

cult to hear due to external noise, 

audio playback, etc.

If the edge of the course

*

 is not 

clear or straight, the lane depar-

ture alert function may not oper-

ate.

Vehicle with BSM: It may not be 

possible for the system to deter-

mine if there is a danger of a colli-

sion with a vehicle in an adjacent 

lane.

Do not attempt to test the opera-

tion of the lane departure alert 

function.

*

: Boundary between asphalt and 

the side of the road, such as 
grass, soil, or a curb

Hands off steering wheel warn-

ing

In the following situations, a warning 

message urging the driver to hold 

the steering wheel and the symbol 

shown in the illustration are dis-

played on the multi-information dis-

play to warn the driver. The warning 

stops when the system determines 

that the driver holds the steering 

wheel. Always keep your hands on 

the steering wheel when using this 

system, regardless of warnings.

When the system determines the 

driver is not holding the steering 

wheel while the lane centering 

function is operating.

If the driver continues to keep their 
hands off of the steering wheel, the 
buzzer sounds, the driver is warned 
and the function is temporarily can-
celed. This warning also operates in 
the same way when the driver con-
tinuously operates the steering 
wheel only a small amount.

When the system determines that 

the vehicle may deviate from the 

lane while driving around a curve 

while the lane centering function is 

operating.

Depending on the vehicle condition 

and road conditions, the warning 

may not operate. Also, if the system 

determines that the vehicle is driv-

ing around a curve, warnings will 

occur earlier than during 

straight-lane driving.

When the system determines that 

the driver is driving without hold-

ing the steering wheel while the 

steering wheel assist of the steer-

ing assist function is operating.

If the driver continues to keep their 
hands off of the steering wheel and 
the steering wheel assist is operat-
ing, the buzzer sounds and the 
driver is warned. Each time the 
buzzer sounds, the continuing time 

-------------------------------------------------------------------------------------------------------------------------------------------------------------

256

4-5. Using the driving support systems

HIGHLANDER_U

of the buzzer becomes longer.

Vehicle sway warning function

When the system determines that 

the vehicle is swaying while the 

vehicle sway warning function is 

operating, a buzzer sounds and a 

warning message urging the driver 

to rest and the symbol shown in the 

illustration are simultaneously dis-

played on the multi-information dis-

play.

Depending on the vehicle and road 

conditions, the warning may not 

operate.

Warning message

If the following warning message is 

displayed on the multi-information 

display and the LTA indicator illumi-

nates in orange, follow the appropri-

ate troubleshooting procedure. Also, 

if a different warning message is 

displayed, follow the instructions 

displayed on the screen.

“LTA Malfunction Visit Your 

Dealer”

The system may not be operating 

properly. Have the vehicle inspected 

by your Toyota dealer.

“LTA Unavailable”

The system is temporarily canceled 

due to a malfunction in a sensor 

other than the front camera. Turn 

the LTA system off, wait for a little 

while, and then turn the LTA system 

back on.

“LTA Unavailable at Current 

Speed”

The function cannot be used as the 

vehicle speed exceeds the LTA 

operation range. Drive slower.

Customization

Function settings can be changed. 

(Customizable features:

P.521)

-------------------------------------------------------------------------------------------------------------------------------------------------------------

257

4-5. Using the driving support systems

4

Dr

iv

ing

HIGHLANDER_U

Meter display

Multi-information display
Set speed

Indicators

Operation switches

Vehicle-to-vehicle distance 
switch
“+RES” switch
Cruise control main switch
Cancel switch
“-SET” switch

Dynamic radar cruise 

control with full-speed 

range

In vehicle-to-vehicle dis-
tance control mode, the 
vehicle automatically accel-
erates, decelerates and 
stops to match the speed 
changes of the preceding 
vehicle even if the accelera-
tor pedal is not depressed. 
In constant speed control 
mode, the vehicle runs at a 
fixed speed.

Use the dynamic radar 
cruise control with 
full-speed range on free-
ways and highways.

Vehicle-to-vehicle distance 
control mode (

P.260)

Constant speed control 
mode (

P.265)

System Components

WARNING

Before using dynamic radar 

cruise control with full-speed 

range

Driving safely is the sole 

responsibility of the driver. Do 

not rely solely on the system, 

and drive safely by always pay-

ing careful attention to your sur-

roundings.

The dynamic radar cruise con-

trol with full-speed range pro-

vides driving assistance to 

reduce the driver’s burden. 

However, there are limitations to 

the assistance provided.

Read the following conditions 

carefully. Do not overly rely on 

this system and always drive 

carefully.

• When the sensor may not be 

correctly detecting the vehicle 

ahead: 

P.267

-------------------------------------------------------------------------------------------------------------------------------------------------------------

258

4-5. Using the driving support systems

HIGHLANDER_U

WARNING

• Conditions under which the 

vehicle-to-vehicle distance con-

trol mode may not function cor-

rectly: 

P.268

Set the speed appropriately 

depending on the speed limit, 

traffic flow, road conditions, 

weather conditions, etc. The 

driver is responsible for check-

ing the set speed.

Even when the system is func-

tioning normally, the condition of 

the preceding vehicle as 

detected by the system may dif-

fer from the condition observed 

by the driver. Therefore, the 

driver must always remain alert, 

assess the danger of each situ-

ation and drive safely. Relying 

solely on this system or assum-

ing the system ensures safety 

while driving can lead to an 

accident, resulting in death or 

serious injury.

Switch the dynamic radar cruise 

control with full-speed range 

setting to off, using the cruise 

control main switch when not in 

use.

Cautions regarding the driv-

ing assist systems

Observe the following precau-

tions, as there are limitations to 

the assistance provided by the 

system. Failure to do so may 

cause an accident resulting in 

death or serious injury.

Assisting the driver to measure 

following distance

The dynamic radar cruise control 

with full-speed range is only 

intended to help the driver in 

determining the following distance 

between the driver’s own vehicle 

and a designated vehicle traveling 

ahead. It is not a mechanism that 

allows careless or inattentive driv-

ing, and it is not a system that can 

assist the driver in low-visibility 

conditions.

It is still necessary for driver to 

pay close attention to the vehi-

cle’s surroundings.

Assisting the driver to judge 

proper following distance

The dynamic radar cruise control 

with full-speed range determines 

whether the following distance 

between the driver’s own vehicle 

and a designated vehicle traveling 

ahead is within a set range. It is 

not capable of making any other 

type of judgement. Therefore, it is 

absolutely necessary for the 

driver to remain vigilant and to 

determine whether or not there is 

a possibility of danger in any 

given situation.

Assisting the driver to operate 

the vehicle

The dynamic radar cruise control 

with full-speed range does not 

include functions which will pre-

vent or avoid collisions with vehi-

cles ahead of your vehicle. 

Therefore, if there is ever any 

possibility of danger, the driver 

must take immediate and direct 

control of the vehicle and act 

appropriately in order to ensure 

the safety of all involved.

-------------------------------------------------------------------------------------------------------------------------------------------------------------

259

4-5. Using the driving support systems

4

Dr

iv

ing

HIGHLANDER_U

WARNING

Situations unsuitable for 

dynamic radar cruise control 

with full-speed range

Do not use dynamic radar cruise 

control with full-speed range in 

any of the following situations. 

Doing so may result in inappropri-

ate speed control and could 

cause an accident resulting in 

death or serious injury.

Roads where there are pedes-

trians, cyclists, etc.

In heavy traffic

On roads with sharp bends

On winding roads

On slippery roads, such as 

those covered with rain, ice or 

snow

On steep downhills, or where 

there are sudden changes 

between sharp up and down 

gradients

Vehicle speed may exceed the 

set speed when driving down a 

steep hill.

At entrances to freeways and 

highways

When weather conditions are 

bad enough that they may pre-

vent the sensors from detecting 

correctly (fog, snow, sand-

storm, heavy rain, etc.)

When there is rain, snow, etc. 

on the front surface of the radar 

or front camera

In traffic conditions that require 

frequent repeated acceleration 

and deceleration

When your vehicle is towing a 

trailer or during emergency tow-

ing

When an approach warning 

buzzer is heard often

-------------------------------------------------------------------------------------------------------------------------------------------------------------

260

4-5. Using the driving support systems

HIGHLANDER_U

This mode employs a radar to detect the presence of vehicles up to 
approximately 328 ft. (100 m) ahead, determines the current vehi-
cle-to-vehicle following distance, and operates to maintain a suitable 
following distance from the vehicle ahead. The desired vehi-
cle-to-vehicle distance can also be set by operating the vehi-
cle-to-vehicle distance switch.

When driving on downhill slopes, the vehicle-to-vehicle distance may 
become shorter.

Example of constant speed cruising
When there are no vehicles ahead

The vehicle travels at the speed set by the driver.

Example of deceleration cruising and follow-up cruising
When a preceding vehicle driving slower than the set speed 
appears

When a vehicle is detected running ahead of you, the system automatically 
decelerates your vehicle. When a greater reduction in vehicle speed is nec-
essary, the system applies the brakes (the stop lights will come on at this 
time). The system will respond to changes in the speed of the vehicle 
ahead in order to maintain the vehicle-to-vehicle distance set by the driver. 
Approach warning warns you when the system cannot decelerate suffi-
ciently to prevent your vehicle from closing in on the vehicle ahead.
When the vehicle ahead of you stops, your vehicle will also stop (vehicle is 
stopped by system control). After the vehicle ahead starts off, pressing the 
“+RES” switch or depressing the accelerator pedal (start-off operation) will 
resume follow-up cruising. If the start-off operation is not performed, system 
control continues to keep your vehicle stopped.

Driving in vehicle-to-vehicle distance control mode

-------------------------------------------------------------------------------------------------------------------------------------------------------------

261

4-5. Using the driving support systems

4

Dr

iv

ing

HIGHLANDER_U

When the turn signal lever is operated and your vehicle moves to an over-
taking lane while driving at 50 mph (80 km/h) or more, the vehicle will accel-
erate to help to overtake a passing vehicle.
The system’s identification of what is an overtaking lane may be determined 
solely based on the location of the steering wheel in the vehicle (left side 
driver position versus right side driver position.) If the vehicle is driven to a 
region where the overtaking lane is on a different side from where the vehi-
cle is normally driven, the vehicle may accelerate when the turn signal lever 
is operated in the opposite direction to the overtaking lane (e.g., if the driver 
normally operates the vehicle in a region where the overtaking lane is to the 
right but then drives to a region where the overtaking lane is to the left, the 
vehicle may accelerate when the right turn signal is activated).

Example of acceleration
When there are no longer any preceding vehicles driving slower 
than the set speed

The system accelerates until the set speed is reached. The system then 
returns to constant speed cruising.

1

Press the cruise control main 
switch to activate the cruise 
control.

Dynamic radar cruise control indi-

cator will come on and a message 

will be displayed on the multi-infor-

mation display. Press the switch 

again to deactivate the cruise con-

trol.
If the cruise control main switch is 

pressed and held for 1.5 seconds 

or more, the system turns on in 

constant speed control mode. 

(

P.265)

2

Accelerate or decelerate, 
with accelerator pedal opera-
tion, to the desired vehicle 
speed (at or above approxi-
mately 20 mph [30 km/h]) 
and press the “-SET” switch 
to set the speed.

Cruise control “SET” indicator will 

come on.
The vehicle speed at the moment 

the switch is released becomes the 

Setting the vehicle speed 
(vehicle-to-vehicle dis-
tance control mode)

-------------------------------------------------------------------------------------------------------------------------------------------------------------

262

4-5. Using the driving support systems

HIGHLANDER_U

set speed.

Adjusting the set speed by the 
switch

To change the set speed, press 
the “+RES” or “-SET” switch 
until the desired set speed is 
displayed.

1

Increases the speed (Except 
when the vehicle has been 
stopped by system control in 
vehicle-to-vehicle distance 
control mode)

2

Decreases the speed

Fine adjustment: Press the switch.
Large adjustment: Press and hold 
the switch to change the speed, 
and release when the desired 
speed is reached.

In the vehicle-to-vehicle dis-
tance control mode, the set 

speed will be increased or 
decreased as follows:

For the U.S. mainland and 
Hawaii

Fine adjustment: By 1 mph (1.6 
km/h)

*1

 or 1 km/h (0.6 mph)

*2

 each 

time the switch is pressed
Large adjustment: Increases or 
decreases in 1 mph (1.6 km/h)

*1

 or 

1 km/h (0.6 mph)

*2

 increments for 

as long as the switch is held

For Canada, Guam, Saipan, 
Puerto Rico and A.Samoa

Fine adjustment: By 1 mph (1.6 
km/h)

*1

 or 1 km/h (0.6 mph)

*2

 each 

time the switch is pressed
Large adjustment: Increases or 
decreases in 5 mph (8 km/h)

*1

 or 5 

km/h (3.1 mph)

*2

 increments for as 

long as the switch is held

In the constant speed control 
mode (

P.265), the set speed 

will be increased or decreased 
as follows:

Fine adjustment: By 1 mph (1.6 
km/h)

*1

 or 1 km/h (0.6 mph)

*2

 each 

time the switch is pressed
Large adjustment: The speed will 
continue to change while the switch 
is held.

*1

:When the set speed is shown in 

“MPH”

*2

:When the set speed is shown in 

“km/h”

Increasing the set speed by 
the accelerator pedal

Adjusting the set speed

-------------------------------------------------------------------------------------------------------------------------------------------------------------

263

4-5. Using the driving support systems

4

Dr

iv

ing

HIGHLANDER_U

1

Accelerate with accelerator 
pedal operation to the 
desired vehicle speed

2

Press the “-SET” switch

Pressing the switch changes the 
vehicle-to-vehicle distance as 
follows:

1

Long

2

Medium

3

Short

If a vehicle is running ahead of you, 
the preceding vehicle mark 

 will 

also be displayed.

Select a distance from the table 
below. Note that the distances 
shown correspond to a vehicle 
speed of 50 mph (80 km/h). 
Vehicle-to-vehicle distance 

increases/decreases in accor-
dance with vehicle speed. When 
the vehicle is stopped by system 
control, the vehicle stops at a 
certain vehicle-to-vehicle dis-
tance depending on the situa-
tion.

After the vehicle ahead of you 
starts off, press the “+RES” 
switch.
Your vehicle will also resume 
follow-up cruising if the acceler-
ator pedal is depressed after the 
vehicle ahead of you starts off.

Changing the vehi-
cle-to-vehicle distance 
(vehicle-to-vehicle dis-
tance control mode)

Vehicle-to-vehicle dis-
tance settings (vehi-
cle-to-vehicle distance 
control mode)

Distance 

options

Vehicle-to-vehicle dis-

tance

Long

Approximately 160 ft. 

(50 m)

Medium

Approximately 130 ft. 

(40 m)

Short

Approximately 100 ft. 

(30 m)

Resuming follow-up 
cruising when the vehicle 
has been stopped by sys-
tem control (vehi-
cle-to-vehicle distance 
control mode)

-------------------------------------------------------------------------------------------------------------------------------------------------------------

264

4-5. Using the driving support systems

HIGHLANDER_U

1

Pressing the cancel switch 
cancels the speed control.

The speed control is also canceled 
when the brake pedal is depressed. 
(When the vehicle has been 
stopped by system control, 
depressing the brake pedal does 
not cancel the setting.)

2

Pressing the “+RES” switch 
resumes the cruise control 
and returns vehicle speed to 
the set speed.

When your vehicle is too close 
to a vehicle ahead, and suffi-
cient automatic deceleration via 
the cruise control is not possi-
ble, the display will flash and the 
buzzer will sound to alert the 
driver. An example of this would 
be if another driver cuts in front 
of you while you are following a 
vehicle. Depress the brake 
pedal to ensure an appropriate 
vehicle-to-vehicle distance.

Warnings may not occur 
when

In the following instances, warn-
ings may not occur even when 
the vehicle-to-vehicle distance is 
small.

When the speed of the pre-
ceding vehicle matches or 
exceeds your vehicle speed

When the preceding vehicle is 
traveling at an extremely slow 
speed

Immediately after the cruise 
control speed was set

When depressing the acceler-
ator pedal

While driving in vehicle-to-vehi-
cle distance control mode, this 
function will reduce the vehicle 
speed, if it is determined to be 
necessary.

Function operation

When the steering wheel begins 
to be turned, the vehicle speed 
will begin being reduced. When 

Canceling and resuming 
the speed control

Approach warning (vehi-
cle-to-vehicle distance 
control mode)

Curve speed reduction 
function

-------------------------------------------------------------------------------------------------------------------------------------------------------------

265

4-5. Using the driving support systems

4

Dr

iv

ing

HIGHLANDER_U

the steering wheel is returned to 
the center position, the vehicle 
speed reduction will end.
Depending on the situation, the 
vehicle speed will then return to 
the vehicle-to-vehicle distance 
control mode set speed.
In situations where vehi-
cle-to-vehicle distance control 
needs to operate, such as when 
a preceding vehicle cuts in front 
of your vehicle, the curve speed 
reduction function will be can-
celed.

Operation display

Displayed when the vehicle 
speed is being reduced.
When the vehicle speed reduc-
tion ends, the display will disap-
pear.

Changing the settings of 
the curve speed reduction 
function

The curve speed reduction func-
tion can be enabled/disabled 
and the vehicle speed reduction 
strength can be adjusted.

4.2-inch display

Press the 

 or 

 meter control 

switch to select 

. Press 

 or 

 to select “Curve Speed 

Reduction” and then press 

.

7-inch display

Press the 

 or 

 meter control 

switch to select 

. Press 

 or 

 to select “Curve Speed 

Reduction” and then press 

.

The setting will change each 
time the 

 meter control switch 

is pressed.

When constant speed control 
mode is selected, your vehicle 
will maintain a set speed without 
controlling the vehicle-to-vehi-
cle distance. Select this mode 
only when vehicle-to-vehicle dis-
tance control mode does not 
function correctly due to a dirty 
radar, etc.

1

With the cruise control off, 
press and hold the cruise 
control main switch for 1.5 
seconds or more.

Immediately after the switch is 

pressed, the dynamic radar cruise 

control indicator will come on. After-

wards, it switches to the cruise con-

trol indicator.
Switching to constant speed control 

mode is only possible when operat-

ing the switch with the cruise con-

Selecting constant speed 
control mode

-------------------------------------------------------------------------------------------------------------------------------------------------------------

266

4-5. Using the driving support systems

HIGHLANDER_U

trol off.

2

Accelerate or decelerate, 
with accelerator pedal opera-
tion, to the desired vehicle 
speed (at or above approxi-
mately 20 mph [30 km/h]) 
and press the “-SET” switch 
to set the speed.

Cruise control “SET” indicator will 

come on.
The vehicle speed at the moment 

the switch is released becomes the 

set speed.
Adjusting the speed setting: 

P.262

Canceling and resuming the speed 

setting: 

P.264

Dynamic radar cruise control 

with full-speed range can be set 

when

The shift lever is in D.

The desired set speed can be set 

when the vehicle speed is approx-

imately 20 mph (30 km/h) or more.

(However, when the vehicle speed 

is set while driving at below 

approximately 20 mph [30 km/h], 

the set speed will be set to 

approximately 20 mph [30 km/h].)

Accelerating after setting the 

vehicle speed

The vehicle can accelerate by oper-

ating the accelerator pedal. After 

accelerating, the set speed 

resumes. However, during vehi-

cle-to-vehicle distance control 

mode, the vehicle speed may 

decrease below the set speed in 

order to maintain the distance to the 

preceding vehicle.

When the vehicle stops while 

follow-up cruising

Pressing the “+RES” switch while 

the vehicle ahead stops will 

resume follow-up cruising if the 

vehicle ahead starts off within 

approximately 3 seconds after the 

switch is pressed.

If the vehicle ahead starts off 

within 3 seconds after your vehicle 

stops, follow-up cruising will be 

resumed.

Automatic cancelation of vehi-

cle-to-vehicle distance control 

mode

Vehicle-to-vehicle distance control 

mode is automatically canceled in 

the following situations.

VSC is activated.

TRAC is activated for a period of 

time.

When the VSC or TRAC system is 

turned off.

When snow mode is set.

The sensor cannot detect cor-

rectly because it is covered in 

some way.

Pre-collision braking is activated.

The parking brake is operated.

The vehicle is stopped by system 

control on a steep incline.

-------------------------------------------------------------------------------------------------------------------------------------------------------------

267

4-5. Using the driving support systems

4

Dr

iv

ing

HIGHLANDER_U

The following are detected when 

the vehicle has been stopped by 

system control:

• The driver is not wearing a seat 

belt.

• The driver’s door is opened.

• The vehicle has been stopped for 

about 3 minutes

If vehicle-to-vehicle distance control 

mode is automatically canceled for 

any reasons other than the above, 

there may be a malfunction in the 

system. Contact your Toyota dealer.

Automatic cancelation of con-

stant speed control mode

Constant speed control mode is 

automatically canceled in the follow-

ing situations:

Actual vehicle speed is more than 

approximately 10 mph (16 km/h) 

below the set vehicle speed.

Actual vehicle speed falls below 

approximately 20 mph (30 km/h).

VSC is activated.

TRAC is activated for a period of 

time.

When the VSC or TRAC system is 

turned off.

Pre-collision braking is activated.

The parking brake is operated.

If constant speed control mode is 

automatically canceled for any rea-

sons other than the above, there 

may be a malfunction in the system. 

Contact your Toyota dealer.

Situations in which the curve 

speed reduction function may 

not operate

In situations such as the following, 

the curve speed reduction function 

may not operate:

When the vehicle is being driven 

around a gentle curve

When the accelerator pedal is 

being depressed

When the vehicle is being driven 

around an extremely short curve

Brake operation

A brake operation sound may be 

heard and the brake pedal response 

may change, but these are not mal-

functions.

Warning messages and buzzers 

for dynamic radar cruise con-

trol with full-speed range

Warning messages and buzzers are 

used to indicate a system malfunc-

tion or to inform the driver of the 

need for caution while driving. If a 

warning message is shown on the 

multi-information display, read the 

message and follow the instructions. 

(

P.233, 468)

When the sensor may not be 

correctly detecting the vehicle 

ahead

In the case of the following and 

depending on the conditions, oper-

ate the brake pedal when decelera-

tion of the system is insufficient or 

operate the accelerator pedal when 

acceleration is required.
As the sensor may not be able to 

correctly detect these types of vehi-

cles, the approach warning 

(

P.264) may not be activated.

Vehicles that cut in suddenly

Vehicles traveling at low speeds

Vehicles that are not moving in the 

same lane

Vehicles with small rear ends 

(trailers with no load on board, 

etc.)

Motorcycles traveling in the same 

lane

When water or snow thrown up by 

the surrounding vehicles hinders 

-------------------------------------------------------------------------------------------------------------------------------------------------------------

268

4-5. Using the driving support systems

HIGHLANDER_U

the detecting of the sensor

When your vehicle is pointing 

upwards (caused by a heavy load 

in the luggage compartment, etc.)

Preceding vehicle has an 

extremely high ground clearance

Conditions under which the 

vehicle-to-vehicle distance con-

trol mode may not function cor-

rectly

In the case of the following condi-

tions, operate the brake pedal (or 

accelerator pedal, depending on the 

situation) as necessary.
As the sensor may not be able to 

correctly detect vehicles ahead, the 

system may not operate properly.

When the road curves or when the 

lanes are narrow

When steering wheel operation or 

your position in the lane is unsta-

ble

When the vehicle ahead of you 

decelerates suddenly

When driving on a road sur-

rounded by a structure, such as in 

a tunnel or on a bridge

Situations in which the curve 

speed reduction function may 

not operate properly

In situations such as the following, 

the curve speed reduction function 

may not operate properly:

When the vehicle is being driven 

around a curve on an 

incline/decline

When the course of the vehicle 

differs from the shape of the curve

When the vehicle speed is exces-

sively high when entering a curve

When the steering wheel is sud-

denly operated

-------------------------------------------------------------------------------------------------------------------------------------------------------------


Content      ..     2      3      4      5     ..