Toyota Corolla Hatchback (2021 year). Manual in english - part 8
 

  Index      Toyota     Toyota Corolla Hatchback (2021 year). Manual in english


Search            copyright infringement  


Content      ..     6      7      8      9     ..


Toyota Corolla Hatchback (2021 year). Manual in english - part 8


460

7-3. Do-it-yourself maintenance

COROLLA H/B_U

genuine Toyota products designed 

for this vehicle.

Because certain bulbs are con-

nected to circuits designed to pre-

vent overload, non-genuine parts or 

parts not designed for this vehicle 

may be unusable.

Check the wattage of the light 

bulb to be replaced. (

P.520)

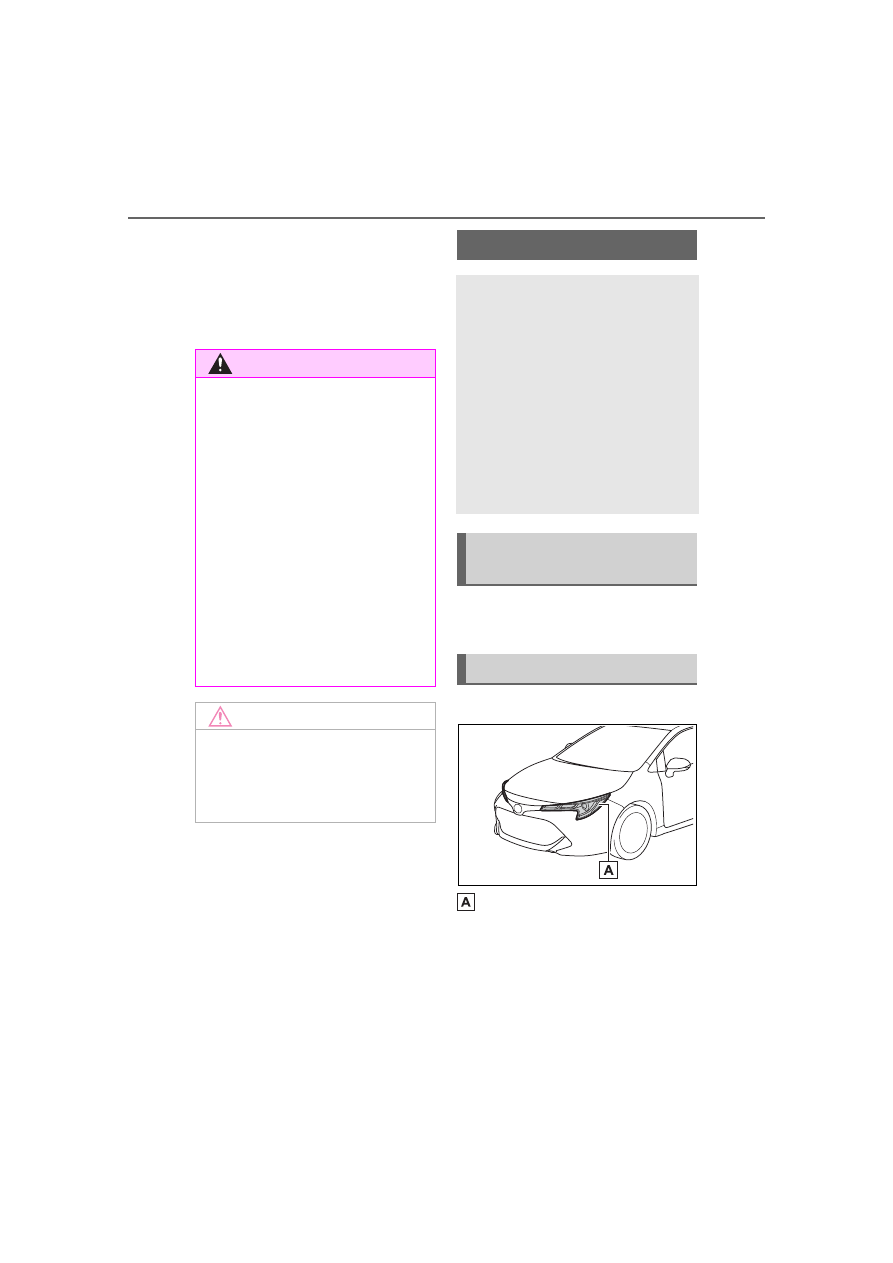
Front

Front side marker lights

WARNING

To prevent system break-

downs and vehicle fire

Observe the following precau-

tions.

Failure to do so may cause dam-

age to the vehicle, and possibly a 

fire or injury.

Never use a fuse of a higher 

amperage rating than that indi-

cated, or use any other object in 

place of a fuse.

Always use a genuine Toyota 

fuse or equivalent.

Never replace a fuse with a 

wire, even as a temporary fix.

Do not modify the fuses or fuse 

boxes.

NOTICE

Before replacing fuses

Have the cause of electrical over-

load determined and repaired by 

your Toyota dealer as soon as 

possible.

Light bulbs

You may replace the follow-

ing bulbs yourself. The diffi-

culty level of replacement 

varies depending on the 

bulb. If necessary bulb 

replacement seems difficult 

to perform, contact your 

Toyota dealer.
For more information about 

replacing other light bulbs, 

contact your Toyota dealer.

Preparing for light bulb 

replacement

Bulb locations

-------------------------------------------------------------------------------------------------------------------------------------------------------------

461

7-3. Do-it-yourself maintenance

COROLLA H/B_U

7

Maintena

nce

 a

nd 

ca
re

Rear

License plate lights

Bulbs that need to be 
replaced by your Toyota 
dealer

Headlights

Parking lights

Daytime running lights

Turn signal lights

Front fog lights (if equipped)

Tail lights

Stop lights

Back-up light

High mounted stoplight

LED light bulbs

The lights other than the front side 
marker lights and license plate lights 
consist of a number of LEDs. If any 
of the LEDs burn out, take your 
vehicle to your Toyota dealer to 
have the light replaced.

Condensation build-up on the 
inside of the lens

Temporary condensation build-up 
on the inside of the headlight lens 
does not indicate a malfunction. 
Contact your Toyota dealer for more 
information in the following situa-
tions:

Large drops of water have built up 

on the inside of the lens.

Water has built up inside the 
headlight.

When replacing light bulbs

P.459

Front side marker lights

1

Turn the bulb base counter-
clockwise.

2

Remove the light bulb.

3

When installing, reverse the 
steps listed.

License plate lights

1

Remove the light unit.

Insert a flathead screwdriver or 
similar into the hole next to the light 
and remove it as shown in the illus-
tration.

To prevent damaging the vehicle, 
wrap the flathead screwdriver with 

Replacing light bulbs

-------------------------------------------------------------------------------------------------------------------------------------------------------------

462

7-3. Do-it-yourself maintenance

COROLLA H/B_U

a tape.

2

Turn the bulb base counter-

clockwise and remove it.

3

Remove the light bulb.

4

When installing, reverse the 

steps listed.

WARNING

Replacing light bulbs

Turn off the lights. Do not 

attempt to replace the bulb 

immediately after turning off the 

lights. The bulbs become very 

hot and may cause burns.

Do not touch the glass portion 

of the light bulb with bare 

hands. When it is unavoidable 

to hold the glass portion, use 

and hold with a clean dry cloth 

to avoid getting moisture and 

oils on the bulb. Also, if the bulb 

is scratched or dropped, it may 

blow out or crack.

Fully install light bulbs and any 

parts used to secure them. Fail-

ure to do so may result in heat 

damage, fire, or water entering 

the light unit. This may damage 

the lights or cause condensa-

tion to build up on the lens.

To prevent damage or fire

Make sure bulbs are fully seated 

and locked.

-------------------------------------------------------------------------------------------------------------------------------------------------------------

463

COROLLA H/B_U

8

8

Whe

n tr

ouble

 ar

ises

When trouble arises

.

8-1. Essential information

Emergency flashers ....

464

If your vehicle has to be 

stopped in an emergency

..................................

464

If the vehicle is trapped in 

rising water................

465

8-2. Steps to take in an emer-

gency

If your vehicle needs to be 

towed.........................

467

If you think something is 

wrong ........................

470

Fuel pump shut off system

..................................

471

If a warning light turns on or 

a warning buzzer sounds

..................................

472

If a warning message is dis-

played........................

482

If you have a flat tire (vehi-

cles without spare tire)

..................................

484

If you have a flat tire (vehi-

cles with a spare tire)

..................................

494

If the engine will not start

..................................

502

If you lose your keys ...

504

If the electronic key does 

not operate properly ..

504

If the vehicle battery is dis-

charged .....................

506

If your vehicle overheats

..................................

510

If the vehicle becomes stuck

..................................

512

-------------------------------------------------------------------------------------------------------------------------------------------------------------

464

8-1. Essential information

COROLLA H/B_U

8-1.Essential information

Press the switch.

All the turn signal lights will flash.

To turn them off, press the switch 
once again.

Emergency flashers

If the emergency flashers are 
used for a long time while the 
engine is not operating, the bat-
tery may discharge.

If any of the SRS airbags deploy 
(inflate) or in the event of a strong 
rear impact, the emergency flash-
ers will turn on automatically. 
The emergency flashers will turn 
off automatically after operating 
for approximately 20 minutes. To 
manually turn the emergency 
flashers off, press the switch 
twice. 
(The emergency flashers may not 
turn on automatically depending 
on the force of the impact and 
conditions of the collision.)

1

Steadily step on the brake 
pedal with both feet and 
firmly depress it.

Do not pump the brake pedal 
repeatedly as this will increase the 
effort required to slow the vehicle.

2

Shift the shift lever to N.

If the shift lever is shifted to N

3

After slowing down, stop the 
vehicle in a safe place by the 
road.

4

Stop the engine.

If the shift lever cannot be 
shifted to N

3

Keep depressing the brake 
pedal with both feet to reduce 
vehicle speed as much as 
possible.

4

To stop the engine, press and 
hold the engine switch for 2 
consecutive seconds or 

Emergency flashers

The emergency flashers are 
used to warn other drivers 
when the vehicle has to be 
stopped on the road due to 
a breakdown, etc.

Operating instructions

If your vehicle has to 

be stopped in an emer-

gency

Only in an emergency, such 
as if it becomes impossible 
to stop the vehicle in the 
normal way, stop the vehicle 
using the following proce-
dure:

Stopping the vehicle

-------------------------------------------------------------------------------------------------------------------------------------------------------------

465

8-1. Essential information

COROLLA H/B_U

8

Whe

trouble

 ar

ises

more, or press it briefly 3 

times or more in succession.

5

Stop the vehicle in a safe 

place by the road.

Remove the seat belt first.

If the door can be opened, 

open the door and exit the 

vehicle.

If the door can not be opened, 

open the window using the 

power window switch and exit 

the vehicle through the win-

dow.

If the window can not be 

opened using the power win-

dow switch, remain calm, wait 

until the water level inside the 

vehicle rises to the point that 

the water pressure inside of 

the vehicle equals the water 

pressure outside of the vehi-

cle, and then open the door 

and exit the vehicle.

WARNING

If the engine has to be turned 

off while driving

Power assist for the brakes and 

steering wheel will be lost, making 

the brake pedal harder to depress 

and the steering wheel heavier to 

turn. Decelerate as much as pos-

sible before turning off the engine.

If the vehicle is 

trapped in rising water

In the event the vehicle is 

submerged in water, remain 

calm and perform the fol-

lowing.

-------------------------------------------------------------------------------------------------------------------------------------------------------------

466

8-1. Essential information

COROLLA H/B_U

WARNING

Using an emergency hammer

*

for emergency escape

The front side windows and rear 

side windows, as well as the rear 

window can be shattered with an 

emergency hammer

*

 used for 

emergency escape. However, an 

emergency hammer

*

 can not 

shatter the windshield as it is lam-

inated glass.

*

: Contact your Toyota dealer or 

aftermarket accessory manu-

facturer for further information 

about an emergency hammer.

Escaping the vehicle from the 

window

There are cases where escaping 

the vehicle from the window is not 

possible due to seating position, 

passenger body type, etc. 

When using an emergency ham-

mer, consider your seat location 

and the size of the window open-

ing to ensure that the opening is 

accessible and large enough to 

escape.

-------------------------------------------------------------------------------------------------------------------------------------------------------------

467

8-2. Steps to take in an emergency

COROLLA H/B_U

8

Whe

trouble

 ar

ises

8-2.Steps to take in an emergency

If your vehicle needs 

to be towed

If towing is necessary, we 

recommend having your 

vehicle towed by your Toy-

ota dealer or commercial 

towing service, using a 

wheel-lift type truck or flat-

bed truck.
Use a safety chain system 

for all towing, and abide by 

all state/provincial and local 

laws.

WARNING

Observe the following precau-

tions.

Failure to do so may result in 

death or serious injury.

When towing the vehicle

Be sure to transport the vehicle 

with the front wheels raised or 

with all four wheels raised off the 

ground. If the vehicle is towed 

with the front wheels contacting 

the ground, the drivetrain and 

related parts may be damaged.

While towing

When towing using cables or 

chains, avoid sudden starts, etc. 

which place excessive stress on 

the towing eyelets, cables or 

chains. The towing eyelets, 

cables or chains may become 

damaged, broken debris may hit 

people, and cause serious dam-

age.

Do not turn the engine switch 

off.

There is a possibility that the 

steering wheel is locked and 

cannot be operated.

Installing towing eyelets to 

the vehicle

Make sure that towing eyelets are 

installed securely.

If not securely installed, towing 

eyelets may come loose during 

towing.

NOTICE

To prevent damage to the 

vehicle when towing using a 

wheel-lift type truck

Do not tow the vehicle from the 

rear when the engine switch is 

off. The steering lock mecha-

nism is not strong enough to 

hold the front wheels straight.

When raising the vehicle, 

ensure adequate ground clear-

ance for towing at the opposite 

end of the raised vehicle. With-

out adequate clearance, the 

vehicle could be damaged while 

being towed.

To prevent damage to the 

vehicle when towing with a 

sling-type truck

Do not tow with a sling-type truck, 

either from the front or rear.

-------------------------------------------------------------------------------------------------------------------------------------------------------------

468

8-2. Steps to take in an emergency

COROLLA H/B_U

The following may indicate a 

problem with your transmission. 

Contact your Toyota dealer or 

commercial towing service 

before towing.

The engine is running but the 

vehicle does not move.

The vehicle makes an abnor-

mal sound.

From the front

Release the parking brake.
Turn automatic mode off. 

(

P.155)

From the rear

Use a towing dolly under the 

front wheels.

When using a flat-bed truck to 

transport the vehicle, use tire 

strapping belts. Refer to the 

owner's manual of the flat-bed 

truck for the tire strapping 

method.
In order to suppress vehicle 

movement during transporta-

tion, set the parking brake and 

turn the engine switch off.

If a tow truck is not available in 

NOTICE

To prevent damage to the 

vehicle during emergency 

towing

Do not secure cables or chains to 

the suspension components.

Situations when it is nec-

essary to contact dealers 

before towing

Towing with a wheel-lift 

type truck

NOTICE

Towing with a sling-type truck

Do not tow with a sling-type truck 

to prevent body damage.

Using a flatbed truck

Emergency towing

-------------------------------------------------------------------------------------------------------------------------------------------------------------

469

8-2. Steps to take in an emergency

COROLLA H/B_U

8

Whe

n tr

ouble

 ar

ises

an emergency, your vehicle may 
be temporarily towed using 
cables or chains secured to the 
emergency towing eyelets. This 
should only be attempted on 
hard surfaced roads for at most 
50 miles (80 km) at under 18 
mph (30 km/h).
A driver must be in the vehicle to 
steer and operate the brakes. 
The vehicle’s wheels, drive train, 
axles, steering and brakes must 
be in good condition.

For vehicles with a continuously 
variable transmission, only the 
front towing eyelets may be 
used.

To have your vehicle towed by 
another vehicle, the towing eye-
let must be installed to your 
vehicle. Install the towing eyelet 
using the following procedure.

1

Take out the wheel nut 
wrench, flathead screwdriver 
and towing eyelet. (

P.485, 

495)

2

Remove the eyelet cover 
using a flathead screwdriver.

To protect the bodywork, place a 
rag between the screwdriver and 
the vehicle body as shown in the 

illustration.

3

Insert the towing eyelet into 
the hole and tighten partially 
by hand.

4

Tighten down the towing eye-
let securely using a wheel nut 
wrench or hard metal bar.

5

Securely attach cables or 
chains to the towing eyelet.

Take care not to damage the vehi-

Emergency towing proce-
dure

-------------------------------------------------------------------------------------------------------------------------------------------------------------

470

8-2. Steps to take in an emergency

COROLLA H/B_U

cle body.

6

Enter the vehicle being towed 
and start the engine.

If the engine does not start, turn the 
engine switch to ON.

7

Shift the shift lever to N and 
release the parking brake.
Turn automatic mode off. 
(

P.155)

Vehicles with a continuously 
variable transmission: When 
the shift lever cannot be 
shifted: 

P.148

While towing

If the engine is not running, the 
power assist for the brakes and 
steering will not function, making 
steering and braking more difficult.

Wheel nut wrench

Wheel nut wrench is installed in lug-
gage compartment. (

P.485, 495)

Fluid leaks under the vehicle.
(Water dripping from the air 
conditioning after use is nor-
mal.)

Flat-looking tires or uneven 
tire wear

Engine coolant temperature 
gauge needle continually 
points higher than normal.

Changes in exhaust sound

Excessive tire squeal when 
cornering

Strange noises related to the 
suspension system

Pinging or other noises 
related to the engine

Engine missing, stumbling or 
running roughly

Appreciable loss of power

Vehicle pulls heavily to one 

If you think something 

is wrong

If you notice any of the fol-
lowing symptoms, your 
vehicle probably needs 
adjustment or repair. Con-
tact your Toyota dealer as 
soon as possible.

Visible symptoms

Audible symptoms

Operational symptoms

-------------------------------------------------------------------------------------------------------------------------------------------------------------

471

8-2. Steps to take in an emergency

COROLLA H/B_U

8

Whe

trouble

 ar

ises

side when braking

Vehicle pulls heavily to one 

side when driving on a level 

road

Loss of brake effectiveness, 

spongy feeling, pedal almost 

touches the floor

Follow the procedure below to 

restart the engine after the sys-

tem is activated.

1

Turn the engine switch to 

ACC or OFF.

2

Restart the engine.

Fuel pump shut off 

system

To minimize the risk of fuel 

leakage when the engine 

stalls or when an airbag 

inflates upon collision, the 

fuel pump shut off system 

stops the supply of fuel to 

the engine.

Restarting the engine

NOTICE

Before starting the engine

Inspect the ground under the 

vehicle.

If you find that fuel has leaked 

onto the ground, the fuel system 

has been damaged and is in need 

of repair. Do not restart the 

engine.

-------------------------------------------------------------------------------------------------------------------------------------------------------------

472

8-2. Steps to take in an emergency

COROLLA H/B_U

Brake system warning light (warning buzzer)

Brake system warning light

High coolant temperature warning light

*

 (warning buzzer)

*

: This light illuminates on the multi-information display.

If a warning light turns on or a warning buzzer 

sounds

Calmly perform the following actions if any of the warning 
lights comes on or flashes. If a light comes on or flashes, but 
then goes off, this does not necessarily indicate a malfunction 
in the system. However, if this continues to occur, have the 
vehicle inspected by your Toyota dealer.

Actions to the warning lights or warning buzzers

Warning light

Details/Actions

(U.S.A.)

or

(Red)

(Canada)

Indicates that:

The brake fluid level is low; or

The brake system is malfunctioning

Immediately stop the vehicle in a safe place and con-
tact your Toyota dealer. Continuing to drive the vehi-
cle may be dangerous.

Warning light

Details/Actions

(Yellow)

Indicates a malfunction in the parking brake system

Have the vehicle inspected by your Toyota dealer 
immediately.

Warning light

Details/Actions

Indicates that the engine coolant temperature is exces-
sively high

Immediately stop the vehicle in a safe place.
Handling method (

P.510)

-------------------------------------------------------------------------------------------------------------------------------------------------------------

473

8-2. Steps to take in an emergency

COROLLA H/B_U

8

Whe

n tr

ouble

 ar

ises

Charging system warning light

Low engine oil pressure warning light

*

 (warning buzzer)

*

: This light illuminates on the multi-information display.

Malfunction indicator lamp (warning buzzer)

SRS warning light (warning buzzer)

Warning light

Details/Actions

Indicates a malfunction in the vehicle’s charging system

Immediately stop the vehicle in a safe place and con-
tact your Toyota dealer.

Warning light

Details/Actions

Indicates that the engine oil pressure is excessively low

Immediately stop the vehicle in a safe place and con-
tact your Toyota dealer.

Warning light

Details/Actions

(U.S.A.)

or

(Canada)

Indicates a malfunction in:

The electronic engine control system;

The electronic throttle control system; or

The electronic continuously variable transmission (if 
equipped) control system

Immediately stop the vehicle in a safe place and con-
tact your Toyota dealer.

Warning light

Details/Actions

Indicates a malfunction in:

The SRS airbag system;

The front passenger occupant classification system; or

The seat belt pretensioner system

Have the vehicle inspected by your Toyota dealer 
immediately.

-------------------------------------------------------------------------------------------------------------------------------------------------------------

474

8-2. Steps to take in an emergency

COROLLA H/B_U

ABS warning light

Brake Override System warning light/Drive-Start Control 
warning light

*

 (warning buzzer)

*

: This light illuminates on the multi-information display.

Warning light

Details/Actions

(U.S.A.)

or

(Canada)

Indicates a malfunction in:

The ABS; or

The brake assist system

Have the vehicle inspected by your Toyota dealer 
immediately.

Warning light

Details/Actions

When a buzzer sounds:

Indicates a malfunction in:

The Brake Override System

The Drive-Start Control system (if equipped)

Have the vehicle inspected by your Toyota dealer 
immediately.

Indicates that the shift position was changed and 
Drive-Start Control (if equipped) was operated while 
depressing the accelerator pedal.

Momentarily release the accelerator pedal.

When a buzzer does not sound:

Indicates that the accelerator and brake pedals are being 
depressed simultaneously, and the Brake Override System 
is operating.

Release the accelerator pedal and depress the brake 
pedal.

-------------------------------------------------------------------------------------------------------------------------------------------------------------

475

8-2. Steps to take in an emergency

COROLLA H/B_U

8

Whe

n tr

ouble

 ar

ises

Electric power steering system warning light (warning 
buzzer)

Low fuel level warning light

Driver’s and front passenger’s seat belt reminder light (warn-
ing buzzer)

*

*

: Driver’s seat belt warning buzzer:

The driver’s seat belt warning buzzer sounds to alert the driver that his or 
her seat belt is not fastened. Once the engine switch is turned to ON, the 
buzzer sounds. If the seat belt is still unfastened, the buzzer sounds inter-
mittently for a certain period of time after the vehicle reaches a certain 
speed.

Front passenger’s seat belt warning buzzer:

The front passenger’s seat belt warning buzzer sounds to alert the front 
passenger that his or her seat belt is not fastened. If the seat belt is unfas-
tened, the buzzer sounds intermittently for a certain period of time after the 
vehicle reaches a certain speed.

Warning light

Details/Actions

(Red)

or

(Yellow)

Indicates a malfunction in the EPS (Electric Power Steer-
ing) system

Have the vehicle inspected by your Toyota dealer 
immediately.

Warning light

Details/Actions

Indicates that remaining fuel is approximately 2 gal. (7.5 L, 
1.6 Imp. gal.) or less

Refuel the vehicle.

Warning light

Details/Actions

Warns the driver and/or front passenger to fasten their seat 
belts

Fasten the seat belt. 
If the front passenger’s seat is occupied, the front 
passenger’s seat belt also needs to be fastened to 
make the warning light (warning buzzer) turn off.

-------------------------------------------------------------------------------------------------------------------------------------------------------------

476

8-2. Steps to take in an emergency

COROLLA H/B_U

Rear passengers’ seat belt reminder lights (warning buzzer)

*

*

: Rear passengers’ seat belt warning buzzer:

The rear passengers’ seat belt warning buzzer sounds to alert the rear pas-
senger that his or her seat belt is not fastened. If the seat belt is unfas-
tened, the buzzer sounds intermittently for a certain period of time, after the 
seat belt is fastened and unfastened and the vehicle reaches a certain 
speed.

Tire pressure warning light

LTA indicator/LDA indicator (warning buzzer)

Warning light

Details/Actions

Warns the rear passengers to fasten their seat belts

Fasten the seat belt.

Warning light

Details/Actions

When the light comes on after blinking for approximately 1 
minute:

Malfunction in the tire pressure warning system

Have the system checked by your Toyota dealer.

When the light comes on:

Low tire inflation pressure such as

Natural causes

Flat tire

Immediately stop the vehicle in a safe place.
Handling method (

P.479)

Warning light

Details/Actions

(Orange)

Indicates a malfunction in the LTA (Lane Tracing Assist) or 
LDA (Lane Departure Alert with steering control)

Follow the instructions displayed on the multi-infor-
mation display. (

P.195, 203)

-------------------------------------------------------------------------------------------------------------------------------------------------------------

477

8-2. Steps to take in an emergency

COROLLA H/B_U

8

Whe

n tr

ouble

 ar

ises

RCTA OFF indicator (warning buzzer)

PCS warning light

Slip indicator

Warning light

Details/Actions

(Flashes)

(if equipped)

Indicates a malfunction in the RCTA (Rear Cross Traffic 
Alert) function

Have the vehicle inspected by your Toyota dealer 
immediately.

Indicates that the rear bumper around the radar sensor is 
covered with dirt, etc. (

P.230)

Follow the instructions displayed on the multi-infor-
mation display. (

P.234)

Warning light

Details/Actions

(Flashes or illu-

minates)

If a buzzer sounds simultaneously:

A malfunction has occurred in the PCS (Pre-Collision Sys-
tem).

Have the vehicle inspected by your Toyota dealer 
immediately.

If a buzzer does not sound:

The PCS (Pre-Collision System) has become temporarily 
unavailable, corrective action may be necessary.

Possible causes and corrective actions (

P.176, 

482)

If the PCS (Pre-Collision System) or VSC (Vehicle Stability 
Control) system is disabled, the PCS warning light will illu-
minate.

P.185

Warning light

Details/Actions

Indicates a malfunction in:

The VSC system;

The TRAC system; or

The hill-start assist control system

Have the vehicle inspected by your Toyota dealer 
immediately.

-------------------------------------------------------------------------------------------------------------------------------------------------------------

478

8-2. Steps to take in an emergency

COROLLA H/B_U

Parking brake indicator

Brake hold operated indicator

iMT indicator

Warning buzzer

In some cases, the buzzer may not 
be heard due to being in a noisy 
location or audio sound.

Front passenger detection sen-
sor, seat belt reminder and 
warning buzzer

If luggage is placed on the front 
passenger seat, the front passen-
ger detection sensor may cause 
the warning light to flash and the 
warning buzzer to sound even if a 
passenger is not sitting in the 
seat.

If a cushion is placed on the seat, 
the sensor may not detect a pas-
senger, and the warning light may 

not operate properly.

SRS warning light

This warning light system monitors 
the airbag sensor assembly, front 
impact sensors, side impact sensors 
(front door), side impact sensors 
(front), side impact sensors (rear), 
driver’s seat position sensor, 
driver’s seat belt buckle switch, front 
passenger occupant classification 
system (ECU and sensors), “AIR 
BAG ON” indicator light, “AIR BAG 
OFF” indicator light, seat belt pre-
tensioners, airbags, interconnecting 
wiring and power sources. (

P.29)

Warning light

Details/Actions

(Flashes)

(U.S.A.)

or

(Flashes)
(Canada)

It is possible that the parking brake is not fully engaged or 
released

Operate the parking brake switch once again.

This light comes on when the parking brake is not released. 
If the light turns off after the parking brake is fully released, 
the system is operating normally.

Warning light

Details/Actions

(Flashes)

Indicates a malfunction in the brake hold system

Have the vehicle inspected by your Toyota dealer 
immediately.

Warning light

Details/Actions

(Orange)

(if equipped)

Indicates a malfunction in the iMT

Have the vehicle inspected by your Toyota dealer 
immediately.

-------------------------------------------------------------------------------------------------------------------------------------------------------------

479

8-2. Steps to take in an emergency

COROLLA H/B_U

8

Whe

trouble

 ar

ises

If the malfunction indicator 

lamp comes on while driving

First check the following:

Is the fuel tank empty?

If it is, fill the fuel tank immediately.

Is the fuel tank cap loose?

If it is, tighten it securely.

The light will go off after several 

driving trips.
If the light does not go off even after 

several trips, contact your Toyota 

dealer as soon as possible.

Electric power steering system 

warning light (warning buzzer)

When the battery charge becomes 

insufficient or the voltage temporar-

ily drops, the electric power steering 

system warning light may come on 

and the warning buzzer may sound.

When the tire pressure warning 

light comes on

Inspect the tires to check if a tire is 

punctured.
If a tire is punctured: 

P.484, 494

If none of the tires are punctured:

Turn the engine switch off then turn 

it to ON. Check if the tire pressure 

warning light comes on or blinks.

If the tire pressure warning light 

blinks for approximately 1 minute 

then stays on

There may be a malfunction in the 

tire pressure warning system. Have 

the vehicle inspected by your Toyota 

dealer immediately.

If the tire pressure warning light 

comes on

1

After the temperature of the tires 

has lowered sufficiently, check 

the inflation pressure of each tire 

and adjust them to the specified 

level.

2

If the warning light does not turn 

off even after several minutes 

have elapsed, check that the 

inflation pressure of each tire is 

at the specified level and perform 

initialization. (

P.448)

The tire pressure warning light 

may come on due to natural 

causes

The tire pressure warning light may 

come on due to natural causes such 

as natural air leaks and tire inflation 

pressure changes caused by tem-

perature. In this case, adjusting the 

tire inflation pressure will turn off the 

warning light (after a few minutes).

When a tire is replaced with a 

spare tire (vehicles with a com-

pact spare tire)

The compact spare tire is not 

equipped with a tire pressure warn-

ing valve and transmitter. If a tire 

goes flat, the tire pressure warning 

light will not turn off even though the 

flat tire has been replaced with the 

spare tire. Replace the spare tire 

with the repaired tire and adjust the 

tire inflation pressure. The tire pres-

sure warning light will go off after a 

few minutes.

Conditions that the tire pres-

sure warning system may not 

function properly

P.445

WARNING

If both the ABS and the brake 

system warning lights remain 

on

Stop your vehicle in a safe place 

immediately and contact your Toy-

ota dealer.

The vehicle will become 

extremely unstable during brak-

ing, and the ABS system may fail, 

which could cause an accident 

resulting in death or serious injury.

-------------------------------------------------------------------------------------------------------------------------------------------------------------

480

8-2. Steps to take in an emergency

COROLLA H/B_U

WARNING

When the electric power 

steering system warning light 

comes on

When the light comes on yellow, 

the assist to the power steering is 

restricted. When the light comes 

on red, the assist to the power 

steering is lost and handling oper-

ations of the steering wheel 

become extremely heavy.

When steering wheel operations 

are heavier than usual, grip the 

steering wheel firmly and operate 

it using more force than usual.

If the tire pressure warning 

light comes on

Be sure to observe the following 

precautions.

Failure to do so could cause a 

loss of vehicle control and result 

in death or serious injury.

Stop your vehicle in a safe place 

as soon as possible. Adjust the 

tire inflation pressure immedi-

ately.

Vehicles with a compact spare 

tire: If the tire pressure warning 

light comes on even after tire 

inflation pressure adjustment, it 

is probable that you have a flat 

tire. Check the tires. If a tire is 

flat, change it with the spare tire 

and have the flat tire repaired by 

the nearest Toyota dealer.

Vehicles with emergency tire 

puncture repair kit: If the tire 

pressure warning light comes 

on even after tire inflation pres-

sure adjustment, it is probable 

that you have a flat tire. Check 

the tires. If a tire is flat, repair 

the flat tire by using emergency 

tire puncture repair kit.

Avoid abrupt maneuvering and 

braking.

If the vehicle tires deteriorate, 

you could lose control of the 

steering wheel or the brakes.

If a blowout or sudden air 

leakage should occur

The tire pressure warning system 

may not activate immediately.

Maintenance of the tires

Each tire, including the spare (if 

provided), should be checked 

monthly when cold and inflated to 

the inflation pressure recom-

mended by the vehicle manufac-

turer on the vehicle placard or tire 

inflation pressure label (tire and 

load information label). (If your 

vehicle has tires of a different size 

than the size indicated on the 

vehicle placard or tire inflation 

pressure label [tire and load infor-

mation label], you should deter-

mine the proper tire inflation 

pressure for those tires.)
As an added safety feature, your 

vehicle has been equipped with a 

tire pressure monitoring system 

(TPMS-tire pressure warning sys-

tem) that illuminates a low tire 

pressure telltale (tire pressure 

warning light) when one or more 

of your tires is significantly 

under-inflated. Accordingly, when 

the low tire pressure telltale (tire 

pressure warning light) illumi-

nates, you should stop and check 

your tires as soon as possible, 

and inflate them to the proper 

pressure. Driving on a signifi-

cantly under-inflated tire causes 

the tire to overheat and can lead 

to tire failure. Under-inflation also 

reduces fuel efficiency and tire 

tread life, and may affect the vehi-

cle’s handling and stopping ability.

-------------------------------------------------------------------------------------------------------------------------------------------------------------

481

8-2. Steps to take in an emergency

COROLLA H/B_U

8

Whe

trouble

 ar

ises

WARNING

Please note that the TPMS (tire 

pressure warning system) is not a 

substitute for proper tire mainte-

nance, and it is the driver’s 

responsibility to maintain correct 

tire pressure, even if under-infla-

tion has not reached the level to 

trigger illumination of the TPMS 

low tire pressure telltale (tire pres-

sure warning light).
Your vehicle has also been 

equipped with a TPMS (tire pres-

sure warning system) malfunc-

tion indicator to indicate when the 

system is not operating properly. 

The TPMS (tire pressure warning 

system) malfunction indicator is 

combined with the low tire pres-

sure telltale (tire pressure warning 

light). When the system detects a 

malfunction, the telltale will flash 

for approximately one minute and 

then remain continuously illumi-

nated. This sequence will con-

tinue upon subsequent vehicle 

start-ups as long as the malfunc-

tion exists. When the malfunction 

indicator is illuminated, the sys-

tem may not be able to detect or 

signal low tire pressure as 

intended.
TPMS (tire pressure warning sys-

tem) malfunctions may occur for a 

variety of reasons, including the 

installation of replacement or 

alternate tires or wheels on the 

vehicle that prevent the TPMS 

(tire pressure warning system) 

from functioning properly. Always 

check the TPMS (tire pressure 

warning system) malfunction tell-

tale after replacing one or more 

tires or wheels on your vehicle to 

ensure that the replacement or 

alternate tires and wheels allow 

the TPMS (tire pressure warning 

system) to continue to function 

properly.

NOTICE

To ensure the tire pressure 

warning system operates 

properly

Do not install tires with different 

specifications or makers, as the 

tire pressure warning system may 

not operate properly.

-------------------------------------------------------------------------------------------------------------------------------------------------------------

482

8-2. Steps to take in an emergency

COROLLA H/B_U

Warning messages

The warning messages explained 
below may differ from the actual 
messages according to operation 
conditions and vehicle specifica-
tions.

Warning buzzer

A buzzer may sound when a mes-
sage is displayed. 
The buzzer may not be audible if the 
vehicle is in a noisy location or if the 
audio system volume is high.

If “Engine Oil Level Low Add or 
Replace” is displayed

The engine oil level is low. Check 
the level of the engine oil, and add if 

necessary.

This message may appear if the 
vehicle is stopped on a slope. Move 
the vehicle to a level surface and 
check to see if the message disap-
pears.

If “Engine Stopped Steering 
Power Low” is displayed

This message is displayed if the 
engine is stopped while driving.

When steering wheel operations are 
heavier than usual, grip the steering 
wheel firmly and operate it using 
more force than usual.

If “Auto Power OFF to Conserve 
Battery” is displayed

Power was cut off due to the auto-
matic power off function. Next time 
when starting the engine, increase 
the engine speed slightly and main-
tain that level for approximately 5 
minutes to recharge the battery.

If “Headlight System Malfunc-
tion Visit Your Dealer” is dis-
played

The following systems may be mal-
functioning. Have the vehicle 
inspected by your Toyota dealer 
immediately.

The LED headlight system

AFS (Adaptive Front-lighting Sys-
tem) (if equipped)

The automatic headlight leveling 
system (if equipped)

Automatic High Beam

If a message that indicates the 
malfunction of front camera is 
displayed

The following systems may be sus-
pended until the problem shown in 
the message is resolved. (

P.176, 

472)

PCS (Pre-Collision system)

LTA (Lane Tracing Assist) (if 
equipped)

LDA (Lane Departure Alert with 
steering control) (if equipped)

If a warning message 

is displayed

The multi-information dis-
play shows warnings for 
system malfunctions and 
incorrectly performed oper-
ations, and messages that 
indicate a need for mainte-
nance. When a message is 
displayed, perform the 
appropriate corrective 
action for the message.
If a warning message is dis-
played again after the 
appropriate actions have 
been performed, contact 
your Toyota dealer.
Additionally, if a warning 
light comes on or flashes at 
the same time that a warn-
ing message is displayed, 
take the appropriate correc-
tive action for the warning 
light. (

P.472)

-------------------------------------------------------------------------------------------------------------------------------------------------------------

483

8-2. Steps to take in an emergency

COROLLA H/B_U

8

Whe

trouble

 ar

ises

Automatic High Beam

RSA (Road Sign Assist) (if 

equipped)

Dynamic radar cruise control with 

full-speed range (if equipped)

Dynamic radar cruise control (if 

equipped)

If “Radar Cruise Control 

Unavailable” is displayed

The dynamic radar cruise control 

with full-speed range system or 

dynamic radar cruise control system 

cannot be used temporarily. Use the 

system when it becomes available 

again.

If “Maintenance Required 

Soon” is displayed

Indicates that all maintenance 

according to the driven distance on 

the maintenance schedule

*

 should 

be performed soon.
Comes on approximately 4500 

miles (7200 km) after the message 

has been reset. If necessary, per-

form maintenance. Please reset the 

message after the maintenance is 

performed. (

P.426)

*

: Refer to the separate “Scheduled 

Maintenance” or “Owner’s Man-

ual Supplement” for the mainte-

nance interval applicable to your 

vehicle.

If “Maintenance Required Visit 

Your Dealer” is displayed

Indicates that all maintenance is 

required to correspond to the driven 

distance on the maintenance sched-

ule

*

.

Comes on approximately 5000 

miles (8000 km) after the message 

has been reset. (The indicator will 

not work properly unless the mes-

sage has been reset.) Perform the 

necessary maintenance. Please 

reset the message after the mainte-

nance is performed. (

P.426)

*

: Refer to the separate “Scheduled 

Maintenance” or “Owner’s Man-

ual Supplement” for the mainte-

nance interval applicable to your 

vehicle.

If a message that indicates the 

need for visiting your Toyota 

dealer is displayed

The system or part shown on the 

multi-information display is malfunc-

tioning. Have the vehicle inspected 

by your Toyota dealer immediately.

If a message that indicates the 

need for referring to Owner’s 

Manual is displayed

If “Engine Coolant Temp High” is 

displayed, follow the instructions 

accordingly. (

P.510)

If any of the following messages 

are displayed on the multi-infor-

mation display, it may indicate a 

malfunction. Have the vehicle 

inspected by your Toyota dealer 

immediately.

• “Smart Key System Malfunction”

If any of the following messages 

are displayed on the multi-infor-

mation display, it may indicate a 

malfunction. Immediately stop the 

vehicle and contact your Toyota 

dealer.

• “Braking Power Low”

• “Charging System Malfunction”

• “Oil Pressure Low”

NOTICE

If “High Power Consumption 

Partial Limit on AC/Heater 

Operation” is displayed fre-

quently

There is a possible malfunction 

relating to the charging system or 

the battery may be deteriorating. 

Have the vehicle inspected by 

your Toyota dealer.

-------------------------------------------------------------------------------------------------------------------------------------------------------------

484

8-2. Steps to take in an emergency

COROLLA H/B_U

Stop the vehicle in a safe 

place on a hard, flat surface.

Set the parking brake.

Shift the shift lever to P (con-

tinuously variable transmis-

sion) or N (manual 

transmission).

Stop the engine.

Turn on the emergency flash-

ers.

Check the degree of the tire 

damage.

A tire should only be repaired 

with the emergency tire punc-

ture repair kit if the damage is 

caused by a nail or screw pass-

ing through the tire tread.

• Do not remove the nail or 

screw from the tire. Removing 

the object may widen the 

opening and make emer-

gency repair with the repair kit 

impossible.

• To avoid sealant leakage, 

move the vehicle until the 

area of the puncture, if 

known, is positioned at the 

top of the tire.

A flat tire that cannot be 

repaired with the emergency 

tire puncture repair kit

In the following cases, the tire can-

not be repaired with the emergency 

tire puncture repair kit. Contact your 

Toyota dealer.

If you have a flat tire 

(vehicles without 

spare tire)

Your vehicle is not equipped 

with a spare tire, but instead 

is equipped with an emer-

gency tire puncture repair 

kit.
A puncture caused by a nail 

or screw passing through 

the tire tread can be 

repaired temporarily using 

the emergency tire puncture 

repair kit. (The kit contains a 

bottle of sealant. The seal-

ant can be used only once 

to temporarily repair one 

tire without removing the 

nail or screw from the tire.) 

After temporarily repairing 

the tire with the kit, have the 

tire repaired or replaced by 

your Toyota dealer.

WARNING

If you have a flat tire

Do not continue driving with a flat 

tire.

Driving even a short distance with 

a flat tire can damage the tire and 

the wheel beyond repair, which 

could result in an accident.

Before repairing the tire

-------------------------------------------------------------------------------------------------------------------------------------------------------------

485

8-2. Steps to take in an emergency

COROLLA H/B_U

8

Whe

n tr

ouble

 ar

ises

When the tire is damaged due to 
driving without sufficient air pres-
sure

When there are any cracks or 
damage at any location on the 
tire, such as on the side wall, 
except the tread

When the tire is visibly separated 
from the wheel

When the cut or damage to the 
tread is 0.16 in. (4 mm) long or 

more

When the wheel is damaged

When two or more tires have been 
punctured

When more than 2 sharp objects 
such as nails or screws have 
passed through the tread on a sin-
gle tire

When the sealant has expired

Jack handle

*

Towing eyelet

Wheel nut wrench

*

Emergency tire puncture repair kit

Jack

*

(Use of the jack: 

P.497)

*

: If equipped

Bottle

Location of the emergency tire puncture repair kit and 
tools

Emergency tire puncture 
repair kit components

-------------------------------------------------------------------------------------------------------------------------------------------------------------

486

8-2. Steps to take in an emergency

COROLLA H/B_U

Hose
Air release cap
Sticker

Compressor

Power plug
Rubber stopper
Air pressure gauge
Compressor switch

Note for checking the emer-

gency tire puncture repair kit

Check the sealant expiry date occa-

sionally.

The expiry date is shown on the bot-

tle. Do not use sealant whose expiry 

date has already passed. Other-

wise, repairs conducted using the 

emergency tire puncture repair kit 

may not be performed properly.

Emergency tire puncture repair 

kit

The emergency tire puncture 

repair kit is for filling the car tire 

with air.

The sealant has a limited life 

span. The expiry date is marked 

on the bottle. The sealant should 

be replaced before the expiry 

date. Contact your Toyota dealer 

for replacement.

The sealant stored in the emer-

gency tire puncture repair kit can 

be used only once to temporarily 

repair a single tire. If the sealant in 

the bottle and other parts of the kit 

have been used and need to be 

replaced, contact your Toyota 

dealer.

The compressor can be used 

repeatedly.

The sealant can be used when the 

outside temperature is from -40°F 

(-40°C) to 140°F (60°C).

The kit is exclusively designed for 

size and type of tires originally 

installed on your vehicle. Do not 

use it for tires that a different size 

than the original ones, or for any 

other purposes.

If the sealant gets on your clothes, 

it may stain.

If the sealant adheres to a wheel 

or the surface of the vehicle body, 

the stain may not be removable if 

it is not cleaned at once. Immedi-

ately wipe away the sealant with a 

wet cloth.

During operation of the repair kit, 

a loud operation noise is pro-

duced. This does not indicate a 

malfunction.

Do not use to check or to adjust 

the tire pressure.

WARNING

Caution while driving

Store the repair kit in the lug-

gage compartment.

Injuries may result in the event 

of an accident or sudden brak-

ing.

-------------------------------------------------------------------------------------------------------------------------------------------------------------

487

8-2. Steps to take in an emergency

COROLLA H/B_U

8

Whe

trouble

 ar

ises

1

Lift the deck mat.

2

Take out the jack.

For tightening
For loosening

1

Lift the deck mat. (

P.487)

2

Take out the emergency tire 

puncture repair kit. (

P.485)

1

Take out the repair kit from 

the plastic bag.

2

Remove the valve cap from 

the valve of the punctured 

tire.

WARNING

The repair kit is exclusively only 

for your vehicle.

Do not use repair kit on other 

vehicles, which could lead to an 

accident causing death or seri-

ous injury.

Do not use repair kit for tires 

that are different size than the 

original ones, or for any other 

purpose. If the tires have not 

been completely repaired, it 

could lead to an accident caus-

ing death or serious injury.

Precautions for use of the 

sealant

Ingesting the sealant is hazard-

ous to your health. If you ingest 

sealant, consume as much 

water as possible, and then 

immediately consult a doctor.

If sealant gets in eyes or 

adheres to skin, immediately 

wash it off with water. If discom-

fort persists, consult a doctor.

Taking out the jack

Taking out the emer-

gency tire puncture repair 

kit

Emergency repair method

-------------------------------------------------------------------------------------------------------------------------------------------------------------

488

8-2. Steps to take in an emergency

COROLLA H/B_U

3

Extend the hose. Remove 
the air release cap from the 
hose.

Attach the sticker enclosed with the 
bottle on the specified locations. 
(See step 

10

.)

You will use the air release cap 
again. Therefore keep it in a safe 
place.

4

Connect the hose to the 
valve.

Screw the end of the hose clock-
wise as far as possible.

5

Make sure that the compres-
sor switch is off.

6

Lift the rubber stopper on the 
compressor.

7

Remove the power plug from 
the compressor.

8

Connect the power plug to 
the power outlet socket. 
(

P.408)

9

Connect the bottle to the 
compressor.

As shown in the illustration, insert 
the bottle securely into the com-
pressor until the upper side of the 
mark on the bottle is aligned with 

-------------------------------------------------------------------------------------------------------------------------------------------------------------

489

8-2. Steps to take in an emergency

COROLLA H/B_U

8

Whe

n tr

ouble

 ar

ises

the upper end of the notch.

10

Attach the sticker provided 

with the tire puncture repair 
kit to a position easily seen 
from the driver’s seat.

U.S.A

Canada

11

Check the specified tire infla-

tion pressure.

Tire inflation pressure is specified 
on the label on the driver’s side pil-

lar as shown. (

P.519)

12

Start the engine.

13

To inject the sealant and 

inflate the tire, turn the com-
pressor switch on.

-------------------------------------------------------------------------------------------------------------------------------------------------------------

490

8-2. Steps to take in an emergency

COROLLA H/B_U

14

Inflate the tire until the speci-

fied air pressure is reached.

The sealant will be injected 
and the pressure will spike to 
between 44 psi (300 kPa, 3.0 

kgf/cm

2

 or bar) and 58 psi 

(400 kPa, 4.0 kgf/cm

2

 or bar), 

then gradually decrease.

The air pressure gauge will 
display the actual tire inflation 
pressure about 1 to 5 min-
utes after the switch is turned 
on.

Turn the compressor switch off and 
then check the tire inflation pres-
sure. Being careful not to over 
inflate, check and repeat the infla-
tion procedure until the specified 
tire inflation pressure is reached.

The tire can be inflated for about 5 
to 20 minutes (depending on the 
outside temperature). If the tire 
inflation pressure is still lower than 
the specified point after inflation for 
25 minutes, the tire is too damaged 

to be repaired. Turn the compres-
sor switch off and contact your Toy-
ota dealer.

If the tire inflation pressure exceeds 
the specified air pressure, let out 
some air to adjust the tire inflation 
pressure. (

P.492, 519)

15

With the compressor switch 

off, disconnect the hose from 
the valve on the tire and then 
pull out the power plug from 
the power outlet socket.

Some sealant may leak when the 
hose is removed.

16

Install the valve cap onto the 

valve of the emergency 
repaired tire.

17

Attach the air release cap to 

the end of the hose.

If the air release cap is not 
attached, the sealant may leak and 
the vehicle may get dirty.

18

Temporarily store the bottle 

in the luggage compartment 
while it is connected to the 
compressor.

19

To spread the liquid sealant 

evenly within the tire, imme-
diately drive safely for about 
3 miles (5 km) below 50 mph 
(80 km/h).

-------------------------------------------------------------------------------------------------------------------------------------------------------------

491

8-2. Steps to take in an emergency

COROLLA H/B_U

8

Whe

n tr

ouble

 ar

ises

20

After driving, stop your vehi-

cle in a safe place on a hard, 
flat surface and reconnect 
the repair kit.

Remove the air release cap from 
the hose before reconnecting the 
hose.

21

Turn the compressor switch 

on and wait for several sec-
onds, then turn it off. Check 
the tire inflation pressure.

If the tire inflation pressure is 
under 19 psi (130 kPa, 1.3 

kgf/cm

2

 or bar): The puncture 

cannot be repaired. Contact 
your Toyota dealer.

If the tire inflation pressure is 
19 psi (130 kPa, 1.3 

kgf/cm

2

or bar) or higher, but 

less than the specified air 
pressure: Proceed to step 

22

.

If the tire inflation pressure is 
the specified air pressure 
(

P.519): Proceed to step 

23

.

22

Turn the compressor switch 

on to inflate the tire until the 
specified air pressure is 
reached. Drive for about 3 
miles (5 km) and then per-
form step 

20

.

23

Attach the air release cap to 

the end of the hose.

If the air release cap is not 
attached, the sealant may leak and 
the vehicle may get dirty.

24

Store the bottle in the lug-

gage compartment while it is 
connected to the compres-
sor.

25

Taking precautions to avoid 

sudden braking, sudden 
acceleration and sharp turns, 
drive carefully at under 50 
mph (80 km/h) to the nearest 
Toyota dealer that is less 
than 62 miles (100 km) away 
for tire repair or replacement.

When having the tire repaired or 
replaced, make sure to tell the Toy-
ota dealer that the sealant is 
injected.

-------------------------------------------------------------------------------------------------------------------------------------------------------------

492

8-2. Steps to take in an emergency

COROLLA H/B_U

If the tire is inflated to more 

than the specified air pressure

1

Disconnect the hose from the 

valve.

2

Install the air release cap to the 

end of the hose and push the 

protrusion on the air release cap 

into the tire valve to let some air 

out.

3

Disconnect the hose from the 

valve, remove the air release cap 

from the hose and then recon-

nect the hose.

4

Turn the compressor switch on 

and wait for several seconds, 

and then turn it off. Check that 

the air pressure indicator shows 

the specified air pressure. 

(

P.519)

If the air pressure is under the des-

ignated pressure, turn the compres-

sor switch on again and repeat the 

inflation procedure until the speci-

fied air pressure is reached.

After a tire is repaired with the 

emergency tire puncture repair 

kit

The tire pressure warning valve 

and transmitter should be 

replaced.

Even if the tire inflation pressure is 

at the recommended level, the tire 

pressure warning light may come 

on/flash.

WARNING

Do not drive the vehicle with 

a flat tire

Do not continue driving with a flat 

tire.

Driving even a short distance with 

a flat tire can damage the tire and 

the wheel beyond repair.
Driving with a flat tire may cause a 

circumferential groove on the side 

wall. In such a case, the tire may 

explode when using a repair kit.

When fixing the flat tire

Stop your vehicle in a safe and 

flat area.

Do not touch the wheels or the 

area around the brakes immedi-

ately after the vehicle has been 

driven.

After the vehicle has been 

driven, the wheels and the area 

around the brakes may be 

extremely hot. Touching these 

areas with hands, feet or other 

body parts may result in burns.

Connect the valve and hose 

securely with the tire installed 

on the vehicle. If the hose is not 

properly connected to the valve, 

air leakage may occur as seal-

ant may be sprayed out.

If the hose comes off the valve 

while inflating the tire, there is a 

risk that the hose will move 

abruptly due to air pressure.

After inflation of the tire has 

completed, the sealant may 

splatter when the hose is dis-

connected or some air is let out 

of the tire.

Follow the operation procedure 

to repair the tire. If the proce-

dures not followed, the sealant 

may spray out.

-------------------------------------------------------------------------------------------------------------------------------------------------------------

493

8-2. Steps to take in an emergency

COROLLA H/B_U

8

Whe

trouble

 ar

ises

WARNING

Keep back from the tire while it 

is being repaired, as there is a 

chance of it bursting while the 

repair operation is being per-

formed. If you notice any cracks 

or deformation of the tire, turn 

off the compressor switch and 

stop the repair operation imme-

diately.

The repair kit may overheat if 

operated for a long period of 

time. Do not operate the repair 

kit continuously for more than 

40 minutes.

Parts of the repair kit become 

hot during operation. Be careful 

handling the repair kit during 

and after operation. Do not 

touch the metal part connecting 

the bottle and the compressor. It 

will be extremely hot.

Do not attach the vehicle speed 

warning sticker to an area other 

than the one indicated. If the 

sticker is attached to an area 

where an SRS airbag is located, 

such as the pad of the steering 

wheel, it may prevent the SRS 

airbag from operating properly.

Driving to spread the liquid 

sealant evenly

Observe the following precautions 

to reduce the risk of accidents.

Failing to do so may result in a 

loss of vehicle control and cause 

death or serious injury.

Drive the vehicle carefully at a 

low speed. Be especially careful 

when turning and cornering.

If the vehicle does not drive 

straight or you feel a pull 

through the steering wheel, stop 

the vehicle and check the fol-

lowing.

• Tire condition. The tire may 

have separated from the wheel.

• Tire inflation pressure. If the tire 

inflation pressure is 19 psi (130 

kPa, 1.3 kgf/cm

2

 or bar) or less, 

the tire may be severely dam-

aged.

NOTICE

When performing an emer-

gency repair

A tire should only be repaired 

with the emergency tire punc-

ture repair kit if the damage is 

caused by a sharp object such 

as nail or screw passing through 

the tire tread.

Do not remove the sharp object 

from the tire. Removing the 

object may widen the opening 

and disenable emergency repair 

with the repair kit.

The repair kit is not waterproof. 

Make sure that the repair kit is 

not exposed to water, such as 

when it is being used in the rain.

Do not put the repair kit directly 

onto dusty ground such as sand 

at the side of the road. If the 

repair kit vacuums up dust etc., 

a malfunction may occur.

Precautions for the emer-

gency tire puncture repair kit

The repair kit power source 

should be 12 V DC suitable for 

vehicle use. Do not connect the 

repair kit to any other source.

If fuel splatters on the repair kit, 

the repair kit may deteriorate. 

Take care not to allow fuel to 

contact it.

Place the repair kit in a storage 

to prevent it from being exposed 

to dirt or water.

Store the repair kit in the lug-

gage compartment out of reach 

of children.

-------------------------------------------------------------------------------------------------------------------------------------------------------------

494

8-2. Steps to take in an emergency

COROLLA H/B_U

Stop the vehicle in a safe 

place on a hard, flat surface.

Set the parking brake.

Shift the shift lever to P (con-

tinuously variable transmis-

sion) or R (manual 

transmission).

Stop the engine.

Turn on the emergency flash-

ers.

NOTICE

Do not disassemble or modify 

the repair kit. Do not subject 

parts such as the air pressure 

indicator to impacts. This may 

cause a malfunction.

To avoid damage to the tire 

pressure warning valves and 

transmitters

When a tire is repaired with liquid 

sealants, the tire pressure warn-

ing valve and transmitter may not 

operate properly. If a liquid seal-

ant is used, contact your Toyota 

dealer or other qualified service 

shop as soon as possible. After 

use of liquid sealant, make sure to 

replace the tire pressure warning 

valve and transmitter when repair-

ing or replacing the tire. (

P.445)

If you have a flat tire 

(vehicles with a spare 

tire)

Your vehicle is equipped 

with a spare tire. The flat tire 

can be replaced with the 

spare tire.
For details about tires: 

P.442

WARNING

If you have a flat tire

Do not continue driving with a flat 

tire. Driving even a short distance 

with a flat tire can damage the tire 

and the wheel beyond repair, 

which could result in an accident.

Before jacking up the 

vehicle

-------------------------------------------------------------------------------------------------------------------------------------------------------------

495

8-2. Steps to take in an emergency

COROLLA H/B_U

8

Whe

trouble

 ar

ises

Wheel nut wrench
Jack handle
Jack
Spare tire
Towing eyelet

Location of the spare tire, jack and tools

WARNING

Using the tire jack

Observe the following precau-

tions. Improper use of the tire jack 

may cause the vehicle to sud-

denly fall off the jack, leading to 

death or serious injury.

Do not use the tire jack for any 

purpose other than replacing 

tires or installing and removing 

tire chains.

Only use the tire jack that 

comes with this vehicle for 

replacing a flat tire. Do not use it 

on other vehicles, and do not 

use other tire jacks for replacing 

tires on this vehicle.

Put the jack properly in its jack 

point.

-------------------------------------------------------------------------------------------------------------------------------------------------------------

496

8-2. Steps to take in an emergency

COROLLA H/B_U

1

Press the button to raise the 

deck board handle and then 

lift the deck board.

2

Secure the deck board.

When the luggage cover is 

installed

Hook the deck board handle onto 

the underside of the luggage cover 

as shown in the illustration, to 

secure the deck board.

When the luggage cover is 

not installed

Hook the deck board handle onto 

the upper edge of the back door 

opening as shown in the illustration.

3

Take out the jack.

For tightening

WARNING

Do not put any part of your body 

under the vehicle while it is sup-

ported by the jack.

Do not start the engine or drive 

the vehicle while the vehicle is 

supported by the jack.

Do not raise the vehicle while 

someone is inside.

When raising the vehicle, do not 

put an object on or under the 

jack.

Do not raise the vehicle to a 

height greater than that required 

to replace the tire.

Use a jack stand if it is neces-

sary to get under the vehicle.

When lowering the vehicle, 

make sure that there is no-one 

near the vehicle. If there are 

people nearby, warn them 

vocally before lowering.

Taking out the jack

-------------------------------------------------------------------------------------------------------------------------------------------------------------

497

8-2. Steps to take in an emergency

COROLLA H/B_U

8

Whe

trouble

 ar

ises

For loosening

1

Secure the deck board. 

(

P.496)

2

Loosen the center fastener 

that secures the spare tire.

1

Chock the tires.

2

Vehicles with a steel wheel: 

Remove the wheel ornament 

using the wrench.

Insert the wrench into the notch   

on the wheel cap.

To protect the wheel ornament, 

place a rag between the wrench 

NOTICE

When the deck board is 

secured

Make sure not to close the back 

door when the deck board is 

hooked onto the luggage cover or 

the back door opening. Doing so 

may lead to damage to interior 

parts.

Taking out the spare tire

WARNING

When storing the spare tire

Be careful not to catch fingers or 

other body parts between the 

spare tire and the body of the 

vehicle.

Replacing a flat tire

Flat tire

Wheel chock 

positions

Front left-hand 

side

Behind the rear 

right-hand side 

tire

Front right-hand 

side

Behind the rear 

left-hand side tire

Rear left-hand 

side

In front of the 

front right-hand 

side tire

Rear right-hand 

side

In front of the 

front left-hand 

side tire

-------------------------------------------------------------------------------------------------------------------------------------------------------------

498

8-2. Steps to take in an emergency

COROLLA H/B_U

and the wheel ornament.

3

Slightly loosen the wheel 
nuts (one turn).

4

Turn the tire jack portion 


by hand until the center of the 
recessed portion of the jack 
is in contact with the center of 
the jack point.

5

Assemble the jack handle 
extension.

6

Raise the vehicle until the tire 
is slightly raised off the 
ground.

7

Remove all the wheel nuts 
and the tire.

When resting the tire on the 
ground, place the tire so that the 
wheel design faces up to avoid 
scratching the wheel surface.

-------------------------------------------------------------------------------------------------------------------------------------------------------------

499

8-2. Steps to take in an emergency

COROLLA H/B_U

8

Whe

trouble

 ar

ises

1

Remove any dirt or foreign 

matter from the wheel con-

tact surface.

If foreign matter is on the wheel 

contact surface, the wheel nuts 

may loosen while the vehicle is in 

motion, causing the tire to come off.

2

Install the tire and loosely 

tighten each wheel nut by 

hand by approximately the 

same amount.

When replacing a steel wheel with 

a steel wheel, tighten the wheel 

nuts until the tapered portion   

comes into loose contact with the 

disc wheel seat  .

When replacing an aluminum wheel 

with a steel wheel, tighten the 

wheel nuts until the tapered portion 

 comes into loose contact with 

WARNING

Replacing a flat tire

Do not touch the disc wheels or 

the area around the brakes 

immediately after the vehicle 

has been driven. After the vehi-

cle has been driven the disc 

wheels and the area around the 

brakes will be extremely hot. 

Touching these areas with 

hands, feet or other body parts 

while changing a tire, etc. may 

result in burns.

Failure to follow these precau-

tions could cause the wheel 

nuts to loosen and the tire to fall 

off, resulting in death or serious 

injury.

• Have the wheel nuts tightened 

with a torque wrench to 76 ft•lbf 

(103 N•m, 10.5 kgf•m) as soon 

as possible after changing 

wheels.

• Do not attach a heavily dam-

aged wheel ornament, as it may 

fly off the wheel while the vehi-

cle is moving.

• When installing a tire, only use 

wheel nuts that have been spe-

cifically designed for that wheel.

• If there are any cracks or defor-

mations in the bolt screws, nut 

threads or bolt holes of the 

wheel, have the vehicle 

inspected by your Toyota 

dealer.

• When installing the wheel nuts, 

be sure to install them with the 

tapered ends facing inward.

Installing the spare tire

-------------------------------------------------------------------------------------------------------------------------------------------------------------

500

8-2. Steps to take in an emergency

COROLLA H/B_U

the disc wheel seat 

.

3

Lower the vehicle.

4

Firmly tighten each wheel nut 
two or three times in the 
order shown in the illustra-
tion.

Tightening torque:
76 ft•lbf (103 N•m, 10.5 kgf•m)

5

Stow the flat tire, tire jack and 
all tools.

The compact spare tire

The compact spare tire is identi-
fied by the label “TEMPORARY 

USE ONLY” on the tire sidewall. 
Use the compact spare tire tempo-
rarily, and only in an emergency.

Make sure to check the tire infla-
tion pressure of the compact 
spare tire. (

P.519)

When the compact spare tire is 
equipped

The vehicle becomes lower when 
driving with the compact spare tire 
compared to when driving with stan-
dard tires.

After completing the tire 
change

The tire pressure warning system 
must be reset. (

P.448)

When using the compact spare 
tire

As the compact spare tire is not 
equipped with a tire pressure warn-
ing valve and transmitter, low infla-
tion pressure of the spare tire will 
not be indicated by the tire pressure 
warning system. Also, if you replace 
the compact spare tire after the tire 
pressure warning light comes on, 
the light remains on.

If you have a flat front tire on a 
road covered with snow or ice 
(vehicles with a compact spare 
tire)

Install the compact spare tire on one 
of the rear wheels of the vehicle. 
Perform the following steps and fit 
tire chains to the front tires:

1

Replace a rear tire with the com-
pact spare tire.

2

Replace the flat front tire with the 
tire removed from the rear of the 
vehicle.

3

Fit tire chains to the front tires.

When reinstalling the wheel 
ornament (steel wheels except 
compact spare tire)

Align the cutout of the wheel orna-
ment with the valve stem as shown 
in the illustration.

-------------------------------------------------------------------------------------------------------------------------------------------------------------

501

8-2. Steps to take in an emergency

COROLLA H/B_U

8

Whe

trouble

 ar

ises

WARNING

When using the compact 

spare tire

Remember that the compact 

spare tire provided is specifi-

cally designed for use with your 

vehicle. Do not use your com-

pact spare tire on another vehi-

cle.

Do not use more than one com-

pact spare tires simultaneously.

Replace the compact spare tire 

with a standard tire as soon as 

possible.

Avoid sudden acceleration, 

abrupt steering, sudden brak-

ing and shifting operations that 

cause sudden engine braking.

When the compact spare tire 

is attached

The vehicle speed may not be 

correctly detected, and the follow-

ing systems may not operate cor-

rectly:
• ABS & Brake assist
• VSC
• TRAC
• Automatic High Beam
• Dynamic radar cruise control 

with full-speed range (if 

equipped)

• Dynamic radar cruise control (if 

equipped)

• EPS

• PCS (Pre-Collision System)
• LDA (Lane Departure Alert with 

steering control) (if equipped)

• LTA (Lane Tracing Assist) (if 

equipped)

• Tire pressure warning system
• Navigation system

Speed limit when using the 

compact spare tire

Do not drive at speeds in excess 

of 50 mph (80 km/h) when a com-

pact spare tire is installed on the 

vehicle.
The compact spare tire is not 

designed for driving at high 

speeds. Failure to observe this 

precaution may lead to an acci-

dent causing death or serious 

injury.

After using the tools and jack

Before driving, make sure all the 

tools and jack are securely in 

place in their storage location to 

reduce the possibility of personal 

injury during a collision or sudden 

braking.

NOTICE

Be careful when driving over 

bumps with the compact 

spare tire installed on the 

vehicle.

The vehicle becomes lower when 

driving with the compact spare tire 

compared to when driving with 

standard tires. Be careful when 

driving over uneven road sur-

faces.

-------------------------------------------------------------------------------------------------------------------------------------------------------------

502

8-2. Steps to take in an emergency

COROLLA H/B_U

One of the following may be the 

cause of the problem:

There may not be sufficient 

fuel in the vehicle’s tank. 

Refuel the vehicle.

The engine may be flooded. 

Try to restart the engine again 

following correct starting pro-

cedures. (

P.142)

There may be a malfunction 

in the engine immobilizer sys-

tem. (

P.64)

One of the following may be the 

cause of the problem:

The battery may be dis-

charged. (

P.506)

NOTICE

Driving with tire chains and 

the compact spare tire

Do not fit tire chains to the com-

pact spare tire. Tire chains may 

damage the vehicle body and 

adversely affect driving perfor-

mance.

When replacing the tires

When removing or fitting the 

wheels, tires or the tire pressure 

warning valve and transmitter, 

contact your Toyota dealer as the 

tire pressure warning valve and 

transmitter may be damaged if not 

handled correctly.

If the engine will not 

start

If the engine will not start 

even though correct starting 

procedures are being fol-

lowed (

P.142), consider 

each of the following points:

The engine will not start 

even though the starter 

motor operates normally.

The starter motor turns 

over slowly, the interior 

lights and headlights are 

dim, or the horn does not 

sound or sounds at a low 

volume.

-------------------------------------------------------------------------------------------------------------------------------------------------------------

503

8-2. Steps to take in an emergency

COROLLA H/B_U

8

Whe

n tr

ouble

 ar

ises

The battery terminal connec-
tions may be loose or cor-
roded. (

P.439)

The engine starting system may 
be malfunctioning due to an 
electrical problem such as elec-
tronic key battery depletion or a 
blown fuse. However, an interim 
measure is available to start the 
engine. (

P.503)

One of the following may be the 
cause of the problem:

The battery may be dis-
charged. (

P.506)

One or both of the battery ter-
minals may be disconnected. 
(

P.439)

There may be a malfunction 
in the steering lock system.

Contact your Toyota dealer if the 
problem cannot be repaired, or if 
repair procedures are unknown.

When the engine does not start, 
the following steps can be used 
as an interim measure to start 

the engine if the engine switch is 
functioning normally.
Do not use this starting proce-
dure except in case of emer-
gency.

1

Pull the parking brake switch 
to check that the parking 
brake is set. (

P.154)

Parking brake indicator will come 
on.

2

Check that the shift lever is 
set in P (continuously vari-
able transmission) or N 
(manual transmission).

3

Turn the engine switch to 
ACC.

4

Press and hold the engine 
switch for about 15 seconds 
while depressing the brake 
pedal (continuously variable 
transmission) or clutch pedal 
(manual transmission) firmly.

Even if the engine can be started 
using the above steps, the system 
may be malfunctioning. Have the 
vehicle inspected by your Toyota 
dealer.

The starter motor does 
not turn over

The starter motor does 
not turn over, the interior 
lights and headlights do 
not turn on, or the horn 
does not sound.

Emergency start function

-------------------------------------------------------------------------------------------------------------------------------------------------------------

504

8-2. Steps to take in an emergency

COROLLA H/B_U

When the electronic key does 

not work properly

Make sure that the smart key sys-

tem has not been deactivated in 

the customization setting. If it is 

off, turn the function on. (Custom-

izable features 

P.535)

Check if battery-saving mode is 

set. If it is set, cancel the function. 

(

P.109)

Use the mechanical key 

(

P.100) in order to perform the 

following operations:

If you lose your keys

New genuine mechanical 

keys can be made by your 

Toyota dealer using another 

mechanical key and the key 

number stamped on your 

key number plate.
Keep the plate in a safe 

place such as your wallet, 

not in the vehicle.

NOTICE

When an electronic key is lost

If the electronic key remains lost, 

the risk of vehicle theft increases 

significantly. Visit your Toyota 

dealer immediately with all 

remaining electronic keys that 

were provided with your vehicle.

If the electronic key 

does not operate prop-

erly

If communication between 

the electronic key and vehi-

cle is interrupted (

P.109) 

or the electronic key cannot 

be used because the battery 

is depleted, the smart key 

system and wireless remote 

control cannot be used. In 

such cases, the doors can 

be opened and the engine 

can be started by following 

the procedure below.

NOTICE

In case of a smart key system 

malfunction or other 

key-related problems

Take your vehicle with all the elec-

tronic keys provided with your 

vehicle to your Toyota dealer.

Locking and unlocking 

the doors

-------------------------------------------------------------------------------------------------------------------------------------------------------------

505

8-2. Steps to take in an emergency

COROLLA H/B_U

8

Whe

trouble

 ar

ises

1

Locks all the doors

2

Unlocks all the doors

Turning the key unlocks the driver’s 

door. Turning the key again unlocks 

the other doors.

Key linked functions

1

Closes the windows (turn and 
hold)

*

2

Opens the windows (turn and 
hold)

*

*

: This setting must be customized 

at your Toyota dealer.

1

Vehicles with a continuously 

variable transmission: 

Ensure that the shift lever is 

in P and depress the brake 

pedal.

Vehicles with a manual trans-

mission: Shift the shift lever 

to N and depress the clutch 

pedal.

2

Touch the Toyota emblem 

side of the electronic key to 

the engine switch.

When the electronic key is 

detected, a buzzer sounds and the 

engine switch will turn to ON.
When the smart key system is 

deactivated in customization set-

ting, the engine switch will turn to 

WARNING

When using the mechanical 

key and operating the power 

windows

Operate the power window after 

checking to make sure that there 

is no possibility of any passenger 

having any of their body parts 

caught in the window.

Also, do not allow children to 

operate the mechanical key. It is 

possible for children and other 

passengers to get caught in the 

power window.

Starting the engine

-------------------------------------------------------------------------------------------------------------------------------------------------------------

506

8-2. Steps to take in an emergency

COROLLA H/B_U

ACC.

3

Firmly depress the brake 
pedal (continuously variable 
transmission) or clutch pedal 
(manual transmission) and 

check that 

 is shown on 

the multi-information display.

4

Press the engine switch 
shortly and firmly.

In the event that the engine still 
cannot be started, contact your 
Toyota dealer.

Stopping the engine

Shift the shift lever to P (continu-
ously variable transmission) or N 
(manual transmission) and press 
the engine switch as you normally 
do when stopping the engine.

Electronic key battery

As the above procedure is a tempo-
rary measure, it is recommended 
that the electronic key battery be 
replaced immediately when the bat-
tery is depleted. (

P.456)

Changing engine switch modes

Release the brake pedal (continu-
ously variable transmission) or 
clutch pedal (manual transmission) 
and press the engine switch in step 

3

 above.

The engine does not start and 
modes will be changed each time 
the switch is pressed. (

P.145)

If the vehicle battery 

is discharged

The following procedures 
may be used to start the 
engine if the vehicle’s bat-
tery is discharged.
You can also call your Toy-
ota dealer or a qualified 
repair shop.

-------------------------------------------------------------------------------------------------------------------------------------------------------------

507

8-2. Steps to take in an emergency

COROLLA H/B_U

8

Whe

n tr

ouble

 ar

ises

If you have a set of jumper (or 
booster) cables and a second 
vehicle with a 12-volt battery, 
you can jump start your vehicle 
by following the steps below.

1

Vehicles with an alarm 
(

P.66): Confirm that the 

electronic key is being car-
ried.

When connecting the jumper (or 

booster) cables, depending on the 
situation, the alarm may activate 
and doors locked. (

P.67)

2

Open the hood. (

P.433)

3

Connect a positive jumper cable clamp to 

 on your vehicle and 

connect the clamp on the other end of the positive cable to 

 on 

the second vehicle. Then, connect a negative cable clamp to 


on the second vehicle and connect the clamp at the other end of 

the negative cable to 

.

Positive (+) battery terminal (your vehicle)

Positive (+) battery terminal (second vehicle)

Negative (-) battery terminal (second vehicle)

Solid, stationary, unpainted metallic point away from the battery 
and any moving parts as shown in the illustration

4

Start the engine of the sec-
ond vehicle. Increase the 
engine speed slightly and 

maintain at that level for 
approximately 5 minutes to 

Restarting the engine

-------------------------------------------------------------------------------------------------------------------------------------------------------------

508

8-2. Steps to take in an emergency

COROLLA H/B_U

recharge the battery of your 
vehicle.

5

Open and close any of the 
doors of your vehicle with the 
engine switch OFF.

6

Maintain the engine speed of 
the second vehicle and start 
the engine of your vehicle by 
turning the engine switch to 
ON.

7

Once the vehicle’s engine 
has started, remove the 
jumper cables in the exact 
reverse order from which 
they were connected.

Once the engine starts, have the 
vehicle inspected at your Toyota 
dealer as soon as possible.

Starting the engine when the 
battery is discharged

The engine cannot be started by 
push-starting.

To prevent battery discharge

Turn off the headlights and the 
audio system while the engine is 
off.

Turn off any unnecessary electri-
cal components when the vehicle 
is running at a low speed for an 
extended period, such as in heavy 
traffic.

When the battery is removed or 
discharged

Information stored in the ECU is 
cleared. When the battery is 
depleted, have the vehicle 
inspected at your Toyota dealer.

Some systems may require initial-
ization. (

P.543)

When removing the battery ter-
minals

When the battery terminals are 
removed, the information stored in 
the ECU is cleared. Before remov-
ing the battery terminals, contact 
your Toyota dealer.

Charging the battery

The electricity stored in the battery 
will discharge gradually even when 
the vehicle is not in use, due to nat-
ural discharge and the draining 
effects of certain electrical appli-
ances. If the vehicle is left for a long 
time, the battery may discharge, 
and the engine may be unable to 
start. (The battery recharges auto-
matically during driving.)

When recharging or replacing 
the battery

In some cases, it may not be pos-
sible to unlock the doors using the 
smart key system when the bat-
tery is discharged. Use the wire-
less remote control or the 
mechanical key to lock or unlock 
the doors.

The engine may not start on the 
first attempt after the battery has 
recharged but will start normally 
after the second attempt. This is 
not a malfunction.

The engine switch mode is memo-
rized by the vehicle. When the 
battery is reconnected, the system 
will return to the mode it was in 
before the battery was dis-
charged. Before disconnecting the 
battery, turn the engine switch off.
If you are unsure what mode the 
engine switch was in before the 
battery discharged, be especially 
careful when reconnecting the 
battery.

When replacing the battery

Use a battery that conforms to 
European regulations.

Use a battery that the case size is 
same as the previous one (LN2), 
20 hour rate capacity (20HR) is 

-------------------------------------------------------------------------------------------------------------------------------------------------------------

509

8-2. Steps to take in an emergency

COROLLA H/B_U

8

Whe

trouble

 ar

ises

equivalent (60Ah) or greater, and 

performance rating (CCA) is 

equivalent (360A) or greater.

• If the sizes differ, the battery can-

not be properly secured.

• If the 20 hour rate capacity is low, 

even if the time period where the 

vehicle is not used is a short time, 

the battery may discharge and the 

engine may not be able to start.

For details, consult your Toyota 

dealer.

WARNING

When removing the battery 

terminals

Always remove the negative (-) 

terminal first. If the positive (+) ter-

minal contacts any metal in the 

surrounding area when the posi-

tive (+) terminal is removed, a 

spark may occur, leading to a fire 

in addition to electrical shocks 

and death or serious injury.

Avoiding battery fires or 

explosions

Observe the following precautions 

to prevent accidentally igniting the 

flammable gas that may be emit-

ted from the battery:

Make sure each jumper cable is 

connected to the correct termi-

nal and that it is not unintention-

ally in contact with any other 

than the intended terminal.

Do not allow the other end of 

the jumper cable connected to 

the “+” terminal to come into 

contact with any other parts or 

metal surfaces in the area, such 

as brackets or unpainted metal.

Do not allow the + and - clamps 

of the jumper cables to come 

into contact with each other.

Do not smoke, use matches, 

cigarette lighters or allow open 

flame near the battery.

Battery precautions

The battery contains poisonous 

and corrosive acidic electrolyte, 

while related parts contain lead 

and lead compounds. Observe 

the following precautions when 

handling the battery:

When working with the battery, 

always wear safety glasses and 

take care not to allow any bat-

tery fluids (acid) to come into 

contact with skin, clothing or the 

vehicle body.

Do not lean over the battery.

In the event that battery fluid 

comes into contact with the skin 

or eyes, immediately wash the 

affected area with water and 

seek medical attention. Place a 

wet sponge or cloth over the 

affected area until medical 

attention can be received.

Always wash your hands after 

handling the battery support, 

terminals, and other bat-

tery-related parts.

Do not allow children near the 

battery.

NOTICE

When handling jumper cables

When connecting the jumper 

cables, ensure that they do not 

become entangled in the cooling 

fan or engine drive belt.

-------------------------------------------------------------------------------------------------------------------------------------------------------------

510

8-2. Steps to take in an emergency

COROLLA H/B_U

1

Stop the vehicle in a safe 
place and turn off the air con-
ditioning system, and then 
stop the engine.

2

If you see steam:
Carefully lift the hood after 
the steam subsides.
If you do not see steam:
Carefully lift the hood.

3

After the engine has cooled 
down sufficiently, inspect the 

hoses and radiator core (radi-
ator) for any leaks.

Radiator

Cooling fan

If a large amount of coolant leaks, 
immediately contact your Toyota 
dealer.

4

The coolant level is satisfac-
tory if it is between the “MAX” 
and “MIN” lines on the reser-
voir.

Reservoir

“MAX” line

“MIN” line

5

Add engine coolant if neces-
sary.

Water can be used in an emer-
gency if engine coolant is unavail-

If your vehicle over-

heats

The following may indicate 
that your vehicle is over-
heating.

The engine coolant tem-
perature gauge (

P.74, 78) 

is in the red zone or a loss 
of engine power is experi-
enced. (For example, the 
vehicle speed does not 
increase.)

“Engine Coolant Temp High 
Stop in a Safe Place See 
Owner’s Manual” is shown 
on the multi-information dis-
play.

Steam comes out from 
under the hood.

Correction procedures

-------------------------------------------------------------------------------------------------------------------------------------------------------------

511

8-2. Steps to take in an emergency

COROLLA H/B_U

8

Whe

trouble

 ar

ises

able.

6

Start the engine and turn the 

air conditioning system on to 

check that the radiator cool-

ing fan operates and to check 

for coolant leaks from the 

radiator or hoses.

The fan operates when the air con-

ditioning system is turned on imme-

diately after a cold start. Confirm 

that the fan is operating by check-

ing the fan sound and air flow. If it is 

difficult to check these, turn the air 

conditioning system on and off 

repeatedly. (The fan may not oper-

ate in freezing temperatures.)

7

If the fan is not operating:

Stop the engine immediately 

and contact your Toyota 

dealer.

If the fan is operating:

Have the vehicle inspected at 

the nearest Toyota dealer.

WARNING

When inspecting under the 

hood of your vehicle

Observe the following precau-

tions. Failure to do so may result 

in serious injury such as burns.

If steam is seen coming from 

under the hood, do not open the 

hood until the steam has sub-

sided. The engine compart-

ment may be very hot.

Keep hands and clothing (espe-

cially a tie, a scarf or a muffler) 

away from the fan and belts. 

Failure to do so may cause the 

hands or clothing to be caught, 

resulting in serious injury.

Do not loosen the coolant reser-

voir caps while the engine and 

radiator are hot.

High temperature steam or 

coolant could spray out.

NOTICE

When adding engine coolant

Add coolant slowly after the 

engine has cooled down suffi-

ciently. Adding cool coolant to a 

hot engine too quickly can cause 

damage to the engine.

To prevent damage to the 

cooling system

Observe the following precau-

tions:

Avoid contaminating the coolant 

with foreign matter (such as 

sand or dust etc.).

Do not use any coolant additive.

-------------------------------------------------------------------------------------------------------------------------------------------------------------

512

8-2. Steps to take in an emergency

COROLLA H/B_U

1

Stop the engine. Set the 

parking brake and shift the 

shift lever to P (continuously 

variable transmission) or N 

(manual transmission).

2

Remove the mud, snow or 

sand from around the front 

wheels.

3

Place wood, stones or some 

other material under the front 

wheels to help provide trac-

tion.

4

Restart the engine.

5

Shift the shift lever to D or R 

(continuously variable trans-

mission) or 1 or R (manual 

transmission) and release 

the parking brake. Then, 

while exercising caution, 

depress the accelerator 

pedal.

When it is difficult to free the 

vehicle

Press the 

 switch to turn off 

TRAC.

If the vehicle becomes 

stuck

Carry out the following pro-

cedures if the tires spin or 

the vehicle becomes stuck 

in mud, dirt or snow:

Recovering procedure

WARNING

When attempting to free a 

stuck vehicle

If you choose to push the vehicle 

back and forth to free it, make 

sure the surrounding area is clear 

to avoid striking other vehicles, 

objects or people. The vehicle 

may also lunge forward or lunge 

back suddenly as it becomes free. 

Use extreme caution.

When shifting the shift lever 

(vehicles with a continuously 

variable transmission)

Be careful not to shift the shift 

lever with the accelerator pedal 

depressed.

This may lead to unexpected 

rapid acceleration of the vehicle 

that may cause an accident 

resulting in death or serious injury.

NOTICE

To avoid damaging the trans-

mission and other compo-

nents

Avoid spinning the front wheels 

and depressing the accelerator 

pedal more than necessary.

If the vehicle remains stuck 

even after these procedures are 

performed, the vehicle may 

require towing to be freed.

-------------------------------------------------------------------------------------------------------------------------------------------------------------

513

COROLLA H/B_U

9

9

Vehicle

 specificatio

ns

Vehicle specifications

.

9-1. Specifications

Maintenance data (fuel, oil 

level, etc.)..................

514

Fuel information ..........

522

Tire information ...........

524

9-2. Customization

Customizable features

..................................

535

9-3. Initialization

Items to initialize .........

543

-------------------------------------------------------------------------------------------------------------------------------------------------------------

514

9-1. Specifications

COROLLA H/B_U

9-1.Specifications

*

: Unladen vehicles

Vehicle identification num-
ber

The vehicle identification num-
ber (VIN) is the legal identifier 
for your vehicle. This is the pri-
mary identification number for 
your Toyota. It is used in regis-
tering the ownership of your 
vehicle.

This number is stamped under 
the right-hand front seat.

This number is also stamped on 
the top left of the instrument 
panel.

Maintenance data (fuel, oil level, etc.)

Dimensions and weight

Overall length

172.0 in. (4370 mm)

Overall width

70.5 in. (1790 mm)

Overall height

*

56.5 in. (1435 mm)

Wheelbase

103.9 in. (2640 mm)

Tread

Front

60.2 in. (1530 mm)

Rear

60.2 in. (1530 mm)

Vehicle capacity weight
(Occupants + luggage)

860 lb. (390 kg)

Seating capacity

Seating capacity

5 (Front 2, Rear 3)

Vehicle identification

-------------------------------------------------------------------------------------------------------------------------------------------------------------

515

9-1. Specifications

COROLLA H/B_U

9

Vehicle

 specificatio

ns

This number is also on the Certi-
fication Label.

Engine number

The engine number is stamped 
on the engine block as shown.

Engine

Model

2.0 L 4-cylinder (M20A-FKS)

Type

4-cylinder in line, 4-cycle, gasoline

Bore and stroke

3.17 

 3.84 in. (80.5 

 97.6 mm)

Displacement

121.3 cu. in. (1987 cm

3

)

Valve clearance

Automatic adjustment

Drive belt tension

Automatic adjustment

Fuel

Fuel type

Unleaded gasoline only

Octane Rating

87 (Research Octane Number 91) or 
higher

Fuel tank capacity
(Reference)

13.2 gal. (50.0 L, 11.0 Imp. gal.)

-------------------------------------------------------------------------------------------------------------------------------------------------------------

516

9-1. Specifications

COROLLA H/B_U

Oil capacity (Drain and refill 

[Reference

*

])

*

: The engine oil capacity is a refer-

ence quantity to be used when 
changing the engine oil. Warm up 
and turn off the engine, wait more 
than 5 minutes, and check the oil 
level on the dipstick.

Engine oil selection

“Toyota Genuine Motor Oil” is 
used in your Toyota vehicle. Use 
Toyota approved “Toyota Genu-
ine Motor Oil” or equivalent to 
satisfy the following grade and 
viscosity.

Oil grade: API SN/RC multi-
grade engine oil

Recommended viscosity: SAE 
0W-16

Outside temperature

SAE 0W-16 is the best choice 
for good fuel economy and good 
starting in cold weather.

If SAE 0W-16 is not available, 
SAE 0W-20 oil may be used. 
However, it must be replaced 
with SAE 0W-16 at the next oil 
change.

Oil viscosity (0W-16 is explained 
here as an example):
• The 0W in 0W-16 indicates 

the characteristic of the oil 
which allows cold startability. 
Oils with a lower value before 
the W allow for easier starting 
of the engine in cold weather.

• The 16 in 0W-16 indicates the 

viscosity characteristic of the 
oil when the oil is at high tem-
perature. An oil with a higher 
viscosity (one with a higher 
value) may be better suited if 
the vehicle is operated at high 
speeds, or under extreme 
load conditions.

How to read oil container label:

API registered mark is added to 
some oil containers to help you 
select the oil you should use.

Lubrication system

With filter

4.9 qt. (4.6 L, 4.0 Imp. 

qt.)

Without 

filter

4.5 qt. (4.3 L, 3.8 Imp. 

qt.)

-------------------------------------------------------------------------------------------------------------------------------------------------------------

517

9-1. Specifications

COROLLA H/B_U

9

Vehicle

 specificatio

ns

Cooling system

Capacity (Reference)

Vehicles with a continuously variable transmis-

sion

6.8 qt. (6.4 L, 5.6 Imp. qt.)

Vehicles with a manual transmission

6.4 qt. (6.1 L, 5.4 Imp. qt.)

Coolant type

Use either of the following:

“Toyota Super Long Life Coolant”

Similar high-quality ethylene glycol-based 

non-silicate, non-amine, non-nitrite, and 

non-borate coolant with long-life hybrid organic 

acid technology

Do not use plain water alone.

Ignition system (spark plug)

Make

DENSO FC20HR-Q8

Gap

0.032 in. (0.8 mm)

NOTICE

Iridium-tipped spark plugs

Use only iridium-tipped spark plugs. Do not adjust the spark plug gap.

Electrical system (battery)

Open voltage at 68°F (20°C):

12.3 V or higher

(Turn the engine switch off and turn on the 

high beam headlights for 30 seconds.)

Charging rates
Quick charge
Slow charge

15 A max.
5 A max.

Continuously variable transmission

Fluid capacity

*

9.0 qt. (8.5 L, 7.5 Imp. qt.)

Fluid type

Toyota Genuine CVT Fluid FE

-------------------------------------------------------------------------------------------------------------------------------------------------------------

518

9-1. Specifications

COROLLA H/B_U

*

: The fluid capacity is a reference quantity.

If replacement is necessary, contact your Toyota dealer.

NOTICE

Continuously variable transmission fluid type

Using continuously variable transmission fluid other than the above type 

may cause abnormal noise or vibration, or damage the continuously vari-

able transmission of your vehicle.

Manual transmission

Gear oil capacity (Reference) 1.6 qt. (1.5 L, 1.3 Imp. qt.)

Gear oil type

“TOYOTA Genuine Manual Transmission 

Gear Oil LV GL-4 75W” or equivalent

NOTICE

Manual transmission gear oil

Please be aware that depending on the particular characteristics of the 

gear oil used or the operating conditions, idle sound, shift feeling and/or 

fuel efficiency may be different or affected and, in the worst case, dam-

age to the vehicle’s transmission.

Toyota recommends to use “TOYOTA Genuine Manual Transmission 

Gear Oil LV GL-4 75W” to achieve optimal performance.

Your Toyota vehicle is filled with “TOYOTA Genuine Manual Transmis-

sion Gear Oil LV GL-4 75W” at the factory.

Use Toyota approved “TOYOTA Genuine Manual Transmission Gear Oil 

LV GL-4 75W” or an equivalent oil of matching quality that satisfies the 

above specifications.

Please contact your Toyota dealer for further details.

Clutch

Pedal free play

0.1 

 0.6 in. (3 

 15 mm)

Fluid type

FMVSS No.116 DOT 3 or SAE J1703

Brakes

Pedal clearance

*1

4.1 in. (105 mm) Min.

Pedal free play

0.04 

 0.24 in. (1 

 6 mm)

Brake pad wear limit

0.04 in. (1 mm)

-------------------------------------------------------------------------------------------------------------------------------------------------------------

519

9-1. Specifications

COROLLA H/B_U

9

Vehicle

 specificatio

ns

*1

: Minimum pedal clearance when depressed with a force of 67.4 lbf (300 

N, 30.6 kgf) while the engine is running.
When performing the brake pedal inspection, also be sure to check that 
the brake system warning light is not illuminated when the engine is run-
ning. (If the brake system warning light is illuminated, refer to P.472.)

*2

: Make sure to confirm that the brake warning light (yellow) does not illumi-

nate. (If the brake warning light illuminates, refer to P.472.)

15-inch tires

16-inch tires

Parking brake indicator

*2

When pulling the parking brake switch for 
1 to 2 seconds: comes on

When pushing the parking brake switch for 
1 to 2 seconds: turns off

Fluid type

FMVSS No.116 DOT 3 or SAE J1703

Steering

Free play

Less than 1.2 in. (30 mm)

Tires and wheels

Tire size

195/65R15 91S

Tire inflation pressure
(Recommended cold tire 
inflation pressure)

Front tire

38 psi (260 kPa, 2.6 kgf/cm

2

 or bar)

Rear tire

36 psi (250 kPa, 2.5 kgf/cm

2

 or bar)

Wheel size

15 

 6 1/2J

Wheel nut torque

76 ft•lbf (103 N•m, 10.5 kgf•m)

Tire size

205/55R16 91H

Tire inflation pressure
(Recommended cold tire 
inflation pressure)

Front tire

35 psi (240 kPa, 2.4 kgf/cm

2

 or bar)

Rear tire

33 psi (230 kPa, 2.3 kgf/cm

2

 or bar)

-------------------------------------------------------------------------------------------------------------------------------------------------------------

520

9-1. Specifications

COROLLA H/B_U

18-inch tires

Compact spare tire (if equipped)

Wheel size

16 

 7J

Wheel nut torque

76 ft•lbf (103 N•m, 10.5 kgf•m)

Tire size

225/40R18 88V

Tire inflation pressure
(Recommended cold tire 
inflation pressure)

Driving under normal conditions

Front tire

33 psi (230 kPa, 2.3 kgf/cm

2

 or bar)

Rear tire

30 psi (210 kPa, 2.1 kgf/cm

2

 or bar)

Driving at high speeds (above 100 mph [160 
km/h]) (in countries where such speeds are per-
mitted by law)

Add 5 psi (30 kPa, 0.3 kgf/cm

2

 or bar) to the front 

tires and rear tires. Never exceed the maximum 
cold tire inflation pressure indicated on the tire 
sidewall.

Wheel size

18 

 8J

Wheel nut torque

76 ft•lbf (103 N•m, 10.5 kgf•m)

Tire size

T125/70D17 98M

Tire inflation pressure
(Recommended cold tire 
inflation pressure)

60 psi (420 kPa, 4.2 kgf/cm

2

 or bar)

Wheel size

17 

 4T

Wheel nut torque

76 ft•lbf (103 N•m, 10.5 kgf•m)

Light bulbs

Light bulbs

Bulb No.

W

Type

Exterior

Front side marker lights

5

A

License plate lights

5

A

-------------------------------------------------------------------------------------------------------------------------------------------------------------

521

9-1. Specifications

COROLLA H/B_U

9

Vehicle

 specificatio

ns

A: Wedge base bulbs (clear)

B: Double end bulbs

Interior

Front interior lights/personal 
lights

5

A

Vanity lights

8

A

Rear interior light

8

B

Luggage compartment light

5

A

Light bulbs

Bulb No.

W

Type

-------------------------------------------------------------------------------------------------------------------------------------------------------------

522

9-1. Specifications

COROLLA H/B_U

Gasoline quality

In very few cases, driveability prob-
lems may be caused by the brand of 
gasoline you are using. If driveability 
problems persist, try changing the 
brand of gasoline. If this does not 
correct the problem, consult your 
Toyota dealer.

Recommendation of the use of 
gasoline containing detergent 
additives

Toyota recommends the use of 
gasoline that contains detergent 
additives to avoid the build-up of 
engine deposits.

All gasoline sold in the U.S.A. con-
tains minimum detergent additives 
to clean and/or keep clean intake 
systems, per EPA’s lowest addi-
tives concentration program.

Toyota strongly recommends the 
use of Top Tier Detergent Gaso-
line. For more information on Top 
Tier Detergent Gasoline and a list 
of marketers, please go to the offi-
cial website www.toptiergas.com.

Recommendation of the use of 
low emissions gasoline

Gasolines containing oxygenates 
such as ethers and ethanol, as well 
as reformulated gasolines, are avail-
able in some cities. These fuels are 
typically acceptable for use, provid-
ing they meet other fuel require-
ments.

Toyota recommends these fuels, 
since the formulations allow for 
reduced vehicle emissions.

Non-recommendation of the 
use of blended gasoline

Use only gasoline containing up to 
15% ethanol.
DO NOT use any flex-fuel or gas-
oline that could contain more than 
15% ethanol, including from any 
pump labeled E30 (30% ethanol 
[

]), E50 (50% ethanol [

]), E85 

(85% ethanol [

]) (which are only 

some examples of fuel containing 
more than 15% ethanol).

If you use gasohol in your vehicle, 
be sure that it has an octane rat-
ing no lower than 87.

Toyota does not recommend the 
use of gasoline containing metha-
nol.

Non-recommendation of the 
use of gasoline containing MMT

Some gasoline contains an octane 
enhancing additive called MMT 
(Methylcyclopentadienyl Manga-
nese Tricarbonyl).

Toyota does not recommend the use 
of gasoline that contains MMT. If 
fuel containing MMT is used, your 
emission control system may be 

Fuel information

You must only use unleaded 
gasoline.
Select octane rating of 87 
(Research Octane Number 
91) or higher. Use of 
unleaded gasoline with an 
octane rating lower than 87 
may result in engine knock-
ing. Persistent knocking 
can lead to engine damage.

At minimum, the gasoline you 
use should meet the specifica-
tions of ASTM D4814 in the 
U.S.A.

-------------------------------------------------------------------------------------------------------------------------------------------------------------

523

9-1. Specifications

COROLLA H/B_U

9

Vehicle

 specificatio

ns

adversely affected.
The malfunction indicator lamp on 

the instrument cluster may come on. 

If this happens, contact your Toyota 

dealer for service.

If your engine knocks

Consult your Toyota dealer.

You may occasionally notice light 

knocking for a short time while 

accelerating or driving uphill. This 

is normal and there is no need for 

concern.

NOTICE

Notice on fuel quality

Do not use improper fuels. If 

improper fuels are used, the 

engine will be damaged.

Do not use leaded gasoline.

Leaded gasoline can cause 

damage to your vehicle’s 

three-way catalytic converters 

causing the emission control 

system to malfunction.

Do not use gasohol other than 

the type previously stated.

Other gasohol may cause fuel 

system damage or vehicle per-

formance problems.

Using unleaded gasoline with 

an octane number or rating 

lower than the level previously 

stated will cause persistent 

heavy knocking.

At worst, this will lead to engine 

damage.

Fuel-related poor driveability

If poor driveability (poor hot start-

ing, vaporization, engine knock-

ing, etc.) is encountered after 

using a different type of fuel, dis-

continue the use of that type of 

fuel.

When refueling with gasohol

Take care not to spill gasohol. It 

can damage your vehicle’s paint.

-------------------------------------------------------------------------------------------------------------------------------------------------------------


Content      ..     6      7      8      9     ..