Toyota 86 (2020 year). Manual in english - part 3
 

  Index      Toyota     Toyota 86 (2020 year). Manual in english


Search            copyright infringement  


Content      ..     1      2      3      4      ..


Toyota 86 (2020 year). Manual in english - part 3


129

1-7. Safety information

1

Before driving

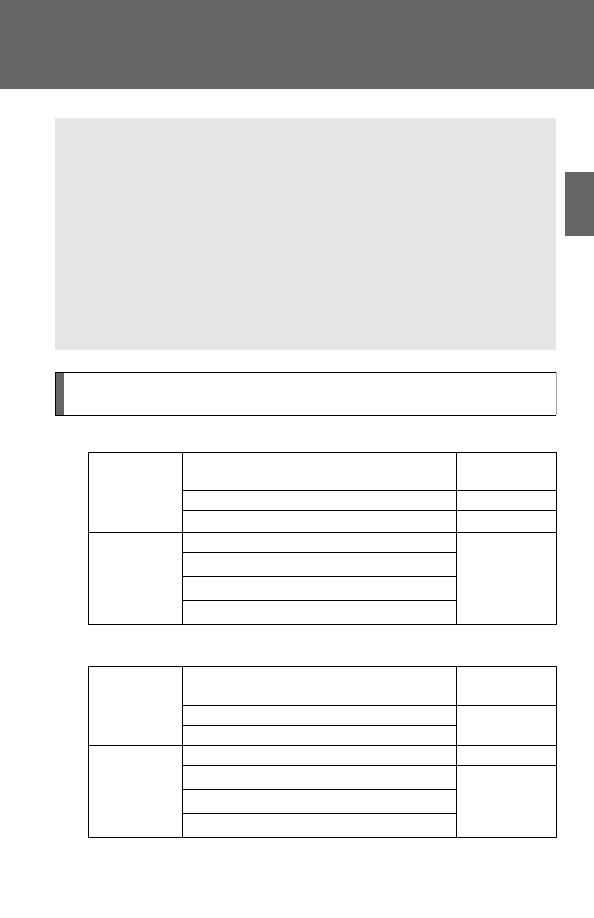
Condition  and  operation  in  the  front  passenger  occupant
classification system

*1

Adult

*2

Child restraint system with infant

*6, *7, *8

Indicator/

warning light

“AIR BAG ON” and “AIR BAG OFF” 

indicator lights

“AIR BAG 

ON”

SRS warning light

Off

Front passenger’s seat belt reminder light

Flashing

*3

Devices

Front passenger airbag

On

Front side airbag

*4

Front curtain shield airbag

*4

Front passenger’s seat belt pretensioner

*4

Indicator/

warning light

“AIR BAG ON” and “AIR BAG OFF” 

indicator lights

“AIR BAG 

OFF”

*9

SRS warning light

Off

Front passenger’s seat belt reminder light

Devices

Front passenger airbag

Off

Front side airbag

*4

On

Front curtain shield airbag

*4

Front passenger’s seat belt pretensioner

*4

The front passenger’s frontal airbag ON and OFF indicators show
you the status of the front passenger’s SRS frontal airbag. When
the  engine  switch  is  turned  to  “ON”  position  (vehicles  without  a
smart key system), or the “ENGINE START STOP” switch to IGNI-
TION ON mode (vehicles with a smart key system), both the ON
and  OFF  indicators  illuminate  while  the  system  is  checked,  after
which both indicators turn off. 
After that, one of the indicators illuminates depending on the status
of  the  front  passenger’s  SRS  frontal  airbag  determined  by  the
Toyota advanced frontal airbag monitoring system.

-------------------------------------------------------------------------------------------------------------------------------------------------------------

130

1-7. Safety information

Child

*5, *7

Unoccupied

There is a malfunction in the system

Indicator/

warning light

“AIR BAG ON” and “AIR BAG OFF” 

indicator lights

“AIR BAG 

OFF” or “AIR 

BAG ON”

*5

SRS warning light

Off

Front passenger’s seat belt reminder light

Off or 

flashing

*3, *5

Devices

Front passenger airbag

Off or on

*5

Front side airbag

*4

On

Front curtain shield airbag

*4

Front passenger’s seat belt pretensioner

*4

Indicator/

warning light

“AIR BAG ON” and “AIR BAG OFF” 

indicator lights

“AIR BAG 

OFF”

SRS warning light

Off

Front passenger’s seat belt reminder light

Devices

Front passenger airbag

Off

Front side airbag

*4

On

Front curtain shield airbag

*4

Front passenger’s seat belt pretensioner

*4

Indicator/

warning light

“AIR BAG ON” and “AIR BAG OFF” 

indicator lights

“AIR BAG 

OFF”

SRS warning light

On

Front passenger’s seat belt reminder light

Off

Devices

Front passenger airbag

Off

Front side airbag

*4

On

Front curtain shield airbag

*4

Front passenger’s seat belt pretensioner

*4

-------------------------------------------------------------------------------------------------------------------------------------------------------------

131

1-7. Safety information

1

Before driving

*1

: The occupant classification system does not operate during self-

checking.

*2

: The  system  judges  a  person  of  adult  size  as  an  adult.  When  a

smaller adult sits in the front passenger seat, the system may not
recognize him/her as an adult depending on his/her physique and
posture.

*3

: In the event the front passenger does not wear a seat belt.

*4

: The front passenger’s SRS side airbag, SRS curtain shield airbag

and  seat  belt  pretensioner  are  not  controlled  by  the  occupant
classification system.

*5

: For some children, child in seat, child in booster seat or child in

convertible  seat,  the  system  may  not  recognize  him/her  as  a
child. Factors which may affect this can be the physique or pos-
ture. 
Children  who  have  outgrown  a  child  restraint  system  should
always wear the seat belt when sitting in the seat irrespective of
whether the airbag is deactivated or activated.

*6

: When a child restraint system is installed on the front passenger

seat,  do  not  place  any  article  on  the  seat  other  than  the  child
occupant and a child restraint system. 
Failure to do so may prevent the front passenger occupant classi-
fication system from functioning correctly or cause the system to
fail.

*7

: Do not place more than one child on the front passenger seat. 

Failure to do so may prevent the front passenger occupant classi-
fication system from functioning correctly.

*8

: Never install a rear-facing child restraint system on the front pas-

senger seat. See the caution that follows regarding installation of
a child restraint system. (

P. 141)

*9

: In  case  the  indicator  is  not  illuminated,  consult  this  manual  on

how to installing the child restraint system properly. (

P. 141)

-------------------------------------------------------------------------------------------------------------------------------------------------------------

132

1-7. Safety information

If the passenger’s frontal airbag OFF indicator illuminates and the ON indicator
turns off even when the front passenger’s seat is occupied by an adult

This can be caused by an adult incorrectly sitting in the front passen-
ger’s seat. Perform the following.

Vehicles without a smart key system: 
The engine switch is turned to the “LOCK” position.
Vehicles with a smart key system:
Turn the “ENGINE START STOP” switch off.
Ask  the  front  passenger  to  set  the  seatback  to  the  upright
position, sit up straight in the center of the seat cushion, cor-
rectly wear the seat belt, position his/her legs out forward, and
adjust the seat to the rearmost position.
Vehicles without a smart key system: 
The engine switch is turned to the “ON” position.
Vehicles with a smart key system:
Turn  the  “ENGINE  START  STOP”  switch  to  IGNITION  ON
mode.
If the OFF indicator remains illuminated while the ON indicator
remains off, perform the following.
• Vehicles without a smart key system: 

The engine switch is turned to the “LOCK” position.
Vehicles with a smart key system:
Turn the “ENGINE START STOP” switch off.

• Make sure that the front passenger is not using a blanket,

seat cushion, seat cover or seat heater, etc. 

• If wearing excessive layers of clothing, the front passenger

should remove any unnecessary items before sitting in the
front passenger seat, or should sit in a rear seat.

STEP 

STEP 

STEP 

STEP 

-------------------------------------------------------------------------------------------------------------------------------------------------------------

133

1-7. Safety information

1

Before driving

The  engine  switch  is  turned  to  the  “ON”  position  (vehicles
without a smart key system), or the “ENGINE START STOP”
switch to IGNITION ON mode (vehicles with a smart key sys-
tem).  After  the  self-check  is  performed,  the  ON  indicator
should  illuminate  while  the  OFF  indicator  remains  off.  If  the
OFF indicator still remains illuminated while the ON indicator
remains  off,  ask  the  occupant  to  move  to  the  rear  seat  and
immediately contact your Toyota dealer for an inspection.

STEP 

-------------------------------------------------------------------------------------------------------------------------------------------------------------

134

1-7. Safety information

If the front passenger’s frontal airbag ON indicator illuminates and the OFF indicator turns off
even when an infant or a small child is in a child restraint system (including booster seat)

This can be caused by the child restraint system being installed incor-
rectly. Perform the following.

Vehicles without a smart key system: 
The engine switch is turned to the “LOCK” position.
Vehicles with a smart key system:
Turn the “ENGINE START STOP” switch off.
Remove the child restraint system from the seat. By referring
to the child restraint manufacturer’s recommendations as well
as  the  child  restraint  system  installation  procedure  in  “child
restraint system”, correctly reinstall the child restraint system.
Vehicles without a smart key system: 
The  engine  switch  is  turned  to  the  “ON”  position  and  make
sure  that  the  front  passenger’s  frontal  airbag  ON  indicator
turns off and the OFF indicator illuminates.
Vehicles with a smart key system:
Turn  the  “ENGINE  START  STOP”  switch  to  IGNITION  ON
mode and make sure that the front passenger’s frontal airbag
ON indicator turns off and the OFF indicator illuminates.
If the ON indicator still remains illuminated while the OFF indi-
cator turns off, perform the following.
• Ensure that no article is placed on the seat other than the

child restraint system and the child occupant.

• Ensure that the backward-forward position and seatback of

front passenger seat are locked into place securely by mov-
ing the seat back and forth.

If the ON indicator still remains illuminated while the OFF indi-
cator  turns  off  after  taking  the  relevant  corrective  actions
described  above,  relocate  the  child  restraint  system  to  the
rear seat and immediately contact your Toyota dealer for an
inspection.

STEP 

STEP 

STEP 

STEP 

STEP 

-------------------------------------------------------------------------------------------------------------------------------------------------------------

135

1-7. Safety information

1

Before driving

WARNING

Front passenger occupant classification system precautions

Observe the following precautions regarding front passenger occupant clas-
sification system. 
Failure to do so may cause the occupant classification system to not function
correctly, resulting in death or serious injury.

Wear the seat belt properly.

Do not apply excessive force to the seat.

Do not put sharp object(s) on the seat or pierce the seat upholstery.

Do not put objects under the front passenger seat.

Do not use a seat accessory, such as a cushion or seat cover, that covers
the seat cushion surface.

Do not spill liquid on the front passenger seat. If liquid is spilled, wipe it off
immediately  and  dry  the  seat.  If  the  airbag  warning  light  illuminates,  dry
the seat until the warning light turns off. If the airbag warning light stays on
even when the seat has dried, do not allow anyone to sit on the front pas-
senger seat and have the system checked by your Toyota dealer. If the air-
bag  warning  light  does  not  illuminate,  check  that  the  airbag  ON/OFF
indicator light works properly. If the indicator light does not work properly,
do not allow anyone to sit in the front passenger’s seat and have the sys-
tem inspected by your Toyota dealer.

Do  not  remove  or  disassemble  the  front  passenger  seat.  Also,  do  not
replace or modify the seat upholstery or foam inside the seat.

Do not install any accessory (such as an audio amplifier) other than a gen-
uine Toyota accessory under the front passenger’s seat.

Do not place a magnetized items near the seat belt buckle.

-------------------------------------------------------------------------------------------------------------------------------------------------------------

136

1-7. Safety information

WARNING

Front passenger occupant classification system precautions

Never  install  a  rearward  facing  child  seat  in  the  front  passenger’s  seat
even if the front passenger’s SRS frontal airbag is deactivated. Be sure to
install  it  in  the  rear  seat  in  a  correct  manner. Also,  it  is  strongly  recom-
mended that any forward facing child seat or booster seat be installed in
the rear seat, and that even children who have outgrown a child restraint
system be also seated in the rear seat. This is because children sitting in
the  front  passenger’s  seat  may  be  killed  or  severely  injured  should  the
front passenger’s SRS frontal airbag deploy. Toyota believes that the rear
seats are the safest place for children

If  luggage  or  electronic  devices  are  placed  on  the  front  passenger  seat,
the OFF indicator may turn off and the ON indicator may illuminate. If this
occurs, the front passenger’s airbag may deploy during a collision. If this is
not desirable, remove the luggage or electronic devices from the front pas-
senger seat.

Modifications for persons with disabilities that may affect the front passen-
ger  occupant  classification  system.  (U.S.  only)  Removing,  replacing  or
modifying any parts of the front seats, seat belts, front bumper, front side
frame, instrument panel, combination meter, steering wheel, steering col-
umn, tires, suspension or floor panel can affect the operation of the Toyota
front passenger occupant classification system.

-------------------------------------------------------------------------------------------------------------------------------------------------------------

137

1

1-7. Safety information

Before driving

Child restraint systems

Points to remember

Studies have shown that installing a child restraint on a rear seat is
much safer than installing one to the front passenger seat. 

Choose  a  child  restraint  system  that  suits  your  vehicle  and  is
appropriate to the age and size of the child. 

For  installation  details,  follow  the  instructions  provided  with  the
child restraint system. 
General installation instructions are provided in this manual. 
(

P. 141)

Types of child restraints

Child  restraint  systems  are  classified  into  the  following  3  types
according to the age and size of the child. 

Rear facing 

 Infant seat/convertible seat

A child restraint system for a small child or baby must itself be prop-
erly restrained on the seat with the LATCH anchors or the lap portion
of the lap/shoulder belt.

The laws of all 50 states of the U.S.A. and Canada now require the
use of child restraint systems.

-------------------------------------------------------------------------------------------------------------------------------------------------------------

138

1-7. Safety information

Forward facing 

 Convertible seat

Booster seat

Selecting an appropriate child restraint system

Use  a  child  restraint  system  appropriate  for  the  child  until  the  child
becomes large enough to properly wear the vehicle’s seat belt.

If a child is too large for a child restraint system, sit the child on a rear
seat and use the vehicle's seat belt. (

P. 60)

-------------------------------------------------------------------------------------------------------------------------------------------------------------

139

1-7. Safety information

1

Before driving

WARNING

Child restraint precautions

For effective protection in automobile accidents and sudden stops, a child
must  be  properly  restrained,  using  a  seat  belt  or  child  restraint  system
depending on the age and size of the child. Holding a child in your arms is
not a substitute for a child restraint system. In an accident, the child can be
crushed against the windshield, or between you and the vehicle's interior.

Toyota strongly urges the use of a proper child restraint system that con-
forms to the size of the child, installed on the rear seat. According to acci-
dent statistics, the child is safer when properly restrained in the rear seat
than in the front seat.

Never  install  a  rear-facing  child  restraint  system  on  the  front  passenger
seat even if the “AIR BAG OFF” indicator light is illuminated. In the event
of an accident, the force of the rapid inflation of the front passenger airbag
can  cause  death  or  serious  injury  to  the  child  if  the  rear-facing  child
restraint system is installed on the front passenger seat.

A forward-facing child restraint system may be installed on the front pas-
senger  seat  only  when  it  is  unavoidable.  A  child  restraint  system  that
requires a top tether strap should not be used in the front passenger seat
since  there  is  no  top  tether  strap  anchor  for  the  front  passenger  seat.
Adjust the seatback as upright as possible and always move the seat as
far  back  as  possible  even  if  the  “AIR  BAG  OFF”  indicator  light  is  illumi-
nated, because the front passenger airbag could inflate with considerable
speed and force. Otherwise, the child may be killed or seriously injured.

-------------------------------------------------------------------------------------------------------------------------------------------------------------

140

1-7. Safety information

WARNING

Child restraint precautions

Do  not  allow  the  child  to  lean  his/her  head  or  any  part  of  his/her  body
against the door or the area of the seat, front and rear pillars or roof side
rails from which the SRS side airbags or SRS curtain shield airbags deploy
even if the child is seated in the child restraint system. It is dangerous if
the  SRS  side  airbags  and  curtain  shield  airbags  inflate,  and  the  impact
could cause death or serious injury to the child.

Make sure you have complied with all installation instructions provided by
the child restraint manufacturer and that the system is properly secured. If
it is not secured properly, it may cause death or serious injury to the child
in the event of a sudden stop, sudden swerve or an accident.

When children are in the vehicle

Do  not  allow  children  to  play  with  the  seat  belt.  If  the  seat  belt  becomes
twisted around a child’s neck, it may lead to choking or other serious injuries
that could result in death. 
If this occurs and the buckle cannot be unfastened, scissors should be used
to cut the belt.

When the child restraint system is not in use

Keep the child restraint system properly secured on the seat even if it is
not in use. Do not store the restraint unsecured in the passenger compart-
ment.

If it is necessary to detach the child restraint system, remove it from the
vehicle  or  store  it  securely  in  the  trunk. This  will  prevent  it  from  injuring
passengers in the event of a sudden stop, sudden swerve or accident.

-------------------------------------------------------------------------------------------------------------------------------------------------------------

141

1

1-7. Safety information

Before driving

Installing child restraints

Follow the child restraint system manufacturer's instructions. Firmly
secure child restraints to the rear seats using the LATCH anchors or
a  seat  belt.  Attach  the  top  tether  strap  when  installing  a  child
restraint.

The  lap/shoulder  belt  can  be  used  if  your  child  restraint  system  is
not compatible with the LATCH (Lower Anchors and Tethers for Chil-
dren) system.

Child restraint LATCH anchors

LATCH  anchors  are  provided
for  both  rear  seats.  (Buttons
displaying  the  location  of  the
anchors  are  attached  to  the
seats.) 

Seat  belts  equipped  with  a
child  restraint  locking  mecha-
nism  (ALR/ELR  belts  except
driver’s seat belt) (

P. 60)

Anchor  bracket  (for  top  tether
strap)

Anchor  brackets  are  provided
for both rear seats.

-------------------------------------------------------------------------------------------------------------------------------------------------------------

142

1-7. Safety information

Installation with LATCH system

Type A

Pull the cover.
Latch  the  hooks  of  the
lower  straps  onto  the
LATCH anchors.
If the child restraint has a
top  tether  strap,  the  top
tether  strap  should  be
latched  onto  the  top
tether strap anchors.

For owners in Canada:
The  symbol  on  a  child  restraint
system indicates the presence of
a lower connector system.

Canada only

STEP 

STEP 

STEP 

-------------------------------------------------------------------------------------------------------------------------------------------------------------

143

1-7. Safety information

1

Before driving

Type B

Pull the cover.
Latch  the  buckles  onto
the LATCH anchors.
If the child restraint has a
top  tether  strap,  the  top
tether  strap  should  be
latched  onto  the  top
tether strap anchors.

For owners in Canada:
The  symbol  on  a  child  restraint
system indicates the presence of
a lower connector system.

Canada only

STEP 

STEP 

STEP 

-------------------------------------------------------------------------------------------------------------------------------------------------------------

144

1-7. Safety information

Installing  child  restraints  using  a  seat  belt  (child  restraint  lock
function belt)

Rear facing 



Infant seat/convertible seat

Place  the  child  restraint  system
on  the  rear  seat  facing  the  rear
of the vehicle.

Run  the  seat  belt  through  the
child  restraint  system  and  insert
the  plate  into  the  buckle.  Make
sure that the belt is not twisted.

Fully  extend  the  shoulder  belt
and allow it to retract to put it in
lock mode. In lock mode, the belt
cannot be extended.

STEP 

STEP 

STEP 

-------------------------------------------------------------------------------------------------------------------------------------------------------------

145

1-7. Safety information

1

Before driving

While pushing the child restraint
system  down  into  the  rear  seat,
allow the shoulder belt to retract
until the child restraint system is
securely in place.

After  the  shoulder  belt  has
retracted to a point where there is
no slack in the belt, pull the belt to
check that it cannot be extended. 

Forward facing 



Convertible seat

Place  the  child  restraint  system
on the seat facing the front of the
vehicle.

Run  the  seat  belt  through  the
child  restraint  system  and  insert
the  plate  into  the  buckle.  Make
sure that the belt is not twisted.

Fully  extend  the  shoulder  belt
and allow it to retract to put it in
lock mode. In lock mode, the belt
cannot be extended.

STEP 

STEP 

STEP 

STEP 

-------------------------------------------------------------------------------------------------------------------------------------------------------------

146

1-7. Safety information

While pushing the child restraint
system  into  the  rear  seat,  allow
the  shoulder  belt  to  retract  until
the  child  restraint  system  is
securely in place.

After  the  shoulder  belt  has
retracted to a point where there is
no slack in the belt, pull the belt to
check that it cannot be extended. 

If the child restraint has a top tether strap, the top tether strap
should be latched onto the top tether strap anchor. (

P. 147)

Booster seat

Place  the  child  restraint  system
on the seat facing the front of the
vehicle.

Sit the child in the child restraint
system.  Fit  the  seat  belt  to  the
child  restraint  system  and  insert
the  plate  into  the  buckle.  Make
sure that the belt is not twisted.

Check  that  the  shoulder  belt  is
correctly  positioned  over  the
child's  shoulder  and  that  the  lap
belt is as low as possible. 
(

P. 60)

STEP 

STEP 

STEP 

STEP 

-------------------------------------------------------------------------------------------------------------------------------------------------------------

147

1-7. Safety information

1

Before driving

Removing a child restraint installed with a seat belt

Push  the  buckle  release  button
and fully retract the seat belt. 

Child restraint systems with a top tether strap

Secure  the  child  restraint  using  a  seat  belt  or  the  LATCH
anchors. 

Remove  the  anchor  bracket
cover.

Store the removed cover in a safe
place.

STEP 

STEP 

-------------------------------------------------------------------------------------------------------------------------------------------------------------

148

1-7. Safety information

Latch  the  hook  onto  the  anchor
bracket and tighten the top tether
strap.

Make sure the top tether strap is
securely latched. 

STEP 

When installing a child restraint system with LATCH anchors and a top
tether strap

Depending  on  the  child  restraint  system's  size  and  shape,  if  the  child
restraint system is installed to the LATCH anchors first, it may not be possi-
ble to attach the top tether strap to the anchor bracket. 
In  that  case,  first  temporarily  attach  the  top  tether  strap  to  the  anchor
bracket, install the child restraint system using the lower anchors and then
tighten the top tether strap.

Laws and regulations pertaining to anchorages

The LATCH system conforms to FMVSS225 or CMVSS210.2. 
Child restraint systems conforming to FMVSS213 or CMVSS213 specifica-
tions can be used. 
This vehicle is designed to conform to the SAE J1819.

-------------------------------------------------------------------------------------------------------------------------------------------------------------

149

1-7. Safety information

1

Before driving

WARNING

When installing a booster seat 

To prevent the belt from going into ALR lock mode, do not fully extend the
shoulder belt. ALR mode causes the belt to tighten only. This could cause
injury or discomfort to the child. (

P. 62) 

When installing a child restraint system

Follow the directions given in the child restraint system installation manual
and fix the child restraint system securely in place. 
If the child restraint system is not correctly fixed in place, the child or other
passengers  may  be  injured  or  even  killed  in  the  event  of  sudden  braking,
sudden swerving or an accident.

If  the  driver’s  seat  interferes  with  the
child  restraint  system  and  prevents  it
from  being  attached  correctly,  attach
the  child  restraint  system  to  the  right-
hand rear seat.

Adjust the front passenger seat so that
it  does  not  interfere  with  the  child
restraint system.

Only put a forward facing child restraint
system on the front seat when unavoid-
able.  When  installing  a  forward  facing
child restraint system on the front pas-
senger seat, move the seat as far back
as possible even if the “AIR BAG OFF”
indicator  light  is  illuminated.  Failure  to
do  so  may  result  in  death  or  serious
injury if the airbags deploy (inflate).

-------------------------------------------------------------------------------------------------------------------------------------------------------------

150

1-7. Safety information

WARNING

When installing a child restraint system

When a booster seat is installed, always ensure that the shoulder belt is
positioned  across  the  center  of  the  child's  shoulder.  The  belt  should  be
kept away from the child's neck, but not so that it could fall off the child's
shoulder. Failure to do so may result in death or serious injury in the event
of sudden braking, sudden swerving or an accident.

Ensure that the belt and plate are securely locked and the seat belt is not
twisted.

Shake the child restraint system left and right, and forward and backward
to ensure that it has been securely installed.

After securing a child restraint system, never adjust the seat.

Follow  all  installation  instructions  provided  by  the  child  restraint  system
manufacturer.

To correctly attach a child restraint system to the anchors

When using the LATCH anchors, be sure that there are no foreign objects
around  the  anchors  and  that  the  seat  belt  is  not  caught  behind  the  child
restraint. Make sure the child restraint system is securely attached, or it may
cause death or serious injury to the child or other passengers in the event of
sudden braking, sudden swerve or an accident.

-------------------------------------------------------------------------------------------------------------------------------------------------------------

-------------------------------------------------------------------------------------------------------------------------------------------------------------

152

2-1. Driving procedures

Driving the vehicle

The  following  procedures  should  be  observed  to  ensure  safe  driv-
ing:

Starting the engine

P. 166, 175

Driving

Vehicles with an automatic transmission

With the brake pedal depressed, shift the shift lever to D. 
(

P. 178)

Release the parking brake. (

P. 189)

Gradually release the brake pedal and gently depress the
accelerator pedal to accelerate the vehicle. 

Vehicles with a manual transmission

While depressing the clutch pedal, shift the shift lever to 1. 
(

P. 185) 

Release the parking brake. (

P. 189)

Gradually release the clutch pedal. At the same time, gently
depress the accelerator pedal to accelerate the vehicle. 

Stopping

Vehicles with an automatic transmission

With the shift lever in D, depress the brake pedal. 
If necessary, set the parking brake. 

If the vehicle is to be stopped for an extended period of time, shift
the shift lever to P or N. (

P. 178)

Vehicles with a manual transmission

While  depressing  the  clutch  pedal,  depress  the  brake
pedal.
If necessary, set the parking brake.

If the vehicle is to be stopped for an extended period of time, shift
the shift lever to N. (

P. 185) 

STEP 

STEP 

STEP 

STEP 

STEP 

STEP 

STEP 

STEP 

STEP 

STEP 

-------------------------------------------------------------------------------------------------------------------------------------------------------------

153

2-1. Driving procedures

2

Wh
en drivin

g

Parking the vehicle

Vehicles with an automatic transmission

With the shift lever in D, depress the brake pedal.
Shift the shift lever to P. (

P. 178)

Set the parking brake. (

P. 189)

Vehicles without a smart key system: 
Turn the engine switch to the “LOCK” position to stop the
engine.
Vehicles with a smart key system:
Press  the  “ENGINE  START  STOP”  switch  to  stop  the
engine.
Lock the door, making sure that you have the key on your
person.

If parking on a hill, block the wheels as needed.

Vehicles with a manual transmission

While  depressing  the  clutch  pedal,  depress  the  brake
pedal.
Shift the shift lever to N. (

P. 185)

Set the parking brake. (

P. 189)

Vehicles without a smart key system: 
Turn the engine switch to the “LOCK” position to stop the
engine.
Vehicles with a smart key system:
Press  the  “ENGINE  START  STOP”  switch  to  stop  the
engine.
Lock the door, making sure that you have the key on your
person.

If  parking  on  a  hill,  shift  the  shift  lever  to  1  or  R  and  block  the
wheels as needed.

STEP 

STEP 

STEP 

STEP 

STEP 

STEP 

STEP 

STEP 

STEP 

STEP 

-------------------------------------------------------------------------------------------------------------------------------------------------------------

154

2-1. Driving procedures

Starting off on a steep uphill

Vehicles with an automatic transmission

Make sure that the parking brake is set and shift the shift lever
to D. 
Gently depress the accelerator pedal. 
Release the parking brake. 

Vehicles with a manual transmission

With  the  parking  brake  firmly  set  and  the  clutch  pedal  fully
depressed, shift the shift lever to 1. 
Lightly  depress  the  accelerator  pedal  at  the  same  time  as
gradually releasing the clutch pedal. 
Release the parking brake. 

When starting off on an uphill

When enabled, the hill-start assist control can operate. (

P. 252)

Driving in the rain

Drive carefully when it is raining, because visibility will be reduced, the
windows may become fogged-up, and the road will be slippery.

Drive  carefully  when  it  starts  to  rain,  because  the  road  surface  will  be
especially slippery.

Refrain  from  high  speeds  when  driving  on  an  expressway  in  the  rain,
because there may be a layer of water between the tires and the road
surface, preventing the steering and brakes from operating properly.

STEP 

STEP 

STEP 

STEP 

STEP 

STEP 

-------------------------------------------------------------------------------------------------------------------------------------------------------------

155

2-1. Driving procedures

2

Wh
en drivin

g

Engine speed while driving (vehicles with an automatic transmission)

In the following conditions, the engine speed may become high while driving.
This is due to automatic up-shifting control or down-shifting implementation
to meet driving conditions. It does not indicate sudden acceleration.

The vehicle is judged to be driving uphill or downhill

When the accelerator pedal is released

When driving on curves

When the brake pedal is firmly depressed

New vehicle break-in driving (the first 1000 miles [1600 km])

The  performance  and  long  life  of  your  vehicle  are  dependent  on  how  you
handle  and  care  for  your  vehicle  while  it  is  new.  Follow  these  instructions
during the first 1000 miles (1600 km):

Do  not  race  the  engine. And  do  not  allow  the  engine  speed  to  exceed
4000 rpm except in an emergency.

Do  not  drive  at  one  constant  engine  or  vehicle  speed  for  a  long  time,
either fast or slow.

Avoid starting suddenly and rapid acceleration, except in an emergency.

Avoid hard braking, except in an emergency.

The  same  break-in  procedures  should  be  applied  to  an  overhauled
engine,  newly  mounted  engine  or  when  brake  pads  or  brake  linings  are
replaced with new ones.

High friction brake pads (if equipped)

The brake pads and discs are designed for use under high load conditions.
Therefore, brake noise may be generated depending on the vehicle speed,
braking force and vehicle environment (temperature, humidity, etc.).

Drum-in-disc type parking brake system

Your  vehicle  has  a  drum-in-disc  type  parking  brake  system.  This  type  of
brake system needs bedding-down of the brake shoes periodically or when-
ever the parking brake shoes and/or drum are replaced. Have your Toyota
dealer perform the bedding down.

-------------------------------------------------------------------------------------------------------------------------------------------------------------

156

2-1. Driving procedures

After the engine starts

In order to secure a rich exhaust sound when starting the vehicle and envi-
ronmental  performance,  air  intake  and  exhaust  sounds  become  loud  and
vibrations may increase for a little while after the engine starts. This is not a
malfunction.

Operating your vehicle in a foreign country

Comply with the relevant vehicle registration laws and confirm the availability
of the correct fuel. (

P. 461)

REV indicator

WARNING

When starting the vehicle (vehicles with an automatic transmission)

Always keep your foot on the brake pedal while stopped with the engine
running. This prevents the vehicle from creeping.

Firmly  depress  the  brake  pedal  because  engine  speed  may  increase
immediately after starting the engine, when the air conditioning system is
operating, when turning the steering wheel, etc., thereby causing creeping
to become stronger. Apply the parking brake as necessary.

When  the  set  engine  speed  is  reached
the REV indicator comes on and a buzzer
sounds to inform the driver. 
(

P. 204, 217)

(When  the  engine  speed  enters  the  red
zone,  the  REV  indicator  flashes  regard-
less of settings.)

-------------------------------------------------------------------------------------------------------------------------------------------------------------

157

2-1. Driving procedures

2

Wh
en drivin

g

WARNING

When driving the vehicle

Do not drive if you are unfamiliar with the location of the brake and accel-
erator pedals to avoid depressing the wrong pedal. 

• Accidentally  depressing  the  accelerator  pedal  instead  of  the  brake

pedal  will  result  in  sudden  acceleration  that  may  lead  to  an  accident
that could result in death or serious injury.

• When backing up, you may twist your body around, leading to a diffi-

culty in operating the pedals. Make sure to operate the pedals properly.

• Make  sure  to  keep  a  correct  driving  posture  even  when  moving  the

vehicle only slightly. This allows you to depress the brake and acceler-
ator pedals properly.

• Depress  the  brake  pedal  using  your  right  foot.  Depressing  the  brake

pedal using your left foot may delay response in an emergency, result-
ing in an accident.

Do not drive the vehicle over or stop the vehicle near flammable materials. 
The exhaust system and exhaust gases can be extremely hot. These hot
parts may cause a fire if there is any flammable material nearby.

On  vehicles  with  an  automatic  transmission,  do  not  let  the  vehicle  roll
backward while the shift lever is in a driving position, or roll forward while
the shift lever is in R. 
Doing so may cause the engine to stall or lead to poor brake and steering
performance, resulting in an accident or damage to the vehicle.

If the smell of exhaust is noticed inside the vehicle, open the windows and
check that the trunk is closed. Large amounts of exhaust in the vehicle can
cause driver drowsiness and an accident, resulting in death or a serious
health hazard. Have the vehicle inspected by your Toyota dealer immedi-
ately.

On vehicles with a manual transmission, do not shift the shift lever to R
while the vehicle is moving forward. 
Doing so can damage the transmission and may result in a loss of vehicle
control.

Do not shift the shift lever to a driving position while the vehicle is moving
backward. 
Doing so can damage the transmission and may result in a loss of vehicle
control.

-------------------------------------------------------------------------------------------------------------------------------------------------------------

158

2-1. Driving procedures

WARNING

On vehicles with a manual transmission, do not release the clutch pedal
too quickly. Doing so may propel the vehicle forward, possibly causing an
accident.

Moving the shift lever to N while the vehicle is moving will disengage the
engine from the transmission. Engine braking is not available when N is
selected.

During  normal  driving,  do  not  turn  off  the  engine. Turning  the  engine  off
while  driving  will  not  cause  loss  of  steering  or  braking  control,  but  the
power assist to these systems will be lost. This will make it more difficult to
steer and brake, so you should pull over and stop the vehicle as soon as it
is safe to do so. 
However, in the event of an emergency, such as if it becomes impossible
to stop the vehicle in the normal way: 

P. 455

Use  engine  braking  (downshift)  to  maintain  a  safe  speed  when  driving
down a steep hill. 
Using the brakes continuously may cause the brakes to overheat and lose
effectiveness. (

P. 179, 185)

Do not adjust the position of the steering wheel, the seat, or the inside or
outside rear view mirrors while driving. 
Doing so may result in a loss of vehicle control that can cause accidents,
resulting in death or serious injury.

Always check that all passengers' arms, heads or other parts of their body
are not outside the vehicle, as this may result in death or serious injury.

Do not drive in excess of the speed limit. Even if the legal speed limit per-
mits it, do not drive over 85 mph (140 km/h) unless your vehicle has high-
speed capability tires. Driving over 85 mph (140 km/h) may result in tire
failure, loss of control and possible injury. Be sure to consult a tire dealer
to determine  whether the tires  on your vehicle  are  high-speed capability
tires or not before driving at such speeds.

-------------------------------------------------------------------------------------------------------------------------------------------------------------

159

2-1. Driving procedures

2

Wh
en drivin

g

WARNING

When driving on slippery road surfaces

Sudden  braking,  acceleration  and  steering  may  cause  tire  slippage  and
reduce your ability to control the vehicle, resulting in an accident.

Sudden acceleration, engine braking due to shifting, or changes in engine
speed could cause the vehicle to skid, resulting in an accident.

After  driving  through  a  puddle,  lightly  depress  the  brake  pedal  to  make
sure that the brakes are functioning properly. Wet brake pads may prevent
the brakes from functioning properly. If the brakes on only one side are wet
and not functioning properly, steering control may be affected, resulting in
an accident.

When shifting the shift lever

On vehicles with an automatic transmission, be careful not to shift the shift
lever  with  the  accelerator  pedal  depressed.  Shifting  the  shift  lever  to  a
gear other than P or N may lead to unexpected rapid acceleration of the
vehicle that may cause an accident and result in death or serious injury.

Do not place items in the shift lever's surrounding area. It may cause incor-
rect operation.

If the shift boot is pulled out during cleaning, return it to its previous posi-
tion. If the shift boot is left pulled out, the shift lever may become difficult to
operate.

If you hear a squealing or scraping noise (brake pad wear limit indica-
tors) 

Have your Toyota dealer check and replace the brake pads as soon as pos-
sible. 
Rotor damage may result if the pads are not replaced when needed. 

It is dangerous to drive the vehicle when the wear limits of the brake pads
and/or those of the brake discs are exceeded.

-------------------------------------------------------------------------------------------------------------------------------------------------------------

160

2-1. Driving procedures

WARNING

When the vehicle is stopped

Do not race the engine. 
If the vehicle is in any gear other than P (vehicles with an automatic trans-
mission only) or N, the vehicle may accelerate suddenly and unexpectedly,
causing an accident.

Do not leave the vehicle with the engine running for a long time. 
If such a situation cannot be avoided, park the vehicle in an open space
and check that exhaust fumes do not enter the vehicle interior.

On vehicles with an automatic transmission, in order to prevent accidents
due to the vehicle rolling away, always keep depressing the brake pedal
while the engine is running, and apply the parking brake as necessary.

If the vehicle is stopped on an incline, in order to prevent accidents caused
by the vehicle rolling forward or backward, always depress the brake pedal
and securely apply the parking brake as needed.

Avoid revving or racing the engine. 
Running the engine at high speed while the vehicle is stopped may cause
the exhaust system to overheat, which could result in a fire if combustible
material is nearby.

-------------------------------------------------------------------------------------------------------------------------------------------------------------

161

2-1. Driving procedures

2

Wh
en drivin

g

WARNING

When the vehicle is parked

Do not leave glasses, cigarette lighters, spray cans, or soft drink cans in
the vehicle when it is in the sun. 
Doing so may result in the following:

• Gas may leak from a cigarette lighter or spray can, and may lead to a

fire.

• The temperature inside the vehicle may cause the plastic lenses and

plastic material of glasses to deform or crack.

• Soft  drink  cans  may  fracture,  causing  the  contents  to  spray  over  the

interior of the vehicle, and may also cause a short circuit in the vehi-
cle's electrical components.

Do not leave cigarette lighters in the vehicle. If a cigarette  lighter is in a
place such as the glove box or on the floor, it may be lit accidentally when
luggage is loaded or the seat is adjusted, causing a fire.

Do  not  attach  suction  cups  to  the  windshield  or  windows.  Do  not  place
containers such as air fresheners on the instrument panel or dashboard.
Suction cups or containers may act as lenses, causing a fire in the vehicle.

Do not leave a door or window open if the curved glass is coated with a
metallized film such as a silver-colored one. Reflected sunlight may cause
the glass to act as a lens, causing a fire.

Always apply the parking brake, shift the shift lever to P (vehicles with an
automatic transmission only), stop the engine and lock the vehicle. 
Do not leave the vehicle unattended while the engine is running.

Do not touch the exhaust pipe while the engine is running or immediately
after turning the engine off. 
Doing so may cause burns.

Do not leave the engine running in an area with snow build-up, or where it
is snowing. If snowbanks build up around the vehicle while the engine is
running, exhaust gases may collect and enter the vehicle. This may lead
to death or a serious health hazard.

-------------------------------------------------------------------------------------------------------------------------------------------------------------

162

2-1. Driving procedures

WARNING

Exhaust gases

Exhaust  gases  include  harmful  carbon  monoxide  (CO),  which  is  colorless
and odorless. Inhaling exhaust gases may lead to death or a serious health
hazard.

If  the  vehicle  is  in  a  poorly  ventilated  area,  stop  the  engine.  In  a  closed
area, such as a garage, exhaust gases may collect and enter the vehicle.
This may lead to death or a serious health hazard.

The exhaust system should be checked occasionally. If there is a hole or
crack caused by corrosion, damage to a joint or abnormal exhaust noise,
be sure to have the vehicle inspected and repaired by your Toyota dealer.
Failure to do so may allow exhaust gases to enter the vehicle, resulting in
death or a serious health hazard.

When taking a nap in the vehicle

Always turn the engine off. Otherwise, you may accidentally move the shift
lever or depress the accelerator pedal, this could cause an accident or fire
due to engine overheating. Additionally, if the vehicle is parked in a poorly
ventilated area, exhaust gases may collect and enter the vehicle, leading to
death or a serious health hazard.

-------------------------------------------------------------------------------------------------------------------------------------------------------------

163

2-1. Driving procedures

2

Wh
en drivin

g

WARNING

When braking

When the brakes are wet, drive more cautiously. 
Braking distance increases when the brakes are wet, and this may cause
one side of the vehicle to brake differently than the other side. Also, the
parking brake may not securely hold the vehicle.

If the brake booster device does not operate, do not follow other vehicles
closely and avoid hills or sharp turns that require braking. 
In  this  case,  braking  is  still  possible,  but  the  brake  pedal  should  be
depressed more firmly than usual. Also, the braking distance will increase.
Have your brakes fixed immediately.

Do not pump the brake pedal if the engine stalls. 
Each push on the brake pedal uses up the reserve for the power-assisted
brakes.

The brake system consists of 2 individual hydraulic systems; if one of the
systems  fails,  the  other  will  still  operate.  In  this  case,  the  brake  pedal
should be depressed more firmly than usual and the braking distance will
increase. 
Have your brakes fixed immediately. 

-------------------------------------------------------------------------------------------------------------------------------------------------------------

164

2-1. Driving procedures

NOTICE

Pre-driving check

Trapping small animals in the cooling fan and belts of the engine may result
in a malfunction. Check that no small animal enters the engine compartment
and under the vehicle before starting the engine.

When driving the vehicle

Vehicles with an automatic transmission

Do not depress the accelerator and brake pedals at the same time during
driving, as this may restrain driving torque.

Do  not  use  the  accelerator  pedal  or  depress  the  accelerator  and  brake
pedals at the same time to hold the vehicle on a hill.

Vehicles with a manual transmission

Do not depress the accelerator and brake pedals at the same time during
driving, as this may restrain driving torque.

Do not shift gears unless the clutch pedal is fully depressed. After shifting,
do not release the clutch pedal abruptly. Doing so may damage the clutch,
transmission and gears.

Observe the following to prevent the clutch from being damaged.

• Do not rest your foot on the clutch pedal while driving. 

Doing so may cause clutch trouble.

• Do not use any gear other than the 1st gear when starting off and mov-

ing forward. 
Doing so may damage the clutch.

• Do not use the clutch to hold the vehicle when stopping on an uphill

grade. 
Doing so may damage the clutch.

Do not shift the shift lever to R when the vehicle is still moving. Doing so
may damage the clutch, transmission and gears.

Do  not  release  the  clutch  pedal  too  quickly.  Doing  so  may  damage  the
transmission.

When parking the vehicle (vehicles with an automatic transmission)

Always shift the shift lever to P. Failure to do so may cause the vehicle to
move or the vehicle may accelerate suddenly if the accelerator pedal is acci-
dentally depressed.

-------------------------------------------------------------------------------------------------------------------------------------------------------------

165

2-1. Driving procedures

2

Wh
en drivin

g

NOTICE

Avoiding damage to vehicle parts

Do not turn the steering wheel fully in either direction and hold it there for
an extended period of time. 
Doing so may damage the power steering motor.

When driving over bumps in the road, drive as slowly as possible to avoid
damaging the wheels, underside of the vehicle, etc.

On  vehicles  with  an  automatic  transmission,  do  not  race  the  engine  for
more than 5 seconds in any position except the N or P position when the
brake is applied or when chocks are used in the wheels. This may cause
the transmission fluid to overheat.

If you get a flat tire while driving

A flat or damaged tire may cause the following situations. Hold the steering
wheel firmly and gradually depress the brake pedal to slow down the vehicle.

It may be difficult to control your vehicle.

The vehicle will make abnormal sounds or vibrations.

The vehicle will lean abnormally.

Information on what to do in case of a flat tire (

P. 425)

When encountering flooded roads

Do not drive on a road that has flooded after heavy rain etc. Doing so may
cause the following serious damage to the vehicle:

Engine stalling

Short in electrical components

Engine damage caused by water immersion

In the event that you drive on a flooded road and the vehicle is flooded, be
sure to have your Toyota dealer check the following:

Brake function

Changes in quantity and quality of oil and fluid used for the engine, trans-
mission, differential, etc.

Lubricant condition for the propeller shaft, bearings and suspension joints
(where possible) and the function of all joints, bearings, etc.

-------------------------------------------------------------------------------------------------------------------------------------------------------------

166

2-1. Driving procedures

Engine (ignition) switch (vehicles with a smart key system)

Performing  the  following  operations  when  carrying  the  electronic
key  on  your  person  starts  the  engine  or  changes  “ENGINE  START
STOP” switch modes.

Starting the engine

Vehicles with an automatic transmission

Check that the parking brake is set.
Check that the shift lever is set in P.

If the shift lever is not set in P, the engine may not be started. 
(

P. 178)

Firmly depress the brake pedal.

The  smart  key  system  indicator  light  (green)  will  turn  on.  If  the
indicator light does not turn on, the engine cannot be started.

Press  the  “ENGINE  START
STOP”  switch  shortly  and
firmly.

When  operating  the  “ENGINE
START  STOP”  switch,  one
short, firm press is enough. It is
not  necessary  to  press  and
hold the switch.

The  engine  will  crank  until  it
starts or for up to 10 seconds,
whichever is less.

Continue depressing the brake
pedal  until  the  engine  is  com-
pletely started.

The  engine  can  be  started
from  any  “ENGINE  START
STOP” switch mode.

STEP 

STEP 

STEP 

STEP 

-------------------------------------------------------------------------------------------------------------------------------------------------------------

167

2-1. Driving procedures

2

Wh
en drivin

g

Vehicles with a manual transmission

Check that the parking brake is set.
Check that the shift lever is set in N.
Firmly depress the clutch pedal.

The  smart  key  system  indicator  light  (green)  will  turn  on.  If  the
indicator light does not turn on, the engine cannot be started.

Press  the  “ENGINE  START
STOP”  switch  shortly  and
firmly.

When  operating  the  “ENGINE
START  STOP”  switch,  one
short, firm press is enough. It is
not  necessary  to  press  and
hold the switch.

The  engine  will  crank  until  it
starts or for up to 10 seconds,
whichever is less.

Continue depressing the clutch
pedal  until  the  engine  is  com-
pletely started.

The  engine  can  be  started
from  any  “ENGINE  START
STOP” switch mode.

STEP 

STEP 

STEP 

STEP 

-------------------------------------------------------------------------------------------------------------------------------------------------------------

168

2-1. Driving procedures

Stopping the engine

Vehicles with an automatic transmission

Stop the vehicle.
Shift the shift lever to P.
Set the parking brake. (

P. 189)

Release the brake pedal.
Press the “ENGINE START STOP” switch.
Check that the  smart  key system indicator  light  (green) is
off.

Vehicles with a manual transmission

While depressing the clutch pedal, stop the vehicle.
Shift the shift lever to N.
Set the parking brake. (

P. 189)

Release the clutch pedal.
Press the “ENGINE START STOP” switch.
Check that the  smart  key system indicator  light  (green) is
off.

STEP 

STEP 

STEP 

STEP 

STEP 

STEP 

STEP 

STEP 

STEP 

STEP 

STEP 

STEP 

-------------------------------------------------------------------------------------------------------------------------------------------------------------

169

2-1. Driving procedures

2

Wh
en drivin

g

Changing “ENGINE START STOP” switch mode

Modes can be changed by pressing the “ENGINE START STOP”
switch with the brake pedal (vehicles with an automatic transmis-
sion)  or  clutch  pedal  (vehicles  with  a  manual  transmission)
released. (The mode changes each time the switch is pressed.)

Off*

The  emergency  flashers  can
be used.

The smart key system indicator
light (green) is off.

ACCESSORY mode

Some  electrical  components
such  as  the  power  outlet  can
be used.

The smart key system indicator
light (green) flashes slowly.

IGNITION ON mode

All  electrical  components  can
be used.

The smart key system indicator
light (green) flashes slowly.

*: Vehicles  with  an  automatic

transmission: If the shift lever is
in a position other than P when
turning  off  the  engine,  the
“ENGINE START STOP” switch
will  be  turned  to ACCESSORY
mode, not to off.

-------------------------------------------------------------------------------------------------------------------------------------------------------------

170

2-1. Driving procedures

When stopping the engine with the shift lever in a position other
than P (vehicles with an automatic transmission)

If the engine is stopped with the shift lever in a position other than P,
the “ENGINE START STOP” switch will not be turned off but instead
be turned to ACCESSORY mode. Perform the following procedure to
turn the switch off:

Check that the parking brake is set.
Shift the shift lever to P.
Check  that  the  smart  key  system  indicator  light  (green)
flashes  slowly  and  then  press  the  “ENGINE  START  STOP”
switch once.
Check that the smart key system indicator light (green) is off.

Auto power off function

Vehicles with an automatic transmission

If the vehicle is left in ACCESSORY mode for more than 20 minutes or IGNI-
TION ON mode (the engine is not running) for more than an hour with the
shift lever in P, the “ENGINE START STOP” switch will automatically turn off.
However,  this  function  cannot  entirely  prevent  battery  discharge.  Do  not
leave the vehicle with the “ENGINE START STOP” switch in ACCESSORY
or IGNITION ON mode for long periods of time when the engine is not run-
ning.

Vehicles with a manual transmission

If the vehicle is left in ACCESSORY mode for more than 20 minutes or IGNI-
TION  ON  mode  (the  engine  is  not  running)  for  more  than  an  hour,  the
“ENGINE  START  STOP”  switch  will  automatically  turn  off.  However,  this
function cannot entirely prevent battery discharge. Do not leave the vehicle
with the “ENGINE START STOP” switch in ACCESSORY or IGNITION ON
mode for long periods of time when the engine is not running.

STEP 

STEP 

STEP 

STEP 

-------------------------------------------------------------------------------------------------------------------------------------------------------------

171

2-1. Driving procedures

2

Wh
en drivin

g

Operation of the “ENGINE START STOP” switch

If the switch is not pressed shortly and firmly, the “ENGINE START STOP”
switch mode may not change or the engine may not start.

Electronic key battery depletion

P. 35

Conditions affecting operation

P. 31

Note for the entry function

P. 32

If the engine does not start

The engine immobilizer system may not have been deactivated. (

P. 79)

Contact your Toyota dealer.

Steering lock

After turning the “ENGINE START STOP” switch off and opening and closing
the doors, the steering wheel will be locked due to the steering lock function.
Operating the “ENGINE START STOP” switch again automatically cancels
the steering lock.

Vehicles  with an  automatic transmission:
Check  that the  shift lever  is securely  set
in P. The engine may not start if the shift
lever is displaced out of P. The smart key
system  indicator  light  (green)  will  flash
quickly.

-------------------------------------------------------------------------------------------------------------------------------------------------------------

172

2-1. Driving procedures

When the steering lock cannot be released

Steering lock motor overheating prevention

To prevent the steering lock motor from overheating, the motor may be sus-
pended if the engine is turned on and off repeatedly in a short period of time.
In this case, refrain from operating the engine. After about 10 seconds, the
steering lock motor will resume functioning.

If the smart key system indicator flashes in yellow and a message is
displayed on the multi-information display 

The  system  may  be  malfunctioning.  Have  the  vehicle  inspected  by  your
Toyota dealer immediately.

If the electronic key battery is depleted

P. 363

If the smart key system has been deactivated in a customized setting

P. 442

Immediately after reconnecting the battery terminals due to replacing
the battery and so forth

The engine may not start. If this occurs, turn the “ENGINE START STOP”
switch to IGNITION ON mode, and start the engine after waiting at least 10
seconds. Idling may be unstable immediately after the engine starts, how-
ever, this is not a malfunction.

The  smart  key  system  indicator  light
(green) will  flash quickly and  a message
will be shown on the multi-information dis-
play. (

P. 414)

Vehicles  with  an  automatic  transmis-
sion

Check that the shift lever is set in P. Press
the “ENGINE START STOP” switch while
turning the steering wheel left and right.

Vehicles with a manual transmission

Press the “ENGINE START STOP” switch
while  turning  the  steering  wheel  left  and
right.

-------------------------------------------------------------------------------------------------------------------------------------------------------------

173

2-1. Driving procedures

2

Wh
en drivin

g

WARNING

When starting the engine

Always start the engine while sitting in the driver’s seat. Do not depress
the accelerator pedal while starting the engine under any circumstances. 
Doing so may cause an accident resulting in death or serious injury.

If the smart key system indicator light flashes in green after the engine has
started, never drive the vehicle. The steering wheel is still locked, and it
may result in an accident. 

Caution while driving

If engine failure occurs while the vehicle is moving, do not lock or open the
doors until the vehicle reaches a safe and complete stop. Activation of the
steering lock in this circumstance may lead to an accident, resulting in death
or serious injury.

Stopping the engine in an emergency

If  you  want  to  stop  the  engine  in  an  emergency  while  driving  the  vehicle,
press and hold the “ENGINE START STOP” switch for more than 2 seconds,
or press it briefly 3 times or more in succession. (

P. 455)

However,  do  not  touch  the  “ENGINE  START  STOP”  switch  while  driving
except in an emergency. Turning the engine off while driving will not cause
loss of steering or braking control, but the power assist to these systems will
be lost. This will make it more difficult to steer and brake, so you should pull
over and stop the vehicle as soon as it is safe to do so.

-------------------------------------------------------------------------------------------------------------------------------------------------------------

174

2-1. Driving procedures

NOTICE

To prevent battery discharge

Do not leave the “ENGINE START STOP” switch in ACCESSORY or IGNI-
TION ON mode for long periods of time without the engine running.

If the smart key system indicator light (green) is illuminated, the “ENGINE
START  STOP”  switch  is  not  off.  When  exiting  the  vehicle,  always  check
that the “ENGINE START STOP” switch is off.

Vehicles with an automatic transmission: Do not stop the engine when the
shift lever is in a position other than P. If the engine is stopped in another
shift lever position, the “ENGINE START STOP” switch will not be turned
off  but  instead  be  turned  to ACCESSORY  mode.  If  the  vehicle  is  left  in
ACCESSORY mode, battery discharge may occur.

When starting the engine

Do not race a cold engine.

If the engine becomes difficult to start or stalls frequently, have your vehi-
cle checked by your Toyota dealer immediately.

Vehicles with an automatic transmission: Do not shift the shift lever while
the starter is operating.

Symptoms  indicating  a  malfunction  with  the  “ENGINE  START  STOP”
switch

If the “ENGINE START STOP” switch seems to be operating somewhat dif-
ferently than usual, such as the switch sticking slightly, there may be a mal-
function. Contact your Toyota dealer immediately.

-------------------------------------------------------------------------------------------------------------------------------------------------------------

175

2-1. Driving procedures

2

Wh
en drivin

g

Engine (ignition) switch (vehicles without a smart key system)

Starting the engine

Vehicles with an automatic transmission

Check that the parking brake is set.
Check that the shift lever is set in P.
Firmly depress the brake pedal.
Turn the engine switch to the “START” position to start the
engine.

Vehicles with a manual transmission

Check that the parking brake is set.
Check that the shift lever is set in N.
Firmly depress the clutch pedal.
Turn the engine switch to the “START” position to start the
engine.

Changing the engine switch positions

“LOCK”

The  steering  wheel  is  locked
and  the  key  can  be  removed.
(Vehicles  with  an  automatic
transmission:  The  key  can  be
removed  only  when  the  shift
lever is in P.)

“ACC”

Some  electrical  components
such  as  the  power  outlet  can
be used.

“ON”

All  electrical  components  can
be used.

“START”

For starting the engine.

STEP 

STEP 

STEP 

STEP 

STEP 

STEP 

STEP 

STEP 

-------------------------------------------------------------------------------------------------------------------------------------------------------------

176

2-1. Driving procedures

Turning the key from “ACC” to “LOCK”

Shift  the  shift  lever  to  N  (manual  transmission)  or  P  (automatic
transmission). (

P. 178, 185)

If the engine does not start

The engine immobilizer system may not have been deactivated. (

P. 79)

Contact your Toyota dealer.

When the steering lock cannot be released

Key reminder function

A buzzer sounds if the driver’s door is opened while the engine switch is in
the “LOCK” or “ACC” position to remind you to remove the key.

Immediately after reconnecting the battery terminals due to replacing
the battery and so forth

The engine may not start. If this occurs, turn the engine switch to the “ON”
position, and start the engine after waiting at least 10 seconds. Idling may be
unstable immediately after the engine starts, however, this is not a malfunc-
tion.

STEP 

Push  in  the  key  and  turn  to  the  “LOCK”
position.

STEP 

When  starting  the  engine,  the  engine
switch  may  seem  stuck  in  the  “LOCK”
position. To free it, turn the key while turn-
ing  the  steering  wheel  slightly  left  and
right.

-------------------------------------------------------------------------------------------------------------------------------------------------------------

177

2-1. Driving procedures

2

Wh
en drivin

g

WARNING

When starting the engine

Always start the engine while sitting in the driver's seat. Do not depress the
accelerator pedal while starting the engine under any circumstances. 
Doing so may cause an accident resulting in death or serious injury.

Caution when driving

Do not turn the engine switch to the “LOCK” position while driving. If, in an
emergency, you must turn the engine off while the vehicle is moving, turn the
engine switch only to the “ACC” position to stop the engine. An accident may
result if the engine is stopped while driving. (

P. 455)

NOTICE

To prevent battery discharge

Do not leave the engine switch in the “ACC” or “ON” position for long periods
of time without the engine running.

When starting the engine

Do  not  crank  the  engine  for  more  than  10  seconds  at  a  time. This  may
overheat the starter and wiring system. 
If the engine does not start, turn the engine switch to the “LOCK” position
and try to start the engine again after waiting for 10 seconds or more.

Do not race a cold engine.

If the engine becomes difficult to start or stalls frequently, have your vehi-
cle checked by your Toyota dealer immediately.

Vehicles with an automatic transmission: Do not shift the shift lever while
the starter is operating.

-------------------------------------------------------------------------------------------------------------------------------------------------------------

178

2-1. Driving procedures

Automatic transmission

Select a shift position appropriate for the driving conditions.

Shifting the shift lever

Vehicles without a smart key system

While the engine  switch is  in the  “ON” position, move the
shift lever with the brake pedal depressed.

When shifting the shift lever between P and D, make sure that the
vehicle is completely stopped.

Vehicles with a smart key system

While  the  “ENGINE  START  STOP”  switch  is  in  IGNITION
ON  mode,  move  the  shift  lever  with  the  brake  pedal
depressed.

When shifting the shift lever between P and D, make sure that the
vehicle is completely stopped.

: If equipped

-------------------------------------------------------------------------------------------------------------------------------------------------------------

179

2-1. Driving procedures

2

Wh
en drivin

g

Shift position uses

*

: Shifting to the D position allows the system to select a gear suitable for

the driving conditions. Setting the shift lever to the D position is recom-
mended for normal driving.

Shift 

position

Multi-information display

Function

Monochrome 

display

Color display

P

Parking the vehicle/start-

ing the engine

R

Reversing

N

Neutral

D

Normal D position driving

*

(gears between “1” and “6” 

are automatically 

selected)

(paddle shift switches 

activated)

(paddle shift switches 

activated)

Temporary manual mode 

driving (

P. 183)

M

Manual mode driving 

(

P. 181)

-------------------------------------------------------------------------------------------------------------------------------------------------------------

180

2-1. Driving procedures

Selecting a driving mode

By  pressing  the  driving  pattern  selector  switch  the  following
modes can be selected to suit driving and usage conditions:

Normal mode
Sport mode 

The “SPORT” indicator comes on.

Use  sport  mode  for  sporty  driving  or  when  driving  in  mountainous
regions with lots of curves.

Snow mode

The “SNOW” indicator comes on.

Use snow mode for accelerating and driving on slippery road surfaces
such as snow.

To cancel sport mode or snow mode, press the same side of the
switch again.

-------------------------------------------------------------------------------------------------------------------------------------------------------------

181

2-1. Driving procedures

2

Wh
en drivin

g

Manual mode driving

To enter manual mode, shift the shift lever to the M position. 

While the upshift/downshift indicator light is illuminated, gears can be
selected by operating the shift lever or paddle shift switches, allowing
you to drive in the gear of your choosing. 

Even if upshifting operations are performed, if vehicle speed is too low for
the requested gear, the gear will not change.

Upshift indicator
Downshift indicator
Upshifting (+)
Downshifting (-)

Each time the shift lever or pad-
dle  shift  switches  are  operated,
the  gear  changes  up  or  down
one gear and the selected gear,
“1” through “6”, will be set.

The selected gear, from “1” to “6”,
and  “M”  will  be  displayed  on  the
shift position and shift range indi-
cator.

*

1

: Vehicles with a monochrome multi-information display

*

2

: Vehicles with a color multi-information display

When in manual mode, the gear will not change unless the shift lever
or paddle shift switches are operated.

However, even when in manual mode, the gears will be automatically
changed in the following situations:

When vehicle speed drops (downshift only).

*

1

*

2

-------------------------------------------------------------------------------------------------------------------------------------------------------------

182

2-1. Driving procedures

When engine oil temperature is high and engine speed rises close
to the red zone.

When moving the shift lever out of P

If  the  shift  lever  is  pushed  sideways  before  the  brake  pedal  is  depressed,
shift lever operation may not be possible. Depress the brake pedal before
shifting the shift lever out of P.

Downshifting restrictions warning buzzer

If downshifting operations are performed at a vehicle speed by which down-
shifting  is  not  possible  (when  downshifting  will  cause  the  engine  speed  to
enter the red zone), a buzzer will sound to warn the driver that downshifting
cannot be performed.

When driving with cruise control activated

Downshifting can be performed even when using cruise control. After down-
shifting, the set speed continues. (

P. 181, 183)

Sport mode

In  sport  mode,  lower  gears  are  used  and  gears  change  at  a  higher
engine speed.

If sport mode is changed to while the shift lever is in the M position, the
“SPORT” indicator will come on but sport mode controls will not be car-
ried out. Shift the shift lever to the D position.

Sport mode cannot be changed to when driving with cruise control acti-
vated.

Snow mode

To prevent slipping, 1

st

 gear cannot be selected when in snow mode.

Sport mode and snow mode automatic deactivation

In the following situations, the driving mode is automatically deactivated:

When the engine is turned off after driving in sport mode or snow mode.

When cruise control is activated while driving in sport mode.

If the shift lever cannot be shifted from P

P. 439

-------------------------------------------------------------------------------------------------------------------------------------------------------------

183

2-1. Driving procedures

2

Wh
en drivin

g

Automatic gear selection when the vehicle is stopped

When the vehicle is idling at high rpm in order to warm up, and the vehicle is
on a slippery road, the transmission may automatically shift to 2

nd

 gear for

stopping and starting off.

Temporary manual mode driving

*

1

: Vehicles with a monochrome multi-information display

*

2

: Vehicles with a color multi-information display

Temporary manual mode driving will be deactivated and normal D position
driving will be returned to in the following situations:

When driving for longer than the set time (the set time differs according
to driving conditions).

When the vehicle comes to a stop.

When the accelerator pedal is continually depressed for longer than the
set time.

When the accelerator pedal is fully, or near-fully, depressed.

Temporary  manual  mode  driving  can  be
changed to by operating the paddle shift
switches  while  the  shift  lever  is  in  the  D
position.

When this occurs, the selected gear and
“D” are displayed on the shift position and
shift range indicator.

(When  engine  speed  rises  close  to  the
red zone, upshifting will be automatically
performed.)

*

1

*

2

-------------------------------------------------------------------------------------------------------------------------------------------------------------

184

2-1. Driving procedures

AI-SHIFT

The AI-SHIFT automatically shifts the gear to the suitable position according
to the driver performance and driving conditions. 
The AI-SHIFT automatically operates when the shift lever is in the D posi-
tion. (Operating the paddle shift switches or shifting the shift lever to the M
position cancels the function.)

WARNING

When driving on slippery road surfaces

Be careful of downshifting and sudden acceleration, as this could result in
the vehicle skidding to the side or spinning.

To prevent incorrect operation

Do not attach items such as accessories to the paddle shift switches. 
Doing so may unintentionally move the paddle shift switches.

-------------------------------------------------------------------------------------------------------------------------------------------------------------

185

2-1. Driving procedures

2

Wh
en drivin

g

Manual Transmission

: If equipped

Shifting the shift lever

Fully depress the clutch pedal before operating the shift lever, and
then release it slowly.

Shifting the shift lever to R

Shift the shift lever to R while
lifting up the ring section.

-------------------------------------------------------------------------------------------------------------------------------------------------------------

186

2-1. Driving procedures

Shift position indicator

The selected shift position will be
displayed  on  the  multi-informa-
tion display.

The selected shift position will not
appear in the following situations:

• When the shift lever is in N.
• When  the  vehicle  speed  is  6

mph (10 km/h) or less (except
when the shift lever is in R)

• When  the  clutch  pedal  is

depressed.

The default setting of the indicator
is off. The indicator can be turned
on/off. (

P. 204, 217)

*

1

: Vehicles with a monochrome multi-information display

*

2

: Vehicles with a color multi-information display

Shift-up indicator

To help enable fuel-efficient driv-
ing, the shift-up indicator flashes
3 times to indicate upshift timing.

The default setting of the indicator
is off. The indicator can be turned
on/off. (

P. 204, 217)

*

1

: Vehicles with a monochrome multi-information display

*

2

: Vehicles with a color multi-information display

*

1

*

2

*

1

*

2

-------------------------------------------------------------------------------------------------------------------------------------------------------------

187

2-1. Driving procedures

2

Wh
en drivin

g

NOTICE

To prevent damage to the transmission

Do not lift up the ring section except when shifting the lever to R.

Shift the shift lever to R only when the vehicle is stationary and the clutch
pedal is fully depressed.

Do  not  shift  the  shift  lever  without
depressing the clutch pedal.

-------------------------------------------------------------------------------------------------------------------------------------------------------------

188

2-1. Driving procedures

Turn signal lever

Turn signals can be operated when

Vehicles without a smart key system

The engine switch is in the “ON” position.

Vehicles with a smart key system

The “ENGINE START STOP” switch is in IGNITION ON mode.

If the indicators flash faster than usual

Check that a light bulb in the turn signal lights has not burned out.

The turn signal lever can be used to show the following intentions of
the driver: 

Right turn
Left turn
Lane  change  to  the  right
(push  and  hold  the  lever
partway)

The  right  hand  signals  will
flash  until  you  release  the
lever.

Lane  change  to  the  left
(push  and  hold  the  lever
partway)

The left hand signals will flash
until you release the lever.

-------------------------------------------------------------------------------------------------------------------------------------------------------------

189

2-1. Driving procedures

2

Wh
en drivin

g

Parking brake

Usage in winter time

P. 261

NOTICE

Before driving

Fully release the parking brake. 
Driving the vehicle with the parking brake set will lead to brake components
overheating,  which  may  affect  braking  performance  and  increase  brake
wear.

To set the parking brake, fully pull the parking brake lever while
depressing the brake pedal.
To release the parking brake, slightly raise the lever and lower it
completely while pressing the button.

U.S.A.

Canada

-------------------------------------------------------------------------------------------------------------------------------------------------------------

190

2-1. Driving procedures

Horn

After adjusting the steering wheel

Make sure that the steering wheel is securely locked. 
The horn may not sound if the steering wheel is not securely locked. 
(

P. 67)

To sound the horn, press on or
close to the 

 mark.

-------------------------------------------------------------------------------------------------------------------------------------------------------------

191

2

Wh
en drivin

g

2-2. Instrument cluster

Gauges and meters

With monochrome display

With color display

Analog Speedometer

Displays the vehicle speed.

Tachometer

Displays the engine speed in revolutions per minute.

Fuel gauge

Displays the quantity of fuel remaining in the tank.

-------------------------------------------------------------------------------------------------------------------------------------------------------------

192

2-2. Instrument cluster

Instrument panel light control

The brightness of the instrument panel lights can be adjusted.

Brighter
Darker

Engine coolant temperature gauge (if equipped)

Displays the engine coolant temperature.

Digital Speedometer

Displays the vehicle speed.

Multi-information display, odometer and trip meter

P. 200, 207

“DISP” switch (if equipped)

P. 203

“ODO/TRIP” switch

P. 202

“km/h MPH” switch

Each time the switch is pressed, the display inside the meter changes
between km/h and MPH.

-------------------------------------------------------------------------------------------------------------------------------------------------------------


Content      ..     1      2      3      4      ..