Toyota Celica (2005 year). Instruction - part 18
’05MY CELICA U (L/O 0409)
—Checking battery condition
Battery recharging precautions
During recharging, the battery is pro-
NOTICE
Type A
ducing hydrogen gas.
Clear or
z Be sure the engine and all accesso-
Therefore, before recharging:
light yellow
Green
Dark
ries are off before performing main-
1. If recharging with the battery installed
tenance.
on the vehicle, be sure to disconnect
z When checking the battery, remove
the ground cable.
the ground cable from the negative
Type B
2. Be sure the power switch on the re-
terminal
(“−” mark) first and rein-
charger is off when connecting the
Blue
White
Red
stall it last.
charger cables to the battery and when
z Be careful not to cause a short cir-
disconnecting them.
cuit with tools.
z Take care no solution gets into the
CAUTION
battery when washing it.
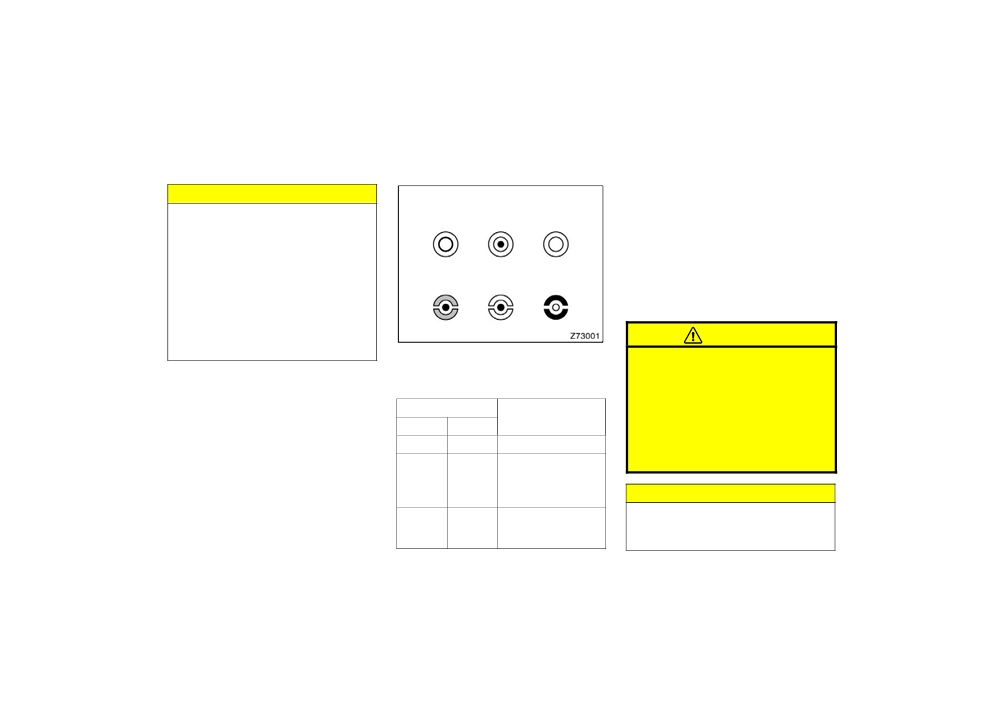
CHECKING BY INDICATOR
D Always charge the battery in an un-
confined area. Do not charge the
If the battery is disconnected or run
Check the battery condition by the indi-
battery in a garage or closed room
down, the moon roof may not operate
cator color.
where there is not sufficient ventila-
automatically and the jam protection func-
Indicator color
tion.
tion will not function correctly after you
Condition
reconnect, replace or recharge the battery.
Type A
Type B
D Only do a slow charge
(5 A or
In any of these cases, you should normal-
less). Charging at a quicker rate is
Green
Blue
Good
ize the moon roof. To normalize the moon
dangerous. The battery may ex-
roof, see
“Electric moon roof” in Section
Charging necessary.
plode, causing personal injuries.
1−2.
Have battery
Dark
White
checked by your
Toyota dealer.
NOTICE
Clear or
Have battery
Never recharge the battery while the
light
Red
checked by your
engine is running. Also, be sure all
yellow
Toyota dealer.
accessories are turned off.
247
2005 CELICA from Sep. ’04 Prod. (OM20888U)
’05MY CELICA U (L/O 0409)
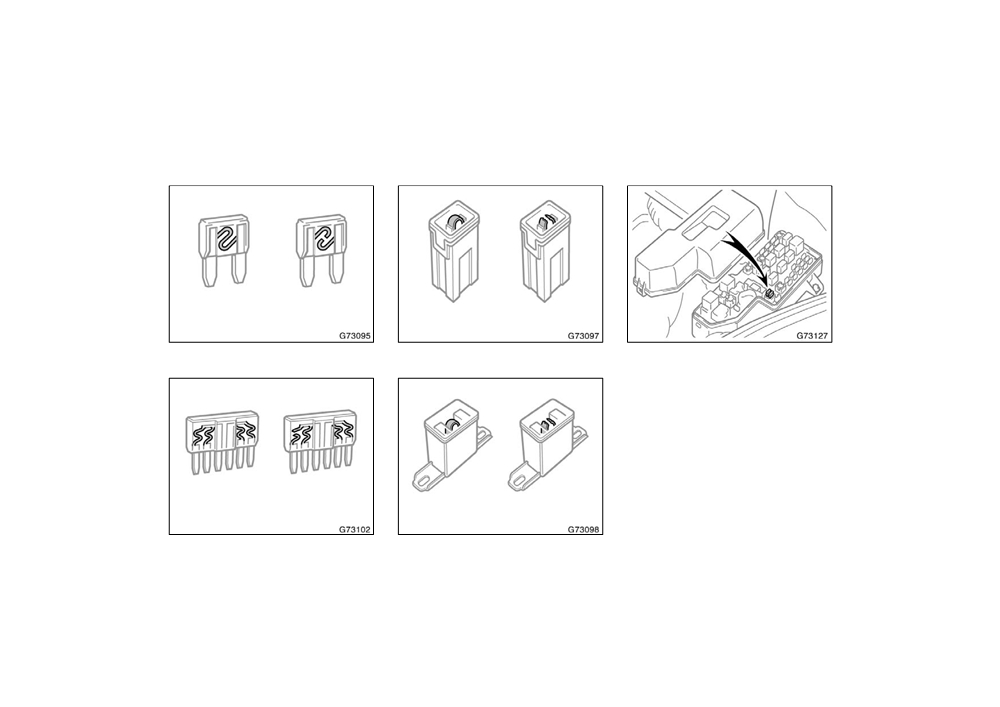
Checking and replacing fuses
Good
Blown
Good
Blown
Type A
Type C
If the headlights or other electrical
components do not work, check the
fuses. If any of the fuses are blown,
they must be replaced.
See
“Fuse locations” in Section
7−1 for
locations of the fuses.
Turn the ignition switch and inoperative
component off. Pull the suspected fuse
straight out and check it.
Determine which fuse may be causing the
Good
Blown
problem. The lid of the fuse box shows
Good
Blown
the name of the circuit for each fuse. See
Section
8 for the functions controlled by
each circuit.
Type B
Type D
248
2005 CELICA from Sep. ’04 Prod. (OM20888U)
’05MY CELICA U (L/O 0409)
Adding washer fluid
Type A fuses can be pulled out by the
If the new fuse immediately blows out,
pull−out tool. The location of the pull−out
there is a problem with the electrical sys-
tool is shown in the illustration.
tem. Have your Toyota dealer correct it as
soon as possible.
If you are not sure whether the fuse has
blown, try replacing the suspected fuse
with one that you know is good.
CAUTION
If the fuse has blown, push a new fuse
Never use a fuse with a higher am-
into the clip.
perage rating, or any other object, in
Only install a fuse with the amperage rat-
place of a fuse. This may cause ex-
ing designated on the fuse box lid.
tensive damage and possibly a fire.
If you do not have a spare fuse, in an
emergency you can pull out the “RADIO”,
“CIG” or
“HTR” fuse, which may be dis-
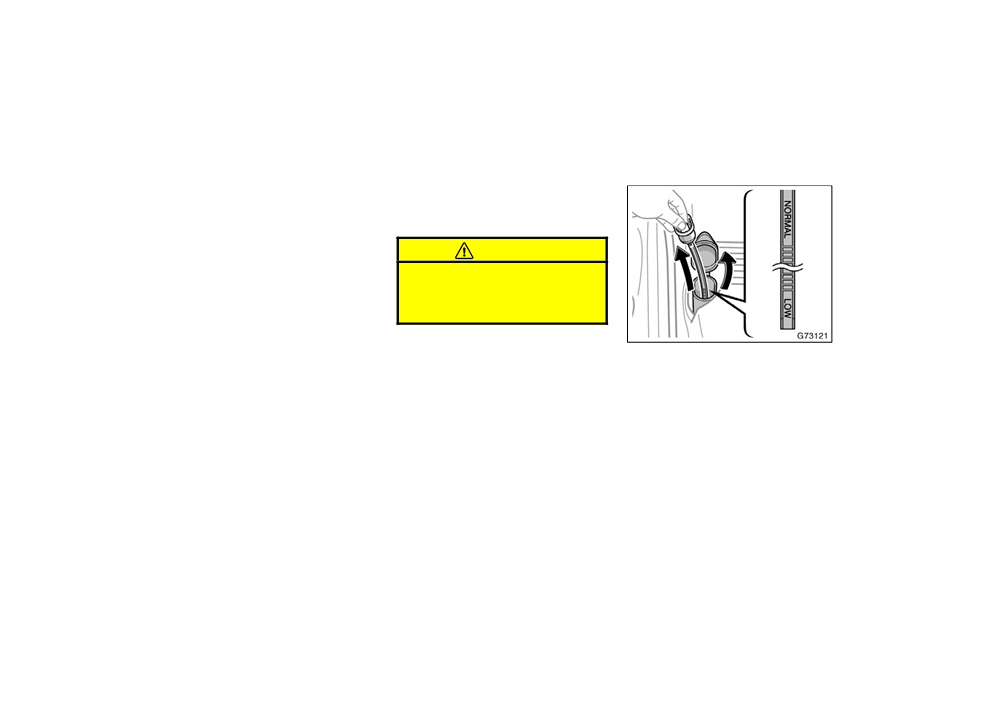
If any washer does not work, the wash-
pensable for normal driving, and use it if
er tank may be empty. Check the wash-
its amperage rating is the same.
er fluid level on the level gauge. If the
If you cannot use one of the same amper-
washer fluid level is below “LOW”, add
age, use one that is lower, but as close
washer fluid.
to the rating as possible. If the amperage
is lower than that specified, the fuse
You may use plain water as washer fluid.
might blow out again but this does not
However, in cold areas where tempera-
indicate anything wrong. Be sure to get
tures range below the freezing point, use
washer fluid containing antifreeze. This
the correct fuse as soon as possible and
product is available at your Toyota dealer
return the substitute to its original clip.
and most auto parts stores. Follow the
It is a good idea to purchase a set of
manufacturer’s directions for how much to
spare fuses and keep them in your ve-
mix with water.
hicle for emergencies.
249
2005 CELICA from Sep. ’04 Prod. (OM20888U)
’05MY CELICA U (L/O 0409)
Replacing light bulbs—
The following illustrations show how to
NOTICE
D Do not disassemble, repair or take
gain access to the bulbs. When replacing
apart the headlight bulbs, connec-
Do not use engine antifreeze or any
a bulb, make sure the ignition switch and
tor, power supply circuits and ro-
other substitute because it may dam-
light switch are off. Use bulbs with the
tated components. Or you may be
age your vehicle’s paint.
wattage ratings given in the table.
injured by electric shocks. Call your
dealer when the headlights fail to
CAUTION
work or have to be replaced or dis-
posed of.
D To prevent burning yourself, do not
replace the light bulbs while they
are hot.
The inside of the lens of exterior lights
such as headlights may temporarily fog up
D Halogen bulbs have pressurized gas
when the lens becomes wet in the rain or
inside and require special handling.
in a car wash. This is not a problem
They can burst or shatter if
because the fogging is caused by the
scratched or dropped. Hold a bulb
temperature difference between the outside
only by its plastic or metal case.
and inside of the lens, just like the
Do not touch the glass part of a
windshield fogs up in the rain. However, if
bulb with bare hands.
there is a large drop of water on the
Vehicles with discharge headlights—
inside of the lens, or if there is water
D Do not touch the high voltage sock-
pooled inside the light, contact your
et when the headlight turns on.
Toyota dealer.
20000 V is momentarily generated
and may cause severe injury by
NOTICE
electric shock.
Only use a bulb of the listed type.
250
2005 CELICA from Sep. ’04 Prod. (OM20888U)
’05MY CELICA U (L/O 0409)
A:
D2S discharge bulbs
Light bulbs
Bulb No.
W
Type
B:
H7 halogen bulbs
Headlights (low)
C: HB3 halogen bulbs
With discharge headlights
—
35
A
D: H3 halogen bulbs
Without discharge headlights
—
55
B
E:
Wedge base bulbs (clear)
F:
Single end bulbs (amber)
Headlights (high)
9005
60
C
G: Wedge base bulbs (amber)
H: Single end bulbs (clear)
Front fog lights
—
55
D
I:
Double end bulbs
Parking lights
—
5
E
Front turn signal lights
—
21
F
Front side marker lights
194
3.8
E
Rear turn signal lights
—
21
G
Stop/tail and rear side marker lights
7443
21/5
E
Back−up lights
921
16
E
License plate lights
—
5
E
Interior light
Without moon roof
—
8
I
With moon roof
—
10
H
Glove box light
—
1.2
E
Luggage compartment light
—
5
I
251
2005 CELICA from Sep. ’04 Prod. (OM20888U)
’05MY CELICA U (L/O 0409)
—Low beam headlights
(without discharge headlights)
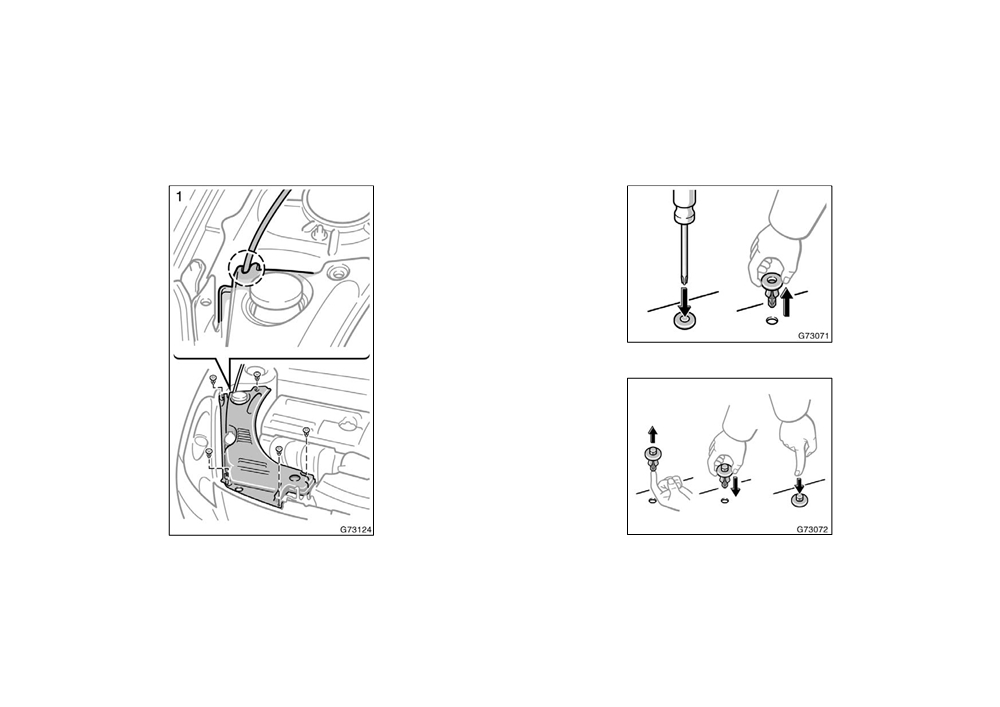
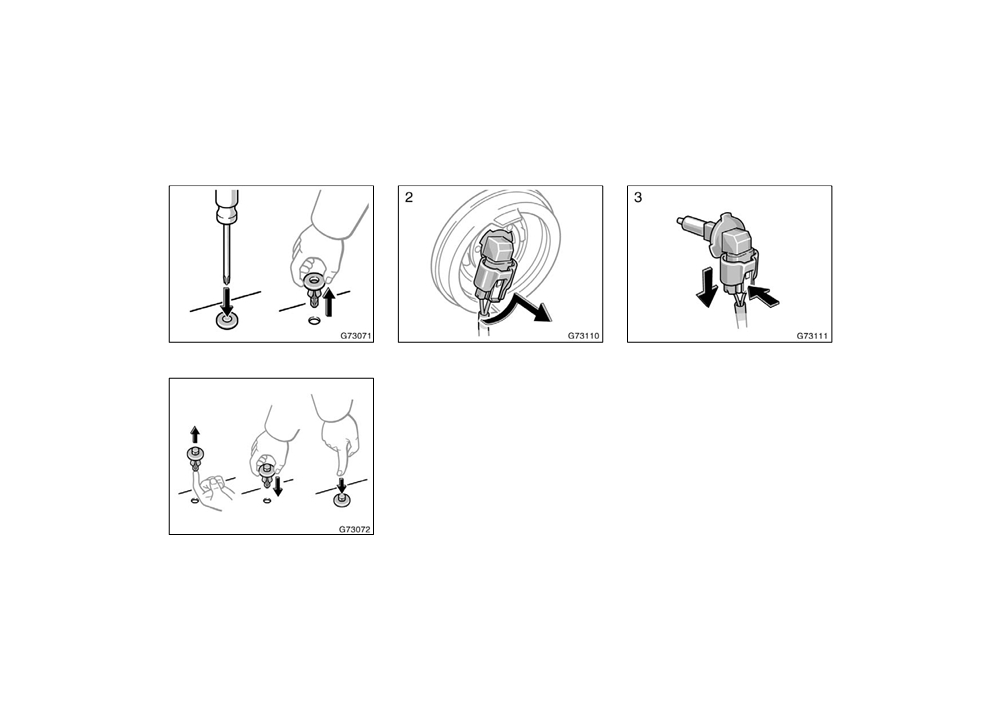
1. Open the hood.
RIGHT SIDE HEADLIGHT—Remove the
clips and take out the cover. In doing
so, remove the washer hose from the
notch on the cover.
Remove and install the cover clips as
shown in the following illustrations.
Removing clip
Installing clip
252
2005 CELICA from Sep. ’04 Prod. (OM20888U)
’05MY CELICA U (L/O 0409)
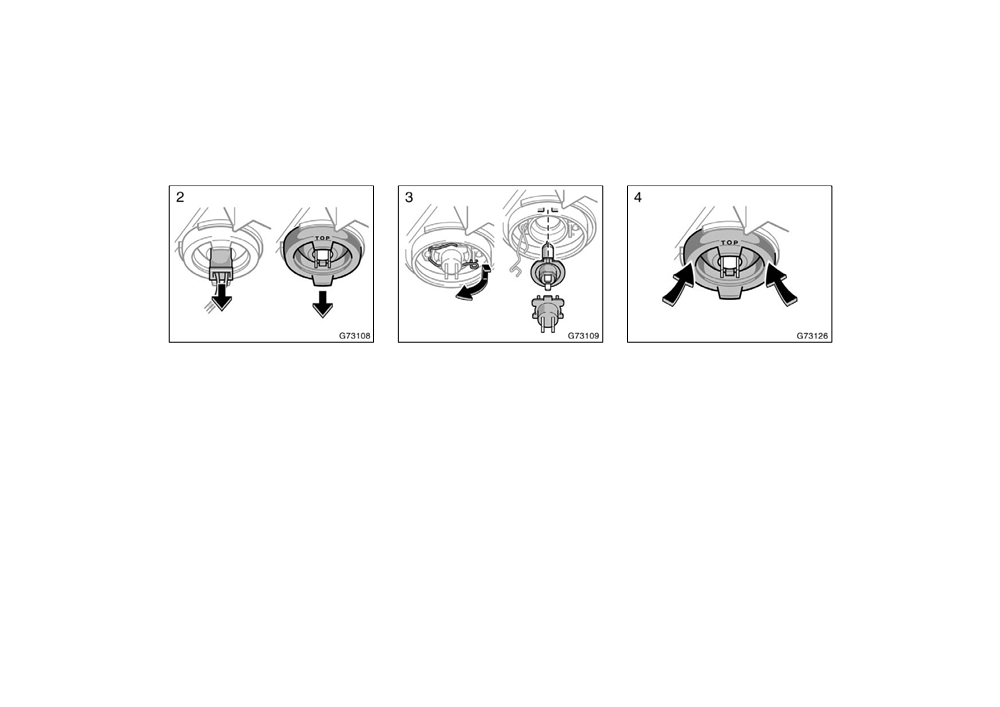
2. Unplug the connector. Remove the
3. Release the bulb retaining spring
4. Install the rubber cover with the
rubber cover.
and remove the bulb along with the
“TOP” mark upward, and fit it se-
socket. Install a new bulb into the
curely on the boss. Plug in the con-
If the connector is tight, wiggle it.
socket and return the bulb retaining
nector.
spring to its original position.
Make sure the rubber cover fits securely
To install a bulb, align the tabs of the
on the bulb base and the mounting body.
bulb with the cutout of the mounting hole.
Aiming is not necessary after replacing
the bulb. When aiming adjustment is nec-
essary, contact your Toyota dealer.
253
2005 CELICA from Sep. ’04 Prod. (OM20888U)
’05MY CELICA U (L/O 0409)
—High beam headlights
(without discharge headlights)
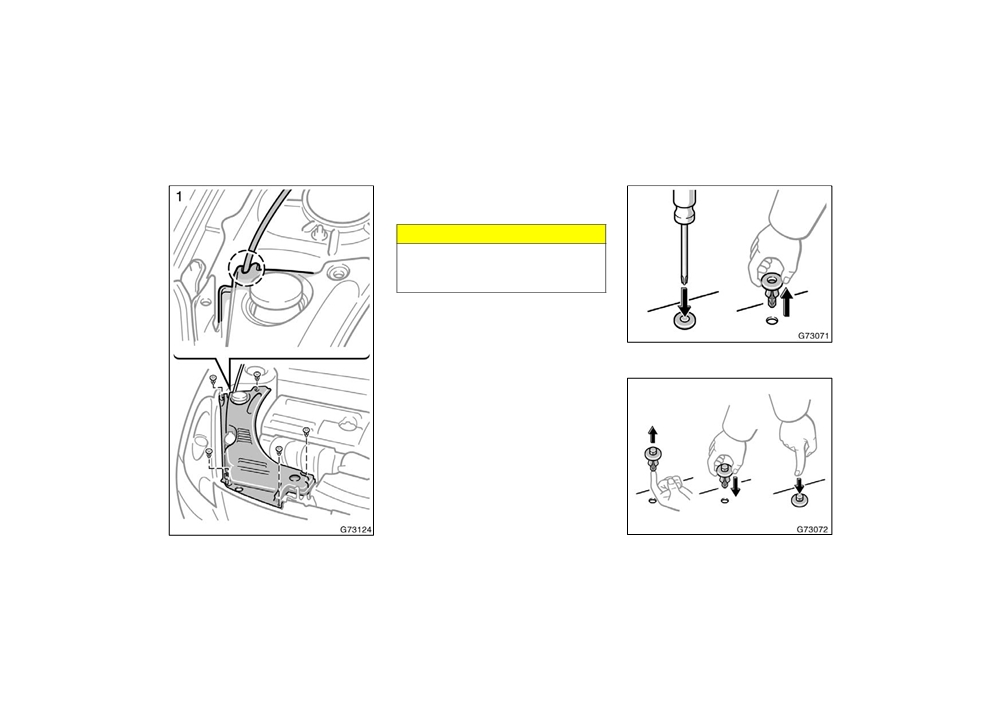
1. Open the hood.
RIGHT SIDE HEADLIGHT—Remove the
clips and take out the cover. In doing
so, remove the washer hose from the
notch on the cover.
Remove and install the cover clips as
shown in the following illustrations.
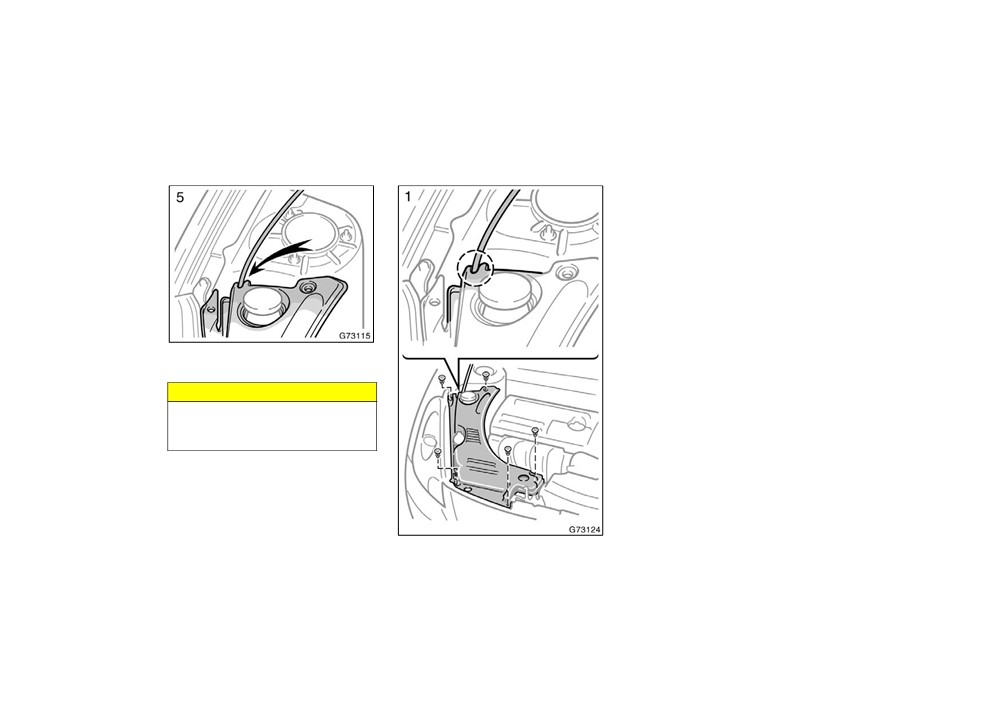
5. RIGHT SIDE HEADLIGHT—Install the
cover.
NOTICE
Always notch the washer hose before
fastening it when installing the cover.
This prevents washer hose damage.
254
2005 CELICA from Sep. ’04 Prod. (OM20888U)
’05MY CELICA U (L/O 0409)
Removing clip
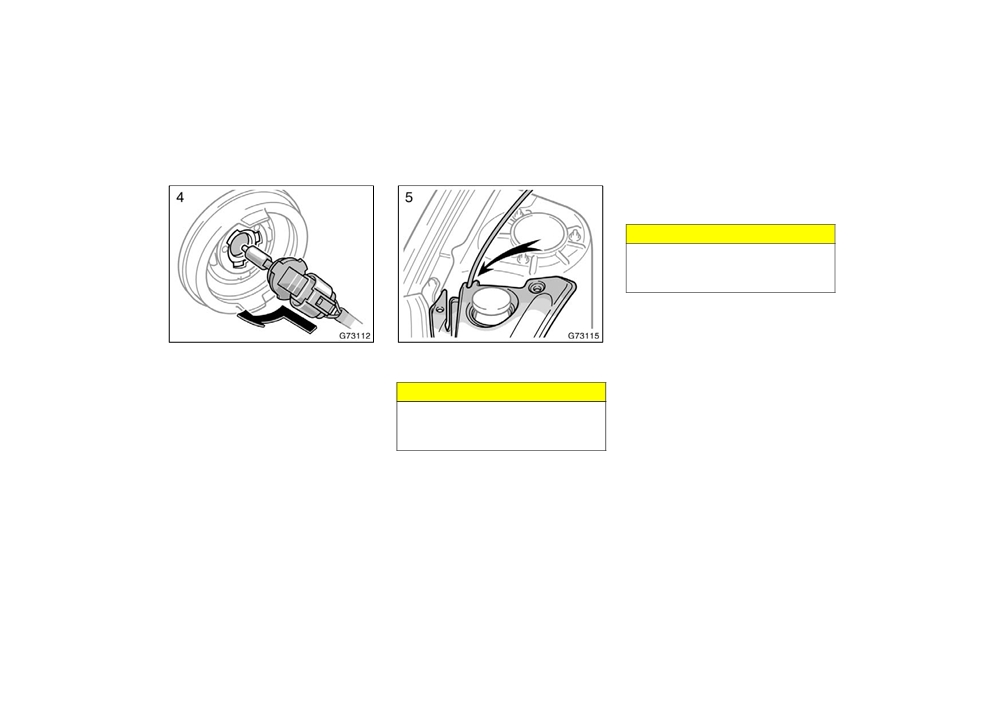
2. Turn the bulb base counterclockwise
3. Pull the bulb out of the bulb base
and remove it.
and install a new bulb.
If the connector is tight, wiggle it.
Installing clip
255
2005 CELICA from Sep. ’04 Prod. (OM20888U)
’05MY CELICA U (L/O 0409)
—Front fog and front side
marker lights
If either the left or right front fog or
front side marker lights burns out, con-
tact your Toyota dealer.
NOTICE
Do not try to replace the front fog or
front side marker light bulbs by your-
self. You may damage the vehicle.
4. Insert the bulb base into the mount-
5. RIGHT SIDE HEADLIGHT—Install the
ing hole by turning it clockwise.
cover.
Aiming is not necessary after replacing
NOTICE
the bulb. When aiming adjustment is nec-
essary, contact your Toyota dealer.
Always notch the washer hose before
fastening it when installing the cover.
This prevents washer hose damage.
256
2005 CELICA from Sep. ’04 Prod. (OM20888U)
’05MY CELICA U (L/O 0409)
—Parking lights
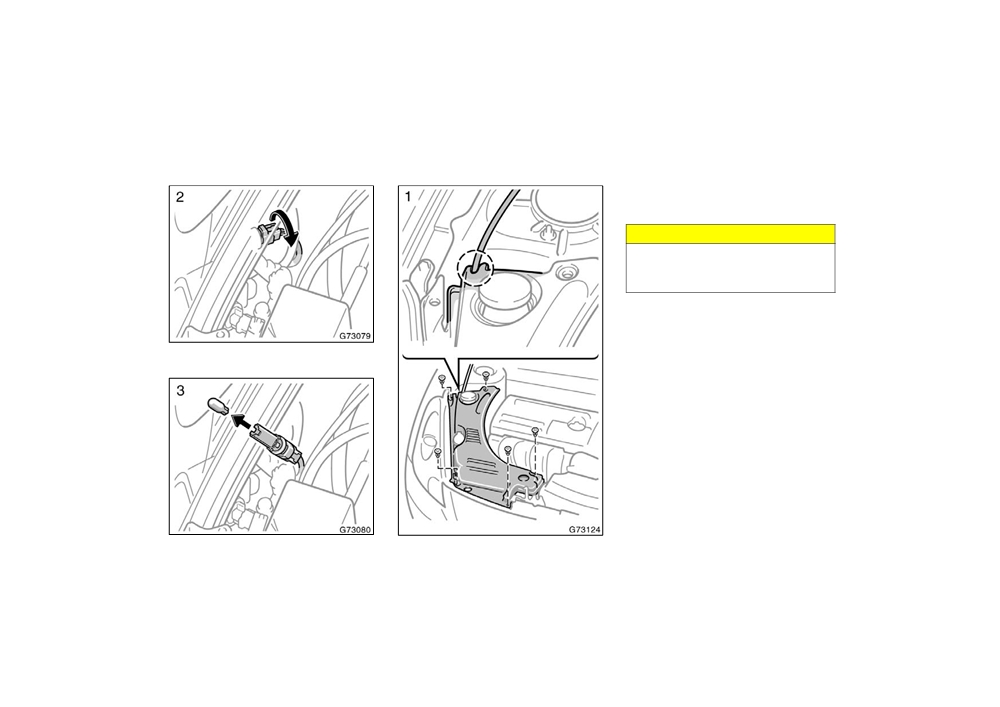
RIGHT SIDE PARKING LIGHT—Remove
and install the clips as shown in the
following illustrations.
NOTICE
Always notch the washer hose before
fastening it when installing the cover.
This prevents washer hose damage.
Removing clip
Installing clip
257
2005 CELICA from Sep. ’04 Prod. (OM20888U)
’05MY CELICA U (L/O 0409)
—Front turn signal lights
RIGHT SIDE FRONT TURN SIGNAL
LIGHT—Remove and install the clips as
shown in the following illustrations.
NOTICE
Always notch the washer hose before
fastening it when installing the cover.
This prevents washer hose damage.
258
2005 CELICA from Sep. ’04 Prod. (OM20888U)
’05MY CELICA U (L/O 0409)
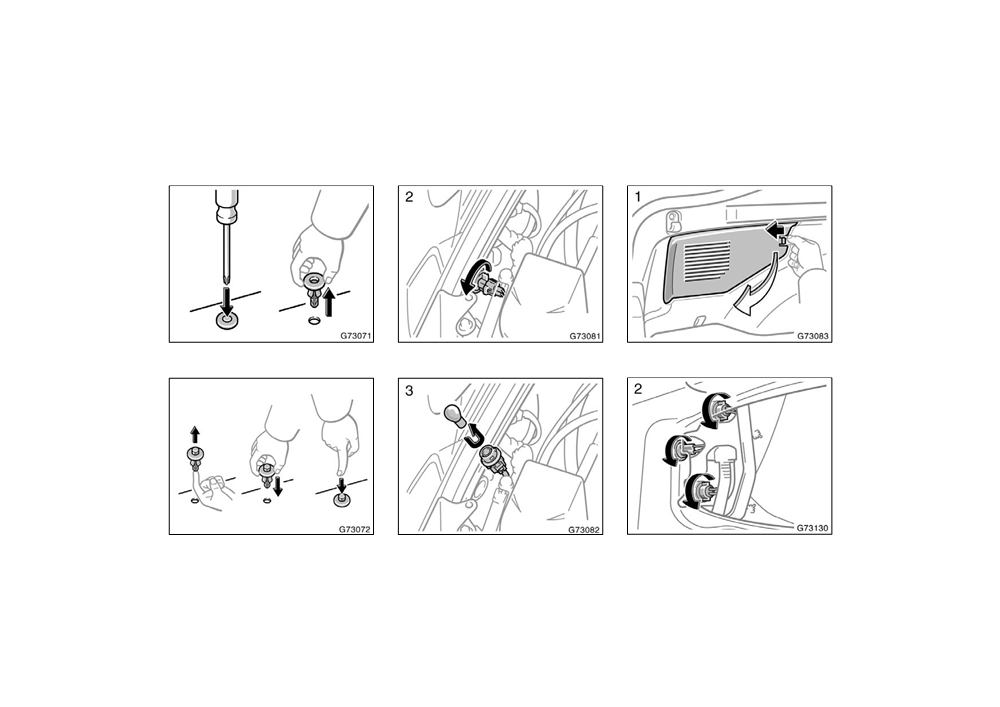
—Rear turn signal, stop/tail
and rear side marker, and
back−up lights
Removing clip
Installing clip
259
2005 CELICA from Sep. ’04 Prod. (OM20888U)
’05MY CELICA U (L/O 0409)
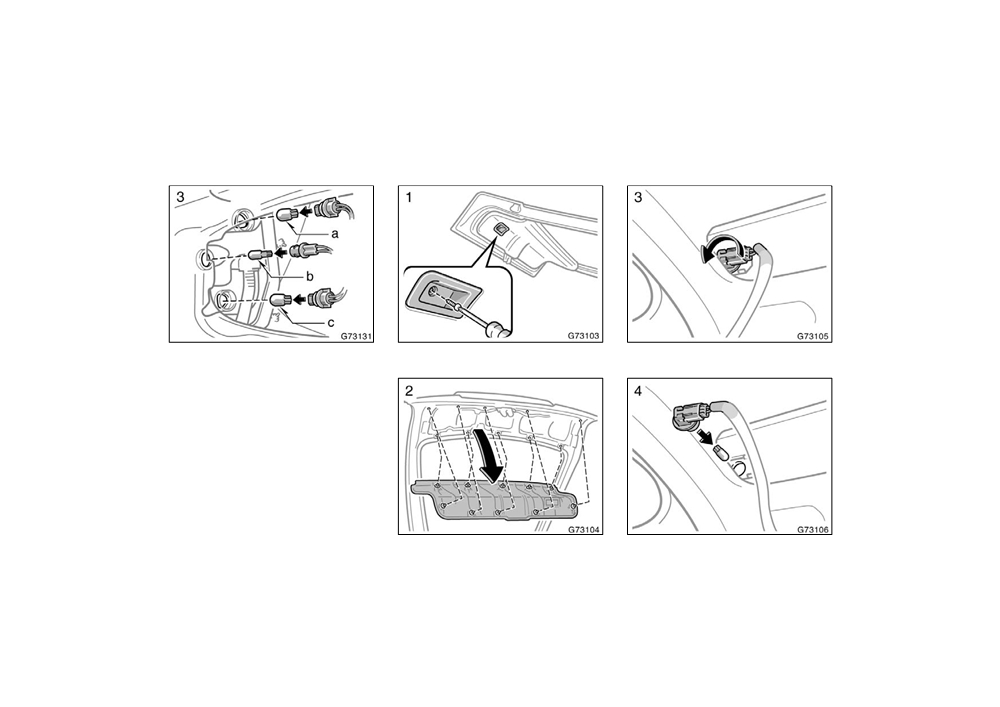
—License plate lights
a: Stop/tail and rear side marker light
Use a Phillips−head screwdriver.
b: Back−up light
c: Rear turn signal light
260
2005 CELICA from Sep. ’04 Prod. (OM20888U)
’05MY CELICA U (L/O 0409)
SECTION 8
SPECIFICATIONS
Specifications
Dimensions and weights
262
Engine
262
Fuel
262
Service specifications
263
Tires
265
Fuses
266
261
2005 CELICA from Sep. ’04 Prod. (OM20888U)