Toyota FJ Cruiser (GSJ 10, 15 series). Instruction - part 314
 

  Index      Toyota     Toyota FJ Cruiser (model GSJ 10, 15 series) - service repair instruction 2007 year


Search            copyright infringement  


Content   ..  312  313  314  315   ..


Toyota FJ Cruiser (GSJ 10, 15 series). Instruction - part 314


LU–18

1GR-FE LUBRICATION  –  OIL PUMP

LU

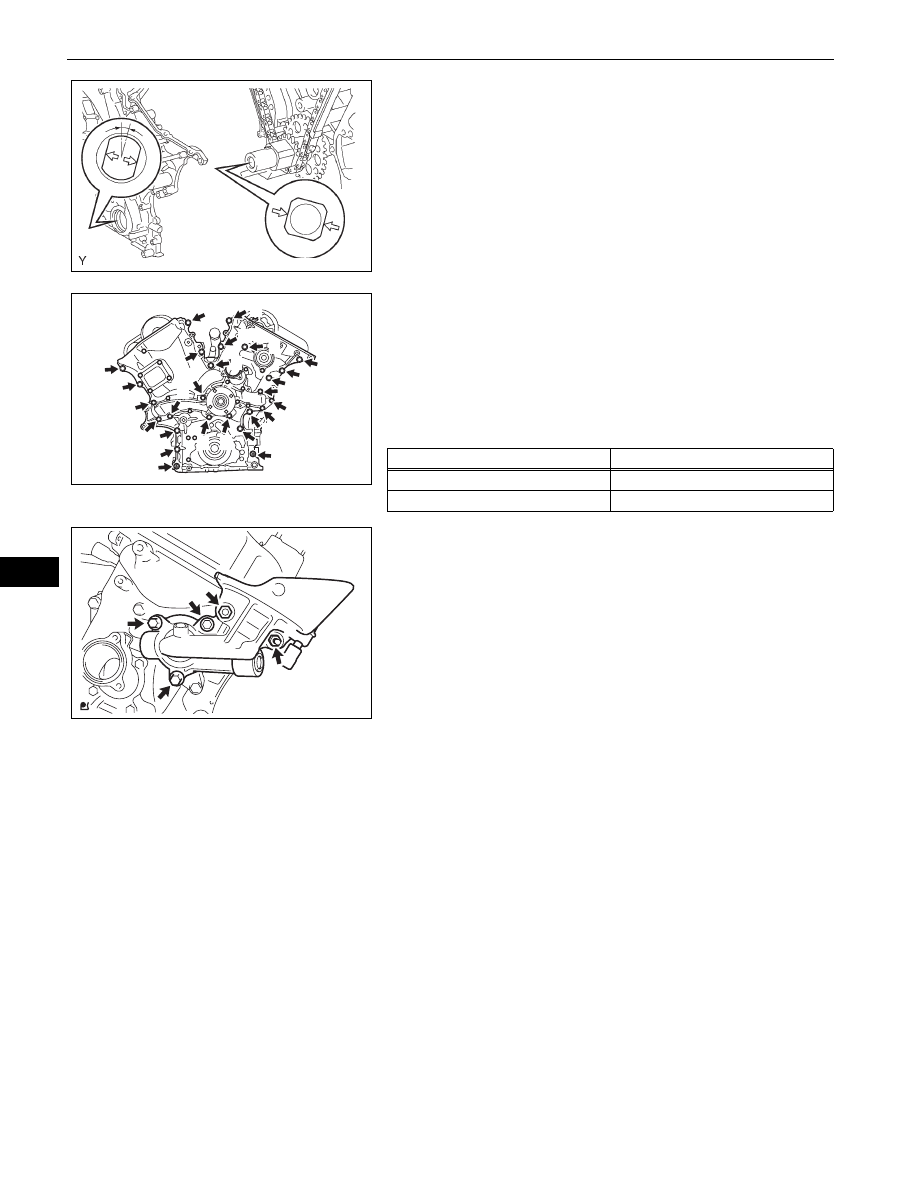
(e) Align the key way of the oil pump drive rotor with the 

rectangular portion of the crankshaft timing gear, 
and slide the timing chain cover into place.

(f)

Install the timing chain cover with the 24 bolts and 2 
nuts. Tighten the bolts and nuts uniformly in several 
steps.
Torque: 23 N*m (235 kgf*cm, 17 ft.*lbf)
NOTICE:
Pay attention not to wrap the chain and slipper 
over the timing chain cover seal line.
Each bolt length is as follows

3.

INSTALL OIL FILTER BRACKET SUB-ASSEMBLY
(a) Install a new gasket and oil filter bracket with the 3 

bolts and 2 nuts.
Torque: 19 N*m (194 kgf*cm, 14 ft.*lbf)

4.

INSTALL CYLINDER HEAD COVER SUB-ASSEMBLY 
LH (See page 

EM-57

)

5.

INSTALL CYLINDER HEAD COVER SUB-ASSEMBLY 
(See page 

EM-58

)

6.

INSTALL WATER INLET (See page 

CO-9

)

7.

INSTALL VVT SENSOR (See page 

ES-417

)

8.

INSTALL CAMSHAFT TIMING OIL CONTROL VALVE 
ASSEMBLY (See page 

ES-415

)

9.

INSTALL IGNITION COIL ASSEMBLY (See page 

IG-8

)

10. INSTALL INTAKE AIR SURGE TANK (See page 

FU-

17

)

11. INSTALL NO. 2 SURGE TANK STAY (See page 

FU-19

)

12. INSTALL NO. 1 SURGE TANK STAY (See page 

FU-19

)

13. INSTALL OIL BAFFLE PLATE (See page 

FU-19

)

14. INSTALL THROTTLE BODY BRACKET (See page 

FU-

19

)

15. INSTALL AIR CLEANER ASSEMBLY (See page 

ES-

431

)

16. INSTALL OIL PAN SUB-ASSEMBLY (See page 

EM-30

)

17. INSTALL OIL STRAINER SUB-ASSEMBLY (See page 

EM-31

)

A076304E02

Y

A

B

B

B

B

B

B

B

B

B

B

B

B

B

B

A

A

A

A

A

A

Nut

Nut

A

A

B

A126429E01

Bolt

Length

A

25 mm (0.98 in.)

B

55 mm (2.17 in.)

A120414

1GR-FE LUBRICATION  –  OIL PUMP

LU–19

LU

18. INSTALL NO. 2 OIL PAN SUB-ASSEMBLY (See page 

EM-31

)

19. INSTALL CRANKSHAFT PULLEY (See page 

EM-32

)

20. INSTALL NO. 1 IDLER PULLEY SUB-ASSEMBLY (See 

page 

EM-32

)

21. INSTALL NO. 2 IDLER PULLEY DUB-ASSEMBLY (See 

page 

EM-33

)

22. INSTALL VANE PUMP ASSEMBLY (See page 

EM-33

)

23. INSTALL OIL LEVEL GAUGE GUIDE (See page 

EM-

33

)

24. INSTALL V-RIBBED BELT TENSIONER ASSEMBLY 

(See page 

EM-33

)

25. INSTALL COOLER COMPRESSOR ASSEMBLY (See 

page 

ES-421

)

26. INSTALL GENERATOR ASSEMBLY

Refer to the procedures up to "INSTALL GENERATOR 
ASSEMBLY" (See page 

CH-17

).

27. INSTALL FAN

Refer to the procedures up to "INSTALL FAN" (See page 

CO-17

).

28. INSTALL FRONT DIFFERENTIAL CARRIER 

ASSEMBLY (for 4WD)
Refer to the procedures up to "INSTALL FRONT 
DIFFERENTIAL CARRIER ASSEMBLY" (See page 

DF-

42

).

29. INSTALL POWER STEERING LINK ASSEMBLY (for 

2WD)
Refer to the procedures up to "INSTALL POWER 
STEERING LINK ASSEMBLY" (See page 

PS-30

).

30. INSTALL POWER STEERING LINK ASSEMBLY (for 

4WD)
Refer to the procedures up to "INSTALL POWER 
STEERING LINK ASSEMBLY" (See page 

PS-49

).

31. INSTALL BATTERY

32. ADD ENGINE COOLANT (See page 

CO-3

)

33. ADD ENGINE OIL (See page 

LU-5

)

34. ADD POWER STEERING FLUID

35. BLEED POWER STEERING FLUID (See page 

PS-2

)

36. ADD DIFFERENTIAL OIL (for 4WD)

37. INSPECT DIFFERENTIAL OIL (for 4WD) (See page 

DF-3

)

38. CHECK FOR ENGINE COOLANT LEAKAGE (See 

page 

CO-4

)

39. CHECK FOR ENGINE OIL LEAKAGE

LU–20

1GR-FE LUBRICATION  –  OIL PUMP

LU

40. CHECK FOR FUEL LEAKAGE

41. CHECK FOR EXHAUST GAS LEAKAGE

42. CHECK POWER STEERING FLUID LEAKAGE

43. INSPECT AND ADJUST FRONT WHEEL ALIGNMENT

(See page 

SP-2

)

MAINTENANCE  –  OUTSIDE VEHICLE

MA–1

MA

OUTSIDE VEHICLE

GENERAL MAINTENANCE

Performing the following maintenance checks on the vehicle 
is the owner's responsibility. The owner may perform the 
maintenance or take the vehicle to a service center. Check 
the parts of the vehicle described below on a daily basis. In 
most cases, special tools are not required. It is recommended 
that the owner performs these checks. The procedures for 
general maintenance are as follows.

1.

GENERAL NOTES

Maintenance requirements vary depending on the 
country.

Check the maintenance schedule in the owner's 
manual supplement.

Following the maintenance schedule is mandatory.

Determine the appropriate time to service the vehicle 
using either miles driven or months elapsed, 
whichever reaches the specification first.

Maintain similar intervals between periodic 
maintenance, unless otherwise noted.

Failing to check each vehicle part could lead to poor 
engine performance and increase exhaust emissions.

2.

TIRES
(a) Check the tire inflation pressure with a gauge. Make 

adjustments if necessary.

(b) Check the surfaces of the tires for cuts, damage or 

excessive wear.

3.

WHEEL NUTS
(a) Check for nuts that are loose or missing. Tighten 

them if necessary.

4.

TIRE ROTATION (See page 

TW-1

)

5.

WINDSHIELD WIPER BLADES
(a) Check the blades for wear or cracks whenever they 

are unable to wipe the windshield clean. Replace 
them if necessary.

6.

FLUID LEAKS
(a) Check under the vehicle for leaking fuel, oil, water 

and other fluids.
NOTICE:
If you smell gasoline fumes or notice any leaks, 
locate the cause and correct it.

7.

DOORS AND ENGINE HOOD
(a) Check that all of the doors and the hood operate 

smoothly and that all the latches lock securely.

(b) When the primary latch is released, check that the 

engine hood secondary latch prevents the hood 
from opening.


Content   ..  312  313  314  315   ..