Toyota Tundra. Manual - part 867
 

  Index      Toyota     Toyota Tundra (2007-2010 year) - Service and Repair Manual


Search            copyright infringement  


Content   ..  865  866  867  868   ..


Toyota Tundra. Manual - part 867


2. REMOVE FRONT SEAT ASSEMBLY (for Manual Seat) 

a. Remove the front seat (see REMOVAL ).  

3. REMOVE FRONT SEAT ASSEMBLY (for Power Seat) 

a. Remove the front seat (see REMOVAL ).  

4. REMOVE FRONT SEAT ASSEMBLY (for Center Seat) 

a. Remove the front seat (see REMOVAL ).  

5. REMOVE REAR SEAT ASSEMBLY (for Double Cab) 

a. Remove the rear seat (see REMOVAL ).  

6. REMOVE FRONT DOOR SCUFF PLATE LH 

a. Detach the 6 claws and 3 clips, and remove the scuff plate. 

Fig. 8: Identifying Front Door Scuff Plate Clips And Claws 
Courtesy of TOYOTA MOTOR SALES, U.S.A., INC. 

7. REMOVE FRONT DOOR SCUFF PLATE RH 

HINT: 

negative (-) battery terminal to prevent airbag and seat belt 
pretensioner activation.

NOTE:

Some systems need to be initialized after the cable is reconnected 
(see INITIALIZATION ).  

After the ignition switch is turned OFF, the navigation system 
requires approximately 90 seconds to record various types of 
memory and settings. As a result, after turning the ignition switch 
OFF, wait 90 seconds or more before disconnecting the cable from 
the negative (-) battery terminal.  


2009 Toyota Tundra 

2009 ACCESSORIES AND EQUIPMENT Interior - Tundra


Use the same procedures described for the LH side. 

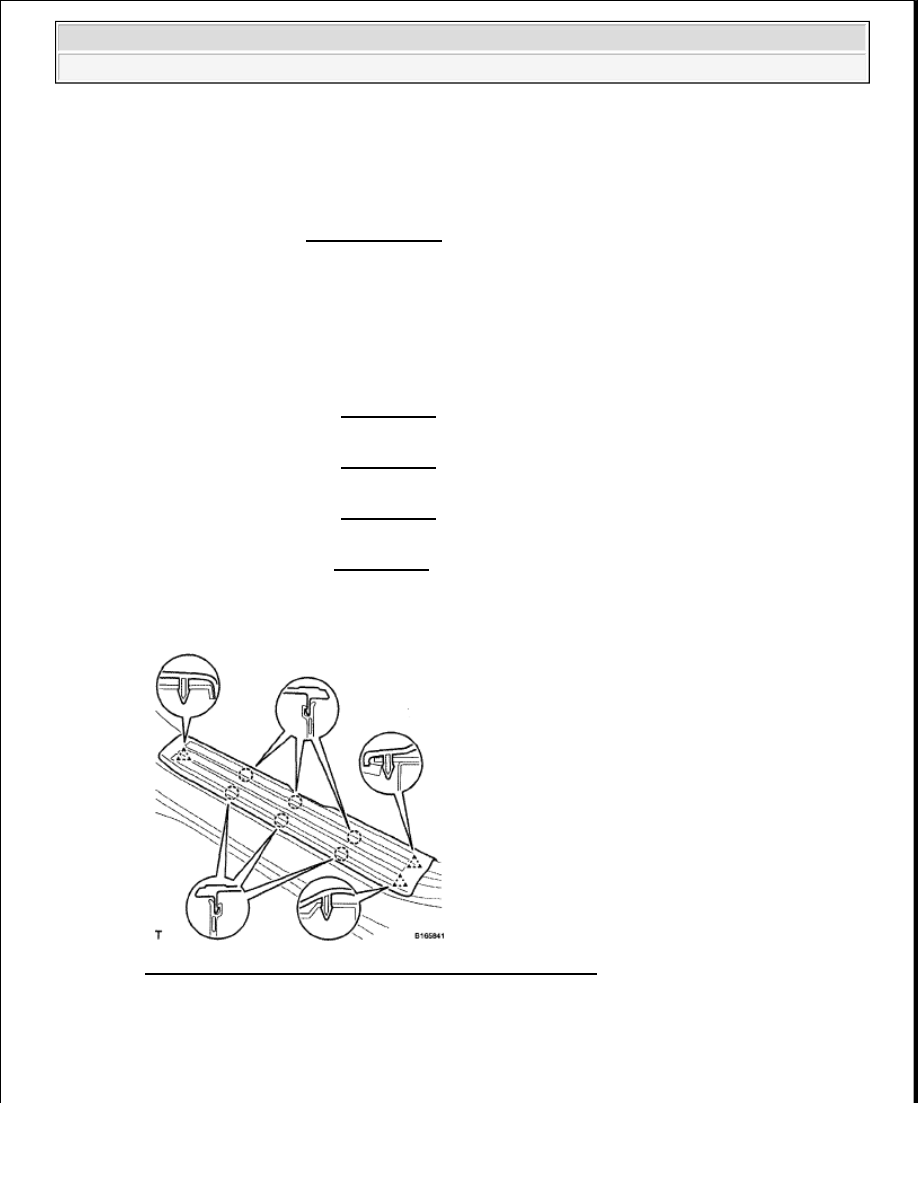
8. REMOVE REAR DOOR SCUFF PLATE LH 

a. Detach the 6 claws and 2 clips, and remove the scuff plate. 

Fig. 9: Identifying Rear Door Scuff Plate Claws And Clips 
Courtesy of TOYOTA MOTOR SALES, U.S.A., INC. 

9. REMOVE REAR DOOR SCUFF PLATE RH 

HINT: 

Use the same procedures described for the LH side. 

10. REMOVE COWL SIDE TRIM BOARD LH 

a. Remove the clip.  

b. Detach the 2 clips and remove the cowl side trim board.  

Fig. 10: Identifying Cowl Side Trim Board Clips 
Courtesy of TOYOTA MOTOR SALES, U.S.A., INC. 


2009 Toyota Tundra 

2009 ACCESSORIES AND EQUIPMENT Interior - Tundra


11. REMOVE COWL SIDE TRIM BOARD RH 

HINT: 

Use the same procedures described for the LH side. 

12. REMOVE FRONT DOOR OPENING TRIM WEATHERSTRIP LH  

13. REMOVE FRONT DOOR OPENING TRIM WEATHERSTRIP RH  

14. REMOVE REAR DOOR OPENING TRIM WEATHERSTRIP LH  

15. REMOVE REAR DOOR OPENING TRIM WEATHERSTRIP RH  

16. REMOVE FRONT PILLAR GARNISH LH 

a. Using a screwdriver, detach the 2 claws and remove the 2 assist grip plugs. 

HINT: 

Tape the screwdriver tip before use. 

b. Remove the 2 bolts and assist grip.  

c. Detach the claw and remove the front pillar garnish. 

Fig. 11: Identifying Front Pillar Garnish Claw 
Courtesy of TOYOTA MOTOR SALES, U.S.A., INC. 

d. Protect the curtain shield airbag. 

1. Thoroughly cover the airbag with a cloth or nylon sheet and fix the ends of the cover with 

adhesive tape, as shown in the illustration. 

NOTE:

Cover the curtain shield airbag with a protective cover as soon 
as the front pillar garnish is removed.


2009 Toyota Tundra 

2009 ACCESSORIES AND EQUIPMENT Interior - Tundra


Fig. 12: Identifying Curtain Shield Airbag 
Courtesy of TOYOTA MOTOR SALES, U.S.A., INC. 

17. REMOVE FRONT PILLAR GARNISH RH 

HINT: 

Use the same procedures described for the LH side. 

18. REMOVE LOWER CENTER PILLAR GARNISH LH 

a. Detach the 2 claws and remove the cover. 

Fig. 13: Identifying Lower Center Pillar Garnish Cover Claws 
Courtesy of TOYOTA MOTOR SALES, U.S.A., INC. 

b. Remove the bolt and outer lap belt anchor. 


2009 Toyota Tundra 

2009 ACCESSORIES AND EQUIPMENT Interior - Tundra


Content   ..  865  866  867  868   ..