Toyota Tundra. Manual - part 499
 

  Index      Toyota     Toyota Tundra (2007-2010 year) - Service and Repair Manual


Search            copyright infringement  


Content   ..  497  498  499  500   ..


Toyota Tundra. Manual - part 499


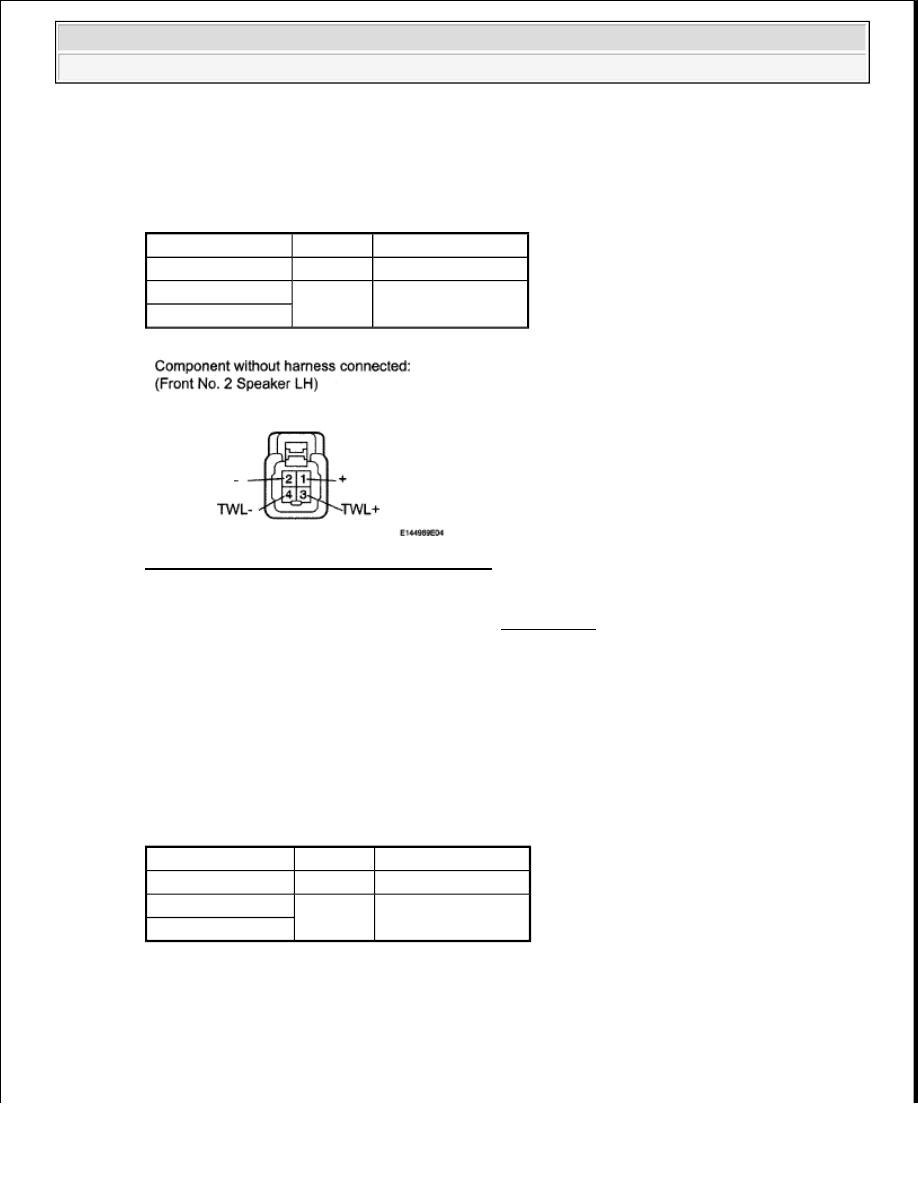
b. Measure the resistance according to the value(s) in the table below. 

Standard resistance  

FRONT NO. 2 SPEAKER LH TESTER CONNECTION SPECIFIED CONDITION 

Fig. 115: Identifying K12 Speaker Connector 
Courtesy of TOYOTA MOTOR SALES, U.S.A., INC. 

NG: REPLACE FRONT NO. 2 SPEAKER LH (See REMOVAL ) 

OK: Go to Next Step  

11. INSPECT FRONT NO. 2 SPEAKER RH 

a. Disconnect the K10 speaker connector.  

b. Measure the resistance according to the value(s) in the table below. 

Standard resistance  

FRONT NO. 2 SPEAKER RH TESTER CONNECTION SPECIFIED CONDITION 

Tester Connection Condition Specified Condition
3(TWL+)-4(TWL-) Always

1.3 to 2.3 ohms

1(+)-3(TWL+)

Always

Below 1 ohms

2(-)-4(TWL-)

Tester Connection Condition Specified Condition

3(TWR+)-4(TWR-) Always

1.3 to 2.3 ohms

1(+)-3(TWR+)

Always

Below 1 ohms

2(-)-4(TWR-)


2009 Toyota Tundra 

2009 ACCESSORIES AND EQUIPMENT Navigation - Tundra


Fig. 116: Identifying K10 Speaker Connector 
Courtesy of TOYOTA MOTOR SALES, U.S.A., INC. 

NG: REPLACE FRONT NO. 2 SPEAKER RH (See REMOVAL ) 

OK: Go to Next Step  

12. INSPECT REAR NO. 1 SPEAKER LH 

a. Disconnect the O7 speaker connector.  

b. Measure the resistance according to the value(s) in the table below. 

Standard resistance  

REAR NO. 1 SPEAKER LH TESTER CONNECTION SPECIFIED CONDITION 

Fig. 117: Identifying O7 Speaker Connector 
Courtesy of TOYOTA MOTOR SALES, U.S.A., INC. 

NG: REPLACE REAR NO. 1 SPEAKER LH (See REMOVAL ) 

OK: REPLACE REAR NO. 1 SPEAKER RH (See REMOVAL ) 

Tester Connection Condition Specified Condition

1-2

Always

1.5 to 2.1 ohms


2009 Toyota Tundra 

2009 ACCESSORIES AND EQUIPMENT Navigation - Tundra


NOISE OCCURS 

INSPECTION PROCEDURE 

1. CHECK SPEAKER INSTALLATION 

a. Check that each speaker is securely installed. 

OK: Each speaker is securely installed.  

NG: INSTALL SPEAKER PROPERLY  

OK: Go to Next Step  

2. IDENTIFY NOISE SOURCE 

a. Check the noise condition. 

HINT: 

The radio has a noise prevention function to reduce noise when listening to the radio. If a loud 
noise occurs, check whether the ground at the antenna mounting base and the noise prevention unit 
are installed and wired correctly. 

NOISE CONDITION CHART 

HINT: 

In the chart's left column, find the situation that matches the customer's vehicle. Then, in the 

Condition in Which Noise Occurs

Noise Type

Depressing accelerator pedal increases noise, and stopping engine 
stops noise immediately

Generator noise

When A/C or heater is operating

Blower motor noise

When rapidly accelerating on unpaved road  

When ignition switch is turned ON  

Fuel pump noise

When horn switch is pressed and released  

When horn switch is pressed and held down  

Horn noise

Running engine causes soft noise, and stopping engine stops noise 
immediately

Ignition noise

Noise occurs synchronously with turn signal flash

Flasher noise

Noise occurs during window washer operation

Washer noise

Running engine causes noise, but stopping engine does not stop 
noise

Engine coolant temperature 
sensor noise

When wiper is operating

Wiper noise

When brake pedal is depressed

Stop light switch noise

Other

Static electricity on vehicle


2009 Toyota Tundra 

2009 ACCESSORIES AND EQUIPMENT Navigation - Tundra


right column, find the part that is causing the noise. Check the noise filter on the part.  

To save time and avoid a misdiagnosis, first make sure that the noise is not originating from 
outside the vehicle.  

Troubleshoot noise problems in order of loudness, starting with the loudest noise.  

Setting the radio to a frequency that receives no signal may make recognition of the noise 
problem easier.  

OK: The noise source can be determined.  

NG: PROCEED TO NEXT CIRCUIT INSPECTION SHOWN IN PROBLEM SYMPTOMS 
TABLE
  

OK: REPAIR OR REPLACE NOISE SOURCE  

NO SOUND CAN BE HEARD FROM SPEAKERS 

INSPECTION PROCEDURE 

1. CHECK SOUND SETTING 

a. Enter the sound adjustment screen by pressing the "SOUND" switch on the AUDIO display.  

b. Set volume, fader, and balance to the initial values and check that sound is normal. 

OK: Sound returns to normal.  

HINT: 

Sound quality adjustment items vary depending on the type of the amplifier. 

Fig. 118: Identifying Audio Setting 
Courtesy of TOYOTA MOTOR SALES, U.S.A., INC. 

NG: PROCEED TO NEXT CIRCUIT INSPECTION SHOWN IN PROBLEM SYMPTOMS 
TABLE
  

OK: END  

CD CANNOT BE EJECTED 


2009 Toyota Tundra 

2009 ACCESSORIES AND EQUIPMENT Navigation - Tundra


Content   ..  497  498  499  500   ..