Toyota Tundra. Manual - part 219
 

  Index      Toyota     Toyota Tundra (2007-2010 year) - Service and Repair Manual


Search            copyright infringement  


Content   ..  217  218  219  220   ..


Toyota Tundra. Manual - part 219


Result:  

RESULT REFERENCE 

B: REPLACE RADIO RECEIVER (see REMOVAL ) 

C: REPLACE RADIO RECEIVER (see REMOVAL ) 

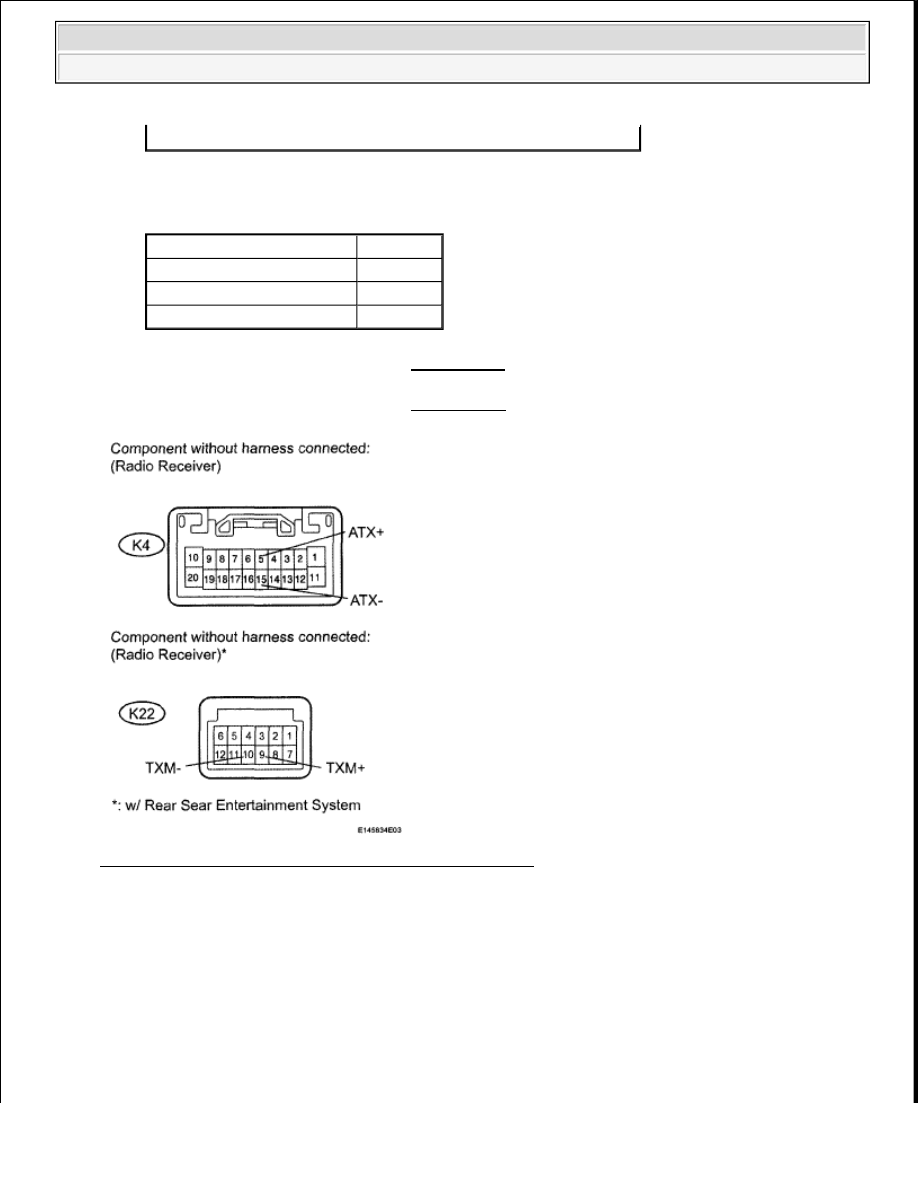
Fig. 240: Identifying K4 And K22 Connectors Terminals 
Courtesy of TOYOTA MOTOR SALES, U.S.A., INC. 

A: Go to next step.  

5. CHECK HARNESS AND CONNECTOR (RADIO RECEIVER - COMPONENT SHOWN BY 

SUB-CODE) 

*: w/ Rear Seat Entertainment System

Result

Proceed to

OK

A

NG (for Column Shift Type)

B

NG (for Floor Shift Type)

C


2009 Toyota Tundra 

2009 ACCESSORIES AND EQUIPMENT Audio/Visual - Tundra


Fig. 241: AVC-LAN Wiring Diagram 
Courtesy of TOYOTA MOTOR SALES, U.S.A., INC. 

HINT: 

Start the check from the circuit that is near the component shown by the sub-code first.  

For details of the connectors, refer to the "TERMINALS OF ECU" .  

a. Referring to the AVC-LAN wiring diagram below, check the AVC-LAN circuit between the radio 

receiver and the component shown by the sub-code. 

1. Disconnect all connectors between the radio receiver and the component shown by the 

subcode.  

2. Check for an open or short in the AVC-LAN circuit between the radio receiver and the 

component shown by the sub-code. 

OK: There is no open or short circuit.  

NG: REPAIR OR REPLACE HARNESS OR CONNECTOR  

OK: Go to next step.  

6. REPLACE COMPONENT SHOWN BY SUB-CODE 

a. Replace the component shown by the sub-code with a normal one and check if the same problem 

occurs again. 

OK: Same problem does not occur.  

Result:  

RESULT REFERENCE 


2009 Toyota Tundra 

2009 ACCESSORIES AND EQUIPMENT Audio/Visual - Tundra


B: REPLACE RADIO RECEIVER (see REMOVAL ) 

C: REPLACE RADIO RECEIVER (see REMOVAL ) 

A: END  

STEREO COMPONENT AMPLIFIER COMMUNICATION ERROR 

INSPECTION PROCEDURE 

1. IDENTIFY COMPONENT SHOWN BY SUB-CODE 

a. Enter the diagnostic mode. 

Result

Proceed to

OK

A

NG (for Column Shift Type)

B

NG (for Floor Shift Type)

C


2009 Toyota Tundra 

2009 ACCESSORIES AND EQUIPMENT Audio/Visual - Tundra


Fig. 242: Service Check Mode And Detailed Information Diagnostic Mode Flow Chart 
Courtesy of TOYOTA MOTOR SALES, U.S.A., INC. 

b. Press the preset switch "3" to change to "Detailed Information Mode".  

c. Identify the component shown by the sub-code.  

HINT: 

"190 (radio receiver)" is the component shown by the subcode in the example shown in the 
illustration.  

For details of the DTC display, refer to "DTC CHECK / CLEAR" .  

2. CHECK POWER SOURCE CIRCUIT OF COMPONENT SHOWN BY SUB-CODE 

a. Inspect the power source circuit of the component shown by the sub-code. 

If the power source circuit is operating normally, proceed to the next step. 


2009 Toyota Tundra 

2009 ACCESSORIES AND EQUIPMENT Audio/Visual - Tundra


Content   ..  217  218  219  220   ..