Toyota Tundra. Manual - part 1898


  Index      Toyota     Toyota Tundra (2007-2010 year) - Service and Repair Manual


Search            copyright infringement  


Content   ..  1896  1897  1898  1899   ..


Toyota Tundra. Manual - part 1898


3

REMOVE NO. 1 ENGINE UNDER COVER (See REPLACEMENT )  

4

DRAIN ENGINE COOLANT (See REPLACEMENT )  

5

DRAIN ENGINE OIL (See REPLACEMENT )  

6

REMOVE HOOD SUB-ASSEMBLY 
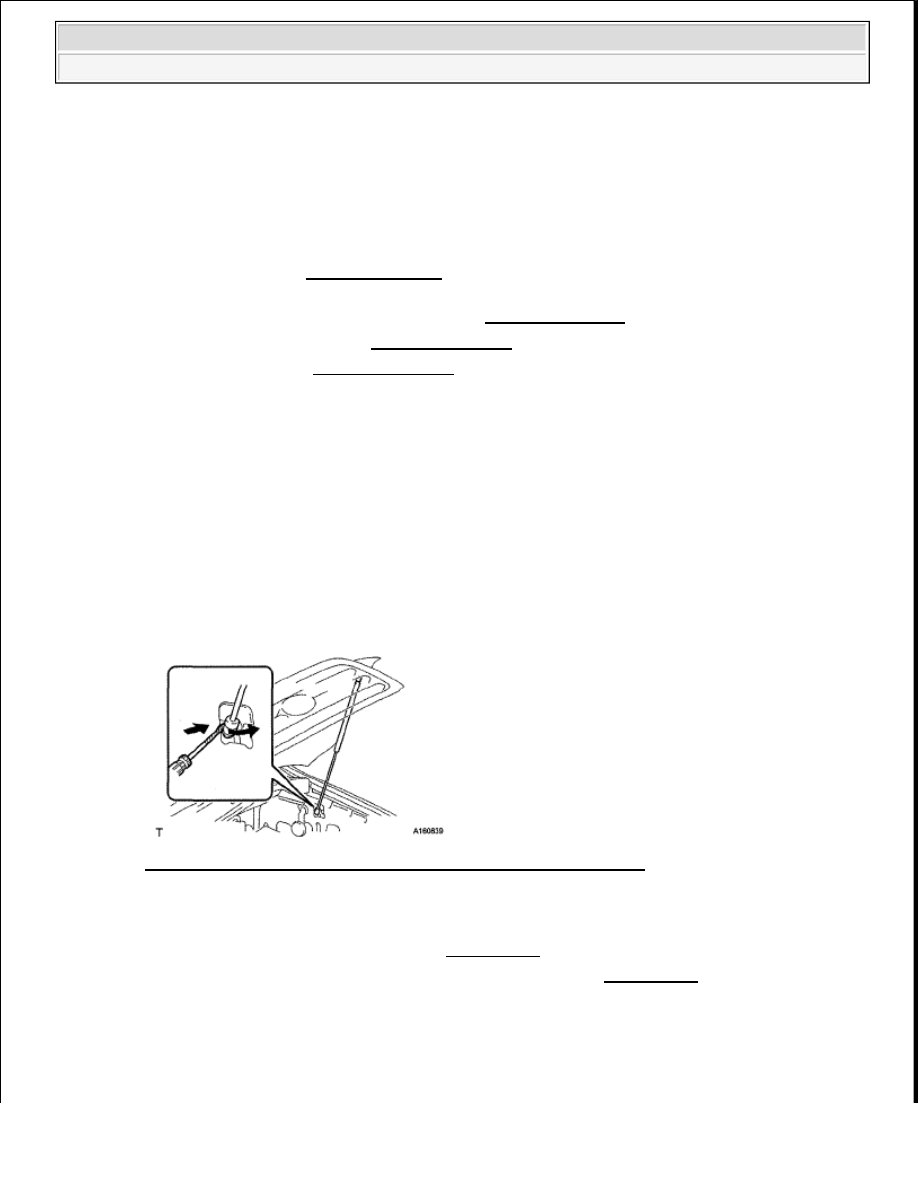
a

Using a screwdriver, remove the hood support assembly while releasing the 2 clips  

HINT: 

Tape the screwdriver tip before use  

b

Remove the 4 bolts and hood  

Fig. 347: Using Screwdriver To Remove Hood Support Assembly 
Courtesy of TOYOTA MOTOR SALES, U.S.A., INC. 

7

REMOVE WINDSHIELD WIPER MOTOR ASSEMBLY 

a

Remove the windshield wiper motor (see REMOVAL )   

8

REMOVE COWL TOP OUTER PANEL SUB-ASSEMBLY (See REMOVAL )  

9

REMOVE THROTTLE BODY COVER SUB-ASSEMBLY (See REMOVAL )  

10

REMOVE AIR CLEANER HOSE ASSEMBLY 

a

Disconnect the vacuum hose and No  2 ventilation hose   

b

Loosen the 2 hose clamps   

After the ignition switch is turned OFF, the navigation system 
requires approximately 90 seconds to record various types of 
memory and setting. As a result, after turning the ignition switch 
OFF, wait 90 seconds or more before disconnecting the cable from 
the negative (-) battery terminal.  

Some systems need to be initialized after the cable is reconnected 
(see INITIALIZATION ).  

CAUTION: Remove the hood support assembly while supporting the hood 

by hand.


2009 Toyota Tundra 

2009 ENGINE Engine Mechanical (2UZ-FE) - Tundra


c

Remove the air cleaner hose  

Fig. 348: Locating Hose Clamps 
Courtesy of TOYOTA MOTOR SALES, U.S.A., INC. 

11

REMOVE NO. 2 VENTILATION HOSE 

a

Remove the No  2 ventilation hose   

b

Remove the vacuum hose  

Fig. 349: Identifying No. 2 Ventilation Hose 
Courtesy of TOYOTA MOTOR SALES, U.S.A., INC. 

12

REMOVE AIR CLEANER ASSEMBLY 

a

Remove the air cleaner cap  

1

Disconnect the MAF meter connector   

2

Using a clip remover, detach the wire harness clamp   

3

Unfasten the 4 hook clamps and then remove the air cleaner cap  


2009 Toyota Tundra 

2009 ENGINE Engine Mechanical (2UZ-FE) - Tundra


Fig. 350: Locating Hook Clamps & Air Cleaner Cap 
Courtesy of TOYOTA MOTOR SALES, U.S.A., INC. 

b

Remove the air cleaner element   

c

Remove the 2 bolts and air cleaner case  

Fig. 351: Locating Air Cleaner Case Bolts 
Courtesy of TOYOTA MOTOR SALES, U.S.A., INC. 

13

REMOVE RADIATOR SIDE DEFLECTOR RH (See REMOVAL )  

14

REMOVE RADIATOR SIDE DEFLECTOR LH (See REMOVAL )  

15

REMOVE RADIATOR HOSE INLET  

16

REMOVE RADIATOR HOSE OUTLET  

17

REMOVE FAN AND GENERATOR V BELT (See REMOVAL )  

18

REMOVE FLUID COUPLING ASSEMBLY (See REMOVAL )  

19

REMOVE OIL COOLER ASSEMBLY (w/ Trailer Towing System) 

a

Remove the oil cooler (see REMOVAL )   

20

REMOVE RADIATOR ASSEMBLY (See REMOVAL )  

21

DISCONNECT FUEL MAIN AND RETURN HOSE 

a

Remove the fuel pipe clamp   

b

Disconnect the fuel main and return hoses (see PRECAUTION )  


2009 Toyota Tundra 

2009 ENGINE Engine Mechanical (2UZ-FE) - Tundra


Fig. 352: Locating Fuel Pipe Clamp 
Courtesy of TOYOTA MOTOR SALES, U.S.A., INC. 

22

DISCONNECT WIRE HARNESS AND HOSE 

a

Disconnect the vacuum hose assembly  

Fig. 353: Locating Vacuum Hose Assembly 
Courtesy of TOYOTA MOTOR SALES, U.S.A., INC. 

b

Disconnect the heater hoses   

c

Disconnect the clamp and ECM connector  

HINT: 

Refer to the following procedures to disconnect the ECM connector (see REMOVAL )  

Fig. 354: Locating Clamp And ECM Connector 
Courtesy of TOYOTA MOTOR SALES, U.S.A., INC. 


2009 Toyota Tundra 

2009 ENGINE Engine Mechanical (2UZ-FE) - Tundra


Content   ..  1896  1897  1898  1899   ..