Toyota Tundra. Manual - part 1893


  Index      Toyota     Toyota Tundra (2007-2010 year) - Service and Repair Manual


Search            copyright infringement  


Content   ..  1891  1892  1893  1894   ..


Toyota Tundra. Manual - part 1893


2

INSTALL CRANKSHAFT TIMING PULLEY 

a

Align the timing pulley set key with the key groove of the pulley   

b

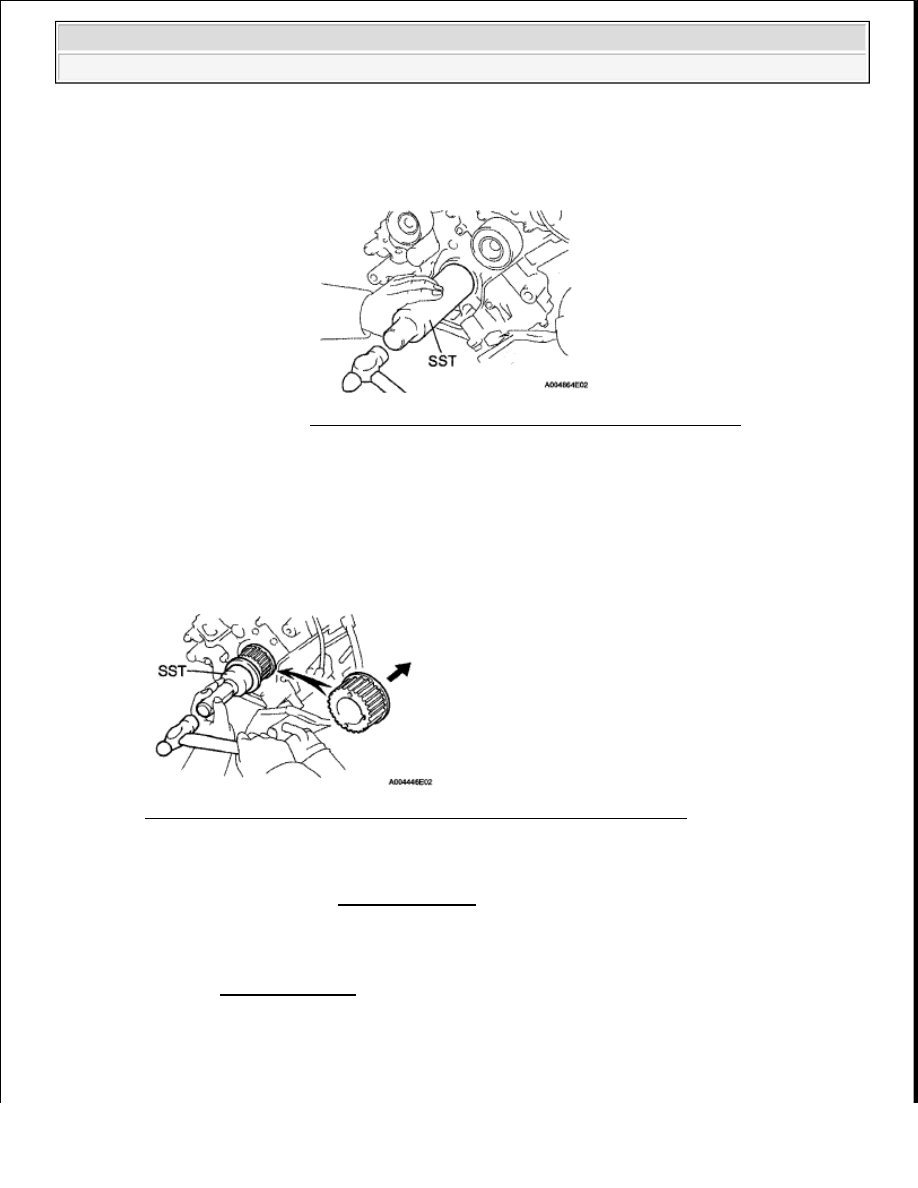
Using SST and a hammer, tap in the timing pulley with the flange side facing inward  

SST 09223-46011  

Fig. 327: Tapping In Crankshaft Timing Pulley Using SST & Hammer 
Courtesy of TOYOTA MOTOR SALES, U.S.A., INC. 

3

INSTALL TIMING BELT 

a

Install the timing belt (see INSTALLATION )   

4

CONNECT CABLE TO NEGATIVE BATTERY TERMINAL 

REAR CRANKSHAFT OIL SEAL 

COMPONENTS 

NOTE:

Keep the lip free from foreign matter.  

Do not tap the oil seal at an angle. 

Fig. 326: Tapping In Oil Seal Using SST & Hammer 
Courtesy of TOYOTA MOTOR SALES, U.S.A., INC. 

NOTE:

Some systems need to be initialized after the cable is reconnected (see 
INITIALIZATION ).


2009 Toyota Tundra 

2009 ENGINE Engine Mechanical (2UZ-FE) - Tundra


Fig. 328: Identifying Rear Crankshaft Oil Seal Replacement Components (1 Of 2) 
Courtesy of TOYOTA MOTOR SALES, U.S.A., INC. 


2009 Toyota Tundra 

2009 ENGINE Engine Mechanical (2UZ-FE) - Tundra


Fig. 329: Identifying Rear Crankshaft Oil Seal Replacement Components (2 Of 2) With Torque 
Specifications
 
Courtesy of TOYOTA MOTOR SALES, U.S.A., INC. 

REMOVAL 

1

DISCONNECT CABLE FROM NEGATIVE BATTERY TERMINAL 

2

REMOVE AUTOMATIC TRANSMISSION ASSEMBLY 

NOTE:

After the ignition switch is turned OFF, the navigation system 
requires approximately 90 seconds to record various types of 
memory and setting. As a result, after turning the ignition switch 
OFF, wait 90 seconds or more before disconnecting the cable from 
the negative (-) battery terminal.  

Some systems need to be initialized after the cable is reconnected 
(see INITIALIZATION ).  


2009 Toyota Tundra 

2009 ENGINE Engine Mechanical (2UZ-FE) - Tundra


a

for 2WD, refer to the following procedures (see REMOVAL )   

b

for 4WD, refer to the following procedures (see REMOVAL )   

3

REMOVE DRIVE PLATE AND RING GEAR SUB-ASSEMBLY (See REMOVAL )  

4

REMOVE REAR CRANKSHAFT OIL SEAL 

a

Using a knife, cut off the lip of the oil seal   

b

Using a screwdriver, pry out the oil seal  

HINT: 

Tape the screwdriver tip before use  

Fig. 330: Prying Out Oil Seal Using Screwdriver 
Courtesy of TOYOTA MOTOR SALES, U.S.A., INC. 

INSTALLATION 

1

INSTALL REAR CRANKSHAFT OIL SEAL 

a

Apply MP grease to the lip of a new oil seal   

b

Using SST and a hammer, tap in the oil seal until its surface is flush with the rear oil seal retainer 
edge  

SST 09223-56010  

NOTE:

Do not damage the surface of the oil seal press fit hole and 
crankshaft.

NOTE:

Keep the lip free from foreign matter.  

Do not tap on the oil seal at an angle. 


2009 Toyota Tundra 

2009 ENGINE Engine Mechanical (2UZ-FE) - Tundra


Content   ..  1891  1892  1893  1894   ..