Subaru Forester (2023 year). Manual in english - page 30
 

  Index      Manuals     Subaru Forester (2023 year). Manual in english


Search            copyright infringement  


Content      ..     28      29      30      31     ..


Subaru Forester (2023 year). Manual in english - page 30


(482,1)

.

To lessen the risk of sparks,

remove rings, metal watchbands,
and other metal jewelry. Never
allow metal tools to contact the
positive battery terminal and any-
thing connected to it WHILE you
are at the same time in contact
with any other metallic portion of
the vehicle because a short cir-
cuit will result.

.

Keep everyone including children

away from the battery.

.

Charge the battery in a well-

ventilated area.

.

Battery posts, terminals and re-

lated accessories contain lead
and lead compounds, chemicals
known to the State of California
to cause cancer and reproductive
harm. Batteries also contain
other chemicals known to the
State of California to cause can-
cer.

Wash hands after handling

.

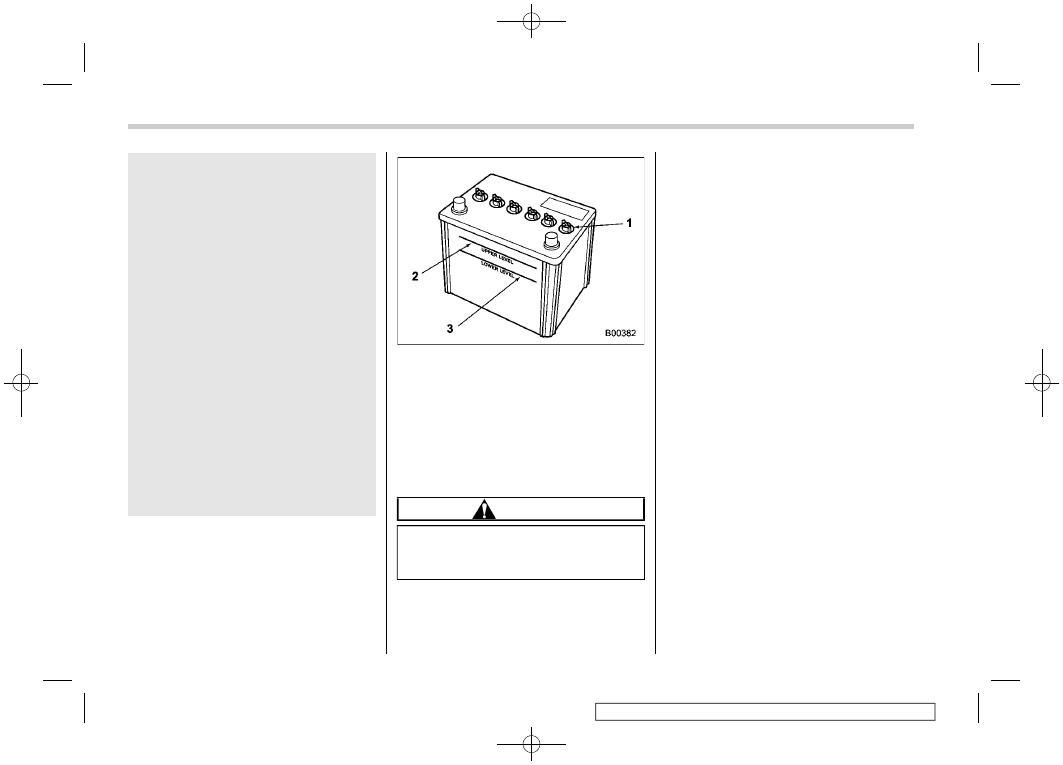
1

Cap

2

Upper level

3

Lower level

It is unnecessary to periodically check the
battery fluid level or periodically refill with
distilled water.
However, if the battery fluid level is below
the lower level, remove the cap. Fill to the
upper level with distilled water.

CAUTION

Never use more than 10 A when
charging the battery because it will
shorten battery life.

It is unnecessary to periodically check the
battery fluid level or periodically refill with
distilled water.

For “STARLINK Safety and Security
without navigation system”:

When the vehicle battery is discharged or
replaced, the audio unit needs to be paired
with a smartphone via bluetooth for some
settings. For details about how to pair,
refer to the separate navigation/audio
Owner’s Manual.

Battery

480

(483,1)

11-21. Fuses

CAUTION

Never replace a fuse with one having
a higher rating or with material other
than a fuse because serious damage
or a fire could result.

NOTE

Fuse rating and using circuit are de-
scribed on each behind the fuse box
cover.

The fuses are designed to melt during an
overload to prevent damage to the wiring
harness and electrical equipment. The
fuses are located in two fuse boxes.

One is located under the instrument panel
behind the fuse box cover on the driver’s
seat side. To remove the cover, pull it out.

1

Spare fuses

The other one (main fuse box) is housed in
the engine compartment. Also, the spare
fuses are stored in the fuse box cover.

The fuse puller is stored in the main fuse
box in the engine compartment.
Pinch the upper part of the fuse puller
when removing it from the main fuse box.

1

Good

2

Blown

– CONTINUED –

Fuses

481

11

Maintenance

and

service

(484,1)

If any lights, accessories or other electrical
controls do not operate, inspect the corre-
sponding fuse. If a fuse has blown, replace
it.
1. Turn the ignition switch to the “LOCK”/

“OFF” position and turn off all electrical
accessories.

2. Remove the cover.
3. Determine which fuse may be blown.

Look at the back side of each fuse box
cover.

4. Pull out the fuse with the fuse puller.
5. Inspect the fuse. If it has blown,

replace it with a spare fuse of the same
rating.

6. If the same fuse blows again, this

indicates that its system has a pro-
blem. Contact your SUBARU dealer for

repairs.

11-22. Installation of acces-
sories

Always consult your SUBARU dealer
before installing fog lights or any other
electrical equipment in your vehicle. Such
accessories may cause the electronic
system to malfunction if they are incor-
rectly installed or if they are not suited for
the vehicle.

Installation of accessories

482

(485,1)

11-23. Replacing bulbs

It may be difficult to replace the bulbs. We
recommend that you have the bulb re-
placed by your SUBARU dealer if neces-
sary.

WARNING

Bulbs may become very hot while
illuminated. Before replacing bulbs,
turn off the lights and wait until the
bulbs cool down. Otherwise, there is
a risk of sustaining a burn.

CAUTION

.

Replace any bulb only with a new

bulb of the specified wattage.
Using a bulb of different wattage
could result in a fire. For the
specified wattage of each bulb,
refer to “Bulb chart”

P500.

.

Do not touch the glass portion of

the light bulb with bare hands.
When holding the glass portion is
unavoidable, hold it using with a
clean dry cloth to avoid getting
moisture and grease on the bulb.
If there is any fingerprints or
grease on the bulb surface, wipe

them away with a soft cloth
moistened with alcohol. Also, if
the bulb is scratched or dropped,
it may blow out or crack.

NOTE

If SRH is malfunctioning, the SRH OFF
indicator appears on the combination
meter when the ignition switch is in the
“ON” position. It indicates that SRH has
been deactivated. Contact a SUBARU
dealer for an inspection.

&

Headlights

The LED headlight warning light illumi-
nates if the LED headlights malfunction.
Have your vehicle inspected at a SUBARU
dealer as soon as possible.

– CONTINUED –

Replacing bulbs

483

11

Maintenance

and

service

(486,1)

&

Front turn signal light

Right-hand side

1. Use a screwdriver to remove the clips

on the air intake duct, then remove the
duct.

Left-hand side

2. Use a screwdriver to remove the

secured clip of the washer tank. To
make it easy to access the bulb, turn
the neck of the washer fluid filler pipe
as illustrated.

3. Disconnect the electrical connector

from the bulb and remove the bulb
from the headlight assembly by turning
it counterclockwise.

4. Replace the bulb. At this time, use care

not to touch the bulb surface.

5. To install the bulb to the headlight

assembly, turn it clockwise until it
clicks.

6. Reconnect the electrical connector.
7. Put the air intake duct with the clips

(right-hand side).

8. Set the washer fluid filler pipe to the

original place and secure it with the
clips (left-hand side).

Replacing bulbs

484

(487,1)

&

Front side marker lights (if
equipped)

Left-hand side

Right-hand side

1. Turn the socket counterclockwise and

pull it out.

2. Pull out the bulb from the socket and

replace the bulb with a new one.

&

Front fog light (if equipped)

It may be difficult to replace the bulbs.
Have the bulbs replaced by your SUBARU
dealer if necessary.

&

Rear turn signal lights

1. Use a screwdriver to remove the

secured clips of the covers.

2. Push and move the cover to the

forward to unlock the 2 tabs.

3. When unlocked, pull out the covers.

– CONTINUED –

Replacing bulbs

485

11

Maintenance

and

service

(488,1)

4. Disconnect the electrical connector.

5. Using a Phillips screwdriver, remove

the screws that secure the rear combi-
nation light assembly.

6. Slide the rear combination light as-

sembly rearward to remove it from the
vehicle.

7. Remove the bulb socket from the rear

combination light assembly by turning
it counterclockwise.

8. Pull the bulb out of the bulb socket and

replace it.

9. Set the bulb socket into the rear

combination light assembly and turn it
clockwise until it locks.

10. Reconnect the electrical connector.

11. Put the rear combination light assem-

bly into place while aligning the 2 pins
with the holes and secure to the
vehicle.

Replacing bulbs

486

(489,1)

12. Tighten the screws.
13. Put the covers back in place.

&

Backup light

1. Apply a flat-head screwdriver to the

light cover as shown in the illustration,
and pry the light cover off from the rear
gate trim.

2. Turn the bulb socket counterclockwise

and remove it.

3. Pull the bulb out of the bulb socket and

replace it.

4. Install the bulb socket by turning it

clockwise.

– CONTINUED –

Replacing bulbs

487

11

Maintenance

and

service

(490,1)

5. Route the wire as shown in the

illustration.

6. Install the light cover on the rear gate.

&

Vanity mirror light

CAUTION

Replacing the bulb could cause
burns since the bulb may be very
hot. Have the bulb replaced by your
SUBARU dealer.

&

Door step light

CAUTION

Replacing the bulb could cause a
short circuit. Have the bulb replaced
by your SUBARU dealer.

&

Cargo area light

Cargo area light (models without rear gate
light)

1. Remove the lens by prying the edge of

the lens with a flat-head screwdriver.

2. Pull the bulb out of the socket.
3. Install a new bulb.
4. Put the lens back in place.

&

Other bulbs

It may be difficult to replace the bulbs.
Have the bulbs replaced by your
SUBARU dealer if necessary.

&

Adjusting headlight aim

1

Adjustment screw A

2

Adjustment screw B

3

Adjustment direction mark

!

Before checking the headlight aim-
ing

1. Make sure the vehicle has a full tank of

gasoline and the area around the
headlight is not deformed.

2. Park the vehicle on level ground.
3. Sit in the driver’s seat.
4. Bounce the vehicle several times.

Replacing bulbs

488

(491,1)

!

Headlight aim adjustment

1

Adjustment direction mark

1. Turn screw A clockwise or counter-

clockwise to adjust it.
Remember the direction of the rotation
and number of rotations.

2. Turn screw B the same number of turns

and in the same direction as step 1.

NOTE

.

If the headlight aim cannot be ad-
justed, contact your SUBARU deal-
er.

.

To inspect the headlight aim posi-
tion, consult a SUBARU dealer.

11-24. Replacing key battery

The access key fob/transmitter battery
may be discharged under the following
conditions.

.

The operation of the keyless access
function is unstable.

.

The operating distance of the remote
keyless entry system is unstable.

.

The transmitter does not operate prop-
erly when used within the standard
distance.

Replace the battery with a new one.

&

Safety precautions

CAUTION

.

Do not let dust, oil or water get on

or in the access key fob/transmit-
ter when replacing the battery.

.

Before replacing the battery, re-

move any static electricity.

.

Be careful not to touch or damage

the printed circuit board in the
access key fob/transmitter when
replacing the battery.

.

Be careful not to allow children to

touch the battery and any re-
moved parts; children could

– CONTINUED –

Replacing key battery

489

11

Maintenance

and

service

(492,1)

swallow them.

.

There is a danger of an explosion

if the battery is incorrectly re-
placed. Replace only with the
same or equivalent type of the
battery.

.

Batteries should not be exposed

to excessive heat such as bright
sunlight, fire or the like.

NOTE

.

Replace only with the same or
equivalent type of battery recom-
mended by the manufacturer.

.

Dispose of used batteries according
to local laws.

.

Mount the battery in the correct
orientation to prevent fluid leakage.
Be careful not to bend the terminals.
It may result in a malfunction.

.

It is recommended that the battery
be replaced by a SUBARU dealer.

.

Use a new battery.

.

After replacing the battery, confirm
that the transmitter functions prop-
erly.

&

Replacing battery of access
key fob

CAUTION

When removing or reinstalling the
access key fob cover, make sure that
the plastic part does not come off or
become misaligned.

Battery: Button battery CR2032 or
equivalent

1

Release button

2

Emergency key

1. Take out the emergency key.

2. Wrap a flat-head screwdriver with vinyl

tape or a cloth, and insert it in the gap
to remove the cover.

3. Take out the battery using a flat-head

screwdriver with vinyl tape or a cloth.

Replacing key battery

490

(493,1)

4. Insert a new battery with its positive (+)

side facing upward as shown in the
figure.

5. Attach the cover to the access key fob

by fitting the projections and recesses
together.

&

Replacing transmitter battery

Battery: Button battery CR1620 or
equivalent

1. Wrap a flat-head screwdriver with vinyl

tape or a cloth. Open the key head
using a flat-head screwdriver.

2. Remove the transmitter case from the

key head.

3. Open the transmitter case by releasing

the hooks.

– CONTINUED –

Replacing key battery

491

11

Maintenance

and

service

(494,1)

1

Negative (−) side facing up

4. Replace the old battery with a new

battery making sure to install the new
battery with the negative (−) side facing
up.

5. Put together the transmitter case by

fitting the hooks on the case.

6. Reinstall the transmitter case in the

key head.

7. Refit the removed half of the key head.

Replacing key battery

492

(495,1)

12-1. Specifications ............................................... 494

Dimensions ........................................................ 494
Engine................................................................ 494
Fuel.................................................................... 495
Engine oil ........................................................... 495
Front differential and rear differential gear oil ..... 497
Fluids ................................................................. 497
Engine coolant ................................................... 498
Electrical system ................................................ 498

Tires .................................................................. 498
Temporary spare tires ........................................ 499
Brake pedal........................................................ 499
Brake disc ......................................................... 499
Brake pad .......................................................... 499

12-2. Bulb chart ......................................................500

Safety precautions ............................................. 500
Bulb chart .......................................................... 501

12-3. Vehicle identification.....................................504

Specifications

12

Specifications

(496,1)

12-1. Specifications

These specifications are subject to change without notice.

&

Dimensions

in (mm)

Item

Forester

Subaru Forester Wilderness

Overall length

182.7 (4,640)

Overall width

71.5 (1,815)

72.2 (1,835)

Overall height

68.1 (1,730)*

2

67.5 (1,715)*

3

68.9 (1,750)

Wheel base

105.1 (2,670)

104.9 (2,665)

Tread

Front

61.6 (1,565)

61.4 (1,560)

Rear

61.8 (1,570)

61.4 (1,560)

Ground clearance*

1

8.7 (220)

9.3 (235)

*1: Measured with vehicle empty
*2: Models with roof rails
*3: Models without roof rails

&

Engine

Engine model

FB25 (2.5 L, DOHC, non-turbo)

Engine type

Horizontally opposed, liquid cooled 4 cylinder, 4-stroke direct injection gasoline engine

Displacement cu-in (cc)

152 (2,498)

Bore

6

Stroke in (mm)

3.70

6

3.54 (94.0

6

90.0)

Compression ratio

12.0 : 1

Firing order

1 – 3 – 2 – 4

Specifications

494

(497,1)

&

Fuel

Fuel requirement

Fuel tank capacity

Unleaded gasoline with 87 AKI (90 RON) or higher

16.6 US gal (63 liters, 13.9 Imp gal)

For more details, refer to “Fuel”

P299.

&

Engine oil

For the checking, adding and replacing procedure or other details, refer to “Engine oil”

P456.

NOTE

The procedure for changing the engine oil and oil filter should be performed by a properly-trained expert. It is recommended
that you have this service performed by your SUBARU dealer.

!

Approved engine oil

Always use the SUBARU approved engine oil. For further details, please contact your SUBARU dealer.
If the approved engine oil is unavailable, use the alternative engine oil described on the next page.

– CONTINUED –

Specifications

495

12

Specifications


Content      ..     28      29      30      31     ..