Subaru Solterra (2023 year). Manual in english - page 3


  Index      Manuals     Subaru Solterra (2023 year). Manual in english


Search            copyright infringement  


Content      ..     1      2      3      4      ..


Subaru Solterra (2023 year). Manual in english - page 3


48

1-2. Child safety

WARNING

SUBARU strongly urges the use 

of a proper child restraint sys-

tem that conforms to the weight 

and size of the child, installed 

on the rear seat. According to 

accident statistics, the child is 

safer when properly restrained 

in the rear seat than in the front 

seat.

Holding a child in your or some-

one else’s arms is not a substi-

tute for a child restraint system. 

In an accident, the child can be 

crushed against the windshield 

or between the holder and the 

interior of the vehicle.

Handling the child restraint 

system

If the child restraint system is not 

properly fixed in place, the child or 

other passengers may be seri-

ously injured or even killed in the 

event of sudden braking, sudden 

swerving, or an accident.

If the vehicle were to receive a 

strong impact from an accident, 

etc., it is possible that the child 

restraint system has damage 

that is not readily visible. In 

such cases, do not reuse the 

restraint system.

Make sure you have complied 

with all installation instructions 

provided with the child restraint 

system manufacturer and that 

the system is properly secured.

Keep the child restraint system 

properly secured on the seat 

even if it is not in use. Do not 

store the child restraint system 

unsecured in the passenger 

compartment.

If it is necessary to detach the 

child restraint system, remove it 

from the vehicle or store it 

securely in the luggage com-

partment.
49

1-2. Child safety

1

Fo
r s

a

fe

ty

 a

nd
 s

e

cu

rity

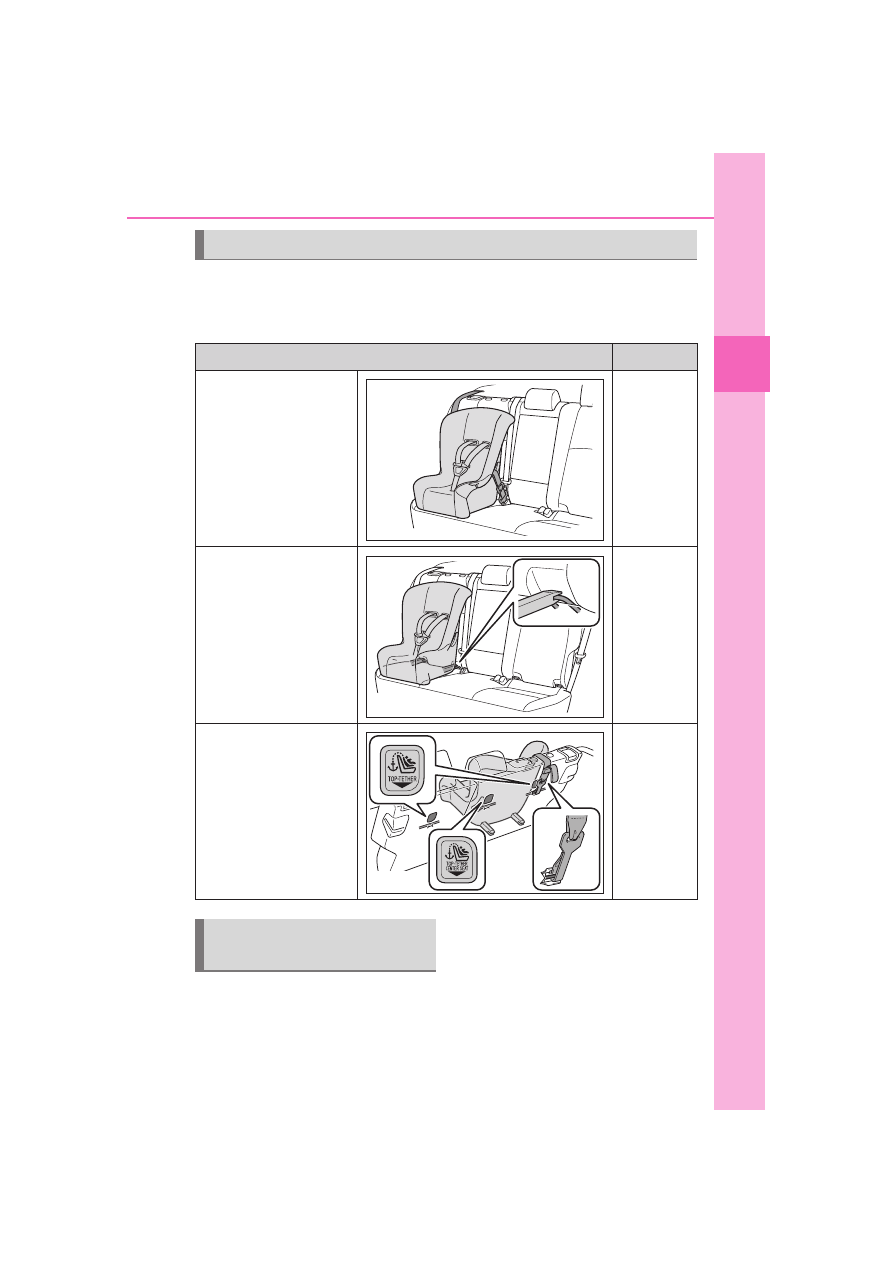
Types of child restraint system installation methods

Confirm with the operation manual enclosed with the child restraint 
system about the installation of the child restraint system.

When installing a child 
restraint system to a front 
passenger seat

For the safety of a child, install a 
child restraint system to a rear 
seat. When installing the child 
restraint system to a front pas-
senger seat is unavoidable, 
adjust the seat as follows and 

Child restraint system

Installation method

Page

Seat belt attachment

P.51

Child restraint LATCH 

anchors attachment

P.56

Anchor brackets (for 

top tether strap) attach-

ment

P.58

When using a child 
restraint system

50

1-2. Child safety

install the child restraint system.

Adjust the seatback angle to 
the most upright position.

Move the front seat fully rear-
ward. If the passenger seat 
height can be adjusted, move 
it to the upper most position.

If the head restraint interferes 
with the child restraint system 
installation and the head 
restraint can be removed, 
remove the head restraint. 
Otherwise, put the head 
restraint in the upper most 
position.

WARNING

When using a child restraint 

system

Observe the following precau-

tions.

Failure to do so may result in 

death or serious injury.

Never install a rear-facing child 

restraint system on the front 

passenger seat even if the “AIR 

BAG OFF” indicator light is illu-

minated. In the event of an acci-

dent, the force of the rapid 

inflation of the front passenger 

airbag can cause death or seri-

ous injury to the child if the rear-

facing child restraint system is 

installed on the front passenger 

seat.

A forward-facing child restraint 

system may be installed on the 

front passenger seat only when 

it is unavoidable. A child 

restraint system that requires a 

top tether strap should not be 

used in the front passenger seat 

since there is no top tether strap 

anchor for the front passenger 

seat.

A forward-facing child restraint 

system may be installed on the 

front passenger seat only when 

it is unavoidable. When install-

ing a forward-facing child 

restraint system on the front 

passenger seat, adjust the seat-

back angle to the most upright 

position, move the seat to the 

rearmost position, even if the 

“AIR BAG OFF” indicator light is 

illuminated. 

If the head restraint interferes 

with the child restraint system 

installation and the head 

restraint can be removed, 

remove the head restraint.

51

1-2. Child safety

1

Fo
r s

a

fe

ty

 a

nd
 s

e

cu

rity

A child restraint system for a 
small child or baby must itself be 
properly restrained on the seat 
with the lap portion of the 
lap/shoulder belt.

Installing child restraint 
system using a seat belt 
(child restraint lock func-
tion belt)

Install the child restraint system 
in accordance to the operation 
manual enclosed with the child 
restraint system.

Rear-facing 

 Infant 

seat/convertible seat

1

Adjust the rear seat.

If there is a gap between the child 

restraint system and the seatback, 

adjust the seatback angle until 

good contact is achieved.

WARNING

Do not allow the child to lean 

his/her head or any part of 

his/her body against the door or 

the area of the seat, front or rear 

pillars, or roof side rails from 

which the SRS side airbags or 

SRS curtain shield airbags 

deploy even if the child is 

seated in the child restraint sys-

tem. It is dangerous if the SRS 

side and curtain shield airbags 

inflate, and the impact could 

cause death or serious injury to 

the child.

When a booster seat is 

installed, always ensure that the 

shoulder belt is positioned 

across the center of the child’s 

shoulder. The belt should be 

kept away from the child’s neck, 

but not so that it could fall off the 

child’s shoulder.

Use a child restraint system 

suitable to the age and size of 

the child and install it to the rear 

seat.

If the driver’s seat interferes 

with the child restraint system 

and prevents it from being 

attached correctly, attach the 

child restraint system to the 

right-hand rear seat.

Adjust the front passenger seat 

so that it does not interfere with 

the child restraint system.

Child restraint system 
fixed with a seat belt

52

1-2. Child safety

2

Place the child restraint sys-
tem on the rear seat facing 
the rear of the vehicle.

3

Run the seat belt through the 
child restraint system and 
insert the plate into the 
buckle. Make sure that the 
belt is not twisted.

4

Fully extend the shoulder belt 
and allow it to retract to put it 
in lock mode. In lock mode, 
the belt cannot be extended.

5

While pushing the child 
restraint system down into 

the rear seat, allow the shoul-
der belt to retract until the 
child restraint system is 
securely in place.

After the shoulder belt has 

retracted to a point where there is 

no slack in the belt, pull the belt to 

check that it cannot be extended.

6

After installing the child 
restraint system, rock it back 
and forth to ensure that it is 
installed securely. (

P.55)

Forward-facing 

 Convert-

ible seat

1

Adjust the seat.

When using the front passenger 

seat: If installing the child restraint 

system to the front passenger seat 

is unavoidable, refer to P.49 for 

front passenger seat adjustment.
When using the rear seat: If there is 

a gap between the child restraint 

system and the seatback, adjust 

the seatback angle until good con-

tact is achieved.

2

If the head restraint interferes 
with the child restraint system 
installation and the head 
restraint can be removed, 

53

1-2. Child safety

1

Fo
r s

a

fe

ty

 a

nd
 s

e

cu

rity

remove the head restraint. 
(

P.190)

3

Place the child restraint sys-
tem on the seat facing the 
front of the vehicle.

4

Run the seat belt through the 
child restraint system and 
insert the plate into the 
buckle. Make sure that the 
belt is not twisted.

5

Fully extend the shoulder belt 
and allow it to retract to put it 

in lock mode. In lock mode, 
the belt cannot be extended.

6

While pushing the child 
restraint system into the rear 
seat, allow the shoulder belt 
to retract until the child 
restraint system is securely in 
place.

After the shoulder belt has 

retracted to a point where there is 

no slack in the belt, pull the belt to 

check that it cannot be extended.

7

If the child restraint has a top 
tether strap, follow the child 
restraint manufacturer’s 
operation manual regarding 
the installation, using the top 
tether strap to latch onto the 
top tether strap anchor. 
(

P.58)

8

After installing the child 
restraint system, rock it back 

54

1-2. Child safety

and forth to ensure that it is 
installed securely. (

P.55)

Booster seat

1

If installing the child restraint 
system to the front passen-
ger seat is unavoidable, refer 
to P.49 for front passenger 
seat adjustment.

2

High back type: If the head 
restraint interferes with your 
child restraint system, and 
the head restraint can be 
removed, remove the head 
restraint. (

P.190)

3

Place the child restraint sys-
tem on the seat facing the 
front of the vehicle.

Booster type

High back type

4

Sit the child in the child 
restraint system. Fit the seat 
belt to the child restraint sys-
tem according to the manu-
facturer’s instructions and 
insert the plate into the 
buckle. Make sure that the 
belt is not twisted.

Check that the shoulder belt is cor-

rectly positioned over the child’s 

shoulder and that the lap belt is as 

low as possible. (

P.29)

Removing a child restraint 
system installed with a seat 
belt

Press the buckle release button 
and fully retract the seat belt.

When releasing the buckle, the 
child restraint system may spring 
up due to the rebound of the seat 
cushion. Release the buckle while 
holding down the child restraint 

55

1-2. Child safety

1

Fo
r s

a

fe

ty

 a

nd
 s

e

cu

rity

system.
Since the seat belt automatically 
reels itself, slowly return it to the 
stowing position.

WARNING

When installing a child 

restraint system

Observe the following precau-

tions. 

Failure to do so may result in 

death or serious injury.

Do not allow children to play 

with the seat belt. If the seat belt 

becomes twisted around a 

child’s neck, it may lead to 

choking or other serious injuries 

that could result in death.

If this occurs and the buckle 

cannot be unfastened, scissors 

should be used to cut the belt.

Ensure that the belt and plate 

are securely locked and the 

seat belt is not twisted.

Shake the child restraint system 

left and right, and forward and 

backward to ensure that it has 

been securely installed.

After securing a child restraint 

system, never adjust the seat.

When a booster seat is 

installed, always ensure that the 

shoulder belt is positioned 

across the center of the child’s 

shoulder. The belt should be 

kept away from the child’s neck, 

but not so that it could fall off the 

child’s shoulder.

Follow all installation instruc-

tions provided by the child 

restraint system manufacturer.

When securing some types of 

child restraint systems in rear 

seats, it may not be possible to 

properly use the seat belts in 

positions next to the child 

restraint without interfering with 

it or affecting seat belt effective-

ness. Be sure your seat belt fits 

snugly across your shoulder 

and low on your hips. If it does 

not, or if it interferes with the 

child restraint, move to a differ-

ent position. Failure to do so 

may result in death or serious 

injury.

When installing a child restraint 

system in the rear center seat, 

adjust both seatbacks at the 

same angle. Otherwise, the 

child restraint system cannot be 

securely restrained and this 

may cause death or serious 

injuries in the event of sudden 

braking, sudden swerving or an 

accident.

When installing a booster 

seat

To prevent the belt from going into 

ALR lock mode, do not fully 

extend the shoulder belt. ALR 

mode causes the belt to tighten 

only. This could cause injury or 

discomfort to the child. (

P.31)

56

1-2. Child safety

Child restraint LATCH 
anchors

LATCH anchors are provided for 
the outboard rear seats.

When installing in the rear 
outboard seats

Install the child restraint system 
in accordance to the operation 
manual enclosed with the child 
restraint system.

1

Adjust the seat.

If there is a gap between the child 

restraint system and the seatback, 

adjust the seatback angle until 

good contact is achieved.

2

If the head restraint interferes 
with the child restraint system 
installation and the head 
restraint can be removed, 

remove the head restraint. 
(

P.190)

With flexible lower attach-
ments

3

Latch the hooks of the lower 
attachments onto the LATCH 
anchors. 
For owners in Canada: 
The symbol on a child 
restraint system indicates   
the presence of a lower con-
nector system.

Canada only

Child restraint system 
fixed with a child restraint 
LATCH anchor

57

1-2. Child safety

1

Fo
r s

a

fe

ty

 a

nd
 s

e

cu

rity

With rigid lower attachments

3

Latch the buckles onto the 
LATCH anchors.
For owners in Canada: 
The symbol on a child 
restraint system indicates   
the presence of a lower con-
nector system.

Canada only

4

If the child restraint has a top 
tether strap, follow the child 
restraint manufacturer’s 
operation manual regarding 
the installation, using the top 
tether strap to latch onto the 
top tether strap anchor. 
(

P.58)

5

After installing the child 
restraint system, rock it back 
and forth to ensure that it is 
installed securely. (

P.55)

Laws and regulations pertain-

ing to anchors

The LATCH system conforms to 

FMVSS225 or CMVSS210.2. 

Child restraint systems conforming 

to FMVSS213 or CMVSS213 speci-

fications can be used. 

This vehicle is designed to conform 

to SAE J1819.

WARNING

When installing a child 

restraint system

Observe the following precau-

tions. 

Failure to do so may result in 

death or serious injury.

When using the LATCH 

anchors, be sure that there are 

no foreign objects around the 

anchors and that the seat belt is 

not caught behind the child 

restraint system.

Follow all installation instruc-

tions provided by the child 

restraint system manufacturer.

Child restraint systems cannot 

be installed in the rear center 

seat. Do not install the child 

restraint system in the rear cen-

ter seat using the LATCH 

anchors.

When securing some types of 

child restraint systems in rear 

seats, it may not be possible to 

properly use the seat belts in 

positions next to the child 

restraint without interfering with 

it or affecting seat belt effective-

ness. Be sure your seat belt fits 

snugly across your shoulder 

and low on your hips. If it does 

not, or if it interferes with the 

child restraint, move to a differ-

ent position. Failure to do so 

may result in death or serious 

injury.

58

1-2. Child safety

Anchor brackets (for top 
tether strap)

Anchor brackets are provided 
for each rear seat.
Use anchor brackets when fix-
ing the top tether strap.

Outboard rear seats

Anchor brackets

Top tether strap

Rear center seat

Anchor bracket

Top tether strap

Fixing the top tether strap 
to the anchor bracket

Install the child restraint system 
in accordance to the operation 
manual enclosed with the child 
restraint system.

Outboard rear seats

1

Remove the head restraint. 
(

P.190)

2

Latch the hook onto the 
anchor bracket and tighten 
the top tether strap.

Make sure the top tether strap is 

securely latched. (

P.55)

Hook

Top tether strap

3

If the head restraint does not 
interfere with the child 

WARNING

If the seat is adjusted, reconfirm 

the security of the child restraint 

system.

Using an anchor bracket 
(for top tether strap)

59

1-2. Child safety

1

Fo
r s

a

fe

ty

 a

nd
 s

e

cu

rity

restraint system installation, 
install the head restraint.

Rear center seat

1

Adjust the head restraint to 
the upmost position.

If the head restraint interferes with 

your child restraint system, and the 

head restraint can be removed, 

remove the head restraint. 

(

P.190)

2

Latch the hook onto the 
anchor bracket and tighten 
the top tether strap.

Make sure the top tether strap is 

securely latched.
When installing the child restraint 

system with the head restraint 

being raised, be sure to have the 

top tether strap pass underneath 

the head restraint.

Hook

Top tether strap

Laws and regulations pertain-

ing to anchors

The LATCH system conforms to 

FMVSS225 or CMVSS210.2. 

Child restraint systems conforming 

to FMVSS213 or CMVSS213 speci-

fications can be used. 

This vehicle is designed to conform 

to SAE J1819.

WARNING

When installing a child 

restraint system

Observe the following precau-

tions. 

Failure to do so may result in 

death or serious injury.

Firmly attach the top tether 

strap and make sure that the 

belt is not twisted.

Do not attach the top tether 

strap to anything other than the 

anchor bracket.

After securing a child restraint 

system, never adjust the seat.

Follow all installation instruc-

tions provided by the child 

restraint system manufacturer.

60

1-2. Child safety

WARNING

Rear center seat: When install-

ing the child restraint system 

with the head restraint being 

raised, after the head restraint 

has been raised and then the 

anchor bracket has been fixed, 

do not lower the head restraint.

61

1-3. Emergency assistance

1

Fo
r s

a

fe

ty

 a

nd
 s

e

cu

rity

1-3.Emergency assistance

Microphone

“SOS” button

LED light indicators

Speaker

Subscribers have the following 
SUBARU SOLTERRA CON-
NECT services available:

Automatic Collision Notifica-
tion

*

Helps drivers receive necessary 
response from emergency service 
providers. (

P.63

)

SUBARU SOLTERRA 

CONNECT

SUBARU SOLTERRA CON-
NECT is a subscription-
based telematics service 
that uses Global Position-
ing System (GPS) data and 
embedded cellular technol-
ogy to provide safety and 
security features to sub-
scribers. SUBARU SOL-
TERRA CONNECT is 
supported by SUBARU’s 
designated response cen-
ter, which operates 24 
hours per day, 7 days per 
week.

Subaru Solterra Connected 
Service trials are automati-
cally activated for your con-
venience.

By using the SUBARU SOL-
TERRA CONNECT service, 
you are agreeing to be 
bound by the Telematics 
Subscription Service Agree-
ment and its Terms and 
Conditions, as in effect and 
amended from time to time, 
a current copy of which is 
available at 
www.Toyota.com/
privacyvts. All use of the 
SUBARU SOLTERRA CON-
NECT service is subject to 
such then applicable Terms 
and Conditions.

If you wish to deactivate 
services, please contact a 
Subaru Solterra Connected 
Specialist by pushing the 
in-vehicle SOS button or 
calling the applicable call 
center number below:

System components

Services

62

1-3. Emergency assistance

*

: U.S. Patent No. 7,508,298 B2

Stolen Vehicle Location

Helps drivers in the event of vehicle 
theft. (

P.63

)

Emergency Assistance Button 
(“SOS”)

Connects drivers to response-cen-
ter support. (

P.64

)

Enhanced Roadside Assis-
tance

Provides drivers various on-road 
assistance. (

P.64

)

After you have signed the 
Telematics Subscription Service 
Agreement and are enrolled, 
you can begin receiving ser-
vices.
A variety of subscription terms 
are available for purchase. Con-
tact your SUBARU dealer, call 
the following or push the “SOS” 
button in your vehicle for further 
subscription details.

The United States

(866) 384-3574

Canada

(800) 263-8802

Subscription

NOTICE

SUBARU SOLTERRA CON-

NECT Services Information

Phone calls using the vehicles 
Bluetooth

®

 technology will not 

be possible during SUBARU 

SOLTERRA CONNECT.

SUBARU SOLTERRA CON-

NECT is available beginning 

May 2022 on select SUBARU 

models (in the contiguous 

United States only). Contact 

with the SUBARU SOLTERRA 

CONNECT response center is 

dependent upon the telematics 

device being in operative condi-

tion, cellular connection avail-

ability, and GPS satellite signal 

reception, which can limit the 

ability to reach the response 

center or receive emergency 

service support. Enrollment and 

Telematics Subscription Ser-

vice Agreement are required. A 

variety of subscription terms are 

available; charges vary by sub-

scription term selected and 

location.

Automatic Collision Notification, 

Emergency Assistance and Sto-

len Vehicle Location are avail-

able in the United States, 

including Hawaii and Alaska, as 

well as Canada, and Enhanced 

Roadside Assistance are avail-

able in the United States and 

Canada.

Automatic Collision Notification, 

Emergency Assistance, Stolen 

Vehicle and Enhanced Road 

Assistance will not function in 

the United States Virgin Islands. 

For vehicles first sold in the 

USVI, no SUBARU SOL-

TERRA CONNECT services will 

function in and outside the 

United States Virgin Islands.

SUBARU SOLTERRA CON-

NECT services are not subject 

to section 255 of the Telecom-

munications Act and the device 

is not TTY compatible.

63

1-3. Emergency assistance

1

Fo
r s

a

fe

ty

 a

nd
 s

e

cu

rity

When the power switch is turned 
to ON, the red indicator light 
comes on for 2 seconds then 
turns off. Afterward, the green 
indicator light comes on, indicat-
ing that the service is active.
The following indicator light pat-
terns indicate specific system 
usage conditions:

Green indicator light on = 
Active service

Green indicator light flashing 
= SUBARU SOLTERRA 
CONNECT call in process

Red indicator light (except at 
vehicle start-up) = System 
malfunction (contact your 
SUBARU dealer)

No indicator light (off) = SUB-
ARU SOLTERRA CONNECT 

service not active

Automatic Collision Notifi-
cation

In case of either airbag deploy-
ment or severe rear-end colli-
sion, the system is designed to 
automatically call the response 
center. The responding agent 
receives the vehicle’s location 
and attempts to speak with the 
vehicle occupants to assess the 
level of emergency. If the occu-
pants are unable to communi-
cate, the agent automatically 
treats the call as an emergency, 
contacts the nearest emer-
gency services provider to 
describe the situation, and 
requests that assistance be sent 
to the location.

Stolen Vehicle Location

If your vehicle is stolen, SUB-
ARU SOLTERRA CONNECT 
can work with local authorities to 
assist them in locating and 
recovering the vehicle. After fil-
ing a police report, call the Cus-
tomer Experience Center at 
(866) 384-3574 in the United 
States or (800) 263-8802 in 
Canada, and follow the prompts 
for SUBARU SOLTERRA CON-
NECT to initiate this service.
In addition to assisting law 
enforcement with recovery of a 

NOTICE

Languages

The SUBARU SOLTERRA CON-

NECT response center will offer 

support in multiple languages. 

The SUBARU SOLTERRA CON-

NECT system will offer voice 

prompts in English, Spanish, and 

French. Please indicate your lan-

guage of choice when enrolling.

When contacting the 

response center

You may be unable to contact the 

response center if the network is 

busy.

SUBARU SOLTERRA 
CONNECT LED light Indi-
cators

SUBARU SOLTERRA 
CONNECT services


Content      ..     1      2      3      4      ..