Subaru Forester (2022 year). Manual in english - page 14
 

  Index      Manuals     Subaru Forester (2022 year). Manual in english


Search            copyright infringement  


Content      ..     12      13      14      15     ..


Subaru Forester (2022 year). Manual in english - page 14


(217,1)

acceleration or deceleration.

!

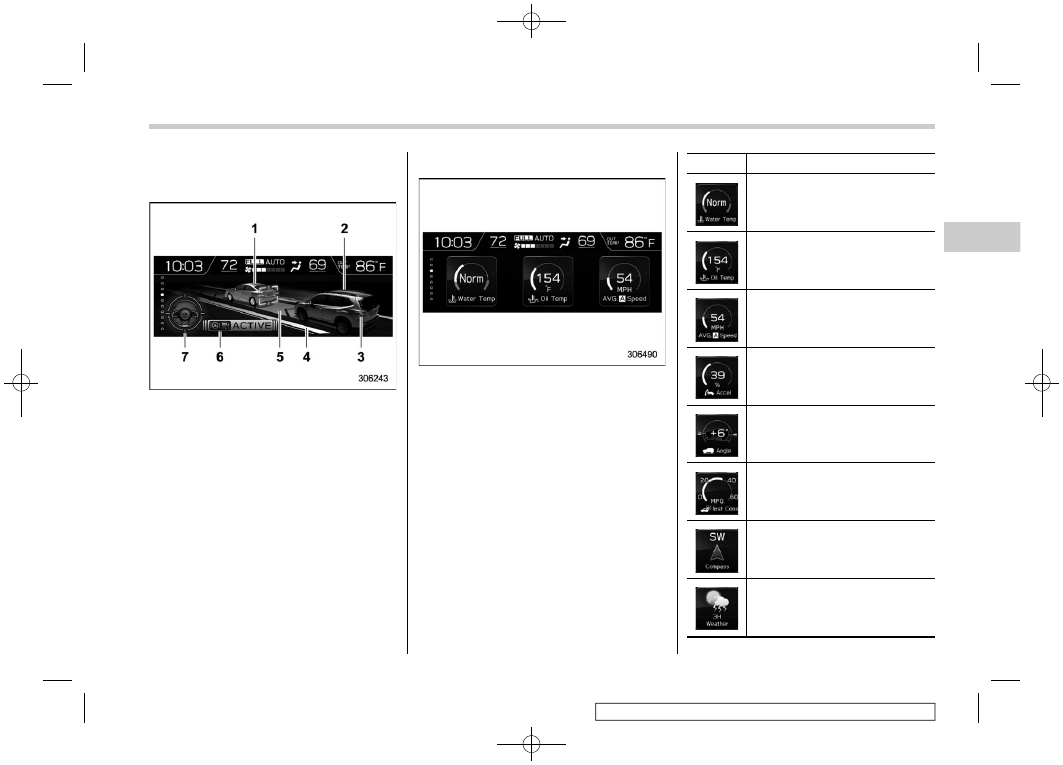
EyeSight screen (if equipped)

1)

Lead vehicle indicator

2)

Your own vehicle indicator

3)

Stop lights

4)

Road line indicator

5)

Lane indicator

6)

Lane Centering indicator

7)

Steering wheel indicator

This screen displays the status of the
EyeSight system. The lead vehicle indica-
tor moves forward and backward depend-
ing on the distance with the vehicle in front.
For details, refer to the Owner’s Manual
supplement for the EyeSight system.

!

Favorite screen

Favorite screen (display example)

This screen displays up to three optional
pieces of information that can be selected
from the following items.

Item

Details

The engine coolant temperature is
displayed.

The engine oil temperature is
displayed.

The average vehicle speed is
displayed.

The accelerator opening ratio is
displayed.

The vehicle posture is displayed.

The current rate of fuel consump-
tion is displayed.

The direction of the vehicle is
displayed.*

1

The weather information is dis-
played.*

2

– CONTINUED –

Multi-function display (color LCD)

215

3

Instruments

and

controls

(218,1)

Item

Details

The posted speed limit of the road
you are currently driving on is
displayed.*

1

The calendar is displayed.

Driver Monitoring System infor-
mation is displayed.*

1

Nothing is displayed.

*1: If equipped
*2: Models with SiriusXM Satellite Radio

NOTE

Some displayed items may not be
displayed depending on the model
and specifications.

The items shown in the favorite screen can
be changed. For details, refer to “Favorite
setting”

F

P228.

!

Weather information screen (if
equipped)

1)

Weather information for the destination*

2)

Weather information for the current loca-
tion

*: Only when a destination is set in the

navigation system

The weather information is displayed on
the screen.

NOTE

.

When all of the following conditions

are satisfied, weather information is
displayed.

– The vehicle is equipped with an
audio and navigation system for
SiriusXM satellite radio.
– You have a current SiriusXM
satellite radio subscription.

.

The weather forecast for the set

destination remains displayed until a
new destination is set or until you reach
the destination.

.

Depending on the reception timing

of XM, the display of weather informa-
tion may be delayed.

!

Navigation screen (models with
navigation system)

The navigation system information to the
destination is displayed on the screen.

NOTE

When a destination is not set in the
navigation system, the compass orien-
tation, name, route sign and speed limit
of the road the vehicle is traveling on
remain displayed on the screen.

Multi-function display (color LCD)

216

(219,1)

!

Audio screen

The screen of the currently selected audio
source is displayed.
For details about how to use the audio set,
refer to the separate navigation/audio
Owner’s Manual.

!

Fuel consumption screen

1)

Driving range on remaining fuel

2)

Average fuel consumption corresponding
to the driving distance of each trip meter

3)

Current fuel consumption

4)

User information (if equipped)

The fuel consumption information is dis-
played on the screen.

If the driver is recognized by the Driver
Monitoring System, average fuel con-
sumption for the driver will be displayed.

NOTE

The driving range on the remaining fuel
is only a guide. The indicated value may
differ from the actual driving range on
the remaining fuel, so you must im-
mediately fill the tank when the low fuel

warning light illuminates.

!

Clock/date screen

The time and date are displayed.
You can adjust the time and date. For
details, refer to “Clock”

F

P233.

– CONTINUED –

Multi-function display (color LCD)

217

3

Instruments

and

controls

(220,1)

!

Guidance screen

When the INFO button on the steering
wheel is pressed and held on this screen,
the setting screen can be displayed.
For details, refer to “Setting screen”

F

P218.

NOTE

When the combination meter display
(color LCD) is displaying the menu
screen entering screen, the system will
not move to the setting screen even if
the INFO button is pressed and held.

&

Setting screen

1. Press and hold the INFO button on the
guidance screen. The top menu is dis-
played.
2. Operate the “

” or “

” switch to

select the preferred menu from the top
menu.
3. Pull the “

/SET” switch to enter the

selected menu.
4. Operate the “

” or “

” switch to

select the preferred menu from the 2nd
menu.
5. Pull the “

/SET” switch to enter the

selected menu.

Multi-function display (color LCD)

218

(221,1)

The menu lists are as follows.

Items that can be set when stopped:

Top menu

2nd menu

Description

Page

Date

Birthday

Set a birthday.

221

Anniversary

Set an anniversary day.

221

Go Back

Return to the 1st menu.

Driver Moni-
toring System

Repeat facial scan

Perform the user recognition.

Yes or No

221

User Recognition

Turn the user recognition settings on or off.

On or Off

227

Automatically retract seat on entry

Turn the automatically retract seat on entry
function on or off.

On or Off

226

Register User

Register the user.

222

Update User Settings

Re-register the driver’s position.

225

Delete Driver Position

Delete the registered driver’s position.

226

Delete User

Delete the registered user.

224

Delete All Users

Delete the registered all user.

Yes or No

225

Go Back

Return to the 1st menu.

Display/Beep

Screen Off*

Turn the screen off.

Yes or No

227

Favorite

Set and customize the triple meter.

228

Bypass Screen

Set the bypass screen for each item.

On or Off

228

Beep

Adjust the beep sound volume.

High, Low or Off

228

Go Back

Return to the 1st menu.

Climate con-
trol

Mode Setting

Set the operation of the automatic climate
control.

Normal, Mild, ECO or Power

229

Occupant Detection

Set the operation of the climate control depend-
ing on passenger.

On or Off

229

Go Back

Return to the 1st menu.

– CONTINUED –

Multi-function display (color LCD)

219

3

Instruments

and

controls

(222,1)

Top menu

2nd menu

Description

Page

Camera set-
tings

Brightness

Set and adjust the brightness of a display.

229

Contrast

Set and adjust the contrast of a display.

230

Camera Shift Link

Set the camera shift link.

On or Off

230

Go Back

Return to the 1st menu.

Maintenance

Engine Oil

Set and adjust the oil maintenance notification date.

230

Oil Filter

Set and adjust the oil filter maintenance notification date.

231

Tires

Set and adjust the tire maintenance notification date.

231

Maintenance Schedule

Set and adjust the vehicle maintenance notification date.

231

ON/OFF

Turn on or off the self-check screen that is
activated when the ignition switch is turned to the
“ON” position.

On or Off

231

Clear All Settings

Clear all settings for maintenance items.

Yes or No

232

Go Back

Return to the 1st menu.

Initialize

Reset all settings to the default settings.

Yes or No

232

Go Back

Return to the setting screen.

*: You can also set this while driving.

Items that can be set while driving:

Menu

Description

Page

Screen Off

Turn the screen off.

Yes or No

227

Go Back

Return to the settings screen.

For safety reasons, we recommend stopping the vehicle in a safe location while setting.

Multi-function display (color LCD)

220

(223,1)

!

Date and time settings

You can set the date, time and 12h or 24h
format settings.

!

Current date and time setting

For details about clock setting, refer to
“Clock”

F

P233.

!

Birthday setting

If a birthday or anniversary is approaching,
a message will be displayed when the
ignition switch is turned to the “ON”
position. This function can be set to on or
off. For details, refer to “Bypass screen
setting”

F

P228.

1. Select “Birthday” from the 2nd menu in
the setting screen. Refer to “Setting
screen”

F

P218.

2. Select from the list the number that you
want to register.

3. Enter the date and the text by using the
control switches.

4. Select “Set” to exit settings. Select “Go
Back” to return to the previous screen
without applying the setting changes.

NOTE

You can store a maximum of 5 birth-
days.

!

Anniversary setting

1. The procedure for setting an anniver-
sary is the same as “Birthday setting”

F

P221, except that in step 1 “Anniversary”

is selected.

NOTE

You can store a maximum of 5 anniver-
saries.

!

Driver Monitoring System settings

You can set the Driver Monitoring System
settings.

!

Repeat facial scan

1. Select “Repeat facial scan” from the
2nd menu in the settings screen. Refer to
“Setting screen”

F

P218.

– CONTINUED –

Multi-function display (color LCD)

221

3

Instruments

and

controls

(224,1)

2. Select “Yes” to start the repeat facial
scan. Select “No” to return to the previous
screen.
3. While seated in the driver’s seat, face
straight forward and wait for a few mo-
ments.

When user recognition is completed, the
Hello screen appears and the screen then
switches to the basic screen associated
with the user information.

!

Register User

1. Adjust the seat position, outside mirror
angle, and reverse tilt-down outside mirror
angle so that you are seated in the correct
driving posture.

NOTE

.

Start the user registration after ad-

justing the seat position, outside mirror
angle, and reverse tilt-down outside
mirror angle. If they are adjusted during
user registration, it may be disrupted.
Refer to “Power seat”

F

P36 or “Out-

side mirrors”

F

P257.

.

If the ignition switch is turned to the

“OFF” position before user registration
is complete, the information of the
adjusted seat position, outside mirror
angle, and reverse tilt-down outside
mirror angle will not be saved.

2. Select “Register User” from the 2nd
menu in the settings screen. Refer to
“Setting screen”

F

P218.

Multi-function display (color LCD)

222

(225,1)

3. Select from the list the number that you
want to register.

4. Select “Set” to start the registration
facial scan. Select “Go Back” to return to
the previous screen.

5. While seated in the driver’s seat, face
straight forward and wait for a few mo-
ments.

When the screen changes, the registration
facial scan is completed.

A)

Forward direction

B)

Display direction

1)

Face forward.

2)

Do not lower your chin.

3)

Face the display.

*: Display

– CONTINUED –

Multi-function display (color LCD)

223

3

Instruments

and

controls

(226,1)

NOTE

.

If user registration cannot be per-

formed, turn your face forward as
shown in the illustration, then turn to
the display.

.

If “Unable to register” appears, re-

peat the procedure beginning from step
4.

.

There are some cases where user

registration cannot be registered prop-
erly. In those cases, refer to “Driver
Monitoring System”

F

P391.

6. Enter the text using the control
switches.
7. Set the desired icons using the control
switches.
8. Select “Set” to exit the settings screen.

NOTE

.

A screen recommending user regis-

tration appears at the following times.

– When the driver has not com-
pleted user registration
– When there are 4 or fewer regis-
tered users
Operate the control switch and
select “Yes” to display the screen
in step 3. Then follow the registra-
tion procedure to complete user
registration.

.

An existing user can be overwritten

by selecting a registered number. When
a user is registered by overwriting, the
individual fuel economy data is reset.

.

When “User Recognition” is set to

OFF, user registration cannot be se-
lected.

!

Delete User

1. Select “Delete User” from the 2nd
menu in the settings screen. Refer to
“Setting screen”

F

P218.

2. Select from the list the number that you
want to register.

Multi-function display (color LCD)

224

(227,1)

3. Select “Yes” to delete the number.
Select “No” to return to the previous
screen.

!

Delete All Users

1. Select “Delete All Users” from the 2nd
menu in the settings screen. Refer to
“Setting screen”

F

P218.

2. Select “Yes” to delete all the users.
Select “No” to return to the previous
screen.

!

Update User Settings

1. Select “Update User Settings” from the
2nd menu in the settings screen. Refer to
“Setting screen”

F

P218.

2. Select “Set” to re-register the driver
position. Select “Go Back” to return to the
previous screen.

NOTE

.

Start the user registration after ad-

justing the seat position, outside mirror
angle, and reverse tilt-down outside
mirror angle. If they are adjusted during
user registration, it may be disrupted.
Refer to “Power seat”

F

P36 or “Out-

side mirrors”

F

P257.

– CONTINUED –

Multi-function display (color LCD)

225

3

Instruments

and

controls

(228,1)

.

If the ignition switch is turned to the

“OFF” position before user registration
is complete, the information of the
adjusted seat position, outside mirror
angle, and reverse tilt-down outside
mirror angle will not be saved.

!

Delete Driver Position

1. Select “Delete Driver Position” from the
2nd menu in the settings screen. Refer to
“Setting screen”

F

P218.

2. Select “Yes” to delete the driver posi-
tion. Select “No” to return to the previous
screen.

!

Automatically retract seat on
entry setting

1. Select “Automatically retract seat on
entry” from the 2nd menu in the settings
screen. Refer to “Setting screen”

F

P218.

2. Select “On” or “Off” to turn the auto
entry/exit function on or off by using the
control switches.
3. Select “Set” to exit settings. Select “Go
Back” to return to the previous screen.

Multi-function display (color LCD)

226

(229,1)

!

User Recognition settings

1. Select “User Recognition” from the 2nd
menu in the settings screen. Refer to
“Setting screen”

F

P218.

2. Select “On” or “Off” to turn the User
Recognition settings on or off by using the
control switches.
3. Select “Set” to exit settings. Select “Go
Back” to return to the previous screen.

!

Display/Beep settings

You can set the display settings and
volume settings.

!

Screen OFF setting

1. Select “Screen Off” from the 2nd menu
in setting screen. Refer to “Setting screen”

F

P218.

2. Select “Yes” to turn off the screen.
Select “No” to return to the previous
screen.

Restoring the screen

When the INFO button is operated after
the ignition switch is turned to the “ON” or
“ACC” position, the screen will be restored.
The screen will be restored with the basic
screen that was displayed when the
screen was turned off.

NOTE

While the screen is off, the screen
switches to the climate control screen
only when the climate control system is
operated.

– CONTINUED –

Multi-function display (color LCD)

227

3

Instruments

and

controls

(230,1)

!

Favorite setting

1. Select “Favorite” from the 2nd menu in
setting screen. Refer to “Setting screen”

F

P218.

2. Set the desired items by using the
control switches. For details about items,
refer to “Favorite screen”

F

P215.

3. Select “Set” to exit settings. Select “Go
Back” to return to the previous screen
without applying the setting changes.

NOTE

.

You can display a maximum of the 3

items.

.

The same item cannot be selected

for the left, center or right location.

.

Weather information for 3 hours

later or 6 hours later can be displayed.

!

Bypass screen setting

1. Select “Bypass Screen” from the 2nd
menu in the setting screen. Refer to
“Setting screen”

F

P218.

2. Select “On” or “Off” to turn the display
of items on or off by using the control
switches.
3. Select “Set” to exit settings. Select “Go
Back” to return to the previous screen
without applying the setting changes.

NOTE

Traffic information setting is only dis-
played for the audio unit with SiriusXM
satellite radio.

!

Beep setting

1. Select “Beep” from the 2nd menu in the
setting screen. Refer to “Setting screen”

F

P218.

2. Set the beep volume by using the
control switches.
3. Select “Set” to exit settings. Select “Go
Back” to return to the previous screen
without applying the setting changes.

Multi-function display (color LCD)

228

(231,1)

!

Climate Control settings

You can set the climate control settings.

!

Mode Setting

1. Select “Mode Setting” from the 2nd
menu in the setting screen. Refer to
“Setting screen”

F

P218.

2. Select “Normal”, “Mild”, “Power” or
“ECO” by using the control switches. For
details about “Mode Setting”, refer to
“Automatic climate control customization
(for type B and C)”

F

P272.

3. Select “Set” to exit settings. Select “Go
Back” to return to the previous screen
without applying the setting changes.

!

Occupant detection settings

1. Select “Occupant Detection” from the
2nd menu in the setting screen. Refer to
“Setting screen”

F

P218.

2. Select on or off to turn the occupant
detection on or off by using the control
switches.
3. Select “Set” to exit settings. Select “Go
Back” to return to the previous screen
without applying the setting changes.

!

Camera settings (if equipped)

You can set the front camera display
settings.

!

Brightness setting

1. Select “Brightness” from the 2nd menu
in the setting screen. Refer to “Setting
screen”

F

P218.

2. Select the brightness level by using the
control switches.
3. Press the “

/SET” button to confirm

the setting.

– CONTINUED –

Multi-function display (color LCD)

229

3

Instruments

and

controls

(232,1)

!

Contrast setting

1. Select “Contrast” from the 2nd menu in
the setting screen. Refer to “Setting
screen”

F

P218.

2. Select the contrast level by using the
control switches.
3. Press the “

/SET” button to confirm

the setting.

!

Camera shift link setting

1. Select “Camera Shift Link” from the
2nd menu in the setting screen. Refer to
“Setting screen”

F

P218.

2. Select “On” or “Off” by using the control
switches.
3. Select “Set” to exit settings. Select “Go
Back” to return to the previous screen
without applying the setting changes.

!

Maintenance settings

You can set maintenance reminders.

!

Engine oil setting

1. Select “Engine Oil” from the 2nd menu
in the setting screen. Refer to “Setting
screen”

F

P218.

2. Set the date and distance of the
reminder by using the control switches.
3. Select “Set” to exit settings. Select
“Update” to change the notification dis-
tance to the default value. Select “Go
Back” to return to the previous screen
without applying the setting changes.

Multi-function display (color LCD)

230


Content      ..     12      13      14      15     ..