Subaru Ascent (2019 year). Instruction - part 17


  Index      Subaru     Subaru Ascent - instruction 2019 year in english


Search            


Content   ..  15  16  17  18   ..


Subaru Ascent (2019 year). Instruction - part 17


(259,1)

北米Model "A3200BE-A" EDITED: 2018/ 3/ 5

1)

“Learn” button

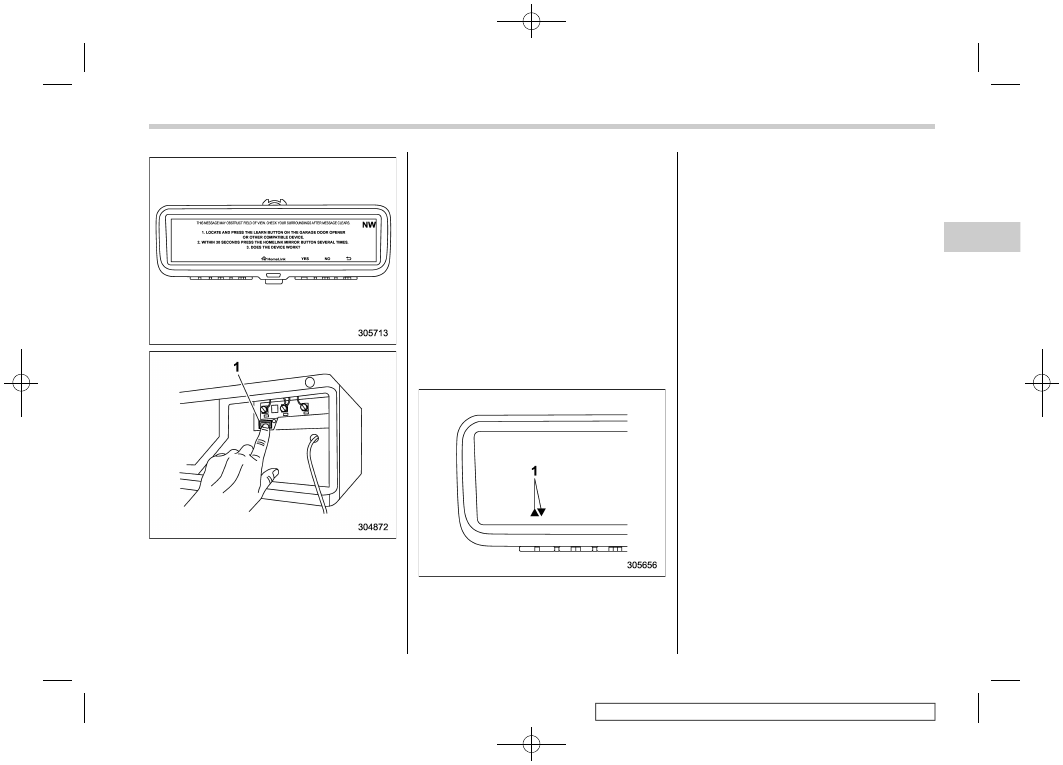
8. At the garage door opener motor,
(security gate motor, etc.) locate the
“Learn”, “Smart”, or “Program” button. This
can usually be found where the hanging
antenna wire is attached to the motor-head

unit (see the device’s manual to identify
this button). The name and color of the
button may vary by manufacturer.

NOTE

A ladder and/or second person may
simplify the following steps.

9. Firmly press and release the “Learn”,
“Smart”, or “Program” button. You now
have 30 seconds in which to complete step
10.
10. Return to the vehicle and press the
HomeLink button. At this point your device
should operate when the HomeLink button
is pressed and released.

1)

Status Indicators

11. If status indicator arrows appear next
to the indicator light, please refer to

“Garage Door Two-Way Communication”
FP245.

In the event that there are still program-
ming difficulties or questions, additional
HomeLink information and programming
videos can be found at
www.HomeLink.com/Subaru and
www.youtube.com/HomeLinkGentex. For
Genie and Sommer garage door openers,
please go directly to the HomeLink web-
site.

!

Gate Operator/Canadian Pro-
gramming

Canadian radio-frequency laws require
transmitter remote signals to “time-out”
(or quit) after several seconds of transmis-
sion, which may not be long enough for
HomeLink to pick up the signal during
programming. Similar to this Canadian
law, some U.S. gate operators are de-
signed to “time-out” in the same manner.
The indicator LED on the hand-held
remote will go off when the device times
out, indicating that it has finished transmit-
ting.

If you live in Canada or you are having
difficulties programming a gate operator or
garage door opener by using the program-
ming procedures, replace “Programming a
New HomeLink Button” step 3 with the

– CONTINUED –

Mirrors

257

3

Instruments

and

controls

(260,1)

北米Model "A3200BE-A" EDITED: 2018/ 3/ 5

following:

While the HomeLink indicator light is
flashing orange, press and release (“cy-
cle”) your device’s hand-held remote every
two seconds until the HomeLink indicator
light changes from orange to green. You
may now release the hand-held remote
button.

NOTE

If programming a garage door opener
or gate operator, it is advised to unplug
the device during the “cycling” process
to prevent possible overheating.

Proceed with “Programming a New
HomeLink Button” step 4 to complete.

!

Using HomeLink

To operate, simply press and release the
programmed HomeLink button. Activation
will now occur for the trained device (i.e.
garage door opener, gate operator, secur-
ity system, entry door lock, home/office
lighting, etc.). For convenience, the hand-
held remote of the device may also be
used at any time.

!

Erasing HomeLink Buttons

1. Press any of the left, center or right
buttons to select the main menu. Select
“HOMELINK” using the center switch and
press the left switch.
2. Select the “CLEAR BUTTON” using
the center button and press the left button.

3. Select the HomeLink button that you
would like to erase the program on the
display using the center button. Then
press the left button.
4. To erase the program for the HomeLink
button, select “YES” using the center
button and press the left button.

HomeLink is now ready to be programmed
at any time beginning with “Programming a
new HomeLink button” - step 1.

!

R e p r o g r a m m i n g a S i n g l e
HomeLink Button

To program a previously programmed
HomeLink button refer to “Programming
a New HomeLink button” FP256.

!

Garage Door Two-Way Commu-
nication

HomeLink has the capability of commu-
nicating with your garage door opener.
HomeLink can receive and display “clos-
ing” or “opening” status messages from
compatible garage door opener systems.
At any time, HomeLink can also recall and
display the last recorded status commu-
nicated by the garage door opener to
indicate your garage door being “closed”
or “opened”.

HomeLink has the capability of receiving
this communication from the garage door
opener at a range up to 820 feet (250 m).
Range may be reduced by obstacles such
as houses or trees. You may have to slow
your vehicle speed to successfully receive
the garage door opener communication.

Mirrors

258

(261,1)

北米Model "A3200BE-A" EDITED: 2018/ 3/ 5

!

Programming Two-Way Commu-
nication

1)

Status Indicators

Within five seconds after programming a
new HomeLink button, both of HomeLink’s
garage door status indicators will flash
rapidly green indicating that the garage
door two-way communication has been
enabled. If your garage door status in-
dicators flashed, two-way communication
programming is complete.

If the garage door status indicators do not
flash, additional HomeLink information
and programming videos can be found
online at www.HomeLink.com/Subaru and
www.youtube.com/HomeLinkGentex.

!

Using Two-Way Communication

1)

Status Indicators

Recall and display (at any time) the last
recorded garage door status message
communicated to HomeLink by simulta-
neously pressing HomeLink buttons 1 and
2 for two seconds. HomeLink will display
the last recorded status for three seconds.

1)

Garage Door Opener CLOSING (Blinking
Orange)

2)

Garage Door Opener CLOSED (Solid
Green)

3)

Garage Door Opener OPENING (Blink-
ing Orange)

4)

Garage Door Opener OPENED (Solid
Green)

If two-way communication programming is
successful, HomeLink will display the
status of your garage door opener with
arrow indicators.

– CONTINUED –

Mirrors

259

3

Instruments

and

controls

(262,1)

北米Model "A3200BE-A" EDITED: 2018/ 3/ 5

!

Certification

In the event that there are still program-
ming difficulties or questions, additional
HomeLink information and programming
videos can be found at
www.HomeLink.com/Subaru,
www.youtube.com/HomeLinkGentex, or
by calling the toll-free HomeLink-hotline
at 1-800-355-3515.
.

U.S.-spec. models

CAUTION

FCC WARNING

Changes or modifications not ex-
pressly approved by the party re-
sponsible for compliance could void
the user’s authority to operate the
equipment.

This device complies with part 15 of the
FCC Rules. Operation is subject to the
following two conditions: (1) This de-
vice may not cause harmful interfer-
ence, and (2) this device must accept
any interference received, including
interference that may cause undesired
operation.

.

Canada-spec. models

HomeLink

®

and the HomeLink

®

house are

registered trademarks of Gentex Corpora-
tion.

WARNING

.

W h e n

p r o g r a m m i n g

t h e

HomeLink

®

Wireless Control Sys-

tem, you may be operating a
garage door opener or other
device. Make sure that people
and objects are out of the way of
the garage door or other device
to prevent potential harm or da-
mage.

.

Do not use the HomeLink

®

Wire-

less Control System with a gar-
age door opener that lacks the
safety stop and reverse feature
as required by applicable safety
standards. A garage door opener
which cannot detect an object,
signaling the door to stop and
reverse, does not meet these
safety standards. Using a garage
door opener without these fea-
tures increases risk of serious
injury or death. For more infor-
mation, consult the HomeLink

®

website at www.HomeLink.com/
Subaru or call 1-800-355-3515.

Mirrors

260

(263,1)

北米Model "A3200BE-A" EDITED: 2018/ 3/ 5

!

Language

Changes the language displayed in the
smart rearview mirror.
1. Press any of the left, center or right
buttons to display the main menu. Select
“LANGUAGE” using the center button and
press the left button.
2. Select the language using the center
button and press the left button.

NOTE

.

If the button is not touched for 30

seconds, the language setting menu
will exit.
.

The main menu cannot be displayed

on the display while the select lever is
in a position other than the “P” posi-
tion.

&

Outside mirrors

!

Convex mirror (passenger side)

WARNING

Objects look smaller in a convex
mirror and farther away than when
viewed in a flat mirror. Do not use the
convex mirror to judge the distance
of vehicles behind you when chan-
ging lanes. Use the inside mirror (or
glance backwards) to determine the
actual size and distance of objects
that you view in convex mirror.

!

Remote control mirror switch

: Select side to adjust
: Direction control

The remote control mirrors operate only
when the ignition switch is in the “ON” or
“ACC” position.
1. Turn the control switch to the side that
you want to adjust. “L” is for the left mirror,
“R” is for the right mirror.
2. Move the control switch in the direction
you want to move the mirror.
3. Return the control switch to the neutral
position to prevent unintentional opera-
tion.

The mirrors can also be adjusted manu-
ally.

Mirrors

261

3

Instruments

and

controls

(264,1)

北米Model "A3200BE-A" EDITED: 2018/ 3/ 5

3-18. Defogger and deicer

1)

Rear window defogger

2)

Outside mirror defogger (if equipped)

3)

Windshield wiper deicer (if equipped)

The vehicle is equipped with the defogger

and the deicer (if equipped) system. The
defogger and deicer system is activated
only when the ignition switch is in the “ON”
position.

1)

Models without outside mirror defogger

2)

Models with outside mirror defogger

To activate simultaneously the rear win-
dow defogger, outside mirror defogger (if
equipped) and windshield wiper deicer (if
equipped), press the control switch that is
located on the climate control panel. The
indicator light on the control switch illumi-
nates while the defogger and deicer
system is activated.

To turn them off, press the control switch
again. They also turn off when the ignition
switch is turned to the “ACC” or “LOCK”/
“OFF” position.

The defogger and deicer system will
automatically shut off after approximately
15 minutes. If the rear window and the
outside mirrors have been cleared and the
windshield blade rubbers have been
deiced completely before that time, press
the control switch to turn them off.

It is possible for the defogger and deicer
system to be set to continuous operation
mode by a SUBARU dealer. Consult your
SUBARU dealer for details. Also, for
models with a combination meter display,
it is possible to set the defogger and deicer
system for the continuous operation mode.
For details, refer to “Menu screens”
FP197.

Defogger and deicer

262

(265,1)

北米Model "A3200BE-A" EDITED: 2018/ 3/ 5

CAUTION

.

To prevent the battery from being

discharged, do not operate the
defogger and deicer system con-
tinuously for any longer than
necessary.

.

Do not use sharp instruments or

window cleaner containing abra-
sives to clean the inner surface of
the rear window. They may da-
mage the conductors printed on
the window.

NOTE

.

Turn on the defogger and deicer

system if the wipers are frozen to the
windshield.
.

If the windshield is covered with

snow, remove the snow so that the
windshield wiper deicer works effec-
tively.
.

While the defogger and deicer sys-

tem is in the continuous operation
mode:

– If the vehicle speed remains at 9
mph (15 km/h) or lower for 15
minutes, the windshield wiper dei-
cer system automatically stops op-
erating. However, the rear window
defogger system and outside mirror
defogger system maintain continu-
ous operation in this condition.
– If the vehicle battery voltage
drops below the permissible level,
continuous operation of the defog-
ger system and deicer system is
canceled and the system stops
operating.

3-19. Tilt/telescopic steering
wheel

WARNING

.

Do not adjust the steering wheel

tilt/telescopic position while driv-
ing. This may cause loss of
vehicle control and result in per-
sonal injury.

.

If the lever cannot be raised to the

fixed position, adjust the steering
wheel again. It is dangerous to
drive without locking the steering
wheel. This may cause loss of
vehicle control and result in per-
sonal injury.

– CONTINUED –

Tilt/telescopic steering wheel

263

3

Instruments

and

controls

(266,1)

北米Model "A3200BE-A" EDITED: 2018/ 3/ 5

1)

Tilt adjustment

2)

Telescopic adjustment

3)

Tilt/telescopic lock lever

1. Adjust the seat position. Refer to
“Manual seat” FP35 or “Power seat”
FP36 
.
2. Pull the tilt/telescopic lock lever down.
3. Move the steering wheel to the desired
level.
4. Pull the lever up to lock the steering
wheel in place.
5. Make sure that the steering wheel is
securely locked by moving it up and down,
and forward and backward.

&

Heated Steering Wheel sys-
tem (if equipped)

The Heated Steering Wheel system
warms the steering wheel at a constant
temperature.

1)

Heated Steering Wheel switch

2)

Indicator light

3)

Heated area

To turn on the Heated Steering Wheel
system, pull the Heated Steering Wheel
switch when the ignition switch is in the
“ON” or “ACC” position. Then the steering
wheel will be warmed and the indicator
light on the switch will illuminate. To turn off
the Heated Steering Wheel system, pull
the switch again. Then the indicator light
will turn off.

CAUTION

.

Use the Heated Steering Wheel

system with the engine running.
Otherwise, the battery voltage
may drop below the permissible
level and it may not be possible to
start the engine.

.

There is a possibility that people

with delicate skin may suffer
slight burns even at low tempera-
tures if they use the Heated
Steering Wheel for a long period
of time. When using the Heated
Steering Wheel, always be sure to
warn the persons concerned.

.

Do not cover the Heated Steering

Wheel with an object such as a
steering wheel cover. Doing so
may cause the Heated Steering
Wheel to overheat.

Tilt/telescopic steering wheel

264

(267,1)

北米Model "A3200BE-A" EDITED: 2018/ 3/ 5

NOTE

.

If the surface temperature of the

steering wheel is approximately above
104
8F (408C) when the switch is turned
on, the system will not heat the steering
wheel. Then, the indicator light will
continue to illuminate.
.

The Heated Steering Wheel system

will automatically turn off approxi-
mately 30 minutes after the system
has been turned on.

3-20. Horn

To sound the horn, push the horn pad.

Horn

265

3

Instruments

and

controls

(268,1)

北米Model "A3200BE-A" EDITED: 2018/ 3/ 5

— — — — — — — — — — — — — — — — — — — — — — — — — — — — — — — — — — — — — — — —

— — — — — — — — — — — — — — — — — — — — — — — — — — — — — — — — — — — — — — — —

— — — — — — — — — — — — — — — — — — — — — — — — — — — — — — — — — — — — — — — —

— — — — — — — — — — — — — — — — — — — — — — — — — — — — — — — — — — — — — — — —

— — — — — — — — — — — — — — — — — — — — — — — — — — — — — — — — — — — — — — — —

— — — — — — — — — — — — — — — — — — — — — — — — — — — — — — — — — — — — — — — —

— — — — — — — — — — — — — — — — — — — — — — — — — — — — — — — — — — — — — — — —

— — — — — — — — — — — — — — — — — — — — — — — — — — — — — — — — — — — — — — — —

— — — — — — — — — — — — — — — — — — — — — — — — — — — — — — — — — — — — — — — —

— — — — — — — — — — — — — — — — — — — — — — — — — — — — — — — — — — — — — — — —

— — — — — — — — — — — — — — — — — — — — — — — — — — — — — — — — — — — — — — — —

— — — — — — — — — — — — — — — — — — — — — — — — — — — — — — — — — — — — — — — —

— — — — — — — — — — — — — — — — — — — — — — — — — — — — — — — — — — — — — — — —

(269,1)

北米Model "A3200BE-A" EDITED: 2018/ 3/ 5

4-1. Ventilator control ............................................ 268

Center ventilators ............................................... 268
Side ventilators .................................................. 268
Rear ventilators .................................................. 268

4-2. Climate control panel ..................................... 269

Front climate control panel ................................. 270
Rear climate control panel (if equipped) .............. 271
Climate control display ....................................... 272

4-3. Automatic climate control operation............. 272

Sensors.............................................................. 273

4-4. Manual climate control operation for front

climate control .............................................. 274

Airflow mode selection ....................................... 274
MAX A/C mode ................................................... 275
Temperature control ........................................... 275
Fan speed control............................................... 275
Air conditioner control........................................ 275
Air inlet selection ............................................... 276
SYNC mode ........................................................ 276
To turn off the front climate control system......... 276
Rear climate control ........................................... 276
To turn off the rear climate control system.......... 277

4-5. Manual climate control operation for rear

climate control ..............................................277

Airflow mode selection....................................... 277
Temperature control ........................................... 278
Fan speed control .............................................. 278
To turn off the climate control system ................ 278

4-6. Defrosting ........................................................278
4-7. Operating tips for heater and air

conditioner.....................................................279

Cleaning ventilation grille ................................... 279
Efficient cooling after parking in direct

sunlight ........................................................... 279

Lubrication oil circulation in the refrigerant

circuit .............................................................. 279

Checking air conditioning system before

summer season ............................................... 279

Cooling and dehumidifying in high humidity

and low temperature weather conditions .......... 279

Air conditioner compressor shut-off when

engine is heavily loaded................................... 279

Refrigerant for your climate control system ........ 280

4-8. Air filtration system.........................................280

Replacing a cabin air filter.................................. 280

Climate control

4

(270,1)

北米Model "A3200BE-A" EDITED: 2018/ 3/ 5

4-1. Ventilator control

&

Center ventilators

Center ventilators

To adjust the airflow direction, move the
tab. To close the ventilator, move the tab all
the way down.

&

Side ventilators

Side ventilators
1)

Close

2)

Open

To adjust the flow direction, move the tab.

&

Rear ventilators

To adjust the airflow direction, move the
tab. To close the ventilator, move the tab all
the way rearward.

Ventilator control

268

(271,1)

北米Model "A3200BE-A" EDITED: 2018/ 3/ 5

4-2. Climate control panel

WARNING

.

The cooling function operates

only when the engine is running.

.

Do not leave children or adults

who would normally require the
support of others alone in your
vehicle. Pets should not be left
alone either. On hot, sunny days,
temperatures in a closed vehicle
could quickly become high en-
ough to cause severe or possibly
fatal injuries to people or ani-
mals.

CAUTION

Do not open and close the center
console lid while operating the rear
climate control panel. There is the
risk of fingers being caught in the
lid.

– CONTINUED –

Climate control panel

269

4

Climate

control

(272,1)

北米Model "A3200BE-A" EDITED: 2018/ 3/ 5

&

Front climate control panel

1)

Driver’s side temperature control dial
(Refer to “Automatic climate control
operation” FP272 
and/or “Temperature
control” FP275.)

2)

AUTO button (Refer to “Automatic cli-
mate control operation” FP272.)

3)

SYNC button (Refer to “SYNC mode”
FP276.)

4)

ON/OFF button (Refer to “Automatic
climate control operation” FP272.)

5)

Fan speed control dial (Refer to “Fan
speed control” FP275.)

6)

Airflow mode selection button (Refer to
“Airflow mode selection” FP274.)

7)

Rear climate control ON/OFF button
(Refer to “To turn off the rear climate
control system” FP277.)

8)

Rear climate control button (Refer to
“Rear climate control” FP276.)

9)

MAX A/C button (Refer to “MAX A/C
mode” FP275.)

10) Passenger’s side temperature control

dial (Refer to “Temperature control”
FP275.)

11) Air conditioner button (Refer to “Air

conditioner control” FP275.)

12) Rear window defogger button and out-

side mirror defogger button (if equipped)
(Refer to “Defogger and deicer” FP262.)

13) Defroster button (Refer to “Defrosting”

FP278.)

14) Air inlet selection button (Refer to “Air

inlet selection” FP276.)

Climate control panel

270

(273,1)

北米Model "A3200BE-A" EDITED: 2018/ 3/ 5

&

Rear climate control panel (if equipped)

1)

Temperature control button (Refer to
“Temperature control” FP278.)

2)

Fan speed control button (Refer to “Fan
speed control” FP278.)

3)

Climate control ON/OFF button (Refer to
“To turn off the climate control system”
FP278.)

4)

Airflow mode selection button (Refer to
“Airflow mode selection” FP277.)

5)

AUTO button (Refer to “Automatic cli-
mate control operation” FP272.)

– CONTINUED –

Climate control panel

271

4

Climate

control

(274,1)

北米Model "A3200BE-A" EDITED: 2018/ 3/ 5

&

Climate control display

!

Front climate control panel

1)

Set temperature indicator (driver’s side)

2)

FULL AUTO indicator

3)

AUTO indicator

4)

Airflow mode indicator

5)

Fan speed indicator

6)

Set temperature indicator (rear)

7)

Maximum air conditioner ON indicator

8)

Set temperature indicator (front passen-
ger’s side)

9)

SYNC indicator (front)

10) Rear climate control lock indicator
11) Rear climate control ON/OFF indicator
12) SYNC indicator (rear)
13) Rear climate control display indicator

!

Rear climate control panel

1)

Set temperature indicator

2)

Airflow mode indicator

3)

Fan speed indicator

4)

AUTO indicator

5)

FULL AUTO indicator

6)

Rear climate control lock indicator

7)

SYNC indicator

4-3. Automatic climate con-
trol operation

When this mode is selected, the fan speed,
airflow distribution, air-inlet control, and air
conditioner compressor operation are
automatically controlled. To activate this
mode, perform the following.
1. Press the AUTO button. The indicator
light “FULL AUTO” on the climate control
display illuminates.
2. Set the preferred temperature using
the temperature control dial.

NOTE

.

Operate the automatic climate con-

trol system when the engine is running.
.

Even when cooling is not necessary,

the air conditioner compressor will
automatically turn on if the temperature
is set much lower than the current
outlet air temperature. Even in this
case, the “A/C” indicator light on the
control panel illuminates.
.

The controllable temperature range

may vary depending on the regional
specifications of the vehicle.
.

If you operate any of the buttons on

the control panel other than the ON/
OFF button, rear window defogger
button, SYNC button and temperature
control dial(s) during FULL AUTO mode

Automatic climate control operation

272


Content   ..  15  16  17  18   ..