Subaru Impreza 3 / Impreza WRX / Impreza WRX STI. Manual - part 740
 

  Index      Subaru     Subaru Impreza 3 / Impreza WRX / Impreza WRX STI - service repair manual 2008-2014 year


Search            


Content   ..  738  739  740  741   ..


Subaru Impreza 3 / Impreza WRX / Impreza WRX STI. Manual - part 740


EI-47

Door Trim

EXTERIOR/INTERIOR TRIM

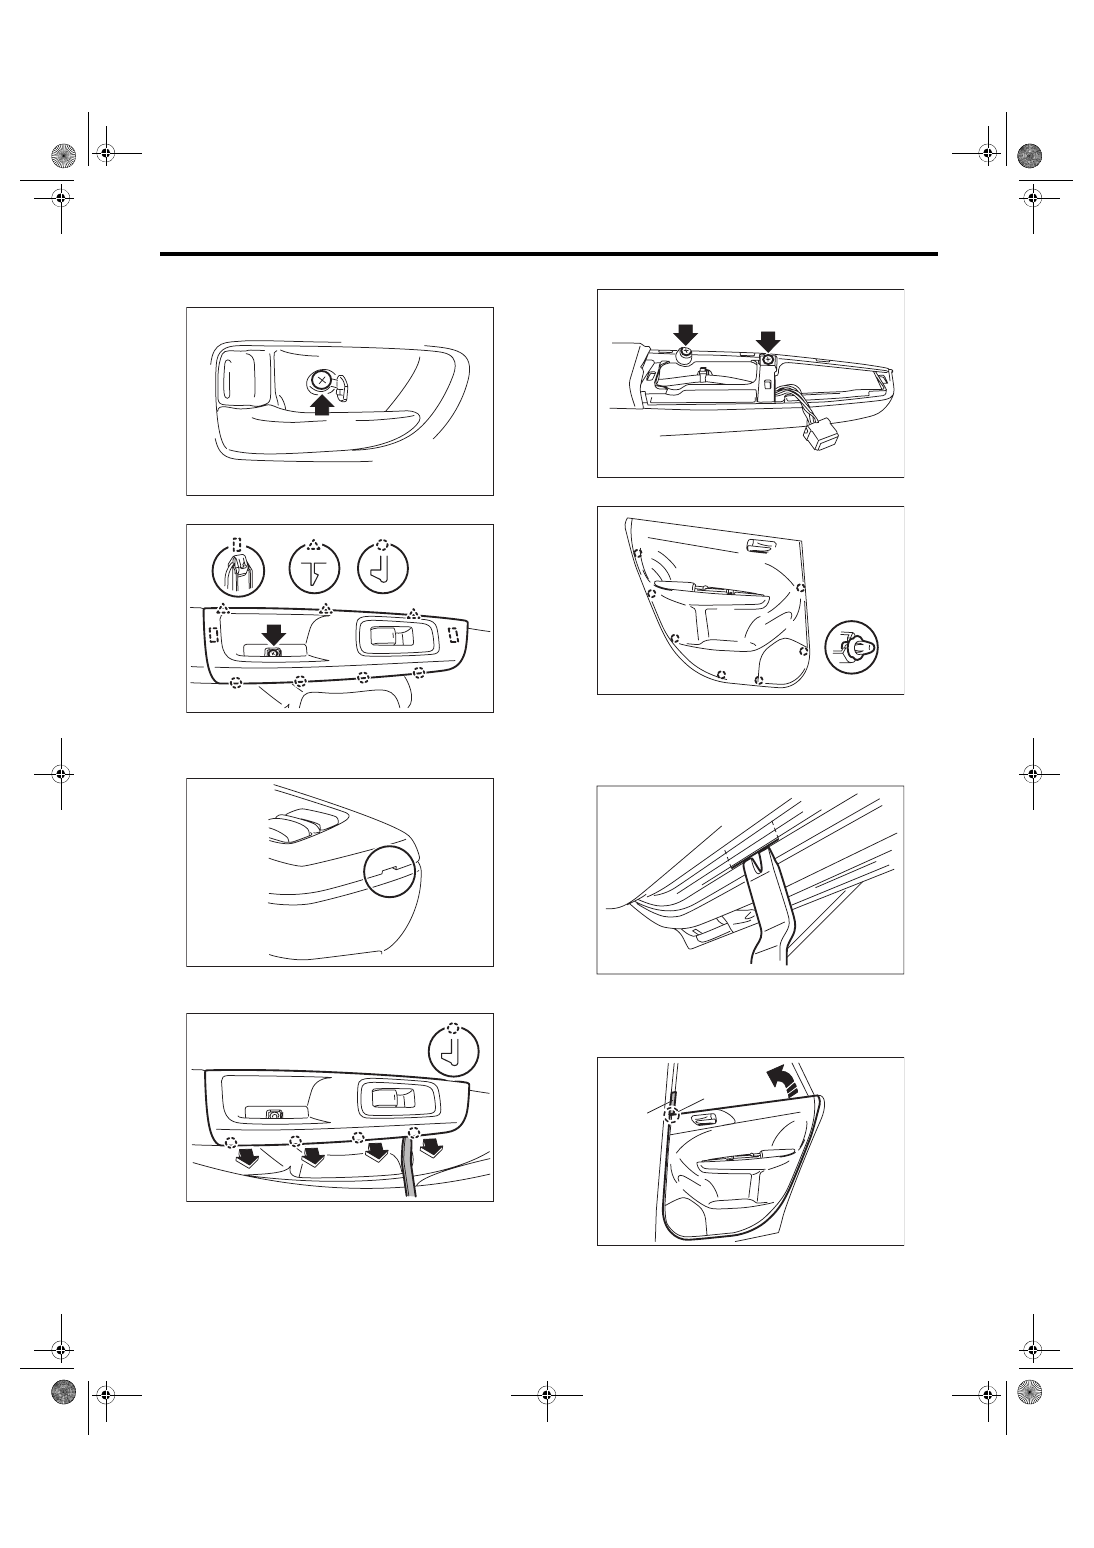
3) Open the cover of the inner remote section, and

remove the screws.

4) Remove the power window switch panel.

(1) Open the cover and remove the screws.

(2) Lift up the tip of switch panel by using a plas-

tic remover.

(3) Remove the side claws by using a plastic re-

mover.

(4) Disconnect the harness connector, and re-

move the power window switch panel.

5) Remove the door trim screws.

6) Remove the door trim.

(1) Remove the clips, then lift the door trim.

NOTE:

Insert a plastic clip remover into the slit at the bot-

tom of the door trim, to lift the door trim.

(2) Attach  the  protective  tape  (a)  to  the  front

door sash.

(3) Remove the door trim by rotating it around

the trim tip part (b).

EI-01878

EI-03085

EI-01881

EI-02378

EI-02379

EI-01883

EI-01658

EI-02889

(a)

(b)

EI-48

Door Trim

EXTERIOR/INTERIOR TRIM

(4) Remove the cable (1) and (2) from the cable

holder of inner remote.

(5) Remove the door trim.

B: INSTALLATION

Install each part in the reverse order of removal.

(2)

(1)

SL-00441

EI-49

Instrument Panel Lower Cover

EXTERIOR/INTERIOR TRIM

15.Instrument Panel Lower Cov-

er

A: REMOVAL

1) Disconnect the ground cable from battery.

2) Remove the plastic hook (A), and remove the in-

strument panel side cover LH.

3) Remove the screws.

4) Remove plastic hook (A), disconnect connectors

and remove the instrument panel lower cover.

B: INSTALLATION

Install each part in the reverse order of removal.

EI-01884

(A)

EI-01885

EI-01886

EI-50

Glove Box

EXTERIOR/INTERIOR TRIM

16.Glove Box

A: REMOVAL

NOTE:

Refer to “Security and Locks” section for key cylin-

der replacement. <Ref. to SL-43, GLOVE BOX LID,

REPLACEMENT, Key Lock Cylinders.>

1) Disconnect the ground cable from battery.

2) Remove the glove box damper.

3) Remove the stoppers and pull the glove box lid

assembly forward to remove.

4) Remove the instrument panel lower. <Ref. to EI-

54,  INSTRUMENT  PANEL  LOWER,  REMOVAL,

Center Console.>

B: INSTALLATION

Install each part in the reverse order of removal.

EI-01887

EI-01831


Content   ..  738  739  740  741   ..